Pool Systems Vektro XL EV90 User manual

RECHARGEABLE POOL VACUUM
USER MANUAL
Vektro XL

1
Table Of Contents
SAFETY WARNINGS & INSTRUCTIONS P.7
GETTING STARTED P.10
Charging The Battery P.10
Set-Up Before Use P.11
Side extension assembly P.11
Side extension disassembly P.12
Telescopic pole connector / telescopic pole (not
included) assembly P.12
Specific telescopic pole connector / specific pole
(not included) assembly P.13
Pool Preparation P.13
OPERATION P.13
Vacuuming the Sunken Compartment of an
Automatic Slatted Cover P.14
EMPTYING THE FILTER BAG P.15
MAINTENANCE & STORAGE P.15
Front wheels replacement P.16
Pole connector replacement P.16
BATTERY DISPOSAL P.17
How to remove the battery pack P.18
TROUBLESHOOTING P.19
Remark: Product/parts photos/drawings in this manual are for demonstration only.
Product/parts in photos/drawings may vary with the model purchased.
Accessories / parts shown in this manual & parts diagram are not necessarily
included with every model.

7
SAFETY WARNINGS & INSTRUCTIONS
Information contained in this Instruction Manual will help you operate the item safely,
protect yourself and others from hazards, and prevent damage to the device and other
property.
SAVE THESE INSTRUCTIONS
WARNING!
- This is not a TOY. Children should be kept out of reach from this pool
vacuum and its accessories.
-Never allow children to operate this product.
-This appliance is not intended for use by persons with reduced physical,
sensory, mental capabilities, or a lack of experience and knowledge,
unless they are given supervision or instructions concerning the safe use
of the appliance and understand the hazards involved by a person
responsible for their safety.
- Children must not play with this product.
-Cleaning and user maintenance must not be carried out by children.
-Make sure the pool vacuum is fully immersed in water before initiating
operation. The minimum water level required to operate the pool vacuum
must cover the entire pool vacuum. Operating the pool vacuum when it
is not immersed in the water correctly could damage the unit and void the
warranty as a result.
-Maximum operating depth in water is 3 meters (9.8 ft.).
- Operating water temperature: 5˚C (41˚F) –35˚C (95˚F).
-
Detachable supply
unit (external adaptor).
-The pool vacuum is only to be recharged with external adaptor and
charging plug delivered with this product.
-For the purposes of recharging the battery, only use the detachable
supply unit (external adaptor model number: DSS12D-1351000-B /
DSS12D-1351000-C / DSS12D-1351000-D/ LX135100U) that provided
with this pool vacuum to charge the battery.
-Connect the external adaptor to a power source through a residential
current device (RCD) / a ground fault circuit interrupter (GFCI). If in doubt,
consult a qualified professional electrician.
-DO NOT use this pool vacuum if any damage is detected.
-Replace damaged parts with ones that are certified by the distributor or
manufacturer.
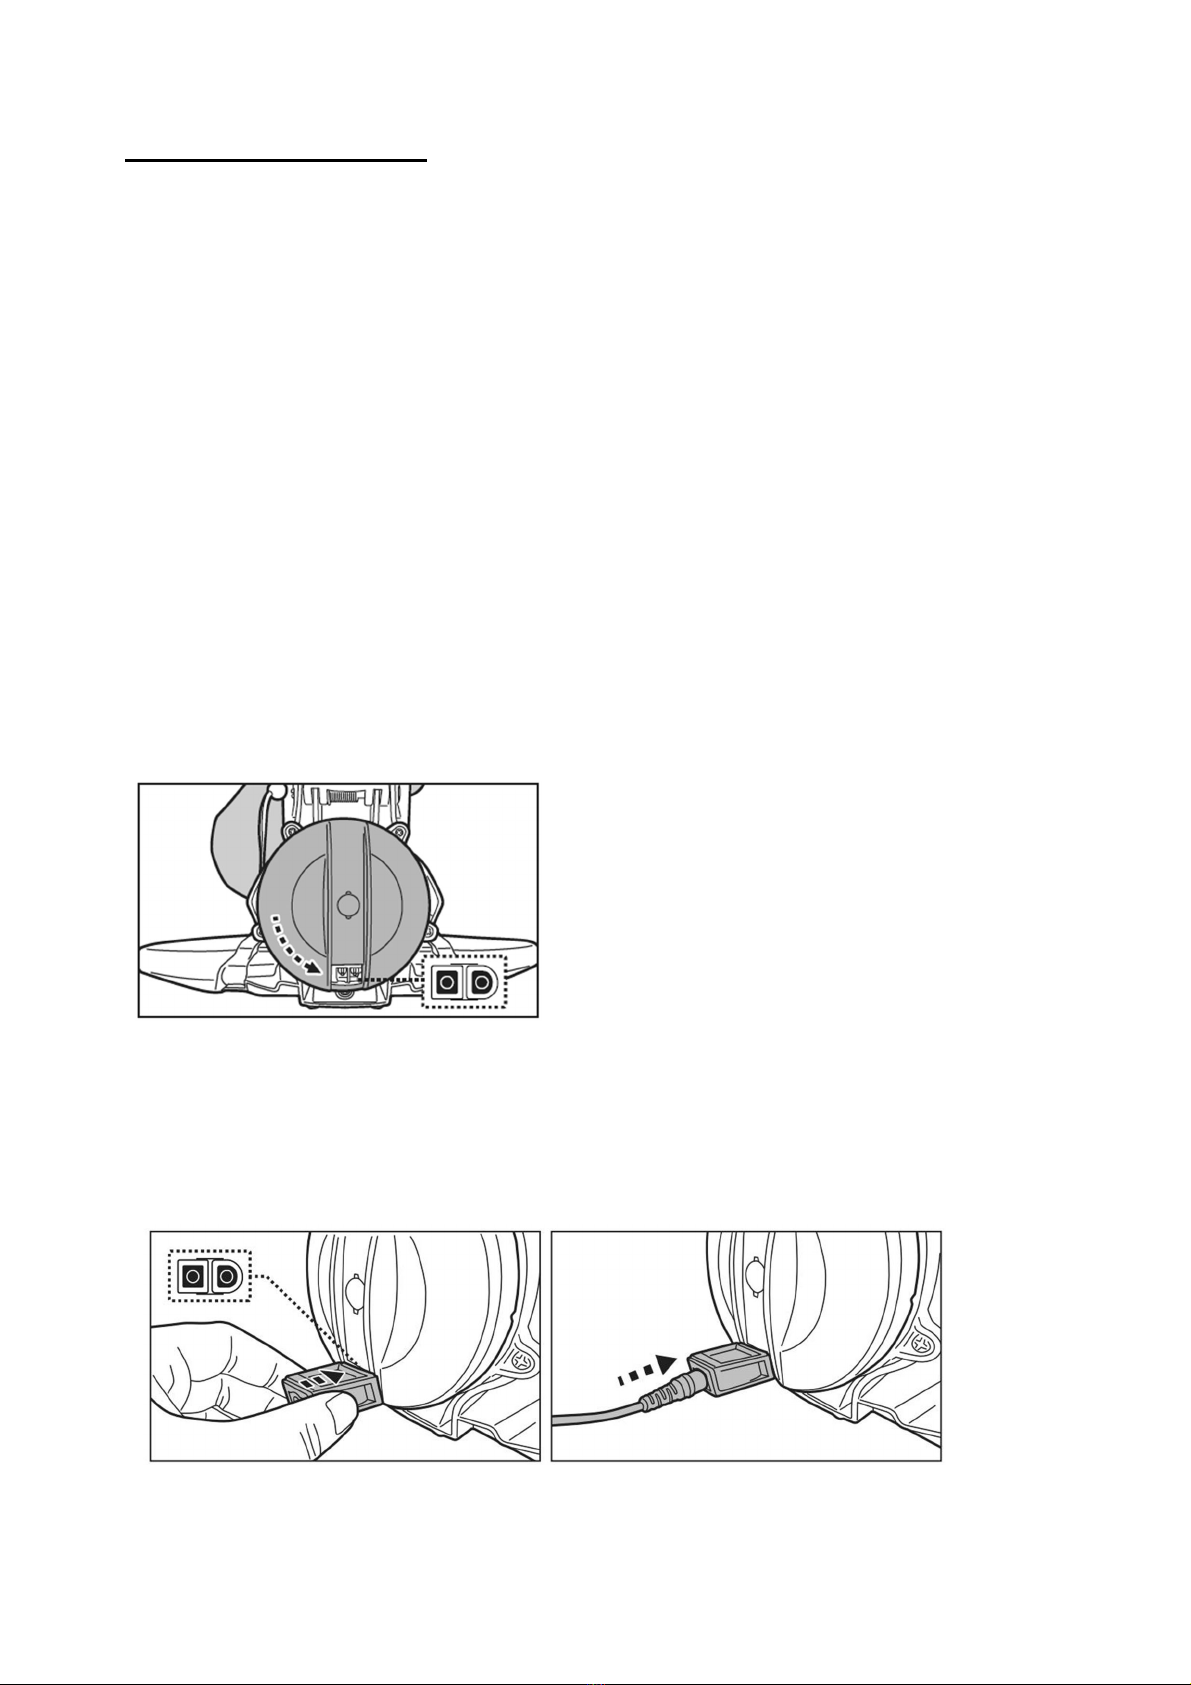
-Turn off the power, disconnect the external adaptor from the power
source, and unplug the external adaptor from the charging plug before
detaching the pool vacuum from the charging plug.
-Disconnect the pool vacuum from the supply mains and make sure the
pool vacuum is powered OFF prior to servicing it such as cleaning the
filter bag.
-DO NOT attempt to replace the installed rechargeable Li-ion battery pack.
-DO NOT handle the pool vacuum, external adaptor and charging plug

8
while it is charging with wet limbs and without shoes.
-You should not operate this pool vacuum when people/pets are present
in the water.
-DO NOT use this pool vacuum without an intact filter bag in place,
otherwise your warranty will be voided as a result.
-Suction entrapment hazard: This pool vacuum generates suction. Do not
allow hair, body, and any loose parts of your clothing to make contact
with the suction point of the pool vacuum during its operation.
-Never insert body parts, clothing, and other objects into the openings and
moving parts of the pool vacuum.
-DO NOT use this pool vacuum to pick up any toxic substance, flammable,
and combustible liquids (i.e. gasoline) in the presence of explosive or
flammable fumes.
-Under no circumstances should you attempt to disassemble the pool
vacuum and replace the impeller, motor, and battery by yourself.
-Never insert fingers and any object to touch the impeller.
- The built-in battery must be removed by a skilled technician before it is
scrapped.
-This pool vacuum contains a battery that are only to be removed by
skilled persons.
-The pool vacuum must be disconnected from the supply mains as the
battery is removed.
- For details regarding battery recycling/disposal, refer to the section
“BATTERY DISPOSAL” in this manual and contact your local authorities
for more information.
-The battery must be disposed safely in accordance with local ordinances
or regulations.
- External adaptor and charging plug:
Never use the external adaptor and charging plug for anything
other than charging the battery of the pool vacuum that is supplied
in the same pack.
The external adaptor and charging plug should not be used outdoors,
nor should it be exposed to rain, humidity, any liquid or heat.
The transformer (or external adaptor) is to be located outside zone
1.
Keep the external adaptor and charging plug out of reach of children.
Never use the external adaptor and charging plug if any damage is
detected.
DO NOT handle the external adaptor and charging plug with wet
hands.
Keep the external adaptor disconnected from power when it is not in
use.
Never attempt to open the external adaptor and charging plug.

9
If the supply cord of the external adaptor is damaged, the external
adaptor must be replaced by the manufacturer or its service agent
to prevent hazards of any kind.
Make sure the pool vacuum and the charging plug are completely
dry before charging.
CAUTION!
-This pool vacuum is designed for underwater use only; it is not an all-purpose
vacuum cleaner. DO NOT attempt to use it to clean anything other than your
pool.
-Use only original accessories delivered with this product.
-DO NOT use this pool vacuum right after pool-shocking. It is recommended to
first leave the pool circulating for at least 24-48 hours.
-If you are planning on using the pool vacuum in a saltwater pool, make sure all
salt are dissolved before placing it in the water.
-DO NOT use this pool vacuum with another automatic cleaner/cleaner
simultaneously in the pool/spa.
-Avoid picking up hard, sharp objects with this product as they may damage the
pool vacuum and filter.
-To avoid damaging the external adaptor and charging plug, do not attempt to
carry the pool vacuum by the cable of external adaptor or pull the cable in
hopes of disconnecting it from the power source and charging
plug.
-Charge the pool vacuum indoors in a clean, dry area with good ventilation and
away from sunlight.
-DO NOT leave the pool vacuum charged for over 10 hours.
-If the pool vacuum will not be used for an extended period, detach it from the
charging plug and use a damp cloth to clean and dry the pool vacuum and its
accessories. Make sure to charge the pool vacuum to about 30% to 50% of the
battery capacity before it is stored. Store in a well-ventilated area away from
sunlight, heat, ignition sources, pool chemicals, and children. Recharge the
pool vacuum every three months.
-All actions concerning the disassembly of the main unit (i.e. battery disposal)
can only be carried by an authorized technician.
Above warnings and cautions are not intended to incorporate all possible
instances for risks and / or severe injuries. Pool / spa owners should always
exercise extra caution and common sense when utilizing the product.

10
GETTING STARTED
Charging The Battery
IMPORTANT NOTE: Fully charge the pool vacuum (about 6 hrs) before using
it for the first time.
WARNING!
Use only the original external adaptor and charging plug provided.
Make sure the pool vacuum and the charging port are clean and dry before
set-up and charging. (TIPS: use a cotton bud to dry the charging port and
charging pins)
The charging pins are waterproof. However, remnants of water in the port
and around the pins could result in natural occurrence of stains (a
byproduct of chemical reaction between water and electric currents).
Otherwise, the stains can be removed by light scrubbing with a cotton bud
soaked with juice of lemon or vinegar.
1. Place the unit on a flat surface. Set the pool vacuum to Power Off/
Charging Mode by turning the switching knob anticlockwise until it clicks
and completely exposes the charging port.
2. Align and attach the charging plug to the charging port. WARNING! Be
sure not to invert the charging plug and ensure both the charging plug and
charging port are clean and dry before charging them. TIPS: Use cotton
bud to dry the charging port and pins. Plug the charging cable of the
external adaptor into the charging plug.

11
3. Connect the external adaptor to the power source. The indicator light on
the external adaptor will turn red when the vacuum is charging and green
when it is fully charged. Charge it for 5-6 hours for best performance.
Immediately disconnect the external adaptor from the power source if you
detect any of the following:
-Offensive or unusual odor
-Excessive heat
-Deformation, cracks,
leaks
-Smoke
4. When charging is complete, disconnect the external adaptor from the
power source and unplug the charging cable from the charging plug.
Detach the charging plug from the main unit. WARNING! Never leave the
charging plug while the pool vacuum is in the water.
Normally the pool vacuum is designed to operate for up to 75 minutes on a full charge.
Note: Empty the filter bag regularly. Excessive debris increases the burden to the motor
and may shorten the operating time.
NOTE: Rechargeable lithium-ion battery is classified as a consumable item. It has a
limited life and will gradually lose its capacity to hold a charge. Therefore, the running time
of the pool vacuum will gradually reduce after repeated charging and discharging
throughout its product life.
Once the lifespan of the battery reaches its end, refer to section “BATTERY DISPOSAL”
for instructions regarding battery disposal.
NOTE: Let the pool vacuum rest for around 30 to 40 minutes before charging it again.
Set-Up Before Use
This pool vacuum has removable extensions which can be removed to clean the narrow
areas.
Side extension assembly
Insert the stem of the wing to the hole on the side of the main body. Turn the wing and
press on it to secure it to the main body. You will hear a “click” sound.
RED light - Charging
GREEN light - Charged

12
Side extension disassembly
Reverse the steps to disassemble the extension from the main unit.
Telescopic pole connector / telescopic pole (not included) assembly
(for EU & US only)
Align and insert the pole connector into the post as shown. Slide the telescopic pole into
the pole connector until the holes on the side of the telescopic pole are secured to the
pins of the pole connector.

13
Specific telescopic pole connector/specific pole (not included) assembly
(for Australia/New Zealand
only)
Align and insert the pole connector into the post as shown. Press on the internal wishbone
clip (preinstalled inside the specific telescopic pole) to retract its side pins. Slide the
specific telescopic pole into the specific pole connector until it’s locked in place by the side
pins and holes.
Pool Preparation
- If the liner is brittle, damaged, or wrinkled, contact a qualified professional to perform the
necessary repairs or perform a liner replacement prior to using the pool vacuum.
- If you are using a saltwater pool, make sure all salt are dissolved before placing the pool
vacuum into the water.
OPERATION
1) Bring your pool vacuum to the side of your pool. Turn the switching knob clockwise
until it clicks to expose the water sensors. The light at the top will turn blue.
Immerse the pool vacuum into water, the light turns immediately to green and the
impeller will start to turn after 4-5 seconds.
Light Color
Blue Power On
(ready for operation)
Blue – Flash Battery level is running low
Green In operation
Green -Flash Battery level is running low.
Green light Off Battery depleted
(need to be recharged)
Red Impeller stops
(impeller clogged).

14
To effectively vacuum up debris, ensure the pool vacuum is laid flat on the pool floor as
you steer it back and forth in regular motion over debris patches for collection. Debris is
collected from the front, side and back to fill up the filter bag.
Excess dirt and debris in the pool could clog the impeller, which would automatically stop
to protect the motor, and the indicator light would turn red. Remove the vacuum from the
pool and turn it off prior to unclogging and emptying the filter bag if it is full. To resume
operation, turn the switching knob anticlockwise until Power Off is selected, then turn it
clockwise to select Power On.
2) To retrieve the pool vacuum, bring it poolside and flip it upside down before lifting. This
is done to prevent debris from scattering back into the pool (especially if you are using
the fine filter bag) and avoid bending the pole in the process.
Once the pool vacuum is out of the water, the impeller will cease to spin within 2-3 seconds.
The LED light will turn blue. When battery level is running low, blue light will flash.
3) Rinse the pool vacuum with fresh water after every use. DO NOT use any aggressive
detergent.
4) Dry the charging port and pins thoroughly (TIPS: Use cotton bud to dry them).
Vacuuming the Sunken Compartment of an Automatic Slatted Cover
WARNING! Pay attention to all safety warnings in the manual of your
automatic slatted cover concerning this cleaning operation beforehand.
- The minimum distance required for the immersion of the vacuum into the sunken
compartment is 30cm (12in )

15
- Remove the duckboard and unroll the pool slat according to instructions from your
pool cover manual.
- Detach one extension of the vacuum cleaner before immersing it into the pool.
- Attach a telescopic pole (not provided) to the pool vacuum handle as instructed in the
manual.
- Power on the vacuum then align it as shown in the image above before immersion.
- Once the cleaner reaches the pool floor, parallel it to the pool length as shown above
and start vacuuming the sunken compartment.
EMPTYING THE FILTER BAG
CAUTION! Make sure the pool vacuum is OFF before cleaning the filter bag.
Washing regularly the filter bag helps to maintain a good suction and close contact
between the vacuum and the pool floor during the operation. Place the cleaner on a flat
surface. Press on the cord fastener to release the bag from the main body. It is
recommended to wash the filter bag with a water jet after each pool cleaning cycle. To
eliminate stubborn dirt or scum on a clogged filter, wash the filter bag in a washing
machine at 30 ˚C (86 ˚F) water temperature. If brushing is deemed necessary, use only a
soft brush to clean it carefully and gently to avoid any damages.
MAINTENANCE & STORAGE
NOTE:
1. Be sure to clean and dry the areas around the charging port and water sensors after
every use to avoid the forming of stains (byproduct of a natural chemical reaction
between electric current and water). Otherwise, the stains can be removed by light
scrubbing with a cotton bud soaked with juice of lemon or vinegar.
2. Battery discharges on its own during storage. Make sure to charge the pool vacuum
to about 30% to 50% of the battery capacity before it is stored.
3. You must recharge the battery at least once every three months when it is not in use.
Unplug the external adaptor from the socket and the charging cable from the charging
plug.
Detach accessories from the pool vacuum. If necessary, rinse the pool vacuum and
accessories with fresh water. DO NOT use aggressive detergent.
Be sure to dry the pool vacuum before storage.
Use a damp cloth to clean and dry the pool vacuum and its accessories.
Store them in a well-ventilated area away from sunlight, heat, ignition sources, pool
chemicals, and from children. Ambient temperature for storage should be 10˚C – 25˚C
(50˚F – 77˚F). NOTE: A higher storage temperature may reduce the battery life.
WARNING!
Under no circumstances should you attempt to disassemble the main unit
and replace the impeller, motor, and battery by yourself.
CAUTION!
Excessive heat can damage the battery and reduce the lifespan of your pool vacuum
as a result.
Consult your dealer regarding battery replacement if the following happens:
-Battery does not charge fully.
-Battery operation time is noticeably reduced. Observe and record the run times of
the first few operations (on a full charge). Use these run times as a reference point
for comparison with run times in the future.

16
The battery must be removed from the pool vacuum before it is scrapped.
The battery is to be disposed safely in accordance with local ordinances or
regulations.
NOTE: Incorrect maintenance may reduce the battery life and affect its capacity as a result.
Front wheels replacement
Before detaching the damaged front wheels, you will need to detach the frame first.
1. Pry and lift up the frame edge.
2/3/4. Rotate the frame to the other end.
5. Pick one end and lift it.
6.
Lift the other end to detach the whole frame to replace the damaged wheel.
Pole connector replacement

17
1. Use a pair of pliers to catch the hook at the end. Press on the hooks and push them
inside the hole of the hinge as shown.
2. As the torsion spring will eject as it leaves the pin, be sure to cover the spring with a
piece of cloth as you pull the pin. Grasp the top round end of the pin with a pair of
pliers. Apply force to pull the pin completely out of the hinges.
3. Insert the flat end of the spring into the hole at the bottom of the post.
4. Use a finger to hold the spring underneath and align the hinges as shown. Ensure
the round hook end is placed underneath the bench as shown.
5. Align and insert the pin all the way through the spring hole and opposite hole.
BATTERY DISPOSAL
(To be carried out by authorized technician)
Your pool vacuum is equipped with a maintenance-free rechargeable lithium-ion battery
pack, which must be disposed of properly. Recycling is required; please contact your local
authority for more information.
WARNING! Never attempt to disassemble a battery pack
Remove all personal items such as rings, bracelets, necklaces, and
watches when the battery pack is unwired from the pool vacuum.
A battery can produce a short circuit current high enough to weld a ring (or
similar item) to metal, causing a severe burn in the process.
Wear complete eye protection, gloves, and protective clothing when the
battery pack is being removed.
Avoid touching the wires altogether and avoid contact between them and
any metal items, which could cause sparking and/or short circuit the battery.
Never smoke or allow a spark or flame in the vicinity of the battery or the
pool vacuum.

18
Do not expose the battery to fire or intense heat as this may result in an
explosion.
CAUTION!
If a battery leak occurs, avoid any contact with the leaking fluids and place the damaged
battery in a plastic bag.
-If leaking fluids come in contact with skin and clothing, wash immediately with plenty
of soap and water.
-
If leaking fluids come in contact with eyes, do not rub them and immediately flush them
with cool running water for at least 15 minutes. Seek medical attention as soon as
possible.
How to remove the battery pack
(To be carried out by authorized technician)
Recommended tools (not included): Screwdriver.
WARNING! The pool vacuum must be disconnected from the supply mains
before removing the battery pack.
1. Place the pool vacuum on a flat surface. Use the screwdriver to unfasten
the screws on the back cover. Remove the battery from the chamber.
2. To detach the battery connection wire, press on the clip of the connector
to pull it out. NOTE: Wrap the connector immediately with insulating tape
in order to avoid any short circuit caused by the contact of both wire
terminals.

19
TROUBLESHOOTING
Problem Possible Cause Solution
Cleaner does not start working under
water (after 5-10 seconds)
Stained water sensors The stains can be removed by using a cotton bud
soaked with juice of lemon or vinegar to clean the
areas around the water sensors.
Out of battery Charge the pool vacuum.
Does not capture the debris / debris is
leaked into the pool
Low battery Charge the pool vacuum.
Jammed impeller Remove the pool vacuum from the water and turn the
knob anticlockwise to shut it off. Check and see if the
impeller is jammed by large debris. Remove the debris.
If necessary, contact your dealer for further
instructions.
WARNING!
Make sure the pool vacuum is off
before the unit is serviced.
Broken impeller Contact your dealer for replacement.
Filter bag is full / clogged Clean the filter bag.
Wheel detached from the body. Check if wheel/ wheel bracket is
broken
Replace a new wheel/wheel bracket.
Charging time is longer than
advertised
Stained charging pins The stains can be removed by using a cotton bud
soaked with juice of lemon or vinegar to clean the
areas around the charging pins.
Cleaner cannot be charged Damaged battery Contact dealer for battery replacement.
WARNING!
DO NOT replace the battery by
yourself. This could result in severe or fatal injuries and
the warranty will be voided as a result.
Charging plug is not correctly
connected to external adaptor
and pool vacuum
Refer to instruction manual and connect the charging
accessories correctly.
External adaptor is out of order Contact dealer for replacement.
WARNING!
Using the wrong external adaptor
will result in damaging the pool vacuum / battery and
voiding the warranty as a result.
Environmental Programmes, WEEE European Directive
Please respect the European Union regulations and help to protect the environment.
Return non-working electrical equipment to a facility appointed by your municipality that properly
recycles electrical and electronic equipment. Do not dispose them in unsorted waste bins. For items
containing removable batteries, remove batteries before disposing of the product.
©
2021 Kokido Development Ltd. 21007030
All rights reserved. No part of this document may be reproduced or transmitted in any form or by any
means, electronic, mechanical, photocopying, recording, or otherwise, without prior written permission
ofKokidoDevelopmentLtd.(V2)
If soft copy of this instruction manual is required, please contact our customer service
by email: [email protected]
SAVE THESE INSTRUCTIONS

NOTES

This manual suits for next models
2
Table of contents
Other Pool Systems Swimming Pool Vacuum manuals
Popular Swimming Pool Vacuum manuals by other brands

Hayward
Hayward TigerShark QC owner's manual

Steinbach
Steinbach Poolrunner Twin ORIGINAL OWNER'S MANUAL

Dolphin
Dolphin PROX 2 Gyro operating instructions

Intex
Intex 35IO quick start guide

Hangzhou Gaoyue Technology
Hangzhou Gaoyue Technology ICH Roboter iCleaner-300/TSX user manual

Oase
Oase Pondovac 4 operating instructions