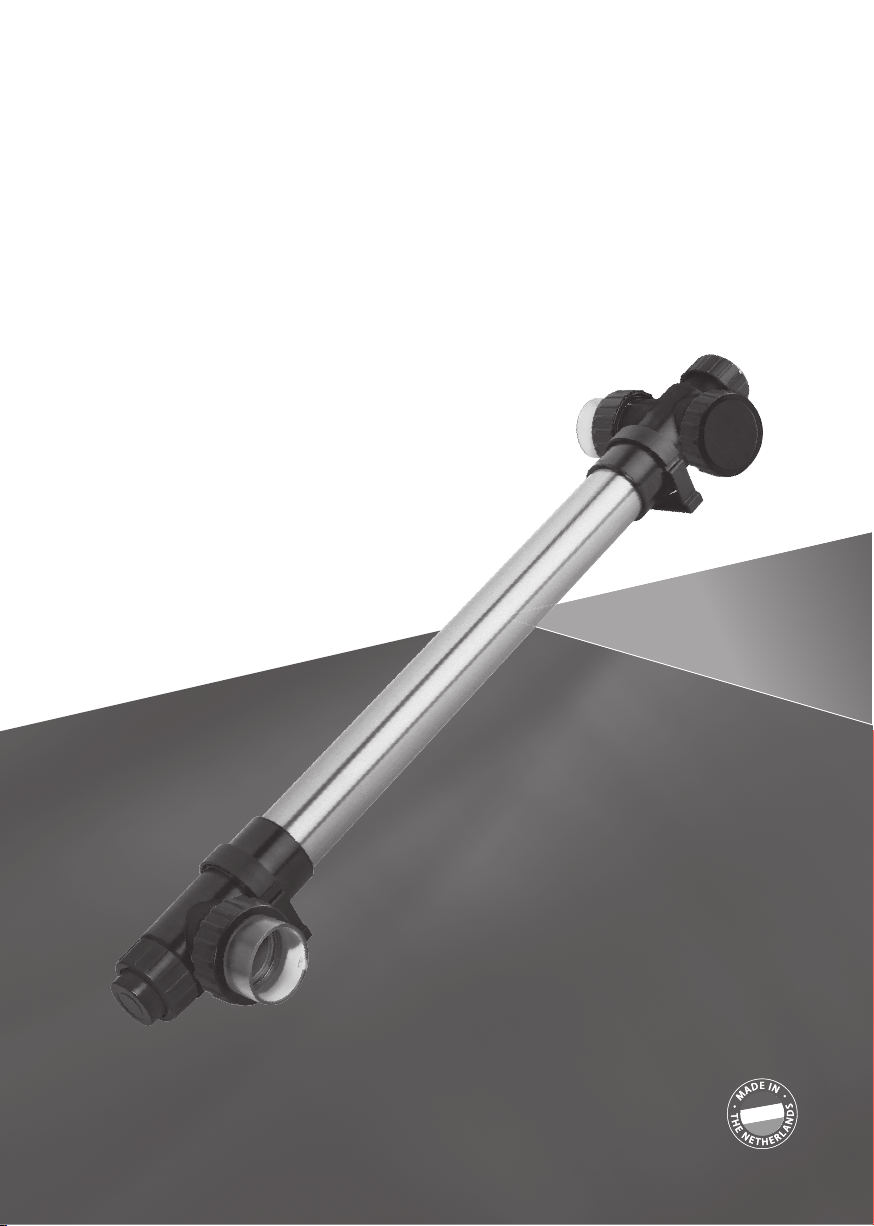
poolsana 40/75W UV-C User manual

40/75W UV-C
Manual

6
12
5
4
3
2
1
N
K
M
U
O
I
P
L
P
2| 40/75W UVC MANUAL

3
4
Q
40/75W UVC MANUAL |3

FLEXIBLE CONNECTION OPTIONS AND POSSIBLE FLOW DIRECTIONS:
EN Warning! For horizontal mounting, the return/output must always point up.
DE ACHTUNG! Bei einer horizontalen Montage muss der Auslauf/Ausgang des Wassers immer nach oben zeigen.
FR Attention ! En cas de montage horizontal, le retour/la sortie doit toujours être dirigé(e) vers le haut.
NL Let op! Bij horizontale montage dient de retour/uitgang altijd naar boven te wijzen.
ES ¡Atención! En el montaje horizontal, el retorno y la salida deben estar siempre hacia arriba.
PT Atenção! No caso de montagem numa posição horizontal, o retorno/a saída deve estar sempre virado/a para cima.
RU Внимание! При горизонтальном монтаже возвратный/выходной патрубок должен быть обращен вверх.
1 2 3
4
4| 40/75W UVC MANUAL

PREFILTER
PUMP
AER ATED
BOTTOM DRAIN
FILTER
HEATER 40/75W UV-C
WALL SKIMMER
PUMP
HEATER
PH CHLORINE
DOSING
40/75W UV-C
FILTER
BOTTOM DRAIN
POSSIBLE INSTALLATION
POOL
POND
TECHNICAL SPECIFICATIONS
40W 75W
Lamp 40 Watt 75 Watt
Lifespan lamp 9.000 h 9.000 h
UV-C (%) after 9,000 hours 80% 80%
Volume (L) 40.000 L 70.000 L
Max. flow through 23.000 L/h 23.000 L/h
Max. pressure 2 Bar 2 Bar
Recommended flow 11.000 L/h 16.000 L/h
40/75W UVC MANUAL |5

HOW IT WORKS
Inside the reactor a UV-C lamp produces radiation with a wavelength of 253.7 nm. Radiation of this type
kills bacteria, viruses, algae and fungi (e.g. Legionella and Cryptosporidium). The UV-C unit produces clean,
fresh, clear water in an efficient, environmentally friendly way. The water is fed through the UV-C device by a
pump. The UV-C radiation neutralizes bacteria, viruses and other micro-organisms and prevents them from
reproducing. Floating algae is also destroyed by this radiation, which greatly improves the clarity of the water.
The UV-C unit is equipped with an electronic ballast. This ballast ensures optimum performance of the lamp.
Thanks to the UV-C unit, the water is disinfected efficiently and safely, providing
you with excellent water quality. Overdosing with UV-C is not possible..
EARTHING INSTALLATION (DRAWING 1)
1. Before the plastic strain relief (4) is fitted on the earthing bolt (1), first pull the cable (2) through the
strain relief (4). Place the strain relief (4) about 10 cm from the eye (2) of the earthing cable.
2. Place the eye (2) of the cable over the earthing bolt that is attached to the housing.
3. Then place a serrated lock washer (3).
4. Attach the strain relief (4) to create a Ø5 cm loop.
5. Finally, place the second serrated lock washer (5) and the lock nut (6) on the earthing bolt.
6. Once the parts have been placed on the earthing bolt in the correct order,
it can be tightened with an 8 mm open-end or ring spanner.
WARNING:
Always ensure proper earthing. In case of doubt about the earthing or the electrical installation in
general, always consult a qualified electrician. Incorrect earthing can be dangerous and/or lead to
corrosion of stainless steel or aluminium reactors.
Make sure the reactor is always grounded.
It is not permitted to flow an aggressive liquid through the reactor or add additives to the treated water
which may have a negative effect on corrosion or degradation of the materials that are used. This to prevent
dangerous situations and damage to the reactor and surrounding installations and / or flora and fauna.
Important Please read carefully through these
instructions for use before installing this device.
40/75W UV-C
6| 40/75W UVC MANUAL

DEVICE INSTALLATION (FIGURE 2)
Decide where you want to mount the device. The best place to install the UV-C device is directly
after the filter(s). See the schematic diagram in the operating instructions. Make sure there is always
water flowing through the device when the lamp is on. Never install the device in direct sunlight.
Install the device in a dry, well-ventilated area. The device can be installed either horizontally or vertically,
provided that the water flow is from bottom to top (see schematic diagram at the beginning of the
instructions for use), with 30 cm of unobstructed space on the side opposite the lamp connection for future
maintenance. At least one metre of unobstructed space must be left on the side with the lamp connection
for convenient future replacement of the lamp (K) without having to disconnect the entire device.
CAUTION: All connections and couplings must be hand-tight. Do not
tighten them with tools. Otherwise damage may occur.
1. Unscrew the nut (N) from the housing (U). Remove the UV-C lamp (K) from the supplied tube
(see packaging) and carefully slide the lamp into the quartz sleeve (M). Place the lamp (K) with
the contact pins in the lamp fitting (L) and then tighten the nut (N) on the housing (U).
2. Fit the supplied pipe clamps (O). Then insert the unit into the pipe clamps. Tighten
the three-piece coupling (I) firmly, while ensuring the correct position of the sealing
rings (P), both at the connections and the quartz sleeve (see figure 2).
3. Mount the unit in the circuit by means of the three-piece coupling (I) . The glue connections
of the three-piece coupling are Ø63 mm or 2”. A hose tail adapter can also be used.
4. Insert the plug of the UV-C device into an earthed wall socket that is protected by a residual current device.
5. Look through the transparent parts of the device to make sure the lamp is lit.
6. The device is shut off when power is disconnected from the device.
40/75W UVC MANUAL |7
EN

DISASSEMBLY/MAINTENANCE
Always disconnect the power supply during maintenance/disassembly of the device.
The device must be cleaned at least twice a year. When there is a significant amount of algal
growth and/or lime build-up in the unit the quartz sleeve (M) must be cleaned.
The special lamp must be replaced after the number of hours of operation has
elapsed. The inside of the reactor can be cleaned with a soft brush.
1. Let the water flow out of the device.
2. Unscrew the nut (N) and remove the lamp (K) from the fitting (L). Remove the lamp from the quartz
sleeve, and replace the special lamp (K) if necessary. Caution is advised as these are very delicate parts.
3. Carefully remove the quartz sleeve (M) (see figure 3). Never use force!
CAUTION: Always wear protective gloves and glasses.
4. Clean the quartz sleeve with an appropriate cleanser. Always use a
soft cloth to clean the sleeve and avoid scratches.
5. Carefully replace the quartz glass (M) (see drawings 3 and 4). Never force it!
And carefully put the end of the quartz glass into the inlet (Q).
6. Carefully place the lamp back in the quartz sleeve, fit the O-ring (T) back onto the quartz sleeve
and connect the lamp (K) to the fitting (L). Screw the nut (N) back onto the housing.
If the housing or the electrical section must be replaced, the earthing must first be disconnected from the
housing. Please read the Installation and Disassembly section before installing a new housing or electrical
section. Make sure you save the various separate parts for the earth connection. These are not supplied
with a new housing or electrical section. If in doubt about the connection, consult a qualified installer.
For the safety instructions and terms of guarantee we would like to
refer to the general UV-C manual.
8| 40/75W UVC MANUAL

ARBEITSWEISE
In diesem Reaktor wird durch die Hilfe einer UVC Lampe eine Strahlung mit einer Wellenlänge von
253,7 nm erzeugt. Diese Strahlung hat eine abtötende Wirkung auf Bakterien, Viren, Algen und
Schimmel (u.a. Legionellen und Cryptosporidien). Die UVC Strahlung sorgt auf eine effiziente und
umweltfreundliche Weise für sauberes, frisches und klares Wasser. Das Wasser wird mit Hilfe eine
Pumpe durch das UVC Gerät geleitet. Die UVC Strahlung neutralisiert Bakterien, Viren und andere
Mikro-Organismen und verhindert deren Vorpflanzung. Auch Schwebealgen werden durch diese
Strahlung vernichtet, wodurch die Klarheit des Wassers stark verbessert wird. Die UVC Einheit ist mit
einem elektronischen Trafo ausgestattet. Dieser Trafo sorgt für eine optimale Leistung der Lampe.
Dank dieses UVC Gerätes wird das Wasser auf eine effiziente und sichere Weise desinfiziert und
eine ausgezeichnete Wasserqualität erreicht. Eine Überdosierung mit UVC ist nicht möglich.
INSTALLATION ERDUNG (ZEICHNUNG 1)
1. Bevor die Kunststoff-Zugentlastung (4) auf der Erdungsschraube (1) montiert wird,
muss zuerst das Kabel (2) durch die Zugentlastung (4) geholt werden. Platzieren Sie die
Zugentlastung (4) auf ungefähr 10 cm Abstand vom Auge (2) des Erdungskabels.
2. Platzieren Sie das Auge (2) des Kabels über der Erdungsschraube die auf dem Gehäuse befestigt ist.
3. Platzieren Sie dann den Zahnfederring (3).
4. Befestigen Sie die Zugentlastung (4) so, das eine Schlaufe von Ø 5 cm entsteht.
5. Platzieren Sie den letzten und zweiten Zahnfederring (5) und die Kontermutter(6) auf der Erdungsschraube.
6. Wenn die Teile in der in der korrekten Reihenfolge auf der Erdungsschraube platziert
wurden, kann dies mit einem Ringschlüssel Nr. 8 festgezogen werden.
ACHTUNG:
Sorgen Sie immer für eine ordnungsgemäße Erdung. Bei Zweifeln an der korrekten Erdung des
Gerätes oder der Elektroinstallation, wenden Sie sich bitte an einen Elektrofachmann.
Unsachgemäße Erdung kann gefährlich werden und /oder zu Korrosion von Edelstahl oder
Aluminium führen.
Stellen Sie sicher das das Gerät geerdet ist!
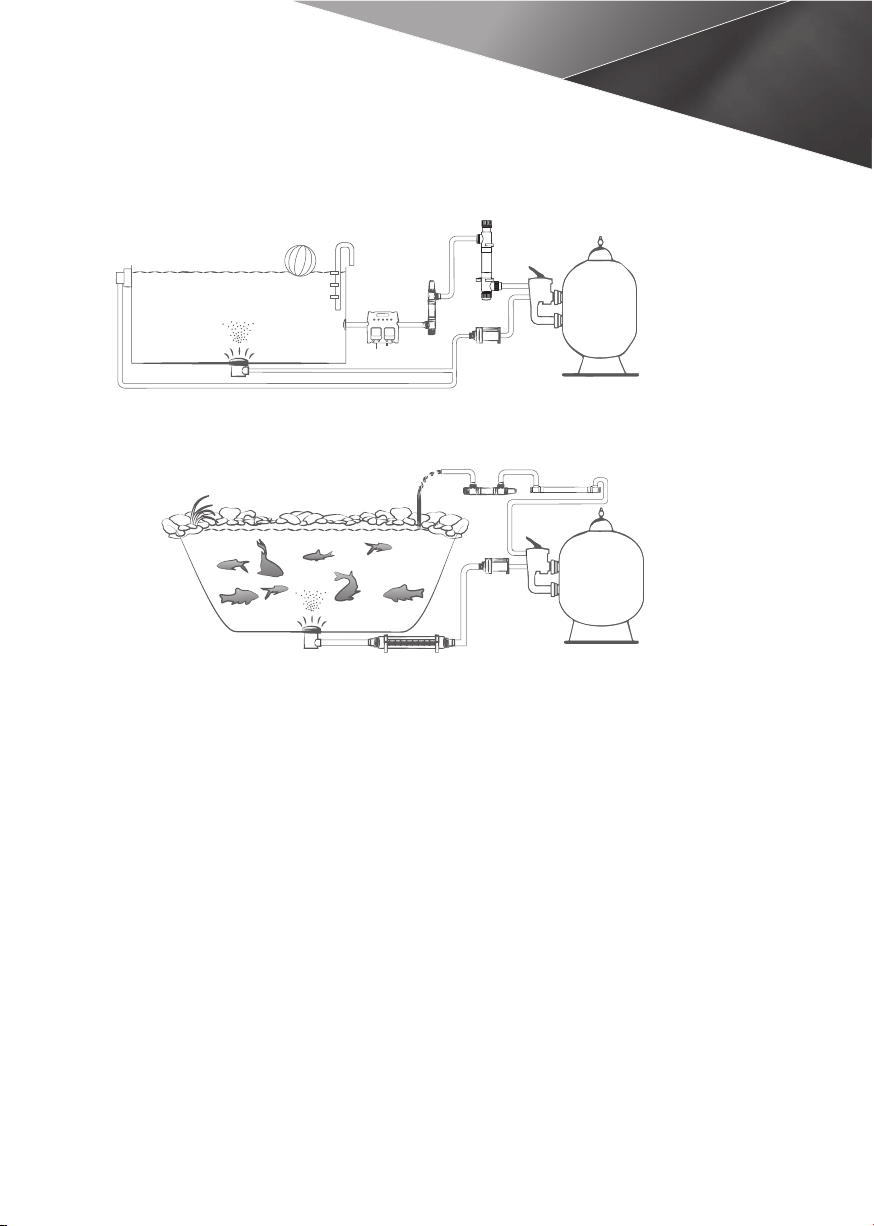
Es ist nicht erlaubt eine Flüssigkeit durch den Reaktor laufen zu lassen, oder dem Wasser
Stoffe beizufügen, die einen negativen Effekt wie Korrosion oder Abbau des genutzten
Materials haben können. Dies um gefährliche Situationen und Schäden am Reaktor und
anschließender Installation, sowie Schäden an Fauna und Flora zu vermeiden.
Wichtig bitte lesen sie vor dem installieren des geräts
diese gebrauchsanweisung aufmerksam durch.
40/75W UV-C
DE
40/75W UVC MANUAL |9

INSTALLATION GERÄT (ZEICHNUNG 2)
Bestimmen Sie den Wunschort um das Gerät zu montieren. Der beste Ort um ein UVC Gerät zu
installieren, ist direkt nach der Filterung. Sehen Sie hierzu auch die schematische Zeichnung in
der Gebrauchsanleitung. Sorgen Sie dafür, das immer genügend Durchfluss besteht, während das
Leuchtmittel brennt. Installieren Sie das Gerät nicht in der prallen Sonne. Installieren Sie das Gerät
immer in einem trockenen und gut belüfteten Raum. Das Gerät kann sowohl horizontal als auch
vertikal montiert werden, solange der Wasserdurchfluss immer von unten nach oben geht (siehe
Zeichnung in der Gebrauchsanweisung). Es muss am Lampenanschluss ausreichend Platz gelassen
werden (ca. 30 cm) für evtl. Wartungsarbeiten. An der Seite des Lampeneinschubes sollte mind. 1
Meter Platz sein, um das Leuchtmittel (6) problemlos entnehmen oder ersetzten zu können.
ACHTUNG: Um Schäden zu vermeiden, sollten alle Verbindungen und Kupplungen Hand-Fest
angezogen werden, also ohne Hilfsmittel wie Schraubenschlüssel, fest gedreht werden.
1. Drehen Sie die Mutter (N) vom Gehäuse (U) ab. Holen Sie das UV-C Leuchtmittel (K) aus
der mitgelieferten Hülle (siehe Verpackung) und führen dieses Leuchtmittel vorsichtig
in das Quarzglas (M). Stecken Sie das Leuchtmittel (K) mit den Kontaktpins in den
Lampenfitting (L) und schrauben dann die Mutter (N) wieder auf das Gehäuse (U).
2. Montieren Sie die im Lieferumgang enthaltenen Rohrklemmen (O). Platzieren Sie dann das Gerät in
den Rohrklemmen. Drehen Sie die dreiteilige Kupplung (I) fest. Achten Sie unbedingt auf die korrekte
Lage der Dichtungsringe (P) bei den Anschlüssen als auch beim Quarzglas (siehe Zeichnung 2)
3. Montieren Sie das Gerat durch Hilfe der dreiteiligen Kupplung (I).
Die Klebeverbindungen der dreiteiligen. Kupplung haben einen Durchmesser von
63 mm bzw. 2“. Ein Schlauchstutzen Adapter kann auch verwendet werden.
4. Stecken Sie den Stromstecker der UVC Lampe in eine geerdete Steckdose mit die mit einem FI gesichert ist.
5. Eine Kontrolle ob das Leuchtmittel brennt, kann durch die transparenten Teile des Gehäuses erfolgen.
6. Das Gerät schaltet sich ab, sobald die Stromspannung vom Gerät getrennt wird.
10 | 40/75W UVC MANUAL

Für die Sicherheitsbestimmungen und Garantiebedingungen
verweisen wir auf unsere allgemeinen UVC Anleitung.
DEMONTAGE / WARTUNG
Bei Wartungs- oder Demontagearbeiten nehmen Sie das Gerät immer vom Stromnetz.
Das Gerät muss mindestens zwei mal jährlich gereinigt werden. Wenn das Algenwachstum
oder die Kalkschicht in der Einheit zunimmt, muss das Quarzglas (M) gereinigt werden. Das
spezielle Leuchtmittel soll nach Ende der empfohlenen Leuchtdauer gewechselt werden. Die
Innenseite der Reaktorkammer kann mit Hilfe eine weichen Bürste gereinigt werden.
1. Lassen Sie das Wasser aus dem Gerät
2. Schrauben Sie die Mutter (N) los und entnehmen das Leuchtmittel (K) aus dem Fitting (L). Nehmen Sie die
Lampe aus dem Quarzglas und ersetzten Sie diese (K) falls nötig. Achtung: Zerbrechliche Glasmaterialien.
3. Entfernen Sie vorsichtig das Quarzglas (M) – siehe Zeichnung 3. Niemals mit Gewalt!
ACHTUNG: Tragen Sie immer Schutzhandschuhe und eine Schutzbrille.
4. Reinigen Sie das Quarzglas sorgfältig – wenn nötig entkalken Sie es. Kalk sieht man häufig
nur auf getrocknetem Glas. Nutzen Sie ein weiches Tuch, um Kratzer zu vermeiden.
5. Tauschen Sie vorsichtig das Quarzglas (M) aus (siehe Zeichnungen 3 und 4). Zwinge es
niemals! Das Ende des Quarzglases vorsichtig in das Aufnahmeteil (Q) schieben.
6. Montieren Sie Quarzglas und Lampe wieder im Gehäuse. Platzieren Sie den
O-Ring (T) wieder auf dem Quarzglas und verbinden das Leuchtmittel (K) im
Lampenhalter (L). Drehen Sie die Mutter (N) wieder auf das Gehäuse.
Sollte das Gehäuse oder der Trafo ersetzt werden müssen, muss die Erdung zuerst vom Gehäuse
gelöst werden. Bei der Montage eines neuen Gehäuses oder eine Trafos (elektrischen Teils) lesen
Sie bitte zuerst das Hauptstück Installation und Demontage. Achten Sie darauf das alle Kleinteile
der Erdung aufgehoben werden. Diese werden nicht mit einem Ersatzteil wie Gehäuse oder
Trafo zusammen geliefert. Bei Zweifeln fragen Sie bitte einen anerkannten Installateur.
DE
40/75W UVC MANUAL |11

FONCTIONNEMENT
Dans le réacteur, un rayonnement d’une longueur d’onde de 253,7 nm est généré au moyen d’une lampe
UV-C. Ce rayonnement a une action létale sur les bactéries, les virus, les algues et les moisissures (entre
autres Légionnelle et Cryptosporidium). L’unité UV-C est garante, de manière efficace et écologique, d’une
eau propre, fraîche et limpide. L’eau est acheminée à travers l’appareil UV-C au moyen d’une pompe. Le
rayonnement UV-C neutralise les bactéries, les virus et autres micro-organismes et met fin à leur prolifération.
Les algues flottantes aussi sont éliminées par ce rayonnement, ce qui améliore fortement la limpidité de l’eau.
L’unité UV-C est dotée d’un ballast électronique, qui garantit des performances optimales de la lampe.
L’unité UV-C permet de désinfecter l’eau de manière efficace et sûre et de maintenir
une excellente qualité de l’eau. Un surdosage d’UV-C est impossible.
MONTAGE DE LA MISE À LA TERRE (FIGURE 1)
1. Avant de monter le serre-câble plastique (4) sur le boulon de mise à la terre (1), il faut tirer le câble (2) à
travers le serre-câble (4). Placer le serre-câble (4) à environ 10 cm de l’œil (2) du câble de mise à la terre.
2. Placer l’œil (2) du câble sur le boulon de mise à la terre fixé sur le corps.
3. Poser ensuite une bague de retenue dentée (3).
4. Fixer le serre-câble (4) de sorte à constituer une boucle de Ø 5 cm.
5. En dernier lieu, poser la deuxième bague de retenue dentée (5) et
l’écrou autobloquant (6) sur le boulon de mise à la terre.
6. Lorsque les pièces sont placées dans l’ordre correct sur le boulon de mise à la terre, elles
peuvent être serrées au moyen d’une clé à fourche ou polygonale numéro 8.
ATTENTION :
Veillez à toujours avoir une mise à la terre correcte. En cas de doute concernant la mise à la terre ou
l’installation électrotechnique en général, consultez toujours un électrotechnicien agréé. Une mise à
la terre incorrecte peut être dangereuse et/ou entraîner la corrosion de réacteurs en acier inoxydable
ou en aluminium.
Veillez a toujours avoir une mise a la terre correcte!
Il est interdit de faire circuler un liquide agressif dans la chambre de traitement ou d’ajouter des additifs à l’eau
traitée qui pourrait générer de la corrosion ou une dégradation prématurée des matériaux constitutifs de nos
équipements UVc. Ceci pour éviter des conditions dangereuses d’utilisation et des dommages irrémédiables
sur la chambre de traitement et sur l’installation proche et / ou d’une façon générale sur l’environnement.
Important Avant d’installer cet appareil, lire attentivement ce mode d’emploi.
40/75W UV-C
12 | 40/75W UVC MANUAL

INSTALLATION DE L’APPAREIL (FIGURE 2)
Déterminez la position souhaitée de l’appareil. L’emplacement idéal pour l’appareil UV-C est directement
en aval de la filtration. Voyez le schéma dans le mode d’emploi. Veillez à ce que de l’eau circule
toujours à travers l’unité lorsque la lampe est allumée. N’installez jamais l’appareil en plein soleil.
Installez toujours l’appareil dans un local sec et bien ventilé. L’appareil peut être monté horizontalement
ou verticalement à condition que le flux d’eau circule du bas vers le haut (voyez le schéma au début du
mode d’emploi) et qu’un espace de 30 cm reste disponible du côté opposé au raccord de lampe pour
une maintenance éventuelle. Du côté du raccord de lampe, il faut laisser un espace d’au moins 1 m afin
de pouvoir remplacer sans problème la lampe (K) sans devoir démonter l’ensemble de l’appareil.
ATTENTION : toutes les connexions et tous les raccords doivent être serrés
à la main, donc sans outil. Ceci afin d’éviter tout dommage.
1. Détachez l’écrou (N) du corps (U). Sortez la lampe UV-C (K) de l’étui livré (voyez l’emballage)
et glissez-la avec précaution dans le verre de quartz (M). Placez la lampe (K) avec les broches
de contact dans le culot de lampe (L) et vissez ensuite l’écrou (N) sur le corps (U).
2. Posez les colliers (O) faisant partie de la livraison. Placez ensuite l’unité dans les colliers.
Serrez le raccord trois pièces (I), en veillant au positionnement correct des bagues
d’étanchéité (P) à l’endroit tant des raccords que du verre de quartz (voyez figure 2).
3. Monter l’unite au moyen du raccord trois pieces (I) dans le circuit. Les connexions
collées du raccord trois pièces présentent un diamètre de 63 mm ou 2”.Un
adaptateur de queue de tuyau peut également être utilisé.
4. Insérez la fiche de l’appareil UV-C dans une prise murale avec une
mise à la terre et un interrupteur de défaut de terre.
5. Assurez-vous que la lampe est allumée par le biais des pièces transparentes de l’appareil.
6. L’appareil se désactive lorsque la tension vers celui-ci est coupée.
FR
40/75W UVC MANUAL |13

Pour les instructions de sécurité et les conditions de garantie,
veuillez consulter le manuel général UV-C.
DÉMONTAGE/ENTRETIEN
Lors du démontage/de l’entretien de l’appareil, coupez toujours l’alimentation de courant.
L’appareil doit être nettoyé au moins 2 fois par an. Lorsque la croissance des algues et/
ou l’entartrage dans l’unité augmente(nt), nettoyez le verre de quartz (M).
La lampe spéciale doit être remplacée après expiration des heures de service. La
section interne du réacteur se nettoie au moyen d’une brosse douce.
1. Laissez l’eau s’écouler de l’appareil.
2. Desserrez l’écrou (N) et désolidarisez la lampe (K) du culot (L). Retirez la lampe du verre de quartz et, le
cas échéant, remplacez-la (K). Procédez avec prudence car ces pièces sont particulièrement fragiles.
3. Déposez avec précaution le verre de quartz (M) (voyez figure 3). Ne forcez jamais
!ATTENTION : portez toujours des gants et des lunettes de protection.
4. Nettoyez le verre de quartz avec un produit approprié. Utilisez toujours
un chiffon doux pour nettoyer le verre, évitez toute rayure.
5. Replacez soigneusement le verre de quartz (M) (voir les schémas 3 et 4). Ne le force
jamais! Et soigneusement mettre l’extrémité du verre de quartz dans l’entrée (Q).
6. Placez à nouveau la lampe avec précaution dans le verre de quartz, posez à nouveau le joint torique (T)
sur le verre de quartz et posez la lampe (K) dans le culot (L). Vissez à nouveau l’écrou (N) sur le corps.
En cas de remplacement du corps ou de la section électrique, débranchez d’abord la mise à la
terre du logement. Lors du montage d’un corps neuf ou de la section électrique, veuillez lire au
préalable le chapitre Installation et Démontage. Conservez soigneusement les diverses pièces
de la mise à la terre. Celles-ci ne sont pas livrées avec un corps neuf ou une section électrique
neuve. En cas de doute concernant le branchement, consultez un installateur agréé.
14 | 40/75W UVC MANUAL

WERKING
In de reactor wordt door middel van een UV-C lamp een straling opgewekt met een golflengte van 253,7
nm. Deze straling heeft een dodende werking op bacteriën, virussen, algen en schimmels (o.a. Legionella
en Cryptosporidium). De UV-C unit zorgt op efficiënte en milieuvriendelijke wijze voor schoon, fris en helder
water. Het water wordt door middel van een pomp door het UV-C apparaat gevoerd. De UV-C straling
neutraliseert bacteriën, virussen en andere micro-organismen en stopt de voortplanting ervan. Ook zweefalg
wordt door deze straling vernietigd, waardoor de helderheid van het water sterk wordt verbeterd. De UV-C
unit is voorzien van een elektronische ballast. Deze ballast zorgt voor optimale prestaties van de lamp.
Dankzij de UV-C unit zal het water op een efficiënte en veilige wijze worden gedesinfecteerd en
wordt een uitstekende waterkwaliteit behouden. Overdosering met UV-C is niet mogelijk.
INSTALLATIE AARDING (TEKENING 1)
1. 1. Voordat de kunststof trekontlasting (4) op de aardingsbout (1) gemonteerd wordt, dient
eerst de kabel (2) door de trekontlasting (4) gehaald te worden. Plaats de trekontlasting
(4) op ongeveer 10 cm afstand van het oog (2) van de aardingskabel.
2. Plaats het oog (2) van de kabel over de aardingsbout die op de behuizing is bevestigd.
3. Plaats vervolgens een tandveerring (3).
4. Bevestig de trekontlasting (4) zodat er een lus van Ø 5cm ontstaat.
5. Plaats als laatste de tweede tandveerring (5) en de borgmoer (6) op de aardingsbout.
6. Als de onderdelen op de juiste volgorde op de aardingsbout zijn geplaatst kan
dit met een steek-, of ringsleutel nummer 8, vastgedraaid worden.
LET OP:
Zorg altijd voor een correcte aarding. Raadpleeg bij twijfel over de aarding of de elektrotechnische
installatie in het algemeen altijd een erkend elektrotechnisch monteur. Ondeugdelijke
aarding kan gevaarlijk zijn, en/of leiden tot corrosie van RVS of aluminium reactoren.
Zorg ervoor dat de reactor altijd geaard is.
Het is niet toegestaan om een vloeistof door de reactor te laten stromen, of toevoegingen
aan het te behandelen water te doen, welke een negatief effect kunnen hebben op
corrosie of degradatie van de gebruikte materialen. Dit, om gevaarlijke situaties en schade
aan de reactor en omliggende installaties, en/of flora en fauna te voorkomen.
Belangrijk Lees voor het installeren van dit apparaat
eerst zorgvuldig deze gebruiksaanwijzing.
40/75W UV-C
NL
40/75W UVC MANUAL |15

INSTALLATIE APPARAAT (TEKENING 2)
Bepaal de gewenste plaats om het apparaat te monteren. De beste plaats om het UV-C apparaat te
installeren is direct na filtering. Zie de schematische weergave in de gebruiksaanwijzing. Zorg ervoor dat
er altijd water door de unit stroomt als de lamp brandt. Installeer het apparaat nooit in de volle zon.
Installeer het apparaat altijd in een droge en goed geventileerde ruimte. Het apparaat kan
zowel horizontaal als verticaal geïnstalleerd worden mits de waterstroom van onder naar
boven gaat (zie schematische weergave voor in de gebruiksaanwijzing), waarbij aan de kant
tegenover de lampaansluiting een ruimte van 30 cm beschikbaar moet blijven voor eventueel
onderhoud. Aan de kant van de lampaansluiting moet minimaal 1 meter ruimte zijn om de lamp
(K) probleemloos te kunnen vervangen zonder het hele apparaat te hoeven losmaken.
LET OP: alle verbindingen en koppelingen dienen handvast, dus zonder
gereedschap worden vastgedraaid. Dit om schade te voorkomen.
1. Draai de moer (N) los van de behuizing (U). Haal de UV-C lamp (K) uit de bijgeleverde koker
(zie verpakking) en schuif de lamp voorzichtig in het kwartsglas (M). Plaats de lamp (K) met de
contactpennen in de lampfitting (L) en schroef daarna de moer (N) op de behuizing (U).
2. Monteer de meegeleverde buisklemmen (O). Plaats vervolgens de unit in de
buisklemmen. Draai de driedelige koppeling (I) vast, let daarbij op de juiste positie van de
afdichtingsringen (P) zowel bij de aansluitingen als bij het kwartsglas (zie tekening 2).
3. Monteer de unit door middel van de driedelige koppeling (I) in het circuit. De lijmverbindingen
van de driedelige koppeling zijn ø 63 mm of 2”. Ook kan er een slang tule gebruikt worden.
4. Plaats de stekker van het UV-C apparaat in een wandcontactdoos met randaarde en aardlekschakelaar.
5. Controleer of de lamp brandt door middel van de transparante delen van het apparaat.
6. Het apparaat wordt uitgeschakeld wanneer de spanning van het apparaat wordt gehaald.
16 | 40/75W UVC MANUAL

Voor de veiligheidsinstructies en garantievoorwaarden verwijzen
we u naar de algemene UV-C handleiding.
DEMONTAGE/ONDERHOUD
Schakel bij onderhoud/demontage van het apparaat altijd de stroomtoevoer uit. Het apparaat dient minimaal
2 maal per jaar gereinigd te worden. Wanneer de algengroei en/of kalkaanslag in de unit toeneemt, moet
het kwartsglas (M) schoongemaakt worden. De speciale lamp dient na het verstrijken van de branduren
vervangen te worden. De binnenzijde van de reactor kan met een zachte borstel worden schoongemaakt.
1. Laat het water uit het apparaat stromen.
2. Schroef de moer (N) los en neem de lamp (K) uit de fitting (L). Neem de lamp uit het kwartsglas en vervang
indien nodig de lamp (K). Voorzichtigheid is geboden daar het om zeer kwetsbare onderdelen gaat.
3. Verwijder voorzichtig het kwartsglas (M) (zie tekening 3). Nooit forceren!
LET OP: draag altijd beschermende handschoenen en een bril.
4. Maak het kwartsglas schoon met een daarvoor geschikt middel. Gebruik altijd
een zachte doek om het glas schoon te maken, voorkom krassen.
5. Plaats voorzichtig het kwartsglas (M) (zie tekening 3 en 4) terug. Nooit
forceren! En schuif het uiteinde voorzichtig in het opvang stuk (Q).
6. Plaats de lamp voorzichtig terug in het kwartsglas, plaats de o-ring (T) terug op het kwartsglas
en koppel de lamp (K) aan de lamphouder (L). Draai de moer (N) terug op de behuizing.
Indien de behuizing of het elektrische gedeelte vervangen moet worden, dient de aarding eerst van de
behuizing los gemaakt te worden. Bij het monteren van een nieuwe behuizing of elektrisch gedeelte,
gelieve eerst het hoofdstuk Installatie en Demontage te lezen. Let erop dat de diverse losse onderdelen
van de aarding goed bewaard worden. Deze worden niet met een nieuwe behuizing of elektrisch
gedeelte meegeleverd. Raadpleeg bij eventuele twijfel over de aansluiting een erkende installateur.
NL
40/75W UVC MANUAL |17

FUNCIONAMIENTO
Las lámparas UV-C producen dentro del reactor una radiación de longitud de onda de 253,7 nm. Este tipo
de radiación mata bacterias, virus, algas y hongos (por ejemplo, la Legionella y el Cryptosporidium). Los
dispositivos UV-C producen agua limpia, fresca y transparente de forma eficiente respetando el medio
ambiente. El agua se alimenta a través del dispositivo UV-C por una bomba. Las radiaciones UV-C neutralizan
las bacterias, los virus y otros microorganismos y también evitan su reproducción. Asimismo, estas radiaciones
destruyen las algas flotantes y consiguen que el agua sea más clara. Los dispositivos UV-C están equipados
con un balasto electrónico que hace que el rendimiento de las lámparas sea siempre el óptimo.
Gracias a los dispositivos UV-C, el agua se desinfecta de manera eficaz y segura y hacen
que su calidad sea excelente. Es imposible padecer una sobredosis de UV-C.
INSTALACIÓN DE LA TOMA DE TIERRA (ILUSTRACIÓN 1)
1. Antes de colocar el protector plástico (4) en el perno de tierra (1), tire primero del cable (2) a través
del protector (4). Coloque el protector (4) a unos 10 cm del anillo (2) del perno de tierra.
2. Coloque la argolla del cable (2) encima del perno de tierra que está unido al armazón.
3. Coloque la arandela dentada (3).
4. Conecte el protector (4) para crear un aro de Ø5 cm.
5. Finalmente, coloque la segunda arandela dentada (5) y la contratuerca (6) en el perno de tierra.
6. Una vez todas las piezas hayan sido colocadas en su debido orden
en el perno de tierra, apriete con una llave de 8 mm.
ADVERTENCIA:
Asegúrese siempre de que la toma de tierra es adecuada. En caso de duda, consulte
a un electricista cualificado. Una toma de tierra inadecuada puede ser peligrosa
ya que puede corroer los reactores de acero inoxidable o de aluminio.
¡Asegúrese de que el reactor está siempre conectado a la toma de tie
No se permite la circulación de líquidos agresivos en el reactor ni tampoco la adición de aditivos al
agua tratada ya que los materiales utilizados se pueden corroer o dañar. Así, se evitan situaciones
peligrosas y daños en el reactor, las instalaciones y/o la flora y fauna circundantes.
Importante Antes de proceder a la instalación de este aparato, le
rogamos lea detenidamente estas instrucciones de uso.
40/75W UV-C
18 | 40/75W UVC MANUAL

INSTALACIÓN DEL DISPOSITIVO (ILUSTRACIÓN 2)
Decida dónde desea montar el dispositivo. El mejor lugar para instalarlo es directamente después del
filtro o filtros. Consulte la ilustración esquemática de las instrucciones de uso. Asegúrese de que siempre
haya agua fluyendo por el dispositivo cuando la lámpara está encendida. Nunca instale el dispositivo bajo
luz solar directa. Instálelo en una zona seca y bien ventilada. El dispositivo puede instalarse horizontal
o verticalmente, siempre que el flujo del agua sea de abajo a arriba (vea la ilustración esquemática del
principio de las instrucciones de uso), con 30 cm de espacio libre en el lado opuesto a la conexión de la
lámpara para su futuro mantenimiento. Para evitar tener que desconectar el dispositivo entero cuando la
lámpara se tenga que sustituir, deje al menos un metro de espacio libre en el lateral de la conexión (K).
PRECAUCIÓN: Todas las conexiones y acoplamientos deben ser ajustados a mano.
No los ajuste con herramientas. De lo contrario, se podrían dañar.
1. Desenrosque la tuerca (N) del armazón (U). Retire la lámpara UV-C (K) del tubo suministrado (vea el
embalaje) y deslice cuidadosamente la lámpara dentro del tubo de cuarzo (M). Coloque la lámpara (K)
con las clavijas de contacto en el portalámparas (L) y después apriete la tuerca (N) en el armazón (U).
2. Monte las abrazaderas de tubo (O). A continuación, introduzca la unidad en las abrazaderas de tubo.
Apriete firmemente el acoplamiento de tres piezas (I) y asegúrese al mismo tiempo que la posición de
los anillos sellados (P) es la correcta, tanto en las conexiones como en el tubo de cuarzo (ver figura 2).
3. Monte la unidad en el circuito mediante el acoplamiento de tres piezas (I). Os acoples de las tres
piezas son de Ø63 mm. Un adaptador de manguera de cola también se puede utilizar.
4. Inserte el enchufe del dispositivo UV-C en una toma de corriente de tierra
que esté protegida por un dispositivo de corriente residual.
5. Mire a través de las partes transparentes del dispositivo para asegurarse de que la lámpara está encendida.
6. El dispositivo se apaga cuando se desconecta del suministro de energía.
ES
40/75W UVC MANUAL |19

Las instrucciones de seguridad y las condiciones de garantía pueden
consultarse en el manual general de la unidad UV-C.
DESMONTAJE/MANTENIMIENTO
Desconecte siempre la fuente de alimentación durante el mantenimiento/desmontaje del
dispositivo. El dispositivo debe limpiarse por lo menos dos veces al año. Limpie el tubo de
cuarzo (M) cuando haya una cantidad significativa de algas y/o mucha acumulación de cal
en la unidad. Sustituya la lámpara especial cuando haya transcurrido su número de horas
en funcionamiento. Puede limpiar el interior del reactor con un cepillo suave.
1. Deje que el agua salga del dispositivo.
2. Desenrosque la tuerca (N) y retire la lámpara (K) del portalámparas (L). Retire la
lámpara del tubo de cuarzo y reemplace la lámpara especial si es necesario. Se
aconseja hacerlo con precaución ya que son piezas muy delicadas.
3. Retire cuidadosamente el tubo de cuarzo (M) (ver ilustración 3). ¡Nunca con
fuerza! PRECAUCIÓN: Siempre use guantes y gafas protectoras.
4. Limpie el tubo de cuarzo con un limpiador apropiado. Para limpiarlo,
utilice siempre un paño suave que evite arañazos.
5. Cuidadosamente reemplace el vidrio de cuarzo (M) (vea los dibujos 3 y 4). ¡Nunca lo
fuerce! Y cuidadosamente ponga el extremo del vidrio de cuarzo en la entrada (Q).
6. Coloque con cuidado la lámpara en el tubo de cuarzo. Vuelva a colocar la junta tórica (T) en el tubo
de cuarzo y conecte la lámpara (K) en el portalámparas (L). Enrosque la tuerca (N) en el armazón.
Si debe reemplazar el armazón o la sección eléctrica, desconecte primero la toma de tierra
de la carcasa. Por favor lea la sección “Instalación y desmontaje” antes de instalar una nueva
carcasa o sección eléctrica. Asegúrese de guardar las distintas partes por separado para la
conexión a tierra. Éstas no se incluyen en carcasas o secciones eléctricas nuevas. En caso
de tener dudas acerca de su instalación, consulte a un instalador cualificado.
20 | 40/75W UVC MANUAL
Table of contents
Languages:
Other poolsana Lighting Equipment manuals
Popular Lighting Equipment manuals by other brands

Gullberg & Jansson
Gullberg & Jansson Nova Comfort Assembly manual

Bestway
Bestway 58332 owner's manual

LEGRAND
LEGRAND Kenall SENSCAPE SPG18 installation instructions

AST System
AST System ASTmidi user manual

MP Lighting
MP Lighting LED92 Rough In Installation Instructions

Ledino
Ledino Eckenheim 300 instruction manual

Sonoff
Sonoff B05-BL user manual

Larson Electronics
Larson Electronics EPL-TL-2X10W-C-PA Series instruction manual

olympia electronics
olympia electronics PLD-25/NiMH quick start guide

Contest
Contest FUSION 180 user guide

RFR
RFR Dynamo TOUR 12 Safety-, Mounting- and Instruction Manual

Lightolier
Lightolier Lytecaster 2011 specification