Poolspa GENESIS SPA 213 x 213 Specification sheet

Multi-person bathtub
GENESIS SPA 213 x 213
Operation and installation manual
Guarantee

2
Dear Customer,
Thank you for the trust you expressed by purchasing our product. We did our very best so that our product
meets your expectations entirely.
For many years we’ve been offering products of best quality on international level. We pay particular attention
to make our products, robust, reliable and safe to use. The highest quality of materials we use, curious
stylistics and ergonomy or our equipment guarantee the greatest comfort during a bath.
We hope you will be highly satised by our products.

3
CONTENTS
Introduction ...........................................................................................................................................4
PART 1 - OPERATION MANUAL
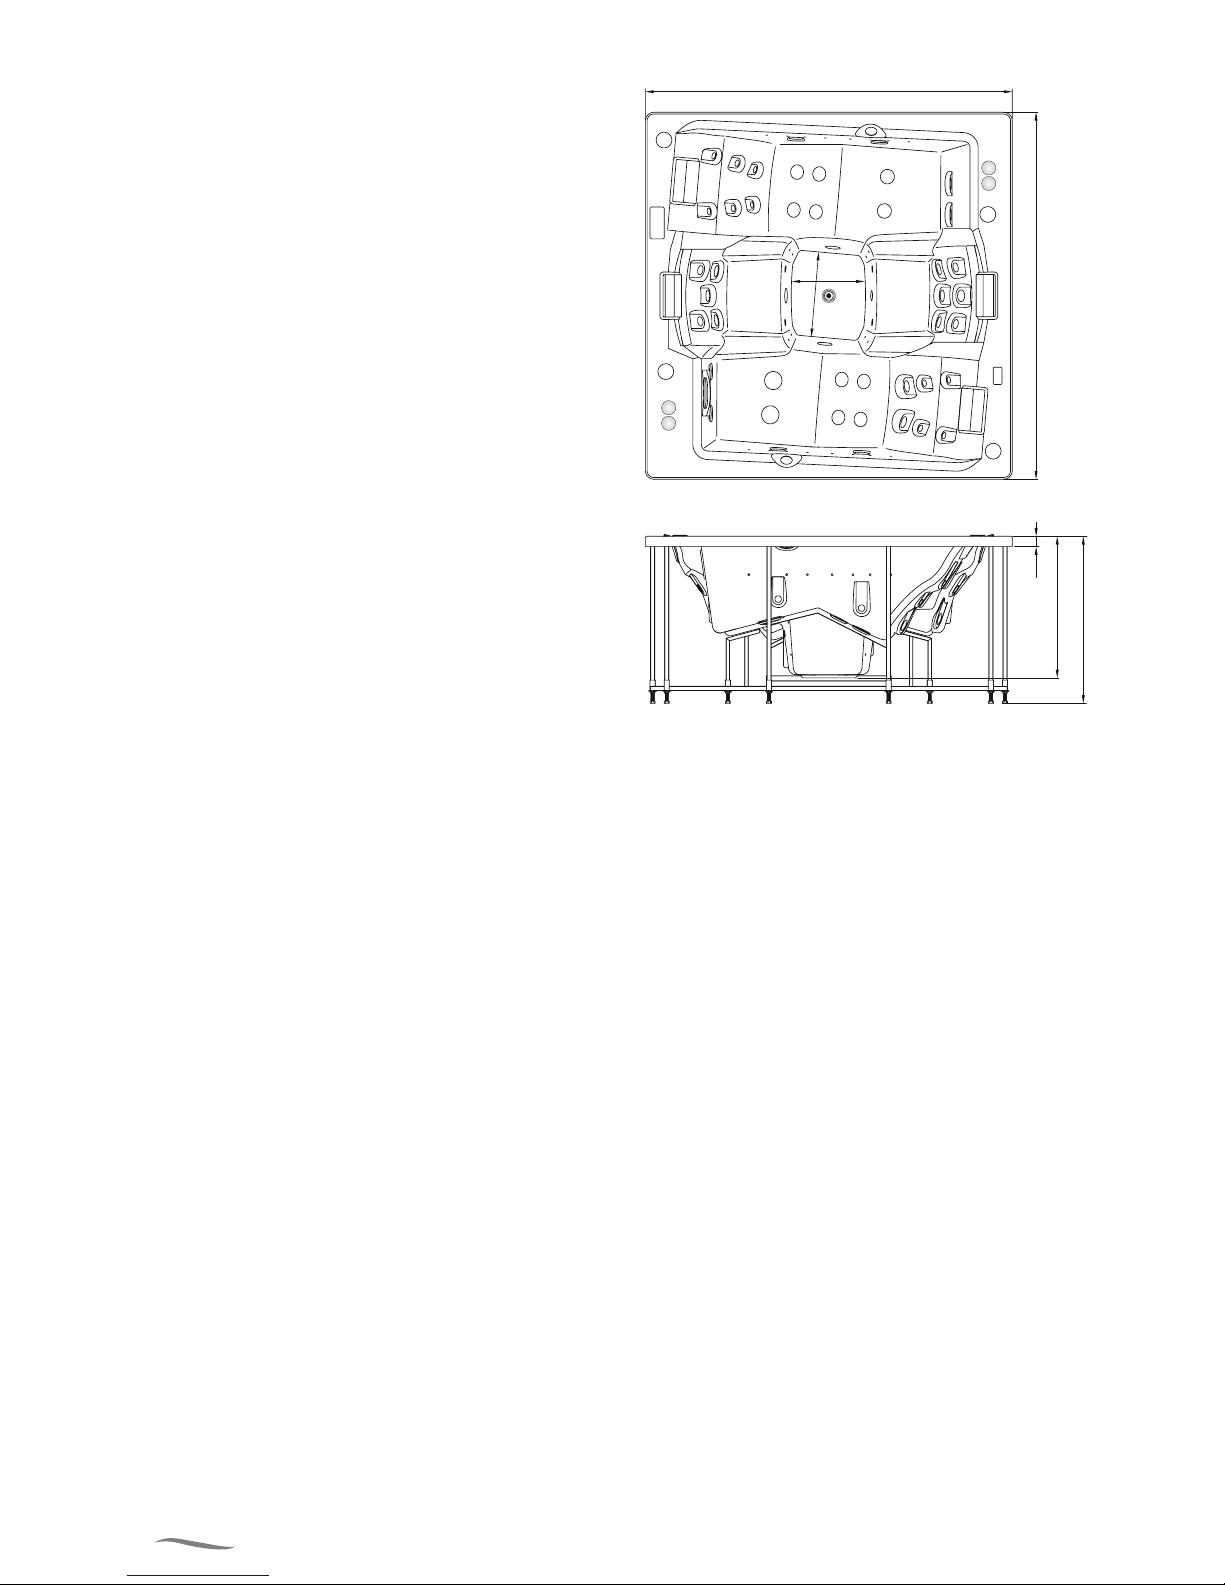
1.1. Technical Features ..........................................................................................................................6
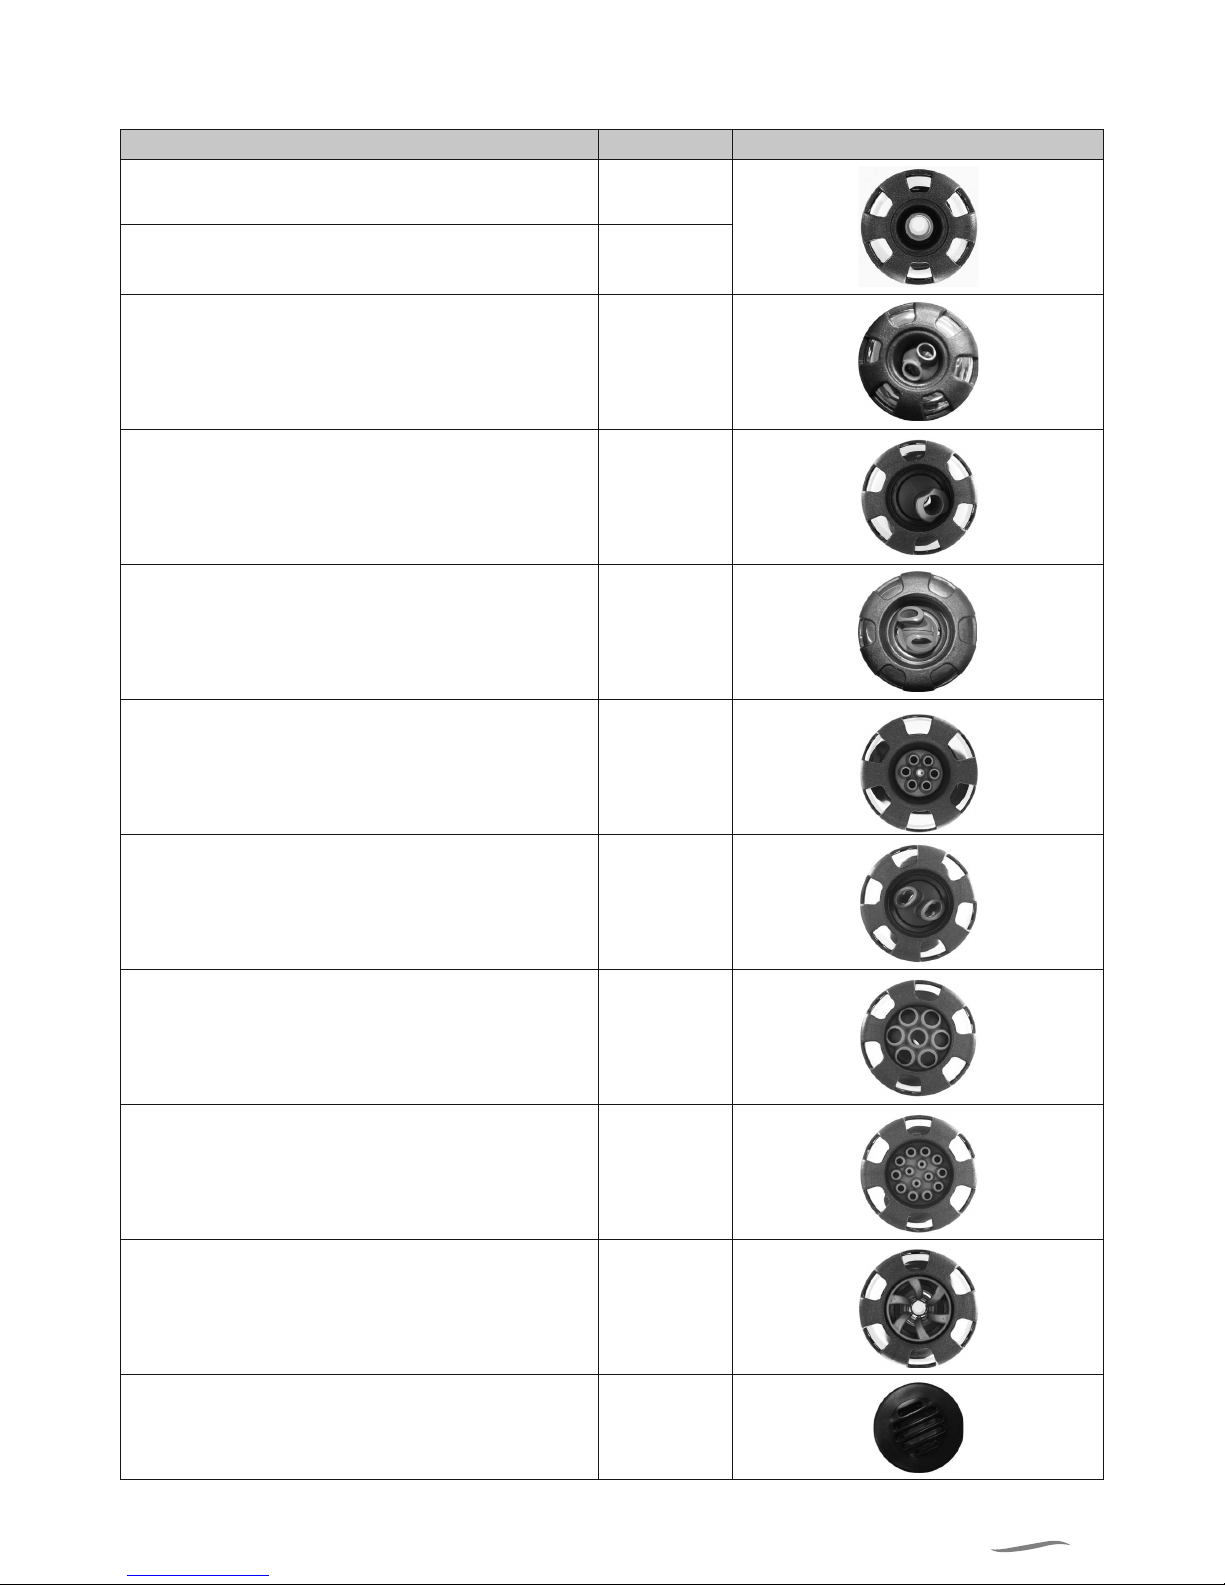
1.2. Jets..................................................................................................................................................7
1.3. Preservatives ..................................................................................................................................8
1.4. Ventilation .......................................................................................................................................8
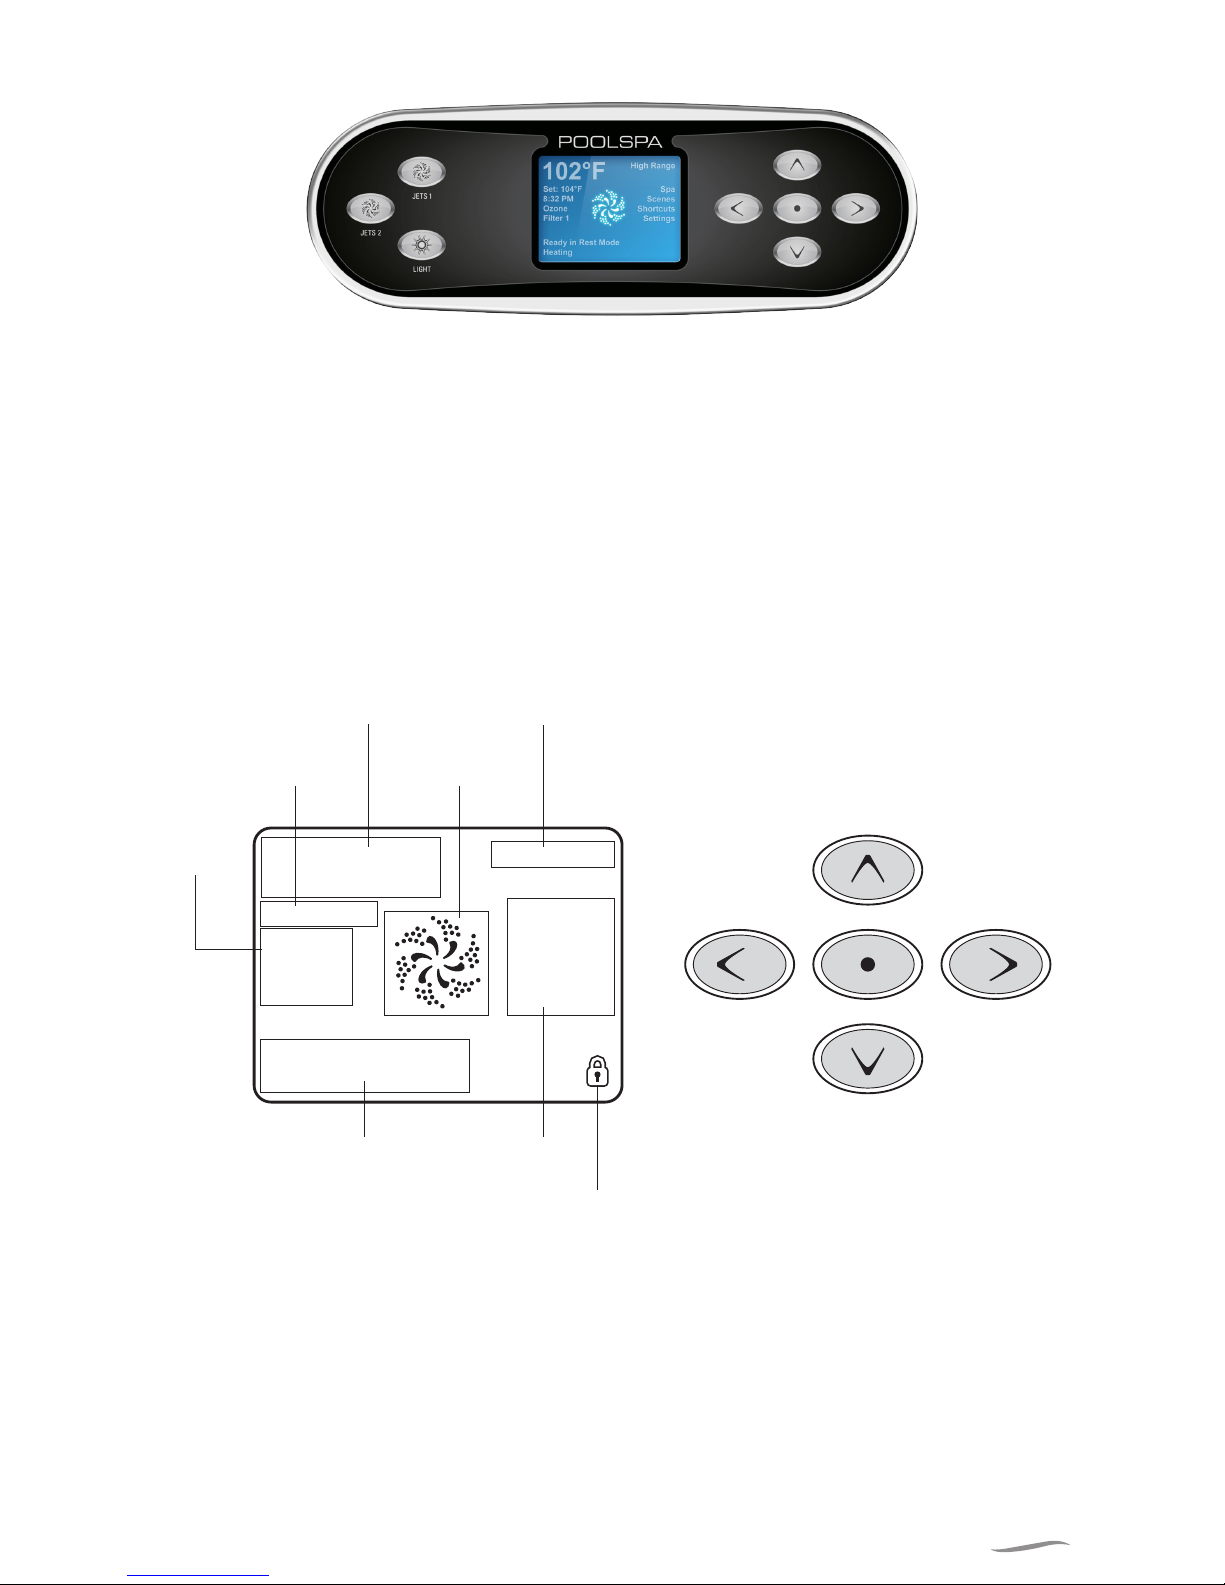
1.5. Operation manual of the user and programming interface .............................................................9
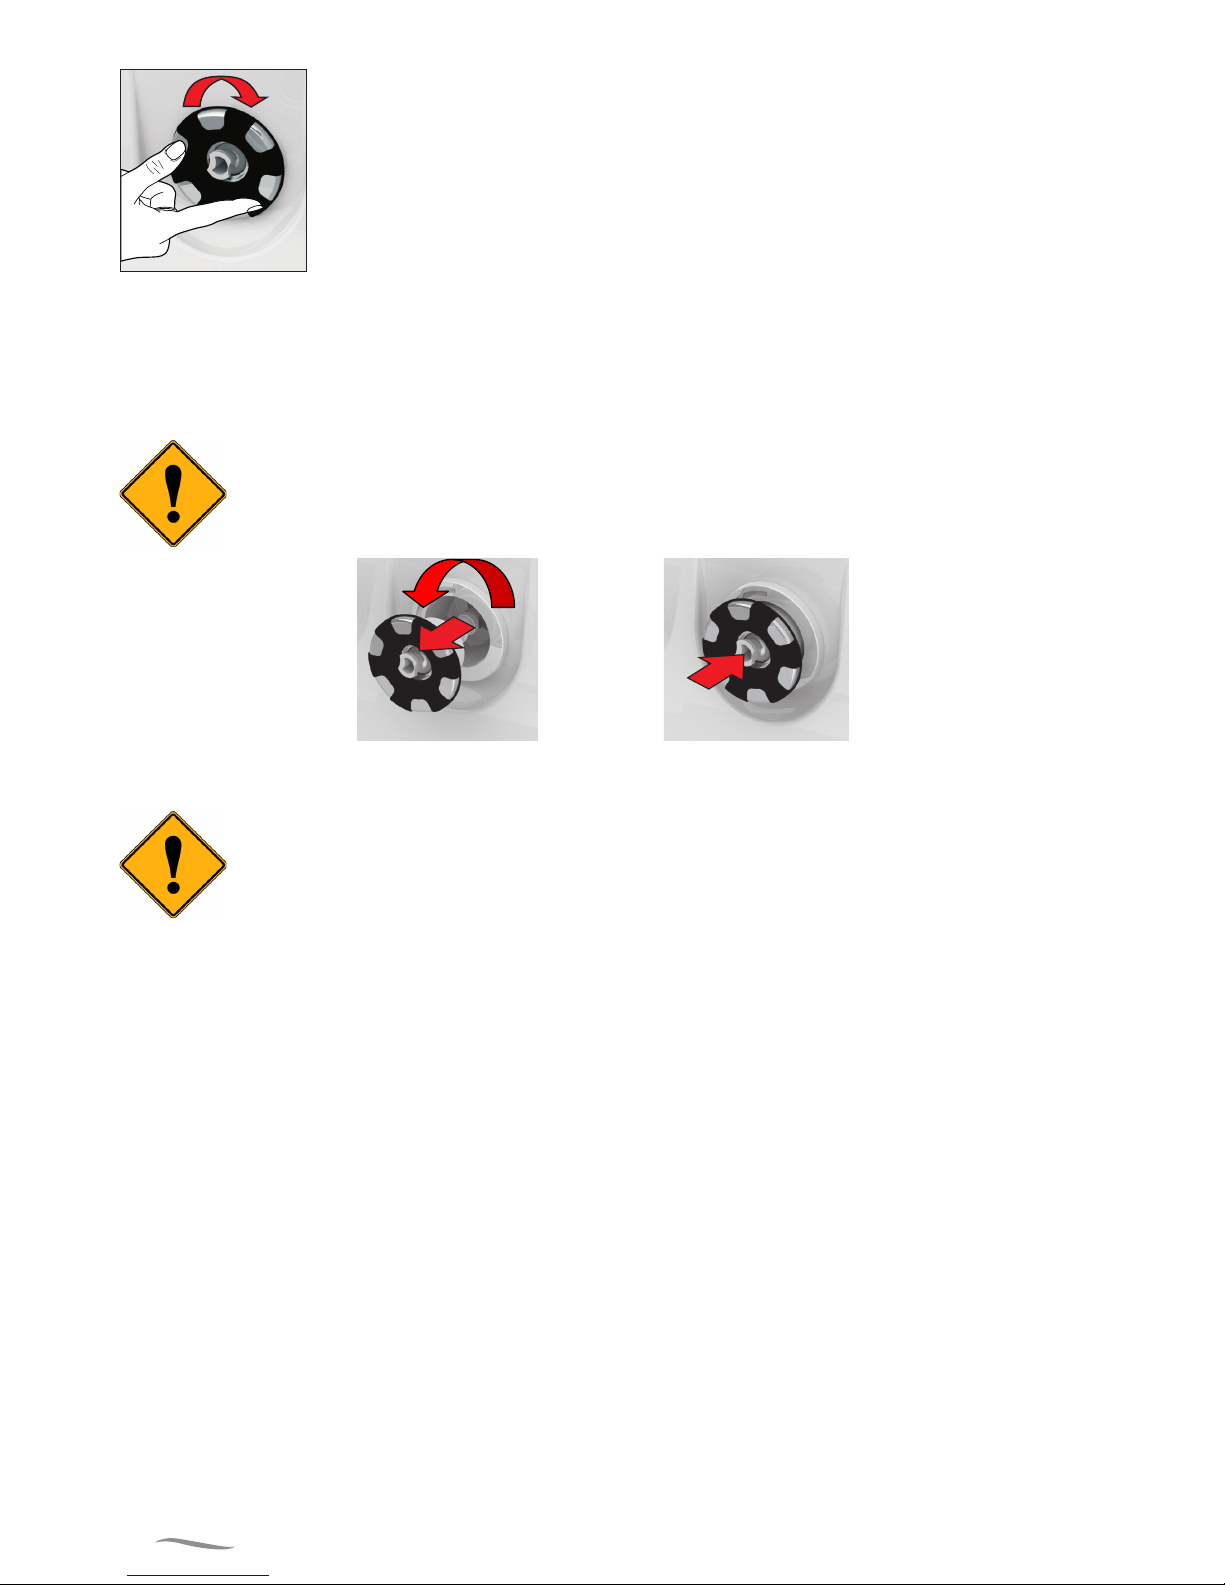
1.6. Hydromassage .............................................................................................................................30
1.7. Single - or multipoint colourful LED lighting (option) ....................................................................31
1.8. Water ozonation ...........................................................................................................................31
1.9. Genesis SPA bathtub ltration system ..........................................................................................32
1.10. Disinfection .................................................................................................................................33
1.11. Water measurement and treatment preparation set....................................................................33
1.12. Thermal cover (option) ................................................................................................................36
1.13. Cover disassembly/assembly (option) ......................................................................................36
PART 2 - INSTALLATION MANUAL
2.1. Transport .......................................................................................................................................37
2.2. Preparing the operation place for the bathtub ..............................................................................37
2.3. Placing the bathtub ......................................................................................................................37
2.4. Preparing electric and water connections ....................................................................................37
2.5. Connecting the earthing conductor ..............................................................................................38
2.6. Connecting to the power supply network .....................................................................................38
2.7. Startup test ...................................................................................................................................40
2.8. Service valves ...............................................................................................................................40
2.9. Acrylic preservation ......................................................................................................................40
TERMS OF GUARANTEE ...................................................................................................................41
PRODUCT TECHNICAL SHEET .........................................................................................................43

4
Introduction
Please read all the manual chapters in order to fully utilise all the functions of a multi-person Genesis SPA
bathtub.
Please remember, that even though hydromassage is therapeutic and relaxing, people who are seriously ill
or suffering from heart conditions or severe hypertension have to take into account special conditions that are
present in Spa and consult with a physician before starting to use the device.
It is recommended to use hydromassage in water of average temperature of 370C, for approx. 20 minutes.
It is recommended that children using the device are always accompanied by an adult.
This equipment is not intended to be used by people (including children) with impaired physical, sensory
or mental capacity, or people who do not have experience or knowledge of the equipment, unless it takes
place under the supervision or according to the equipment operation manual, transferred by people who are
responsible for their safety.
Mind that children must never play with this appliance.
Before starting a bath, ensure that the water level in the bath is correct. If the water level is approx.
3-4 below the middle of the skimmer lter, the bath can be started. If the water level in the bathtub
is incorrect, the ltration system will not work properly. Heating water in the bathtub will not be
possible. Please remember to periodically drain water from the lter.
Parts that include active parts, except for parts powered by very low safe voltage that does not exceed 12 V,
must be inaccessible for the person present in the appliance.
Parts that include electric components, except for remote control devices, must be placed or fastened in a
way that prevents their falling into the bath device.
This manual should be retained for further use.

5
PART 1 - OPERATION MANUAL
Congratulations on the purchase of Genesis SPA mobile bathtub!
Genesis SPA makes it possible to enjoy
hydromassage for ve people (sitting) both
outdoors and in a bath salon.
The bathtub is equipped in an ozoniser in a
standard version, which greatly facilitates the
maintenance of water cleanness and yields
excellent results in the eld of cosmetic medicine.
The ozone properties were described more in
detail in the 1.8. point of the manual.
The “anti-freeze” system makes it possible to use
the bathtub, even at negative temperatures.
Genesis SPA bathtub is equipped in:
- electronic control panel with a display
- 4 aeration regulators for water massage
- 3 kW electric heater (additional electric heater 3 kW - option),
- 2 hydromassage pumps - power 1.3 kW each
- ltration pump 0.75 kW,
- ozoniser,
- UV lamp (option) - no ozone jet,
- the “anti-freeze” system makes it possible to use the bathtub at negative air temperatures.
- water temperature sensor
- hydromassage:
- jet set – 48 pcs. (including 1 ozone jet),
- water aspirator,
- multi-point colourful LED lighting - 24 points,
- 4 polyurethane pillows (black in a standard),
- wooden enclosure in mahogany or pine colour (option),
- plastic enclosure in grey, mahogany or pine colour (option),
- wooden stairs in mahogany or pine colour (option),
- thermal cover (option)
It is recommended to disable electric power supply using a manual disconnecting
switch before emptying the bathtub in order to prevent hydromassage pump dry
running! Possible claims related to the damage caused by dry running are not subject
to complaints!

6
1.1. TECHNICAL FEATURES
60
822
970
+20
0
2130
2130
519
423
Genesis SPA dimensions:
- width: 2130 mm
- depth: 820 mm
- height: 970 mm x 20 mm
Volume:
950 l
Weight:
~ 350 kg (empty bathtub) with enclosure
Material, design:
Sanitary acrylic enhanced with polyester laminate
on aluminium frame.
Supply voltage:
3N 400VAC 50Hz,
3N 400VAC, 50 Hz (option)
Genesis SPA bathtub dimensions
Electric equipment:
- 3 kW electric heater (additional electric heater
3 kW - option),
- 2 hydromassage pumps, power 1.3 kW each,
- ltration pump 0.75 kW
Power supply cable: 5 x 4 mm2
Rated power and energy consumption:
6,5 kW (L1 - 10 A; L2 - 12,5 A; L3 - 6 A) - version 3N 400VAC
9,5 kW (L1 - 15,5 A; L2 - 12,5 A; L3 - 12 A) - version 3N 400VAC (option)
Maximum number of people bathing: 4
Water type
Use water intended for domestic, properly puried and disinfected. Water should full the conditions specied
in the Ordinance of the Minister of Health and Social Welfare of 4th of May 1990 Journal of Laws no 35. Do
not use well water without appropriate attestations in accordance with the standards currently in force.
Protection Against Freezing
When the temperature sensors installed in the sensor detect that the temperature is sufciently low, the
devices will be automatically activated in order to protect the system against freezing. Depending on the
current conditions, they will operate continuously or periodically.

7
1.2. JETS
SPA GENESIS is tted with an innovative jet system:
Jets Quantity Drawing
171ZPD1000248
mini xed jets (A) 14 pcs.
171ZPD1000248
mini xed ozone jet (A1) 1 pcs.
171ZPD1000249
mini pulsating jets (B) 6 pcs.
171ZPD1000251
mini directional jets (C) 2 pcs.
171ZPD1000252
mini rotating jets (D) 8 pcs.
171ZPD1000255
mini xed jets (E) 4 pcs.
171ZPD1000257
large rotating jets (F) 4 pcs.
171ZPD1000258
large xed jets (G) 4 pcs.
171ZPD1000260
large xed jets (H) 4 pcs.
171ZPD1000262
large xed jet (I) 1 pcs.
171ZPD1000308
black bathtub drain 3/4’’ (J) 1 pcs.

8
All jets are regulated.
By rotating the jets from left to right in the range of 900we increase the hydromassage
intensity. Close the jets by rotating them in the opposite direction.
Replacing jet inserts with the same diameters.
Grip tightly and rotate the jet insert (from right to left) until the insert slides out slowly, then remove it from the
enclosure. Then insert the second insert prepared earlier and push it forcefully into the enclosure. If we put
the jet insert incorrectly, we need to rotate it slowly leftwards until we hear a click.
Replace the jet inserts with the device OFF
It is recommended to remove large jet inserts at least once each 6 months in order to
clean them from possible contamination. Clean the middle of the jet, put the insert to-
gether and screw it into the jet body.
1.3. TREATMENT SUBSTANCES
Acrylic bathtub surface is coated with a thin wax layer which is a remainder of the polishing process. Metallised
elements were coated with silicon oil in order to protect them. Before lling the bathtub with water, it should
be washed (e.g. using a dishwashing liquid).
1.4. VENTILATION
High water temperature during a bath (up to 400C) causes large amounts of steam. Effective ventilation
should be used in the room that contains a bath. Installing a steam condenser that maintains constant air
humidity in the bathroom minimises the danger of dampening walls and ceiling. The building’s air conditioning
eliminates the need to use stem condenser. This problem is not present in the cases when the bath work in
open space.
Removal of the jet insert Installation of the jet insert

9
1.5. USER INTERFACE AND PROGRAMMING REFERENCE.
Genesis SPA control panel
1.5.1. THE MAIN SCREEN
Spa Status
The main screen shows the most important information on the operation of the SPA bath. The screen allows
the user to access the main features such as temperature adjustment. The current water temperature is dis-
played in the screen in large characters with the “Set temperature” being indicated below. The temperature
range (High range or Low range) is indicated in the upper right hand corner. The jet icon located in the middle
of the screen is displayed after the pump is started and it will change the colour once the heater is on.
A Lock icon is visible if the panel or settings are locked.
The Menu choices on the right can be selected and the screen will change to show more detailed controls or
programming functions.
Set: 104°F
8:32 PM
Ozone
Filter 1
Spa
Shortcuts
Settings
High Range
102°F
Ready in Rest Mode
Heating
Water Temperature
Messages
Desired Temperature
Temperature Range
Pump and Heat
Menus
Lock Indicator
Status
Navigation
Navigating the entire menu structure is done with the 5 buttons on the control panel.
When a text item changes to white during navigation, that indicates the item is selected for action.
Operating or changing a selected item is generally done with the centre button.
The only item that can be changed on the left side of the Main Screen is the Set Temperature. Press the Left
Arrow button to change the Set Temperature number to white. The Set Temperature can then be adjusted
with the up and down buttons. Pressing the Select button or the Right Arrow button will save the new set
temperature.

10
On the right side of the screen, the menu selections can be selected with the Up and Down Buttons. Use the
Select Button to choose an item. Selecting one of these items will change to a different screen with additional
controls.
Set: 104°F
8:32 PM
Ozone
Filter 1
Spa
Shortcuts
Settings
High Range
102°F
Ready in Rest Mode
Heating
Press-and-Hold
If an Up or Down button is pressed and held when the Set Temperature is selected, the temperature will con-
tinue to change until the button is released, or the Temperature Range limits are reached.
1.5.2. ACCESS TO ALL FEATURES
The SPA screen presents all the available and easily congurable bath features, such as the panel rotation,
in one place. The icons visible in the screen correspond to the equipment installed in the specic bath model,
hence, the content of the screen may vary depending on the product. To select a specic feature use the
navigation buttons. The feature currently selected is marked with a white frame around the icon and white
text below it. Once selected, the feature can be activated/congured by pressing the selection button located
in the middle. Some units, including pumps, may be in one of several different states. The current state is
always indicated by the specic icon. The below example illustrates the icons of a two- speed pump.
Jets HighJets Low
Jets Off
If the Spa has a Circ Pump, a Circ Pump Icon will appear to indicate its activity, but outside of Priming Mode,
the Circ Pump cannot be controlled directly.
NOTE: The icon for the pump that is associated with the heater (Circ or P1 Low) will have a red glow in the
center when the heater is running.
Ready in Rest Mode
Heating
Back Jets 1
Invert
Jets 2 Jets 3 Light
One-Press Activation
The Shortcut Screen requires no navigation. Each button is xed on a specic function and can be used as
a very simple user interface for the spa.
Each button function is illustrated in the display and mapped according to the manufacturer’s instructions.

11
Ready in Rest Mode
Heating
Shortcuts
Jets 3
Jets 2
Jets 1
Light
Back
1.5.3. THE SETTINGS SCREEN
The Settings Screen is where all programming and other spa behaviors are controlled.
This screen has several features that can be acted on directly. These features include Temp Range, Heat
Mode, and Invert Panel. When one of these items is highlighted, the Select Button is used to toggle between
two settings.
All other menu items (with an arrow pointing to the right) go to another level in the menu.
Press-and-Hold
If an Up or Down button is pressed and held when an item in a Menu List is highlighted, the list can be scrolled
quickly from top to bottom. The scroll bar on the right side of the screen indicates the relative position of the
highlighted item in the list.
Settings
Back
Temp Range
Heat Mode
Time of Day
Filter Cycles
Light Cycle
Invert Panel
Lock
High
Ready
Normal
Temperature Ranges
This system incorporates two temperature range settings with independent set temperatures. The specic
range can be selected on the Settings screen and is visible on the Main Screen in the upper right corner of
the display.
These ranges can be used for various reasons, with a common use being a “ready to use” setting vs. a “va-
cation” setting. Each range maintains its own set temperature as programmed by the user. This way, when a
range is chosen, the spa will heat to the set temperature associated with that range.
High Range can be set between 26,5 °C and 40 °C.
Low Range can be set between 10 °C and 26,5 °C.
Freeze Protection is active in either range.
Heat Mode
To heat the water in the bath the pump has to feed water to the heater. The pump responsible for the opera-
tion is called a ltration pump. The heat pump can be either a two-speed (Pump 1) or a single-speed pump.
If the ltration pump is a two-speed pump 1, water will be supplied in the Ready mode every 30 minutes
with the pump 1 operating at low speed (Pump 1 low) to ensure a constant water temperature. If necessary,
the water will be heated and the temperature displayed on the screen will be updated. In the Rest mode the
heating is carried out during the programmed ltration cycles only. When in the Rest mode, the temperature
displayed on the screen may not reect the current water temperature and the value will be updated after 1 -
2 minutes of the ltration pump operation. While you can turn on or off the pump 1 operating with high speed
[Pump 1 High], the pump 1 operating with low speed [Pump 1 Low] will run continuously and turn off once the
desired temperature is reached or after 1 hour from the activation.

12
Filter cycles
If the SPA bath has been congured for a 24-hour circulation, the heat pump will run continuously. As the
ltration pump is always on, the system will maintain the required water temperature in the Ready mode and
it will heat it if required. In the Rest mode the bath will heat water until the desired temperature is reached
during the programmed ltration cycles only.
Settings
Back
Temp Range
Heat Mode
Time of Day
Filter Cycles
Light Cycle
Invert Panel
Lock
High
Ready
Normal
1.5.4. FILL IT UP!
Preparation and Filling
Fill the spa to its correct operating level. Be sure to open all valves and jets in the plumbing system before
lling to allow as much air as possible to escape from the plumbing and the control system during the lling
process.
After turning the power on at the main power panel, the top-side panel will display a splash, or startup screen.
Priming Mode
After the initial start-up sequence, the control will enter Priming Mode and display a Priming Mode screen.
Only pump icons appear on the priming mode screen. The system will automatically return to normal heating
and ltering at the end of the priming mode, which lasts 4-5 minutes. During the priming mode, the heater is
disabled to allow the priming process to be completed without the possibility of energizing the heater under
low-ow or no-ow conditions. Nothing comes on automatically, but the pump(s) can be energized by se-
lecting the “Jet” buttons. If the spa has a Circ Pump, it can be turned on and off by pressing the “Circ Pump”
button during Priming Mode.
Priming Mode
Exit Circ
Jets 3Jets 2Jets 1
Manually exit Priming Mode by pressing the “Exit” Button.
Priming the Pumps
As soon as the Priming Mode screen appears on the panel, se-
lect the “Jets 1” button once to start Pump 1 in low-speed and
then again to switch to high-speed. Also, select the other pumps,
to turn them on. The pumps should be running in high-speed to
facilitate priming. If the pumps have not primed after 2 minutes,
and water is not owing from the jets in the spa, do not allow the
pumps to continue to run. Turn off the pumps and repeat the pro-
cess. Note: Turning the power off and back on again will initiate
a new pump priming session. Sometimes momentarily turning the pump off and on will help it to prime. Do
not do this more than 5 times. If the pump(s) will not prime, shut off the power to the spa and call for service.
Important: A pump should not be allowed to run without priming for more than 2 minutes. Under NO circum-
stances should a pump be allowed to run without priming beyond the end of the 4-5 minute priming mode.
Doing so may cause damage to the pump and cause the system to energize the heater and go into an over-
heat condition.

13
Exiting Priming Mode
You can manually exit Priming Mode by navigating to the “Exit” button on the Priming Mode Screen. Note
that if you do not manually exit the priming mode as described above, the priming mode will be automatically
terminated after 4-5 minutes. Be sure that the pump(s) have been primed by this time.
Once the system has exited Priming Mode, the top-side panel will display the Main Screen, but the display
will not show the temperature yet, as shown below. This is because the system requires approximately
1 minute of water owing through the heater to determine the water temperature and display it.
– – –°F – – –°C
1.5.5. SPA BEHAVIOR!
Pumps
On the Spa Screen, select a “Jets” button once to turn the pump on or off, and to shift between low- and high-
speeds if equipped. If left running, the pump will turn off after a time-out period. The pump 1 low-speed will
time out after 30 minutes. The high-speed will time-out after 15 minutes.
On non-circ systems, the low-speed of pump 1 runs when the blower or any other pump is on. If the spa is in
Ready Mode, Pump 1 low may also activate for at least 1 minute every 30 minutes to detect the spa temper-
ature (polling) and then to heat to the set temperature if needed. When the low-speed turns on automatically,
it cannot be deactivated from the panel, however the high speed may be started.
1.5.6. TIME-OF-DAY
Be sure to set the Time-of-Day
Setting the time-of-day is important for determining ltration times and other background features.
“Set Time” will appear on the display if no time-of-day is set in the memory.
On the Settings Screen, select the Time-of-Day line. On the Time-of-Day screen, simply navigate right and
left to select the Hour, Minutes, AM/PM and 12/24 Hour segments. Use the Up and Down Buttons to make
changes.
Time of Day
Back
12 :00PM12HR
Saving Settings
The Time-of-Day screen is a simple, editable screen that illustrates a feature of the control that applies to all
other editable screens as well.
When changes are made, the icon to go “Back” changes to “Save” and a new icon for “Cancel” appears under
the Save icon. Navigating to the left will highlight the Save icon, and navigating down from there will allow
the user to cancel the pending change. Pressing the “Select” button will save or cancel the changes and go
back to the previous screen.

14
Time of Day
Back
12 :00PM12HR
Cancel
Save
10:05 PM 12 HR
Note:
If power is interrupted to the system, Time-of-Day will be maintained for several days.
1.5.7. ADJUSTING FILTRATION
Main Filtration
Using the same navigation and adjustment as Setting the Time, Filter Cycles are set using a start time and
a duration. Each setting can be adjusted in 15-minute increments. The panel calculates the end time and
displays it automatically.
Filter Cycles
Back
Filter Cycle1
Startsat 12:00 AM
Runs 0HR0Min
Ends at 12:00 AM
Filter Cycle2 NO
Startsat 12:00 AM
Runs 0HR0Min
Ends at 12:00 AM
Filter Cycles
Back
Filter Cycle 1
Startsat6:15 AM
Runs 3HR0Min
Ends at 9:15 AM
Filter Cycle 2NO
Startsat 12:00 AM
Runs 0HR0Min
Ends at 12:00 AM
Cancel
Save
Filter Cycle 2 - Optional Filtration
Filter Cycle 2 is OFF by default.
Simply navigate to the Filter Cycle 2 line by pressing the Right Navigation Button, and when “NO” is highlight-
ed, press Up or Down to toggle Filter Cycle 2 on and off. When Filter Cycle 2 is ON, it can be adjusted in the
same manner as Filter Cycle 1 by navigating to the right.
It is possible to overlap Filter Cycle 1 and Filter Cycle 2, which will shorten overall ltration by the overlap
amount.
Invert Panel
Selecting Invert Panel will ip the display and the buttons so the panel can be easily operated from inside or
outside the hot tub.
1.5.8. RESTRICTING OPERATION
The control can be restricted to prevent unwanted use or temperature adjustments.
Locking the Panel prevents the controller from being used, but all automatic functions are still active.
Locking the Settings allows Jets and other features to be used, but the Set Temperature and other pro-
grammed settings cannot be adjusted.
Settings Lock allows access to a reduced selection of menu items. These include Set Temperature, Invert,
Lock, Utilities, Information and Fault Log. They can be seen, but not changed or edited.

15
Lock
Back
Settings
Panel
OFF
OFF
Lock
Back
Settings
Panel
OFF
ON
Set: 104°F
8:32 PM
Ozone
Filter 1
Unlock
High Range
102°F
Ready in Rest Mode
Heating
To release the lock, go to the [Lock] screen and the [Settings] eld and use the navigation buttons in the
following order:
Utilities
The Utilities Menu contains the following:
A/B Temps
Once this option is activated, the sensor A temperature and the heater sensor B temperature are dis-
played on the screen.
Fault Log Fault Log
Back
Entry2
Message Code M026
1 Days Ago 2:21PM
Rest Mode
High Range
Set Temp 104°F
Sensors: A: 100 B: 96
Message:
Sensors are out of sync
The Fault Log is a record of the last 24 faults that can be
reviewed by a service tech.

16
1.5.9. ADDITIONAL SETTINGS
Preferences Preferences
Back
Temp Display
Time Display
Reminders
Cleanup
Dolphin
Color
Language
°F
12 HR
On
0.5HR
5
Blue
English
The Preferences Menu allows the user to change certain param-
eters based on personal preference.
Temp Display
Change the temperature between Fahrenheit and Celsius.
Time Display
Change the clock between 12 hr and 24 hr display.
Reminders
Turn the reminder messages (like “Clean Filter”) On or Off.
Colour
Pressing the Select Button when Colour is highlighted will cycle through 5 background colours available
in the control.
Language
Change the language displayed on the panel.
1.5.10. INFORMATION
System Information System Information
Back
Software ID (SSID)
System Model
Current Setup
Configuration Signature
Heater Voltage
Heater Type
Software ID (SSID):
M100_101 V0.6
The System Information Menu displays various settings and
identication of the particular system. As each item in the menu
is highlighted, the detail for that item is displayed at the bottom
of the screen.
1.5.11. GENERAL MESSAGES
Clean the filter
Most messages and alerts will appear at the bottom of the
normally used screens. Several alerts and messages may be
displayed in a sequence.
Some messages can be reset from the panel. Messages that
can be reset will appear with a “right arrow” at the end of the
message. This message can be selected by navigating to it at pressing the Select button.
– – –°F – – –°C
Water Temperature is Unknown
After the pump has been running for 1 minute, the temperature will be displayed.
Possible freezing condition
A potential freeze condition has been detected, or the Aux Freeze Switch has closed. All water devices are
activated. In some cases, pumps may turn on and off and the heater may operate during Freeze Protection.
This is an operational message, not an error indication.
The water is too hot – M029
The system has detected a spa water temp of 43,3 °C (110 °F) or more, and spa functions are disabled.
System will autoreset when the spa water temp is below 42,2 °C (108 °F). Check for extended pump operation
or high ambient temp.
M0XX numbers are Message Codes.
* This message can be reset from the topside panel.

17
1.5.12. HEATER-RELATED MESSAGES
The water ow is low – M016
There may not be enough water ow through the heater to carry the heat away from the heating element.
Heater start up will begin again after about 1 min. See “Flow Related Checks” below.
The water ow has failed* – M017
There is not enough water ow through the heater to carry the heat away from the heating element and the
heater has been disabled. See “Flow Related Checks” below. After the problem has been resolved, you must
press any button to reset and begin heater start up.
The heater may be dry* – M028
Possible dry heater, or not enough water in the heater to start it. The spa is shut down for 15 min. Press any
button to reset the heater start-up. See “Flow Related Checks” below.
The heater is dry* – M027
There is not enough water in the heater to start it. The spa is shut down. After the problem has been resolved,
you must clear the message to restart heater start up. See “Flow Related Checks” below.
The heater is too hot* – M030
One of the water temp sensors has detected 47,8 °C (118 °F) in the heater and the spa is shut down. You
must clear the message when water is below 42,2 °C (108 °F). See “Flow Related Checks” below.
Flow-Related Checks
Check for low water level, suction ow restrictions, closed valves, trapped air, too many closed jets and pump
prime.
On some systems, even when spa is shut down by an error condition, some equipment may occasionally turn
on to continue monitoring temperature or if freeze protection is needed.
M0XX numbers are Message Codes.
* This message can be reset from the topside panel.
1.5.13. SENSOR-RELATED MESSAGES
Sensors are out of sync – M015
The temperature sensors MAY be out of sync by 2° or 3°. Call for Service.
Sensors are out of sync -- Call for service* – M026
The temperature sensors ARE out of sync. The fault above has been established for at least 1 hour.
Call for Service.
Sensor A Fault, Senor B Fault – Sensor A: M031, Sensor B: M032
A temperature sensor or sensor circuit has failed. Call for Service.
1.5.14. MISCELLANEOUS MESSAGES
Communications error
The control panel is not receiving communication from the System. Call for Service.
Test software installed
The Control System is operating with test software. Call for Service.
°F or °C is replaced by °T
The Control System is in Test Mode. Call for Service.
M0XX numbers are Message Codes.
* This message can be reset from the topside panel.

18
1.5.15. SYSTEM-RELATED MESSAGES
Program memory failure* – M022
At Power-Up, the system has failed the Program Checksum Test. This indicates a problem with the rmware
(operation program) and requires a service call.
The settings have been reset (Persistent Memory Error)* – M021
Contact your dealer or service organization if this message appears on more than one power-up.
The clock has failed* – M020
Contact your dealer or service organization.
Conguration error (SPA will not Start Up)
Contact your dealer or service organization.
A pump may be stuck on – M034
Water may be overheated. POWER DOWN THE SPA. DO NOT ENTER THE WATER. Contact your dealer
or service organization.
Hot fault – M035
A Pump Appears to have been Stuck ON when spa was last powered
POWER DOWN THE SPA. DO NOT ENTER THE WATER. Contact your dealer or service organization.
M0XX numbers are Message Codes.
* This message can be reset from the topside panel.
1.5.16. REMINDER MESSAGES
General maintenance helps.
Reminder Messages can be suppressed by using the Preferences Menu.
Reminder Messages can be chosen individually by the Manufacturer. They may be disabled entirely, or there
may be a limited number of reminders on a specic model. The frequency of each reminder (i.e. 7 days) can
be specied by the Manufacturer.
Check the pH
May appear on a regular schedule, i.e. every 7 days.
Check pH with a test kit and adjust pH with the appropriate chemicals.
Check the sanitizer
May appear on a regular schedule, i.e. every 7 days.
Check sanitizer level and other water chemistry with a test kit and adjust with the appropriate chemicals.
Clean the lter
May appear on a regular schedule, i.e. every 30 days.
Clean the lter media as instructed by the manufacturer.
Change the water
May appear on a regular schedule, i.e. every 90 days.
Change the water in the spa on regular basis to maintain proper chemical balance and sanitary conditions.
Clean the cover
May appear on a regular schedule, i.e. every 180 days.
Vinyl covers should be cleaned and conditioned for maximum life.
Treat the wood
May appear on a regular schedule, i.e. every 180 days.
Wood skirting and furniture should be cleaned and conditioned per the manufacturers instructions for
maximum life.

19
Change the lter
May appear on a regular schedule, i.e. every 365 days.
Filters should be replaced occasionally to maintain proper spa function and sanitary conditions.
Reminder messages can be reset from the topside panel.
Additional messages may appear on specic systems.
1.5.17. WARNING! QUALIFIED TECHNICIAN REQUIRED FOR SERVICE AND INSTALLATION
Warning: People with infectious diseases should not use a spa or hot tub.
Warning: To avoid injury, exercise care when entering or exiting the spa or hot tub.
Warning: Do not use a spa or hot tub immediately following strenuous exercise.
Warning: Prolonged immersion in a spa or hot tub may be injurious to your health.
Warning: Maintain water chemistry in accordance with the Manufacturers instructions.
Warning! GFCI or RCD Protection
The Owner should test and reset the GFCI or RCD on a regular basis to verify its function.
Warning! Shock Hazard!
Do not attempt service of this control system. Contact your dealer or service organization for assistance.
Follow all owner’s manual power connection instructions. Installation must be performed by a licensed
electrician and all grounding connections must be properly installed.
1.5.18. MUSIC SYSTEM (OPTION)
To work correctly with the music system, the source device must have the following characteristics:
• Communication protocol: 2.1 Bluetooth® or previous version.
• Prole: A2DP, AVRCP.
• Band frequency: 2.4GHz
• Capacity (range of action): Class 2 – 10m
• Adjustment of audio emission volume.
To carry out the audio connection by Bluetooth® between the D10-BLUTOO amplier and an audio source
provided with a Bluetooth® A2DP transmission signal, follow these steps:
• Feed power source to the amplier (loudspeakers must be connected)
• Switch on the source device and trigger on the Bluetooth® function. Search BLUTOO MODO.
• If the connection conrmation is required, enter the pairing code: 0000
• Start an audio track through the player located on the source device
NOTE: in cases of source devices such as mobile phones, you have to perform the “synchronisation of
Bluetooth® devices” by using the function “search devices”. Please refer to the operating manual of your
mobile phone.
Sound
T1 T2 T3 T4
Function Keys
Volume - T1
Volume + T2
Previous radio station / previous audio le T3
Next radio station / next audio le T4
Continuous volume - T1>1”
Continuous volume + T2>1’’
Mute (esc pressing T1+T2) T1+T2>1”
Audio source selection (AUX → BT → FM → AUX → BT…) T2+T3

20
1.5.19. CONTROL YOUR HOT TUB FROM YOUR SMARTPHONE (OPTION)
The Balboa Worldwide App (bwa™), is an app for your smart device (Android™ or iPhone®) that allows you
to access your hot tub via a direct connection anywhere in the local proximity of your tub, anywhere in your
house that you can connect to your local Wi-Fi network, or anywhere in the World you have an Internet con-
nection to your smart device via 3G, 4G, or Wi-Fi hot spots.
With the bwa app, you can ensure that your hot tub will be ready whenever you want to take a dip. Instead of
going outside and pressing buttons on the topside panel, the app lets you start the tub and change settings
from your smartphone or tablet.
The app provides full interface control so you can set the temperature, turn pumps on and off and even set
ltration cycles.
GETTING READY
You’re just several easy steps away from connecting your tub to your home network and the Internet. Before
you begin, you might want to record some information for your records and to help troubleshoot your setup
if needed.
Before the next step, write down the name of your wireless network, password and the encryption type. If
you do not know the above data, contact your network administrator, the person who helped you to congure
the wireless router or refer to the relevant manuals. You will also need to check if the wireless connection is
available at the place where the tub is located.
Download the app to your smart device from either the Google® Play or the iTunes® store. Once you have it
loaded on your phone you are ready to connect to your hot tub. Scan the QR code below to take you directly
to the the download page.
Google® Play Store iTunes® App Store
CONFIGURING THE CONNECTION
Direct control
Make sure your device’s Wi-Fi is turned on. Check with your device
instructions on how to access your Wi-Fi settings. For this example we are
using an Android™ device, iOS® would be similar.
Make sure you are near your tub. Go to your Wi-Fi settings screen and
look for the BWGSpa_12345 network or similar. In our example it is
BWGSpa_0E608F and connect to it. No password is needed.
Table of contents
Other Poolspa Hot Tub manuals
Popular Hot Tub manuals by other brands

QCA Spa
QCA Spa VS501 PAK (VL260 TOPSIDE) owner's manual

ThermoSpas
ThermoSpas Genesis Series owner's manual

Aquatic
Aquatic HOTSOAK 76 AI21AIR7242CHS Specification sheet

Jacuzzi
Jacuzzi BELLAVISTA 5 Specification sheet

habitat et jardin
habitat et jardin Antibes 1079 121082 manual

Dimension One Spas
Dimension One Spas AQUATIC FITNESS SYSTEM 2003 owner's manual