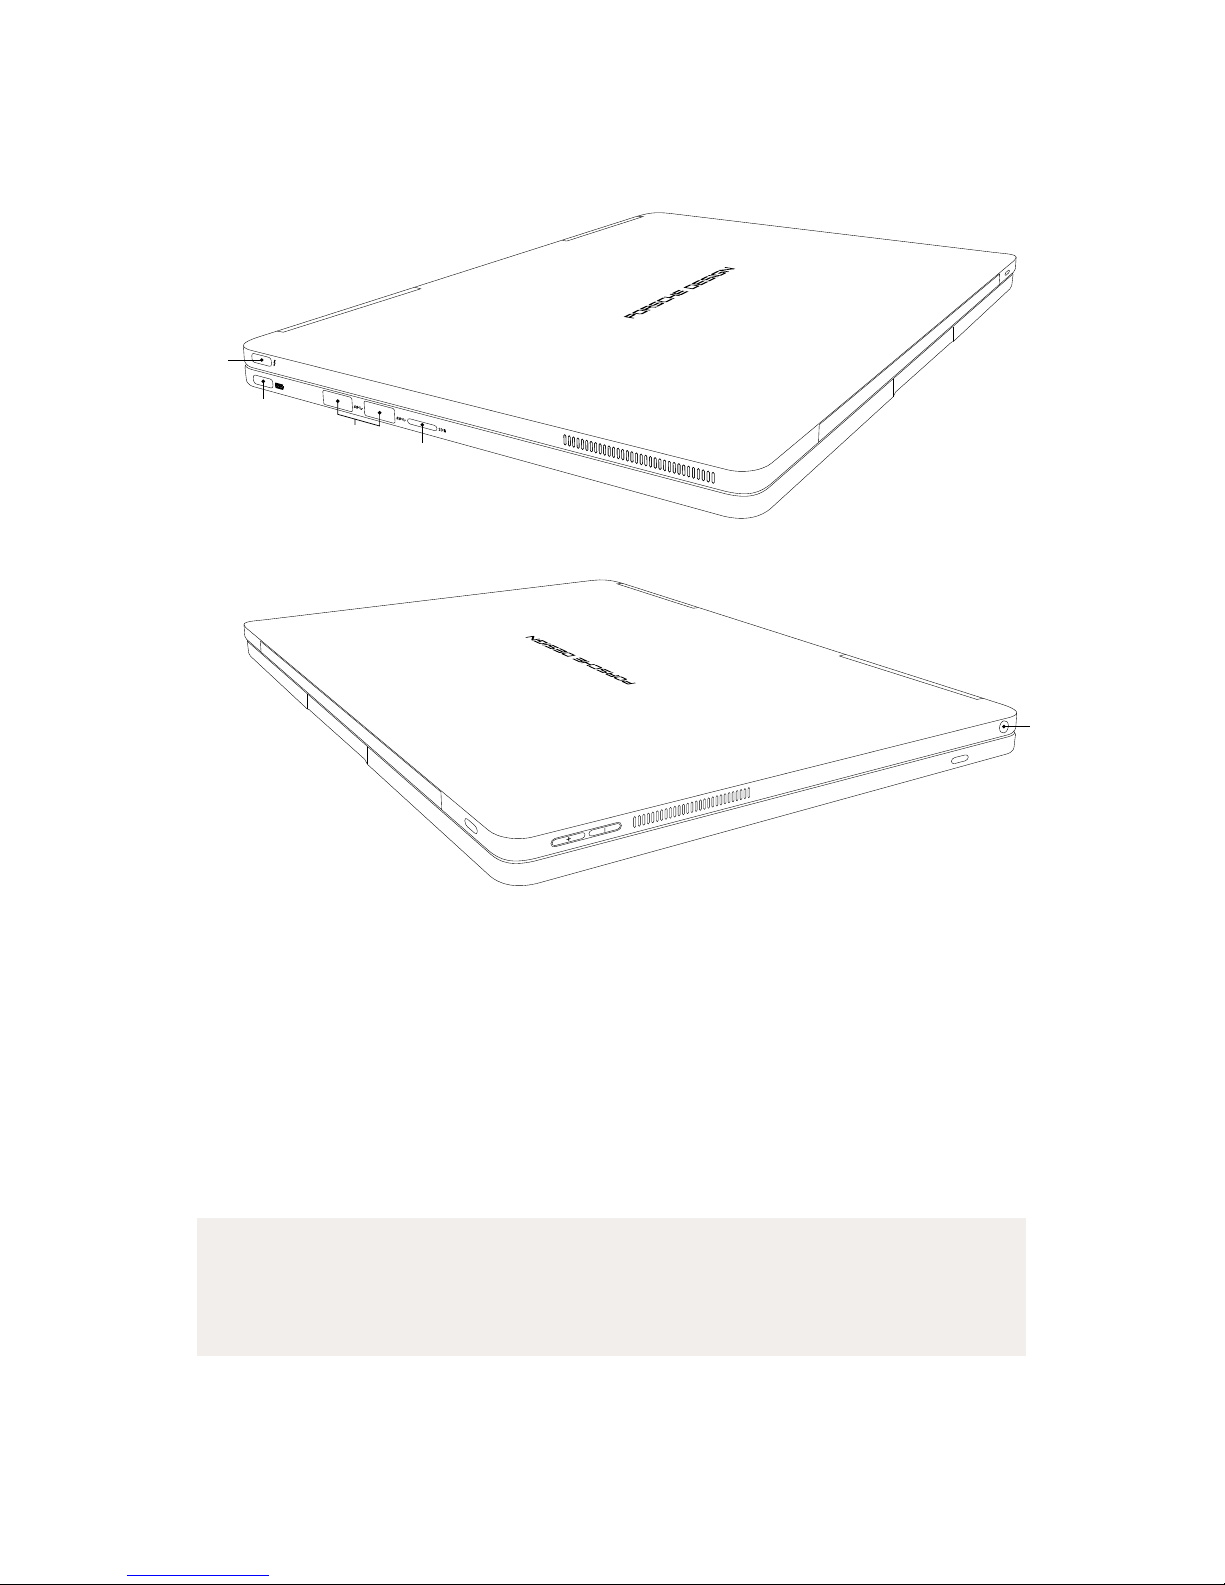
PORSCHE DESIGN Book One User manual

BOOK ONE
Quick Start Guide
porsche design
COMPUTING


Welcome to Porsche Design!
Get to know your new PORSCHE DESIGN BOOK ONE.

4
Table of contents
Quick Start Guide 1
1. The Quick Start Guide 5
2. Description 6
2.1 Control elements 6
2.2 Ports 10
2.3 Further technical specifications 12
2.4 Accessories – stylus 13
2.5 Package contents 14
3. First steps 15
3.1 Modes of use for the 2-in-1 laptop 15
3.2 Charging the 2-in-1 laptop 17
3.3 Setting up the 2-in-1 laptop 17
4. Core basic functions 18
4.1 Switching your 2-in-1 laptop on and off 18
4.2 Start screen 19
4.3 Switching on WiFi 21
4.4 Resetting your 2-in-1 laptop 21
5. In the event of technical issues or defects 22
6. Copyright and trademarks 23
Table of contents

5
1. The Quick Start Guide
The Quick Start Guide is there to help you during the initial setup of
your new 2-in-1 laptop. Along with that, it also provides information
about the device’s basic features and functions.
Please read the user’s manual to find out more about the device’s
features, functions and options as well as get tips on how to work
productively and creatively with the device.
You can download and read the user’s manual at www.porsche-
design-computing.com. This requires that you are connected to the
Internet.
It is important that you read the safety instructions in the enclosed
brochure before using your new 2-in-1 laptop. This contains all key
safety information on your device.
The online user’s manual, the enclosed Quick Start Guide and the
companion brochure "Important safety and legal information" are an
integral part of the product.
Please read all three documents carefully. They contain important
information in regard to safety, use and disposal of the device.
Please keep these documents in a safe place and pass them on in full
to the new owner if the device changes hands.

6
2. Description
2.1 Control elements
1
2345
6
7
8
9
10
11
12
13
1 Touch screen
The 13.3" QHD+ IPS display delivers a resolution of 3200 x 1800 pixels
at a 16:9 aspect ratio.
The touch screen displays your chosen content (films, documents,
websites etc.) and also allows you to precisely control and select apps,
move items on the display and use your fingers to zoom in or out on
content on the screen.
For more information, see "Input options" – "Using the touch screen" in
the user’s manual.

7
2 Stereo speakers
The 2 x 2 W stereo speakers are located in the upper left and right
corners of the tablet. They direct the sound straight to the user to
deliver impressive, top-rate sound quality.
3 Antenna cover
The modified material property of the antenna cover ensures proper
and efficient operation of the dual-band WiFi and Bluetooth® module.
4 Front camera
The high-resolution front camera with built-in microphone is used to
take photos at a resolution of up to 5 MP (2592 x 1944 pixels), shoot
videos in HD quality (1080p) with a 4:3 aspect ratio as well as video
chat online. The camera is on if the LED on the left is illuminated white.
The camera features an infrared LED for facial recognition. This allows
you to log in on Windows without entering a password using the
"Windows Hello" feature.
For more information, see "Windows Hello" in the user’s manual.
5 On/off button
Press the on/off button to switch on your 2-in-1 laptop. You can also
use this button to place your device in standby mode and wake it up
when you want to resume working on it.
6 Volume control
Press the "+" volume control button to increase the volume.
Press the "-" button to decrease the volume.

8
7 Ventilation slots
The ventilation slots help cool the device by providing for optimum heat
transfer to ensure reliable operation.
WARNING
Do not cover these openings by placing the device on unsuitable
surfaces such as on a bed, couch or carpet. Having a constant flow of
air will help reduce the risk of fire.
8 Tablet dock
The tablet dock features guide pins and a tablet connector used to attach
and detach the keyboard to and from the tablet unit of the 2-in-1 laptop.
This allows you to switch from laptop to tablet mode or vice versa.
9 Unlock button
Press the unlock button to separate the tablet unit from the keyboard.
A low-pitched clicking sound is played and a white, open padlock icon
appears at the centre of the lower edge of the tablet to indicate that
the tablet has been unlocked from the keyboard. When you hear the
acoustic signal, you can remove the tablet unit.
For more information, see "Modes of use" in the user’s manual.
10 Keyboard
The keyboard is used to enter information on your 2-in-1 laptop.
For more information, see "Input options" – "Using the keyboard" in the
user’s manual.
11 Tabs
Tabs are placed on both sides of the keyboard to protect the display
from mechanical damage when it is resting on the keyboard.

9
12 Touchpad
The touch-sensitive touchpad is used in place of a mouse. It offers
both a left- and right-click function and also supports Windows 10
gesture control.
For more information, see "Input options" – "Using the touchpad" in the
user’s manual.
13 Hinge
The unique hinge mechanism enables the tablet to be rotated 360°.
This allows you to operate the 2-in-1 convertible laptop at any angle
between 0° and 360° in various modes (laptop | tent | presentation).

10
2.2 Ports
A
B
C
D
E
A USB Type-C™ port with USB 3.1 (Gen 2)
and Thunderbolt 3 standard
This universal interface allows you to connect a variety of USB
peripheral devices (e.g., a mouse, printer, external hard drive, Ethernet
adapter, smartphone etc.). It provides for ultra-fast data transfer rates
of up to 10 Gbps with the USB 3.1 (Gen 1) standard and up to 40
Gbps with the Thunderbolt 3 standard.
iNOTICE
The data transfer rate depends directly on the equipment used (cable,
adapter etc.).

11
The Thunderbolt 3 standard also supports DisplayPort for use in audio
and video transmission via cable.
iNOTICE
The USB Type-C™ to HDMI®adapter included with the laptop is
connected here.
For more information, see "Connecting other devices" in the user’s manual.
Thanks to its support for Thunderbolt 3, the port, in combination with
the enclosed USB Type-C™ power adapter, provides a fast charge
function and also supports the USB Power Delivery standard.
For more information, see "Charging the 2-in-1 laptop" in the user’s manual.
B USB Type-C™ port with USB 3.1
This universal interface allows you to connect a variety of USB
peripheral devices (e.g., a mouse, printer, external hard drive, Ethernet
adapter, smartphone etc.). It provides for fast data transfer rates of up
to 5 Gbps.
For more information, see "Connecting other devices" in the user’s manual.
In combination with the enclosed USB Type-C™ power adapter, the
port provides a charging function.
For more information, see "Charging the 2-in-1 laptop" in the user’s
manual.
C USB 3.0 Type A
The two full-size USB 3.0 ports allow you to connect a variety of USB
peripheral devices (e.g., a mouse, printer, external hard drive, Ethernet
adapter, smartphone etc.).
For more information, see "Connecting other devices" in the user’s manual.

12
D Memory card slot
In combination with microSD-HC/XC cards (available separately), the
memory card slot is used to transfer data or for providing additional
external memory (up to 512 GB).
E Audio port
The 3.5 mm audio port is a bidirectional interface (audio out/mic in).
This is where you connect an audio device (e.g., speakers, headphones
etc.) to play music or a headset equipped with a microphone to take part
in phone conferences.
2.3 Further technical specifications
Operating system Windows®10 Pro
Processor Intel®Core™ i7-7500U
(4M Cache, up to 3.50 GHz)
RAM 16 GB LPDDR3
Storage capacity 512 GB Intel®SSD (PCIe)
Graphics processing unit Intel®HD Graphics 620
Network Dual-band WiFi | Bluetooth®4.1 |
Wireless Display
WiFi frequencies 802.11 abgn+ac 2.4 | 5 GHz
Battery Li-polymer (70 Wh)* |
Charging via USB Type-C™
Dimensions (W x H x D) approx. 311.4 x 226.5 mm x 15.9 mm
Weight approx. 1580 g
Operation and storage Temperatures 5°C to 30°C
Relative humidity 30 to 70%
* The user cannot simply exchange the product’s battery by themselves. | Refer to the
detailed user’s manual for technical specifications on the power adapter.

13
2.4 Accessories – stylus
The sleek, classic stylus combines a natural writing experience with
the benefits of digital connectivity. The stylus can be used in any app
that supports freehand input (for example, apps for drawing, Word,
PowerPoint, OneNote and many others).
For more information, see "Input options" – "Using the stylus" in the
user’s manual.
1 2 3 4
1 Pen tip
The pressure-sensitive pen tip is used to write and draw on the display.
Touch the display with the pen tip.
The display recognises the pen automatically.
2 Function key
The function key enables you to access the context menus in apps that
support Microsoft Inking.
iNOTICE
If Microsoft Inking is not supported, the pre-assigned functions of the
function key may vary.
3 Delete key
The delete key enables convenient erasing of drawings and notes from
the display.
4 Removable cap
Unscrew the cap and insert the AAAA battery with the positive side in
the direction of the pen tip. The stylus is ready to use once the battery
has been inserted.

14
2.5 Package contents
• PORSCHE DESIGN BOOK ONE
• USB Type-C™ to HDMI®adapter (up to Ultra HD video quality)
• USB Type-C™ power adapter (100 V – 240 V)
• Stylus
• AAAA battery
• Cleaning cloth
• Quick Start Guide
• "Important safety and legal information" brochure
Please check the package contents to ensure nothing is missing or
damaged. To do so, take all of the components listed above out of the
box. Remove all packaging material, including the protective film.
If you discover the device is damaged or parts are missing, please
contact your retailer or customer service immediately.

15
3. First steps
You will now learn about the basic functions of your new 2-in-1 laptop.
3.1 Modes of use for the 2-in-1 laptop
You can operate your 2-in-1 laptop in tablet or laptop mode.
Laptop mode
This is the standard mode as
delivered. The tablet unit is
connected to the keyboard via the
tablet dock.
The tablet unit features a special
hinge that allows it to be rotated
360° along its x-axis. As a result,
the convertible laptop can be
adjusted to any angle for use in
presentation and tent mode.
Presentation mode
In this mode, you can display the
contents of the screen to other
people where alternative options
are unavailable (for example,
output devices such as a monitor
or projector).

16
Tent mode
In this mode, you can watch HD
films and videos in comfort, for
example.
Tablet mode
The detachable function of the
2-in-1 laptop allows you to remove
the tablet unit.
A low-pitched clicking sound is
played and a white, open padlock
icon appears at the centre of the
lower edge of the tablet to indicate
that the tablet has been unlocked
from the keyboard. When you
hear the acoustic signal, you can
remove the tablet unit.
iNOTICE
You can only detach the tablet
unit if the keyboard is adequately
charged.

17
3.2 Charging the 2-in-1 laptop
In the first step, fully charge your 2-in-1 laptop.
1. Plug the UBS connector of the enclosed power adapter
into one of the USB Type-C™ ports on the device.
2. Now connect the power adapter to an outlet.
iNOTICE
Once the power adapter is connected to a power source,
the LED on the power adapter’s USB connector will light up and
appear blue.
3.3 Setting up the 2-in-1 laptop
You can now customise the settings of your 2-in-1 laptop.
You can change any of the settings and preferences you configure now
in the future.
For more information, see "Setting up and customising your 2-in-1
laptop" in the user’s manual.
1. Press the on/off button for approximately two to three seconds to
switch on the 2-in-1 laptop.
2. Windows now boots up and guides you through the setup process.
Go step-by-step through the setup assistant to configure your
2-in-1 laptop.
iNOTICE
During the setup process, you will be prompted to sign in with your
Microsoft account. If you do not yet have a Microsoft account, please
set one up at this point.

18
3. Once you have fully completed the setup process, your device will be
configured according to the settings you made and is ready for use.
This process may take a while. Be patient and do not turn off the
device until the configuration process is complete.
4. Once your device is ready for use after the setup process, you
will be shown the lock screen. Drag the lock screen on the touch
display upwards with your fingertip to unlock the screen.
iNOTICE
If your device is password-protected, you must then enter the
password.
For more information on securing your device, see "Protecting your
personal data" in the user’s manual.
4. Core basic functions
You will now learn about the core basic functions of your new
2-in-1 laptop.
4.1 Switching your 2-in-1 laptop on and off
Press the on/off button for approximately two to three seconds to
switch on your device. Briefly press this button to place your device in
standby mode and wake it up when you want to resume working on it.
To switch off your device, open the Start menu by clicking the
Windows icon on the touch display (tablet mode) or by pressing the
Windows key on the keyboard (laptop mode). Tap or click "Power" in
the Start menu and then "Shut down" to power down your device.

19
4.2 Start screen
The icons located in the task bar on the start screen allow you to
access a number of functions (including the Start menu [A | B]):
Windows icon
Use the Windows icon to open and close the Start menu [A | B]
(also on the keyboard).
From the Start menu, you can access any of the installed apps and
various utility programs. The Start menu is divided into two panels:
A: "Classic" view of the navigation bar
To access a list of all installed apps arranged in alphabetical order,
drag the navigation bar upwards or tap "All Apps" in the bottom left
of the navigation bar.
B: Customisable app panel
You can arrange your apps and favourites as live tiles in the preferred
order here.
Cortana
Cortana is your (voice-activated) personal digital assistant. It reminds
you of pending tasks and appointments and gives useful hints and tips.

20
Task View
Press this icon to enable the Task View that shows all open programs
including the "+ New Desktop" button for creating virtual desktops.
Microsoft Edge
Press this icon to open the Internet browser.
Folder icon
Press this icon to open Windows Explorer.
Microsoft Store
Press this icon to open Microsoft Store, where you can download
additional apps.
iNOTICE
Some apps must be purchased.
Battery level indicator
This indicates the device’s battery level.
Volume control
Use the volume control slider to adjust the volume to the desired level.
Other manuals for Book One
1
This manual suits for next models
1
Table of contents
Other PORSCHE DESIGN Laptop manuals