Portamatik ROSSO 60 Use and care manual

v1.1
REV. 08/2020
ROSSO
USER’S AND INSTALLER’S MANUAL

2
SAFETY INSTRUCTIONS
In order for the automation system to function
properly, the following parameters must be careful
before installation:
Read all the steps at least once so that you know
the installation and configuration process.
Make sure that the door frame is solid and in condi-
tion to be automated.
Check that the sectioned door has no mechanical
faults, such as friction / locking points, as this may
jeopardize the durability of the operator.
Make sure the door is in good condition to install
the motor. To do this, raise it manually at 800mm,
1600mm and 2000mm off the ground.
Make sure that the door stays suspended in these
positions or to lower it minimally. If the door starts
to rise or fall, it means that the springs are not well
calibrated.
Check the surrounding space. Carefully evaluate
any hazards that could cause property damage,
may possible contact with insects, infiltrations, and
so on.
Make sure that the drive is plugged into a pro-
perly grounded 230V outlet.
Check for proper electrical protection against short
circuits / current peaks, and ground connection on
the Electrical Board.
Be careful in the event that you directly handle the
control unit. Incorrect handling may damage some
electrical components.
Make sure you have prepared all the necessary
material for the installation.
Evaluate the security devices to install. This will
ensure that unexpected accidents do not happen.
To ensure full operation of the operator, check that
the door frame is strong enough.
CONTENT
It is very important that these precautions are
adhered to!
Only in this way can the correct operation and dura-
bility of the operator be assured!
PRE-INSTALLATION
PRE-INSTALLATION...............................................................................
PACKAGE................................................................................................
OPERADOR............................................................................................
MANUAL BRAKE RELEASE.................................................................
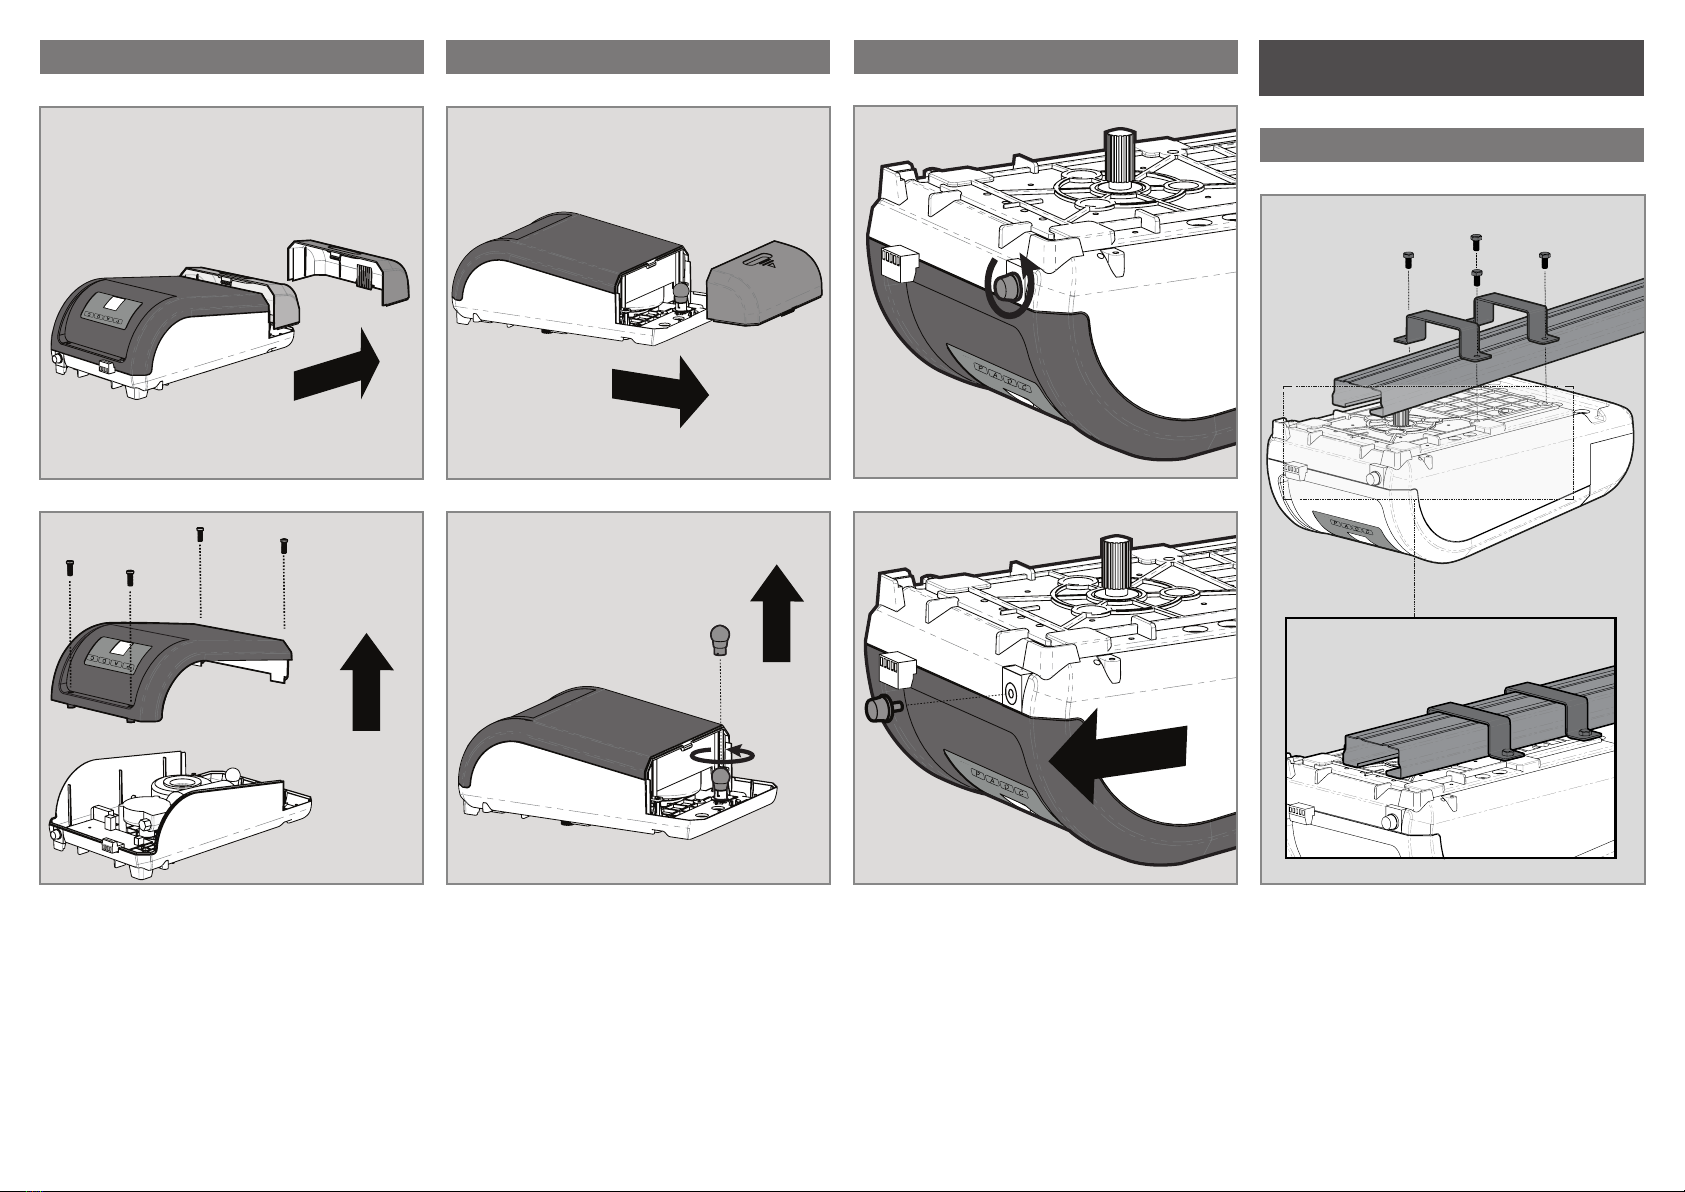
REMOVING TOP COVER....................................................................
SWITCH LAMP 24V 5W......................................................................
REPLACE FUSE..................................................................................
INSTALLATION........................................................................................
FIXING THE MOTOR IN RAILS...........................................................
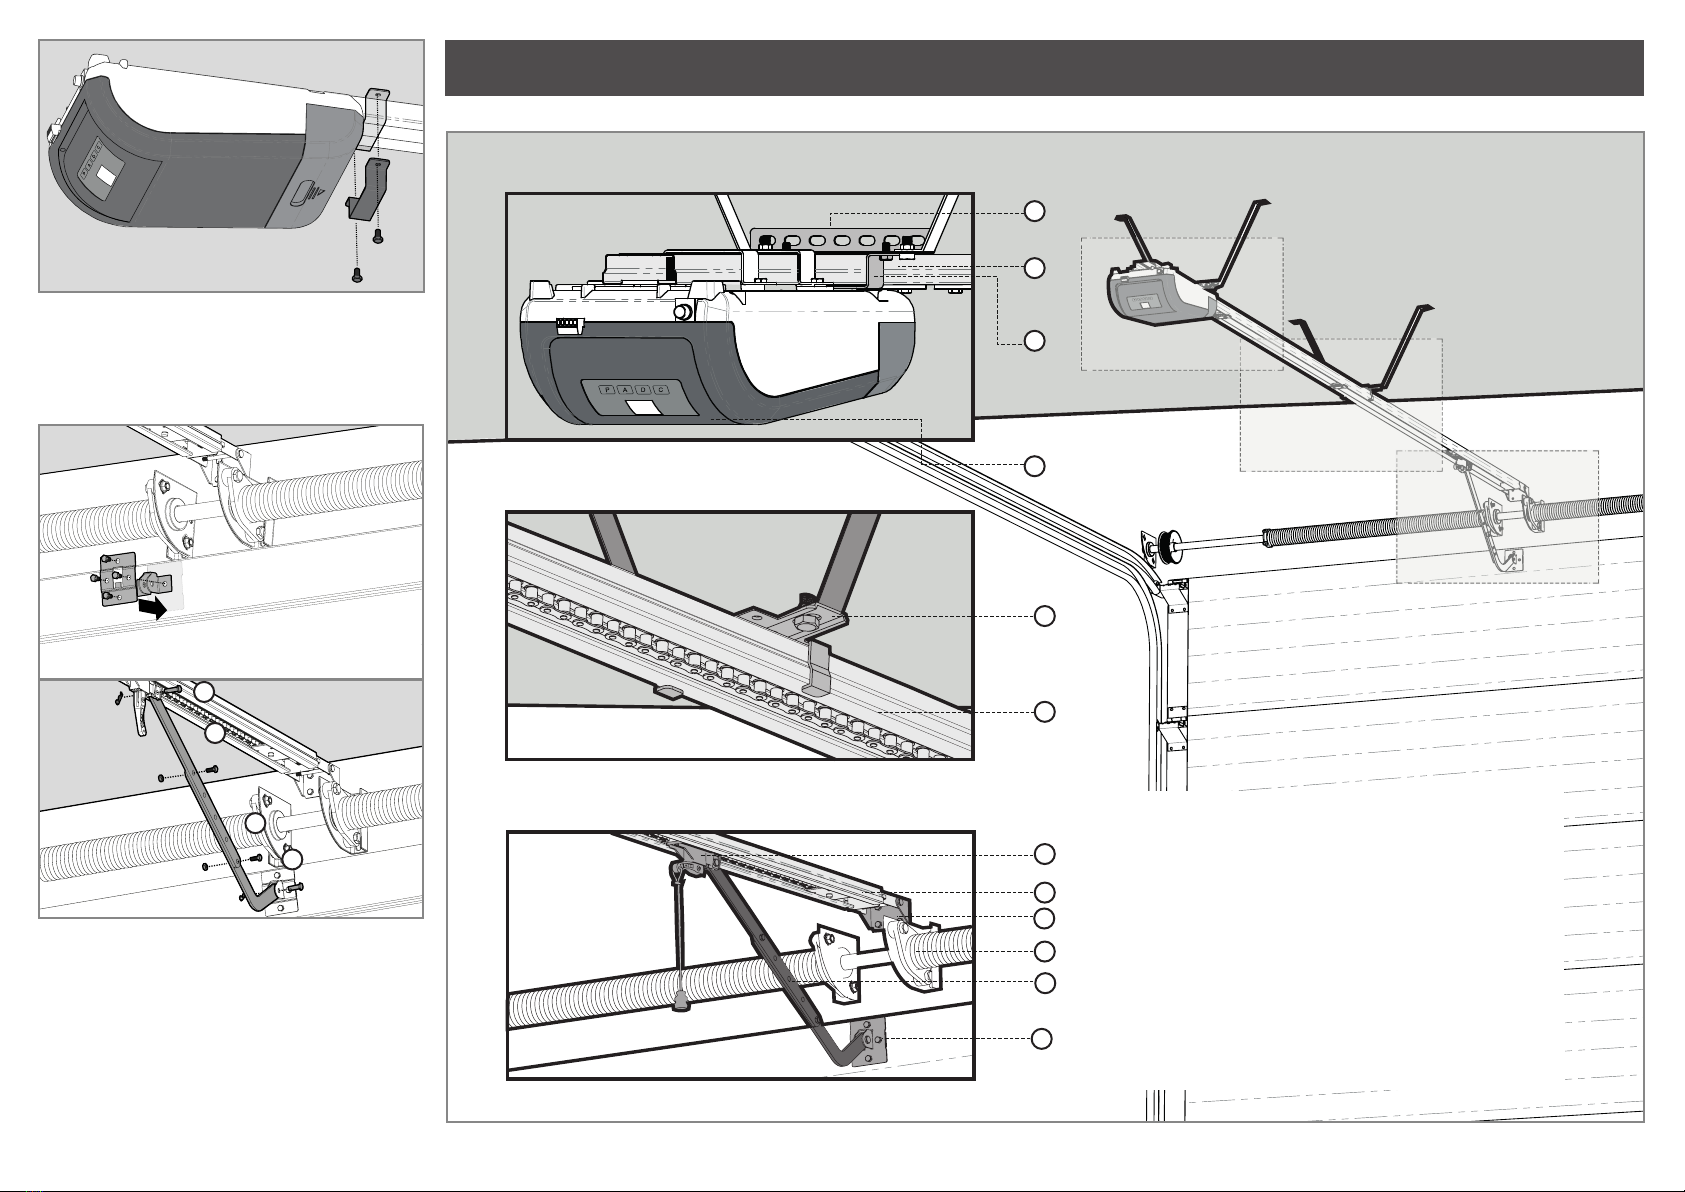
FIXING OF THE SUPPORT PLATE.....................................................
AUTOMATISM INSTALLATION............................................................
INSTALLATION MAP............................................................................
PROGRAMMING.....................................................................................
MENU FUNCTIONS.............................................................................
PROGRAMMING OPENING AND CLOSING COURSES............
PROGRAMMING OF THE AUTOMATISM FORCE LEVEL.................
ENABLE/DISABLE SAFETY PHOTOCELLS.......................................
PROGRAMMING THE SELF-CLOSING FEATURE......................
ENABLE/DISABLE CONDOMINIUM FUNCTION...............................
PROGRAMMING MAINTENANCE WARNINGS..................................
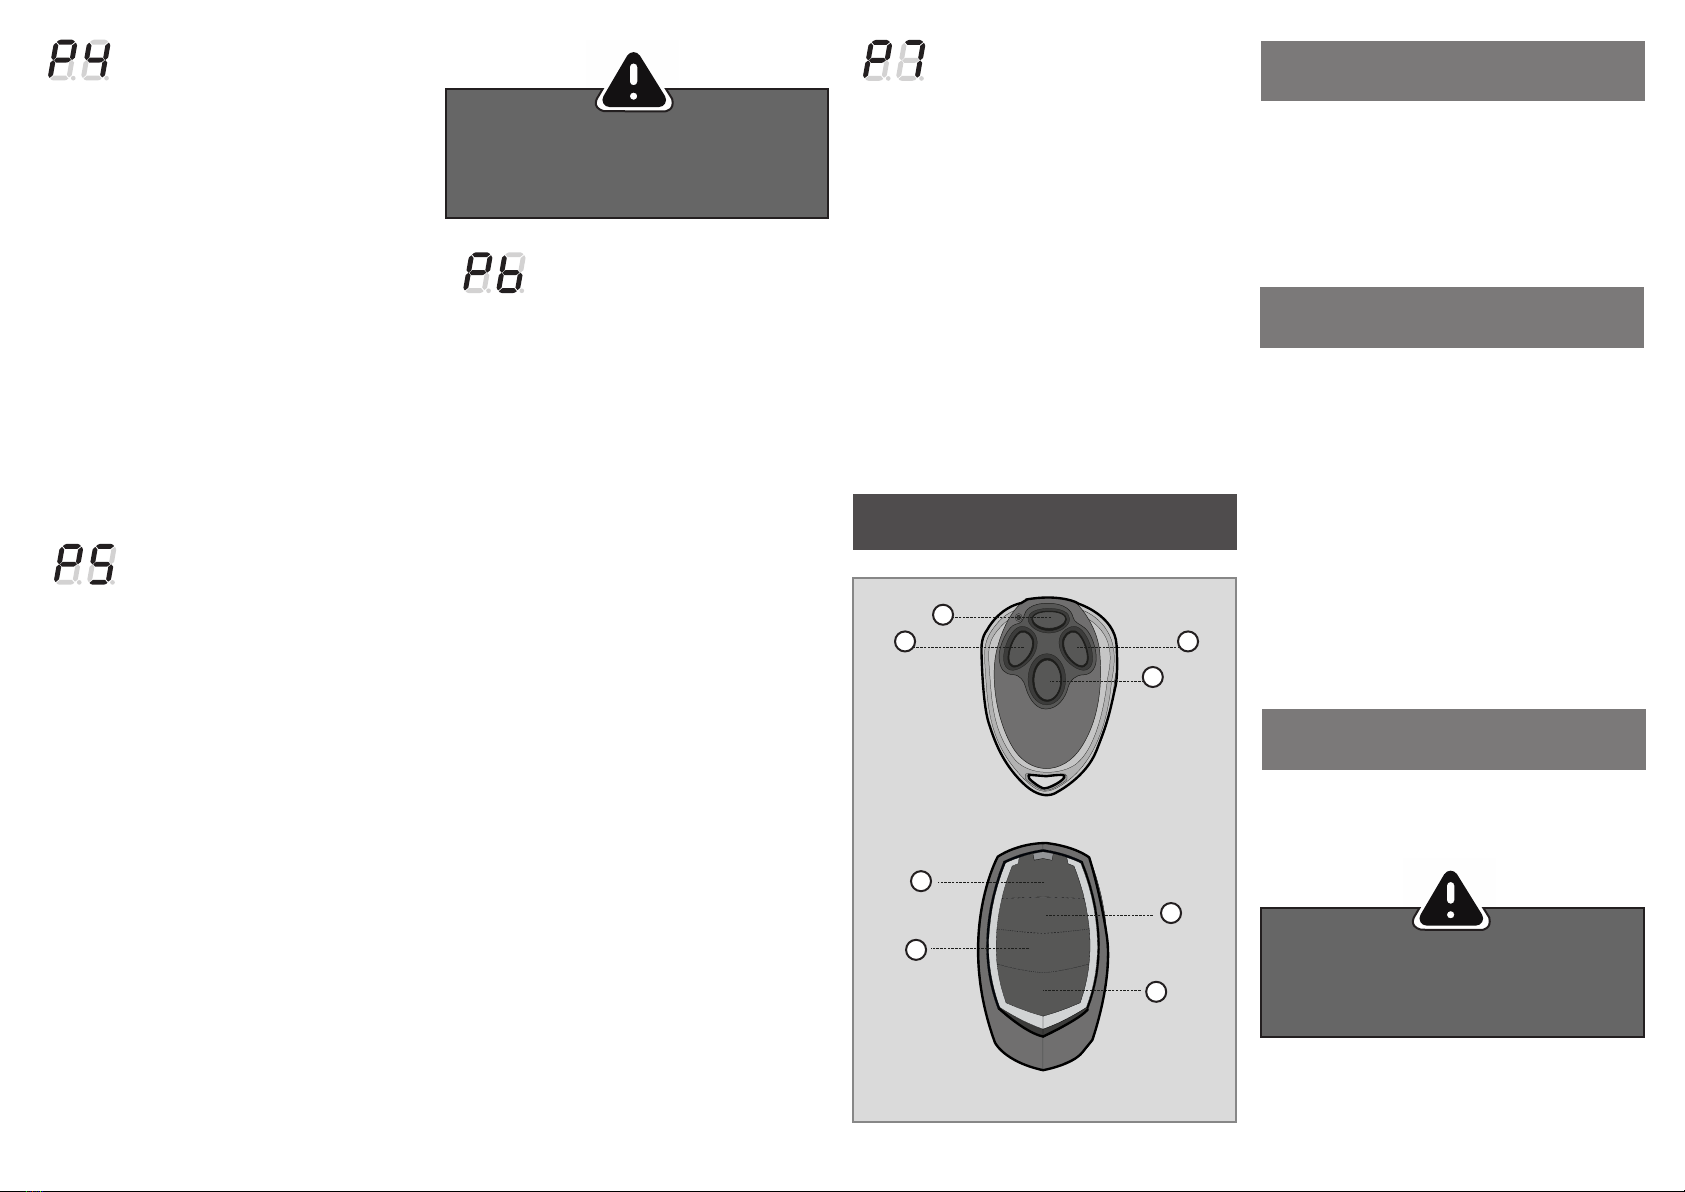
PROGRAMMING REMOTE CONTROLS................................................
STANDARDCONFIGURATION............................................................
CONFIGURATION THROUGH ALREADY CONFIGURED CONTROL
DELETE ALL CONFIGURED REMOTE CONTROLS..........................
POST- INSTALLATION.............................................................................
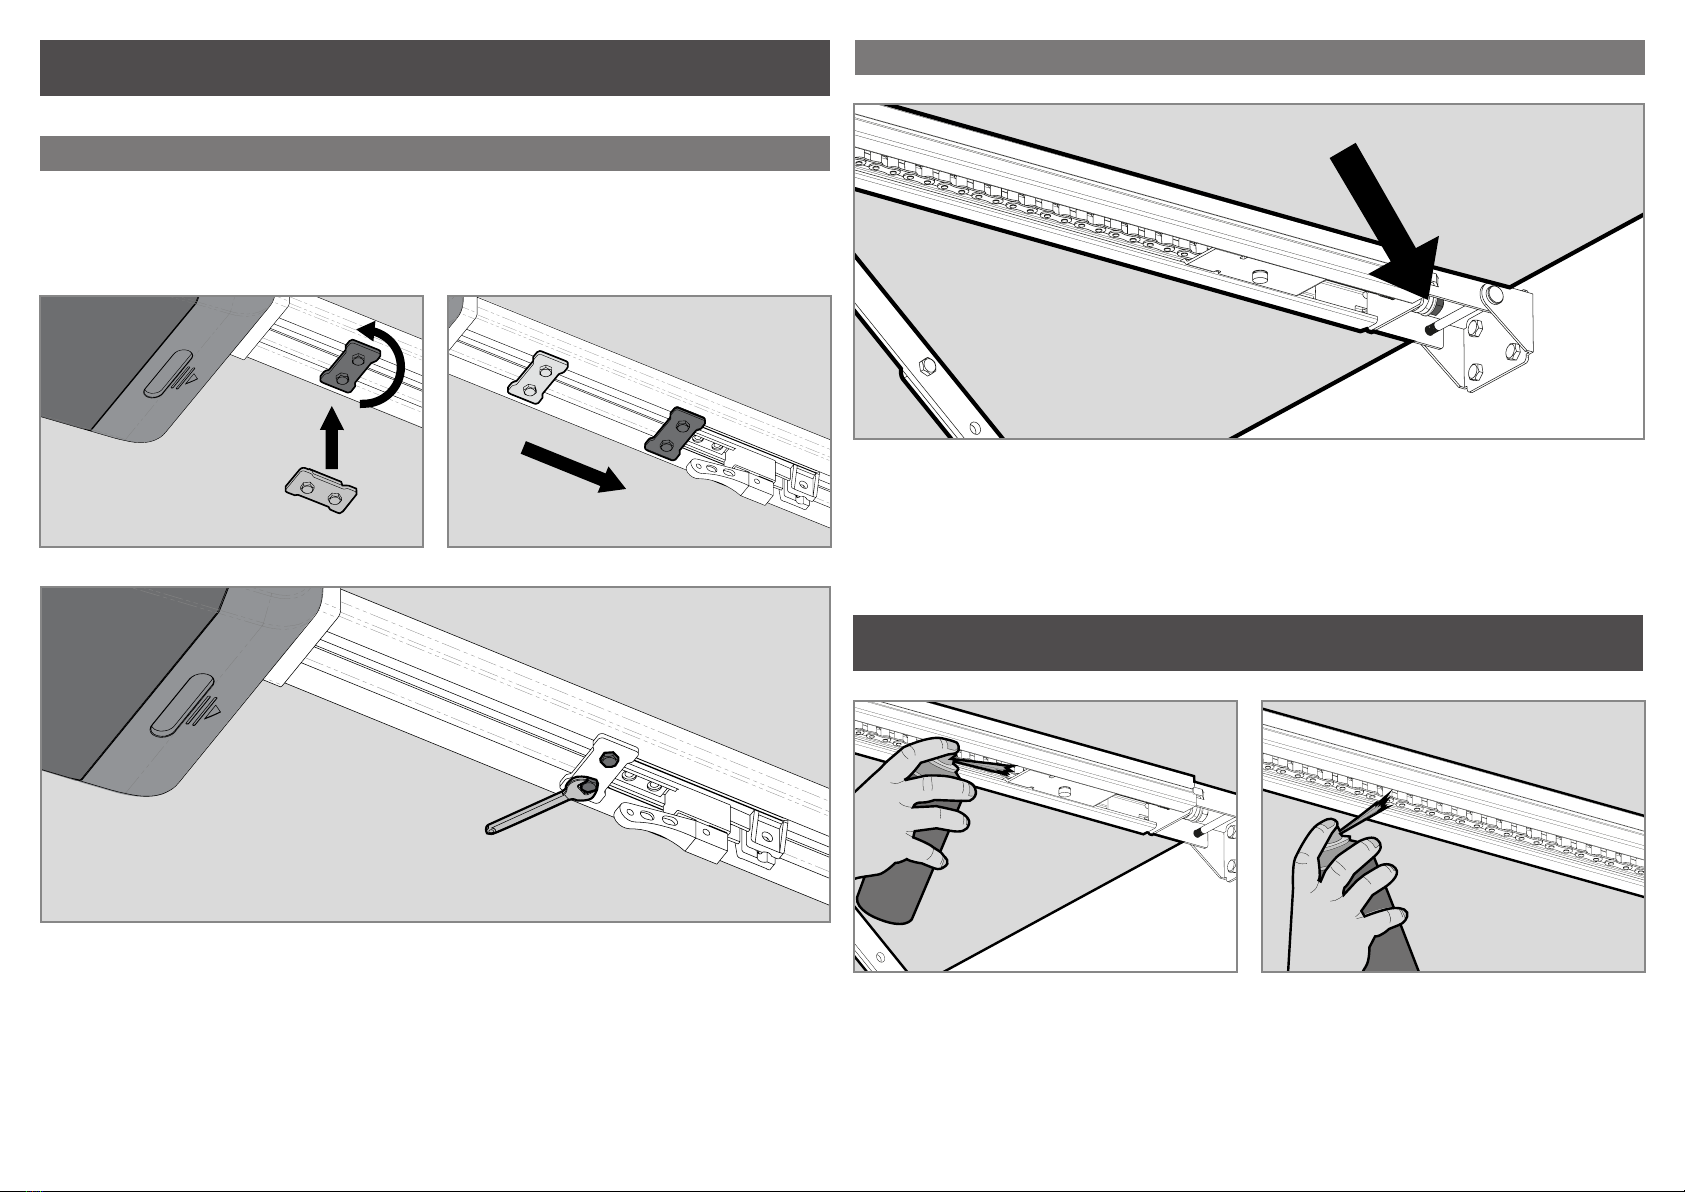
STOPPER AT THE OPENING............................................................
STRETCH RAIL’S CHAIN....................................................................
MAINTENANCE.......................................................................................
DIAGNOSIS...........................................................................................
TROUBLESHOOTING...........................................................................
CENTRAL CONNECTIONS..................................................................
2
3
3
3
4
4
4
4
4
5
5
6
7
7
7
7
7
8
8
8
8
8
8
9
9
9
9
9
10
11
13
• It is important for your safety that these instructions
are followed.
• Keep these instructions in a safe place for future re-
ference.
• The Supplier is not responsible for the improper use
of the product, or other use than that for which it was
designed.
cal wires, essentially on the power cable.
• When programming the control unit, pay particular
attention to touching only the location intended for that
purpose. Failure to do so may result in electric shock.
• The Supplier is not responsible if safety standards
were not taken into account when installing the equip-
ment, or for any deformation that may occur.
• The Supplier is not responsible for insecurity and mal-
function of the product when used with components
that were not sold by the them.
• This product was designed and manufactured strictly
for the use indicated in this manual.
• Any other use not expressly indicated may damage
the product and/or can cause physical and property
damages, and will void the warranty.
• Do not make any changes to the automation compo-
nents and/or their accessories.
• Keep remote controls away from children, to prevent
the automated system from being activated involunta-
rily.
• The customer shall not, under any circumstances, at-
tempt to repair or tune the operator. Must call qualified
technician only.
• The installer must have certified professional knowle-
dge at the level of mechanical assemblies in doors and
gates and control board programmation. He should
also be able to perform electrical connections in com-
pliance with all applicable regulations.
• The installer should inform the customer how to han-
dle the product in an emergency and provide him the
manual.
• This device can be used by children 8 year old or older
and persons whose physical, sensory or mental capa-
cities are reduced, or by persons without experience
or knowledge if they have received supervision or ins-
tructions on the use of the device in a safe manner and
understood the hazards involved. Children should not
play with the device. Cleaning and maintenance by the
user must not be carried out by unsupervised children.
• Before installing, the installer must verify that the tem-
perature range indicated on the operator is appropriate
to the location of the installation.
• Before installing, the installer must verify that the
equipment to be automated is in good mechanical
condition, correctly balanced and opens and closes
properly.
• If the operator is to be installed at a level higher than
2,5 m above ground level or other level of access, ,
should be followed the minimum safety and health re-
quirements for the use of work equipment workers at
work in Directive 2009/104/EC of the European Parlia-
ment and of the Council of 16th September of 2009.
• In the case of the equipment where the automation
will be installed, have a pedestrian door, be aware that
it must be closed when the operator is activated.
• After installation, make sure that the mechanism is
properly adjusted and that the protection system and
any manual unlocker works correctly.
• In order to protect the electrical cables against me-
chanical stress, you should use conduit for the electri-
This product is certified in accordance with
European Community (EC) safety stan-
dards.
This product complies with Directive
2011/65/EU of the European Parliament
and of the Council, of 8 June 2011, on the
restriction of the use of certain hazardous
substances in electrical and electronic
equipment.
(Applicable in countries with recycling
systems). This marking on the product or
literature indicates that the product and
electronic accessories (eg. charger, USB
cable, electronic material, controls, etc.)
should not be disposed of as other hou-
sehold waste at the end of its useful life.
To avoid possible harm to the environ-
ment or human health resulting from the
uncontrolled disposal of waste, separate
these items from other types of waste and
recycle them responsibly to promote the
sustainable reuse of material resources.
Home users should contact the dealer
where they pruchased this product or the
National Environment Agency for details
on where and how they can take these
items for environmentally safe recycling.
Business users should contact their ven-
dor and check the terms and conditions of
the purchase agreement.
This product and its electronic accessories
should not be mixed with other commercial
waste.
This marking indicates that the procut
and electronic accessories (eg. charger,
USB cable, electronic material, controls,
etc.) are susceptible to electric shock by
direct or indirect contact with electricity.
Be cautious when handling the product
and observe all safety procedures in this
manual.

3
10
11
12
1
2
3
4
5
67
8
9
1
2
700 (máximo)
366
209
132
170
450
240
158
1 • ROSSO motor (1x)
2 • Main rod (1x)
3 • Secondary rod (1x)
4 • Mounting bracket (4x)
5 • Unlocking string (1x)
6 • Motor’s fixing plate to the rail (3x)
7 • Rail’s fixing plate to the ceiling (1x)
8 • Rail’s fixing plate to the lintel (1x)
9 • Gate’s fixing plate (1x)
10 • Reinforcing plate for fixing plate to the gate (1x)
11 • Stopper (1x)
12 • Remote Controls (2x)
13 • Control stand (1x)
The unlock system is very simple and practical to use. To do this just pull the lever down. To block it simply pull the
lever to the original position. Together with the automatism it is also provided a string to apply on the unlock lever,
which makes it even a more practical and comfortable process.
Position 1 • Motor locked
Position 2 • Motor unlocked
The specifications of the operator are as follows:
The dimensions of the ROSSO operator are in
milimeters (mm) throughout the manual.
PACKAGE OPERATOR
ROSSO 60 ROSSO 100 ROSSO 120
• Power Supply AC 230V 50/60Hz AC 230V 50/60Hz AC 230V 50/60Hz
• Motor’s Power DC24V - 60W DC24V - 100W DC24V - 120W
• Velocity 140mm /seg 140mm /seg 140mm /seg
• Noise Level ≤56dB ≤56dB ≤56dB
• Force 600N 1000N 1200N
• Operating temperature -25°C a 70°C -25°C a 70°C -25°C a 70°C
• Thermal protection 120°C 120°C 120°C
• IP IP20 IP20 IP20
• Working frequence 70% 70% 70%
• Courtesy Light 2 minutos 2 minutos 2 minutos
• Maximum door area 10m² 15m² 18m²
• Memory 30 comandos 30 comandos 30 comandos
• Code Type Rolling Code Rolling Code Rolling Code
• Radio frequency 433,92Hz 433,92Hz 433,92Hz
MANUAL BRAKE RELEASE

4
• To change the lamp, remove the white light zone co-
ver, loosen the lamp, tighten a new compatible lamp,
and replace the cover.
• To replace the fuse, you must first unscrew it. Then
just pull it out. Repeat the same steps in reverse order
to fit a new fuse.
• The automation uses a 250V 3A fuse.
• The steel rail and automatism attachment must be
done using the plates and females M6 as shown
above. It must fasten the 4 screws.
• To remove the top cover, first undo the white cover of
the light zone. Then unscrew the 4 screws on the main
cover, and lift it up.
• To assemble it, simply reverse the process.
REMOVING TOP COVER SWITCH LAMP 24V 5W REPLACE FUSE INSTALLATION
FIXING THE MOTOR IN RAILS

5
125-175
100-150
• Attach the rail’s support plate to the lintel
• Observe the distance to be maintained between the
gate rail and support plate’s upper part from 125-175
mm.
• If you are unable to fix the rail to the ceiling for not re-
specting the measures above, there should be created
a solid structure to be able to fix the motor in correct
measurements.
• This structure may be fixed to the ceiling.
1 • Fasten the rail in the fixation plate already attached. To facilitate the task, you can do it with the rail inclined
(motor on the floor / support) which facilitates the installation.
2 • Place celling rail ‘s fixation plate roughly halfway
through the steel rail as shown.
3 • Raise up the motor until the rail is levelled
orizontally.
If necessary, you should create a support structure
to a solid surface as shown on the previous page, so
that the rail stays horinzotally aligned.
4 • Mark the holes in the ceiling plate and/or structure
and make the necessary holes to fix it.
FIXING OF THE SUPPORT PLATE
AUTOMATISM INSTALLATION
CEILING
SUPPORT

6
1
4
3
2
1
5
2
6
2
8
9
10
7
2
3
4
5 • After rising the rail and mark the holes, you should
fix the plate with screws.
After that, you should use bracket to reinforce the
attachment, this time near the motor.
6 • Attach the plates to the top of the door panel. The
rods must be centered horizontally with the panel so
that it stays aligned with the rail.
It should also be to fixed as higher as possible.
7 • Now attach the two connecting rods between the
trolley and the panel’s upper plate.
Use the screws and M8 nuts to tighten 2 rods together
(02 and 03), and 2 pins with pegs to fix them on the
trolley and the gate (01 and 04).
INSTALLATION MAP
SUBTITLE:
1 • ROSSO Motor
2 • Steel rail
3 • Rail to ceilling’s/struture’s fixation plate
4 • Bracket for structure fixing
5 • Fast rail to ceilling’s/struture’s fixation plate
6 • Trolley with unlocking system
7 • Rail to lintel’s fixation plate
8 • Connection arm between trolley and gate
9 • Fixation rod to the gate
10 • Shaft and sectional door springs

7
135
24
P
C
A
D
• When you turn the power on, the display shows a countdown from 99 to 11, and the courtesy lamp remains on
for 2 seconds.
• When the motor is in stand-by, the display shows --.
• When the motor is opening, the display always shows the OP message.
• When the motor is closing, the display always shows the CL message.
1 • Press P for 4sec to enter the programming menu.
2 • The display will show P1 and press P for 2sec once
to enter the submenu.
3 • The display will show OP.You can now set the aper-
ture limit using the A or D keys to adjust it.
4 • Press P for 2sec to confirm the open position.
5 • The display will show CL. You can now set the clo-
sing position using the A and D keys.
6 • Press P for 2sec to confirm the closing position.The
control panel saves the setting and exits programming
mode.
The lamp switches on for 2sec and the gate automa-
tically opens and closes to the programmed limits,
displaying the message OP during opening and CL
during closing. When you have finished closing the
control panel, you will exit to standby mode (--).
1 • Press P for 4sec to enter the programming menu.
2 • When P1 appears in the display, press the A key as
many times as necessary until the display shows P2.
3 • Press P for 2sec to access this submenu.
4 • The display will show a value between F1 and F9,
which identifies the force level at which the motor is
configured. Use the A or D keys to move over the
desired option, where F1 is the minimum force and F9
is the maximum.
5 • Press P for 2sec to save this option.
6 • The control panel will go into stand-by (-) mode and
the setup has been successful.
The control unit comes with the factory set F2 level.
1 • Press P for 4sec to enter the programming menu.
2 • When P1 appears on the display, press key A until
the display shows P3.
3 • Press P for 2sec to access this submenu.
4 • The display will show the value H0 or H1, which
identifies the option in which the control panel is
configured. Use the A or D keys to move to the desired
option, H0 deactivates the use of photocells and H1
activates it.
5 • Press P for 2sec to save this option.
6 • The control panel will exit to standby mode (-) and
the setup will be successful.
Functionality • When the use of photocells is active and
some obstacle crosses them when the door is closed,
the door will reverse the direction starting to open.
The use of photocells is deactivated at the factory (H0).
Conector links:
1 • Fireflies (max 5W)
2 • START
3 • Photocells
4 • GND (common)
5 • + 24V
The central control unit has a main menu that allows
access to all the different settings of the automatism.
Programming opening and closing courses
Programming of the automatism force level
Enable/disable safety photocells
Programming the self-closing feature
Enable / disable condominium function
Programming maintenance warnings
Programming remote controls using
already configured control
• Programming opening and
closing courses
• Programming of the
automatism force level
• Enable/disable safety
photocells
PROGRAMMING
If you connect a signaling lamp, this will blink during any gate’s movement cycle.
MENU FUNCTIONS
Start all programs from the stand-by mode (--)
If it stays more than 20sec without pressing any key, the controlboard will exit the
state and will automatically go to stand-by mode without saving any action.
Legend:
• Display
• Main Menu
• Programming transmmiters
• Up
• Down

8
1
1
3
3
4
4
2
2
• Programming the self-closing
feature
• Enable / disable
condominium function
• Programming maintenance
warnings
• Programming remote controls
using already congured control
1 • Press P for 4sec to enter the programming menu.
2 • When P1 appears on the display, press key A until
the display shows P4.
3 • Press P for 2sec to access this submenu.
4 • The display will show a value between 10 and 90,
which identifies the time in seconds that the engine is
in standby from when the opening is finished until the
automatic closing is started. Use the A and D keys to
move to the desired option.
5 • Press P for 2sec to save this option.
6 • The control panel will exit to standby mode (-) and
the setup will be successful.
The 00 option disables the automatic closing, so the
gate will only close if it receives an order from some
configured device.
Any other option sets the auto-closing time, the mini-
mum being 10 seconds (option 10) and the maximum
is 90 seconds (option 90).
1 • Press P for 4sec to enter the programming menu.
2 • When P1 appears in the display, press key A until
the display shows P6.
3 • Press P for 2sec to access this submenu.
4 • The display will show a value between C0 and C1,
which identifies the thousands of maneuvers to which
the engine will emit a maintenance warning light.
Use the A or D keys to move to the desired option.
5 • Press P for 2sec to save this option.
6 • The control panel will exit to standby mode (-) and
the setup will be successful.
Functionality • This warning is used to schedule revi-
sions to the operator, gate or springs after a number of
complete maneuvers (open-close-close-stops). When
the operator makes the number of maneuvers defined
in this submenu, the LEDs will blink intermittently for
two minutes in any maneuver performed to signal the
maintenance warning.
The C0 option disables the maintenance warning. Any
other option defines the thousands of maneuvers, the
minimum being 2000 maneuvers (option C1) and the
maximum is 18000 maneuvers (option C9).
Whenever you want to re-configure this submenu, you
must make two settings. In the first you must set the op-
tion C0 to make a RESET to the maneuver count and
then in the second set the desired option. The control
panel will then start counting the maneuvers to issue
the warning signal.
1 • Press P for 4sec to enter the programming menu.
2 • P1 will appear on the display and press the A key as
many times as necessary until the display shows P7.
3 • Press P for 2sec to access this submenu.
4 • The display will show the value L0 or L1 that identi-
fies the option in which the control panel is configured.
Use the A or D keys to move to the desired option.
5 • Press P for 2sec to save this option.
6 • The control panel will exit to standby mode (-) and
the setup will be successful.
Functionality • This menu allows you to activate or
deactivate the possibility of programming new remote
controls via an already configured remote control.
L0 means that this feature is disabled, and L1 means
that it is enabled.
1 • In stand-by (--) mode, press T until the display
shows SU.
2 • Press the desired remote control button 2 times un-
til the motor starts moving.
Repeat these steps whenever you want to configure
new remote controls.
Once you have a remote control already configured,
you can use it to open the remote control’s memory so
that you can configure new remote controls.
This allows easy setup without having to have direct
access to the motor.
1 • In stand-by (-) mode, press buttons 3 and 4 of an
already set remote control until the courtesy LEDs start
flashing. Drop the buttons now.
2 • Press the desired button of the new remote control
to be set up until the motor starts moving.
Repeat these steps whenever you want to configure
new remote control.
This function can be enabled or disabled via the control
display menu P7.
1 • Press P for 4sec to enter the programming menu.
2 • When P1 appears on the display, press key A until
the display shows P5.
3 • Press P for 2sec to access this submenu.
4 • The display will show the value B0 or B1 that identi-
fies the option in which the control panel is configured.
Use the A or D keys to move to the desired option.
5 • Press P for 2sec to save this option.
6 • The control panel will exit to standby mode (-) and
the setup will be successful.
Functionality • This feature causes the control panel to
ignore all orders sent by devices configured during the
opening route.
• If you press the command during opening, the
command is rejected and continues to open.
• Pressing the door fully open will close the door.
• If you press during closing, the gate reverses the di-
rection by starting to open.
When deactivated, you can control the opening or
closing of the gate whenever you want, and its beha-
vior is open-close-stop-stop-(...) each time you press
the control
STANDARD CONFIGURATION USING THE
T KEY ON THE DISPLAY
CONFIGURATION THROUGH ALREADY
CONFIGURED REMOTE CONTROLS
1 • In standby mode (--), press the T key for 10sec until
the display shows DL.
DELETE ALL CONFIGURED REMOTE
CONTROLS
The P4 and P5 functions, when activated, prevent
the gate to stay open. This
way the gate will always open completely, starting
the closure after the pause time
PROGRAMMING REMOTE CONTROLS
The control unit has a maximum capacity of 30
remote controls and only accepts Rolling Code
Remonte Controls!
[MX4SP]
[FALK]

9
The automatism needs a stopper in the opening and closing to always control the courses. In closing maneuvers,
the ground will be the stopper for the gate, but in the opening maneuvers it is necessary to create a stopper on
the steel rail, to ensure that the trolley always stop in the correct place.
The only maintenance required is lubricating the automatism and rail motion axes. The pinions at both ends of the
rails as well as their supporting bearings and chain should be lubricated at least once every year.
For a correct automatism function, the chain has to be very well adjusted. For that, you just need to tighten or
loosen the shadowed nut in the above picture with a wrench key, which will stretch or relieve the chain.
The chain can’t be too much stretched, or it will get too stuck and damage the gear and the motor, nor too loose
to the point of creating a sag in the middle and come out of the rail.The spring tensioner should never get fully
compressed, because it means that it is on is maximum tension!
1 •To install the opening stopper just apply it on the rail.
2 • The stopper must have a metal plate out of the rail and other on the inside, so when you fasten it, this is secure
in the pipeline.
3 •With the door completely open, push the stopper untill it touches the trolley.
4 • Fasten the two screws to hold the stopper in that exact position.
POST-INSTALLATION
MAINTENANCE
STOPPER AT THE OPENING
STRETCH RAIL’S CHAIN

10
In case of automatism failure or malfunction, you must detect the fail component (motor or central).To do that, you
should test the motor directly connected to a 24V DC power source, in order to understand if this works.
Just disconnect the two motor cables which connect to the central and connect them directly to a 24V DC battery.
Motor cables have no specific way of connection. The only difference is that if you connect the motor in one way,
it will rotate in one direction, and if you connect the wires in the oppose it will rotate in the other direction.
DIAGNOSIS
CONNECTING THE ENGINE TO 24V BATTERY

11
TROUBLESHOOTING
Erro Descrição do erro Causa Resolução do problema
ERRO DE ENCODER
•
A central não recebe informação do encoder instalado no
motor. • Ficha de ligação do encoder. • Verifique se a ficha está bem ligada.
• Motor não funciona e o encoder não faz leitura. • Testar com bateria para ver se o motor funciona.
• Encoder não funciona/está desligado. • Testar com outro encoder.
• Central de dígitos não envia sinal para a central base. • Testar com outra central de dígitos.
• Central base não dá saída de energia para motor funcionar.
• Testar com outra central base.
MEMÓRIA CHEIA
•
É impedido de programar um novo comando (nº31). • A memória está cheia (30 comandos). •No caso de não utilizar os comandos memorizados,
limpe a memória existente.
• Se tem 30 comandos programados e quer adicionar
mais, instale uma recetora exterior (MR5SP).
TEMPO DE TRABALHO
EXCESSIVO
•
O motor pára o seu funcionamento. Em programação não grava
o curso. • O motor esteve mais de 1 minuto em funcionamento
contínuo. • O motor não suporta um tempo de trabalho superior
a 1 minuto. No caso de tentar fazer uma programação
com um curso superior a 1 minuto este não será
memorizado. Volte a fazer a programação do curso sem
que este exceda 1 minuto.
ERRO DE CURSO
• Tentar programar o fecho antes da abertura.
• Motor de calhas de ferro (CF) mas com calhas de aluminio (CA) instaladas ou o contrário (motor CA e calha CF).
• Verificar se ao pressionar seta
A
sobe a porta e surge OP no display.
• Verificar se ao pressionar
D
desce aporta e surge CL no display.
• Trocar fio vermelho pelo fio preto do motor.
CARGA EXCESSIVA • Sobrecarga no motor devido a peso excessivo do portão.
• Esforço em demasia. Ao programar o motor (tempo de trabalho, Menu P1), o portão ficou em demasiado esforço contra o
batente de abertura ou contra o chão.
• Refazer a programação do curso sem esforçar
demasiado contra os batentes.
Error Error Description Cause Solving the problem
ENCODER ERROR • The control board does not receive information encoder
installed on the motor. • Encoder’s plug. • Make sure the plug is fully inserted.
• Motor does not work and the encoder does not scan. • Test battery to see if the motor is running.
• Encoder does not work/is off. • Test with another encoder.
• Digit control board does not send signal to the base
control board. • Test with another digits control board.
• Base control board does not send power to motor. • Test with another base control board.
MEMORY FULL
• It is unable to program a new remote controls (# 31).
• The memory is full (30 remote controls). • In case of not using the memorized remote controls,
clear the existing memory.
• If you have 30 programmed commands and want to
add more, install an external receiver (MR5).
EXCESSIVE WORKING TIME • The motor stops functioning. During programming does not
record the course. • The engine is more than 1 minute in continuous operation. • The motor does not support a working time exceeding
1 minute. In the case of trying to make a program
exceeding 1 minute it will not be stored. Reprogram the
course without exceeding 1 minute.
COURSE ERROR
• Trying to program the closure before opening.
• Iron rails motor (CF) with aluminum rails (CA) installed or the opposite (CA motor with CF rail)
• Check if, by pressing the arrow
A
, the door goes up and the display shows OP.
• Check if, by pressing the arrow
D
, the door goes down and the display shows CL.
• Swap the red wire with the motor’s black wire.
EXCESSIVE LOADING • Excessive loading in the motor due to gate’s excessive weight.
• Too much effort. When programming the motor (working time, P1 Menu), the gate was in too much effort against the opening
stopper or against the floor.
• Redo the course programming without putting too
much effort against the stoppers.

12
TROUBLESHOOTING
Todas as centrais possuem LEDs que
permitem facilmente concluir quais os
dispositivos com anomalias.
Todos os LEDs dos dispositivos de segurança
(DS) em situações normais permanecem
acesos.
Todos os LEDs de circuitos “START” em
situações normais permanecem apagados.
Caso os LEDs de dispostivos não estejam
todos ligados, existe alguma avaria nos
sistemas de segurança (fotocélulas, bandas
de segurança).
Caso LEDs “START” estejam ligados, existe
algum dispostivo de emissão de comandos a
emitir um sinal permanente.
A) SISTEMAS DE SEGURANÇA:
1 • Feche com um shunt todos os sistemas
de segurança da central (deve consultar o
manual da central em questão).
Caso o automatismo comece a trabalhar
normalmente, analise qual o dispositivo
problemático
2 • Retire um shunt de cada vez até descobrir
qual o dispositivo com avaria.
3 • Troque esse dispositivo por um
funcional, e verifique se o automatismo
funciona corretamente com todos os outros
dispositivos. Caso encontre mais algum
defeituoso, siga os mesmos passos até
descobrir todos os problemas.
B) SISTEMAS DE START:
1 • Desligue todos os fios ligados no conetor
START.
2 • Se o LED apagou, tente voltar a ligar um
dispositivo de cada vez até descobrir qual o
dispositivo avariado.
NOTA:
Caso os procedimentos descritos nas alíneas
A) e B) não resultem, retire a central e envie
para os serviços técnicos para diagnóstico;
1 • Analisar condensadores,
fazendo teste com
condensadores novos;
2 • Caso o problema não seja
dos condensadores, desligue os
motores da central e teste-os
ligados diretamente à corrente
para descobrir se estão avariados
3 • Caso os motores funcionem,
o problema está na central.
Retire-a e envie para os serviços
técnicos para diagnóstico;
4 • Caso os motores não
funcionem, retire-os e envie
para os serviços técnicos para
diagnóstico.
1 • Abra a central e verifique
se tem alimentação a
230V/110V/24V;
2 • Verifique os fusíveis de
entrada da central;
3 • Desligue os motores da
central e teste-os ligados
diretamente à corrente para
descobrir se este está avariado
4 • Caso os motores funcionem, o
problema estará na central.
Retire-a e envie para os serviços
técnicos para diagnóstico;
5 • Caso os motores não
funcionem, retire-os do local
de instalação e envie para
os serviços técnicos para
diagnóstico.
1 • Remove the top cover of the
engine;
2 • Measure the 24V
transformer’s output to detect
the location of the malfunction;
A) Has 24V:
1 • Make sure the central is
supplying the motor to detect
whether the fault is in the engine
or in the central. Replace the
damaged component or send to
Motorline facilities for diagnosis
and repair.
B) Doesn’t have 24V:
1 • Check the 230V transformer
input. If you can measure 230V
on the input, the transformer is
the problem. If not, the problem
is the fuse, electrical cables or
electrical current itself. Check all
systems.
1 • Give a start on the transmitter
to open and check the LEDs
behavior.
2 • If it blinks twice, then the
connection with the photocells
is having problems. Check all the
photocells circuit connection.
3 • If it flashes three times, then
the service door connection is
having problems. Check all the
door’s connection circuit.
1 • Turn off the central’s motor
and test it directly connected
to a 24V battery to find the
malfunction (see page 12.B)
2 • If the engine operate, the
problem is in the central.
Pull it out and send it to the
MOTORLINE technical services
for diagnosis;
3 • If the motor does not work,
remove it and send it to the
MOTORLINE technical services
for diagnosis.
1 • Make sure the display and the courtesy
LEDs are connected and to see if it has power;
2 • Check if the photocells have power supply
from the control board. If not, check the fuse
nºFUSE FT (see page 14);
3 • Go to the menu on the display and disable
the photocells and the service door;
4 • Try to close;
A) It closed:
1 • Problem is in one of these two systems.
Activate the photocells and make sure the
gate closes. If it closes, the problem will be
on the service door. Activate it from the menu
and try to close the gate to be sure.
B) Didn’t close:
1 • The problem is in the motor or in the
central.Give the order to close the gate while
measuring the output power from the central
to the engine.
If you have 24V, the center is working and the
problem is in the engine.
2 • If it does not have power, the problem
remains in the centralboard.
1 • Check if there is
any obstacle in front
of the photocells;
2 • Chech if the
photocells are
working. Put your hand in front of
their infrared link, and check if the
relay makes noise.
3 • Check if any of the gate’s control
devices (key selector, push button,
video intercom, etc.) are locked and
sending permanent sign;
Anomaly Procedure Actions Procedure II Discovering the origin of the problem
• Motor does
not work
• Verify that you have
connected to 230V
power to the automa-
tion and if the fuse is
working properly.
• Still not working • Consult a qualified techni-
cian.
• Make sure the pe-
destrian service door
is securely closed.
• Still not working • Consult a qualified techni-
cian.
• Motor does
not move but
makes noise
• Unlock the engine
and move the gate
manually to check for
mechanical problems
on the gate.
• Encountered any
problems?
• Consult an gate’s techni-
cian.
1 • Check all the motion axes and the movement systems associated to the gate and the automatism (rails,pulleys, bolts, hinges, etc.) to find
out he problem. Also make sure the springs are in good condition and are able to withstand the gate.
• The gate moves
easily?
• Consult a qualified techni-
cian.
• Motor opens
but does not
close
• Gate has opened
but did not close.
• Consult a qualified techni-
cian.
NOTE • With the gate open, if you give the order to close and you have some
obstacle in front of the the photocells, Lampe blink twice.
During closing, if it invert for stress detection, blink once.
• Motor does
not the full
itinerary
• Unlock motor and
move gate by hand to
check for mechanical
problems on the gate.
• Encountered any
problems?
• Consult an gate’s techni-
cian.
1 • Check all the motion axes and the movement systems associated to the gate and the automatism (rails,pulleys, bolts, hinges, etc.) to find
out he problem. Also make sure the springs are in good condition and are able to withstand the gate.
• Is the gate moving
easily?
• Consult a qualified techni-
cian.
1 • Remove the top cover of the
engine;
2 • Measure the 24V
transformer’s output to detect
the location of the malfunction;
A) Has 24V:
1 • Make sure the central is
supplying the motor to detect
whether the fault is in the engine
or in the central. Replace the
damaged component or send to
facilities for diagnosis and repair.
B) Doesn’t have 24V:
1 • Check the 230V transformer
input. If you can measure 230V
on the input, the transformer is
the problem. If not, the problem
is the fuse, electrical cables or
electrical current itself. Check all
systems.
1 • Give a start on the transmitter
to open and check the lamp
behavior.
2 • If it blinks twice, then the
connection with the photocells
is having problems. Check all the
photocells circuit connection.
3 • If it flashes three times, then
the service door connection is
having problems. Check all the
door’s connection circuit.
1 • Turn off the central’s motor
and test it directly connected
to a 24V battery to find the
malfunction
2 • If the engine operate, the
problem is in the central. Pull it
out and send it to the technical
services for diagnosis;
3 • If the motor does not work,
remove it and send it to the
technical services for diagnosis.
1 • Make sure the display and the courtesy
Lamp are connected and to see if it has
power;
2 • Check if the photocells have power supply
from the control board. If not, check the fuse
nºFUSE FT;
3 • Go to the menu on the display and disable
the photocells and the service door;
4 • Try to close;
A) It closed:
1 • Problem is in one of these two systems.
Activate the photocells and make sure the
gate closes. If it closes, the problem will be
on the service door. Activate it from the menu
and try to close the gate to be sure.
B) Didn’t close:
1 • The problem is in the motor or in the
central.Give the order to close the gate while
measuring the output power from the central
to the engine.
If you have 24V, the center is working and the
problem is in the engine.
2 • If it does not have power, the problem
remains in the centralboard.
1 • Check if there is
any obstacle in front
of the photocells;
2 • Chech if the pho-
tocells are working.
Put your hand in front of their
infrared link, and check if the relay
makes noise.
3 • Check if any of the gate’s control
devices (key selector, push button,
video intercom, etc.) are locked and
sending permanent sign;
1 • Verify that the gate tests were
well done;
2 • Change the force on P2 menu
until the engine move the gate
without changing direction;
3 • This adjustment must be
made so that the gate when
meeting an obstacle inverts his
direction (left illustration);
4 • If even at his maximum
strength (F9) the problem still
remains, test the motor directly
connected to a 24V battery to
see if it has the strength to open/
close the door completely;
5 • Change the force on P2 menu
until the engine moves the gate
without changing direction;

Recetora
433,92Hz
Encoder
GND ANT
13
12/24v
0v
CH1-a
CH1-b
1 2 3 4 5
CONETOR1*
MR17
MR13 + MX13
ON
1 2
ANT
1 2 3 4 5 6 7 8 9 1110 12 13
STRSECSIGNL R G B + -
SAFETYINIB
+
--
+
ON
1 2 3
CENTRAL CONNECTIONS
Pushbutton/Key
Selector
230V
Power Supply
Fuse
3A 250V Earth wire
Transformer
IN:230V OUT:24V
MOTOR
(max 240W)
CONTROL
BOARD
DISPLAY
BOARD
2 Batteries 12V
*CON1:
1 • FLASH (max: 24V 5W)
2 • PB
3 • PE
4 • GND
5 • +24V (max: 1,5W)
Photocells Lightbulb External Receiver
Outdoor Antenna
Courtesy
Lamp
Option 1 - Pedestrian Door
Contact (NC)
24V
5W max
or
This manual suits for next models
2
Table of contents
Other Portamatik Gate Opener manuals
Popular Gate Opener manuals by other brands

V2
V2 ATRIS-700 user manual

PowerTech
PowerTech PL500 user manual

Chamberlain
Chamberlain TPD10-05 Mechanical and Electrical Installation Manual

Chamberlain
Chamberlain LiftMaster PROFESSIONAL LYN300 instructions

SEA
SEA LYRA Fitting and Connection Instructions

Infineon Technologies
Infineon Technologies IR HiRel RIC74424EVAL1 user guide