Portek CHARGER Service manual

ALWAYS WEAR SAFETY CLOTHING IN
CONJUNCTION WITH HAND, EYE, HEARING
AND FOOT PROTECTION TO
HSE/EN SPECIFICATIONS
Operator’s
Handbook
portek.co.uk

SAVE THESE INSTRUCTIONS FOR FUTURE REFERENCE
Please refer to the safety instructions, assembly instructions and parts list before setting-up, operating,
maintaining and cleaning the Charger Logsplitter. Keep this Instruction Manual safe so you may refer to
it at any time.
Safety Rules
WARNING
Read and understand all the instructions before use.
Failure to follow the instructions in this manual may cause
electric shock, fire or other injury.
This machine is strictly to be operated by one person.
WARNING:
When using this
machine, basic safety
precautions should
be followed to reduce
risk of personal injury
and machine damage.
Read all instructions
thoroughly before
attempting to operate
the machine.
2
Safety information
Essential Equipment for Your Protection
The Charger complies with all current safety standards. For your safety You
must wear full protection as specified below.
Head, eye and hearing protection
Eye protection to EN166 – B
Hearing protection to EN 352-1: 2002
Face protection visor recommended
Hand protection
Gloves to EN 12477:2001
Foot protection
Boots to EN 20345:2011
Leg protection
Sturdy full length trousers - ideally to
EN381 standard
Portek cannot be held liable for any injuries or
damages that may occur, if the Charger is used in
any inappropriate way, and/or if the device has been
modified in any way.
© Copyright 2018
Nothing within this edition may be copied, reproduced
or stored onto a retrieval system without the written
approval of Portek. Specifications, descriptions and
illustrative material in this manual are as accurate as
known at the time of publication, but are subject to
change without notice.

1. Keep the workplace free from obstacles which could cause an accident. Ensure a clear working area of at least
1.5m is maintained to eliminate trip hazards from logs or tools.
2. Do not expose the Charger Logsplitter to rain. DO NOT use the Charger Logsplitter in damp or wet locations.
3. Keep children away from the Logsplitter. Children should never be allowed in the work place, or operate the
machine or tools.
4. Store your Charger Logsplitter in a dry and dust free environment.
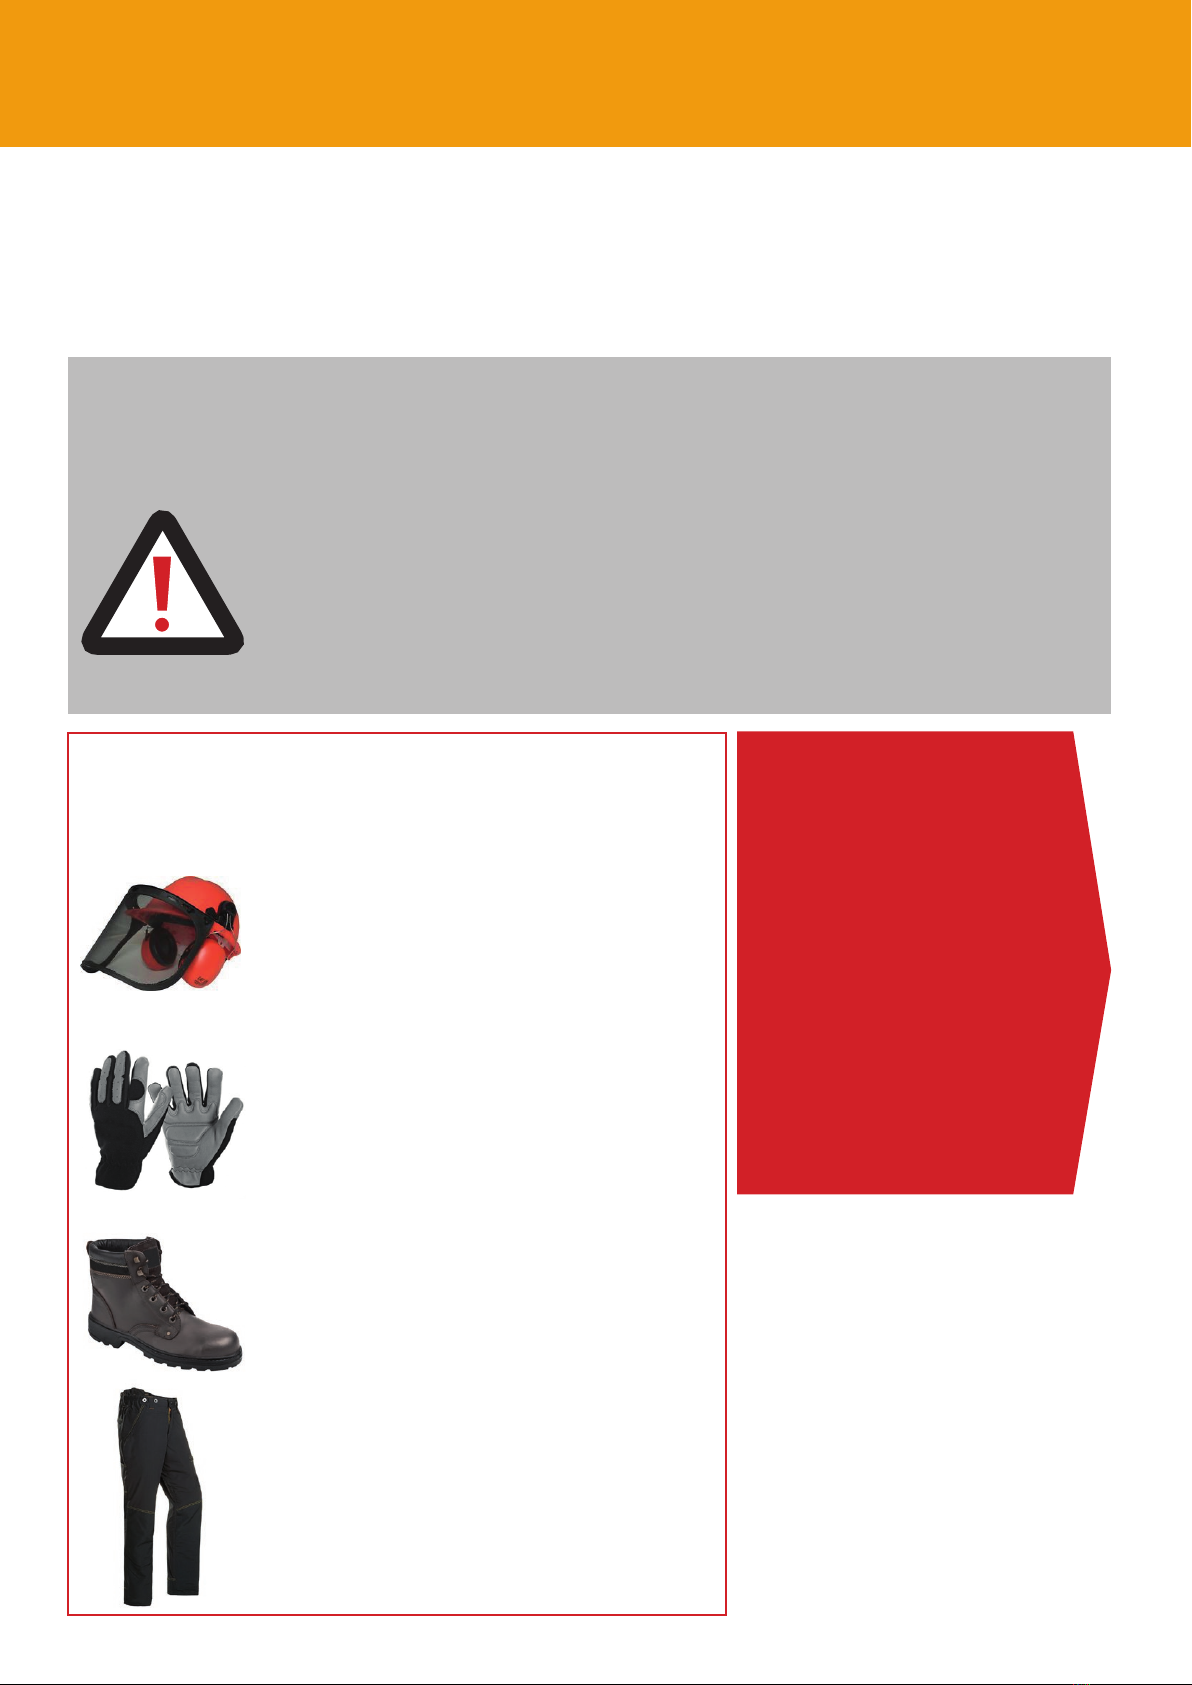
5. Dress appropriately. Do not wear loose clothing, jewellery or anything that could be caught by the moving parts.
Protective clothing and slip-resistant shoes are recommended when operating the machinery. Wear protective hair
covering to secure long hair.
6. Safety equipment must be used. When operating the Charger Logsplitter, protective strike-resistant certified
goggles, earplugs, working gloves and boots should be worn, see page 2.
7. Maintain the Charger Logsplitter and tools with care. Follow the instructions for lubricating, cleaning and parts
replacement. Keep handles clean, dry and free from oil and grease.
8. STAY ALERT! Look at what you are doing. Keep your judgement. Do not operate when you’re tired.
9. Check all parts. Before using the Charger Logsplitter, any damaged part should be carefully checked to determine
that it will operate properly and perform its intended function. Check all fasteners and tighten as necessary.
Any damaged parts should be repaired or replaced by a qualified technician.
10. Only genuine Charger Logsplitter accessories and parts can be used as replacements.
Using accessories and parts other than those recommended may cause the quality guarantee to be invalid.
11. Do not operate the machine if intoxicated with alcohol or drugs. If you’re taking prescribed drugs, make sure your
judgement and reactions are unaffected. If there is any doubt about this do not operate the Charger Logsplitter.
12. MAINTENANCE. For your own safety, the care and maintenance of the Charger Logsplitter should be on a regular basis.
13. WARNING! When operating, all persons, apart from operator, should keep at least 5m away from the Charger
machine, to avoid injuries by wood or debris. Only one operator is allowed to operate the machine at any one time.
14. CAPACITY. Do not try to split wood more than the specified size. If the wood can’t be split, take the wood out from the
machine and cut it into smaller sizes or split it by other means. For full specification and capacity, see page 9.
15. This machine can only be used to split wood. Splitting other material or using the Charger Logsplitter in other
ways may cause injuries or damage to property and invalidate any guarantee.
16. Care should be taken placing and removing logs from the log splitter as the splitting wedge has a sharp edge.
17. Always place the logs centrally on the cutting area. Hint: Logs split easier if the narrower diameter (towards top of
tree) is nearest the splitting wedge.
18. ATTENTION: the warnings, alerts and instructions in this manual cannot cover all situations. The operator must have
basic common sense and caution at all times.
19. ATTENTION: do not leave the Charger Logsplitter running unattended.
20. Use of a residual current device is recommended.
3
Important safety information
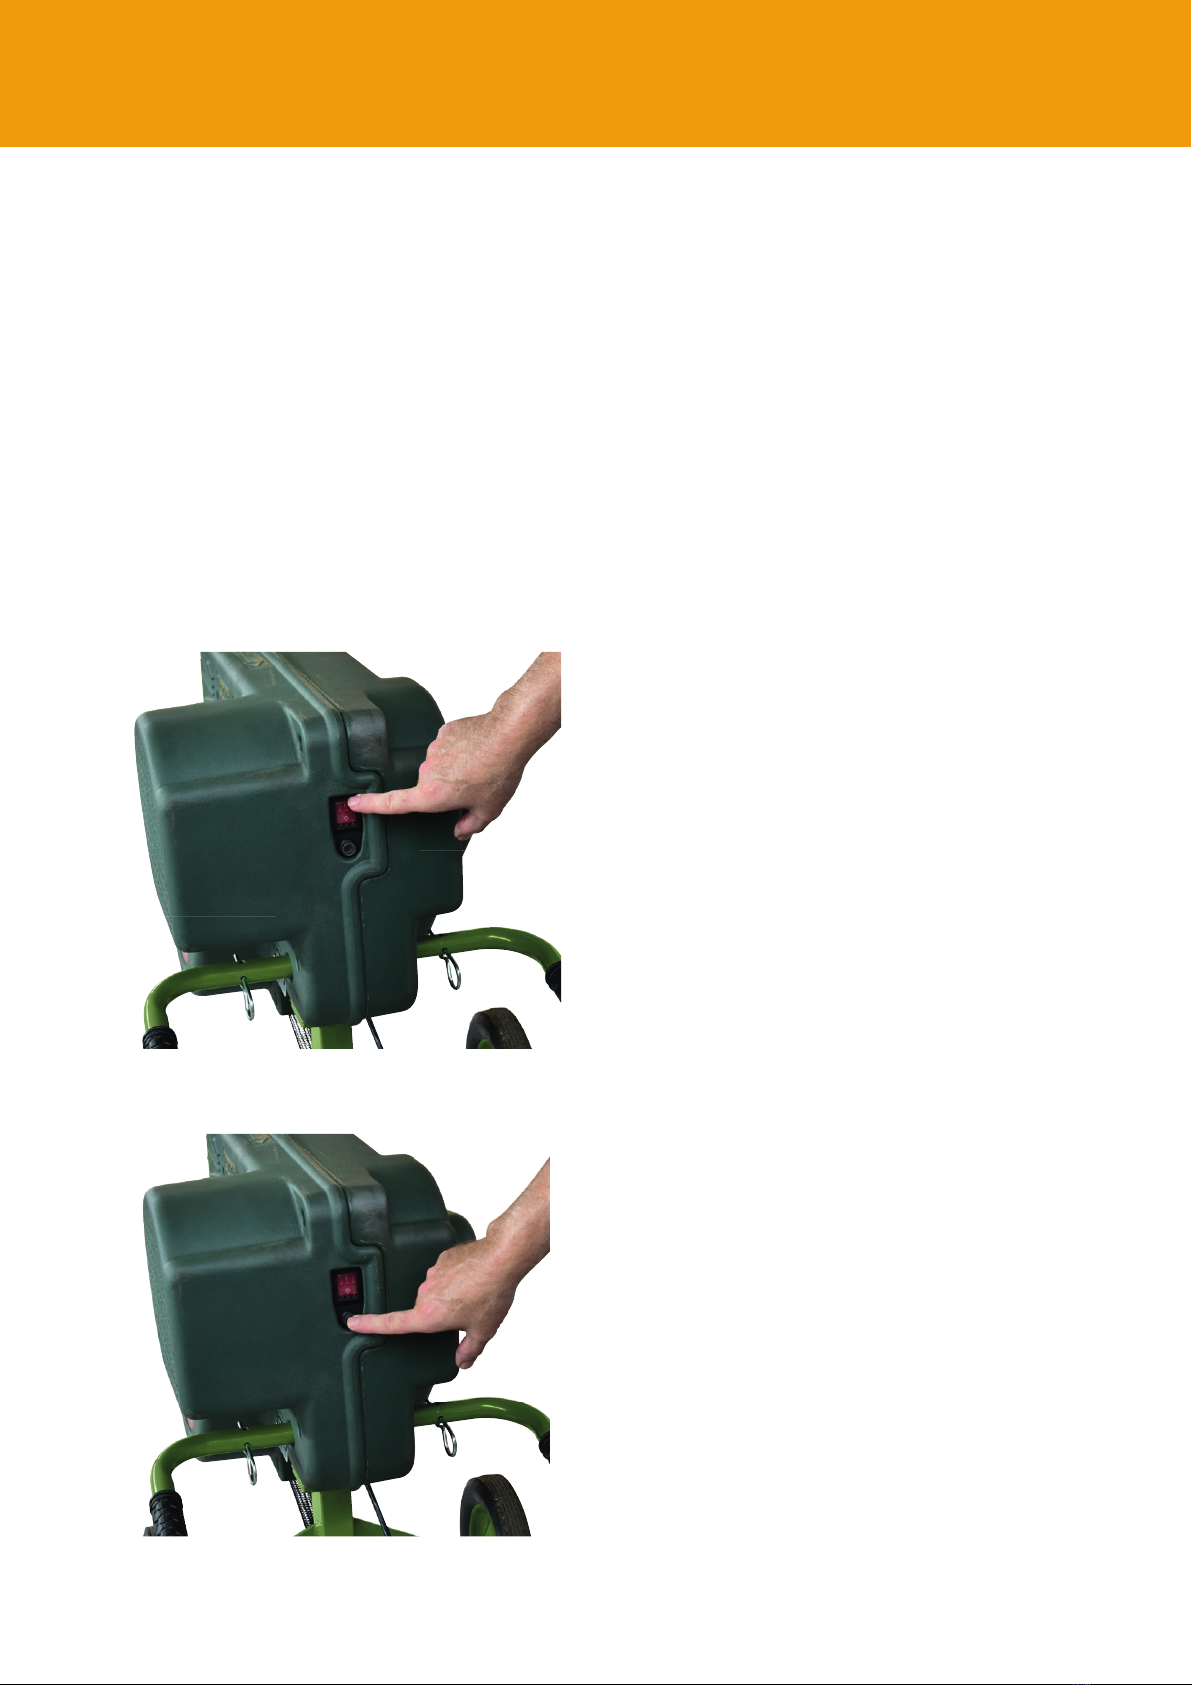
The Charger MUST be
operated from the back of
the machine as shown
This enables complete control of the
splitting process.
The Charger MUST be
operated from the back of
the machine as shown

Attach the operating levers to the outside of the arms as
shown using the 4 bolts, washers and nuts supplied. Ensure
that handle grips are facing forward and the fixings are
tight before use
Attach the front
support using the 2
bolts, washers and
nuts supplied
Once the front support and the wheels are
attached, connect the long return spring
Lifting Handles shown in
typical transit position.
Remove R clip and
rotate as shown below
Attach the wheel assembly
using the 2 bolts, washers
and nuts supplied
Remove the Charger from the packaging -
the unit is heavy so a 2 person lift is required.
Front Support
Operating Handle 1
On and Off Switch
Reset Button
Operating Handle 2
Splitting Wedge
4
Setting up

Preparation
Transport the machine to a designated work place on flat, even ground. This can be done
by using the lifting handles and wheeling it to your work area. If you need to lift the whole
machine this can easily be done using front support handle and the lifting handles in the
horizontal position. When operating the machine, move the lifting handles to the upright
position.
For best operation the Front Support should be fixed to the ground to ensure stability. Check
all moving parts are attached and fixed securely. Please check your Charger Logsplitter and
contact your supplier immediately if any parts are incomplete or if you are unsure.
Use the rocker switch to turn the machine on
and off. This starts the motor to drive
the flywheels.
The Charger Logsplitter features a reset button.
The electrical system will automatically cut-out
if overloaded due to excessive power being
used.
If the system has tripped:
1. Ensure the unit is free from obstructions
2. Switch the machine off with rocker switch
3. Wait 20-30 seconds and press restart button
4. Restart machine with the rocker switch
5
Controls and main features

Plug the Charger into power supply. Use of a circuit protection breaker is recommended.
6
Operation
IMPORTANT OPERATING PROCEDURE
NEVER OPERATE THE CHARGER FROM THE SIDE
Before use, familiarise yourself with the operating sequence by
practicing without logs. The log must be placed resting against
the splitting wedge.
The Charger is a robust machine comprising heavy duty components.
The levers must be moved positively to ensure smooth operation.
Don’t be timid using the operating levers.
A rapid movement of the handles are necessary for the rack and pinion to engage and disengage fully
without damage. The handles should never be stopped in any location between the fully forward or
fully backward positions.
When placing a log onto the
Charger, ensure it is positioned
length-ways and not horizontally
and aligned centrally with the
splitting wedge
Before use, familiarise yourself with the operating sequence by
practicing without logs. The log must be placed resting against
the splitting wedge.
fully backward positions.
12
RAM
READY TO SPLIT
LOG AGAINST
SPLITTING WEDGE
The Ram returns:
only when both handles
are put in the complete
home position, 1 all the
way forward, and 2 all
the way back.

7
Operation
Push handle 2forward
swiftly and firmly
and HOLD
The ram will move forward
and drive the log on to the
splitting wedge
Once log is split, REVERSE
the sequence to retract
the ram
NOTE: If the handles are suddenly
released there is a mechanism to
help prevent injury.
Only when both handles are put in
the complete home position, 1 all the
way forward, and 2 all the way back,
will the ram return.
Pull handle 1FIRMLY
towards you and HOLD
1
1
2
2
4
3
3-4

Tests have shown that most wood in the UK can be split satisfactorily, but some hardwoods such as
Apple can only typically be split in small sections.
With regular use you will get to know the limitations of the machine, it is essential to work
within them for a trouble free service.
8
Operation
Repeated motor stalling when trying to split very knotty wood will cause
the trip switch to operate, protecting the motor from damage. After a
short period, usually less than a minute, the trip can be reset by pressing
the push button. The unit can then be restarted as shown on page 5.
If a log is difficult to split and requires a few attempts ensure the motor
and flywheel are up to speed before repeating the splitting process.
DISCONNECT POWER SUPPLY BEFORE ATTEMPTING TO
REMOVE STUCK LOGS OR ANY ISSUES WITH RAM
POSITION AFTER ENCOUNTERING PROBLEMS
IF THE LOG IS SPLIT AND THE RAM IS RETURNED TO THE START POSITION
Remove split pieces carefully and repeat operation for next log
IF LOG IS SPLIT BUT RAM DOES NOT RETURN
Clean and clear the surface below the ram from debris
IF LOG IS TOO KNOTTY AND DOES NOT SPLIT FIRST TIME
A second or third attempt can be made but ensure the ram returns each time. Ensure the
motor and flywheel are up to speed before repeating the splitting process. (the motor
may stall and the thermal cut out will activate to stop the motor - the reset switch must be
pressed and wait for the power to be reset see page 5)
IF LOG IS STUCK ON THE SPLITTING WEDGE
Firstly return the handles to their starting position
first handle 2, then handle 1, to retract the ram.
Next, to free the log, give it a sharp knock with a
hammer away from the splitting wedge. If the ram
will not return first, then the log can be knocked
free before retracting the ram
12
Only when both handles are put in the complete
home position, 1 all the way forward, and 2 all
the way back, will the ram return.

9
Maintenance and Specifications
Wipe down & clean the machine before storing in a dry, safe place.
1. Every time before use, check all the nuts and bolts have been fastened, ensure the
machine is in good condition before using.
2. During use, the area beneath the ram can accumulate debris and splinters which can prevent the
ram returning fully to the start position. Keep this area clear from debris to ensure
correct operation.
3. A build up of debris can occur under the carriage where the bearings run. Keep this part of the
machine clean
4. Lubricate the surface of beam, the meshing part of rack and rack gear with light machine oil
weekly or every 25 hours. For other metal parts, use a little oil to prevent rust. Spray grease can
be used to lubricate the internal mechanism by spraying into the moulding by the handles
Before performing any maintenance procedure or
inspection, stop the motor and unplug the power cord.
PROCEDURE BEFORE EACH USE EVERY 25 HOURS
CHECK GENERAL EQUIPMENT
CONDITION •
PERFORM RAIL MAINTENANCE
CLEAN AND LUBRICATE •
CHECK THE CONDITION OF
THE ELECTRICAL CORD •
GREASE MECHANISM •
Specifications
Size 107 x 32 x 57cm
Power / Voltage 1.5 KW / 220-240volt
Log Capacity Max Length: 400mm
Max Diameter: 300mm
Max. splitting force 8.5 Ton
Nett weight 73.0 Kg

10
Troubleshooting
Symptom Possible Cause
Motor does not run Splitter unplugged; plug in Splitter.
Machine electric cable may be damaged - do not use until unit is checked by
competent electrician.
The motor Reset has tripped; push the Reset Button.
If the above causes are not the problem, a circuit breaker might need to be reset;
Reset Circuit Breaker.
Motor Reset
continuously trips
If you are using an extension cable, make sure that the cable is no more than
10m long, is not smaller than 1.5mm2wire. Longer extensions will need a
higher rating.
Log fails to split Incorrect positioning of the log; re-position the log flat on the splitting beam with
the end squarely against the Wedge.
Log exceeds permitted dimensions or the wood is too hard or knotty for the
capacity of the machine.
If a log is difficult to split and requires a few attempts ensure the motor and
flywheel are up to speed before repeating the splitting process.
Rack returning
very slowly or not
returning properly.
Check for wood chips or debris between ram and rail. Clean beam of built up/
caked on debris.
Return spring is unhooked or damaged. Reconnect or replace as needed.
Machine does not
seem to have full
splitting power.
If you are using an extension cable, make sure that the cable is no more than
10m long, is not smaller than 1.5mm2wire. Longer extensions will need a
higher rating.
Belt may be slipping or damaged - check and replace as necessary.

11
Parts List
Motor
Drive Pulley
Rack
Wheel Assy
Return
Spring
Chassis
Log Guide
Log GuideSplitting
Wedge
Ram
Front Lifting Handle
Wear Pad
Left Guard
Rear lifting
Handle
Levers
Right Guard
Flywheel
Drive Belt
Please contact Portek Ltd for spare parts availability. Any attempt to repair or
indication of the guards having been removed to repair will invalidate the warranty.
Contact Portek in the first instance if a problem occurs.

Portek Ltd.
Bryn Hall, Knolton Bryn
Overton-on-Dee
Wrexham, LL13 0LF
Tel: 01234 889 454
Fax: 01234 889 464
© 2018 Portek Ltd
Issue 1 - 08.18
EC Declaration of Conformity
Portek Ltd, Bryn Hall, Knolton Bryn, Overton on Dee,Wrexham, LL13 0LF
declare that, in accordance to the following directives:
2006/42/EC (Machinery Directive)
2004/108/EC (EMC Directive)
the “Charger 8.5” has been designed to comply with the relevant sections of the below
BS EN ISO standards:
12100-2: 2010
14121-1: 2007
13857: 2008
953:1997 + A1: 2009
1037: 1995 +A1: 2008
BS EN 609-1:2017
The unit complies with all applicable Essential Requirements of the Directives.
Declaration made by Stephen Morris, Designer
on 31/08/2018
CE Certificate of Conformity
Table of contents
Other Portek Log Splitter manuals
Popular Log Splitter manuals by other brands

Posch
Posch LogFix L operating instructions

GÜDE
GÜDE GHS 1100/25TEZ-A Translation of the original instructions

ATIKA
ATIKA ASP 10 N-400 Original instructions

Northline Express
Northline Express WoodEze NLE5WZ LS56 owner's manual

Gude
Gude GHS 500/7 TED Translation of the original instructions

Scheppach
Scheppach HL520 Translation from original manual