manuals.online logo
Brands
  1. Home
  2. •
  3. Brands
  4. •
  5. Portland
  6. •
  7. Lighting Equipment
  8. •
  9. Portland Ecolux Solar User manual

Portland Ecolux Solar User manual

INSTALLATION & WIRING INSTRUCTIONS
1. IMPORTANT: Please read these
instructions carefully before
proceeding with installation.
1.1 This instruction sheet should be passed
on by installer to the end user for
maintenance purposes.
1.2 It is recommended that the fitting is
installed by a competent electrician in
accordance with these instructions and
appropriate wiring regulations.
1.3 Portland Lighting products should not
be modified. No responsibility will be
accepted for any modified products or
for any damage caused as a result of
their modification.
1.4 It is not recommended to install the
fitting in areas that are liable to reach an
ambient temperature in excess of 35oC.
1.5 To clean fittings use a soft damp cloth
and dry immediately. Do not use any
chemical/abrasive cleaner.
1.6 All fittings are class III fittings.
1.7 The light source contained in this luminaire
shall only be replaced by the manufacturer,
service agent or similar qualified person.
1.8 Type Y Attachment – If the external
flexible cable or cord of this luminaire
is damged, it shall be exclusively
replaced by Portland Lighting Ltd or
their service agent or a similar qualified
person in order to avoid a hazard.
12V input and should be used in
conjunction with provided solar
components and attached Ecolux Solar
instruction sheet.
The fitting should be mounted on a suitable weight bearing surface, using appropriate fixings
(Weight per metre 3kg).
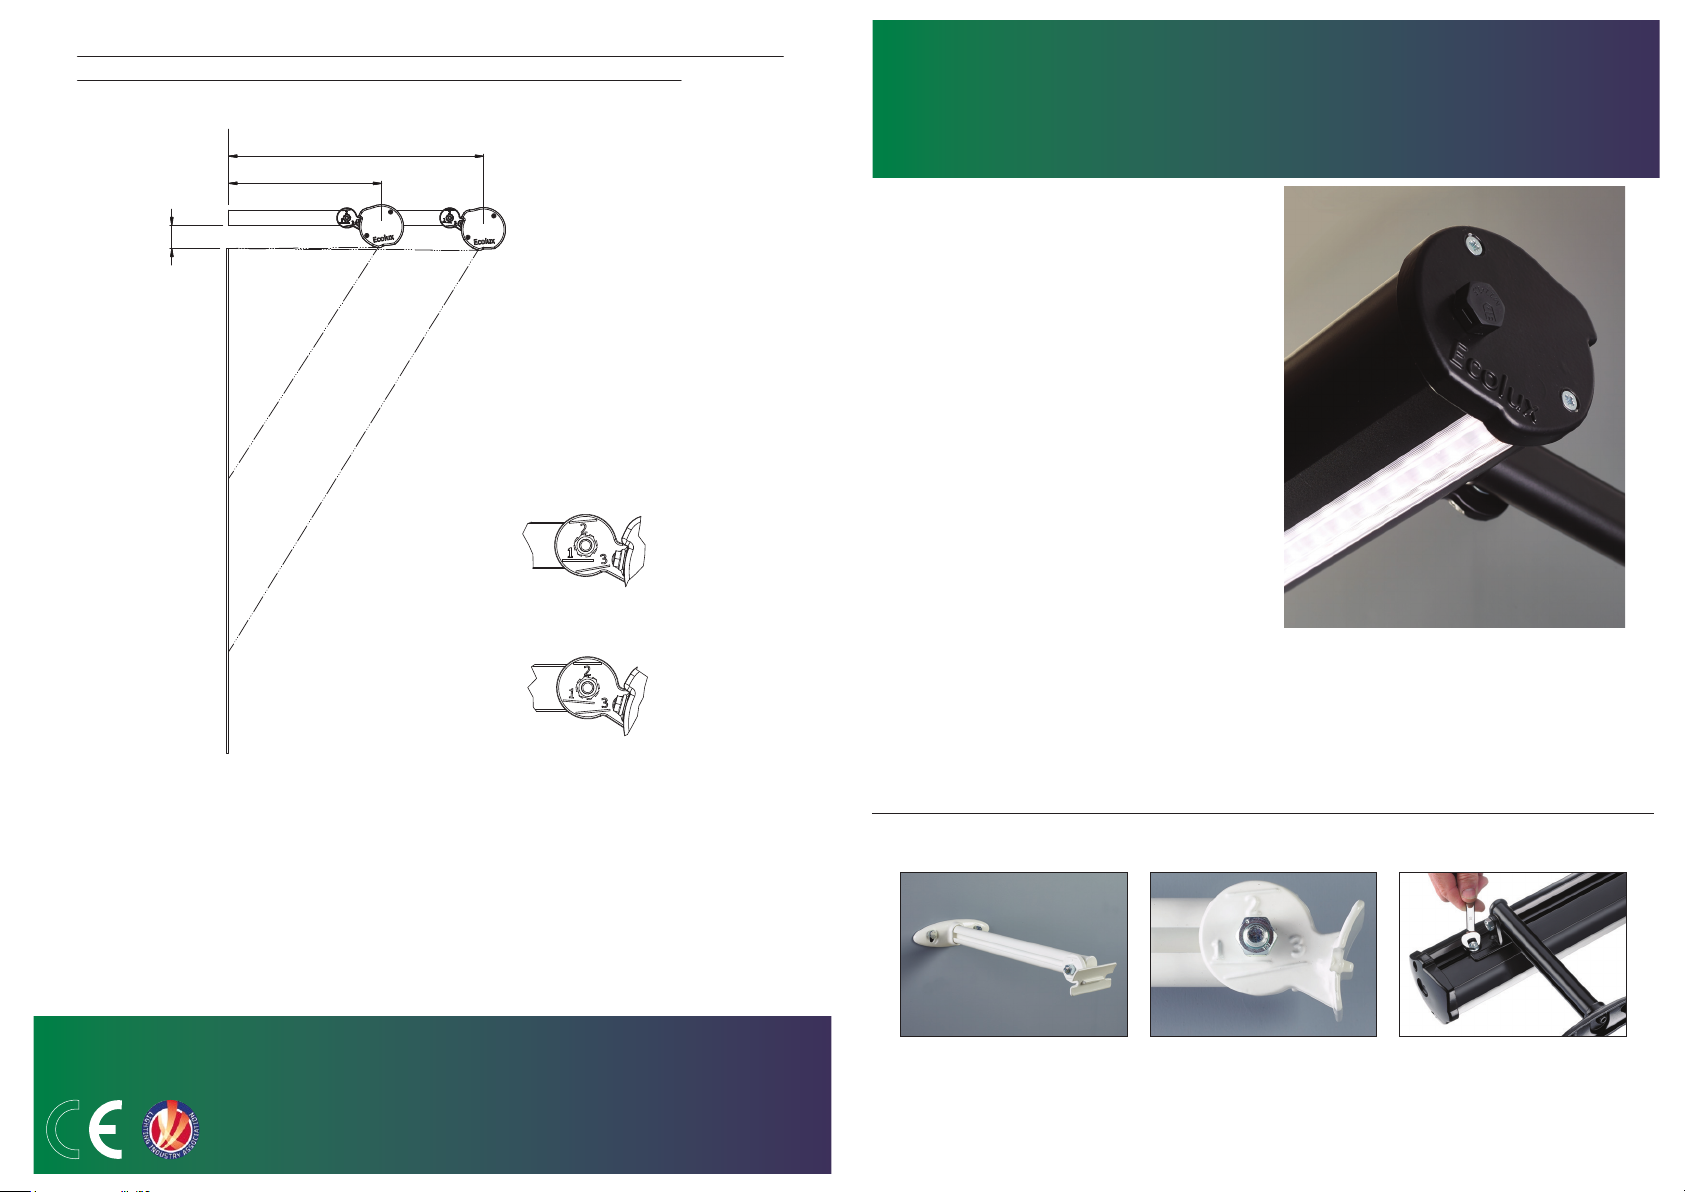
Secure bracket to wall.
For best results 100-150mm
above your sign.
Hang lights on bracket and
slide fasteners into position
and secure.
Tighten bracket end to specified
setting:
300mm bracket - 1
500mm bracket - 2
Setting 3 - not for use
with solar system.
ecolux solar
Portland Lighting
Unit 2
Reedswood Park Road
Walsall
WS2 8DQ
Telephone: 01922 721 133
Email: [email protected]
Important Safety
Before carrying out any servicing on this luminaire, ensure that the supply is fully isolated.
Setting 1
Setting 2
line parallel with bottom edge of bracket.
line parallel with top edge of bracket.
For best results fix brackets
100-150mm above your sign.
Setting
r
1
2
for 0 -2m Signs
Setting2fo-3mSigns
300
500
Sign
Leave
100-150mm
clear above
sign
VITALLY IMPORTANT: TO GIVE OPTIMUM ILLUMINATION TO SIGN FACE SELECT
CORRECT SETTING 1 OR 2 ON BRACKET FIXINGS WHEN TIGHTENING
technical enquiries
If you need any help with the installation or maintenance of Portland Lighting products, please
contact us
Portland Lighting
Unit 2
Reedswood Park Road
Walsall
WS2 8DQ
Telephone: 01922 721 133
Email: [email protected]
A
B
Plug Male & Female
Connector Together &
Twist to Seal
Feed Cable Into
IP 67 Grommet
Push Sections
A & B Together
Bolt At Rear Into
Slotted Prong
A
B
Preparation:- For Best Results Fix Brackets within 300mm Either Side of Join
300 300
ecolux solar lens
CONNECTING INSTRUCTIONS
This Kit includes the following:
A. Solar PV Panels
(please note the number of PV panels in the kit may vary).
B. Splitter Looms
C. Battery Splitter Loom
D. 1C0L
E. PS800 Controller
F. Batteries (please note the number of batteries in the kit may vary).
G. Battery Box
Step 1:
Connect the splitter looms to the PV panels, creating pairs.
(please note the number of PV panels
in the kit may vary).
Step 2:
Next, connect all of the red wires to the positive (+) side of the batteries (red) and connect the
black wires to the negative (-) side of the batteries (black).
(please note the number of batteries in
the kit may vary).
Step 7:
Next, take one of the remaining connectors from the
battery splitter loom and plug it into the 1C0L.
Step 8:
Next, take the remaining connector from the battery splitter
loom and connect it to the batteries.
Step 9:
Finally, take the orange wire from the 1C0L and connect it
to the orange wire from the PS800 controller.
Now connect the single end of the battery splitter loom to the PS800 controller.
Step 6:
Next, connect the 1C0L to 1 of the pairs of PV, via the splitter loom you connected in step 1.
Step 3:
Step 4:
Next, connect the PS800 controller to the other pair of PV
Step 5:
Then connect the trough light to the PS800 controller, as shown.
Install instructions

Popular Lighting Equipment manuals by other brands

mitoredlight Original 2.0 Series user manual

mitoredlight

mitoredlight Original 2.0 Series user manual

Pluto 2000 HEX user manual

Pluto

Pluto 2000 HEX user manual

Chroma Color Force 72 user manual

Chroma

Chroma Color Force 72 user manual

HEPER MINIMO Installation & maintenance instructions

HEPER

HEPER MINIMO Installation & maintenance instructions

Hydrofarm Magnetic Ballast Series instruction manual

Hydrofarm

Hydrofarm Magnetic Ballast Series instruction manual

Velleman MML6R user manual

Velleman

Velleman MML6R user manual

Brilliance BriLux DMX Power Washer manual

Brilliance

Brilliance BriLux DMX Power Washer manual

CREE-LED XLamp XQ Series manual

CREE-LED

CREE-LED XLamp XQ Series manual

FERRITALIA PAPILLON 82888 quick start guide

FERRITALIA

FERRITALIA PAPILLON 82888 quick start guide

Elumen8 ELUM450 user manual

Elumen8

Elumen8 ELUM450 user manual

Lightolier Lytecaster 1001H specification

Lightolier

Lightolier Lytecaster 1001H specification

Philips iPlayer 3 instruction manual

Philips

Philips iPlayer 3 instruction manual

Chauvet LED Followspot 75 user manual

Chauvet

Chauvet LED Followspot 75 user manual

Indigo OU41424 instructions

Indigo

Indigo OU41424 instructions

Beghelli GDE-SP instructions

Beghelli

Beghelli GDE-SP instructions

Lake Lite LL-BHL-LED-KIT quick start guide

Lake Lite

Lake Lite LL-BHL-LED-KIT quick start guide

EuroLite LED BAR-9 UV 9x1W user manual

EuroLite

EuroLite LED BAR-9 UV 9x1W user manual

GE RTL-FPC-2835-2.5cm-19.6FT-120V-Ex-B Guideline

GE

GE RTL-FPC-2835-2.5cm-19.6FT-120V-Ex-B Guideline

manuals.online logo
manuals.online logoBrands
  • About & Mission
  • Contact us
  • Privacy Policy
  • Terms and Conditions

Copyright 2025 Manuals.Online. All Rights Reserved.