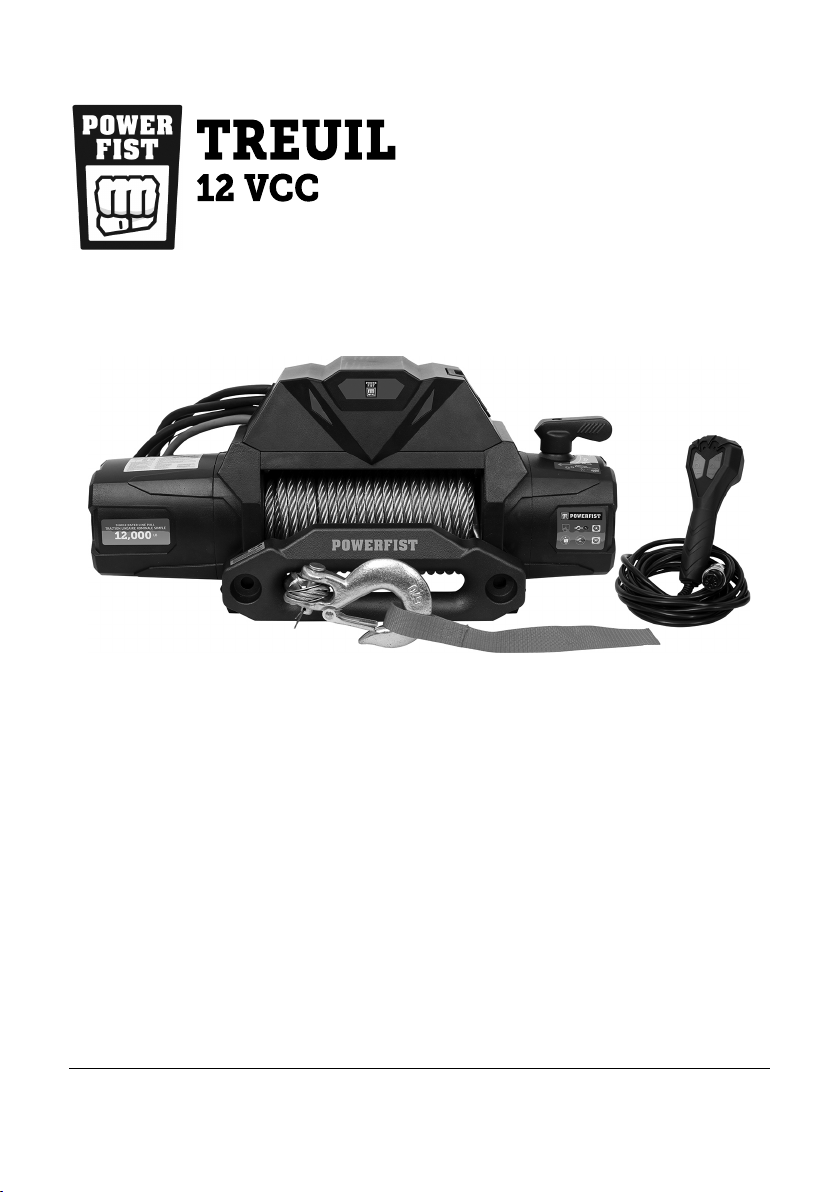
Power Fist 8942724 User manual

V1.0 8942724
Please read and understand all instructions before use. Retain this manual for future
reference.

8942724 12V DC Winch V1.0
2 For technical questions call 1-800-665-8685
SPECIFICATIONS
Voltage Rating 12V DC
Current Rating 360A
Single Rated Line Pull 12,000 lb
Cable Diameter 3/8 in.
Cable Length 65 ft
HP Rating 7 HP
Gear Ratio 232 : 1
Gear Type 3-stage planetary
Motor Type SW-4P
Braking Automatic load holding
Control Type Wired remote control
Fairlead Hawse Fairlead
Clutch Type Cam-activated free spooling
Full Load Line Speed 5 FPM
No Load Line Speed 22 FPM
Gear Train 3-stage planetary
Cable Material Oxygen free copper
Colour/Finish Powder coating
Mounting Bolt Pattern 10 x 4-1/2 in.
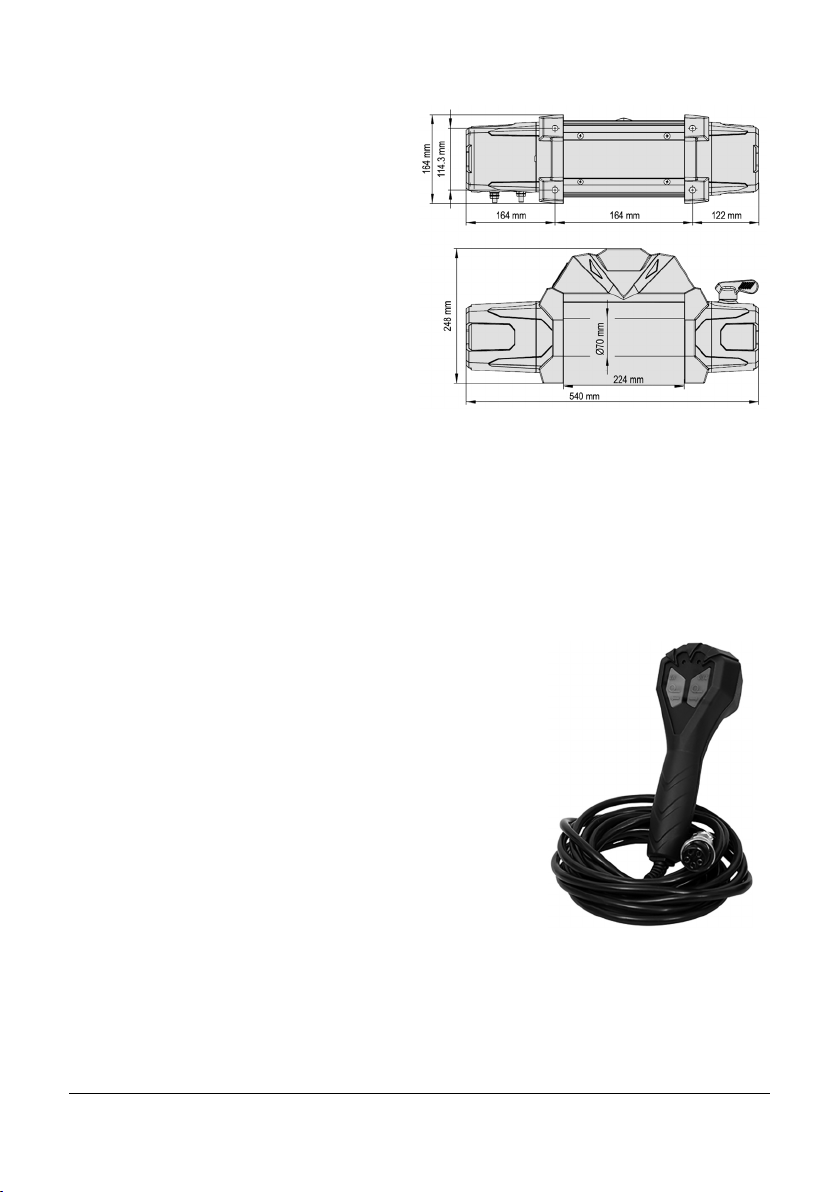
Size (L x W x H) 24.4 x 7.5 x 15.8 in.

V1.0 12V DC Winch 8942724
Visit www.princessauto.com for more information 3
INTRODUCTION
The 12V DC Electric Winch is strong enough for use in a shop or garage to pull
vehicles onto a lift or frame straightener. The unit has a tethered remote, overload
protection to avoid heat damage and a 65 ft steel cable with a sling hook.
SAFETY
WARNING! Read and understand all instructions before using this tool. The
operator must follow basic precautions to reduce the risk of personal injury
and/or damage to the equipment.
Keep this manual for safety warnings, precautions, operating or inspection and
maintenance instructions.
HAZARD DEFINITIONS
Please familiarize yourself with the hazard notices found in this manual. A notice
is an alert that there is a possibility of property damage, injury or death if certain
instructions are not followed.
DANGER! This notice indicates an immediate and specific hazard that will
result in severe personal injury or death if the proper
precautions are not taken.
WARNING! This notice indicates a specific hazard or unsafe practice that
could result in severe personal injury or death if the proper
precautions are not taken.
CAUTION! This notice indicates a potentially hazardous situation that may
result in minor or moderate injury if proper practices are not
taken.
NOTICE! This notice indicates that a specific hazard or unsafe practice will
result in equipment or property damage, but not personal injury.
WORK AREA
1. Operate in a safe work environment. Keep your work area clean, well-lit
and free of distractions. Place lights so you are not working in a shadow.
2. Keep anyone not wearing the appropriate safety equipment away from the
work area.
3. Store tools properly in a safe and dry location. Keep tools out of the reach
of children.
4. Do not install or use in the presence of flammable gases, dust or liquids.

8942724 12V DC Winch V1.0
4 For technical questions call 1-800-665-8685
PERSONAL SAFETY
WARNING! Wear personal protective equipment approved by the Canadian
Standards Association (CSA) or American National Standards Institute (ANSI).
PERSONAL PROTECTIVE EQUIPMENT
1. Always wear impact safety goggles that provide front and side protection
for the eyes. Eye protection equipment should comply with CSA Z94.3-07
or ANSI Z87.1 standards based on the type of work performed.
2. Wear gloves that provide protection based on the work materials or to
reduce the effects of tool vibration.
a. Do not wear gloves when operating a tool that can snag the material
and pull the hand into the tool.
3. Wear protective clothing designed for the work environment and tool.
4. Non-skid footwear is recommended to maintain footing and balance in the
work environment.
5. Wear steel toe footwear or steel toe caps to prevent a foot injury from
falling objects.
PERSONAL PRECAUTIONS
Control the tool, personal movement and the work environment to avoid
personal injury or damage to the tool.
1. Do not operate any tool when tired or under the influence of drugs,
alcohol or medications.
2. Avoid wearing clothes or jewelry that can become entangled with the
moving parts of a tool. Keep long hair covered or bound.
3. Do not overreach when operating the tool. Proper footing and balance
enables better control in unexpected situations.
SPECIFIC SAFETY PRECAUTIONS
WARNING! DO NOT let comfort or familiarity with product (gained from
repeated use) replace strict adherence to the tool safety rules. If you use this
tool unsafely or incorrectly, you can suffer serious personal injury.
1. Use the correct tool for the job. This tool was designed for a specific
function. Do not modify or alter this tool or use it for an unintended
purpose.
2. Do not use the tool if any parts are damaged, broken or misplaced. Repair
or replace the parts.

V1.0 12V DC Winch 8942724
Visit www.princessauto.com for more information 5
3. All users must understand the operation of all controls and learn how to
stop the winch quickly in case of emergency.
4. Keep hands clear of the winch and steel cable when spooling the line in or
out. Hold the cable by the strap. Fingers caught in the hook or fairlead
may be pulled into the mechanism and crushed or pinched.
5. Make sure the winch is fixed to a solid support structure that can
withstand the towing capacity.
6. Never fully extend the cable while under load.
7. Do not exceed the winch load capacity.
a. Do not use the winch if damaged or it was subjected to a dynamic
shock load. Have the winch inspected and repaired by a qualified
service technician.
8. Always use proper couplings when connecting the winch cable hook,
sling, eyebolt or other accessory to the load. Never connect the hook back
to the cable. This causes cable damage. Always use a sling or chain of
suitable strength.
9. Do not use inappropriate attachments to extend the length of the winch
cable.
10. Do not lift items vertically. The winch was designed for horizontal use
only.
11. Do not pull the steel cable around or over corners.
12. Stay well away from the winch, steel cable and load when under tension.
A cable that breaks under tension can whiplash and inflict death or a
serious injury.
a. Use a winch rope dampener to absorb the cable’s energy should it
break.
13. Secure the load after moving it with the winch. Do not rely on the winch
to hold a load in position for an extended period of time. Never leave the
load unattended.
14. Apply blocks to a vehicle while connecting and disconnecting the winch
cable.
15. Observe the spooling of the cable onto the drum. Side pulls can cause the
cable to pileup at one end of the drum. To correct uneven stacking, spool
out that section of cable and move it to the other end of the drum and
continue winching. Uneven spooling causing cable pileup can interfere
with the winch tie rods causing damage to the winch.

8942724 12V DC Winch V1.0
6 For technical questions call 1-800-665-8685
16. Do not use the winch to transport animals or people.
17. Do not use the vehicle to ‘assist’ the winch in moving a load. This applies
additional strain on the winch and can damage it or snap the winch cable.
ELECTRICAL SAFETY
WARNING! Do not touch or handle a live tool with any part of your body that is
wet or damp. Wet skin reduces resistance to electrical current, increasing the
danger of a serious or fatal shock.
1. Disconnect tool from power source before cleaning, servicing, changing
parts/accessories or when not in use.
2. Protect yourself against electric shocks when working on electrical
equipment. Avoid body contact with grounded surfaces. There is an
increased chance of electrical shock if your body is grounded.
3. Do not expose the tool to rain or wet conditions. Water entering a tool will
increase the risk of electric shock.
4. Do not alter any parts of the tool or accessories. All parts and accessories
are designed with built-in safety features that may be compromised if
altered.
5. Make certain the power source conforms to requirements of your
equipment (see Specifications).
6. When wiring an electrically driven device, follow all electrical and safety
codes, as well as the most recent Canadian Electrical Code (CE) and
Canadian Centre for Occupational Health and Safety (CCOHS).
7. Disconnect the battery cables before working near the cable, drum,
fairlead or load, to prevent accidental starting.
WARNING! All wiring should be performed by a qualified electrician.
BATTERY CABLES
1. Do not operate this tool if the battery cables are frayed or damaged, as an
electric shock or surge may occur, resulting in personal injury or property
damage.
2. Keep all connections dry and off the ground to reduce the risk of electric
shock. Do not touch battery cables with wet hands.
3. Prevent damage to the battery cables by observing the following:
a. Do not pull on the cable to disconnect it from the battery
b. Keep the battery cables away from heat, oil, sharp edges or moving parts.
V1.0 12V DC Winch 8942724
Visit www.princessauto.com for more information 7
UNPACKING
WARNING! Do not operate the tool if any part is missing. Replace the missing
part before operating. Failure to do so could result in a malfunction and
personal injury.
Remove the parts and accessories from the packaging and inspect for damage. Make
sure that all items in the contents are included.
Contents: • Winch • Tethered Remote • Hawse Fairlead
• Hook with Strap • Grade 8, M10-1.50x30 mm (4)
• Grade 8 M12-1.75x25 mm
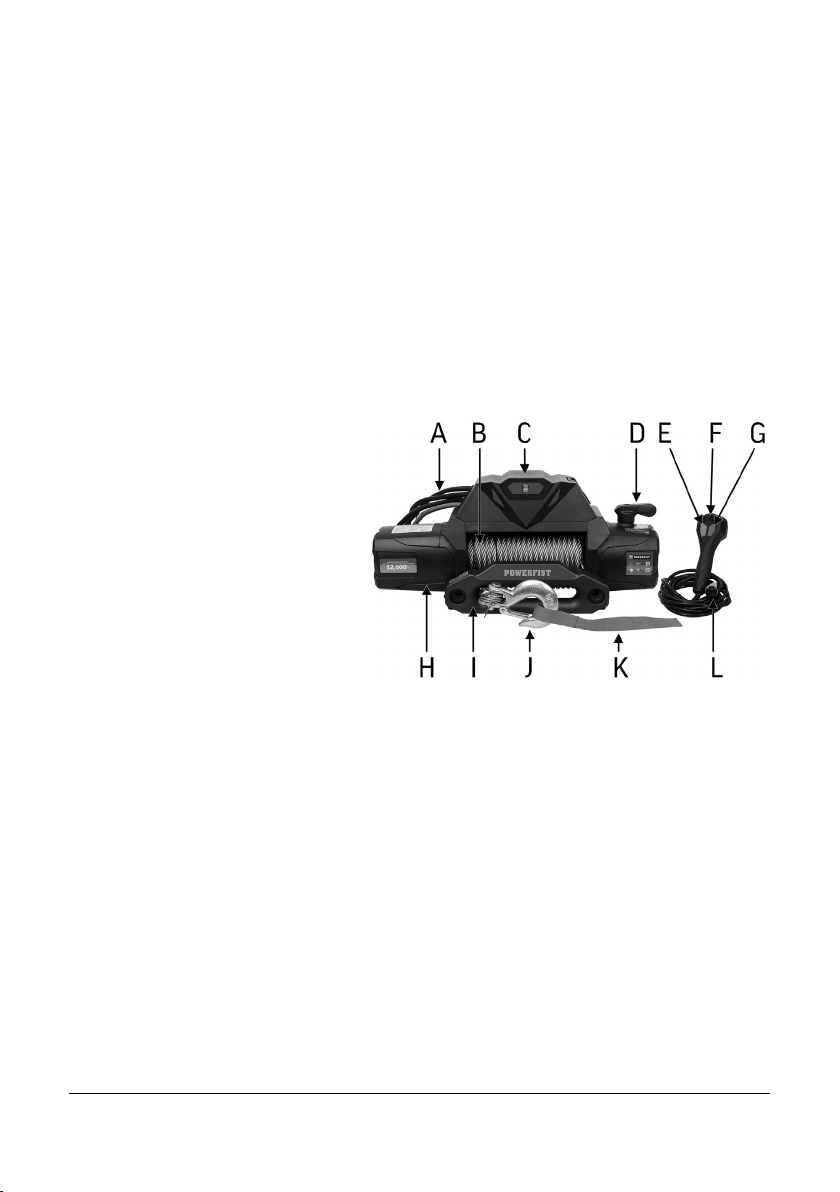
IDENTIFICATION KEY
A Wiring
B Wire Cable
C Control Pack
D Clutch
E IN Button
F Remote
G OUT Button
H Winch
I Hawse Fairlead
J Hook
K Strap
ASSEMBLY & INSTALLATION
Use the included hardware to attach the winch to the location and the fairway
to the winch.
1. Install a mounting plate that is capable of withstanding the stresses
acting upon it without bending or breaking (see Specifications). The drum
supports must sit flush with no gaps.
2. This winch can generate extreme
forces
.
Select
a location that can
withstand the rated capacity
without
damage or weakening. Steel
reinforcement plates may be needed or a certified welder may need to
weld
on
additional bracing depending on the mounting location.
Fig.
1
8942724 12V DC Winch V1.0
8 For technical questions call 1-800-665-8685
3. Align the winch perpendicular to
the vehicle’s centerline of
the
vehicle at the desired
location.
Mark the bolt holes you will use
to connect the winch to the
structure. Compare the
dimensions
of the marked
holes.
4. Before drilling, verify that the
installation surface has no
hidden components
or
structural pieces that will be
damaged.
5. Drill holes for the
hardware
at
the marked
locations.
6. Install the winch using the included
hardware
. Do not weld the mounting
bolts in place.
OPERATION
REMOTE
1. Press the IN button. The red LED above the
button will glow and the cable will retract into
the drum.
2. Press the OUT button. The green LED above the
button will glow and the cable will spool out.
3. There is a slight delay when switching from
one direction to the other.
4. Both LEDs will flash when the battery voltage
is below 10.8V. The battery requires recharging
or replacement.
5. The winch may stall at the maximum load (see
Specifications). Winch protection will activate
after two seconds and both LEDs will flash.
BEFORE FIRST USE
The steel cable must be broken-in before using to pull a heavy load. The break-
in process will stretch the cable, ensure the individual wires are seated and the
wire compacted.
Fig. 2
Fig.
3
V1.0 12V DC Winch 8942724
Visit www.princessauto.com for more information 9
1. Position the vehicle on a flat surface approximately 60 ft distance from a
suitable anchor point, such as a large tree.
2. Unspool the entire cable until only five cable wraps are remaining on the
winch drum.
a. Remove the entire cable if the remaining wraps are overlapping or
there is a gap that the second level of cable can become trapped in.
Rewrap the five wraps carefully without load.
3. Attach a chain or belt around the anchor point that is capable of
withstanding the load. Connect the cable hook to the chain or belt.
4. Shift the vehicle into neutral gear to prevent damage to the transmission.
5. Follow the instructions in Operating The Winch and recoil the rope back
into the winch under at least 1,000 lb (454 kg) of tension. Apply light
pressure to vehicle brake pedal as needed to produce load.
6. Stop approximately every minute to check that the cable is winding level.
Make sure vehicle is in park with parking brake applied before exiting the
vehicle. Do not check, touch or attempt to reposition rope with load on
winch rope.
OPERATING THE WINCH
WARNING! Do not release the clutch while the winch is pulling a load. It may
cause the load to shift or move unexpectedly and the wire may snap with the
unexpected stress. Either may cause death or severe injury to the user or
bystanders.
WARNING! Keep clear of fairlead when operating. Do not try to guide the wire
rope, as your hand may be pulled into the winch and suffer a crushing injury.
Do not operate the winch on slopes. The cable angle should be as close to
vehicle center line as possible.
1. Make sure the operator can safely
control the winch before performing
any functions with it and that they
are familiar with all safety and
operating instructions.
2. Inspect the winch, steel cable and
terminal tackle before each use.
Replace any damaged or frayed
components before use.
Fig. 4
8942724 12V DC Winch V1.0
10 For technical questions call 1-800-665-8685
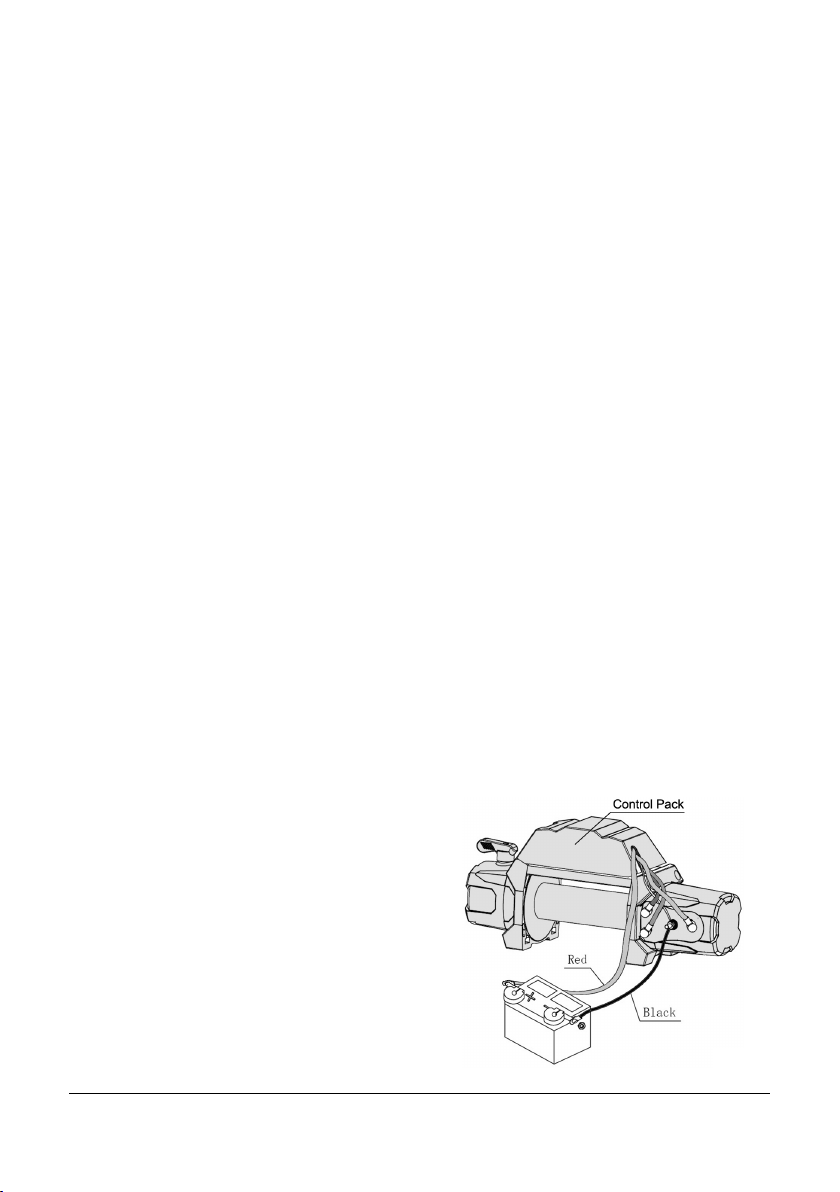
3. Connect the winch to a 12V power supply. The
12V automotive battery must be in good
operating condition. Consult the battery’s
safety and use instructions (Fig. 4).
a. Attach the red battery cable to the
positive battery terminal.
b. Attach the black battery cable to the
negative battery terminal
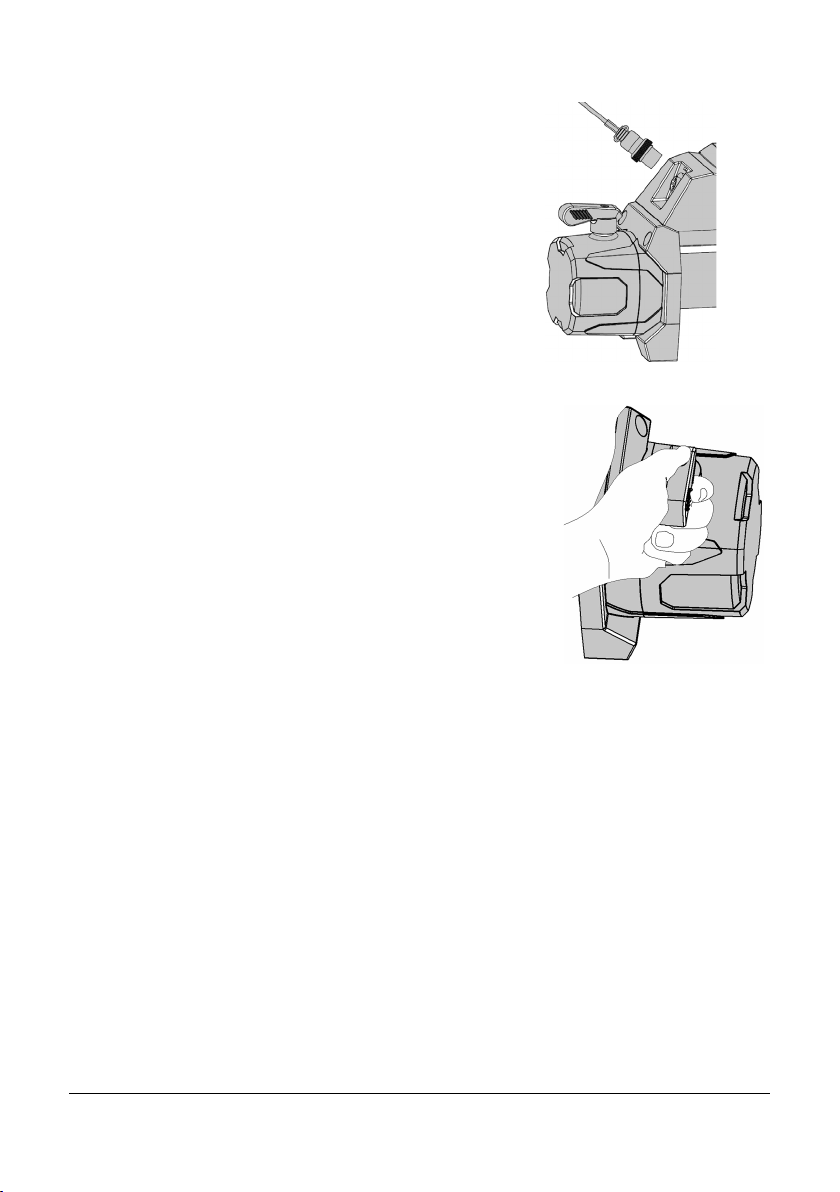
4. Insert the remote control plug into the winch
(Fig. 5). Press both the IN and OUT buttons to
make sure they winch is functioning properly.
5. Twist the clutch knob out a quarter turn to the
left to disengage the brake (Fig. 6).
6. Pull out the cable by the hook strap until you
have the desired length out.
a. Make sure there is always five turns of
cable on the winch drum.
7. Attach the steel cable to the load with a hook,
shackle, sling or chain capable of withstanding the
strain from winching the load. Make sure the
terminal tackle is secure to avoid an unintended
disconnection while winching.
a. Consult the vehicle owner’s manual for anchor points to connect the
steel cable’s terminal tackle if connecting to another vehicle.
8. Re-engage the clutch by twisting the clutch knob to the right until it locks
in place.
9. Check that the line is straight without kinks or twisted. Do not wrap the
steel cable around the load or wind it around corners or obstacles.
10. Place a dampening device on the steel cable, if you have one available.
11. Press and hold the remote control’s IN button until the slack is removed
from the steel cable.
12. Recheck the connections to ensure the terminal tackle will not shift.
a. Check the clutch is engaged. Do not pull the clutch knob out when
the winch is under load.
13. Press and hold the remote control’s IN button to pull the load towards the
winch. Release the button when the load is in the final position.
a. Secure the load in place if necessary. Use wheel chocks for a vehicle.
Fig. 6
Fig. 5
V1.0 12V DC Winch 8942724
Visit www.princessauto.com for more information 11
14. Press the Out button to remove tension on the steel cable. Disengage and
remove the hook or terminal tackle.
15. Hold the hook strap to keep some pressure on the winch and retract the
steel cable. Make sure each wire wrap fits snugly with the next wrap.
16. Disconnect from the power supply once the hook reaches the winch fairlead.
17. Disconnect and store the remote.
WINCHING LIMITATIONS
There are several limitation that can affect the time duration, power consumption
and maximum weight a winch can move. A snatch block will improve the winch’s
performance. Make sure to follow all safety and operation instructions from the
snatch block’s manufacturer.
POWER
The maximum load the
winch can pull is
diminished with each
additional layer of steel
cable around the winch’s
drum. Table 1 shows the
maximum amount of
weight it can pull and the length of cable remaining on the drum.
Whenever possible, remove as much steel cable off the winch to pull with the
maximum power. Keep five wraps of steel cable on the drum at all times to
prevent the steel cable from slipping off.
Use a snatch block to move a heavier load that is
close to the winch. This will double the amount of
line outside the fairlead and increase the winch’s
pulling power at close range.
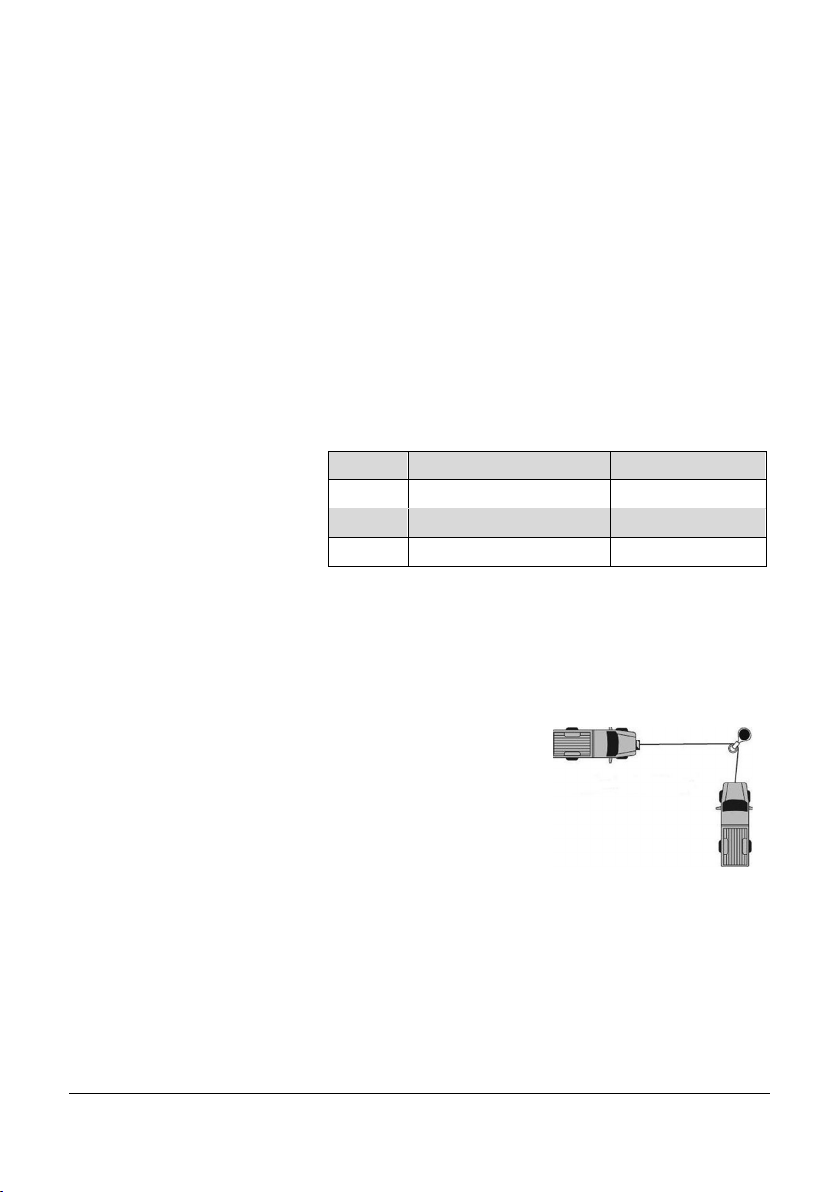
Pull a load at an angle by using a pulley attached to
a structure (Fig. 7). Both must be capable of
withstanding the load.
LINE SPEED
The heavier the load, the longer it will take the winch to move the load to the
desired location. Consult Table 2 to determine how fast the line will be drawn
into the winch.
A snatch block will halve the line speed when pulling the load.
Layer Rated Line Pull Cable Capacity
1 12,000 lb (5,443 kg) 17 ft (5.2 m)
2 9,685 lb (4,393 kg) 40 ft (12.2 m)
3 8,119 lb (3,683 kg) 65 ft (20 m)
Table 1
Fig. 7

8942724 12V DC Winch V1.0
12 For technical questions call 1-800-665-8685
POWER CONSUMPTION
The winch requires more amps to move a heavier load. Consult Table 2 to
determine the amperage consumption based on the load’s weight.
A snatch block increases a winch’s pulling power without an increase in amperage.
Using a snatch block can halve the power required.
OVERLOAD
The overload protection may kick in if the winch becomes overheated. Allow
several minutes for the winch to cool before pressing the overload reset button
to continue pulling the load.
NOTICE! Do not press and hold the reset button while winching. This can
damage the winch.
CARE & MAINTENANCE
1. Maintain the tool with care. A tool in good condition is efficient, easier to
control and will have fewer problems.
2. Inspect the tool components periodically. Repair or replace damaged or
worn components. Only use identical replacement parts when servicing.
3. Follow instructions for lubricating and changing accessories.
4. Only use accessories intended for use with this tool.
5. Keep the tool handles clean, dry and free from oil/grease at all times.
6. Maintain the tool’s labels and name plates. These carry important
information. If unreadable or missing, contact Princess Auto Ltd. for
replacements.
WARNING! Only qualified service personnel should repair the tool. An
improperly repaired tool may present a hazard to the user and/or others.
CLEANING
Clean the external surfaces with cloth after each use.
Weight Pull Line Speed Amp Draw Max Pull Length
0 lb (0 kg) 21 FPM (6.4 m/min) 80 VDC 65 ft (20.0 m)
3,000 lb (1,361 kg) 11 FPM (3.4 m/min) 160 VDC 20 ft (6.1 m)
6,000 lb (2,722 kg) 8 FPM (2.4 m/min) 260 VDC 8 ft (2.4 m)
9,000 lb (4,082 kg) 6 FPM (1.8 m/min) 280 VDC 3 ft (1.0 m)
12,000 lb (5,443 kg) 5 FPM (1.5 m/min) 360 VDC 1 ft (0.3 m)
Table 2

V1.0 12V DC Winch 8942724
Visit www.princessauto.com for more information 13
LUBRICATION
The winch is permanently lubricated and does not require additional
lubrication. The exception is if the winch is submerged in water. Open the
housing, dry and have a qualified technician re-lubricate the winch.
Lubricate the steel cable with a light oil from time to time to prevent corrosion.
STORAGE
When not in use for an extended period, apply a thin coat of lubricant to the
steel parts to avoid rust. Remove the lubricant before using the tool again.
DISPOSAL
Recycle a tool damaged beyond repair at the appropriate facility.
Contact your local municipality for a list of disposal facilities or by-laws for
electronic devices, batteries, oil or other toxic liquids.
IMPORTANT! DO NOT pollute the environment by allowing uncontrolled
discharge of waste oil.
TROUBLESHOOTING
Visit a Princess Auto Ltd. location for a solution if the tool does not function
properly or parts are missing. If unable to do so, have a qualified technician
service the tool.
Problem(s) Possible Cause(s) Suggested Solution(s)
Motor overheats. Winch running time too
long.
Allow winch to cool down
periodically.
Motor does not
turn on.
1. Solenoid malfunctioning.
2. Remote damaged.
3. Defective motor.
4. Internal damage or
wear.
5. Remote not properly
plugged in.
6. Battery cables damaged
or not properly
connected.
1. Tap solenoid to loosen contacts.
2. Replace remote.
3. Check for voltage at armature
port with switch pressed. If
voltage is present, replace motor.
4. Have technician service winch.
5. Check the remote plug is firmly
seated.
6. Replace damaged cables or
reconnect clips to the battery.
Motor runs, but
steel cable
drum does not
turn.
The clutch is not engaged. Move the clutch handle to the
engaged position. If problem
persists, a qualified technician
needs to check and repair.

8942724 12V DC Winch V1.0
14 For technical questions call 1-800-665-8685
Problem(s) Possible Cause(s) Suggested Solution(s)
Motor runs slowly
or without normal
power.
Insufficient current or
voltage.
Connect to appropriate power supply.
Motor runs in one
direction only.
1. Defective or stuck
solenoid.
2. Remote damaged.
3. Defective remote
button.
1. a. Tap solenoid to loosen contacts.
1. b Repair or replace solenoid.
2 & 3 Replace remote.
Motor is water
damaged.
Submerged in water or
water from pressure
washing.
Allow to drain and dry thoroughly.
Have a service technician repair
and lubricate the winch.
V1.0 12V DC Winch 8942724
Visit www.princessauto.com for more information 15
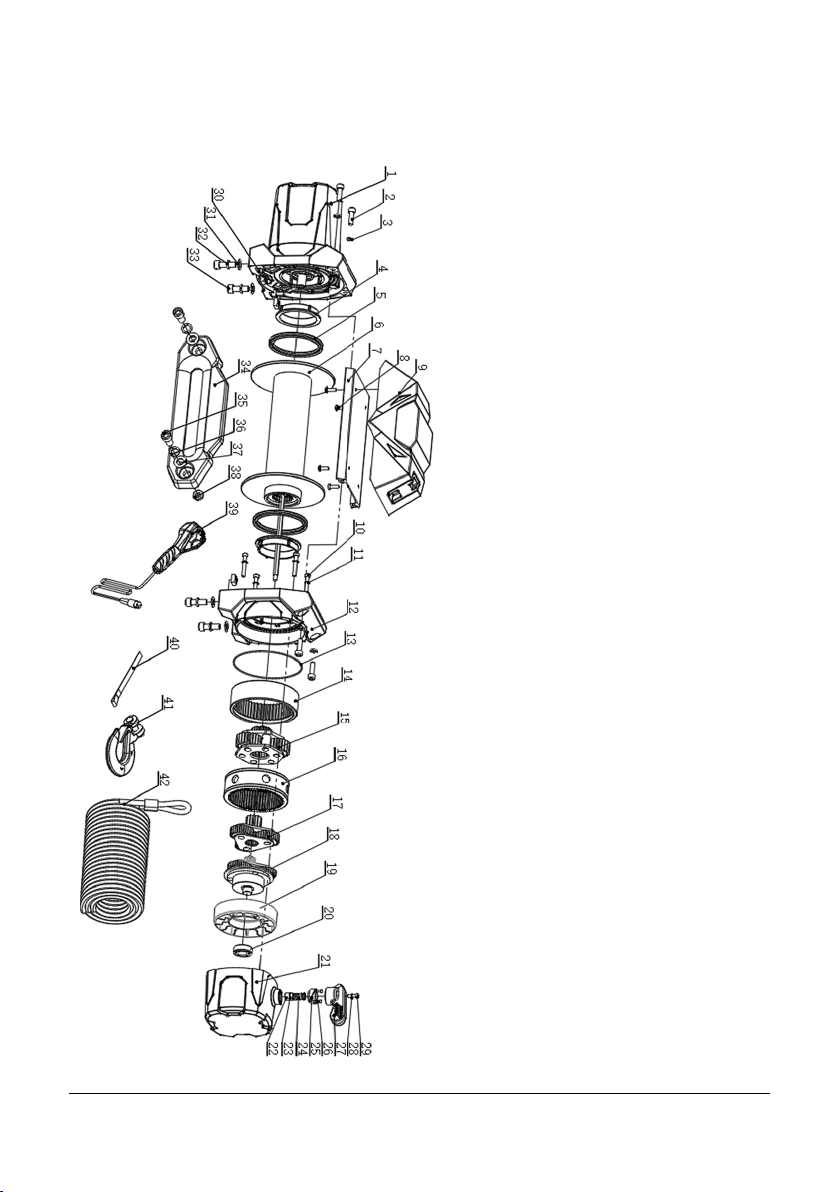
PARTS BREAKDOWN

8942724 12V DC Winch V1.0
16 For technical questions call 1-800-665-8685
PARTS LIST
#
DESCRIPTION
QTY
1 Motor Assembly 1
2 Tie Bar Screw M8x30 4
3 Tie Bar Washer Ø8 4
4 Nylon Bearing 2
5 Seal Kit 2
6 Drum Assembly 1
7 Support Plate 1
8 Cross Recessed Pan Head Ta
pping Screws ST5.5 x16
4
9 Integrated Control Pack 1
10 Tie Bar Screw M6x50 4
11 Tie Bar Washer Ø6 4
12 Gear Box Base 1
13 O-Ring 125x2 1
14 3 Stage Ring Gear 1
15 Gear Carrier Assembly
(Output)
1
16 Clutch Gear 1
17 Gear Carrier Assembly
(Intermediate)
1
18 Gear Carrier Assembly
(Input)
1
19 Baffle Plate 1
20
Bearing
1
21 Deceleration Box 1
22
Clutch Pin
1
23 O-Ring 10.6 x1.8 1
24
Clutch Spring
1
25 Clutch Cap 1
26
Tie Bar Screw M3x16
1
27 Clutch Handle 1
28
Tie Bar Screw M5x14
1
29 Tie Bar Washer Ø5 1
30
Square Nut M10
4
31 Flat Washer Ø10 4
32
Spring Washer Ø10
4
33 Tie Bar Screw M10x30 4
34
Hawse Fairlead
1
35 Tie Bar Screw M12x25 2
36
Spring Washer Ø12
2
37 Flat Washer Ø12 2
38
Nut M12
2
39 Pendant Controller 1
40
Red Strap
1
41 Clevis Hook 1
42
Wire cable
1

V1.0 12V DC Winch 8942724
Visit www.princessauto.com for more information 17

8942724 12V DC Winch V1.0
18 For technical questions call 1-800-665-8685
V 1,0 8942724
Vous devez lire et comprendre toutes les instructions avant d'utiliser l'appareil.
Conservez ce manuel afin de pouvoir le consulter plus tard.

8942724 Treuil, 12 Vcc V 1,0
2 En cas de questions techniques, appelez le 1-800-665-8685
SPÉCIFICATIONS
Tension nominale 12 Vcc
Courant nominal 360A
Traction linéaire nominale simple 12 000 lb
Diamètre de câble 3/8 po
Longueur de câble 65 pi
Puissance nominale en CV 7 CV
Rapport d’engrenage 232 : 1
Type d’engrenage Planétaire à 3 étages
Type de moteur SW-4P
Freinage Rétention de charge automatique
Type de commande Télécommande à fil
Guide-câble Guide-câble d’écubier
Type d’embrayage Décrabotage à commande par came
Vitesse linéaire à la charge maximale 5 pi/min
Vitesse linéaire à vide 22 pi/min
Train d’engrenages Planétaire à 3 étages
Matériau de câble Cuivre sans oxygène
Couleur/fini Revêtement en poudre
Disposition des boulons de montage 10 x 4 1/2 po
Taille (long. x larg. x haut.) 24,4 x 7,5 x 15,8 po
Table of contents
Languages:
Other Power Fist Winch manuals


Popular Winch manuals by other brands

Lewmar
Lewmar 40 manual

Kangaroowinch
Kangaroowinch 2000 instruction manual

Harken
Harken Performa 46.2 STP Installation and maintenance manual

Prowinch
Prowinch PWMD Series User Manual and Security Warnings

Badland
Badland 56412 Owner's manual & safety instructions

WOODY'S WINCH
WOODY'S WINCH WW-700-34 manual


TORSO WINCH
TORSO WINCH HC0200E Installation and operating instructions

KStrong
KStrong AFA930301 User instruction manual

Harken Industrial
Harken Industrial 500 installation manual

Tractel Group
Tractel Group altotir Operating and maintenance instructions

Comeup
Comeup Rhino 12 Pro manual

Comeup
Comeup DV-4500i quick start guide