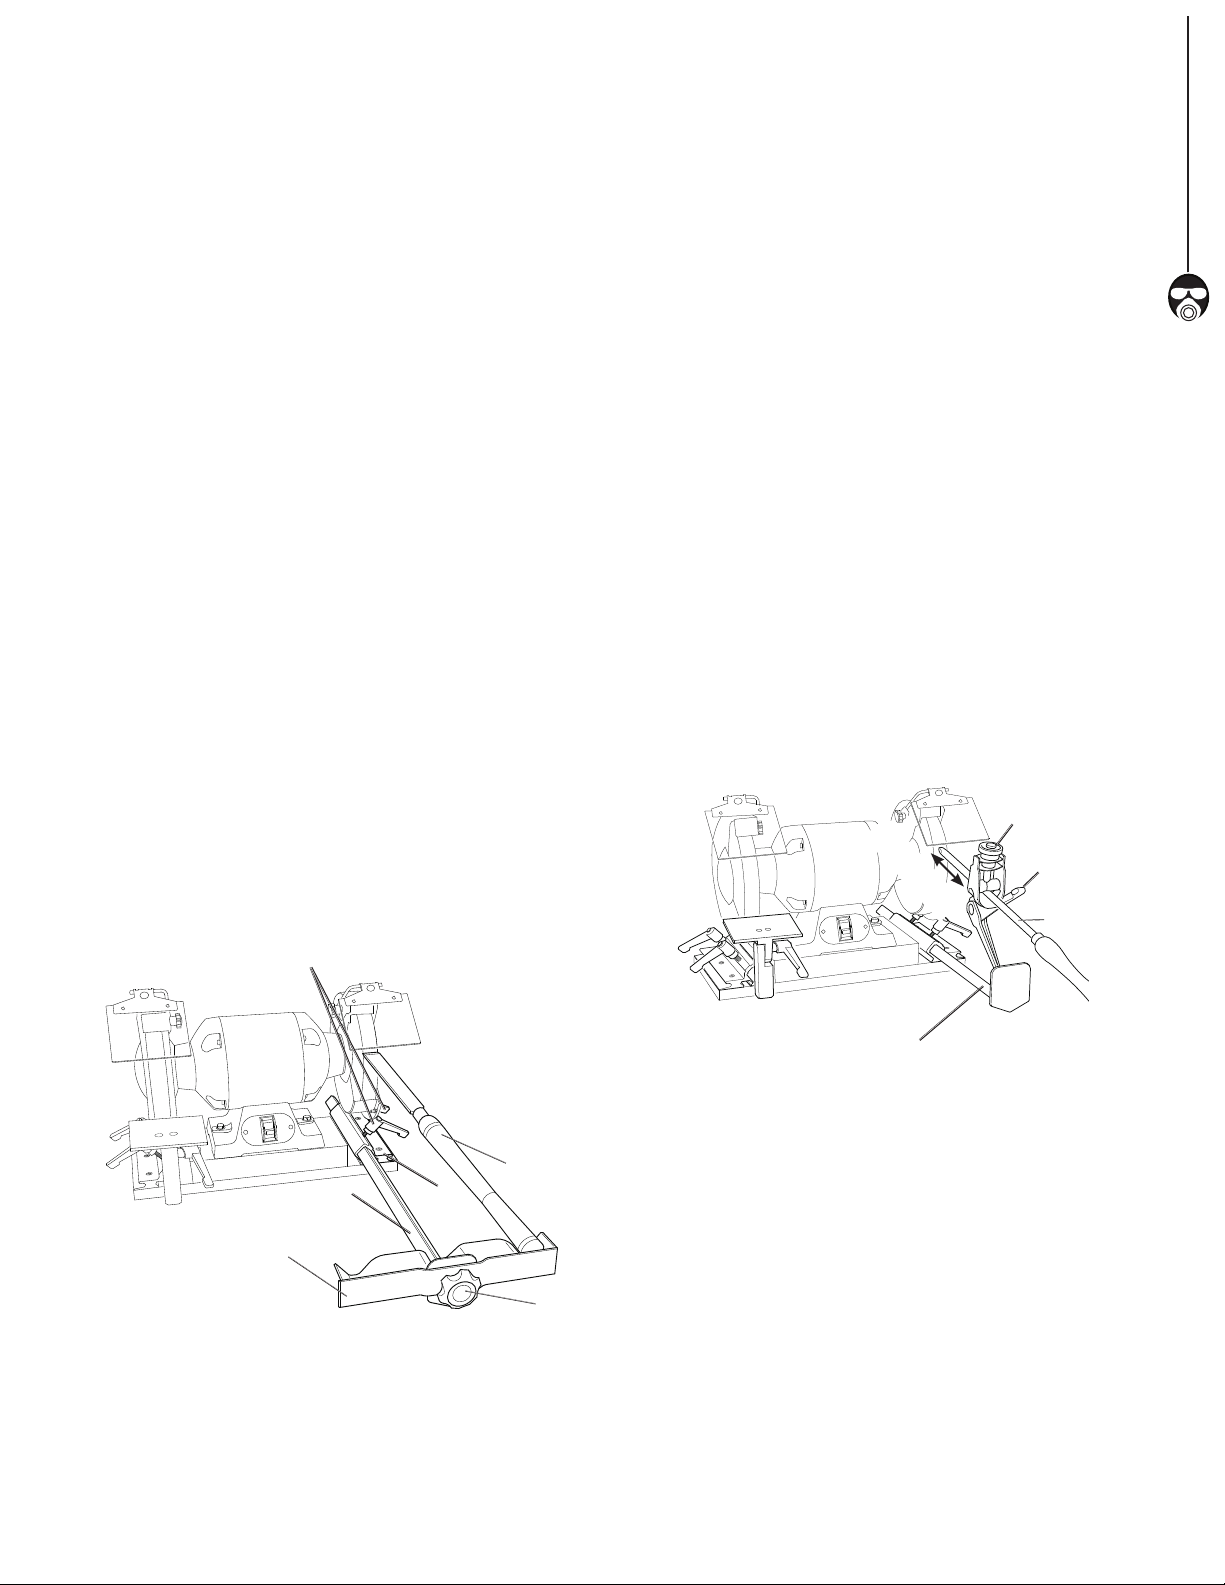
manuals.online logo
Brands
  1. Home
  2. •
  3. Brands
  4. •
  5. Power Tec
  6. •
  7. Grinder
  8. •
  9. Power Tec 71021 User manual

Power Tec 71021 User manual

Owner’s Manual
Model No. 71021
14-1205
You will need this manual for safety instructions, operating procedures, and warranty.
Put it and the original sales invoice in a safe, dry place for future reference.
Visit us on the web at www.southerntechllc.com
Bench Grinder Sharpening Jig Kit
TABLE OF CONTENTS
SECTION PAGE
SAFETY 1
ASSEMBLY 1
Unpacking
Tool Needed
Mounting Bases
OPERATION 2
Tool Terminology
V Arm Set up
Sharpening
Platform Operation
Skew Jig Operation
Versa-Grind Operation
WARRANTY 5
SAFETY
1
WARNING
For your own safety, read and understand all warnings
and operating instructions in this manual and in the
grinder manual before using any tool or equipment.
WARNING
Some dust created by operation of power tool contains
chemicals known to the State of California to cause
cancer, birth defects or other reproductive harm.
To reduce your exposure to these chemicals, work in a
well ventilated area and work with approved safety
equipment. Always wear OSHA/NIOSH approved,
properly fitting face mask or respirator when using such
tools.
WARNING
Failure to follow these rules may result in serious personal
injury. Remember that being careless for even a fraction
of a second can result in severe personal injury.
CAUTION
Think safety! Safety is a combination of operator common
sense and alertness at all times when tool is being used.
WARNING
Do not attempt to operate tool until it is completely
assembled according to the instructions.
UNPACKING
Refer to Figure 1.
Check for shipping damage. Check immediately whether
all parts and accessories are included.
This Bench Grinder Sharpening Jig Kit is to be used with a
bench grinder.
NOTE: Most Grinders work with the V Arm, Skew jig as
long as the 6 1/4 -6 1/2 measurement shown in Figure 2 is
achieved.
ITEM DESCRIPTION QUANTITY
A V Arm 1
B Bases 2
C Platform Assembly 1
D Skew Jig 1
E Screws (mounting hardware) 4
F Versa-Grind 1
G Jig Locking Levers 4
ASSEMBLY
1
1
SPECIFIC SAFETY RULES
Figure 1
F
E
A
C
B
D
G
1
ASSEMBLY
WARNING
Do not use the Bench Grinder Sharpening Jig Kit until it is
completely assembled and you have read and understood
the entire operating manuals.
TOOLS NEEDED
The following tools (not included) are needed to assemble
and adjust the Bench Grinder Sharpening Jig Kit:
1 Cross Head Screwdriver
MOUNTING BASES
Refer to Figure 2
For best results mount the grinding jig bases onto a board
or bench. Mount one base under each grinding wheel.
t $FOUFSUIFCBTFVOEFSUIFHSJOEJOHXIFFMXJUIUIFGSPOU
of the base flush with the wheel.
t 4MJEFUIF7"SNJOUPUIFCBTFBOEFOTVSFUIFDFOUFSPG
the V Arm pocket aligns with center of grinding wheel.
t 6TFTDSFXTTVQQMJFEUPTFDVSFUIFCBTFUPCPBSEPS
bench.
t *OTFSUKJHMPDLJOHMFWFSTJOUPIPMFTJOCBTF%POPUUJHIUFO
securely.
ASSEMBLY
2
NOTE:
 t 3FNPWFUIFHSJOEFSSVCCFSGFFUBOEJOTUBMMUIFN
underneath the mounting board, if required.
 t 5IFoNNNJOJNVNEJNFOTJPO
shown in Figure 2 must be achieved to prevent base
from interfering with the wheel guards. Add a spacer
block or shims under the grinder if needed.
Figure 2
Spacer Block
(if needed )
Center
Pocket to
Wheel

NN
OPERATION 2
TOOL TERMINOLOGY
Refer to Figure 3
Figure 3
Flute
Heel
Cutting
Edge
Bevel
V ARM SET UP
Refer to Figure 4
The V Arm is used to sharpen bowl-gouges, roughing
gouges and skews.
t 5VSOUIFHSJOEFSPGG
t 4MJEFUIF7"SNJOUPUIFCBTF
t 3FTUUIFIBOEMFPGUIFUPPMJOUIF7"SNQPDLFU
t 4MJEFUIF7"SNJOBOEPVUVOUJMUIFFYJTUJOHCFWFMNFFUT
the wheel. Lock the V Arm in place.
t -JGUUIFUPPMPGGUIFXIFFMBOEUVSOUIFHSJOEFSPO
t (FOUMZUPVDIUIFUPPMUPUIFXIFFM$IFDLUIFQPTJUJPOPG
the V Arm:
t -JGUUIFUPPMPGGUIFXIFFMBOEDIFDLUIFHSJOENBSLTPO
the bevel.
- If the grind marks are even on the whole bevel, then
the V Arm is adjusted properly.
- If the grind marks are just on the cutting edge, move
the V Arm in.
- If the grind marks are on the heel of the tool, away
from the cutting edge, move the V Arm out.
TIP: Coloring the existing bevel with a black felt tip marker
allows the new grinding marks to be seen.
Figure 4
Jig Locking
Levers
V Arm
Platform
OPERATION
2
OPERATION
OPERATION
3
3
SHARPENING
Bowl Gouge
Refer to Figure 5
t 4FUVQ7"SNGPMMPXJOHUIFV Arm Set Up instructions.
t 5PVDIUIFCFWFMUPUIFXIFFMBOESPUBUFUIFUPPMCBDL
and forth. The further you roll the tool, the further back
the corners will be ground.
NOTE: A good general purpose bevel angle is 45
degrees. Most turners will grind the corners back 10 to
20 degrees.
Figure 5
Bowl Gouge Side View
Roughing Gouge
Refer to Figure 6
t 4FUVQ7"SNGPMMPXJOHUIFV Arm Set Up instructions.
t 5PVDIUIFCFWFMUPUIFXIFFMBOESPUBUFUIFUPPMCBDL
and forth. Grinding the ears back 20 degrees, the end of
the tool should remain square.
NOTE: Tools grind away at different speeds. Pay
attention to the corners during grinding.
Figure 6
Roughing Gouge Side View
Chisels
t 4FUVQ7"SNGPMMPXJOHUIFV Arm Set Up instructions.
t 5PVDIUIFDIJTFMCFWFMUPUIFXIFFMBOEHSJOEUIFDIJTFM
with small sideways motions and light cutting pressure.
NOTE: Most chisels are carbon steel which softens and
turns blue with heat, cool these often.
Skews
Refer to Figure 7
t 4FUVQ7"SNGPMMPXJOHUIFV Arm Set Up instructions.
t 5PVDIUIFCFWFMUPUIFXIFFM6TJOHMJHIUQSFTTVSFTMJEF
the tool back and forth with a small sideway motion.
t 5VSOUIFUPPMPWFSPGUFOTIBSQFOJOHCPUITJEFTPGUIF
skew.
Figure 7
Top View
Skew Side View
Long Point
Short Point
PLATFORM OPERATION
Refer to Figure 8
The platform can be assembled to the right or left side of
the grinder.
t 5VSOUIFHSJOEFSPGG
t 4MJEFUIFQMBUGPSNJOUPUIFCBTF
t -PDLUIFQMBUGPSNJOQMBDF
t 3FMFBTFUIFQMBUGPSNMPDLJOHMFWFS
t 1MBDFUIFUPPMPOUPUIFQMBUGPSNBOEBEKVTUUIFQMBUGPSN
until the existing bevel meets the wheel. Lock the
platform in place.
t5VSOUIFHSJOEFSPOBOEHFOUMZUPVDIUIFUPPMUPUIF
wheel.
TIP: Coloring the existing bevel with a black felt tip marker
allows the new grinding marks to be seen.
Figure 8
Base
Platform Locking Lever
Platform
Jig Locking Levers
OPERATION
4
SKEW JIG OPERATION
3FGFSUP'JHVSFBOE
The skew jig saves time when sharpening skews. Using
the skew increases safety, creates a flat bevel, bevel and
cutting edge will be parallel, creates the same bevel every
time and there is a minimal material waste.
t 5VSOUIFHSJOEFSPGG
t 8JUI7"SNJTBTTFNCMFETMJEFUIFTLFXKJHPOUPUIF
V arm pocket and secure with locking knob.
t 3FTUUIFIBOEMFPGUIFUPPMJOPOFPGUIFTLFXKJHQPDLFU
depending on desired angle.
t 4MJEFUIF7"SNJOBOEPVUVOUJMUIFFYJTUJOHCFWFMNFFUT
the wheel.
t -PDLUIF7"SNJOQMBDF
t -JGUUPPMGSPNXIFFMBOEUVSOUIFHSJOEFSPO
t -JGUUIFUPPMPGGUIFXIFFMBOEDIFDLUIFHSJOENBSLTPO
the bevel.
- If the grind marks are even on the whole bevel, then
the V Arm is adjusted properly.
- If the grind marks are just on the cutting edge, move
the V Arm in.
- If the grind marks are on the heel of the tool, away
from the cutting edge, move the V Arm out.
TIP: Coloring the existing bevel with a black felt tip marker
allows the new grinding marks to be seen.
t 5PVDIUIFCFWFMUPUIFXIFFM6TJOHMJHIUQSFTTVSFTMJEF
the tool back and forth with a small sideway motion.
t 5VSOUIFUPPMPWFSPGUFOTIBSQFOJOHCPUITJEFTPGUIF
skew.
TIP: Applying pressure to the side with the short point
creates more skew. Applying pressure to the long point
reduces skew.
Figure 9
Base
V Arm
Jig Locking Levers
Skew
Skew Jig
Locking
Knob
VERSA-GRIND OPERATION
Refer to Figure 10
Consistently achieve the fingernail grind, bowl gouge
grind and side or Irish grind by using the Versa-Grind
attachment.
t 5VSOUIFHSJOEFSPGG
t *OTFSUUIFUPPMJOUPUIF7FSTB(SJOE5JHIUFOMPDLJOH
knob.
NOTE:5IFUPPMTIPVMEQSPUSVEFNNUP
create the best results. This measurement should be the
same each time the tool is ground. Use a wood block
with a hole drilled to the desired depth to save time.
t "EKVTUUIF7FSTB(SJOEBSNUPEFTJSFEBOHMF
NOTE: Adjusting the arm with the arm adjustment knob
will alter the angle to be ground.
t 8JUIUIF7"SNBTTFNCMFESFTUUIFBSNPGUIF7FSTB
Grind onto the V arm pocket.
t 4MJEFUIF7"SNJOBOEPVUVOUJMUIFEFTJSFEBOHMFNFFUT
the wheel.
t -PDLUIF7"SNJOQMBDF
t -JGUUPPMGSPNXIFFMBOEUVSOUIFHSJOEFSPO
t 8JUIPOFIBOEFOTVSFUIFUIF7FSTB(SJOEBSNSFTUJO
the bottom of the V arm, use the other hand to control
the sweep of the Versa-Grind. Let the weight of the tool
do the work.
NOTE: Frequently dip the tool in water to keep it cool.
Figure 10
V Arm
Locking
Knob
Tool
Arm
Adjusting
Knob
NN
WARRANTY
5
Thank you for investing in a POWERTEC power tool. These products have been designed and manufactured to meet
high quality standards and are guaranteed for domestic use against defects in workmanship or material for a period of
12 months from the date of purchase. This guarantee does not affect your statutory rights.
SOUTHERN TECHNOLOGIES LLC. BENCH TOP AND STATIONARY POWER TOOL
LIMITED 1 YEAR WARRANTY AND 30-DAY SATISFACTION GUARANTEE POLICY
POWERTEC products are designed and manufactured by Southern Technologies LLC. All warranty communications
should be directed to Southern Technologies LLC. 206 Terrace Dr. Mundelein, IL 60060, Attn: POWERTEC technical
TFSWJDFPSCZDBMMJOHUPMMGSFF".UP1..POEZUISPVHI'SJEBZ64$FOUSBM5JNF
30- DAY SATISFACTION GUARANTEE POLICY
During the first 30 days after the date of purchase, if you are dissatisfied with the performance of this POWERTEC tool
for any reason, you may return the tool to the retailer from which it was purchased for a full refund or exchange. You
must present proof of purchase and return all original equipment packaged with the original product. The replacement
tool will be covered by the limited warranty for the balance of the one year warranty period.
LIMITED ONE YEAR WARRANTY
This warranty covers all defects in workmanship or materials in this POWERTEC tool for a one year period from the
date of purchase. This warranty is specific to this tool. Southern Technologies, LLC reserves the right to repair or
replace the defective tool, at its discretion.
HOW TO OBTAIN SERVICE
To obtain service for this POWERTEC tool you must return it, freight prepaid, to an authorized POWERTEC service
center for bench top and stationary power tools. You may obtain the location of the authorized service center nearest
ZPVCZDBMMJOHUPMMGSFFPSCZMPHHJOHPOUPUIFPOWERTEC website at www.southerntechllc.com.
When requesting warranty service, you must present the proof of purchase documentation, which includes a date of
purchase. The authorized service center will either repair or replace any defective part, at our option at no charge to
you. The repaired or replacement unit will be covered by the same limited warranty for the balance of one year warranty
period.
WHAT IS NOT COVERED
This warranty applied to the original purchaser at retailer and may not be transferred.
This warranty does not cover consumable items such as saw blades, knives, belts, discs, cooling blocks and sleeves.
This warranty does not cover required service and part replacement resulting from normal wear and tear, including
accessory wear.
This warranty does not cover any malfunction, failure or defect resulting from:
1) misuse, abuse, neglect and mishandling not in accordance with the owner's manual.
2) damage due to accidents, natural disasters, power outage, or power overload.
3) commercial or rental use.
4) alteration, modification or repair by other than an authorized service center for POWERTEC product.
WARRANTY
5
DISCLAIMER
To the extent permitted by applicable law, all implied warranties, including warranties of MERCHANTABILITY or
FITNESS FOR A PARTICULAR PURPOSE, are disclaimed. Any implied warranties, that cannot be disclaimed under
state law are limited to one year from the date of purchase. Southern Technologies LLC. is not responsible for direct,
indirect, incidental or consequential damages. Some states do not allow limitations on how long an implied warranty
lasts and/or do not allow the exclusion or limitation of incidental or consequential damages, so the above limitations may
not apply to you. This warranty gives you specific legal rights, and you may also have other rights which vary from state
to state. Southern Technologies LLC., makes no warranties, representations, or promises as to the quality or
performance of its power tools other than those specifically stated in this warranty.
NOTE
WARRANTY
6
Southern Technologies, LLC
206 Terrace Drive
Mundelein, Illinois 60060

Other Power Tec Grinder manuals

Power Tec 11801 User manual

Power Tec

Power Tec 11801 User manual

Power Tec BGSS801 User manual

Power Tec

Power Tec BGSS801 User manual

Popular Grinder manuals by other brands

DeWalt DWE496 Original instructions

DeWalt

DeWalt DWE496 Original instructions

EINHELL RT-AG 115 Original operating instructions

EINHELL

EINHELL RT-AG 115 Original operating instructions

Milwaukee 5211 Operator's manual

Milwaukee

Milwaukee 5211 Operator's manual

PRO STORMER PSMD001 instruction manual

PRO STORMER

PRO STORMER PSMD001 instruction manual

Makita BGA452 instruction manual

Makita

Makita BGA452 instruction manual

Chicago Pneumatic CP857 Operator's manual

Chicago Pneumatic

Chicago Pneumatic CP857 Operator's manual

Nakanishi Emax EVOlution Operation manual

Nakanishi

Nakanishi Emax EVOlution Operation manual

Makita 9565CLR instruction manual

Makita

Makita 9565CLR instruction manual

Toro STX-38 Cleaning guide

Toro

Toro STX-38 Cleaning guide

SKIL MASTERS F0159408 Series Original instructions

SKIL MASTERS

SKIL MASTERS F0159408 Series Original instructions

Meec tools 010-306 User instructions

Meec tools

Meec tools 010-306 User instructions

Makita GA4030 instruction manual

Makita

Makita GA4030 instruction manual

Air TEc BS-270-EL-STH Original instruction manual

Air TEc

Air TEc BS-270-EL-STH Original instruction manual

Makita GA7001L Parts Breakdown

Makita

Makita GA7001L Parts Breakdown

Hilti GTB 6X-A22 Original operating instructions

Hilti

Hilti GTB 6X-A22 Original operating instructions

Baileigh BG-260-3-110 Operator's manual

Baileigh

Baileigh BG-260-3-110 Operator's manual

Sealey SGE100 instructions

Sealey

Sealey SGE100 instructions

Lukas AMIN 12-125 WH Operation instructions

Lukas

Lukas AMIN 12-125 WH Operation instructions

manuals.online logo
manuals.online logoBrands
  • About & Mission
  • Contact us
  • Privacy Policy
  • Terms and Conditions

Copyright 2025 Manuals.Online. All Rights Reserved.