POWER USB SMART User manual

POWER USB
10/5/2012
SMART Model
USER MANUAL

Power USB
Page
1
Power USB
U S E R M A N U A L
Please read the PowerUSB Basic Manual for Software Installation
and Configuration of the unit with your computer. The SMART
model has all the features of the Basic model along with the LCD
display and standalone operation in several modes. This manual
describes only the additional features of the SMART model.
CAUTION
Please note that the PowerUSB unit is to be used for low to medium power devices and
not
for devices requiring a load peak of more than 16Amps. Following is the
recommended
outlet usage:
Outlet 1 (Modem): Max 4A (440Watt).
Low to Med loads. Light inductive loads. No Leakage current.
Outlet 2 (Monitor): Max 8A (880Watt).
High loads. High Inductance (Motor, Power Supply).
Leakage current of up to 3VAC due to snubber circuit.
Outlet 3 (Printer): Max 8A (880Watt).
High loads with medium inductance. Light Leakage current of up to 0.2VAC
The PowerUSB is protected from overloads with a reset switch for up to 8A.
CONTROLLED OUTLETS WILL BE SWITCHED OFF AND THE UNIT WILL GO
INTO OVERLOAD MODE WITH FLASHING OUTLET LEDs
THE UNIT HAS TO BE POWERED DOWN, USB CABLE REMOVED AND
RESET TO COME OUT OF OVERLOAD MODE.

Power USB
Page
2
Contents
1.
INTRODUCTION ................................................................................................................3
1.1
TIMED .........................................................................................................................................3
1.2
SMART.................................................................................................................................4
1.3
SMART2...............................................................................................................................4
1.4
TIMER .........................................................................................................................................4
1.5
ALL ON.................................................................................................................................4
2.
SOFTWARE USAGE................................................................................................................5
2.1
Advanced Options ...............................................................................................................5
2.2
Scheduled On-Off Dialog ....................................................................................................6
2.3
SMART Dialog Options.......................................................................................................8

Power USB
Page
3
1.
INTRODUCTION
The PowerUSB-SMART is a programmable power strip using an attached computer
and also can be used as
a standalone power strip. It can be used for calendar-date-based power on-off, frequency-based
power on-
off, timer-based power on-off, and load-based power on-off. The unit also can measure how much power is
consumed at any given time, total power consumed (in terms of dollars), and TV on times per day.
The PowerUSB-SMART comes with an alpha-numeric LCD display. As illustrated below, the LCD displays
the day of the week, the current time, the selected mode, power consumption information, and mode-
specific information.
Current Time
Day of the week Currently Selected Mode
Current Power Consumption in milliamps Mode Specific: Next On-Off Time
Mode Specific: TV On time for today
Total PowerConsumption in $ (units x price per unit)
The PowerUSBunit can work in thefollowing modes, which can be changed using the push button switch
located on the
side of the unit:
TIMED: Calendar-based power on-off at certain times of the day or with a certain frequency.
SMART: Switches on controlled outlets when the master load is high (for example, when the DVD
outlet is switched on while the TV is
also on.)
SMART2: Similar to the SMART mode. Outlet 1 is always kept on for the DVR, etc.
TIMER: Countdown timer allowing an outlet to be switched off after a certain amount of time.
ALL ON: All the outlets will be switched on. This mode can also be used with direct computer control.
1.1
TIMED
In the Timed mode, outlets can be programmed to power on or off two times per day for weekdays and two
times
per
day for weekend days. By default, programmed times are turned on during evenings and for the
whole day during weekdays. The times can be reprogrammed by connecting the unit to the computer and
using the
PowerUSB software (see section 2). All controlled outlets are off by default and come on only during
these
programmed periods. Mode-specific information on the LCD displays the time when the next power on-
off change is

Power USB
Page
4
scheduled. The resolution of the time is 2 seconds, and the minimum time for an outlet to be powered on is
also
2 seconds.
Outlets also can be programmed to power on or off with a certain frequency using the same PowerUSB
software interface. In the timed mode, each outlet is configured for either calendar or frequency
mode.
1.2
SMART
In the smart mode, all the controlled outlets are powered off by default. These outlets are powered on
only
when the masteralways-onoutlet attemptstoconsume loads exceeding a set threshold. For example, the default
load threshold is 700ma (a typical TV load is higher), and if aregularTV is
switched on in the master outlet and
consumes a load exceeding the preset threshold, then the DVD player and set-top box
will be switched on
through the controlled outlets. Default load thresholdscan be changedinthe connected computer’s PowerUSB
software (see section 2).
When controlled outlets are switched on, they are kept on for first minute irrespective of master load
changes during this time so that the master load canstabilize.
The mode-specific information on the LCD displays the amount of time the TV is switched on for the current
day in a HH:MM format. This ‘TV on’ time
information is stored internally for the previous seven days and can
be checked in the PowerUSB’s software (seesection2).
1.3
SMART2
The SMART2 mode is similar to the SMART mode. The only change is that the controlled outlet 1 is always
powered
on to support a DVR (or satellite dish receiver), should it need to be on all the time. The power load
consumed by
the DVR is measured in the first 4 seconds of entering the SMART2 mode and is compensated
for in the total load
calculation.
The ‘TV on’ time of both the SMART and SMART2 modes is displayed in the mode-specific section of the LCD.
1.4
TIMER
The Timer mode offers a countdown timer for all controlled of the outlets. All outlets will power on when
entering this
mode. The unit will start counting downand once it reaches zero, the
controlled outlets will be
powered off.
The countdown time can be changed by holding the push button switch for more than 5 seconds. A selection
of
off times (10mins, 20mins, 30mins, 1hr, 4hrs, and 8hrs) are displayed in sequence. Release the button
when you see the desired length of time to make your selection. This time will also be set as the countdown
time for future use.
1.5
ALL ON
The All On mode powers on all the controlled outlets and keeps them on. The unit will function like a normal
power strip with additional load monitoring capability. This mode also can be used to control outlets from
the
attached computer, working like a standard basic model where the control is given to computer
software.
Power USB
Page
5
2.
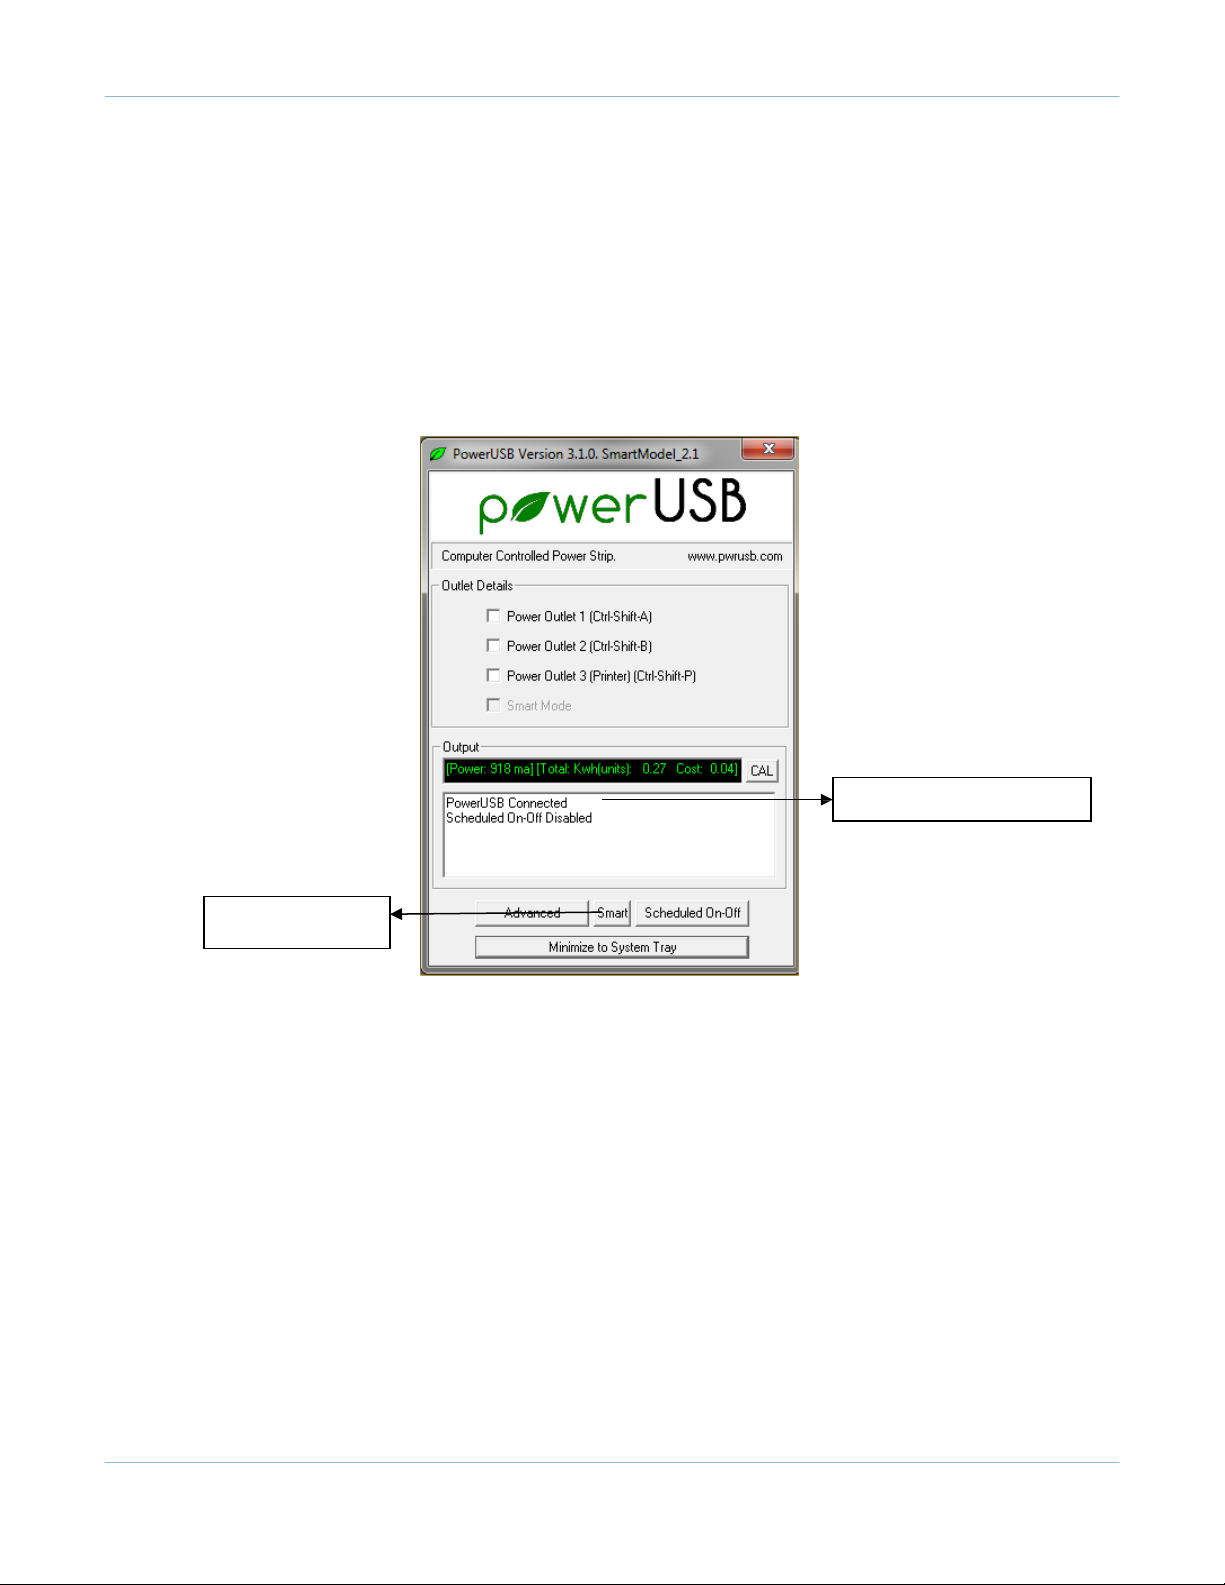
SOFTWARE USAGE
The SMART options are enabled only when a PowerUSB-SMART model is connected to the computer
The SMART model uses the same software application as used for the Basic model. The application will have
the
following changes (as compared to the Basic model) in the main screen. The below screen is
seen only
when a PowerUSB-SMART model is connected to computer
-
The SMART button is enabled for SMART dialog box options
-
The last check box (“SMART Mode”) is disabled
-
The output window displays only the connection status and the scheduled on-off status
Indicates just the connection status and the scheduled on-off status
SMARTOptionsDialog
Button
Similar to the Basic model, outlets can be manually controlled by the Power Outlet check boxes. This control
is
best done when the unit is using the ALL ON mode. In other modes, the unit can change outlet states
internally.
Similar to the Basic model, power consumption measurements are also displayed.
2.1
Advanced Options
Clicking the Advanced button will open the Advanced Options dialog box. Set options in this dialog by
clicking on ‘OK’ at the bottom of the dialog.
The ‘Default PowerUp State’ for outlets is disabled since the SMART model works differently in different modes.
2.1.1 Power Options
The first two entries in Power options set the default Voltage (110V for the US) and price per unit of power
consumed ($0.15 average for the US). These values can be changed in the dialog box. Changed values are
then stored in the registry.

Power USB
Page
6
SMART Mode Trigger Load sets the threshold load at which point the controlled outlets are to be switched on.
This is set to
700ma by default and can be changed to accommodate higher or lower power for master
appliances. This value will beused in theSMARTmode.
SMART Mode Off delay specifies how much time the unit will wait before switching off the controlled outlets
when the
master appliance is switched off.
The next entry, Cumulative Power Reset, will reset the accumulated power reading in the PowerUSB to zero.
The last entry, Reset PowerUSB, completely resets the PowerUSB and is useful for troubleshooting if the unit
appears to not be running.
i
Please refer to the Basic manual for “Network Monitoring Options.”
2.2
Scheduled On-Off Dialog
Clicking on the Scheduled On-Off button will open the Timed On-Off dialog box. Here, the
user can set the
outlets to switch on and switch off at pre-determined times for weekday and weekend days. The user can also
set the frequency for how often the outlets will switch on and off.

Power USB
Page
7
The procedure below has to be followed in order to schedule on-off times:
-
Select the outlet to be programmed.
-
Select one of the On-Off Modes: Always Off, Timed On-Off, or Frequency. When Timed On-Off is
selected,
the Timed options will be enabled. When Frequency is selected, Frequency options will be
enabled.
-
If the Timed On-Off mode is selected:
o
Enter the on times (up to 2) for weekdays and corresponding off times.
o
Enter the on times (up to 2) for weekend days and corresponding off
times.
o
Please also note:
The off times should be always higher than the on times. The second on-off time
should be higher than the first on-off times.
To disable the on-off times, you can enter 12:00:00 AM for both on and off times.
-
If Frequency mode is selected:
o
Enter the On Time and Off Time in seconds.
o
Enter the “Start time Offset” in seconds. The frequency on-off seconds will start after this
offset delay in the
beginning. This feature can also be used to offset on-off times between two outlets.
-
If the Always Off mode is selected, the outlet will remain off.
-
If these settings need to be applied to two more outlets, you can click on ‘Apply Time to Other Two
Outlets’.
-
Repeat the above steps for each of the outlets to be programmed.
-
Click ‘OK’ to schedule the programmed on-off operation and close the dialog box.
Power USB
Page
8
The time based on-off calendar file is then saved in the PowerUSB’s software and will be used for all future
Timed mode operation until it is reset by the user.
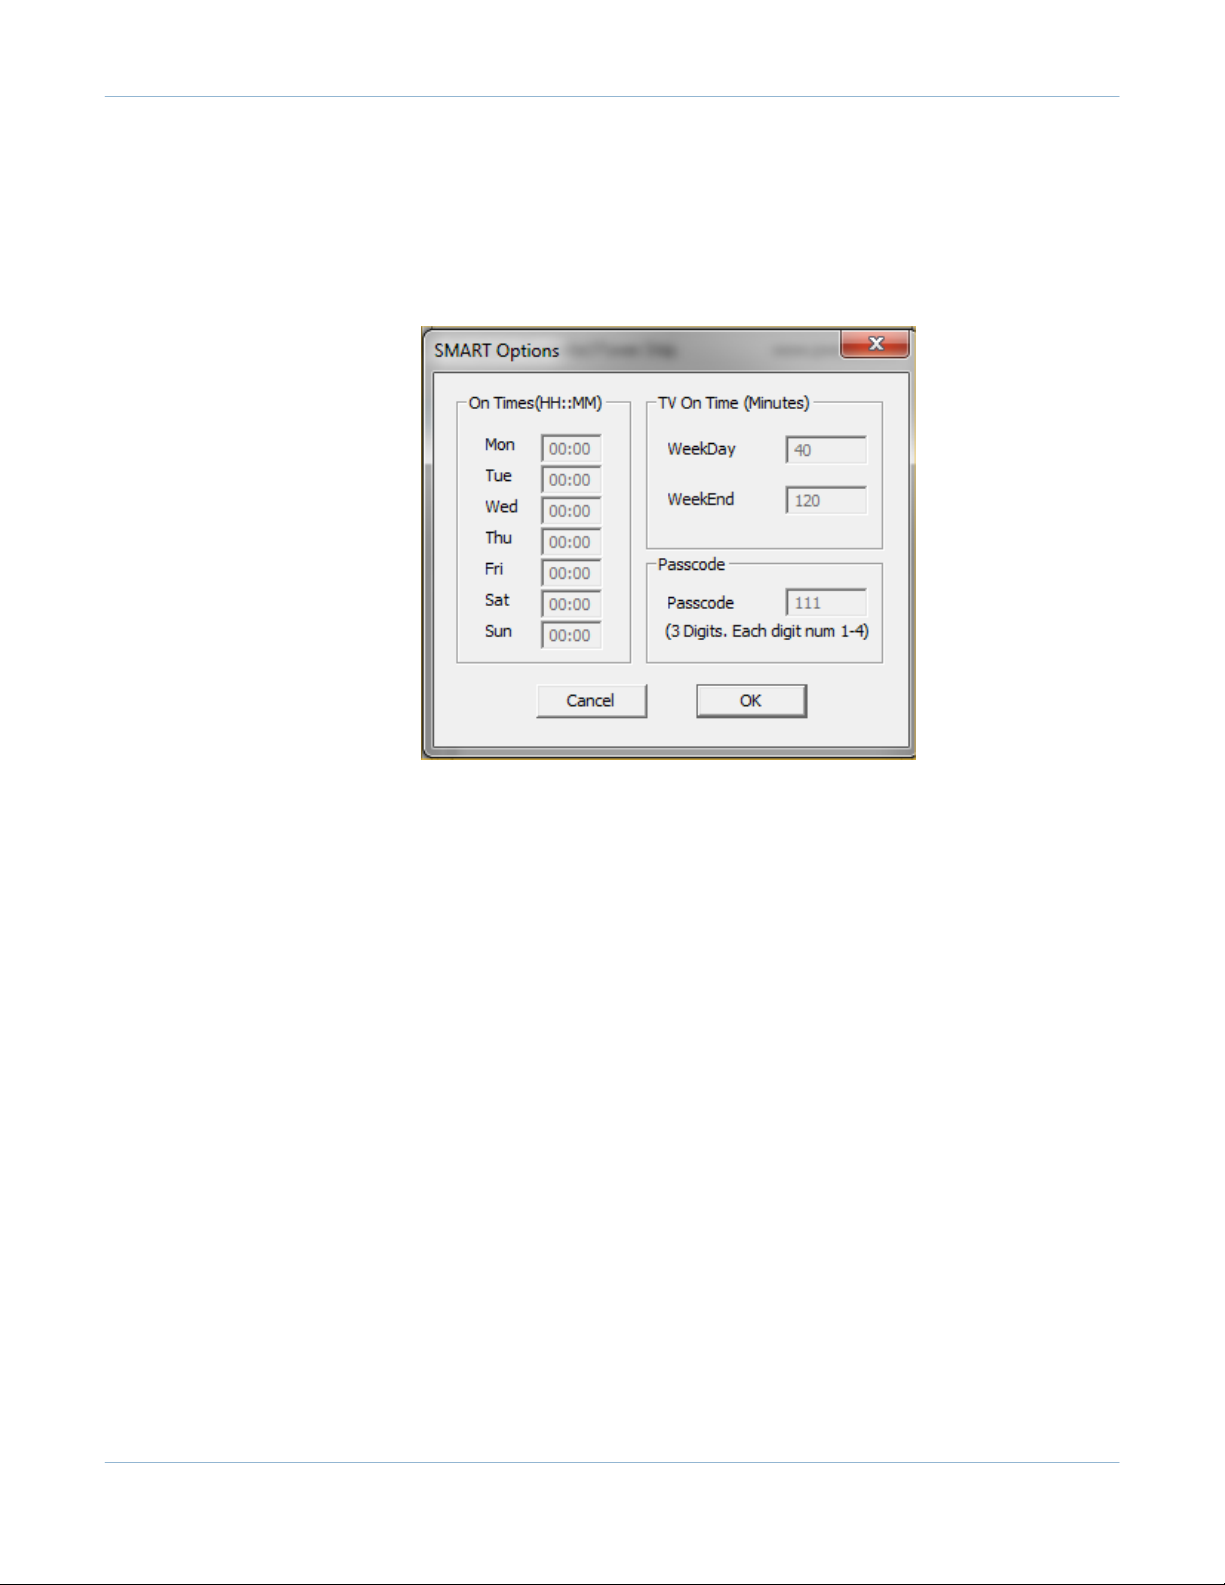
2.3
SMART Dialog Options
The SMART dialog displays the TV On Times for each of the past seven days. There are also options for
future TV Limit modes that are disabled by default.
Table of contents
Other POWER USB Power Supply manuals

Popular Power Supply manuals by other brands

IBM
IBM PowerLinux 7R2 Installing

Anolis
Anolis ArcPower Micro 270 user manual

Artesyn
Artesyn RTM-ATCA-749X quick start guide

CPS
CPS DPA03-800V/US Installation and operation manual

Avaya
Avaya 1151D1 Installation and safety instructions

EA-ELEKTRO-AUTOMATIK
EA-ELEKTRO-AUTOMATIK EA-ELR 9000 HP Series quick start guide


