Powerfix Profi 280231 User manual

IAN 280231
DIGITAL ANGLE FINDER
Operation and Safety Notes
DIGITAALINEN KULMAMITTA
Käyttö- ja turvallisuusohjeet
DIGITAL VINKELMÄTARE
Bruksanvisning och säkerhetsanvisningar
KĄTOMIERZ CYFROWY
Wskazówki dotyczące obsługi i bezpieczeństwa
SKAITMENINIS KAMPAMATIS
Naudojimo ir saugos pastabos
DIGITALER WINKELMESSER
Bedienungs- und Sicherheitshinweise

GB Operation and Safety Notes Page 5
FI Käyttö- ja turvallisuusohjeet Sivu 12
SE Bruksanvisning och säkerhetsanvisningar Sidan 19
PL Wskazówki dotyczące obsługi i bezpieczeństwa Strona 26
LT Naudojimo ir saugos pastabos Psl 34
DE/AT/CH Bedienungs- und Sicherheitshinweise Seite 41

B
A
2
658
1 3
7
4
C
2
65

D
E
2
65

GB 5
Introduction..........................................................Page 6
Intended use................................................................Page 6
Scope of delivery .......................................................Page 6
Description of parts....................................................Page 6
Technical data.............................................................Page 6
Safety instructions..........................................Page 7
Safety instructions for batteries .................................Page 8
Before start of operation..........................Page 9
Insert/replace battery...............................................Page 9
Starting up the device..................................Page 9
Using the angle ruler..................................................Page 9
Troubleshooting ..........................................................Page 9
Cleaning and maintenance.....................Page 10
Disposal....................................................................Page 10
Warranty................................................................Page 11

GB
6
DIGITAL ANGLE FINDER
Q Introduction
We congratulate you on the purchase of your new
device. You have chosen a high quality product. The
instructions for use are part of the product. They
contain important information concerning safety, use and
disposal. Before using the product, please familiarise yourself
with all of the safety information and instructions for use. Only
use the unit as described and for the specified applications. If
you pass the product on to anyone else, please ensure that you
also pass on all the documentation with it.
Q Intended use
Only for private use.
Not for commercial use.
Q Scope of delivery
1x Angle Ruler
1x Battery
1x Instruction for use
Q Description of parts
1Measuring ruler
2Locking knob
3LCD display
4Battery compartment button
5ON/OFF button
6ZERO button
7Battery receptacle
8Hanging hole
Q Technical data
Measurement unit: degrees (°)
Measuring range: 0 - 360°
Resolution: 0.1°
Accuracy: ± 0.3°
Measuring system: Liner capacitive measuring system
Display: LCD display
Operating temperature: +5°C - +40 °C
Influence of humidity: within a range from 0% to 80%
relative humidity irrelevant
Battery: 3V CR2032 (included)

GB 7
Safety instructions
BEFORE USING THIS DEVICE, PLEASE
READ THE DIRECTIONS FOR USE!
PLEASE KEEP THE DIRECTIONS FOR USE
IN A SAFE PLACE!
CAUTION! RISK OF INJURY!
JKEEP THE PRODUCT OUT
OF THE REACH OF
CHILDREN. THIS PRODUCT
IS NOT A TOY! This product should
never be used by children unsupervised.
DANGER TO LIFE AND RISK OF
ACCIDENT FOR TODDLERS AND
CHILDREN! Never leave children alone
and unsupervised with the packaging
material.
JThere is a risk of suffocation from the
packaging material. Children often
underestimate risks. Always keep children
away from the product.
DANGER TO LIFE! Batteries could be
swallowed and pose a lethal hazard.
Consult a doctor immediately if anyone
swallows a battery.
JThis appliance can be used by children
aged from 8 years and above and
persons with reduced physical, sensory
or mental capabilities or lack of
experience and knowledge if they have
been given supervision or instruction
concerning use of the appliance in a safe
way and understand the hazards
involved. Children shall not play with the
appliance. Cleaning and user
maintenance shall not be made by
children without supervision.
JNever expose the product to high
temperatures, water or moisture as this
may damage the product.
JDo not put the angle ruler under any
strain. This may damage the chip in the
angle ruler.
JKeep the angle ruler clean and dry.
Fluids could damage the angle ruler.

GB
8
Safety instructions for
batteries
JCAUTION! RISK OF
EXPLOSION! Never recharge
the batteries!
JBatteries must not be short-circuited. This
could result in over-heating and risk of
fire or explosion.
JRemove a depleted battery from the
product immediately; otherwise there is
an increased risk of leakage!
JKeep batteries out of the reach of
children; do not throw them into fire; do
not short-circuit them; and do not take
them apart.
JEnsure polarity is correct (+ and –).
JOnly use the recommended battery
type.
JIf these instructions are not complied
with, the battery may be discharged
beyond its cut-off voltage. There is then a
risk of leakage. If the battery has leaked
into your device, please remove it
immediately in order to prevent any
damage to the product!
JWear protective gloves! If they
come into contact with skin, leaked or
damaged batteries could cause chemical
burns; you should therefore wear suitable
protective gloves at all times if such an
event occurs.
JAvoid contact with skin, eyes, and
mucous membranes. If you come into
contact with battery acid, rinse the
affected spot with plenty of water
and/or consult a doctor immediately!
J
WARNING!
Switch the product OFF
before inserting the battery (LCD
display 3is off.)
JRemove the battery from the device if it is
not in use for a long period of time.
JDo not, on any account, short-circuit the
terminals.

GB 9
Q Before start of operation
Q Insert/replace battery
Tip: Low voltage symbol showing in the LCD display 3
indicate a discharged/flat battery.
Tip: When changing the battery, the LCD display 3may
experience faults. Remove the battery and insert it again.
j Push the battery compartment button 4, and then pull out
the battery receptacle 7(see fig B).
j Remove the old battery.
j
Insert battery receptacle containing the new battery into the
battery compartment and ensure correct polarity (+ and –).
Make sure that the plus terminal points outwards.
j
Push the battery receptacle 7fully in (see Fig. B).
Q Starting up the device
Q Using the angle ruler
j Press the ON/OFF button to switch the LCD display 3on.
j
Loosen the locking knob 2by turning it anti-clockwise.
j
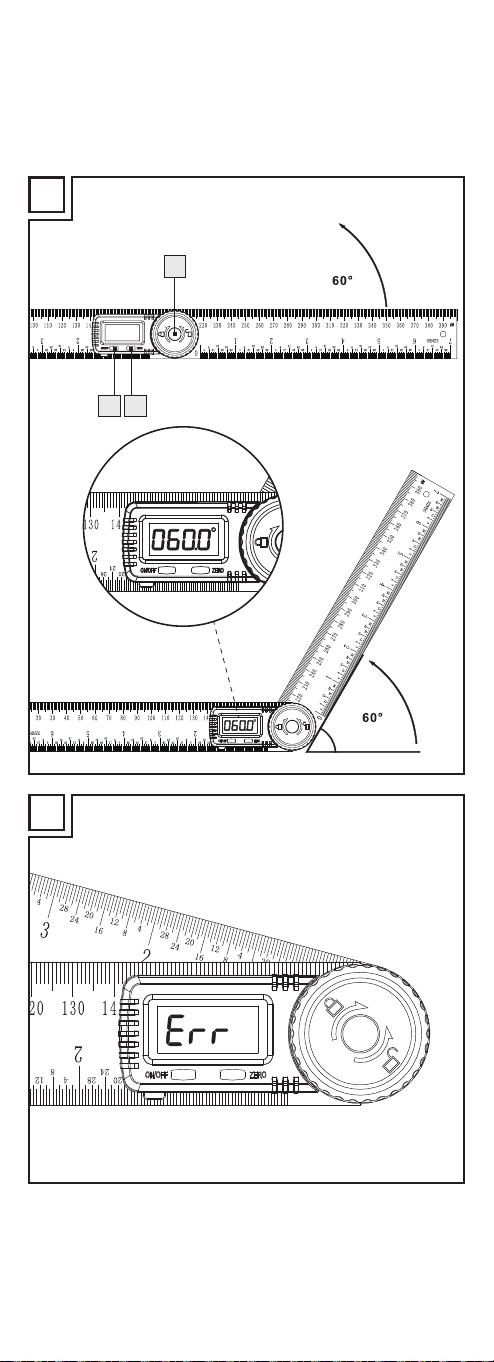
Put on a flat surface. Make sure both rulers
1
are aligned with
the surface (see fig. C), and then press ZERO button
6
to set
data to zero.
j
Rotate the ruler to measure the angle. Note: The locking
knob 2can be tightened by turning it clockwise, so as to
hold a desired measured angle.
j
You may also open the 2 rulers 180° straight aligned with
the surface (see fig. D), and then press ZERO button 6to
set zero. Rotate the ruler to measure the angle.
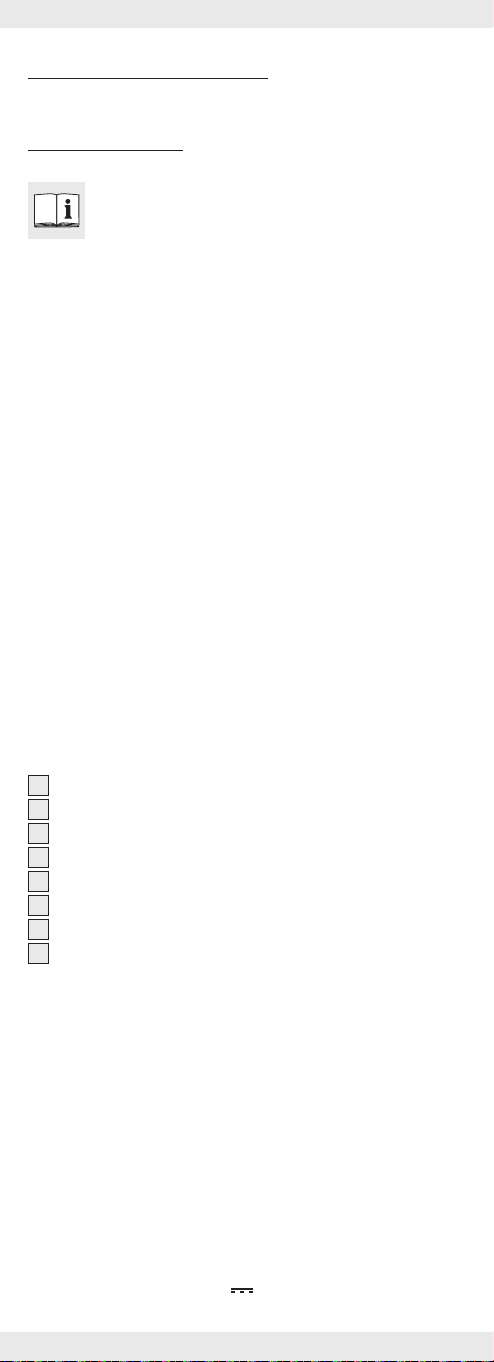
Tip: The display will show “Err”, if the ruler has been turned
over 360° (see fig. E). Turn back the ruler to the original
starting point and measure again.
Tip: The LCD display 3automatically switches itself off after
approx. 4 minutes.
Q Troubleshooting
The device contains sensitive electronic components. That is why
it experiences interference when in close proximity to radio
transmission devices. If any indication errors appear in the
display, remove such devices out of the proximity of the angle
ruler.
Electrostatic discharge could result in malfunctions.
j
When such malfunctions occur, remove the battery for a
short while and re-insert.

GB
10
Failure Cause Solution
Low voltage
symbol
shown on LCD
display 3.
The battery voltage
is lower than 2.7V.
Replace the battery
in line with the chap-
ter on “Inserting /
replacing battery”.
The LCD dis-
play 3does
not continue to
count.
Faulty wiring or
circuit
Remove battery
and re-insert after
30 seconds.
Nothing is dis-
played on the
LCD display 3.
1. LCD display is
switched off.
2. Battery is the wrong
way round or the
battery contact is
poor.
3. The battery voltage
is lower than 2.4V.
1. Switch the LCD
display on by
pressing the ON/
OFF key 5.
2. Remove the bat-
tery and insert /
replace it in line
with the terminals
and the chapter
“Inserting/repla-
cing the battery”
so that it touches
all contacts.
3. Replace the bat-
tery in line with
the chapter “In-
serting / repla-
cing the batte-
ry”.
Q Cleaning and maintenance
j
Clean the angle ruler before and after using it with a dry
cloth; never use petrol, solvents or cleaning agents.
j
Do not immerse the angle ruler into water. Liquids can
damage the angle ruler.
j
Always switch the LCD display 3off when not using the
angle ruler. This will extend the life of the battery.
j
Keep away from electrical current and electrically charged
pens to prevent damage to the chip.
Tip: You may use the hanging hole 8to store the angle ruler
after use or cleaning.
Q Disposal
The packaging is made entirely of recyclable
materials, which you may dispose of at local
recycling facilities.
Contact your local refuse disposal authority for more details of
how to dispose of your worn-out product.

GB 11
To help protect the environment, please dispose of the
product properly when it has reached the end of its
useful life and not in the household waste. Information
on collection points and their opening hours can be
obtained from your local authority.
Faulty or used batteries must be recycled in accordance with
Directive 2006 / 66 / EC and its amendments. Return the
battery and /or the device through the appropriate collection
facilities.
Environmental damage through incorrect
disposal of the batteries!
Batteries may not be disposed of with the usual domestic waste.
They may contain toxic heavy metals and are subject to
hazardous waste treatment rules and regulations. The chemical
symbols for heavy metals are as follows: Cd = cadmium,
Hg= mercury, Pb = lead. That is why you should dispose of
used batteries at a local collection point.
Q
Warranty
The device has been manufactured to strict quality guidelines
and meticulously examined before delivery. In the event of
product defects you have legal rights against the retailer of this
product. Your legal rights are not limited in any way by our
warranty detailed below.
The warranty for this device is 3 years from the date of
purchase. Should this device show any fault in materials or
manufacture within 3 years from the date of purchase, we will
repair or replace it – at our choice – free of charge to you.
The warranty period begins on the date of purchase. Please
keep the original sales receipt in a safe location. This document
is required as your proof of purchase. This warranty becomes
void if the device has been damaged or improperly used or
maintained.
The warranty applies to faults in material or manufacture. This
warranty does not cover product parts subject to normal wear,
thus possibly considered consumables (e.g. batteries) or for
damage to fragile parts, e.g. switches, rechargeable batteries
or glass parts.

FI12
Yleistä ..................................................................... Sivu 13
Käyttötarkoitus.......................................................... Sivu 13
Toimitus...................................................................... Sivu 13
Osaluettelo................................................................ Sivu 13
Tekniset tiedot ........................................................... Sivu 13
Turvallisuusohjeet......................................... Sivu 14
Paristojen turvaohje.................................................. Sivu 15
Ennen käyttöönottoa................................. Sivu 15
Pariston vaihto/asetus............................................. Sivu 15
Käyttöönotto..................................................... Sivu 16
Digitaalisen vesivaa´an käyttö ................................ Sivu 16
Virheiden korjaus...................................................... Sivu 16
Huolto ja puhdistus...................................... Sivu 17
Jätehuolto............................................................ Sivu 17
Takuu........................................................................ Sivu 18

FI 13
DIGITAALINEN KULMAMITTA
Q Yleistä
Onnittelemme sinua uuden tuotteen hankinnasta.
Valitsit erittäin korkealaatuisen tuotteen. Käyttöohje on
osa tätä tuotetta. Se sisältää tärkeitä
turvallisuusohjeita sekä käyttöä ja hävitystä koskevia ohjeita.
Tutustu ennen tuotteen käyttöä huolellisesti kaikkiin käyttöja
turvallisuusohjeisiin. Käytä tuotetta ainoastaan ohjeen mukaan
ja siinä mainittuihin tarkoituksiin. Anna kaikki ohjeet mukaan, jos
luovutat tuotteen edelleen.
Q Käyttötarkoitus
Vain yksityiskäyttöön.
Ei ammattimaiseen käyttöön.
Q Toimitus
1 x digitaalinen vesivaaka
1 x paristo
1 x käyttöohje
Q Osaluettelo
1Digitaalinen vesivaaka
2Lukitusnuppi
3LCD-näyttö
4Paristolokeron painike
5PÄÄLLE/ POIS-painike (ON / OFF)
6ZERO-painike (nollaus)
7Pariston pidike
8Ripustusreikä
Q Tekniset tiedot
Mittausyksikkö: aste (°)
Mittausalue: 0 - 360°
Tarkkuus: 0,1°
Täsmällisyys: ± 0,3°
Mittaussysteemi: lineaarinen, kosketukseton
CAP-mittaussysteemi
Näyttö: LCD-näyttö
Käyttölämpötila: +5°C - +40 °C
Ilmankosteuden vaikutus: 0% bis 80 %
Suhteellinen ilmankosteus
on merkityksetön

FI14
Paristo: 3V CR2032
(sisältyy toimitukseen)
Turvallisuusohjeet
LUE KÄYTTÖOHJEET ENNEN
ENSIMMÄISTÄ KÄYTTÖÄ! SÄILYTÄ
KÄYTTÖOHJEET HUOLELLISESTI!
VAROITUS!
LOUKKAANTUMISVAARA!
JEI LASTEN KÄSIIN! TÄMÄ EI
OLE LEIKKIKALU! Lapset eivät
saa käyttää tuotetta ilman
aikuisten valvontaa.
LAPSILLE HENGEN- JA
LOUKKAANTUMISVAARA! Älä
jätä lapsia koskaan pakkausmateriaalin
lähettyville ilman valvontaa!
J Pakkausmateriaali merkitsee
tukehtumisvaaraa! Lapset aliarvioivat
usein vaarat. Pidä lapset aina pois
tuotteen ulottuvilta.
HENGENVAARA! Lapset voivat niellä
paristoja, mikä merkitsee hengenvaaraa.
Ota yhteys lääkäriin heti, jos lapsi nielee
pariston.
J Laitetta voivat käyttää 8 vuotta täyttäneet
lapset ja henkilöt, jotka ovat fyysisiltä tai
psyykkisiltä kyvyiltääntai aisteiltaan
rajoittuneita tai joilla ei ole kokemusta tai
tietoa laitteen käytöstä, jos he käyttävät
laitettavalvonnan alaisina tai heitä on
opastettu laitteen turvallisessa käytössä
ja he ovat tietoisia laitteeseen liittyvistä
vaaroista. Lapset eivät saa leikkiä
laitteella. Lapset eivät saa puhdistaa tai
huoltaa laitetta ilman valvontaa.
J Vältä liikaa kuumuutta tai kosteutta, sillä
tuote saattaa vahingoittua.
J Älä kuormita vesivaakaa millään tavoin.
Laitteessa oleva siru voisi vahingoittua.
J Pidä vesivaaka puhtaana ja kuivana.
Nesteet ja kosteus voivat vahingoittaa
laitetta.

FI 15
Paristojen turvaohje
J
VAROITUS!
RÄJÄHDYSVAARA! Paristoja
ei saa koskaan ladata uudelleen!
J Paristoja ei saa oikosulkea.
Kuumentuminen, palovaara ja räjähdys
saattaa olla seurauksena.
J Poista käytetty paristo heti tuotteesta.
Vuotovaara!
J Paristoja ei lasten käsiin, niitä ei saa
heittää tuleen, ei saa yhdistää toisiinsa
eikä purkaa.
JKatso oikea napaisuus: (+ ja -).
JKäytä vain suositeltua paristotyyppiä.
J Virheellinen käyttö saattaa johtaa
pariston purkautumiseen. Vuotovaara. Jos
laitteen paristo on vuotanut, poista se
heti välttääksesi tuotteen vahinkoitumista!
J Käytä suojakäsineitä! Tyhjät tai
vialliset paristot voivat syövyttää ihoa.
Pidä aina ehdottomasti sopivia
suojakäsineitä, kun käsittelet paristoja.
J Vältä kosketusta ihoon, silmiin,
limakalvoihin. Paristohappo on
huuhdeltava heti pois runsaalla vedellä
ja/tai otettava yhteys lääkäriin.
J VAROLTUS!Sulje laite POIS päältä, kun
asetatat pariston paikoilleen (LCD-
näyttö 3pois päältä).
J Kun laitetta ei käytetä pitempään aikaan,
poista paristo laitteesta.
J Älä koskaan tee oikosulkua napojen
välillä.
Q Ennen käyttöönottoa
Q Pariston vaihto/asetus
Ohje: Alhaisen jännitteen symboli LCD-näytössä 3
merkitsee, että pariston varaus on purkautunut / paristo on
tyhjä.
Ohje: Paristoa vaihdettaessa LCD-näytössä 3saattaa
esiintyä virheitä.Poista paristo ja aseta se uudelleen sisään.
j
Paina paristolokeron painiketta 4ja vedä pariston
pidike 7ulos (kuva B).
j Poista vanha paristo.

FI16
j
Aseta pariston pidike, joka sisältää uuden pariston
paristolokeroon ja tarkista oikea napaisuus (+ ja –).
Varmista, että plusliitin näyttää ulospäin.
j
Paina pariston pidike 7kunnolla sisään (kuva B).
Q Käyttöönotto
Q Digitaalisen vesivaa´an käyttö
j
Kytke LCD-näyttö 3päälle painamalla ON/OFF-
painiketta.
j
Avaa lukitusnappi 2kääntämällä sitä vastapäivään.
j
Aseta laite tasaiselle pinnalle.Varmista, että vesivaa´an
1
molemmat kyljet ovat kuvan C osoittamalla tavalla ja paina
sitten ZERO-painiketta
6
nollataksesi laitteen.
j
Käännä viivainta, jotta voit mitata kulman.Huomio:Mitattu
kulma voidaan lukita kääntämällä lukitusnappia 2
myötäpäivään.
j
Voit asettaa molemmat viivaimet myös 180° asentoon
kuvan D osoittamalla tavalla ja painaa sitten ZERO-
painiketta 6nollataksesi laitteen.Käännä viivainta, jotta
voit mitata kulman.
Ohje: Näyttöön ilmestyy “Err”, jos viivainta on käännetty yli
360° (kuva E). Käännä viivain takaisin alkuperäiseen
aloituspisteeseen ja mittaa uudelleen.
Ohje: Noin 4 minuutin jälkeen LCD-näyttö menee 3
automaattisesti pois päältä.
Q Virheiden korjaus
Laitteessa on herkkiä sähköosia. Radiolaitteet lähistöllä voivat
vaikuttaa laitteeseen.Jos näytössä näkyy virheellisiä tuloksia,
poista tällaiset laitteet vesivaa´an läheisyydestä. Electrostatic
discharge could result in malfunctions.
Elektrostaattiset lataukset voivat aiheuttaa häiriöitä.
j
Jos sellaisia häiriöitä esiintyy, ota paristot hetkeksi pois ja
laita ne uudelleen paikoilleen.
Virhe Syy Apu
Alhaisen
jännitteen symboli
ilmestyy LCD-
näyttöön 3.
Paristojännite alle
2,7V.
Vaihda paristo
seuraamalla ohjeita
kappaleen „Pariston
asetus/ vaihto“.
LCD-näyttö 3ei
laske enää
eteenpäin.
Viallinen kytkentä. Ota paristo ulos ja laita
se 30 sek. päästä
takaisin paikoilleen.

FI 17
Virhe Syy Apu
LCD-näyttö ei
toimi. 3.
1.
LCD-näyttö on
pois päältä.
2. Paristo ei saa
kontaktia
tai on
väärinpäin.
3. Paristojännite
alle 2,4V.
1. Laita LCD-näyttö
päälle painamalla
PÄÄLLE/ POIS- 5
painiketta.
2. Ota paristo pois ja
laita se paikoilleen
napaisuudet
huomi
oimalla ja
kappale
en „Pariston
asetus/ vaihto“
mukaan niin, että
kaikki vastukset ovat
kosketuksissa.
3. Vaihda paristo
kappaleen
„Pariston
asetus/ vaihto“
mukaan.
Q Huolto ja puhdistus
j
Puhdista vesivaaka ennen ja jälkeen käytön kuivalla liinalla;
älä koskaan käytä bensiiniä, liuotinaineita tai
puhdistusaineita.
j
Älä upota vesivaakaa veteen.Nesteet voivat vahingoittaa
vesivaakaa.
j
Kytke LCD-näyttö 3aina pois päältä kun et käytä laitetta.
Näin paristo kestää pidempään.
jÄlä altista laitetta sähkövirralle tai sähköllä toimiville kynille,
sillä ne saattavat vahingoittaa sirua.
Ohje: vesivaakaa voidaan säilyttää ripustamalla se
ripustusreiästä 8käytön tai puhdistuksen jälkeen.
Q Jätehuolto
Pakkaus koostuu ympäristöystävällisistä
materiaaleista ja voit toimittaa sen paikallisiin
kierrätyspisteisiin.
Voit tiedustella käytettyjen tuotteiden jätehuoltoa koskevista
mahdollisuuksista kunnan tai kaupungin virastosta.
Älä hävitä käytöstä poistettua tuotetta
kotitalousjätteen mukana, vaan vie se
keräyspisteeseen. Suojelet näin luontoa. Kuntasi /
kaupunkisi ympäristöviranomaiset antavat lisätietoja
keräyspisteistä ja niiden aukioloajoista.
Vialliset ja käytetyt akut on kierrätettävä direktiivin
2006/66/EY mukaisesti. Palauta akku ja / tai laite tarjolla
olevaan keräyslaitokseen.

FI18
Paristojen väärä hävittäminen aiheuttaa
ympäristövahinkoja!
Paristoja ei saa hävittää talousjätteenä. Ne voivat sisältää
myrkyllisiä raskasmetalleja ja ne kuuluvat
ongelmajätekäsittelyyn. Raskasmetallien kemialliset merkit ovat
seuraavat: Cd = kadmium, Hg = elohopea, Pb = lyijy. Toimita
tästä syystä vanhat paristot kunnalliseen keräyspisteeseen.
Q
Takuu
Laite on valmistettu huolellisesti tiukkojen laatudirektiivien
mukaan ja tarkistettu huolella ennen toimitusta. Jos tuote on
virheellinen, sinulla on ostajana lakisääteiset oikeudet esittää
vaatimuksia tuotteen myyjää kohtaan. Seuraavassa esitetty
takuu ei rajoita lakisääteisiä oikeuksiasi.
Laitteelle myönnetty takuu on voimassa 3 vuotta ostopäivästä
lukien. Takuun voimassaolo alkaa tuotteen ostopäivästä. Säilytä
aina alkuperäinen kassakuitti. Se toimii todisteena tehdystä
ostoksesta.
Jos 3 vuoden sisällä tuotteen ostopäivästä alkaen tuotteesta
löytyy materiaali- tai valmistusvirhe, korjaamme tuotteen
ilmaiseksi tai toimitamme tilalle uuden tuotteen harkintamme
mukaan. Takuu raukeaa, jos tuote on vioittunut asiattoman
käytön tai huollon vuoksi.
Takuu koskee materiaali- ja valmistusvirheitä. Takuu ei kata
tuotteen osia, jotka kuluvat normaalissa käytössä ja siitä syystä
pidetään kuluvina osina (esim. paristot) tai vaurioita särkyvissä
osissa esim. kytkimessä, akuissa tai lasista valmistetuissa osissa.

SE 19
Inledning..............................................................Sidan 20
Ändamålsenlig användning....................................Sidan 20
Leveransomfång.......................................................Sidan 20
Beskrivning av delarna ...........................................Sidan 20
Tekniska data ...........................................................Sidan 20
Säkerhetsinformation..............................Sidan 21
Säkerhetsinformation beträffande batterier..........Sidan 22
Före idrifttagandet......................................Sidan 22
Lägga i/Byta ut batteriet .......................................Sidan 22
Idrifttagande....................................................Sidan 23
Med hjälp av vinkellinjal.........................................Sidan 23
Att åtgärda fel..........................................................Sidan 23
Underhåll och rengöring........................Sidan 24
Avfallshantering............................................Sidan 24
Garanti...................................................................Sidan 25

SE20
DIGITAL VINKELMÄTARE
Q Inledning
Grattis till köpet av din nya produkt. Du har köpt en
högklassig produkt. Bruksanvisningen hör till
produkten. Den innehåller viktiga anvisningar för
säkerhet, användning och avfallshantering. Läs
säkerhetsanvisningarna och monteringsanvisningen innan du
använder produkten. Använd produkten endast enligt
beskrivningen och endast för de angivna ändamålen. Se till att
bruksanvisningen alltid finns tillgänglig även vid vidare
användning av tredje man.
Q Ändamålsenlig användning
Endast för privat bruk.
Ej för yrkesmässig användning.
Q Leveransomfång
1 x Vinkellinjal
1 x Batteri
1 x Bruksanvisning
Q Beskrivning av delarna
1Mätlinjal
2Låsvred
3LCD-display
4Knapp för batterifack
5PÅ/ AV-knapp (ON/OFF)
6ZERO-knapp
7Inställningshjul för mätspetsar
8Upphängnings hål
Q Tekniska data
Mätenhet: grader (°)
Mätområde: 0 - 360°
Upplösning: 0,1°
Noggrannhet: ± 0,3°
Mätsystem: linjärt, utan kontakt
CAP-mätsystem
Indikering: LCD-display
Arbetstemperatur: +5°C - +40 °C
Påverkan genom luftfuktighet: utan betydelse vid 0 % till 80 %
relativ luftfuktighet
Other manuals for 280231
9
Table of contents
Languages:
Other Powerfix Profi Camera Accessories manuals