PowerPortLA THERACK All In One Gym User manual

1

2
TABLE
OF CONTENTS
Important Safety Information 3
Parts List 4
Assembling THERACK® 5–7
How To Unfold THERACK® 8
How To Fold THERACK® 9
THERACK® Levels 10
Warranty 11

3
IMPORTANT
SAFETY INFORMATION
IMPORTANT: Please read and follow all instructions thoroughly before
using THERACK®.
• Maximum user weight is 250 lbs.
• ALWAYS USE CAUTION WHEN GETTING ON AND OFF THERACK®.
• KEEP THERACK® OUT OF THE REACH OF CHILDREN. THERACK® is not a toy and is
not meant to be used by or near children and pets. Please keep children and pets away
from THERACK® during use, as well as when the product is left unattended. If you have
children, it is your responsibility to ensure that they do not place any part of their body
such as their fingers near the unit while you are exercising.
• Consult your physician before beginning any exercise or diet program, especially if you
have concerns about your physical and fitness levels and overall suitability for exercising
with THERACK®.
• If you experience any pain or unusual discomfort during exercising, stop your workout
at once and consult a physician before continuing.
• When using THERACK® , follow the instructions provided in this booklet. Do not use
the product for any other exercises or motions which are not contained herein.
• ONLY USE THE THERACK® ON A FLAT, STABLE SURFACE.
• Use only accessories and attachments recommended by the manufacturer. Use of any
other attachments or accessories not recommended by the manufacturer will void the
warranty and could possibly cause serious personal injury or damage to you and the unit.
• Always choose the proper workout level which best suits your physical strength
and flexibility.
• Know your limits and train within them. Always use common sense when exercising.
If you have any questions regarding your exercise program, please see your physician.
• DO NOT USE THERACK® if it is damaged in any manner. Inspect before each use.
Failure to observe this warning could result in personal injury while exercising.
• Use the machine only for intended use as described herein. DO NOT modify the machine.
• Do not replace any parts with parts from other equipment or other manufacturers.
Use only parts provided by the manufacturer.
SAVE THESE INSTRUCTIONS

4
PARTS LIST
Part No. Part Name Quantity
1 Down Frames 2
2 Up Frames 2
3 Cross Brace 1
4 Pull Pins 2
5 Long Bolts 2
6 Washers 4
7 Lock Nuts 2
8 Foam Grips 4
9 Foam Grips (Curl) 2
Part No. Part Name Quantity
10 End Caps 6
11 Inside Caps 2
12
Round-Head Allen Bolts
6
13 Bushings 4
14 Wheels 4
15 Knobs 4
16
Tool A - allen wrench - S8
1
17 Tool B - S17, S19 1
5
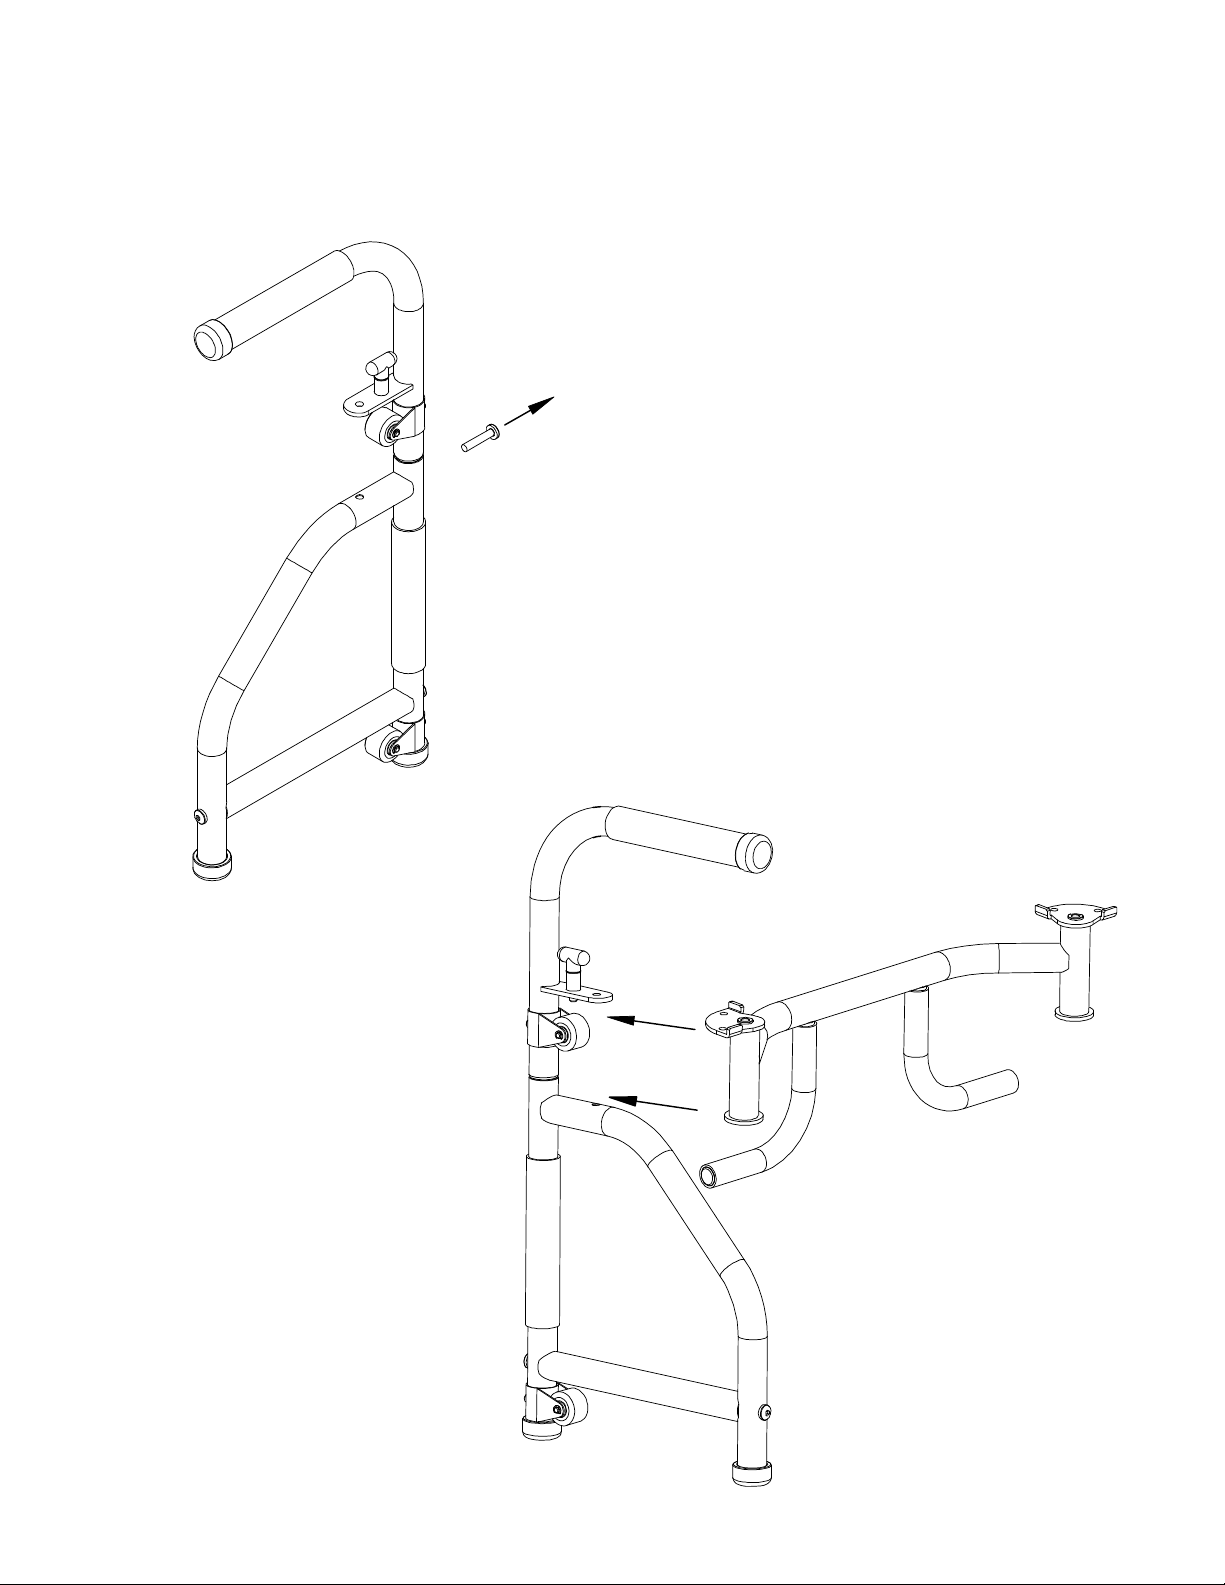
STEP 2
Align one end of the Cross
Brace (PART #3) with the
hole located next to the Pull
Pin (PART #4). Make sure the
handles of the Cross Brace are
facing down towards the oor
and the bend of the Cross Brace
is towards the front of the unit.
Align the bottom of the cylinder
with the hole in the Down Frame
(PART #1).
STEP 1
Loosen the Round-Head Allen Bolt
(PART# 12), Do not secure at this time.
All the necessary hardware has been placed in their correct location for ease of assembly. You
will need to remove many of the bolts and re-insert them during the assembly of this item.
ASSEMBLING TheRack®

6
STEP 5
Secure the Round-Head
Allen Bolt (PART #12) at
this time.
STEP 6
Repeat Steps 1, 2, 3, 4 and 5 to
assemble the other end of the
Cross Brace and side. Then you
may go back and secure the
Long Bolt from STEP 4.
STEP 4
Secure the bolt with the
Washer and Lock Nut
(PART #7) provided. Do
not tighten completely
as there may be
adjustments needed to
complete the assembly.
STEP 3
Place a Washer (PART #6)on the Long Bolt (PART #5) and then insert
the bolt down through the hole next to the Pull Pin (PART #4).Continue
to insert the bolt through the cylinder (of the Center Brace) and the
Down Frame (PART #1) so that the end of the bolt becomes exposed.
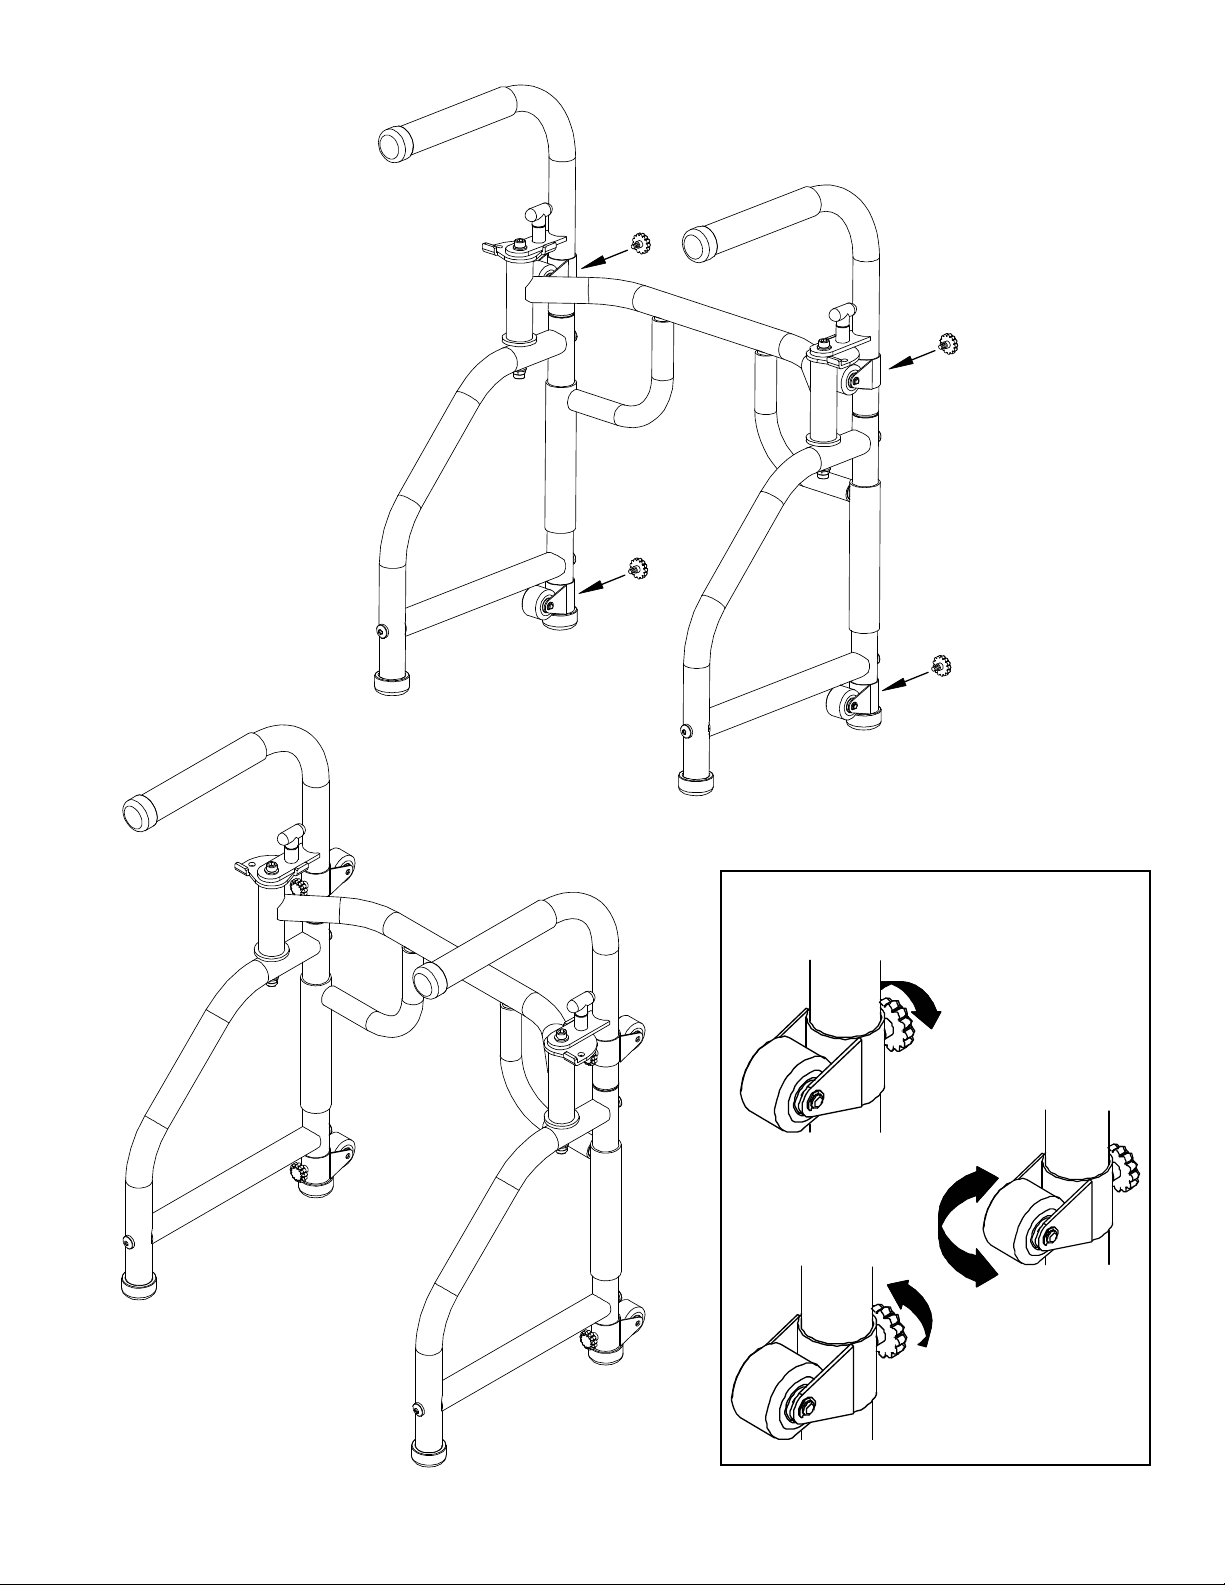
7
STEP 8
THERACK® is now
completely assembled.
STEP 7
Insert and tighten the Knobs
(PART #15).
STEP 1
Turn the Wheel lock
counter-clockwise to
loosen the Wheel.
Adjusting the Wheels
STEP 3
Turn the Wheel lock
clockwise to lock the
Wheel in place.
STEP 2
Rotate the Wheel to
the desired position.
8
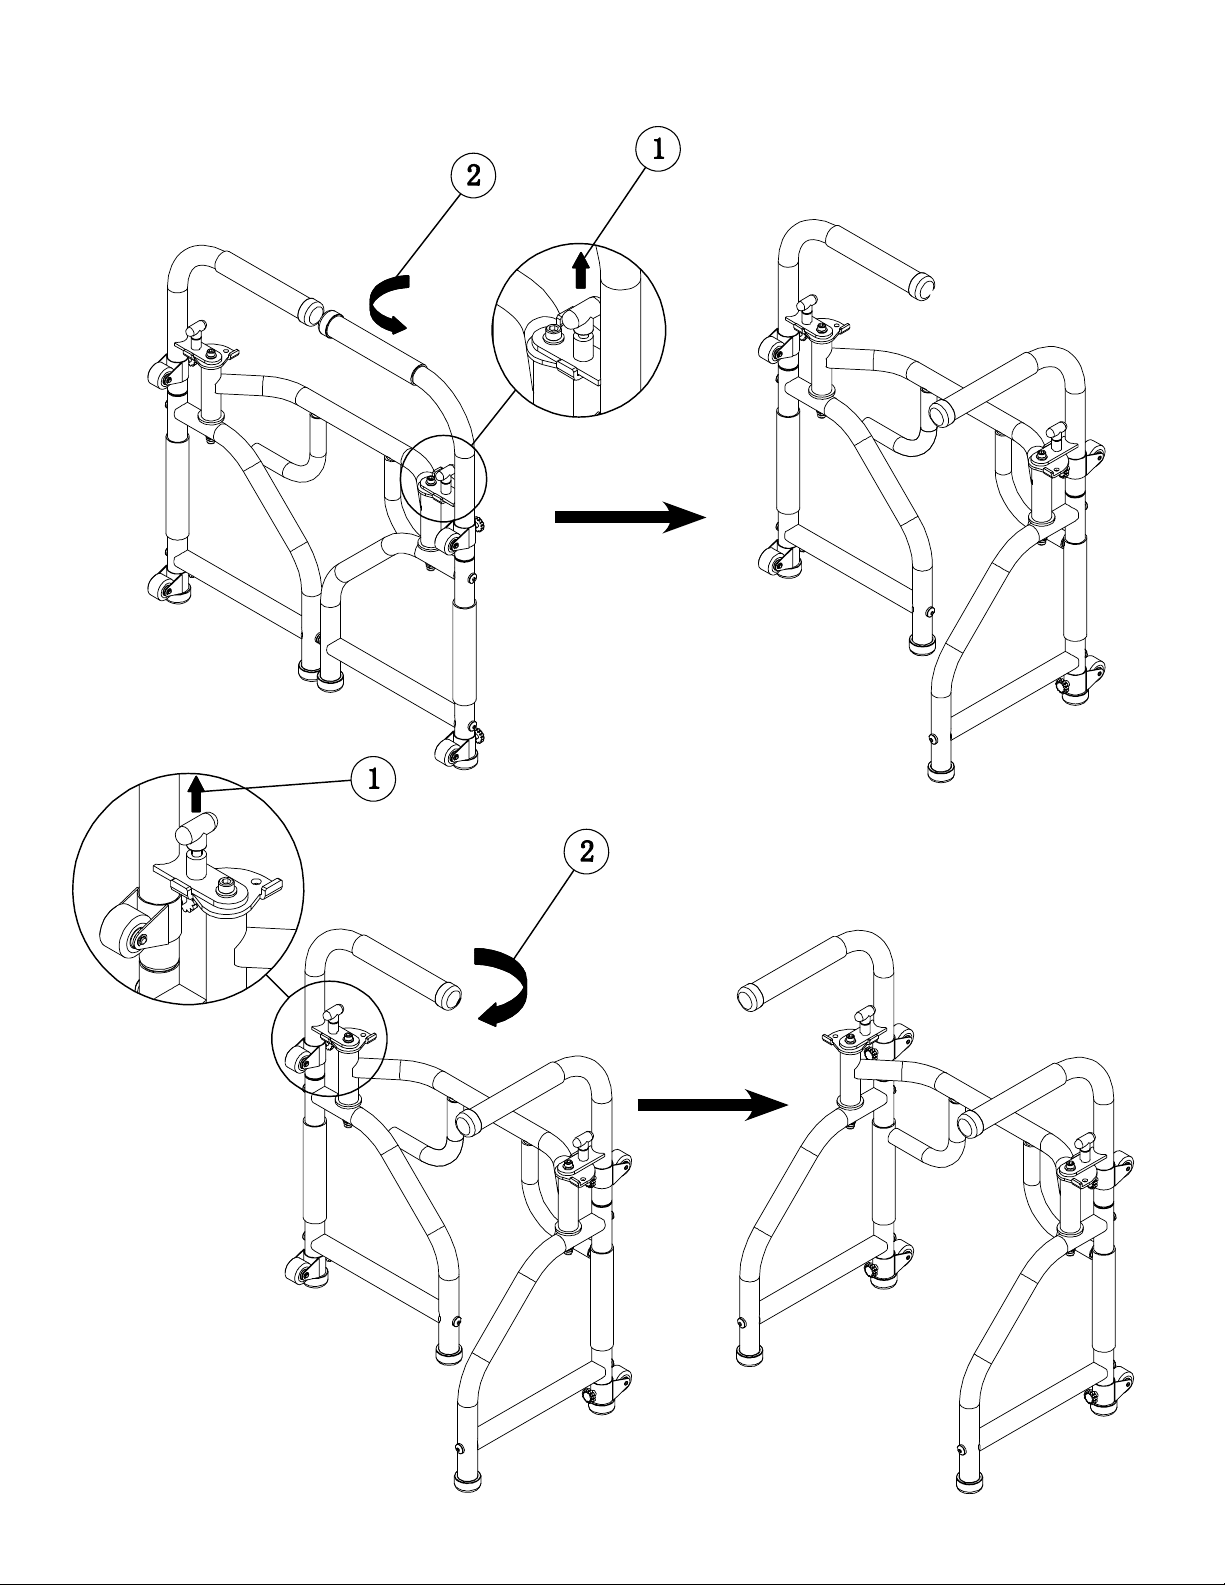
HOW TO UNFOLD TheRack®
1 - Pull up on the Pull Pin on
right side of THERACK®.
2 - Rotate the right side of
the Up Frame outward
until the Pull Pin locates
the locking hole.
1 - Pull up on the Pull Pin on
left side of THERACK®.
2 - Rotate the left side of the
Up Frame outward until
the Pull Pin locates the
locking hole.

9
HOW TO FOLD TheRack®
1 - Pull up on the Pull Pin on
left side of THERACK®.
2 - Rotate the left side of the
Up Frame inward until
the Pull Pin locates the
locking hole.
1 - Pull up on the Pull Pin on right
side of THERACK®.
2 - Rotate the right side of the Up
Frame inward until the Pull Pin
locates the locking hole.

10
Level 1
Level 2
Level 3
TheRack® LEVELS
You can perform exercises in three different machine congurations. Each targets the muscles differently
by changing hand and body positions to build core strength, muscle balance, power and endurance.

11
Manufacturer’s Limited Warranty
The manufacturer warrants that THERACK® is free of defects in materials and workmanship
and will, at its option, repair or replace any defective THERACK® that is returned to it. All parts
and components of THERACK® are warranted for 60 days from the original date of purchase.
This warranty is valid only in accordance with the conditions set forth below:
1. Normal wear and tear are not covered by this warranty. This warranty applies
to consumer use only, and is void when the product is used in a commercial or
institutional setting.
2. The warranty extends only to the original consumer purchaser and is not transferable.
In addition, proof of purchase must be demonstrated. This warranty is void if the
product has been subject to accident, misuse, abuse, improper maintenance or repair,
or unauthorized modification.
3. This limited warranty is the only written or express warranty given by the manufacturer.
Any implied warranty of merchantability or fitness for a particular purpose on this product
is limited in duration to the duration of this warranty. Some states do not allow limitations
on how long an implied warranty lasts, so the above limitation may not apply to you.
4. Repair or replacement of the product (or, if repair or replacement is not feasible, a refund
of the purchase price) is the exclusive remedy of the consumer under this warranty. The
manufacturer shall not be liable for any incidental or consequential damages for breach
of this warranty or any implied warranty on this product. Some states do not allow the
exclusion or limitation of incidental or consequential damages, so the above limitation
or exclusion may not apply to you.
5. This warranty gives you specific legal rights, and you may also have other rights which
vary from state to state.
Procedure for Warranty Repairs or Replacement:
If warranty service is necessary, the original purchaser must pack the product securely and
send it postage paid with a description of the defect, proof of purchase, and a check or
money order for $29.99 to cover return postage and handling to the following address:
THERACK®, P.O. Box 3007, Wallingford, CT 06492.

12
U.S. Patent Nos 5,961,430, 6,248,048, & 6,692,417 are owned by PowerPortLA, LLC and used under license.
THERACK® word and design marks are federally registered trademarks owned by PowerPortLA, LLC and under license. All rights reserved.
TR_RTLMAN_TP_ENG_V1_110117
Congratulations on your purchase of THERACK®.
We are very proud of the functional design and exceptional quality of this product.
Our manufacturing process is geared to deliver long years of product service to our
valued customers. Should you experience any problem with your purchase,
our dedicated customer service staff is here to serve you.
We are available at:
1-973-287-5143
or see our website at:
www.rackworkout.com
Distributed By:
Tristar Products, Inc.
Faireld, NJ 07004
Table of contents


