PREDICTWIND DATAHUB User manual

Aqua Map Navionics Boating
Configuring Internet Access
Access to the internet is required to send position information from the DataHub to PredictWind.
Although a dedicated Internet connection is desired for real time updates to your tracking
website it is not required. DataHub will store acquired position reports internally for later
transmission if an Internet connection is not available. This for example might be used by
sailors sailing offshore away from cell phone coverage who do not own satellite phones.
Someone could cross the north Atlanic from Newfoundland, CA to Ireland while tracking their
voyage. Initially their tracks while cruising in coastal Canada will be updated in real time. As
they leave Canada and spend a full month offshore in the North Atlantic, position reports will be
stored in the DataHub’s internal nonvolatile memory. Once the vessel arrives in Ireland and Cell
phone Internet access is arranged, all of the stored position reports will be uploaded to

PredictWind for display on the tracking portal. Real time tracking can only occur while there is
Internet access, but users can track their global voyages without it.
DataHub provides four different ways to connect to the Internet. These include:
● USB Connected iOS devices
● USB Connected Android Devices
● Ethernet connected router with Internet access such as a broadband satellite device
(Iridium Certus, Inmarsat Fleet Broadband, KVH Vsat, etc) or an LTE enabled router
such as a Pepwave.
● WiFi bridge to MyFi devices such as a Netgear Aircard, Cricket wireless router, Verizon
Jetpack and others.
Multiple Internet connections can be configured at the same time. For example, users could
use a USB connected Android phone as well as an Ethernet connected satellite terminal. When
the satellite phone is on then data is routed through it. If the satellite phone is off then data is
routed through the Android connected device. If none of the two are available then the position
reports are stored internally in non-volatile memory until an Internet connection is available.
Internet via USB connected iOS device
Use a standard lightning iOS USB charging cable to connect your iPhone or iPad to the USB
port on the DataHub.
Once connected iOS will prompt you as to whether the DataHub should be trusted or not.
Select “Trust.
On the iOS device navigate to Settings->Settings->Personal hotspot and enable it as depicted
below.

The DataHub should now be connected to the Internet if your iOS device has Internet
connectivity. See section below called “Verifying Internet Connectivity” to confirm that the
device is connected to the Internet.
Internet via Android
To establish an internet connection via Android connect the devices USB charging cable to the
DataHub’s USB connection.

On the Android device now navigate to “Settings->Network & Internet->Hotspot & tethering” and
enable USB tethering.
The DataHub should now be connected to the internet. See section below called “Verifying
Internet Connectivity” to confirm that the device is connected to the Internet.
You will need to repeat the process every time you disconnect and reconnect the Android device
to the DataHub’s USB port. However, there is a good trick that allows you to automate this
process so that the phone enters USB tethering mode automatically when you plug it in.
Detailed instructions on configuring automatic USB tethering are beyond the scope of this guide
but are described in detail in the following article.
Internet via Ethernet WAN port
This is the simplest of all methods. Run an Ethernet cable from your vessels router LAN port to
the port labeled WAN on the DataHub. DataHub’s WAN port is the RJ-45 jack furset way from
the power connector.
The DataHub should now be connected to the internet. See section below called “Verifying
Internet Connectivity” to confirm that the device is connected to the Internet.
Internet connection via WiFi Tethering
Although WiFi tethering is the most complex of all Internet connectivity methods it is quite
effected and once configured very convenient to use. The DataHub will persistently search for
the remote access point and once found will automatically connect to it. No buttons or settings
need to be changed between power up/down. The Hub searches and automatically connects.
Access points can be your phone in mobile hotspot mode or a dedicated WiFi access point.
When using your phone, enable hotspot mode and the DataHub will automatically connect to it.
This for many is more convenient than plugging the phone into the USB port on the DataHub
since the DataHub connects to the phone wirelessly. If you have your DataHub installed in a
cabinet then you will probably want to use this method for Internet connectivity.
To configure WiFi tethering WiFi connect to the DataHub, login into the web administrator, and
browse to “Settings” under “Services”.

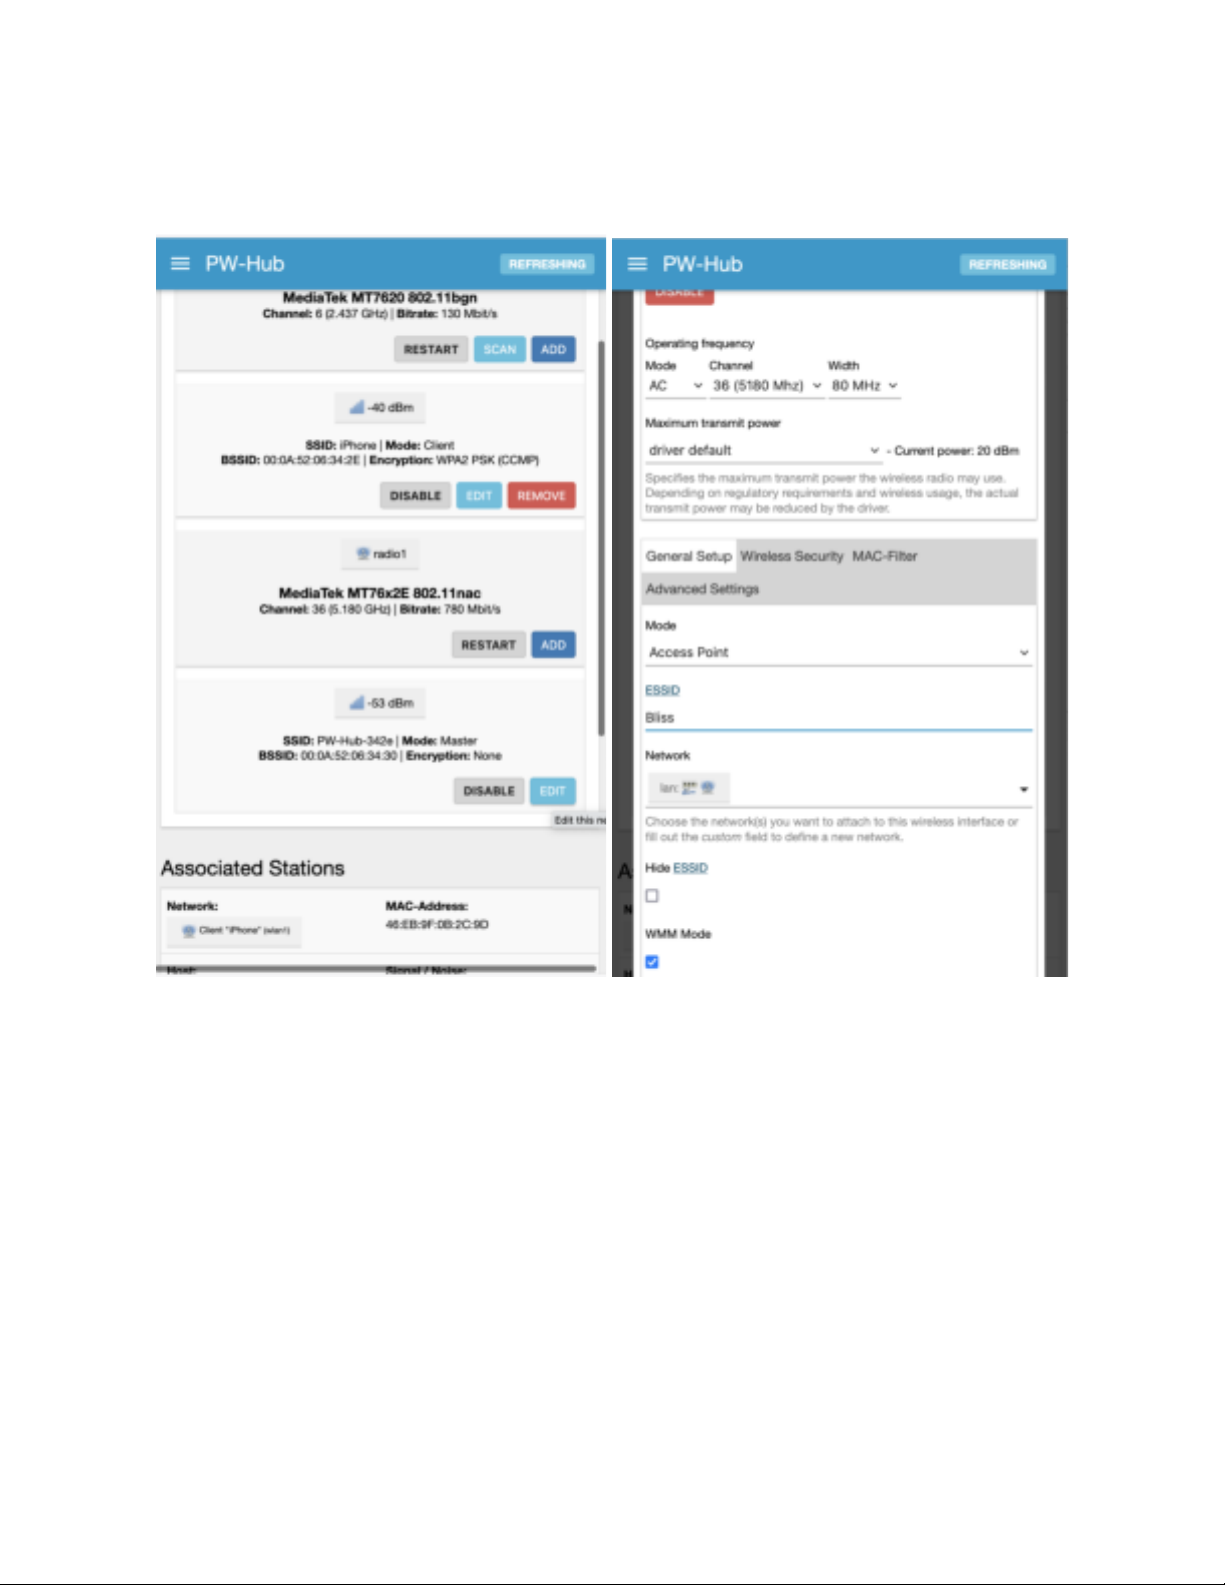
Now navigate to the WiFi tab

You will see two WiFi radios listed there. radio0, the first one listed on the page, is used for
tethering. You will note that its disabled and has a name “SSID: WiFi Client” with mode “Client”.
Radio1 is the WiFi radio that you use are currently using to connect to the DataHub. Its the
radio with “SSID: PW-Hub-XXXX” with mode “Master”. We will return to this radio later in the
guide when we discuss how to password protect the WiFi connection to your DataHub and
change its broadcast WiFi name or SSID.
Push the “SCAN” button next to radio0 to list all the available WiFI access points near you.
Select the one you desire to connect to and tap “JOIN NETWORK”. In this example I am
selecting my iPhon in hotspot mode. Next enter the passphrase for the WiFi access point then
tap “SUBMIT” at the bottom of the page.

On the following page review and hit “SAVE” at the bottom of the page. Don’t make any
changes to this page unless you are an expert and know what you are doing. Back on the
wireless overview page scroll to the bottom and push “SAVE & APPLY” to confirm your settings
and activate them. You can push the “UNSAVED CHANGES” button at the top right of the page
if you want to discard the session without connecting.

You know if you have successfully WiFi tethered to the remote access point by looking at the
status in “Associated Stations”.

You will see the SSID of the remote station listed with signal strength and a transit(TX) and
receive(RX) rate. You will know that the station is not available or you were not successful (if
say you entered the password incorrectly) when the signal bounces between 0 and some value
and the RX/TX rates drop to zero.
But… note there are easier and better ways to know if you are connected to the internet as
described in the “Verifying Internet Connectivity” section.
Enabling Tracking
To enable tracking, browse to the “Services->Tracking” page. Once there check the “Enable
Tracking” checkbox, note the “Serial Number”, and set the tracking interval to the desired value.
The default tracking interval is 15 minutes per position report. This value is fine for vessels
moving at displacement speeds. Faster moving vessels may want to decrease the interval
period.
Press the “Save & Apply” button at the bottom of the page to start the tracking service.
tracking portal. Please provide the tracking serial number (noted above) and your vessel name.
PredictWind support will reply with a tracking URL for your vessel. Here is mine
http://tracking.predictwind.com/MV_Bliss
This concludes the tracking setup. You should not be able to see tracks on your
tracking/blogging portal at PredictWind given that you have a valid GPS information and an
Internet connection to the DataHub.
DataHub Status LEDs
DataHub provides status LED on its top cover that rapidly allows you to know the status of the
GPS feed, Internet connectivity, and if you have position reports stored on the device that have
not yet been sent to PredictWind.
There are total of 3 LEDS, Blue, Orange, and Green.
The blue LED is illuminated when power is supplied to the DataHub.
The orange and green LEDs serve multiple purposes to display both GPS status, Internet
connectivity, and tracking spool state.

Invlalid GPS
The orange and green LED will blink very rapidly in alternating succession when there is invalid
or NO GPS data. Fast alternating orange/green LEDs means that you will not be able to send
tracking position reports to predict wind no matter the state of the Internet connection. Read
section “Configuring the GPS Feed” to address this problem.
No Internet
With valid GPS positions a NO Internet connectivity issue is displayed by a slow blinking orange
LED. The Orange LED blinks once every 3 seconds when there is no active Internet
connection.
Spooled Position Reports
With valid GPS positions a slow blinking green LED indicates that position reports have been
sampled but not sent to PredictWind for processing. Normally you see slow blinking green
along with slow blinking orange. The blinking orange LED indicates no Internet while the slow
blinking green means that you have position reports queue but not sent.
When an Internet connection avails itself the DataHub will automatically send the position
reports and the green LED will be turned off.
Verifying Internet Connectivity
The DataHub provides several methods to determine if you are Internet connected. The
simplest way to know if you are connected to the Internet is to WiFi connect to the unit and try to
browse pages online. Try Google.com. If the page shows up then you are Internet connected.
Alternatively a solid orange LED on the top of the DataHub indicates a valid Internet connection.
There is a detailed Internet status page found under “Services->Settings” under the Internet
Status tab. A green square represents an active internet connection. In the image displayed
below we see that “wwan” or wireless wan(wide area network) is active as well as wan(the
ethernet WAN connection). The squares indicate that the interfaces are online and the uptime
for the connection. A red blox means that the interface is available but there is no internet
connection through it. In other words the interface exists but its offline. A yellow box indicates
that there is no interface. In this case an Android phone or USB LTE modem has been detected
by the DataHub.

More advanced users can use the tools under the “Diagnostics” tab under “Services->Settings”
to diagnose Internet connectivity problems.
Securing DataHub
By default the DataHub’s WiFi is open and unencrypted and the administrator username and
password is well known. Since the DataHub can provide Internet access to any WiFi client
connected to it, it is best to secure the WiFi connection to prevent unintended network access.
Changing the WiFi SSID and Securing with a Password
WiFi connect to the DataHub and browse to “Services->Settings” and select WiFi. Scroll down
towards the bottom of the page and push the “EDIT” button for “radio1”. As stated earlier
“radio1” is the DataHubs WiFi device used by users to connect to it. Radio0 is used for
tethering. Under the General tab in the next next page scroll towards the button and find the
ESSID entry. The ESSID is the SSID that is broadcast by the DataHub. My vessel is called
Bliss so I want my DataHub to advertise itself as “Bliss”. Change the ESSID entry to the desired
broadcast name.
Next click on the “Wireless Security” tab and select “WPA2-PSK (strong security)”, leave
“cipher” on “auto”, and finally enter a password for WiFi. Scroll to the bottom of the page and
push “SAVE”. Back on the “Wireless Overview” scroll down to the bottom and push “SAVE &
APPLY” to activate the changes. You will be momentarily disconnected from the WiFi and then
when you reconnect you will be prompted for the new password.

Note below that “Bliss” now shows up in a WiFi scan as encrypted when scanning on my Mac.

Changing the Password for Admin
Connect to the DataHub via WiFi and login with username admin using the default password
(admin).
To change the admin password browse to the “Password” tab and enter the new password
twice.
Now logout from the DataHub by selecting the “Logout” menu entry under “Settings”.
Log back into the router using username “superadmin” with password “superadmin” and repeat
the process.
Although we have not discussed “superadmin” this login provides advanced features to the
DataHub not required for tracking and blogging. Advanced users may enjoy exploring the
advanced features of the DataHub but most users will not require these. None the less the
superadmin account should be secured.
Firmware Updates
On occasion PredictWind may provide updates to the DataHub software that includes
enhancements and bug fixes. Users wishing to update their devices should download the latest
version of the firmware from PredictWind and store it on their computer.
To upgrade the firmware login to the DataHub via WiFi (or Ethernet/WAN), login as admin, and
browse to “Services->Settings”. Select the Firmware tab and select “FLASH IMAGE…” at the
bottom of the page and follow the prompts. You will need to browse for the software image you
download to your computer, upload it to the DataHub, and then confirm that you wish to update
the firmware.
You have the option of keeping the current configuration. Normally you would want to check this
option otherwise you would need to go through the full setup of the unit as described in this
document.
Confirm the update and wait for about 5-10 minutes before trying to reconnect to the DataHub.
Note that it is CRITICAL that power not be interrupted during the update process.

Factory Reset
The DataHub can be returned to its original factory defaults (i.e. the way you originally received
it) by one of two methods.
Software
If you are able to WiFi or Ethernet connect to the unit and can login to the web admin ui then
browse to “Services->Settings” and select the “Firmware” tab. Push the “PERFORM RESET”
button to restore the factory default settings.
Note that it takes 5-10 minutes for the process to complete. Do not interrupt the DataHub
during the reset process.
Hardware Reset Switch
A hardware reset is in order if you have either lost the WIFi password or admin password, or are
unable to otherwise access the web admin ui for the DataHub.
To perform a hardware reset locate the rest button next to the power inlet for the unit. You will
find it through a small pin hole through the enclosure. Use a paperclip or other other small
object to depress the button for 15 seconds while the unit is powered on. After 15 seconds
release the button. The unit will then perform a factory reset. Note that a quick push of the
button will reboot the unit but not reset it to its defaults. The button must be held for more than
10 seconds and less than 30 for the reset action to occur.
Legal
Federal Communication Commission Interference Statement
This equipment has been tested and found to comply with the limits for a Class B digital device,
pursuant to Part 15 of the FCC Rules. These limits are designed to provide reasonable
protection against harmful interference in a residential installation.
This equipment generates, uses and can radiate radio frequency energy and, if not installed and
used in accordance with the instructions, may cause harmful interference to radio
communications. However, there is no guarantee that interference will not occur in a particular
installation. If this equipment does cause harmful interference to radio or television reception,
which can be determined by turning the equipment off and on, the user is encouraged to try to
correct the interference by one of the following measures:
. Reorient or relocate the receiving antenna.
. Increase the separation between the equipment and receiver.
. Connect the equipment into an outlet on a circuit different from that to which the
receiver is connected.

. Consult the dealer or an experienced radio/TV technician for help.
FCC Caution: To assure continued compliance, any changes or modifications not expressly
approved by the party responsible for compliance could void the user's authority to operate this
equipment. (Example - use only shielded interface cables when connecting to computer or
peripheral devices).
FCC Radiation Exposure Statement
This equipment complies with FCC RF radiation exposure limits set forth for an uncontrolled
environment. This equipment should be installed and operated with a minimum distance of 20
centimeters between the radiator and your body.
This transmitter must not be co-located or operating in conjunction with any other antenna or
transmitter.
The antennas used for this transmitter must be installed to provide a separation distance of at
least 20 cm from all persons and must not be co-located or operating in conjunction with any
other antenna or transmitter.
FCC ID: 2A23ZDATAHUB
Model: AWAP7633-EC2
This device complies with Part 15 of the FCC Rules. Operation is subject to the following two
conditions: (1) This device may not cause harmful interference, and (2) This device must accept
any interference received, including interference that may cause undesired operation.
Other manuals for DATAHUB
1
Table of contents


