Jebao WP-40 User manual

WP - 40 &WP - 25 Wave Maker
These wave makers are intended to simulate the natural waves and
whirlpools found in a marine environment.
Before installing and using the pump, please read through these
instructions to familiarise yourself with the correct operation of the device.
Features:
•Maximum flow rate of up to 13,000 litres/hour WP-40 (8,000
litres/hour WP-25).
•Unique multi mode controller to allow adjustment of the
wavemaker to suit the users requirements.
•Use of low-voltage, low power, DC variable-speed pump,
minimizing heat transfer to the aquarium and maximising user
safety.
•Easy to use controller
•Adjustable pump housing so pump flow direction can be easily
altered
•Wide voltage input (AC100 ~ 240V 50/60Hz)
•Can be used in a variety of aquarium sizes. Suitable for aquariums
with glass up to 15mm thickness.
Package Contents:
• Wave maker pump
• Intelligent controller
• AC/DC adapter
• Mains power cord
• Light sensor (very small) and double sided tape for mounting
controller.
IMPORTANT INFORMATION:
• In order to ensure product performance, please only operate the
pump in water.
• The controller is NOT waterproof – please position the controller to
avoid water splashes.
• Please take care whilst fitting the magnets to the glass.
• If the Controller or AC/DC adapter are opened, the warranty will be
voided.
• The Wave maker is suitable for indoor use in water only. The motor
in the wave maker will be damaged if it is run dry.
Installation Instructions:
Every user’s tank is unique, so the wavemaker should be installed based on
your tank’s style and your requirements.
Ideally, the wavemaker should be placed opposite a flat glass surface
(without a overflow or any irregular glass) in order to gain the greatest
effect of reflecting waves. This is usually best accomplished by positioning
the wavemaker on a side wall pointing to the opposite side wall
(rectangular tank).
When the WP- 40 wavemaker is running at full power, it has a flow rate of
13,000 litres/hour (8,000 litres/hour for WP-25), so please avoid placing
the wavemaker too low which will causing a vortex on your sand bed,
disturbing the sand, and also avoid placing too high as this will cause air to
be sucked in - we recommend a depth of at least 15cm for the wavemaker.
•Remove the magnet from the pump to install the pump in the
aquarium in the desired location. Place the rubber suction cup
suction cylinder onto the inside wall of the aquarium. Then position
the rear magnet plate (with attached rubber damper) to the outer wall
of the aquarium. Please take care when positioning the magnet as
the magnets are very strong and could trap your fingers.
• Remove the backing on one side of the double-sided adhesive paper
and stick to the rear of the controller in the middle. Remove the other
side of the double-sided adhesive protective paper and affix the
controller in a suitable location.
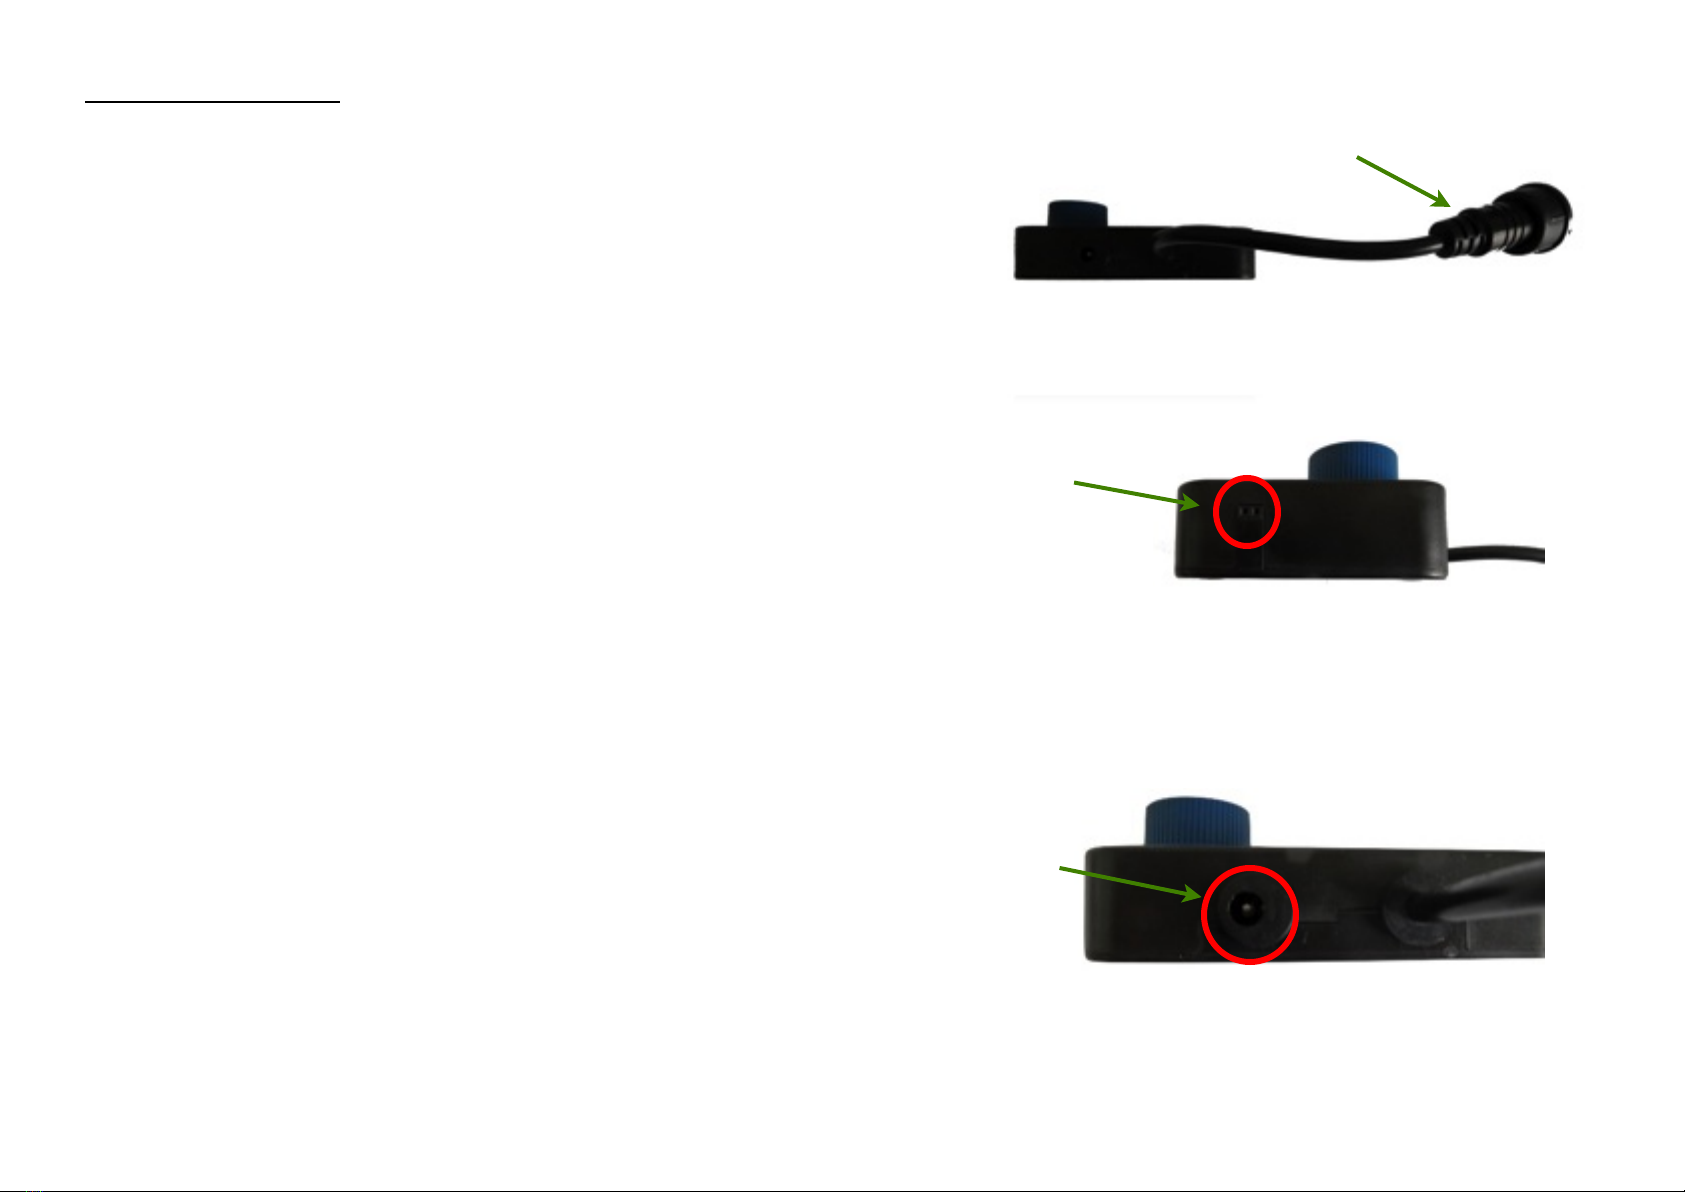
• BEFORE ATTACHING THE MAINS CABLE, attach the 3-pin
waterproof connector from the pump to the controller. If required,
gently insert the light sensor into the small socket on the left of the
controller. Connect AC/DC power adapter to controller. See images
opposite:
Once all connection are made, the mains power can be connected with the
provided mains power cord.
Waterproof Pump
Connector
DC power
Socket
Light Sensor
Socket
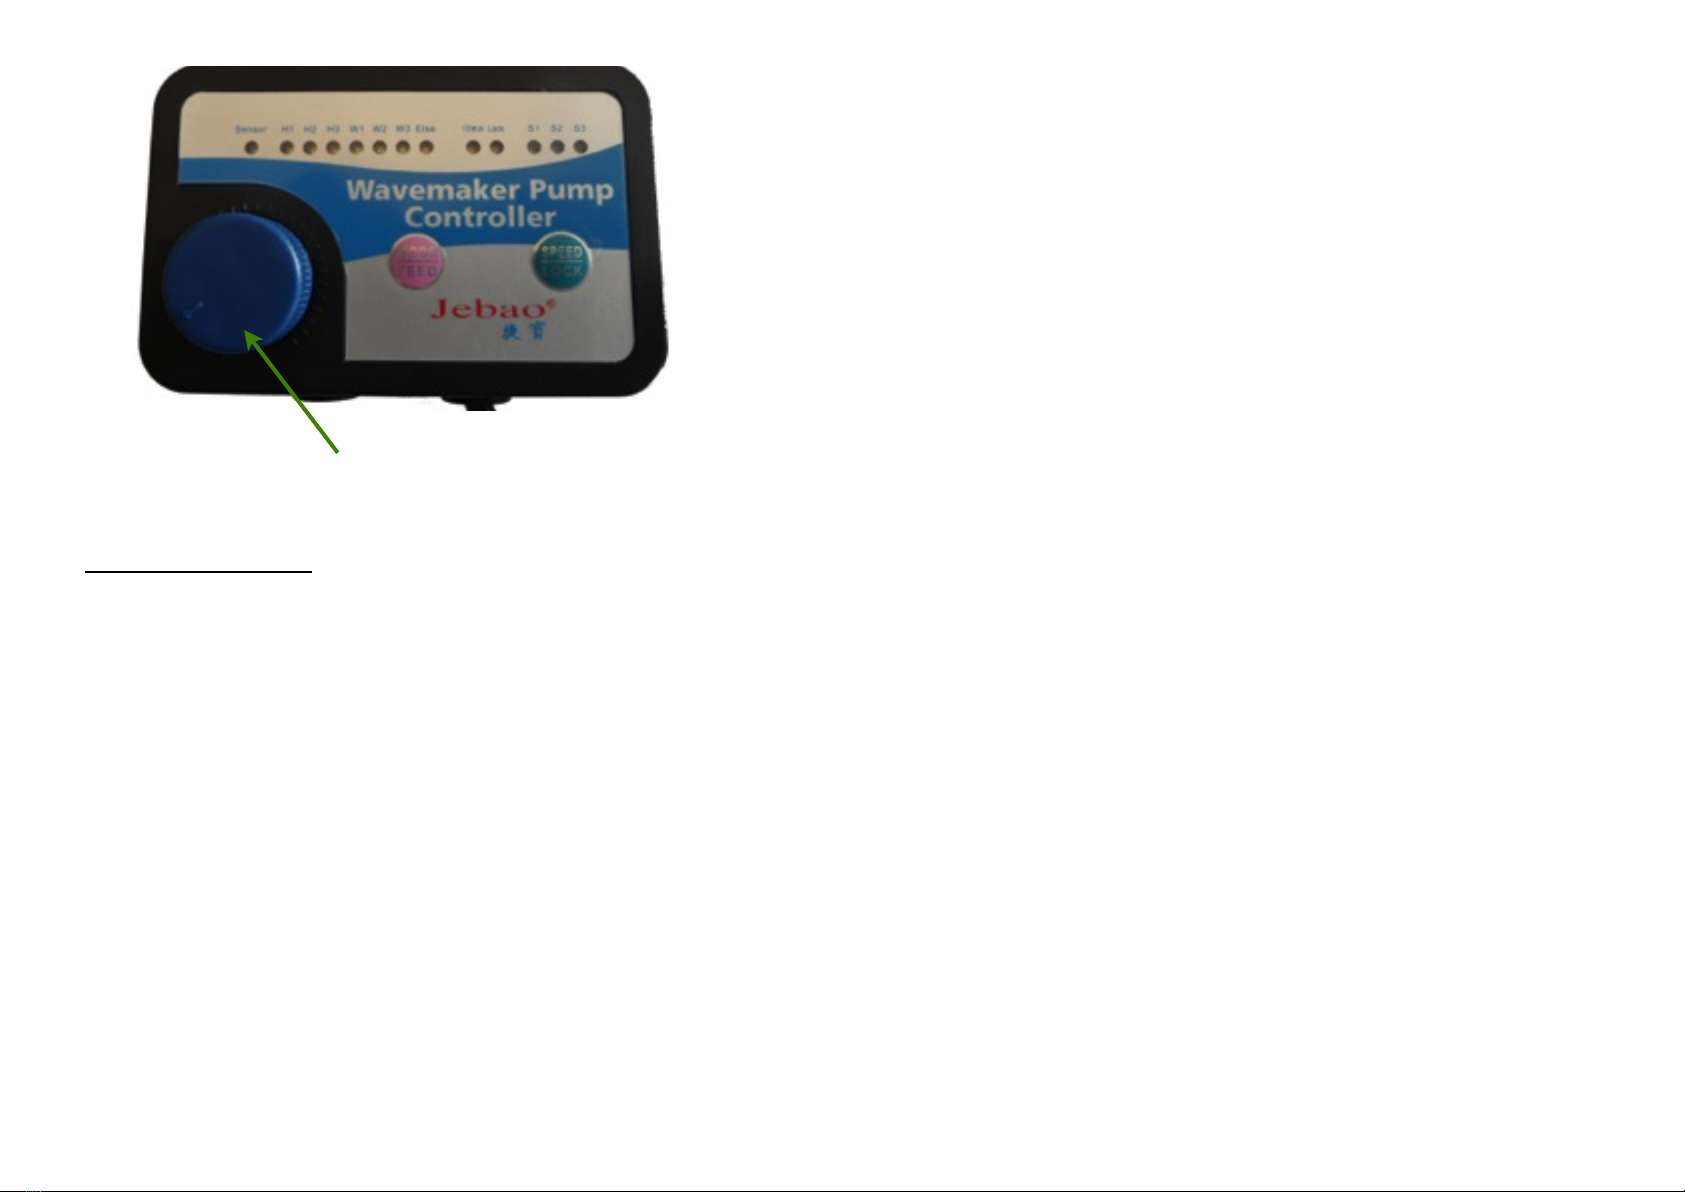
Controller Operation:
The controller has nine modes which can be used. Pressing the "MODE"
key will cycle through the modes until the desired mode is selected.
Below are details of the 8 modes available:
• H1: High, constant, non-variable flow - max flow rate (13,000 LPH)
• H2: Medium, constant, non-variable flow- 75% of max flow rate
(9,750 LPH)
• H3: Low, constant, non-variable flow - 50% of max flow rate (6,500
LPH)
Note: The speed setting (S1, S2, S3) has no effect on the above modes.
• W1: Adjustable pulses and speed. Pressing the speed button will
cycle from S1 = 100% of max flow rate, S2 = 75% flow of max flow
rate, and S3 = 50% of max flow rate. Adjust the controller wave
duration knob to change the duration (left decrease, right increase) of
the pulses and vary the size of the wave according to your tank.
When the duration is set correctly, you will create a back and forth
motion and form a gentle standing wave in your tank.
Note: The speed setting (S1, S2, S3) has an effect in this mode only.
• W2: The wave maker speeds up from a low flow rate to the
maximum flow rate in approximately 8 steps and slows down
similarly, with a longer on time on higher flows. This creates a varied
flow pattern. Adjusting the controller wave duration knob will cause
the duration of the individual steps to be lengthened/shortened.
Adjust to form the wave best suited to your tank.
• W2: The wave maker speeds up from a low flow rate to the
maximum flow rate in approximately 8 steps and slows down and
slows down similarly, with a longer on time on lower flows. This
creates a varied flow pattern. Adjusting the controller wave duration
knob will cause the duration of the individual steps to be lengthened/
shortened. Adjust to form the wave best suited to your tank.
• Else: Reef Stream Mode, a random flow cycle that randomly
increases and decreases pump speed and duration. This creates a
random flow cycle similar to what you would find in a natural reef.
• Feed: Press the 'MODE/FEED' button for 5 seconds, the blue '10min'
light will illuminate indicating that the pump has been stopped for 10
minutes. When the time has elapsed, the light will go off and the
pump will be turned back on. Alternatively, press the 'MODE/FEED'
button again for 5 seconds to start the pump.
Wave duration adjustment

• Lock: To prevent changes from inadvertently occurring by
accidentally knocking the adjustable control knob, press and hold the
'SPEED/LOCK' button for 5 seconds. The red 'LOCK' light will
illuminate and the control knob will no longer function. Press and
hold the 'SPEED/LOCK' button for a further 5 seconds to disable this
feature.
• Night: When the two-pinned light sensor is inserted into the small
socket on the left-hand side of the control box, night mode will
function automatically. The sensor detects when the tank lights go
out and slows the pump to half speed. The 'Sensor' LED will
illuminate when night mode is in operation. To disable the night
mode function, remove the sensor from the control box.
Maintenance:
• Regularly clean the outer parts to ensure effective action
• Use a dry cloth to prevent water from entering the controller box
• To disassemble the wave maker for cleaning - disconnect power,
remove the pump from the cradle and whilst holding the rear
section of the pump turn the front grid by rotating it clockwise - see
images below:
• To re assemble, reverse the disassembly instructions. Be sure when
fitting the front grid that the ceramic shaft is located into the
bearing. Once in position, turn the front grid clockwise until you
hear a loud click, indicating that the pump is assembled correctly.
Disposal: Do not dispose this product as unsorted municipal waste.
Collection of such waste separately for special treatment is necessary.
Jebao Co., Ltd.
Tongmao Industrical Park, Dongsheng, Zhongshan, Guangdong. China.
Email:[email protected]
Website: www.jebao.com
Tel: +86-760-22212306, 22212307
Fax:+86-760-22212368
Front grid to remove
Hold this section firmly Rotate front section
anti clockwise
Pump disassembled
WP-40 =130mm
WP-25 = TBC
WP-40 = 100mm
WP-25 = TBC
This manual suits for next models
1


