Premier Tech Aqua TAD-240 User manual
Premier Tech Aqua 1/5 Accessories - Installation Guide and Owner’s Manuel
Edition: 016-01-13
A
AA
Adapter
dapterdapter
dapter
TAD
TADTAD
TAD-
--
- 40
4040
40/SC
/SC/SC
/SC,
, ,
, R
RR
Risers
isersisers
isers
PSR
PSRPSR
PSR-
--
-060/140,
060/140, 060/140,
060/140,
F
FF
Filter
ilterilter
ilter
C
CC
Containers
ontainersontainers
ontainers
TLF
TLFTLF
TLF-
--
- 40/P
40/P40/P
40/P
and
andand
and
A
AA
Access
ccessccess
ccess
L
LL
Lids
idsids
ids
LID
LIDLID
LID-
--
- 40S/D
40S/D40S/D
40S/D
Installation
Installation Installation
Installation Guide
GuideGuide
Guide
and Owner’s Manual
and Owner’s Manual and Owner’s Manual
and Owner’s Manual
This guide provides information on Premier Tech
Premier TechPremier Tech
Premier Tech
Aqua
AquaAqua
Aqua’s
’s’s
’s septic tank adapter, access risers, filter containers and
access lids. For additional information, contact our customer service at 1 800 63
1 800 631 800 63
1 800 63 -
--
-6356
63566356
6356.
1.
1. 1.
1. TAD
TADTAD
TAD-
--
- 40
40 40
40 and TAD
and TADand TAD
and TAD-
--
- 40SC
40SC 40SC
40SC access adapter
access adapteraccess adapter
access adapters
ss
s
for
for for
for existing
existing existing
existing concrete septic tank
concrete septic tankconcrete septic tank
concrete septic tanks
ss
s
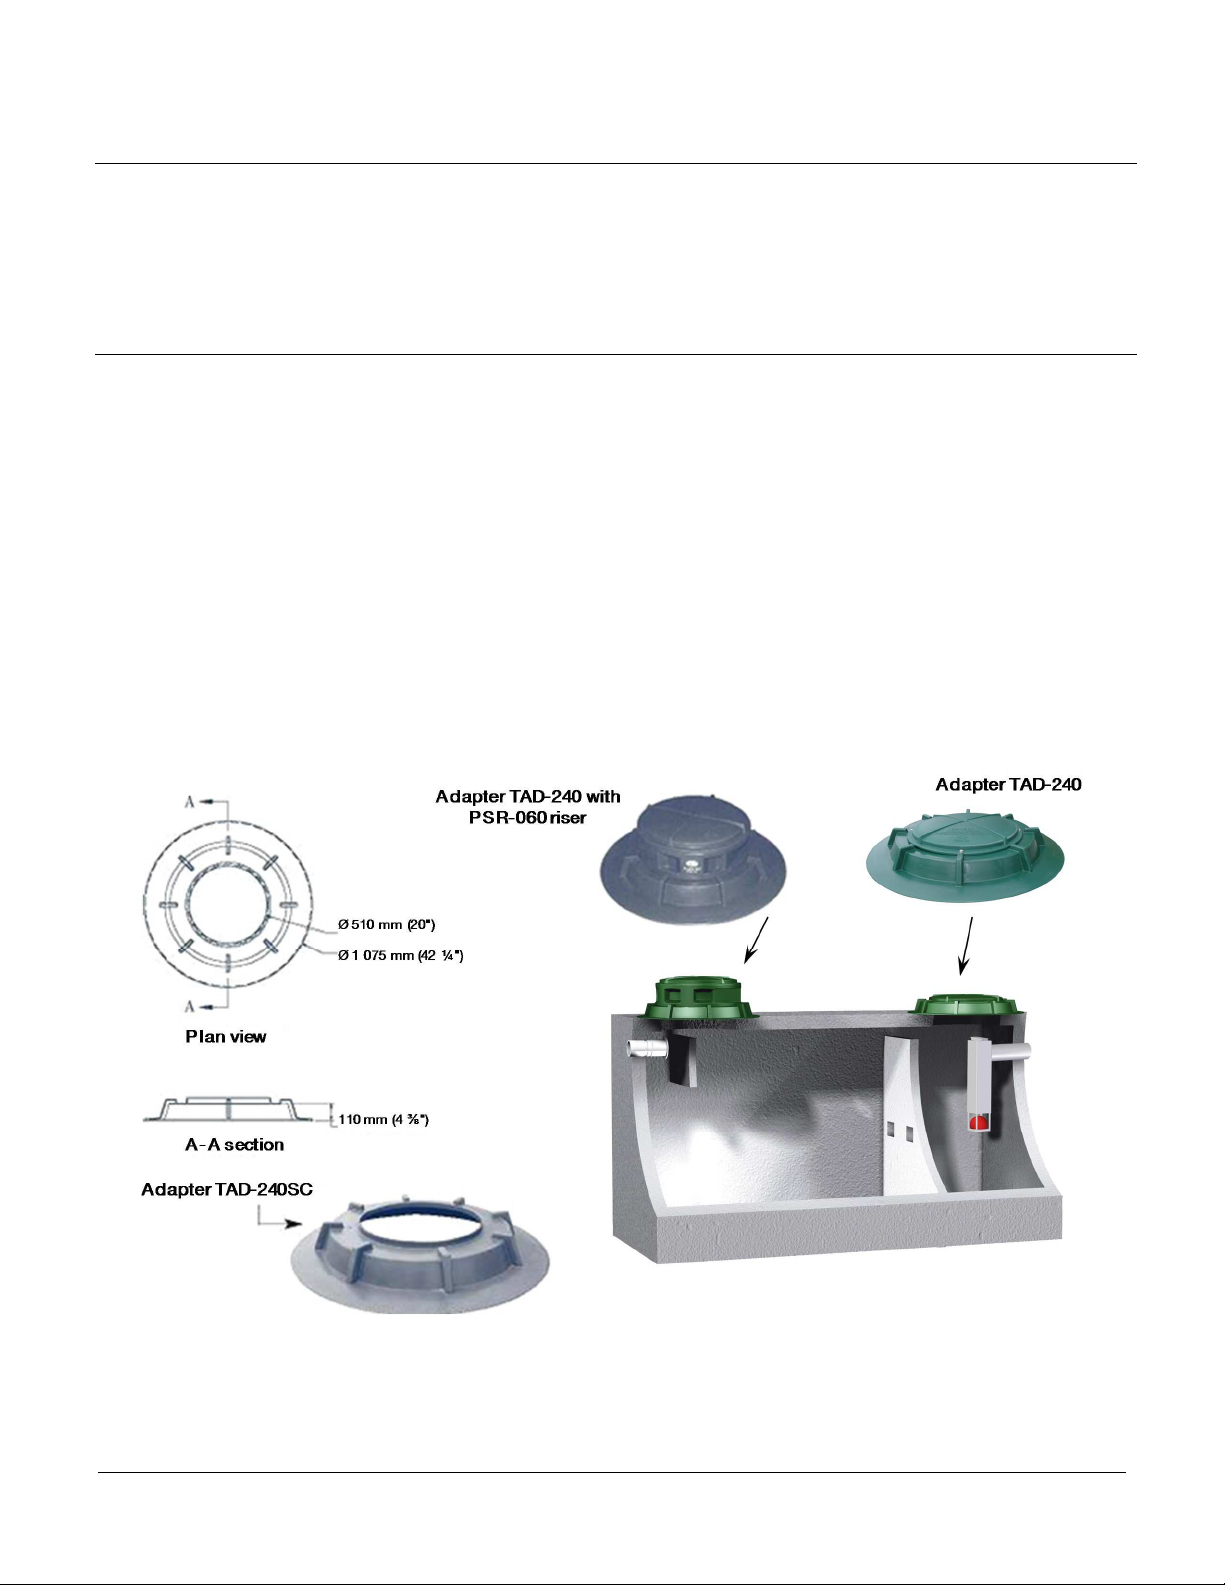
The TAD- 40 access adapter has been especially designed for existing concrete septic tanks to eliminate the heavy
concrete lids as well as the added frustration of handles that are often corroded. Its unique design fits most type of
residential septic tank currently on the market. The adapter is conceived to facilitate the access to the tank for
inspection and pumping. The access adapter has a 510 mm ( 0") diameter opening and is compatible with PSR-060
and PSR-140 risers, depending on installation requirements (consult section . for more information on risers). The
access holes are then securely closed with the LID- 40S lids (consult section 4. for more information on lids).
Material included with the TAD- 40 access adaptor: 1 TAD- 40SC access adaptor without lid, 1 LID- 40S lid, 4 lag
screws with washers and 1 watertight seal.
1.1 Dimensions
1.1 Dimensions1.1 Dimensions
1.1 Dimensions
Premier Tech Aqua /5 Accessories - Installation Guide and Owner’s Manuel
Edition: 016-01-13
1. Installation Procedure
1. Installation Procedure1. Installation Procedure
1. Installation Procedure
To install the TAD- 40 adapter, completely clear the access wells until you reach the septic tank's concrete surface.
Remove the old riser(s).
Clean the surface of the concrete thoroughly where the adapter is to be installed. Make sure the surface of the adapter
is clean and dry and then install 19 mm X 19 mm (¾" X ¾") butyl coils (or equivalent) around the bottom of the adapter
as shown in the diagram below. Butyl coils are necessary to hold the adapter in place and ensure the watertightness.
Remove the backing paper from the butyl coil and then place the adapter on the septic tank. Make sure the adapter
and septic tank openings are aligned. Apply uniform pressure on the rim of the adapter. It is recommended to add
4 concrete screws on the adapter to make sure it stays in place. Install the PSR-060 or PSR-140 riser, if needed, on
top of the adapter as instructed in the next section.
.
..
.
R
RR
Risers PSR
isers PSRisers PSR
isers PSR-
--
-060 and
060 and060 and
060 and
PSR
PSRPSR
PSR-
--
-140
140 140
140
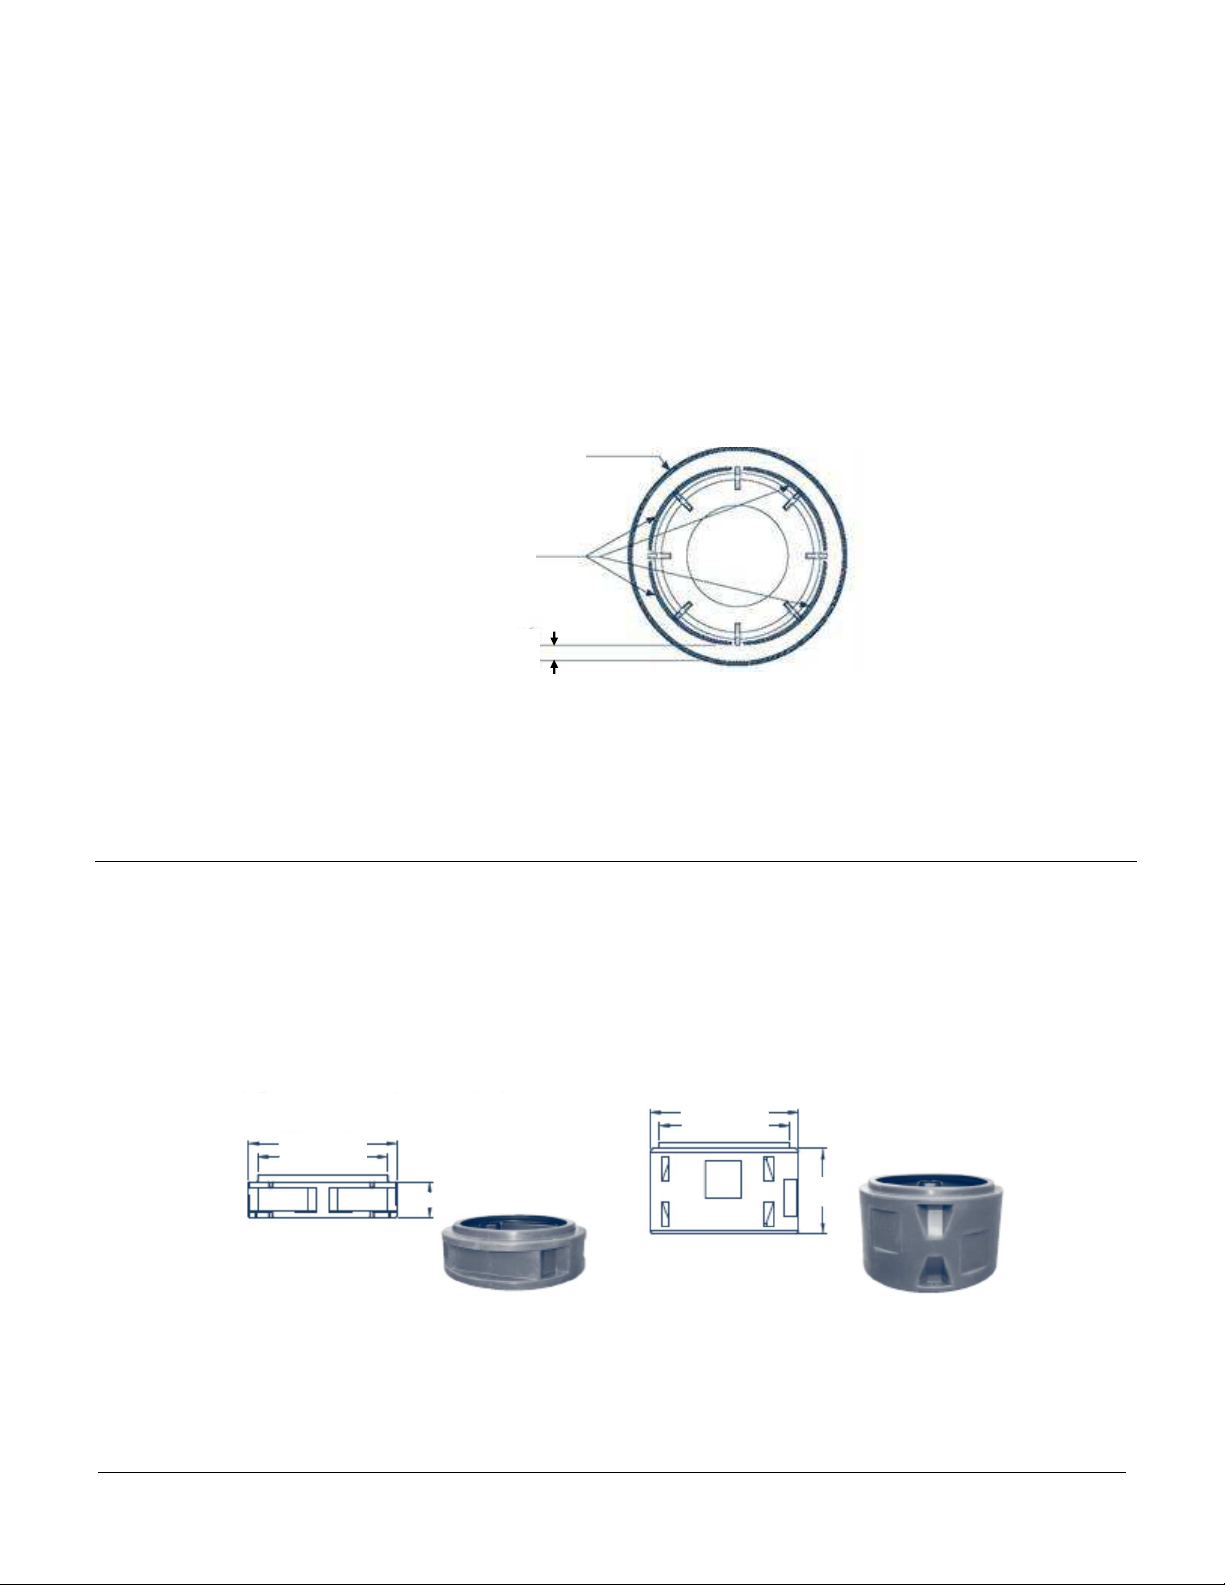
Two types of risers are available: the PSR-060,
,,
, 150 mm (6") in height and the PSR-140,
, ,
, 355 mm (14") in height. The
PSR-140
has four flat surfaces to facilitate the installation of bulkhead union fittings for pipe connections of up to 100
mm (4") in diameter or waterproof electrical connectors.
Material included with the riser: 1 riser, 4 leg screws with washers and 1 watertight seal.
.1 Dimensions
.1 Dimensions.1 Dimensions
.1 Dimensions
Bottom view of the TAD
Bottom view of the TADBottom view of the TAD
Bottom view of the TAD-
--
- 40 adapter
40 adapter 40 adapter
40 adapter
6 mm ( 4 ½")
510 mm ( 0")
6 mm ( 4 ½")
510 mm ( 0")
150
mm (
6
")
355
mm
(14")
PSR
PSRPSR
PSR-
--
-060
060060
060
RISER
RISERRISER
RISER
PSR
PSRPSR
PSR-
--
-14
1414
140
00
0
RISER
RISERRISER
RISER
19 mm X 19 mm (¾" X ¾") butyl coil
wound around adapter opening
3 50 mm (1 8") long
(not included)
4 butyl coils
19 mm X 19 mm (¾" X ¾")
500 mm ( 0") long
(not included)
75mm (3")
Premier Tech Aqua 3/5 Accessories - Installation Guide and Owner’s Manuel
Edition: 016-01-13
. Installation procedure
. Installation procedure. Installation procedure
. Installation procedure
The PSR-060 and PSR-140 risers are easy to install. The risers can be installed on several PTA products, such as the
TAD- 40 access adapter, the PSA- 40 pumping stations, the septic tanks, the holding tanks, the TLF- 40 reservoirs,
etc.
Install the seal around the opening of the product that will
be equipped with the riser, having first made sure that the
surfaces are clean and dry. Place the riser on the desired
product making sure the openings are aligned. Finally,
screw the riser at the specified places using the four lag
screws and washers provided by PTA to ensure the
watertightness.
3.
3. 3.
3. TLF
TLFTLF
TLF-
--
- 40
4040
40
and TLF
and TLFand TLF
and TLF-
--
- 40P
40P40P
40P
filter container
filter containerfilter container
filter containers
ss
s
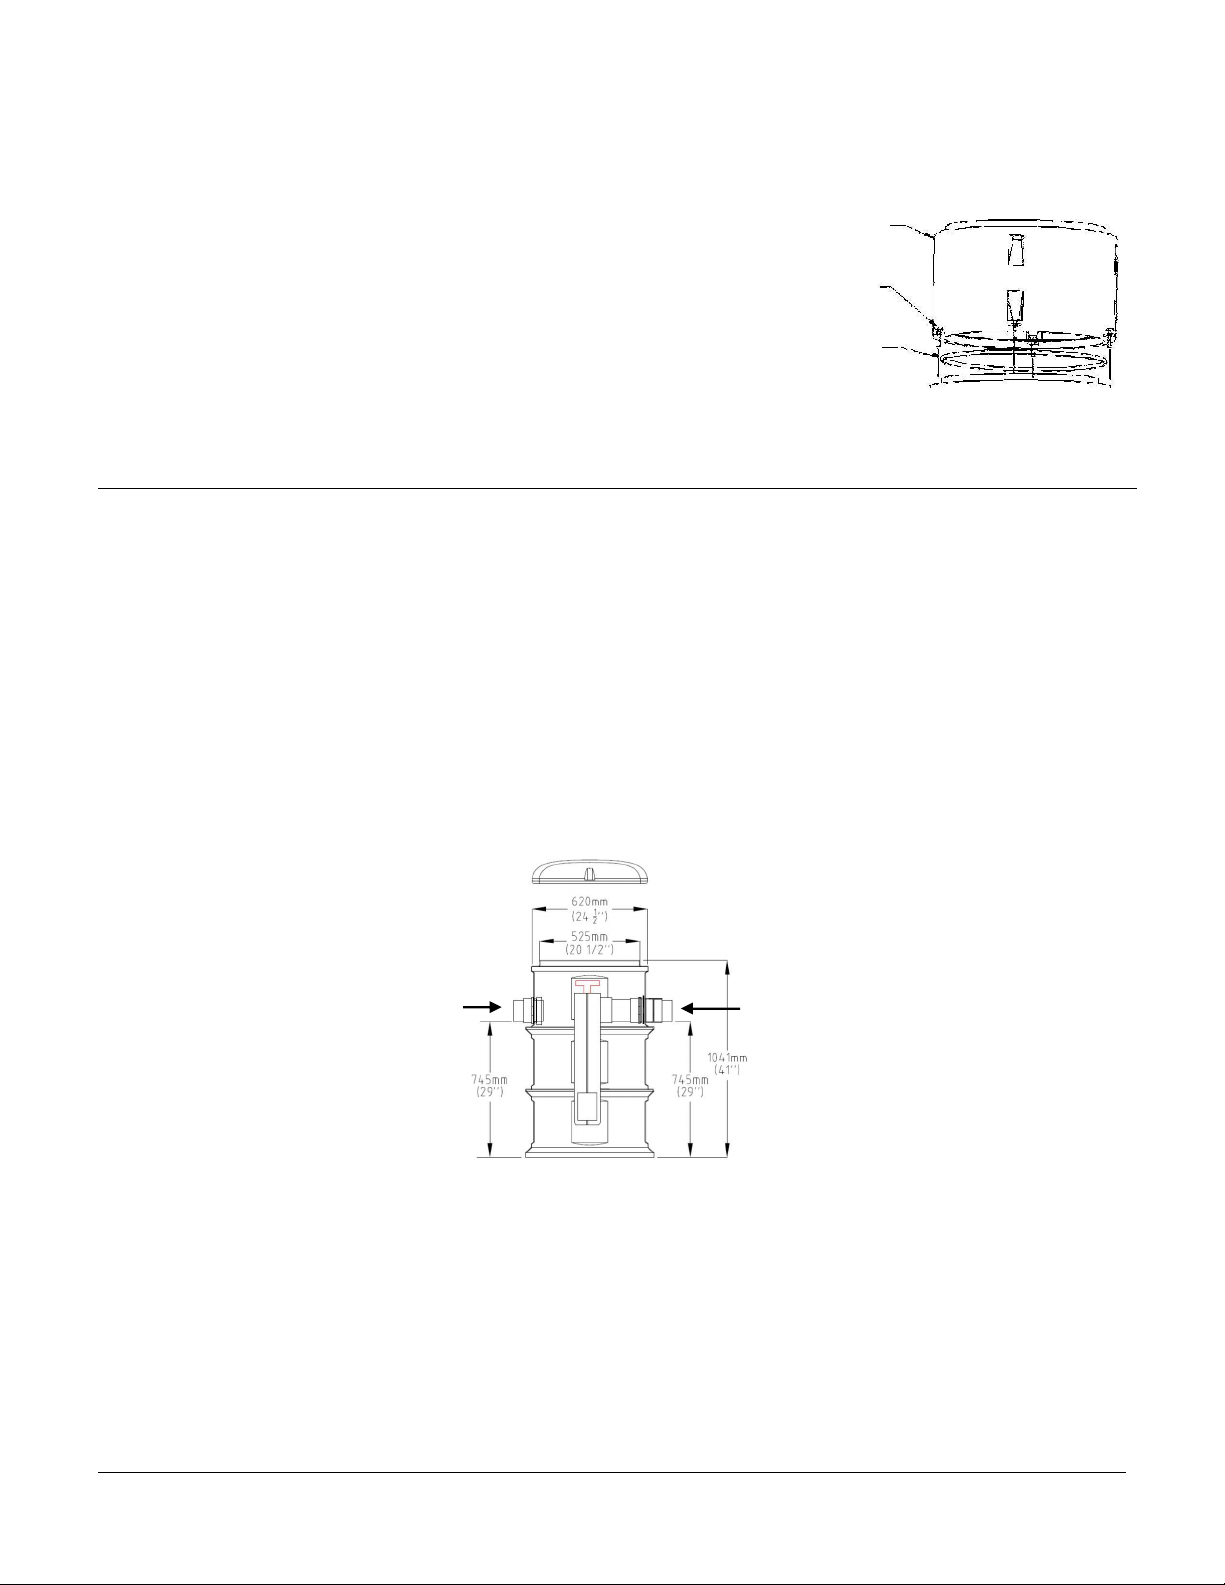
When it is impossible to install the effluent filter directly in the septic tank, it is possible to use PTA’s TLF filter
container. Two models of TLF filter containers are available: the TLF- 40P, equipped with effluent filter PL-1 from
Polylok (already assembled) and the TLF- 40, with no effluent filter, which can accommodate most types of effluent
filters currently available on the market. Thus, the effluent filter can quickly and easily be installed outside a septic
tank.
The TLF filter containers provide safe and easy access for the effluent filter’s inspection and maintenance. Made of
polyethylene, these reservoirs can be equipped with PSR-060 or PSR-140 PTA risers (consult section . for more
information on risers). The maximal
The maximal The maximal
The maximal riser
riser riser
riser height allowed
height allowed height allowed
height allowed above the TLF
above the TLFabove the TLF
above the TLF
filter container
filter containerfilter container
filter containers
ss
s
is
is is
is of
of of
of 355 mm (14")
355 mm (14")355 mm (14")
355 mm (14").
Material included with the TLF filter containers: 1 filter container (with PL-1 for model TLF- 40P), 1 LID- 40D lid, 4
lag screws with washer and 1 watertight seal.
3.1 Dimensions
3.1 Dimensions3.1 Dimensions
3.1 Dimensions
3. Installation
3. Installation 3. Installation
3. Installation and maintenance
and maintenance and maintenance
and maintenance procedure
procedureprocedure
procedure
•Excavate the necessary area to install the reservoir. The base of the reservoir must be above groundwater table
at all times.
•Level and compact the excavated area and place the
TLF filter container. Handle the reservoir with care. The
maximum depth at which the TLF reservoir can be installed is of 1 370 mm (54"), which corresponds to the
height of the reservoir with a maximum of one PSR
PSRPSR
PSR-
--
-140 riser
140 riser140 riser
140 riser of 355 mm (14").
•Make sure to align the inlet of the reservoir with the pipe coming from the septic tank. Do not reverse the inlet
and outlet connections because the effluent filter must be on the side of the
the effluent filter must be on the side of the the effluent filter must be on the side of the
the effluent filter must be on the side of the TLF reservoir
TLF reservoir TLF reservoir
TLF reservoir outlet pipe.
outlet pipe.outlet pipe.
outlet pipe.
TLF
TLFTLF
TLF
-
--
-
40F Profile view
40F Profile view 40F Profile view
40F Profile view
4 stainless steel
304
lag screws
with 4 washers
Watertight seal
Riser PSR
-
060 150 mm (6") or
PSR-140 355 mm (14")
IN OUT
Premier Tech Aqua 4/5 Accessories - Installation Guide and Owner’s Manuel
Edition: 016-01-13
•Backfill the TLF filter container (with the lid on) up to the pipe level with material exempt of organic matter,
impervious soil, stones, debris, particles larger than 0 mm (¾") in diameter, or any other object that could
damage the reservoir. Do not compact the backfill.
•The backfill material must be placed into the excavation and not dumped. A backhoe is not recommended.
•Connect the inlet and outlet pipes to the TLF reservoir. The pipe that connects the septic tank to the reservoir
must be levelled with the invert of the septic tank’s outlet pipe. The pipe connecting the outlet of the reservoir
to the treatment system must have a downward slope of at least 1% (towards the treatment system).
•Complete the backfill up to 50 mm ( ") under the base of the lid. Do not bury or cover the lid, it must be
accessible for inspection and maintenance of the effluent filter at all times.
•Open the lid of the TLF reservoir to make sure that all its components are in place.
•Always close the lid of the TLF reservoir with the 4 lag screws provided for.
•Give the present document to the owner.
•During the annual inspection of the effluent filter, it is suggested to verify the level of the sludge at the bottom
of the TLF reservoir. PTA recommends emptying the reservoir at the same time as the septic tank or as needed.
4
44
4.
..
.
LID
LIDLID
LID-
--
- 40
4040
40, LID
, LID, LID
, LID-
--
- 40
4040
40S and LID
S and LIDS and LID
S and LID-
--
- 40D access lids
40D access lids40D access lids
40D access lids
The LID
LIDLID
LID-
--
- 40
4040
40 lids allow to securely close the access of all the following PTA products:
•Polyethylene pumping stations series PSA- 40;
•Polyethylene septic tanks series PST;
•Polyethylene holding tanks series PHT;
•Self-cleaning DiUV disinfection unit;
•PSR-060 and PSR-140 risers;
•TAD- 40 septic tank adapter;
•PFS-300C to 1000C pressure flow dividers;
•Other products such as the TLX- 40, TSD- 40, TLF- 40/P, TLV- 40, PSX- 40, TLP-FDi, etc.
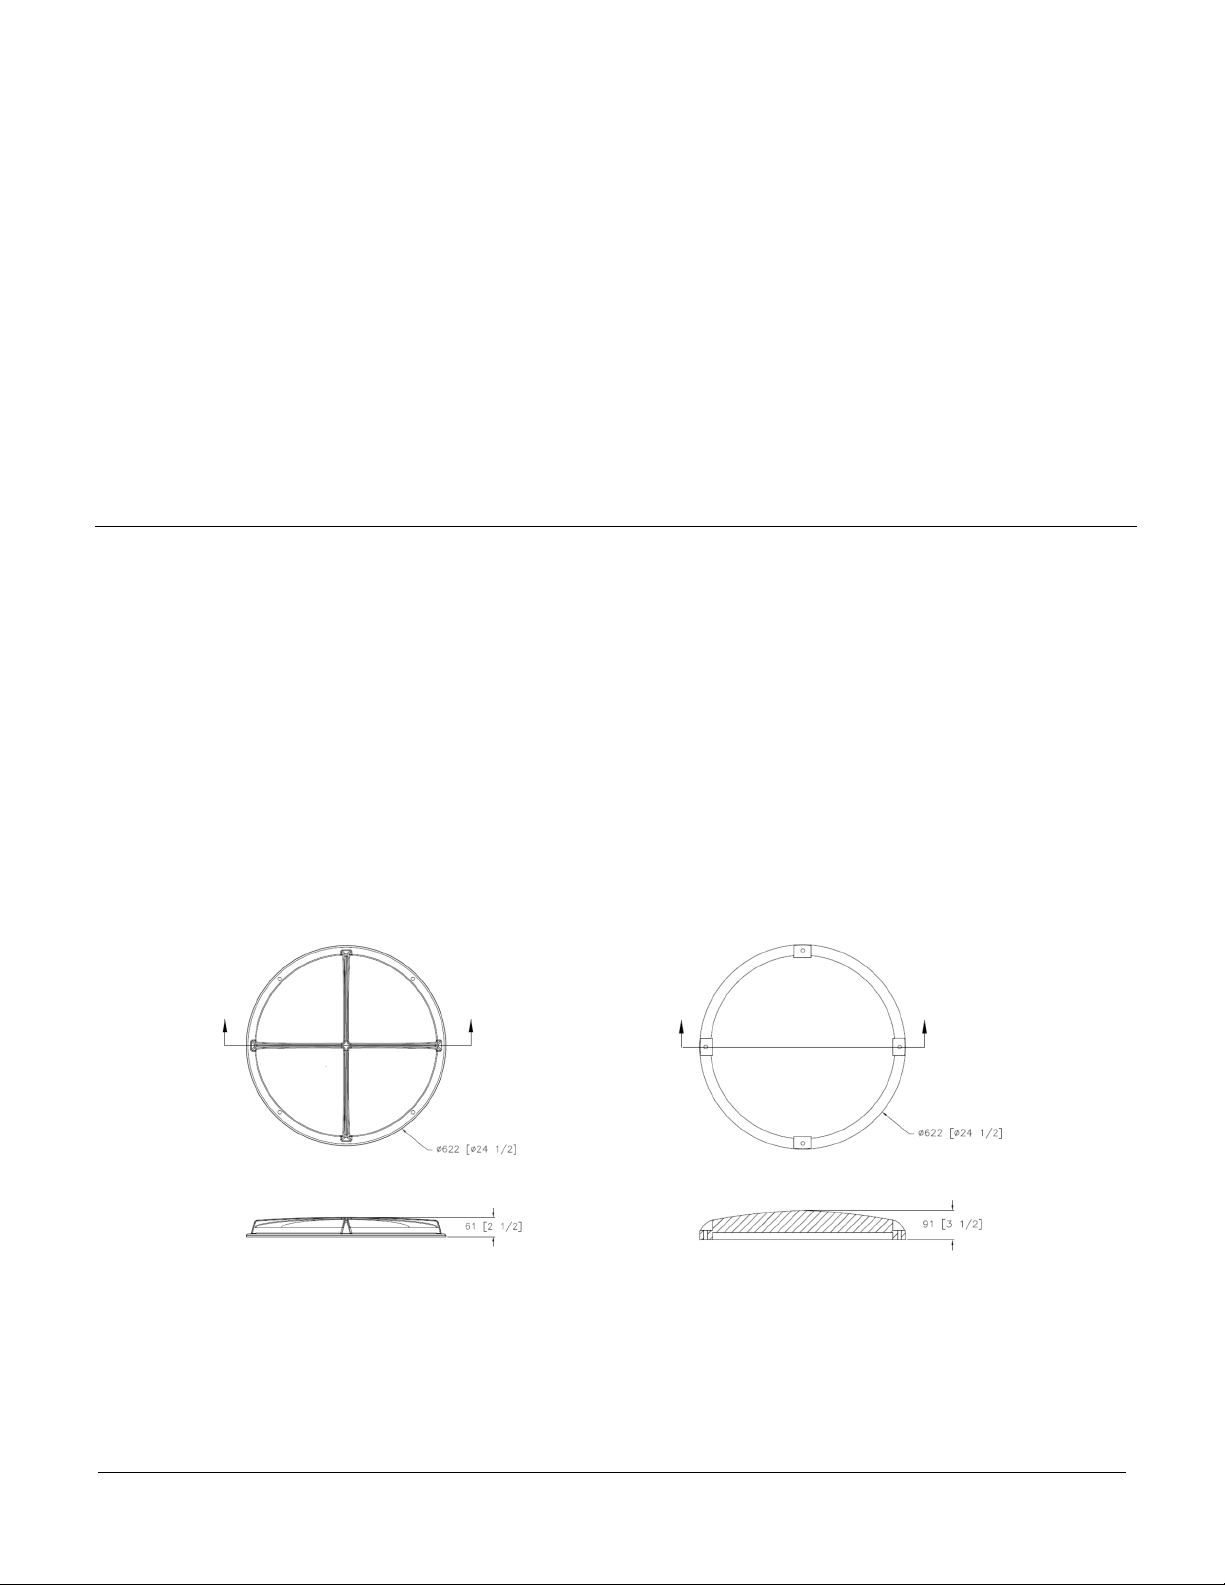
There are two models of lid: Single wall lid (LID- 40S)
Double wall lid (LID- 40D)
Material included with the LID- 40S or LID- 40D: 1 lid, 4 lag screws with washers and 1 watertight seal.
LID
LIDLID
LID-
--
- 40
4040
40D
DD
D
LID
LIDLID
LID-
--
- 40
4040
40S
SS
S
A
A
PLAN VIEW
A-A SECTION
B
B
B
-
B
PLAN VIEW
B-B SECTION

Premier Tech Aqua 5/5 Accessories - Installation Guide and Owner’s Manuel
Edition: 016-01-13
5.
5. 5.
5. W
WW
Warranty
arrantyarranty
arranty
Premier Tech Aqua’s accessories described in the present document are guaranteed against any defects (parts only)
for a period of one (1) year starting from the purchase date (proof of purchase required) if these accessories have
been installed and used according to the installation, operation and maintenance instructions as described in the
present Installation Guide and Owner’s Manual. The warranty only covers these accessories and does not extend to
peripheral equipments.
Exclusion
ExclusionExclusion
Exclusion
Premier Tech Aqua will not be liable for any damages, problems or expenses arising from inappropriate installation
or use of the product. This warranty will be null and void if product failure is caused by or arises from modifications,
faulty installation, improper usage or alterations.
The information contained in this document is based upon the latest information available at the time of publication and is d
esigned
to provide you with a general introduction to our products. We make no
warranties or representations as to its accuracy. We are
continually upda-ting and improving our products and reserve the right to amend, discontinue, alter or change specifications
and prices
without prior notice.
© Premier Tech Ltd, 2016
This manual suits for next models
7
Table of contents


