manuals.online logo
Brands
  1. Home
  2. •
  3. Brands
  4. •
  5. Premier
  6. •
  7. Plumbing Product
  8. •
  9. Premier 120125 User manual

Premier 120125 User manual

6. 7.
4.
2.
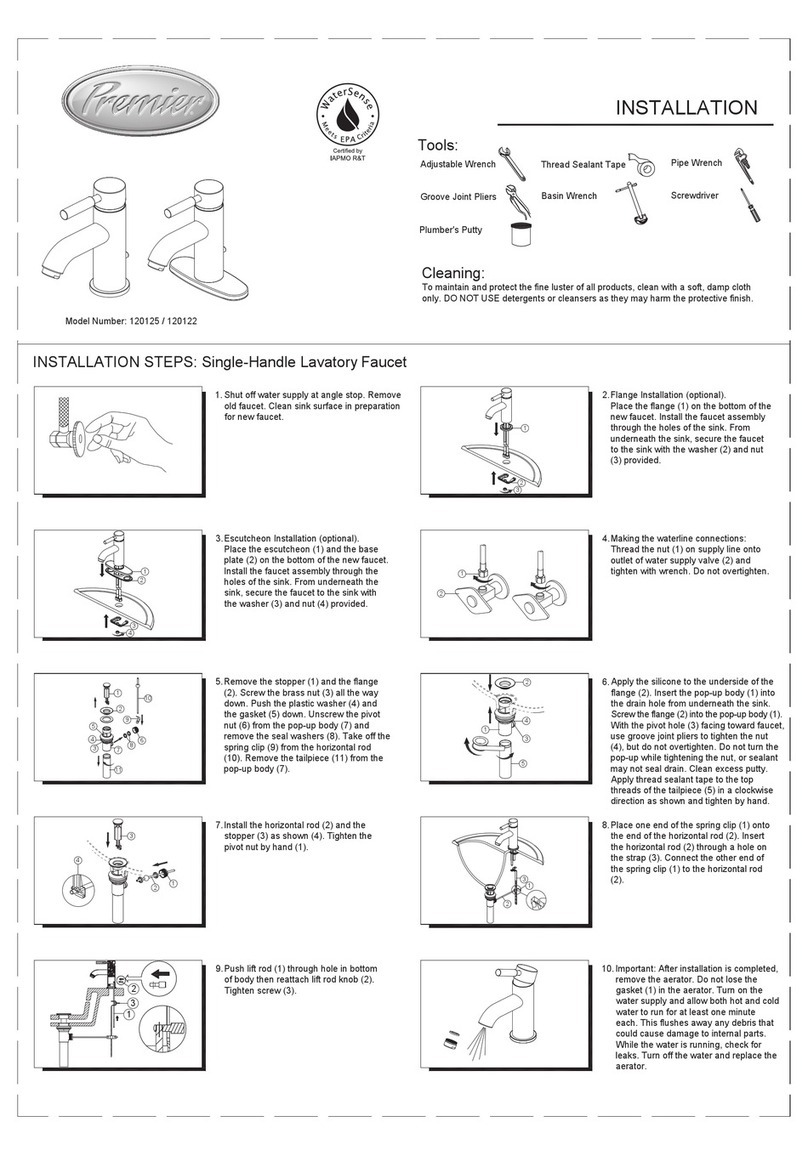
INSTALLATION STEPS: Single handle lavatory faucet
1a.
5.
3.
1b.
Cleaning:
To maintain and protect the fine luster of all products, clean with a soft, damp cloth
only. DO NOT USE detergents or cleansers as they may harm the protective finish.
Model Number: 120125 & 120122
INSTALLATION
8.
1
2
3
Push lift rod (1) through hole in bottom
of body then reattach lift rod knob (2).
Tighten screw (3).
Escutcheon Installation (optional).
Place gasket (1) on bottom of new faucet.
Place faucet through mounting holes in
sink. Secure faucet to sink using washer
(2) and nut (3) provided.
1
3
2
1
Shut off water supply. Remove old faucet.
Flange Installation (optional).Place Flange
(1) on bottom of new faucet.Place faucet
through mounting holes in sink. Secure
faucet to sink using washer (2) and nut (3)
provided.
3
1
2
Attach horizontal rod (1) to strap (2) using
clip (3).
Important : After installation is completed,
remove aerator. Turn on water supply and
allow both hot and cold water to run for at
least one minute each. While water is
running, check for leaks. Replace aerator.
Tighten nuts slightly to stop minor leaks. If
problems persist, refer to troubleshooting
chart.
3
2
3
12
Making the waterline connections:
Use 1/2 in. I.P.S. faucet connections (2, not
included), or use the coupling nuts (3, not
included) with a 3/8 in. O.D. ball-nose riser (1, not
included). Before tightening the faucet connector
to the water supply, apply a second wrench to the
supply tube fitting. This will prevent the supply
tube from moving or twisting when tightening the
faucet connector. Do not overtighten.
NOTE: The hot side inlet tube is indcated by a
label. If the label is not present, the hot supply
tube is the longer of the two inlet tubes.
Brand Lavatory Faucets Tools:
Adjustable wrench
Groove joint pliers
Pipe wrench
Screwdriver
Thread sealant tape
Basin wrench
Plumber's putty
6
8
3
11
7
9
5
4
2
110
Remove the stopper (1) and the flange
(2). Screw the brass nut (3) all the way
down. Push the plastic washer (4) and
the gasket (5) down. Unscrew the pivot
nut (6) from the pop-up body (7) and
remove the seal washers (8). Take off
the spring clip (9) from the horizontal rod
(10). Remove the tailpiece (11) from the
pop-up body (7).
2
3
4
5
1
Apply the silicone to the underside of the flange
(2). Insert the pop-up body (1) into the drain hole
from below sink. Screw the flange (2) into the
pop-up body (1). With the pivot hole (3) facing
toward faucet, Use groove joint pliers to tighten
the nut (4), do not over tighten. Do not turn the
pop-up while tightening the nut, or sealant may
not seal drain. Clean excess putty. Apply thread
sealant tape to the top threads of the tailpiece (5)
in a clockwise direction, as shown and hand
tighten.
4
3
1
2
Install the horizontal rod (2) and the
stopper (3) as shown (4). Hand tighten
the pivot nut (1).
120125 & 120122
14
1
234
5
6
7
8
9
10
12
13
1
NO.
264
Lift Rod & Lift Knob 124020
Pop-Up Assembly
1
247
Handle
30
12
13
Flange & O-ring
10
9
11 211
263
Washer
Escutcheon & Base Plate 1
1
1
1
1
165 Cap
6
8
7 260
994658
261
Bonnet
Cartridge
Aerator
2
3
4
259
20
O-ring
Set Screw 248
Handle Seat 1
1
1
1
1
1
1
PART NO.PART DESCRIPTION
MODEL NO.120125 QTY.
11
14
Nut 262 1
262
Nut 1
11
124011
14
12
13 267
266
Pop-Up Assembly
Lift Rod & Lift Knob
Escutcheon & Base Plate
1
1
1
1
Handle Seat 2564
994658
Aerator 265
8
9
10 211
31
Washer
Flange & O-ring
6
5
7 Bonnet
Cap 17
260
Cartridge 1
1
1
1
1
1
PART NO.PART DESCRIPTIONNO.
2
1
3 O-ring
Handle 255
259
Set Screw 20
MODEL NO.120122 QTY.
1
1
1
www.premierfaucet.com, [email protected]

This manual suits for next models

1

Other Premier Plumbing Product manuals

Premier 106165 User manual

Premier

Premier 106165 User manual

Premier 120125 User manual

Premier

Premier 120125 User manual

Premier 120461LF User manual

Premier

Premier 120461LF User manual

Popular Plumbing Product manuals by other brands

MAINLINE Treme TR137-CP Installation

MAINLINE

MAINLINE Treme TR137-CP Installation

Glacier bay HDQFW6AC027CP Installation and care guide

Glacier bay

Glacier bay HDQFW6AC027CP Installation and care guide

Bristan Target TG SNK C Fitting instructions

Bristan

Bristan Target TG SNK C Fitting instructions

Sensea 3276007457476 Assembly, Use, Maintenance Manual

Sensea

Sensea 3276007457476 Assembly, Use, Maintenance Manual

Hans Grohe Raindance Select S 240 2jet 26470000 Instructions for use/assembly instructions

Hans Grohe

Hans Grohe Raindance Select S 240 2jet 26470000 Instructions for use/assembly instructions

KWC VESUNO Z.534.673.700 Specification sheet

KWC

KWC VESUNO Z.534.673.700 Specification sheet

Sunlighten mPulse Aspire user manual

Sunlighten

Sunlighten mPulse Aspire user manual

Bradley Sentry SN2003/AST4 Installation

Bradley

Bradley Sentry SN2003/AST4 Installation

METHVEN 01-8222 installation guide

METHVEN

METHVEN 01-8222 installation guide

Grohe MintaTouch Series manual

Grohe

Grohe MintaTouch Series manual

Luxart Aerro A511TOV Installation

Luxart

Luxart Aerro A511TOV Installation

Grohe ATRIO 29216001 owner's manual

Grohe

Grohe ATRIO 29216001 owner's manual

Spectrum Brands Pfister Vosa F-072-VV Quick installation guide

Spectrum Brands

Spectrum Brands Pfister Vosa F-072-VV Quick installation guide

Zoeller 910 installation instructions

Zoeller

Zoeller 910 installation instructions

Axel ARAX.8105CR quick start guide

Axel

Axel ARAX.8105CR quick start guide

Atlantic FBKIT3 instruction manual

Atlantic

Atlantic FBKIT3 instruction manual

BSaunas Patio M manual

BSaunas

BSaunas Patio M manual

Hans Grohe Axor Citterio Twin Towel Bar 40820XX0 Specification sheet

Hans Grohe

Hans Grohe Axor Citterio Twin Towel Bar 40820XX0 Specification sheet

manuals.online logo
manuals.online logoBrands
  • About & Mission
  • Contact us
  • Privacy Policy
  • Terms and Conditions

Copyright 2025 Manuals.Online. All Rights Reserved.