manuals.online logo
Brands
  1. Home
  2. •
  3. Brands
  4. •
  5. Premier
  6. •
  7. Plumbing Product
  8. •
  9. Premier 120461LF User manual

Premier 120461LF User manual

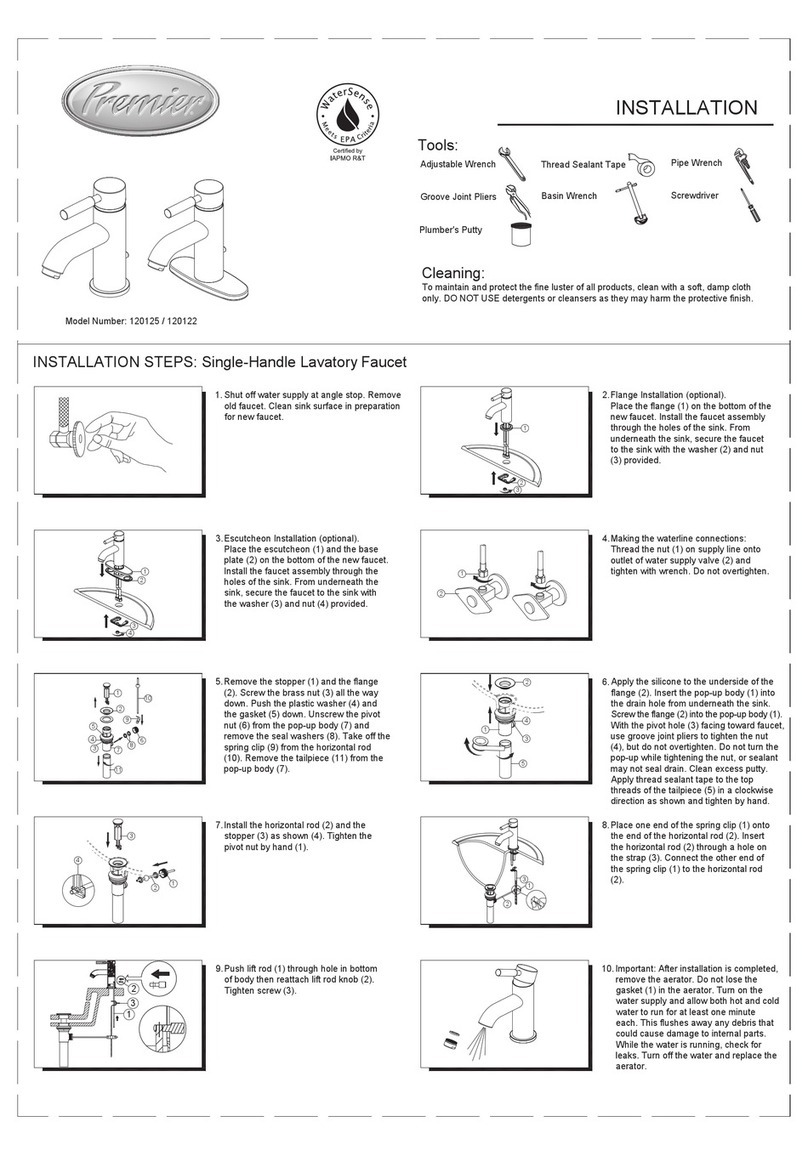
Important: After installation is
completed, remove the aerator. Do
not lose the gasket (1) in the
aerator. Turn on the water supply
and allow both hot and cold water to
run for at least one minute each.
This flushes away any debris that
could cause damage to internal
parts. While the water is running,
check for leaks. Turn off the water
and replace the aerator.
INSTALLATION STEPS: 2-Handle Lavatory Faucet
Shut off water supply at angle stop. Remove
old faucet. Clean sink surface in preparation
for new faucet.
1.
Making the waterline connections:
Use 1/2" IPS faucet connections (2, not
included), or use the coupling nuts (3, not
included) with a 3/8" OD ball-nose riser
(1, not included). Use wrenches when
tightening. Do not overtighten.
Ensure the gasket (1) is on the bottom
of the new faucet (2). Place the faucet
(2) through the mounting holes in the
sink. Secure the faucet (2) to the sink
using the mounting nuts (3) provided.
Hand-tighten only.
Option: If the sink is uneven, use the
silicone under the gasket (1).
2.
Cleaning:
To maintain and protect the fine luster of all products, clean with a soft, damp cloth
only. DO NOT USE detergents or cleansers as they may harm the protective finish.
Model Number: 120461LF / 120463LF / 120464LF
INSTALLATION
Place one end of the spring clip (1) onto the
end of the horizontal rod (2). Insert the
horizontal rod (2) through a hole on the
strap (3). Connect the other end of the
spring clip (1) to the horizontal rod (2).
Insert the lift rod (4) into the strap and
tighten the screw (5).
3. 4.
6.
8.
7.
Install the horizontal rod (2) and the
Tools:
Adjustable Wrench
Groove Joint Pliers
Pipe Wrench
Screwdriver
Thread Sealant Tape
Basin Wrench
Plumber's Putty
Remove the stopper (1) and the flange
(2). Screw the brass nut (3) all the way
down. Push the plastic washer (4) and
the gasket (5) down. Unscrew the pivot
nut (6) from the pop-up body (7) and
remove the seal washers (8). Take off
the spring clip (9) from the horizontal rod
(10). Remove the tailpiece (11) from the
pop-up body (7).
1
3
2
1
3
2
4
5
10
9
6
8
7
11
3
4
2
5
1
3
1
2
4
1
3
2
3
4
2
1
5
1
5. Apply the silicone to the underside of the
flange (2). Insert the pop-up body (1) into
the drain hole from underneath the sink.
Screw the flange (2) into the pop-up body (1).
With the pivot hole (3) facing toward
faucet, use groove joint pliers to tighten
the nut (4), but do not overtighten. Do not
turn the pop-up while tightening the nut,
or sealant may not seal drain. Clean
excess putty. Apply thread sealant tape
to the top threads of the tailpiece (5) in a
clockwise direction as shown and tighten
by hand.
stopper (3) as shown (4). Tighten the
pivot nut by hand (1).
11596621 Handle Assembly
1
1
1
1
Handle Wrench 994666
5
Brass Pop-Up
Lift Rod & Lift Knob
6
994602
124011
Mounting Nut
4
3
46
1
1
41
Bonnet Nut
Ceramic Cartridge
2
Aerator
QTY.
PART DESCRIPTION
MODEL NO.120464LF
NO.PART NO.
120461LF / 120463LF / 120464LF
9
8
7
Washer 155 1
586
1
994666
Handle Wrench
8
Lift Rod & Lift Knob
9
Brass Pop-Up
1
1
994599
124020
155
Washer 1
3
Ceramic Cartridge
Aerator5
Mounting Nut
7
6
4
585 1
1
46
1
Bonnet Nut
2 1
41
MODEL NO.120463LF
Handle Assembly
PART DESCRIPTION
NO.
1
QTY.
1159661
PART NO.
MODEL NO.120461LF
PART DESCRIPTION
Ceramic Cartridge
10
Handle Wrench
Cap
3 Washer
5 Aerator
6
7
Mounting Nut
4
2 Bonnet Nut
1
NO.
Handle Assembly
994666 1
158 1
1
155
585 1
46 1
1
41 1
QTY.
159661
PART NO.
1
3 & 4 3 & 4 3 & 4
www.premierfaucet.com, support@premierfaucet.com
1
1
2
3
4
5
6
7
8
9
10

This manual suits for next models

2

Other Premier Plumbing Product manuals

Premier 120125 User manual

Premier

Premier 120125 User manual

Premier 106165 User manual

Premier

Premier 106165 User manual

Premier 120125 User manual

Premier

Premier 120125 User manual

Popular Plumbing Product manuals by other brands

Homa Saniflux Series Installation and operation instruction manual

Homa

Homa Saniflux Series Installation and operation instruction manual

BATHSELECT BS10101 installation instructions

BATHSELECT

BATHSELECT BS10101 installation instructions

Galvin Engineering 170.01.13.00 Installation guidelines

Galvin Engineering

Galvin Engineering 170.01.13.00 Installation guidelines

VADO Zoo Installation & maintenance instructions

VADO

VADO Zoo Installation & maintenance instructions

Honeywell T104 Specifications

Honeywell

Honeywell T104 Specifications

Hans Grohe Metris Select Prep 14848 1 Series Installation/User Instructions/Warranty

Hans Grohe

Hans Grohe Metris Select Prep 14848 1 Series Installation/User Instructions/Warranty

Delta 132900 parts manual

Delta

Delta 132900 parts manual

ESS Easy Drain EDVIN-M4 Installation advice

ESS

ESS Easy Drain EDVIN-M4 Installation advice

Kallista P23010 installation instructions

Kallista

Kallista P23010 installation instructions

Kohler K-8207 installation guide

Kohler

Kohler K-8207 installation guide

Tres Slim Exclusive Technical Characteristics

Tres

Tres Slim Exclusive Technical Characteristics

Helvex ELITE UE-300-DX installation guide

Helvex

Helvex ELITE UE-300-DX installation guide

Speakman SB-2141 instructions

Speakman

Speakman SB-2141 instructions

Sterling Plumbing 71100116 Specification sheet

Sterling Plumbing

Sterling Plumbing 71100116 Specification sheet

Artos F502-6 installation guide

Artos

Artos F502-6 installation guide

Grohe Tectron 37 324 installation instructions

Grohe

Grohe Tectron 37 324 installation instructions

Mira Play 8.5 kW Installation & user guide

Mira

Mira Play 8.5 kW Installation & user guide

Clou first CL/03.08110 installation instructions

Clou

Clou first CL/03.08110 installation instructions

manuals.online logo
manuals.online logoBrands
  • About & Mission
  • Contact us
  • Privacy Policy
  • Terms and Conditions

Copyright 2025 Manuals.Online. All Rights Reserved.