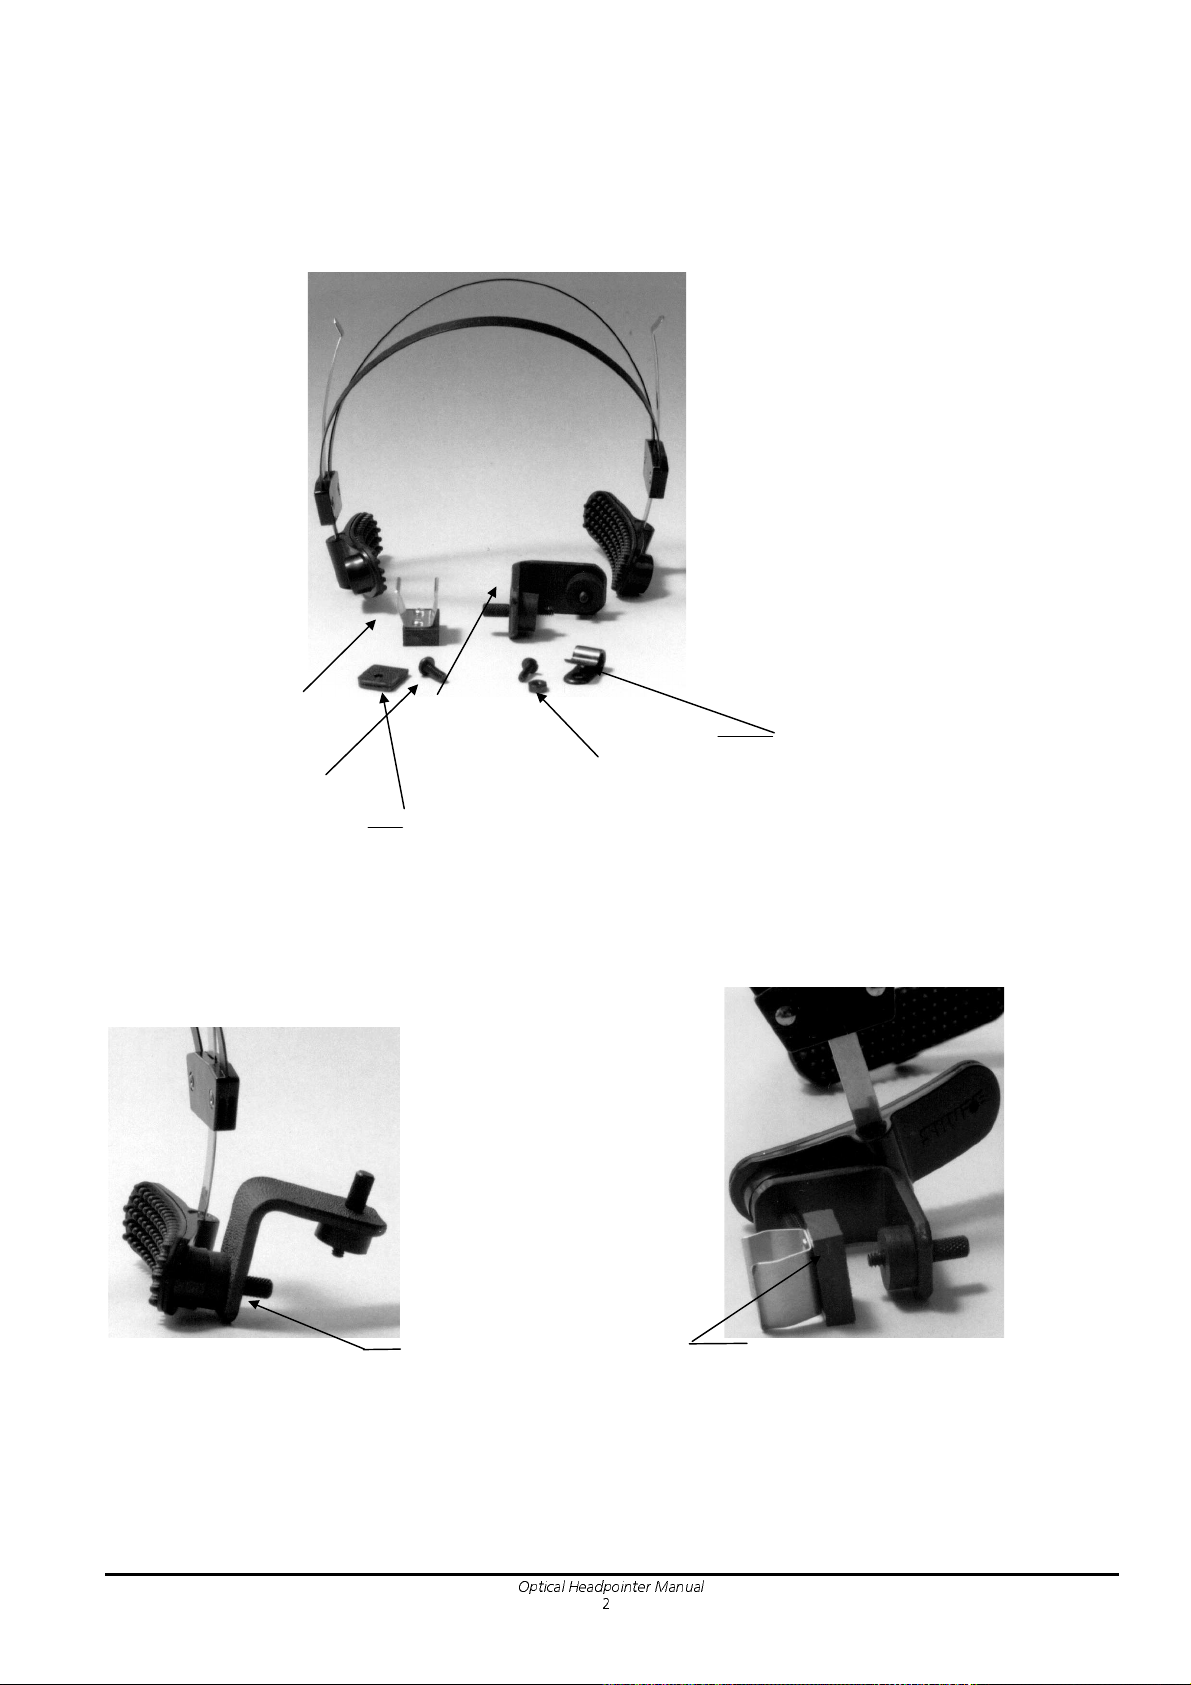
Prentke Romich Company Optical Headpointer User manual

Optical Headpointer for the
Liberator, DeltaTalker, AlphaTalker, AlphaTalker II, Light Talker and IntroTalker
Optical Headpointer
Mounting Instructions
PRENTKE ROMICH COMPANY
World Headquarters:
1022 Heyl Rd. • Wooster, Ohio 44691
Telephone: (330) 262-1984
Fax: (330) 263-4829
E-Mail Address: info@prentrom.com
Web Site Address: www.prentrom.com
European Headquarters
Prentke Romich Europe Ltd
Whitegates • Swinstead • Grantham • Lincs.• NG33 4PA • UK.
Fax: 44 1476 550357
E-Mail Address: preltd@aol.com

!
" # # $ % % & % ' (
) * + , - . - + / - . - + ) 0 . - 132 . - 4 1 5 6
1 2
Liberator headpointer DeltaTalker, AlphaTalker, ATII,
center-mounted on headset LightTalker, IntroTalker
headpointer side-mounted on
the headset
3 4
Another side-mounting DeltaTalker, AlphaTalker, ATII, Light Talker and
IntroTalker headpointer mounted on the headband

Your Headpointer is Compatible With Your
Communication Device
You have received an optical headpointer that is compatible with your communication device.
If you use a Liberator, your headpointer looks like the headpointer in illustrations 1 on the facing page.
The fat, round end points toward the Liberator keyboard.
If you use a DeltaTalker, an AlphaTalker or AlphaTalker II, a Light Talker or an IntroTalker, your
headpointer looks like the headpointer in illustrations 2, 3 and 4 on the facing page. The longer, thin,
round end points toward the keyboard on your device.
Both kinds of headpointers can be mounted on either the headset or the headband.
On the headset, the headpointer can be mounted either on one of the sides or on the top center. In
illustrations 2 and 3, the headpointer is mounted to the side of the headset. In illustration 1 it is mounted
on the top.
In illustration 4, the DelktaTalker, AlphaTalker, AlphaTalker II, Light Talker, IntroTalker headpointer is
center-mounted horizontally on the headband. You can also change the headband mount to a vertical
one. This is explained later.

Clamp Side
mounting Cable holder
bracket with nut and screw
Mounting screw for cable strain relief
and Mounting plate
for Center Mount
Attach bracket to earpiece Attach clamp to
bracket and tighten screw

Mounting the Headpointer on the Headset
Illustration 1 opposite page 1 shows a Liberator headpointer mounted on the headset.
The DeltaTalker, AlphaTalker, AlphaTalker II, Light Talker, IntroTalker headpointer mounts exactly the
same way, except the long, thin, round end of the headpointer points at the keyboard of your
communication device.
The top picture on the facing page shows the unassembled headset mounting pieces. You can see the
headset, a bracket, a clamp, a center mounting plate and mounting screw and a small cable-holder with a
screw and nut.
Side Mount
Find the bracket.
The bracket has a screw at the side and at the top. The side screw attaches to the side of the headset and
the top screw attaches to the clamp.
Attach the Bracket
Attach the bracket to the earpiece on either side of the headset. Place the shaft of the screw that is on the
bottom side of the bracket into the hole that is designed for it on the earpiece (see illustration on facing
page). Turn the screw until it is tight against the bracket. Later, you can loosen the screw a few turns if
you want to rotate the bracket.
Attach the Clamp
There is a separate clamp that attaches to the top of the bracket. The clamp has a small hole in the top
where the screw in the top of the bracket fits. The clamp holds the headpointer. Place the hole in the
clamp over the top screw and tighten the screw. See the illustration on the facing page. Once the clamp
is attached to the screw, you can loosen the screw a few turns to rotate the clamp (and headpointer), if
necessary.

Mounting plate Mounting
screw
Cable Holder
Nut and screw

Center Mount
You can also mount the headpointer on the center of the headset. (See the illustration above.) To do this
you will use the small center mount mounting plate and and the small mounting screw that are part of
your headset kit. You will need a Phillips screwdriver.
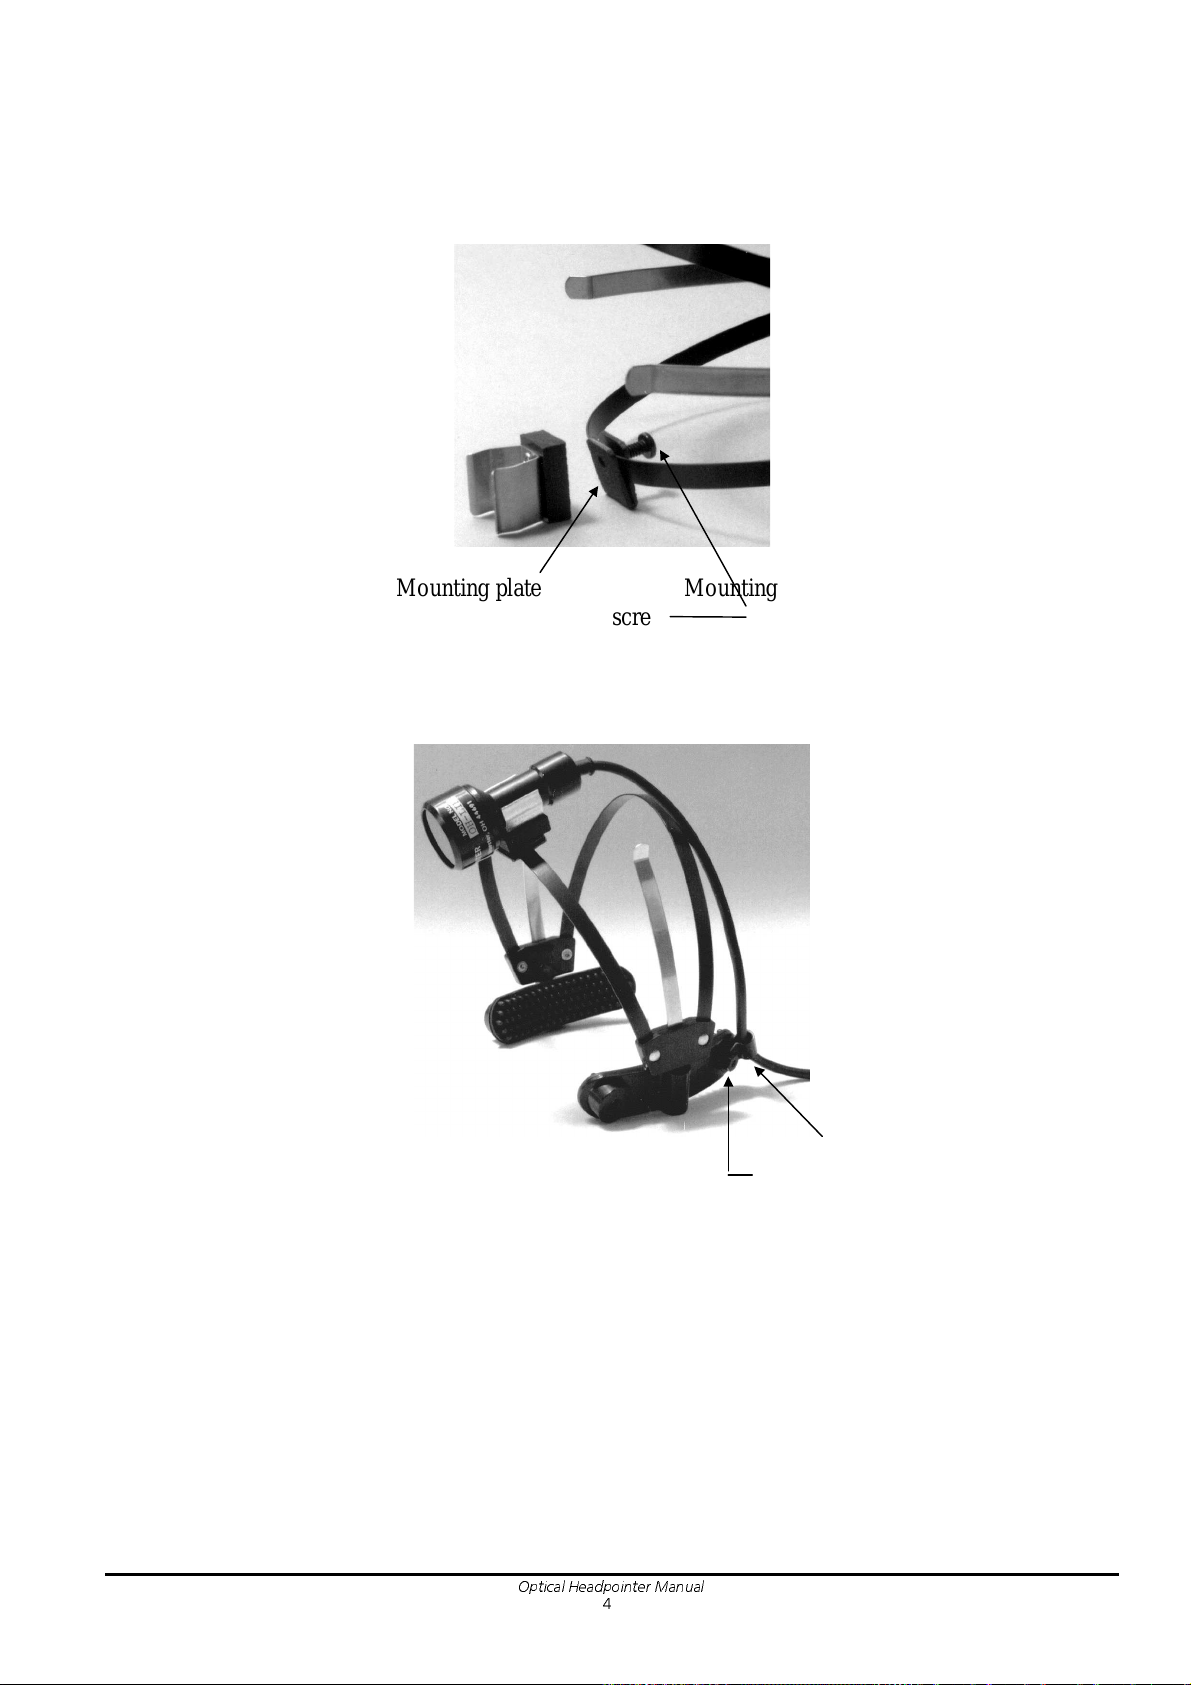
Find the small center mount mounting plate and the small black screw. The mounting plate has two small
holes in it.
Place the mounting plate over the front metal band on the headset. (You may have to use your fingers to
pry the edges of the mounting plate apart; or, you may be able to just push it onto the headset so that
one side is above and one side below the metal band.) It doesn't matter which direction the mounting
plate faces. Place the black screw into the holes in the mounting plate from the underside. The shaft of
the screw will now be poking up through the holes in the mounting plate.
Find the clamp. Place the hole in the clamp on top of the mounting screw. Using the Phillips
screwdriver, tighten the black screw until the clamp and the mounting plate are secure on the metal band.
You can also attach the cable-holder now. The cable-holder is designed to work with the center-mount.
It holds the cable and helps to remove any strain on the cable. It also keeps the cable from hanging
awkwardly around the user's head or face.
Place the headpointer cable in the holder then place the cable-holder over the back hole in one of the
earpieces. Take the remaining small screw, and, from the back of the earpiece (the side that fits against
the head), look for the spot where there is a small piece of rubber missing. Push the screw through the
hole in this spot. Place the small nut over the end of the screw and tighten the nut. You can see a picture
of the cable-holder in the picture on the facing page.

Connect cable to regular headpointer
Cable is already connected
to Liberator headpointer

Connecting the Cable
For DeltaTalker, AlphaTalker, AlphaTalker II, Light Talker, IntroTalker
If you are using one of the communication devices listed above, you must connect the cable that came
with your headpointing kit to your headpointer.
Plug the end of the cable that matches the one in the picture (top illustration on facing page) into the back
of the headpointer. Plug the other end of the cable aid in the connector labeled either DUAL or
HEADPOINTER on your communication aid.
For the Liberator
The Liberator headpointer already has the cable attached to it. Just plug the other end of the cable into
the connector marked INFRARED SENSOR on the left side panel of your Liberator.
1Recommendation
We recommend that you do not plug in the headpointer
until you have it completely set up for the person who will be using it.

Regular headpointer mounted in clamp on headband—
long thin end points toward keyboard
Gray dot on Liberator headpointer
must always point down
(towards the floor)

Attach the Headpointer
For the DeltaTalker, AlphaTalker, AlphaTalker II, Light Talker, IntroTalker
Position the headpointer so that it is facing the keyboard of your communication device and snap the
headpointer into the clamp. Remember, the longer, thin, round end (the end that does not have the cable
coming from it) must point toward the keyboard.
For the Liberator
The Liberator headpointer has a small gray dot on the back of the fat round end of the pointer. (See
bottom illustration on facing page.) When you snap the headpointer into the clamp, this dot must be
pointing toward the floor.
When the headpointer is in the clamp correctly, you will not be able to see the dot unless you look
underneath the headpointer.
1Recommendation
We recommend that you do not plug in the headpointer
until you have it completely set up for the person who will be using it.

Headband
Headband hinge and clamp
Headband with clamp attached and headpointer in clamp

Mounting the Headpointer on the Headband
Attach the Headpointer to the Center-Mounted Clamp
You received a headband with a center mount already on it (see illustration 4 opposite page 1 and on
facing page). If you want to use it this way, just lift up the hinge on the mount and snap the headpointer
into the clamp.
Remember that either the long, thin, round end of the headpointer (DeltaTalker, AlphaTalker,
AlphaTalker II, Light Talker or IntroTalker) or the fat round end of the headpointer (Liberator) must
point toward the keyboard.
The cable can be threaded through the sleeve that covers part of the headband, or it can rest on the head
of the person using the headpointer.
Use the Velcro strap to loosen or tighten the headband. You can position the headband so that the
headpointer is almost anywhere on the head. Just remember that the pointing end of the headpointer
must face the keyboard of the communication aid.
You can remove the clamp and re-position it by prying the two dual-lock squares apart. Pull gently on
the dual-lock.
There is a small metal circle on either side of the headband. You can attach a chinstrap to these holders.
If You Are Using a Liberator Headpointer
All of the directions for attaching a Liberator headpointer are the same as above except that you must
remember to make sure the small gray dot on the headpointer is pointing down, or towards the floor,
when you snap the headpointer into place.

Remove the horizontal mount by unscrewing the 2 screws from the back of the headband.
Place the mounting plate vertically over the two holes. Remove the 2 screws and nuts from the plastic
bag that came with your headband. Screw these screws in from the back of the headband (so the shaft
of the screw is not against the user's head). Place the nuts over the end of the screws and tighten them.
Place the mount vertically over the mounting plate. Screw the remaining 2 screws into the hole on each
end of the mount. (Remember, put the screws in from the back of the headband.) Screw an acorn nut
over each screw.

Change the Horizontal Mount on the Headband
to a Vertical Mount
If you prefer, you can change the horizontal mount on the headband to a vertical mount. You will need a
common screwdriver to remove the flathead screws in the mount.
You will remove the mount, turn the adapter plate from horizontal to vertical, attach the screws and then
replace the mount vertically on the adapter plate.
The pictures on the facing page show how to change the mount.

Liberator headpointer
Headpointer stem unscrewed and connector removed from stem
Unplugged connector discard this part
Plug new cable into
remaining connector

Replace the Liberator Headpointer Cable
At some point you may have to replace the cable in the Liberator Headpointer. The wires may become
frayed or disconnected, or for some other reason the headpointer may quit working. To order a
replacement cable, call the PRC Sales Department at 1-800-262-1933 and ask for part number 11115.
When you receive your new cable, take your headpointer and turn it so that the slender end (the stem) is
facing you. Unscrew the bottom part of the stem (the part of the headpointer that the cable goes into).
When the old cable is unscrewed from the headpointer, gently pull the cable wires out of the back of the
headpointer until you see a small white connector. The Liberator cable wires are attached to the bottom
of this connector. The rest of the headpointing wires are attached to the top of the connector. Using
your fingernails, pull the very bottom part of the connector away from the top part of the connector.
(See bottom illustration on facing page ) The cable should now be disconnected from the connector.
Throw the old cable away.
Plug the white connector end of the new cable into the place on the headpointer connector where you just
disconnected the old cable.
The cable connector only attaches to the headpointer connector in one way. If you try to push the two
ends together and they don' t connect, turn thecable connector over and try again. When the cable and
headpointer are connected, push the wires back into the headpointer stem. Screw the bottom piece of the
headpointer back onto the stem. Plug the other end of the cable into the Liberator.
Your headpointer is now ready to use.

Table of contents
Popular Accessories manuals by other brands

Miller
Miller 499 Operation and instruction manual

Ravpower
Ravpower RP-PB19 user manual

Panasonic
Panasonic SC-GU1-485 instruction manual

Crown Boiler
Crown Boiler BWF Series Installation and operating instructions

Applied Research and Technology’s
Applied Research and Technology’s USB Phono Plus user manual

Vernier
Vernier STS-BTA manual