Prestel HD-F1L User manual

1
Contents
1 Notes...........................................................................................................................2
2 Main Features.............................................................................................................2
3 Standard Accessories..................................................................................................2
4 Interface description...................................................................................................3
5 OSD Menu Operation.................................................................................................4
6 Serial port command ..................................................................................................7
7 Network Contro..........................................................................................................8
8 Maintenance and.........................................................................................................9
9 Fault phenomenon and processing .............................................................................9
10 Standard Specification............................................................................................10
11 Dimension...............................................................................................................11
12 Copyright Notice....................................................................................................11

2
1 Notes
●Electric Safety
Installation and operation must accord With
electric safety standard.
●Caution to transport
Avoid stress, vibration and soakage in
transport, storage and installation.
●Polarity of power supply
The power supply of the product is +12V,
the max electrical current is 2A .Polarity of the
power supply plug drawing as follows.
●Careful of installation
Do not grasp the camera head when carrying
the camera. Don’t turn camera head by hand.
Doing so may result in mechanical damage.
Never power on before installation is not
completed.
●Don’t dismantle the camera
We are not responsible for any unauthorized
modification or dismantl- eing.
CAUTION!
The specific frequency of electromagnetic
field may affect the image of the camera!
2 Main Features
●Highest resolution 1920 x1080, output Full
HD 1080p real-time image.
●Advanced coding technology, time delay
within 200 ms.
●Support HD-SDI interface, the effective
transmission distance up to 200 meters.
●High SNR of CMOS sensor, sensitivity high,
low-light good.
●Support 2D and 3D noise reduction.
●ICR infrared filter plate automatic switch,
achieve monitoring day and night.
●Support PoE power supply
●Supports dual stream.
●Support automatic aperture, automatic
electronic shutter, adapt different monitoring
environment.
●Support SDK.
3 Standard Accessories
When opened the package, please check
and confirm that all attachments shall be
provided:
HD color gun type camera x1
The user manual x1
Certificate/warranty card x1

3
4 Interface description
●Camera appearance
1. Lens focal adjustment after fixed screw
holes
2. Lens mounting position (only for C / CS
lens *)
3. Aperture control interface (only applicable
DC automatic aperture)
4. The installation location hole
5. Fuselage
Operating tips
Both sides threaded hole is consistent with
the positioning hole size, installation can be
used instead of each other.
Notice
●Use C camera lens, you need to use special
adapter ring.
●The back of the interface specifications
1. power interface
Connect external adapter, 12V power
supply.
2. power light
3. OK key
4. Up select key
5. Internet interface
Internet interface for 10/100 m adaptive
Ethernet interface, through the interface be
connected with various internet Settings, such
as hubs, routers, switches etc.
6. HD-SDI interface
7. Right select key
8. Down select key
9. Left select key
10. RS485 interface
Operating tips
Press "OK" button and then to electricity
and keep holding down the "OK" button 8

4
seconds, the camera will restore factory
Settings.
5 OSD Menu Operation
●Key Description
The camera USES five buttons, respectively,
to determine key [OK], select key 【 】 up
and down, left and right sides choose key "
【】; Under normal image press "OK" key,
the screen displays the main menu, press
【】,from top to bottom cycle options
menu item and press 【】select menu
options, use a scroll arrow or highlight the
selected item, press menu button "OK" to
highlight the menu item; Each menu page has a
"Return" option, to Return to the superior
menu or exit the menu.
●MENU
Directly press "OK" button to enter the main
menu.
Operating tips
Use the select key up and down【 】
Choose a menu item, press【OK】to enter
submenu.
choose[Exit]press【OK】to exit menu.
●EXPOSURE
Operating tips
Mode: Set the camera exposure mode,
Optional items: Full Auto, Bright, Shutter
Priority.
EXPOSURE
Mode Full Auto
ExpCompMod Off
Backlight Off
DRC Strength 4
Anti Flicker 50Hz
Lens Manual
Return
MENU
Exposure
Color
Image
Noise Reduction
Setting
Information
Restore Factory Settings
Exit

5
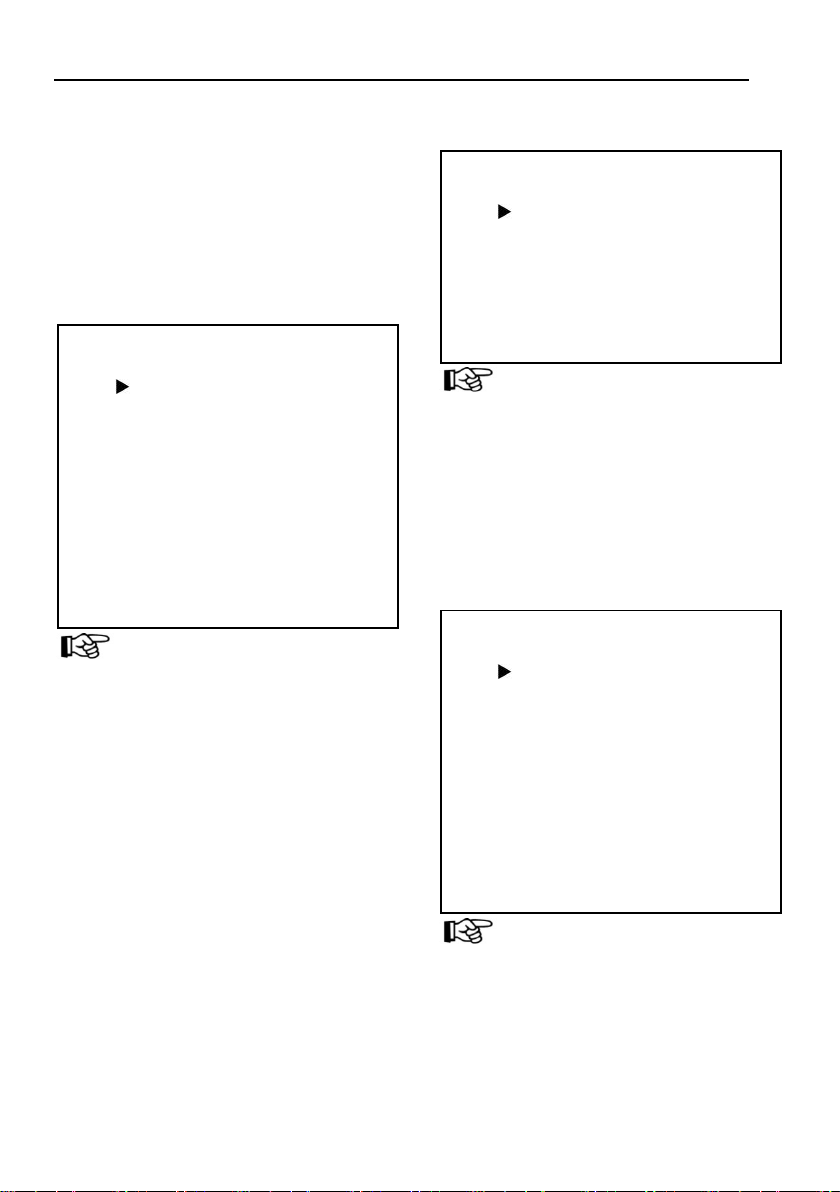
Shutter: Set the Shutter values, only when
the Mode for the Shutter Priority Mode
effective, Optional items: 1/10000s,1/6000s,
1/4000s,1/3000s,1/2000s,1/1500s,1/1000s,1/72
5s,1/500s,1/350s,1/250s,1/200s,1/125s,1/100s,
1/90s,1/60s,1/30s.
Bright: Set the brightness values, only when
the effective Mode for Bright Mode, Optional
items: 0 ~ 17.
ExpCompMode: Set the exposure
compensation mode, Optional items: On, Off.
ExpComp: Set the exposure compensation
value, only when ExpCompMode item to On
effective, Optional items: -7 ~ 7.
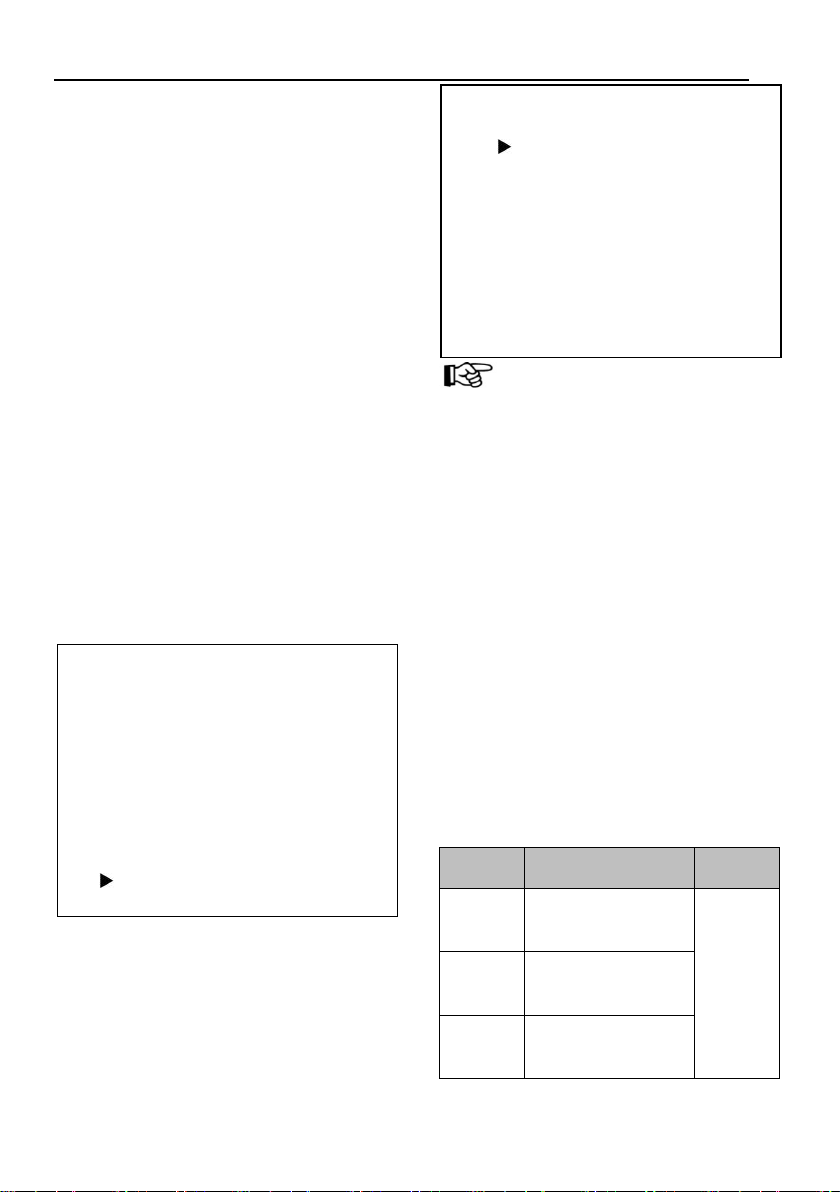
Backlight: Set the backlight compensation,
Optional items: On, Off.
DRC Strength: Set up digital wide dynamic
strength, can set up different levels of wide
dynamic effect, Optional items: 0 ~ 8.
Anti Flicker: Set the flashing function,
Optional items: 50Hz, 60Hz, Off.
Lens: Set lens mode, Optional items:
Manual, DC.
Return: get back
●COLOR
Operating tips
WB Mode: Set the camera white balance
mode, Optional items: Auto, 3000K(Indoor),
4000K,5000K(Outdoor),6500K-1,6500K-2,65
00K-3,One Push WB(ok), Manual.
R Gain: Adjust the camera white balance
mode of red gain, are effective only when the
white balance mode to Manual, Optional items:
0 ~ 255.
B Gain: Adjust the camera white balance
mode of blue gain, are effective only when the
white balance mode to Manual, Optional items:
0 ~ 255.
Saturation: Color saturation adjustment,
Optional items: 60% ~ 200%.
Hue: Chroma adjustment, Optional items:
COLOR
WB Mode Auto
Saturation 140%
Hue 7
AWB Sens Low
Style Fujifilm(301)
Return

6
0 ~ 14.
AWB Sens: The white balance sensitivity,
Optional items: Low, Middle, High.
Style: Optional items: Ricom, Fujifilm(301),
Fujifilm(300), Fujifilm(500),HE45.
Return: get back.
●IMAGE
Operating tips
Luminance: Brightness adjustment, Optional
items: 0~14.
Contrast: Contrast adjustment, Optional
items: 0~14.
Sharpness: Sharpness adjustment, Optional
items: Auto, 0~15.
Flip-H: Image flipped horizontally. Optional
items: On, Off.
Flip-V: Image Flip Vertical. Optional items:
On, Off.
LDC: Lens distortion correction, Optional
items: 1~10, Off.
Return: get back.
●NOISE REDUCTION
Operating tips
2D NR: 2D noise reduction, Optional items:
1 ~ 5, Close, Auto.
3D NR: 3D noise reduction, Optional items:
1 ~ 8, Close.
Return: get back.
●SETTING
Operating tips
Language: Language Settings, Optional
items: English, Chinese.
Protocol: Communication protocol Settings,
Optional items: VISCA, PELCO-D, PELCO-P.
SETTING
Language English
Protocol VISCA
Visca Address 1
Baudrate 9600
Video Format 1080P30
EPTZ Off
Return
NOISE REDUCTION
2D NR 3
3D NR 3
Return
IMAGE
Luminance 6
Contrast 7
Sharpness 1
Flip-H Off
Flip-V Off
LDC Off
Return

7
Visca Address: Address of the Visca
Settings, Optional items: 0 ~ 7.
P-D Address: P-D address settings, valid in
PELCO-D mode, Optional items: 0~254.
P-P Address: P-P address settings, valid in
PELCO-P model, Optional items: 0~31.
Baudrate: Camera baud rate Settings,
Optional items: 38400,19200, 9600,4800,2400.
Video Format: Camera system Settings,
Optional items: 1080P30, 1080P25, 1080I60,
1080I50, 720P60, 720P50.
EPTZ: e-PTZ, Optional items: On, Off.
Zoom Limit: Optional items: 1.5x, 2x, 3x,
4x, 8x.
Return: get back.
●INFROMATION
●RESTORE FACTORY SETTINGS
Operating tips
Yes: verify, press【OK】to restore factory
Settings.
No: cancel, press【OK】to back to menu.
Return: get back.
6 Serial port command
description
●Serial port control
Camera on the electric initialization
complete, available command (VISCA) with
RS485 and RS232 serial port for
communication. The camera provides the
following commands to control menu:
function command packet Notes
UP 8x 01 06 01 08 08 03 01
FF
Equival
ent to
the back
four
directio
n keys.
DOWN 8x 01 06 01 08 08 03 02
FF
LEFT 8x 01 06 01 08 08 01 03
FF
RESTORE FACTORY SETTINGS
Yes
No
Return
INFORMATION
Version 1.53D-H
Data 2015-07-02
IP 192.168.100.88
Gateway 192.168.100.1
Netmask 255.255.255.0
Return

8
RIGHT 8x 01 06 01 08 08 02 03
FF
OK
8x 01 04 0B 02 FF
或
8x 01 04 0B 03 FF
Equival
ent to
the back
【OK 】
key.
x:Camera address.
7Network Contro
1. View from Web browser (better in IE)
●To view from web browser, firstly need
to check camera IP address.Connect camera to
PC with ethernet cable, use upgrade software
to search for IP address(If you need the
upgrade software, please contract the
manufacturer)
●Please enter the IP address, username,
password to web browser you have got via the
above methods, then enter network
control/viewing.
2. Change IP address,2 methods as below:
Method 1: On web control page, find
"Network"--->Change IP---->Click "Apply"
----> Restart camera
Method 2: Open "upgrade_En.exe", change
IP and click "Set"
3. Once IP changed, need to restart the camera.
2 methods to restart as below:
Method 1: Turn off and turn on manually
to restart camera
Method 2: On web page, find "System"

9
and click "Apply" (when under remote
controlling environment, better use this
method)
Operating tips
Default IP address: 192.168.100.88
8 Maintenance and
troubleshooting
●Maintenance of the camera
If the camera is not used for a long time,
after use, please disconnect the power switch,
at the same time the ac power adapter and ac
socket to disconnect.
Clear the dust on the camera housing, please
use soft cloth or cotton paper.
Clean the camera lens, please use dry soft
cloth to wipe, such as dirt serious when, please
use neutral detergent wipe gently. Don't use
strong or with corrosive cleaner, so as to avoid
the lens scratches, influence the image effect;
●Beyond the camera work intensity of
illumination
Camera may be more than camera work
intensity of illumination, the image cannot
achieve the best effect.
●The camera should avoid using at the
following specific situation
Camera should avoid shooting especially
bright objects, such as sunshine, lamplight, etc.
The camera don't work in lighting conditions
unstable environment, otherwise the image will
happen.
Don't can launch a large power of the
facilities around the use of radio waves, such
as television or radio transmitters, etc.
9 Fault phenomenon and
processing
9.1 Images
●Display shows no image
1,Check whether the camera power supply is
connected and the voltage is normal, whether
the power light shine.
2,Check whether video platform, TV cable
connection is normal
3,Check for manual lens aperture and open the
aperture.
●Sometimes there is no image
1, Check whether video platform, TV cable
connection is normal.
2, check whether the camera installation safety,
if there is a strong shock.
●image blurring
1, Check whether the installation.
2, Check whether the lens focusing accurately.

10
●When modify IP address in an incorrect way
cause the wrong IP address or forget web
passwords, press OK button 2 s to restore the
default value (Default IP: 192.168.100.88
Default username: admin Default password:
admin),restart pages times will have image.
9.2 Control
Serial port can't control
1, The camera control parameters is set up
correctly.
2, Check whether control line connection is
good.
10 Standard Specification
Model
parameter
HD Color Box Camera
Camera
Video System 1080i/60,1080i/50,1080p/30,108
0p/25,720p/60,720p/50
Sensor Type 1/2.7", CMOS, Effective pixel:
2.07M
Scanning Mode Progressive
Lens C/CS lens
Auto Iris DC
minimal
illumination 0.05 Lux @ (F1.2, AGC ON)
shutter 1s ~ 1/10000s
white balance
Auto, 3000K(Indoor), 4000K,
5000K(Outdoor),6000K,6500K_
1,6500K_2,6500K_3,
One Push
WB(ok), Manual
Day-night mode ICR Infrared filter plate
Digital noise
reduction
2D&3D Digital noise
reduction
Backlight
compensation Support
Video standard H.264
Video rate 32 Kbps~8Mbps
Audio standard AAC
Audio rate 96K, 128K, 256K
Control mode Support control port and
internet control method
Auto/manual
control
Support auto/manual white
balance,auto/manual
exposure(aperture, shutter,
gain), fixed focus
Support protocols
TCP/IP,HTTP,DHCP,DNS,RTP,
RTMP,RTSP,NTP,QoS,802.11X
(Optional)
Interface protocols ONVIF,SDK etc
General function
A key recovery, flicker, double
stream, heartbeat, mirror,
password etc
Video output 1x,HD-SDI:75Ω/BNC
Internet
1x,RJ45:10M/100M adaptive
Ethernet ports
Communication
interface
1xRS-485: 2pin Phoeni
x port,
Max Distance: 1200m, Protocol:
VISCA/Pelco-D/Pelco-P
Power Connector JEITA(DC IN 12V)
Reset Button Support

11
General specification
Input Voltage DC 12V DC
Current
Consumption 0.4A(Maximum)
Operating
Temperature -15°C ~ 60°C
Storage
Temperature -20°C ~ 80°C
Power
Consumption 4.8W
Size 127.5mm x 72.0mm x 60.0mm
Weight 0.5Kg
11 Dimension
left view
front view
top view
12 Copyright Notice
All contents of this manual, whose copyright
belongs to our Corporation. Cannot be cloned,
copied or translated without the permission of
the company. Product specifications and
information which were referred to in this
document are for reference only, and the
content will be updated at any time without
prior notice. All rights reserved, infringement.
2015/7
Table of contents
Other Prestel IP Camera manuals