Pretorian n-Abler Trackball User manual

Pack Contents
Carefully check the contents of
the box, which are:
n-ABLER unit
USB to PS/2 adaptor plug
Instruction booklet
Warranty card
If any items are missing please contact
your supplier immediately
INSTRUCTIONS
n-Abler Trackball
Product Description
n-ABLER is the most adaptable mouse
alternative on the market and is specifically
designed to address the needs of computer
users with motor skills difficulties, poor hand-
eye co-ordination or learning difficulties.
It is especially suitable for improving
access for children and young people with
some special educational needs, learning
difficulties, for those who’s work entails long
periods of computer use and for older people
and others with movement impairment.
The large, high mass, free-running ball requires
only a light touch which, together with the
function buttons, makes for easy navigation,
selection and manipulation of objects on the
computer screen.
The ‘n-ABLER’ emulates a computer mouse
but, with fingertip control and the need
for only minimal hand movement, reduces
wrist and elbow fatigue, requires far less
effort and is less tiring. The symmetrical
design enables users to work with either
hand without having to angle the wrist, and
the unit can also be configured for ‘left-
handed’ operation. Its large, integrated hand
support/palm rest makes work posture more
relaxed and less strained.

Features
• Rugged construction and ergonomic design
• Large footprint for maximum stability
• Symmetrical design allowing use with either hand
• Integral wrist support to minimise fatigue
• Easy ‘plug and play’ installation
(no additional drivers required)
• High mass, 63mm, free-running ball for easy cursor control
• Dwell Click function for users who cannot use buttons or
switches
• Colour coded buttons mounted sub-flush to
prevent accidental activation
• Switchable left and right click buttons
• Double click and latching drag lock buttons
• X-Y axis and Scroll button for up/down or left/right
only cursor movements and scrolling facility
• Audible (switchable to mute) and visual warnings
indicating selection or change of function
• Cursor speed control
• Auto-detects between USB and PS/2 modes
• PC, Mac and Chromebook compatible
Compatibility
The n-ABLER works with USB and PS/2 compatible computers. This includes the majority of
Personal Computers (PCs), Apple Macintosh computers and Chromebooks. PS/2 sockets are
circular with 6 pins, whereas USB connectors are rectangular with 4 pins.
Installation
USB (Preferred connection method)
Having located an available USB socket, simply plug your n-ABLER into it. It doesn’t matter whether
the computer is on or off. The first time you install n-ABLER the operating system may take a few
seconds to build a driver. Your n-ABLER is available for use as soon as its green LED lights. There are
no driver files to load onto the computer- the computer’s resident drivers are used to help simplify
installation.
PS/2
Make sure your computer is fully turned off and not just in standby. Insert the USB plug of n-ABLER
into the supplied PS/2 adaptor and then plug it into the PS/2 socket, ensuring that the socket in
question is for a mouse and not for a keyboard. This can usually be identified either because it is
green (as opposed to purple for keyboard sockets) or it may be identified with a mouse symbol.
When you switch on your computer your n-ABLER automatically configures itself to PS/2 mode.
There are no driver files to load onto the computer- the computer’s resident drivers are used to help
simplify installation.

n-ABLER
Getting Started
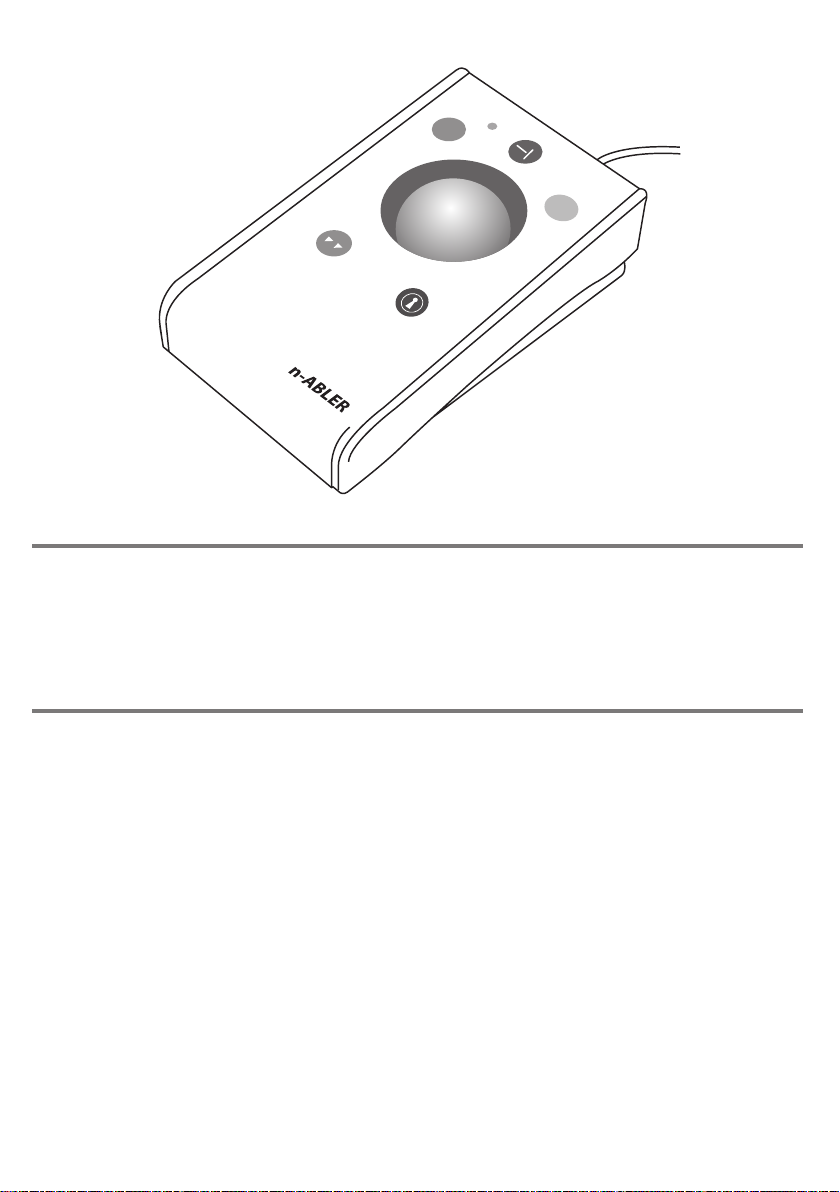
Refer to Figure 1 for an introduction to the various buttons and features of your n-ABLER.
Figure 1
LED
The LED is used to show
which features are active:
Green Drag Lock off
Red Drag Lock on
Blinks off briefly
(either colour)
Single Axis mode selected
Flashes Green
Learn mode
Single Axis Button
This button is used to freeze movement in one axis allowing you to ‘home in’ to a
position one axis at a time.
Press the button once to give left-right cursor only movement. Press it a second time
to give up-down cursor only movement. Press it a third time to give scroll movement
(similar to that on a ‘wheel mouse’). Press it a fourth time to return to normal operation.
If the buzzer is on it emits a single beep to indicate each change of axis and the LED
blinks while in single axis mode.
The cursor speed setting
affects the relationship
between ball movement
and cursor speed (see top
of next page).
If the buzzer is on it emits an ascending two-tone beep as the Drag Lock is turned
on and a descending two-tone beep as it is turned off. Whilst the Drag Lock is on
the LED turns red to give you a visual indication that Drag Lock is in operation.
If you have decided to
have the buzzer on (see
Additional Features and
Learn Mode) it emits a
‘beep, beep’ to indicate
the double click has
taken place.
Left Mouse Button
(Red)
Performs exactly the same
function as a mouse ‘left click’
Right Mouse Button
(Yellow)
Performs exactly the same
function as a mouse ‘right
click’
Drag Lock Button (Blue)
When dragging an object on
the screen it can sometimes
be difficult moving the
cursor whilst keeping the
Left Button depressed. To
overcome this difficulty
your n-ABLER has a Drag
Lock Button. Simply press
this button to perform the
‘dragging’ operation.
When you have finished
press any button to cancel.
Cursor Control
Move the trackball in the
direction you wish the
cursor to move
Double Click Button
(Green)
Double clicking on the Left
Button can sometimes be
awkward, so we’ve
included a button to do it
for you! Just press the
green button once and
your n-ABLER does the
double click sequence
automatically.

Figure 2
Speed Control (see Figure 2)
This button allows the cursor speed to be changed to suit
your personal preferences. Press the button briefly to
change the speed. There are four speed settings to choose
from. Once you have reached the fastest speed, pressing the
button again will return the unit to the slowest speed.
Note the speed setting you have chosen is automatically
retained in your n-ABLER’s memory and recalled after loss
of power (e.g. if the computer is turned off).
If the buzzer is enabled it emits a number of beeps to
indicate the speed whenever the button is pressed. One
beep indicates the slowest speed and four beeps the
fastest.
Features
• Orientation Facility Your n-ABLER can
be used in any of the positions shown
in Figure 3. This, together with the
option to mount your n-ABLER on a
bracket, allows it to be mounted in many
different ways to make using it easier.
The default setting is with the computer
lead furthest from you. If you prefer this
you do not need to do anything. If you prefer
to use it in a different position follow the
steps in the Learn Mode section.
• Buzzer The buzzer gives an audible
indication as you select or deselect some
of the features. The default setting for
the buzzer is ‘on’ and you don’t need to
do anything if this is your preference.
If, however, you like to work in a quiet
environment and wish to have the buzzer
‘off’ follow the steps in the Learn Mode
section.
• Left/Right Button Swap If you are left-
handed, or wish to use your n-ABLER ‘upside
down’ you may wish to swap the Left and Right
buttons around. If so follow the steps in the
Learn Mode section.
• External Switches Two sockets are
provided at the rear of the unit to allow
external switches to be connected. By
default, the socket adjacent to the Red
Button performs the same function as the
Red Button, and the socket adjacent to the
Yellow Button performs the same function
as the Yellow Button. Suitable switches
are widely available from retailers.
Note that the external switches work in
addition to the internal ones.
Warning: These jack sockets are not for
external power supplies. Never connect
an external power supply to the unit,
otherwise permanent damage may occur.
• Dwell Click Some users may experience
difficulty in using both the n-ABLER buttons
and external switches. As an alternative,
the Dwell Click feature may be enabled to
automatically perform a button click a short
time after the cursor has stopped moving.
For example, if the Double Click button is
selected, an application may be started
simply by moving the cursor over its icon
and waiting for the selected dwell period.

Socket Learn Mode
Programming the Sockets on your n-ABLER
Your n-ABLER is supplied with the sockets pre-programmed as Left Click and Right Click. The sockets
can be re-programmed at any time to access any of the buttons INCLUDING THE SPEED CONTROL
BUTTON using the following procedure:
Step 1
Put your n-ABLER into Socket Learn Mode.
Press the Speed Control button at the rear of the unit together with the Red Button and keep both
pressed for three seconds until a warbling beep is heard. The LED flashes red.
Step 2
Press the button you would like the Left Socket to function as.
For example, if you want the Left Socket to function as Double Click, press the green (double-click)
button once.
Your n-ABLER emits a single beep to acknowledge your selection.
Learn Mode
Figure 3 Step 1
Orientate your n-ABLER
Begin with your n-ABLER unit in the
intended operating position (1,2,3 or 4
as shown in Figure 3).
Step 3
Tell your n-ABLER which way
is up
Move the ball in the direction
you want the cursor to move
‘up’. There will be no immediate
cursor movement but when your
n-ABLER has understood your
instruction it emits a single
beep and the cursor moves in
the direction you want.
Step 4
Enable or Disable the Buzzer
If you want the buzzer on press
the Red Button once. If you
want the buzzer off press the
Yellow Button once.
Your n-ABLER emits a single
beep to acknowledge your
selection (irrespective of
whether the buzzer will be ‘on’
or ‘off’).
You can quit Learn Mode at any stage by pressing and holding the Speed Control button until the
unit emits a warbling beep. Any new settings will be lost. If you make a mistake simply return to
Learn Mode by beginning at Step 1 and repeat the procedure.
Step 5
If you would like the Red
Button to be Left Click, press
it. Otherwise press the Yellow
Button.
Your n-ABLER emits a
‘warbling beep’ to indicate you
are now leaving Learn Mode.
Your personal settings are
stored in your n-ABLER’s
memory and will be retrieved
each time the computer is
powered-up.
Step 2
Put your n-ABLER into Learn Mode
Press the Speed Control button at the
rear of the unit and keep it pressed
for three seconds until you hear
a ‘warbling beep’ to indicate your
n-ABLER is in Learn Mode. The LED
flashes green.
n-ABLER
n-ABLER
n-ABLER
n-ABLER
1
4
2 3
Step 3
Press the button you would like the Right Socket to function as
For example, if you want the Right Socket to function as Speed Control, press the red Speed Control
button (at the rear of the unit) once.
Your n-ABLER emits a ‘warbling beep’ to acknowledge your selection and to indicate that you are
leaving Socket Learn Mode.
Your personal settings are stored in your n-ABLER’s memory and will be retrieved each time the
computer is powered up.
You can quit Socket Learn Mode at any stage by pressing the Speed Control Button until a ‘warbling beep’
is heard and the LED returns to a steady green colour. Any new settings you made will not be saved.
If you make a mistake simply return to Socket Learn Mode by beginning at Step 1 and repeat the
procedure.
Step 3
Select the Dwell Click Period
Press one of the five buttons on the front of n-ABLER to select the Dwell Click Period using
Table 1. The dwell click period is the time delay after the cursor was last moved after which the
Dwell Click occurs. Your n-ABLER emits a warbling beep to acknowledge your selection and to
indicate that you are leaving Dwell Click Learn Mode. Your personal settings are saved in non-
volatile memory and are retrieved each time the unit is powered on.
You can quit Dwell Click Learn Mode at any
stage by pressing and holding the Speed Control
button until the unit emits a warbling beep.
Any new settings will be lost. If you make a
mistake simply return to Dwell Click Learn Mode
beginning at Step 1 and repeat the procedure.
Dwell Click Learn Mode
Your n-ABLER is supplied with Dwell Click disabled. To enable the Dwell Click feature, use the
following procedure:
Step 1
Put your n-ABLER into Dwell Click Learn Mode
Press the Speed Control button at the rear of the unit
together with the Yellow Button and keep both pressed
for three seconds until a warbling beep is heard. The
LED flashes orange.
Step 2
Select the Dwell Click switch function
Press the button you would like the Dwell Click function
to use. For example, to perform a double click after the
dwell period, press the Double Click button. Note that
the Single Axis button disables the Dwell Click function
and exits Dwell Click Learn Mode. n-ABLER emits a
single beep to acknowledge your selection.
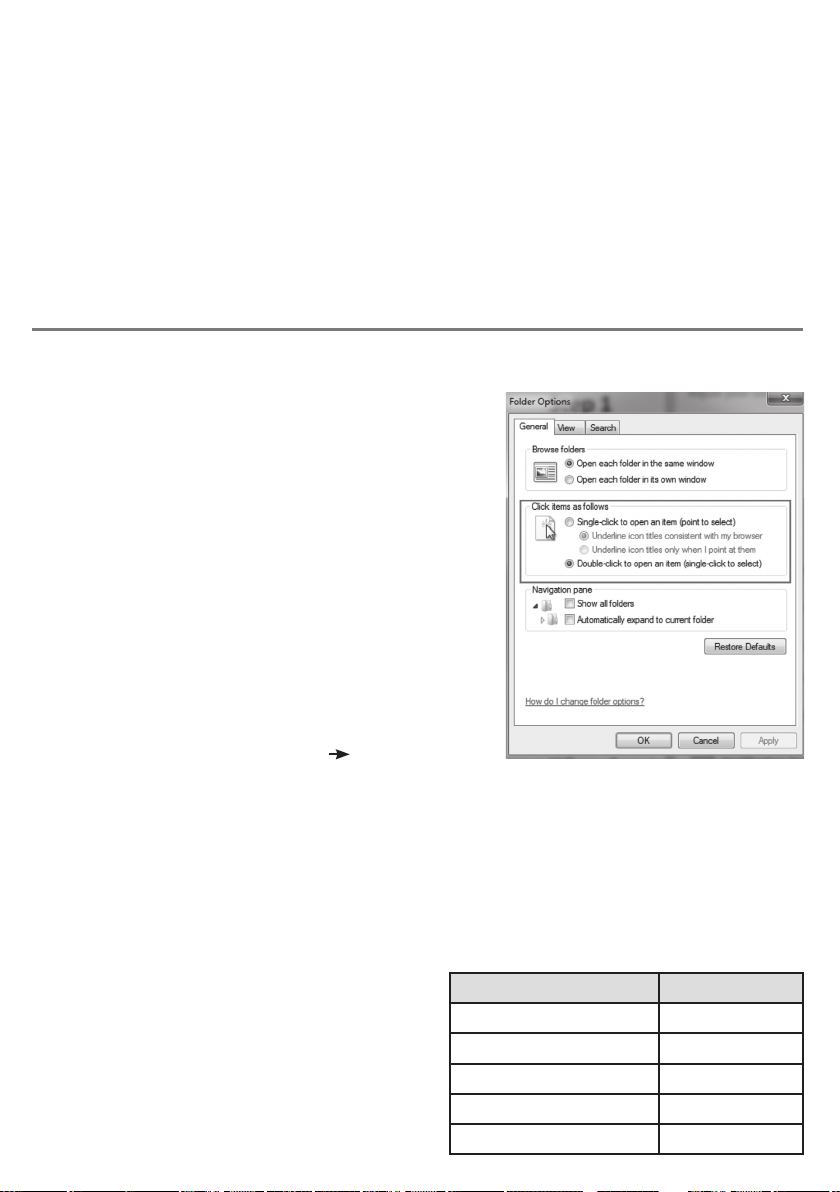
When choosing the switch function to use, it is useful to know that PCs
running Windows have an option to allow software to launch with a
single click. This can be found in Control Panel Folder Options:
Selecting ‘Single Click to open an item’, Left Click can be used as the Dwell Click setting to achieve almost
everything that users will require.
Button Dwell Period
Left (Red) 1 sec
Single Axis (Black) 1.5 sec
Right (Yellow) 2 sec
Double Click (Green) 3 sec
Drag (Blue) 4 sec

www.pretorianuk.com
Unit 37 Corringham Road Industrial Estate
Gainsborough Lincolnshire DN21 1QB UK
Tel +44 (0) 1427 678990 Fax +44 (0) 1427 678992
S040118
Refers to firmware version 79 onwards.
Maintenance
Warranty
The ‘n-ABLER’ has no user serviceable parts. If repair is necessary the unit should be returned to
Pretorian Technologies Ltd or an authorized distributor.
The ‘n-ABLER’ is warranted for 24 months from the date of purchase against defects in manufacture,
or component failure. The unit is designed for use in domestic, educational, commercial and light
industrial applications. Use outside these areas will invalidate the warranty.
Unauthorised repair or modification, mechanical abuse, immersion in any liquid and connection to
any equipment other than a host computer will invalidate the warranty.
This manual suits for next models
1
Table of contents
Other Pretorian Mouse manuals


