Prima Musa Apollo User manual

®
ESPRESSO COFFEE MACHINE
Multi Boiler System
Thermosiphonic System


ENGLISH
Apollo
Apollo
Apollo is the machine that Prima Musa created
to express the excellence of craftsmanship.
In Greek mythology, the prophetic symbols of Apollo
are the laurel, the bow and the arrows.

Apollo
Pag. 2
1. WARNINGS
1.1 READ CAREFULLY
Read this manual carefully in its entirety, before using the machine.
The espresso coffee machine you purchased was conceived and built with the latest generation methods and technologies
that ensure quality and reliability over time.
This manual is the guide that will allow you to know the advantages of choosing our brand. Inside you will find all the news
on how to best use the machine, how to keep it efficient and how to behave in case of problems.
Keep this manual carefully. In case of loss and / or deterioration of the present, a copy of the same can be requested from
the manufacturer.
1.2 HOW TO USE THIS MANUAL
The manufacturer ensures the right to make any changes and / or improvements to the product without any communication
to the customer. It is guaranteed that this manual reflects the state of the art when the machine was marketed.
We take this opportunity to invite our kind customers to report any proposals for improvement of both the product and the
manual, to our contact details.
1.3 GENERAL WARNINGS
• After removing the packaging, check the integrity of the appliance, if in doubt, do not use it and contact the dealer or
distributor directly.
• The packaging elements must not be left within the reach of children and must be disposed of according to current
regulations. We recommend that you keep the packaging until the warranty expires.
• Before using the machine, make sure that the mains voltage corresponds to the indications on the machine's data plate.
• The installation must be carried out by qualified personnel, in compliance with the current safety standards.
• The safety of this appliance is total only when it is connected to an effective earthing system, carried out as required by
current safety standards. The electrical system must be equipped with an adequate differential switch (circuit breaker). It
is important to have these requirements checked and in case of doubt, request an accurate check of the system by
qualified personnel. The manufacturer cannot be held responsible for any damage caused by an inadequate electrical
installation and / or installation.
• When installing the device, a qualified protective switch must be installed by qualified personnel as required by current
safety regulations, with a contact opening distance equal to or greater than 3 mm.
• The use of extension cords or electrical adapters with multiple sockets is not recommended. If their use becomes
indispensable, use only simple or multiple adapters, and extension cords that comply with current safety standards.
Never exceed the power value in kW indicated on the simple adapter and on the extensions, and the maximum power
value indicated on the adapter.
• The espresso coffee machine is intended for the preparation of hot drinks such as coffee, tea, hot milk. This appliance is
strictly intended for the use for which it was designed. Any other use is to be considered improper and therefore
dangerous. The manufacturer cannot be held responsible for any damage caused by incorrect and irrational use.
• The use of an electrical appliance must comply with the behavioral safety rules:
- Do not touch the appliance when you have wet or damp hands or feet.
- Do not use the appliance with bare feet.
- Do not use extension cables in rooms used for showers or bathrooms.
- Do not pull on the power cable to disconnect the appliance.
- Do not access inside the machine.
- Do not use the machine in the absence of external parts.
- Do not spill liquid on the machine.
- Do not allow the machine to be used by children or unable.
- Make sure that the machine is used in a sufficiently ventilated, hygienic and illuminated area.
• The spaces and access to the machine and the main switch must be left free, to allow the user to be able to intervene
without any constraint and also to be able to leave the area immediately if necessary.
• Position and install the machine leaving sufficient space for good ventilation of the machine on all sides and in a position
to allow good maneuverability for the operator.
• Do not use water jets on the machine for cleaning. Cleaning operations must be carried out as indicated in this manual.
• Before carrying out any maintenance operation, turn off the appliance from the mains using the main switch.
• In case of failure or malfunction, immediately switch off the appliance, contact the specialized technician immediately, do
not attempt any type of intervention and / or repair.

Apollo Pag. 3
• Any repairs must be carried out only by the manufacturer or by a technician or center authorized by the manufacturer. Use
only and exclusively original spare parts. Failure to comply with this standard can seriously compromise the safety and
functionality of the appliance and may void the warranty validity.
• Inside the machine there is a battery to avoid the loss of programming data in case the power supply is interrupted.
• In the event of damage to the power supply cable, it cannot and must not be replaced by the user, switch off the machine
and disconnect the power supply cable, and contact only a center or professionally qualified personnel for replacement.
• In the event that the appliance is not used for a long period, it is recommended to have it disconnected from the power
supply and to have it emptied by qualified personnel.
• To guarantee a good efficiency of the machine and for its correct functioning it is essential to follow the manufacturer's
instructions, having periodic and scheduled maintenance carried out by qualified personnel with the control of all safety
devices.
• Never expose with your hands or other parts of the body in the direction of the steam, hot water, coffee dispensing
terminals. Steam and water leaving the machine can cause burns.
• With the machine running and running, handle the steam wands, hot water wands and filter holders carefully and only at
the points provided as they are overheated parts.
• Cups and mugs must be placed on the special cup warmer surface only after they have been dried.
• Do not use the cup warmer to place dishes or similar objects.
• The device is not intended for use by people with reduced physical, sensory or mental abilities, by children and by people
without experience or knowledge of the device.
• Children must be supervised and not let them play with the appliance.
• Use the machine only with a temperature between 5 ° and 40 ° C.
• Unauthorized tampering with any part of the machine voids any warranty.
1.4 WARRANTY
The machine is covered by a 12-month warranty excluding electrical components as well as wearing parts.
2. PRESENTATION
This product is manufactured in compliance with the requirements for agri-food machines as indicated in paragraph 2.1 of
Directive 2006/42/CE.
The espresso coffee machine is intended for purely professional use, it has been designed for the preparation of hot drinks
such as coffee, tea, cappuccinos, hot milk, etc. If the model has two or more groups, the use can be carried out by two or
more people at the same time, the machine is capable of dispensing drinks seamlessly and guarantees intensive use of the
same.
3. WARNINGS FOR THE INSTALLER
3.1 POWER SUPPLY
The indicated power supply of the appliance must be made with water suitable for human consumption in compliance with
the provisions in force in the place of installation. The owner and / or operator of the system must confirm to the installer
that the water meets the requirements indicated above.
3.2 MATERIALS TO USE
When installing the machine, the components and materials supplied with the machine must be used.
If there is a need to use other components, the installer must verify the suitability of the same and be suitable for contact
with water for human consumption.
3.3 HYDRAULIC CONNECTIONS
The installer must make the hydraulic connections respecting the regulations in force in the place of installation.
3.4 ACTIVATION
At the end of the installation the appliance must be activated and brought up to the normal working condition and leave it in
the standby condition for a minimum of 30 minutes.
Subsequently, the appliance must be turned off and left to cool, then it must be completely emptied of the water inside it in
order to eliminate any initial impurities.
Afterwards, the appliance must be filled with water again up to normal operating conditions.
Turn the machine back on and wait for it to reach the state of use, then carry out the following operations:
• For each coffee group, make a continuous delivery to drain a minimum of 0.5 liters of water from the circuit.
• Drain the entire volume of water from the boiler by making a continuous supply from the special lance, drain a minimum
of 6 liters for 2 groups and a minimum of 8 liters for 3 groups.
• Drain for at least 1 minute continuously from each individual steam wand.

Apollo
Pag. 4
3.5 MAINTENANCE AND REPAIR
After a maintenance and / or repair, the components used must ensure that the hygiene and safety requirements initially
envisaged for the appliance are maintained, this condition occurs using only original components available from the
manufacturer.
After a repair or replacement of components involving parts in contact with water and / or food, the procedure described in
point 3.4 must be repeated
In case of not using the machine and / or reinstallation, before use repeat the procedure described in point 3.4.
4. DESCRIPTION OF THE MACHINE
4.1 DESCRIPTION
1. Cup support grid
2. Pressure gauge
3. Faucet and steam wand
4. Tea temperature regulator
5. Display
6. Cup warmer top
7. Pushbutton
8. Switch
9. Launch water
10. Dispensing groups
4.2 TECHNICAL DATA
The machine data plate is fixed on the front left side. The machine data are also visible on the machine packaging
POWER SUPPLY VOLTAGE
ABSORBED POWER
BOILER CAPACITY
WIDTH
DEPTH
HEIGHT
SAFETY VALVE CALIBRATION
BOILER OPERATION PRESSURE
FEEDING WATER PRESSURE
V
W
Lt / gal UK
cm / inc
cm / inc
cm / inc
bar / psi
bar / psi
bar / psi
230 - 400
3.500
13 / 2,86
86 / 33,86
66 / 25,98
50 / 19 , 69
2,00 / 29,01
0,8 ÷ 1,4 / 11,6 ÷ 20,3
1,5 ÷ 5 (MAX)
21,8 ÷ 72,5 (MAX)
2 GP
4.3 PUSHBUTTON
In the diagram below you will find a description of the functions of the individual keys. The dual function keys are used when
programming the display items, if any.
K1GR1 K2GR1 K3GR1 K4GR1
K5GR1
K6GR1
a a a
a
1 2 3 4
K1GR1 - 1 Espresso coffee
K2GR1 - 1 Medium coffee
K3GR1 - 2 Espresso coffee
K4GR1 - 2 Medium coffee
K5GR1 - Manual dispensing
K6GR1 - Hot water
5. MACHINE PREPARATION
The preparation of the machine and the installation operations must be carried out exclusively by qualified personnel. The
installer must scrupulously observe the indications given in the chapter "warnings for the installer".
Using the machine without carrying out all installation operations by technical personnel will void the warranty.
1
2
3
4
56
78
9
3
7
10
WEIGHT Kg / lbs 81 / 178
230 - 400
3.500 + 2x1.000
11 / 2,42 + 2x0,6 / 0,13
86 / 33,86
66 / 25,98
50 / 19 , 69
2,00 / 29,01
0,8 ÷ 1,4 / 11,6 ÷ 20,3
1,5 ÷ 5 (MAX)
21,8 ÷ 72,5 (MAX)
2 GP - M. Boiler
91 / 200

Apollo Pag. 5
6. RENEWAL OF WATER
In the event that the machine remains inactive for more than a week, it is necessary to change the water contained within
the whole machine, follow the instructions as indicated in point 3. 4 ..
7. TURNING THE MACHINE ON
Before turning on the machine, make sure that the water level inside the boiler is sufficient (visible from the optical level,
located inside the machine on the right side, visible by removing the right side or the cup support grid), in the case of an
insufficient and / or absent level proceed with manual loading, in order to avoid overheating of the resistance. The machine
is equipped with a system that interrupts the power supply of the electric heater in case of insufficient and / or absent water
level, and will automatically load the water in the boiler before powering the resistance.
Open the water mains tap and the machine tap.
Turn the switch to position 1 or ON.
Wait for the machine to carry out all the checks and checks (any electrical and electronic problems, filling the boiler).
The display (if any) shows the water level inside the boiler and the steam temperature inside the boiler which, when fully
operational, must stabilize at around 120 ° C. If present, the temperatures of the individual groups are also displayed.
During the machine heating phase, the anti-depression valve may release steam for a few seconds, until the valve closes.
8. PRELIMINARY OPERATIONS
It is important to have a grinder-doser next to the machine with which to grind the coffee. To obtain a good espresso, it is
advisable not to keep large stocks of coffee beans and to respect the expiry date indicated by the manufacturer. Never grind
large volumes of coffee, it is recommended to grind only the quantity used daily. Do not buy and / or use already ground
coffee, as it quickly deteriorates.
Fill the filter with a dose of ground coffee (about 6-8 gr.) And compress it with the special press, hook the filter holder to the
group without closing it too much, to avoid rapid wear of the seal. For the same reason, it is advisable to clean the edge of
the filter every time before attaching the filter holder to the group.
Before using the machine, make several empty dispensings with the filter holders attached in order to release any air
present in the circuit and allowing the complete heating of the dispensing groups.
Also carry out some coffee dispensing with different grinding tests to check the most suitable grinding and to check the
operating pressures of the machine. Never remove the filter holder from the group when brewing coffee, risk of burns.
9. COFFEE PREPARATION
Hook the filter holder with the coffee to the group, place the cup or cups under the spout, press the desired dispensing
switch to obtain the coffee dispensing, which will stop automatically when the programmed quantity is reached or can be
stopped in advance by pressing the dispensing switch (the dispensing times are set by the manufacturer for a correct
quantity of coffee, the dispensing times can be changed by the operator or by technical personnel as reported in the
machine programming chapter).
Place the cup or cups under the spout and press the desired dose button and wait for the coffee to be dispensed (during
delivery, the LED corresponding to the button pressed will remain lit.
To stop coffee delivery early, press the button with the LED on.
10. PREPARATION OF HOT DRINKS
10.1 HOT WATER DELIVERY
Place the jug under the hot water wand and press the hot water button (function active on all keyboards) and wait for the
end of the supply, if the quantity of hot water is insufficient press the hot water button again, the water supply hot water can
be stopped early by pressing the hot water button.
Do not touch the hot water spout, contact with the spear can cause burns and damage to people, things and animals.
10.2 STEAM DELIVERY
Insert the steam wand (s) into the liquid to be heated and operate the joystick or the tap knob, return the joystick to the
central position or the knob closed after dispensing.
Turning the knob anticlockwise the tap opens and allows the steam to escape, turning the knob clockwise closes the tap.

Apollo
Pag. 6
By moving the joystick (if provided by the model purchased) vertically, there is a continuous opening of steam, manually
return the joystick to the central position to stop steam delivery. Moving the joystick horizontally opens the steam and
automatically closes the steam when the joystick is released.
To obtain optimal swarming, it is advisable to heat only the quantity of milk to be used, once heated, it must be poured
entirely from the jug and not re-heated. The milk to be frothed must be at room temperature and at a temperature not lower
than 4 ° C.
Before each use of the steam wand, drain the condensation inside the wand by operating the tap for at least 2 seconds.
Leave the steam wand immersed in the milk only for the time strictly necessary for heating the milk.
Handle the steam wand with care, use the special anti-scald rubber, contact with the nozzle and the steam can cause burns
and damage to people, things and animals.
Clean the lance (s) with a soft, damp cloth after each use, the milk residues left on the steam wand favor the proliferation
of bacteria and mold, highly harmful to the human organism. Do not use detergents for cleaning the steam wands.
Never open the tap of the steam wand immersed in milk or other liquid with the machine off, the machine is equipped with
an anti-vacuum and anti-suction valve, in case of valve malfunction the milk is sucked into the boiler with serious damage
to the machine itself (contact the service center).
11. CUP WARMER
Place the cups to be heated on the cup warmer top, the top is heated by induction from the heat generated by the boiler
inside the machine. It is not possible to adjust the heating temperature of the cups. Do not place cups or cups that are damp
or containing liquids on the cup warmer surface, spilling liquids inside the coffee machine through the openings on the cup
warmer surface can cause serious damage to the machine. In the event of liquid spillage inside the machine, immediately
turn off and unplug the machine from the power supply and contact the service center.
12.1 USER INTERFACE
12.2 KEYS
12. PARAMETERS AND MACHINE FUNCTIONS PROGRAMMING
K1GR1, K1GR2, K1GR3:
K2GR1, K2GR2, K2GR3:
K3GR1, K3GR2, K3GR3:
K4GR1, K4GR2, K4GR3:
K5GR1, K5GR2, K5GR3:
First coffee dose button
Second coffee dose button
Third coffee dose button
Fourth coffee dose button
Continuous key / programming
Group 1, 2, 3
Group 1, 2, 3
Group 1, 2, 3
Group 1, 2, 3
Group 1, 2, 3
KEY
K1GR1
ADDITIONAL
FUNCTION
+ (MORE)
FUNCTION DESCRIPTION
"Increase" function of the numerical values or
selection of the "preset" options relating to the
parameter being programmed
NOTE: as will be better specified in the specific paragraph, some keys belonging to the
group 1 push-button panel perform specific functions (different from the delivery ones)
when programming is taking place:
K2GR1 - (LESS)
"Decrease" function of the numerical values or
selection of the "preset" options relating to the
parameter being programmed
K3GR1 ENTER Confirmation function of some operations during
programming
K5GR1 - (MENU) Selection / selection function of the parameter to be
programmed

Apollo Pag. 7
12.3 LED
K1GR1, K1GR2, K1GR3:
K2GR1, K2GR2, K2GR3:
K3GR1, K3GR2, K3GR3:
K4GR1, K4GR2, K4GR3:
K5GR1, K5GR2, K5GR3:
Led First coffee dose button
Led Second coffee dose button
Led Third coffee dose button
Led Fourth coffee dose button
Led Continuous key / programming
Group 1, 2, 3
Group 1, 2, 3
Group 1, 2, 3
Group 1, 2, 3
Group 1, 2, 3
13. TURNING THE MACHINE ON
By powering the machine through the external main switch, it returns to the "OFF" or "IDLE-ON" state that it had before
disconnecting from the network
(see "Procedures in the event of a mains failure").
When the machine is powered up, the display briefly shows the version of the software installed (x.yy).
13.1 OFF STATUS (MACHINE OFF BUT POWERED)
With the dosage off, the display shows the word OFF, time and date:
OFF
hh:mm
day
- all outputs are disabled
- all the functions are disabled, except for the TECHNICAL Programming ones
IDLE ON STATUS
13.2 POWER ON
To switch on the dosage, press the K3GR1 button.
1a
2
a
a
a
3 4
In idle-on status, the dosage detects the status relative to the level and
minimum level probes; if the probe detects the lack of water in the boiler,
filling of the same is arranged by activating the EVLIV filling solenoid valve
and the PUMP until the correct water level is restored
(Filling time-out - see ALARMS paragraph).
When filling is complete, heating is activated (see paragraph ''boiler
heating")
In the event that the correct levels are detected, or after the phase of
restoration of the same, the dosage is predisposed to the enabling of the
coffee dose selections or to a possible programming of the same (see
following paragraphs).
The authorization to dispense is not subject to reaching the set-point temperature in the boiler.
The display shows the following messages:
hh:mm
Max
Min
T°Cald
day
xxxxxxxxxxxxxxxxx
T°gr1 T°gr2 T°gr3
where is it
hh = current time (0 ÷ 23)
mm = current minute
day = day of the week
xxxxxxxxxxxxx = customer name of your choice, functional states, alarms
……. that flow from right to left
T°grx = group temperature
T°cald = boiler temperature
Max = boiler level
Min = minimum boiler level
IN IDLE-ON STATUS ALL LEDS ARE ON
Apollo
Pag. 8
13.3 SHUTDOWN
To switch off the dosage, first hold down the K5GR1 key and immediately after the K3GR1 key.
3
1a 2a
a 4a
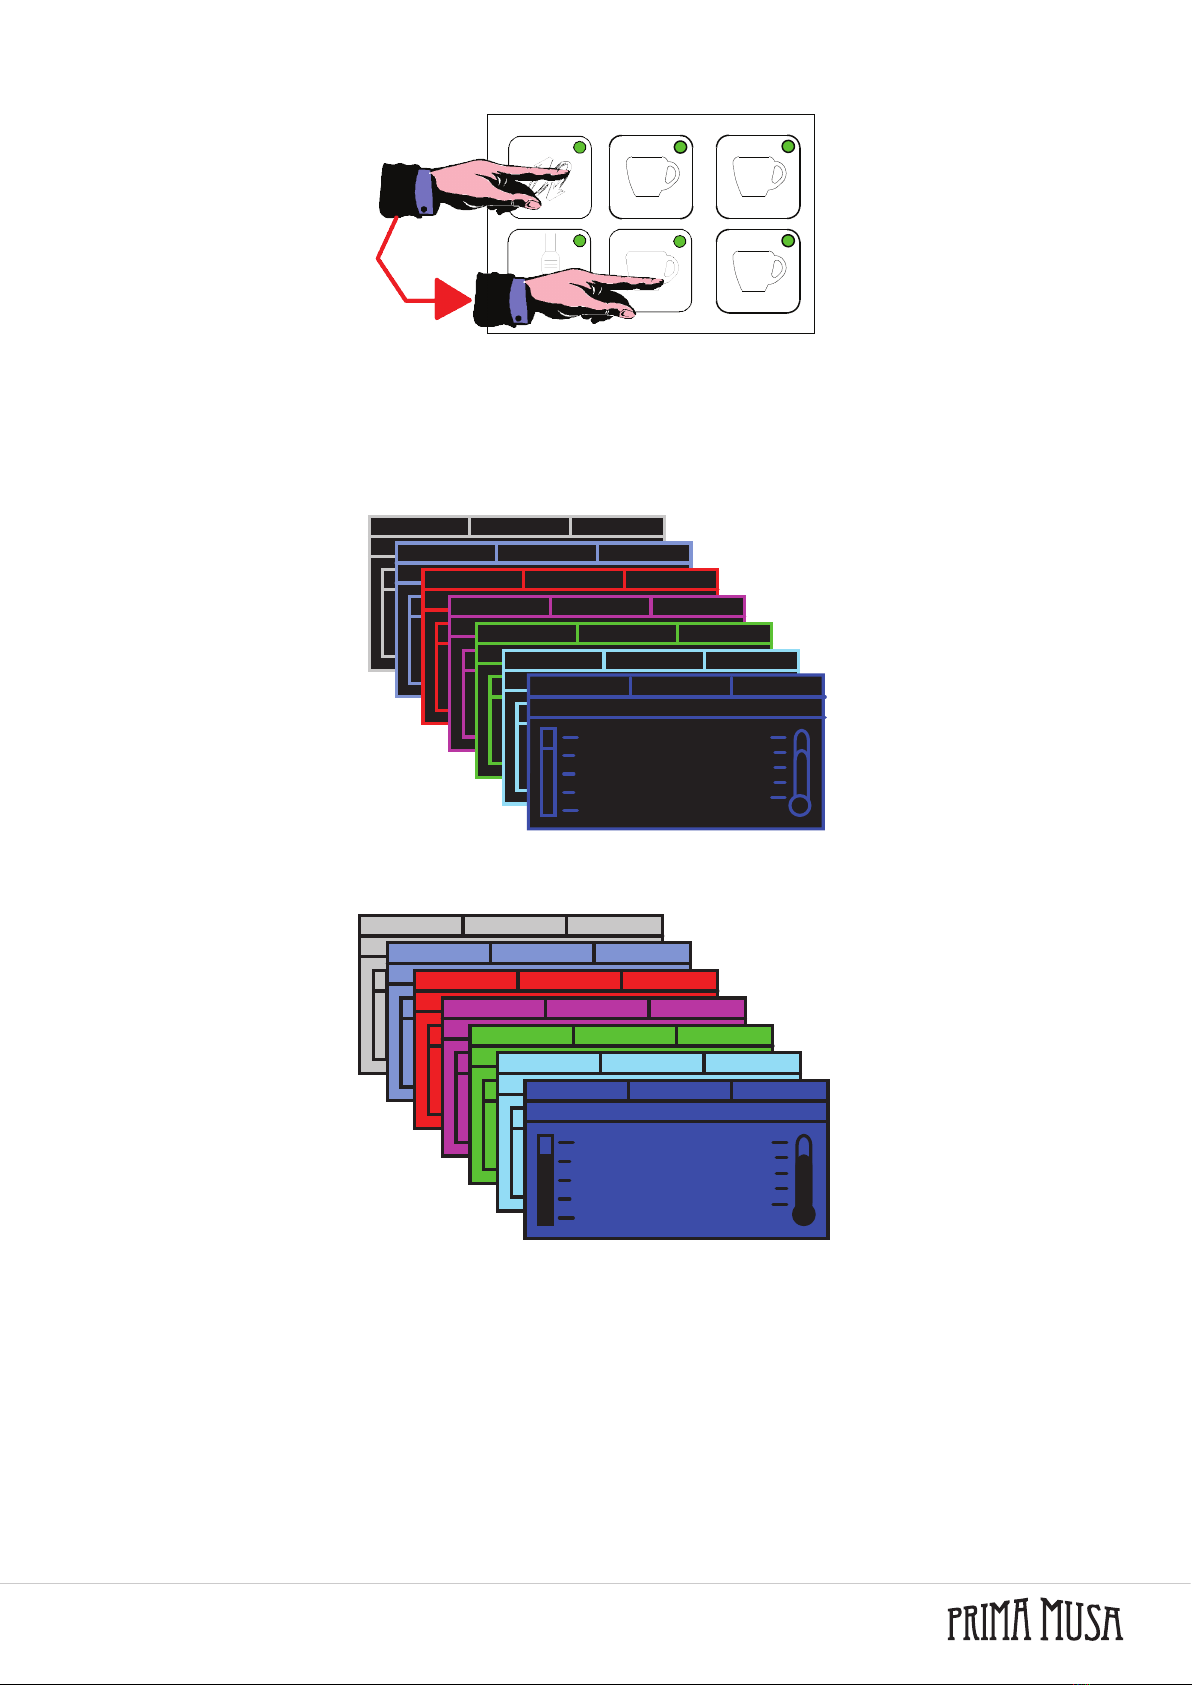
14. COLOR GRAPHIC RGB DISPLAY
The RGB graphic display allows the choice of the desired background color with the colors that can be set in the
TECHNICAL PROGRAMMING.
14.1 NORMAL MODE
In normal mode, the display has a black background and colored writing.
14.2 REVERSE MODE
In normal mode, the display has a colored background and black lettering.
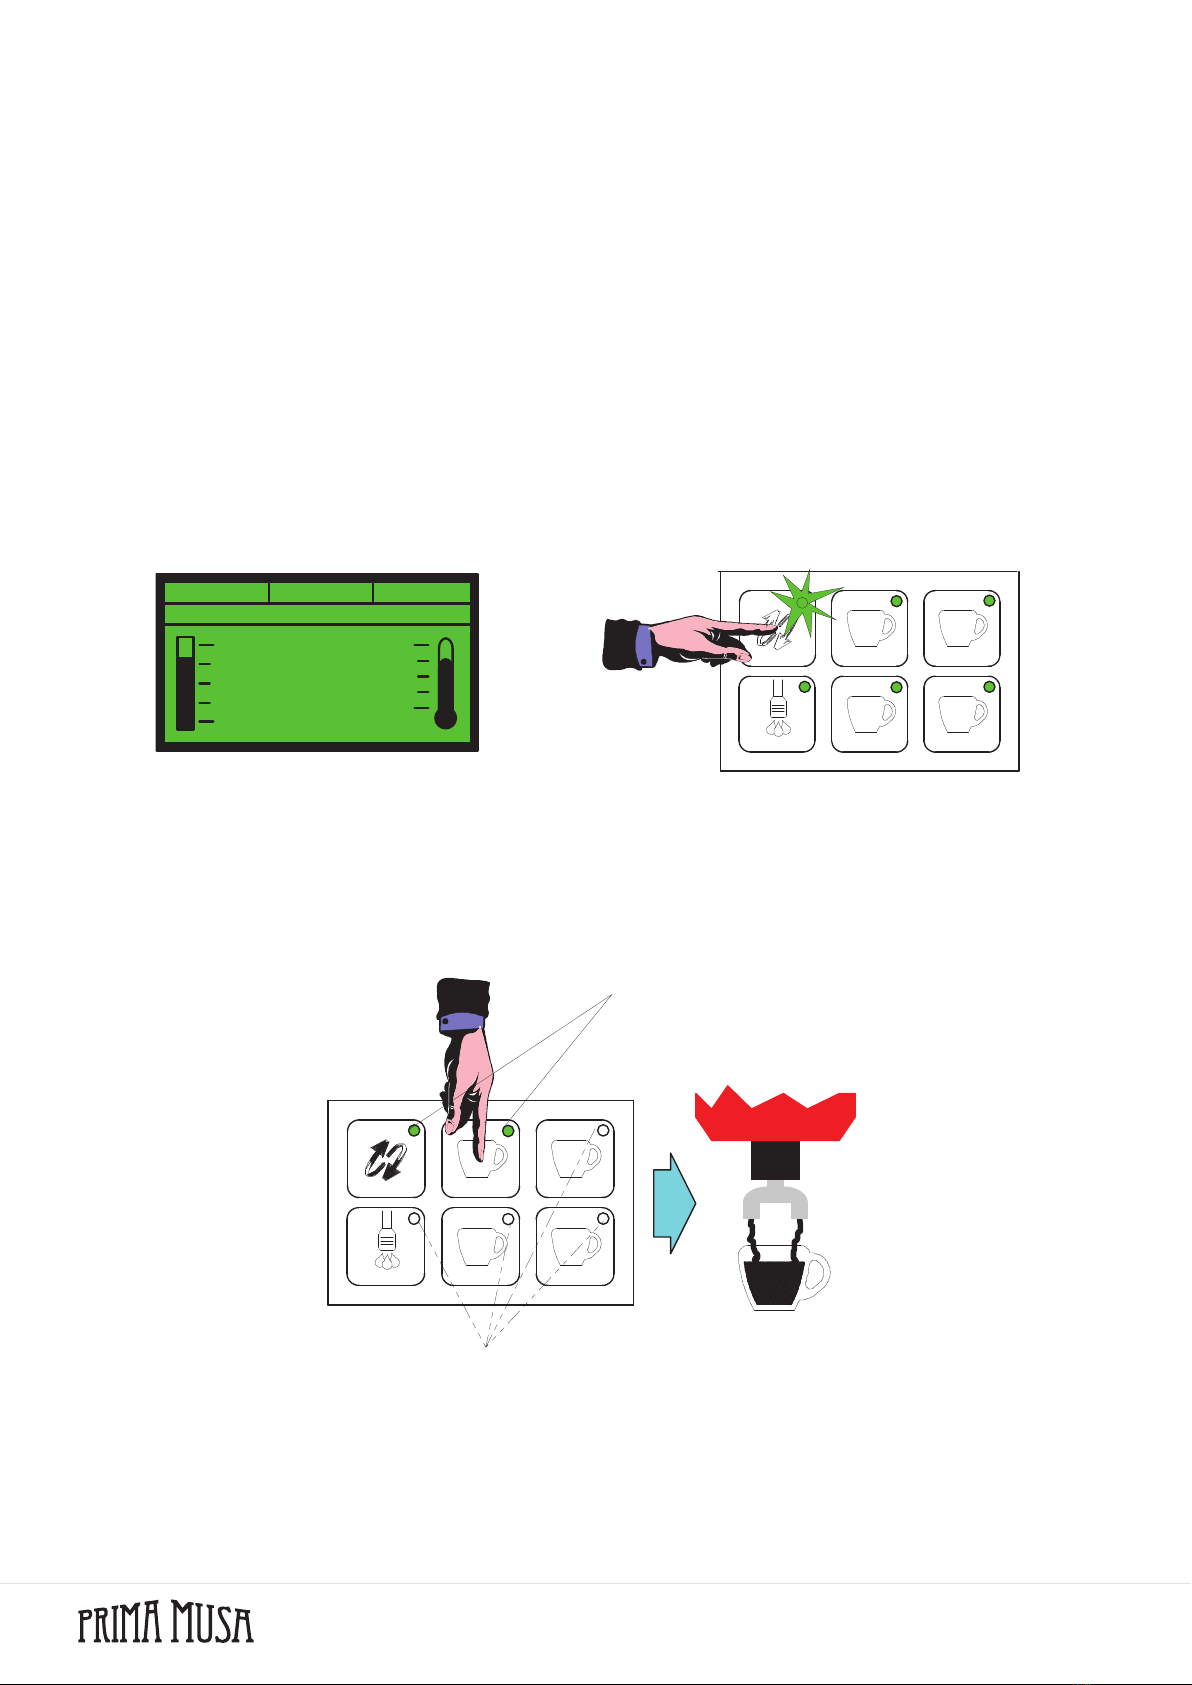
15.1 COFFEE CYCLE
15.2 DELIVERY
15. DONATIONS
From the idle-on state, pressing one of the four dose keys belonging to the group from which you wish to dispense (for
example K1GRx) both the EVx dispensing solenoid valve and the PUMP are energized, starting the dispensing phase.
Pump and solenoid valve will remain active until the quantity of product (volumetric counter pulses) previously programmed
is reached.
The LED relating to the button for the selected dose remains lit for the duration of coffee brewing.
hh:mm
Max
Min
T°Cald
day
scrolling custom name
T°gr1 T°gr2 T°gr3
hh:mm
Max
Min
T°Cald
day
scrolling custom name
T°gr1 T°gr2 T°gr3
hh:mm
Max
Min
T°Cald
day
scrolling custom name
T°gr1 T°gr2 T°gr3
hh:mm
Max
Min
T°Cald
day
scrolling custom name
T°gr1 T°gr2 T°gr3
hh:mm
Max
Min
T°Cald
day
scrolling custom name
T°gr1 T°gr2 T°gr3
hh:mm
Max
Min
T°Cald
day
scrolling custom name
T°gr1 T°gr2 T°gr3
hh:mm
Max
Min
T°Cald
day
xxxxxxxxxxxxxxxx
T°gr1 T°gr2 T°gr3
hh:mm
Max
Min
T°Cald
day
scrolling custom name
T°gr1 T°gr2 T°gr3
hh:mm
Max
Min
T°Cald
day
scrolling custom name
T°gr1 T°gr2 T°gr3
hh:mm
Max
Min
T°Cald
day
scrolling custom name
T°gr1 T°gr2 T°gr3
hh:mm
Max
Min
T°Cald
day
scrolling custom name
T°gr1 T°gr2 T°gr3
hh:mm
Max
Min
T°Cald
day
scrolling custom name
T°gr1 T°gr2 T°gr3
hh:mm
Max
Min
T°Cald
day
scrolling custom name
T°gr1 T°gr2 T°gr3
hh:mm
Max
Min
T°Cald
day
xxxxxxxxxxxxxxxxxx
T°gr1 T°gr2 T°gr3
Apollo Pag. 9
1 2
34
a a
aa
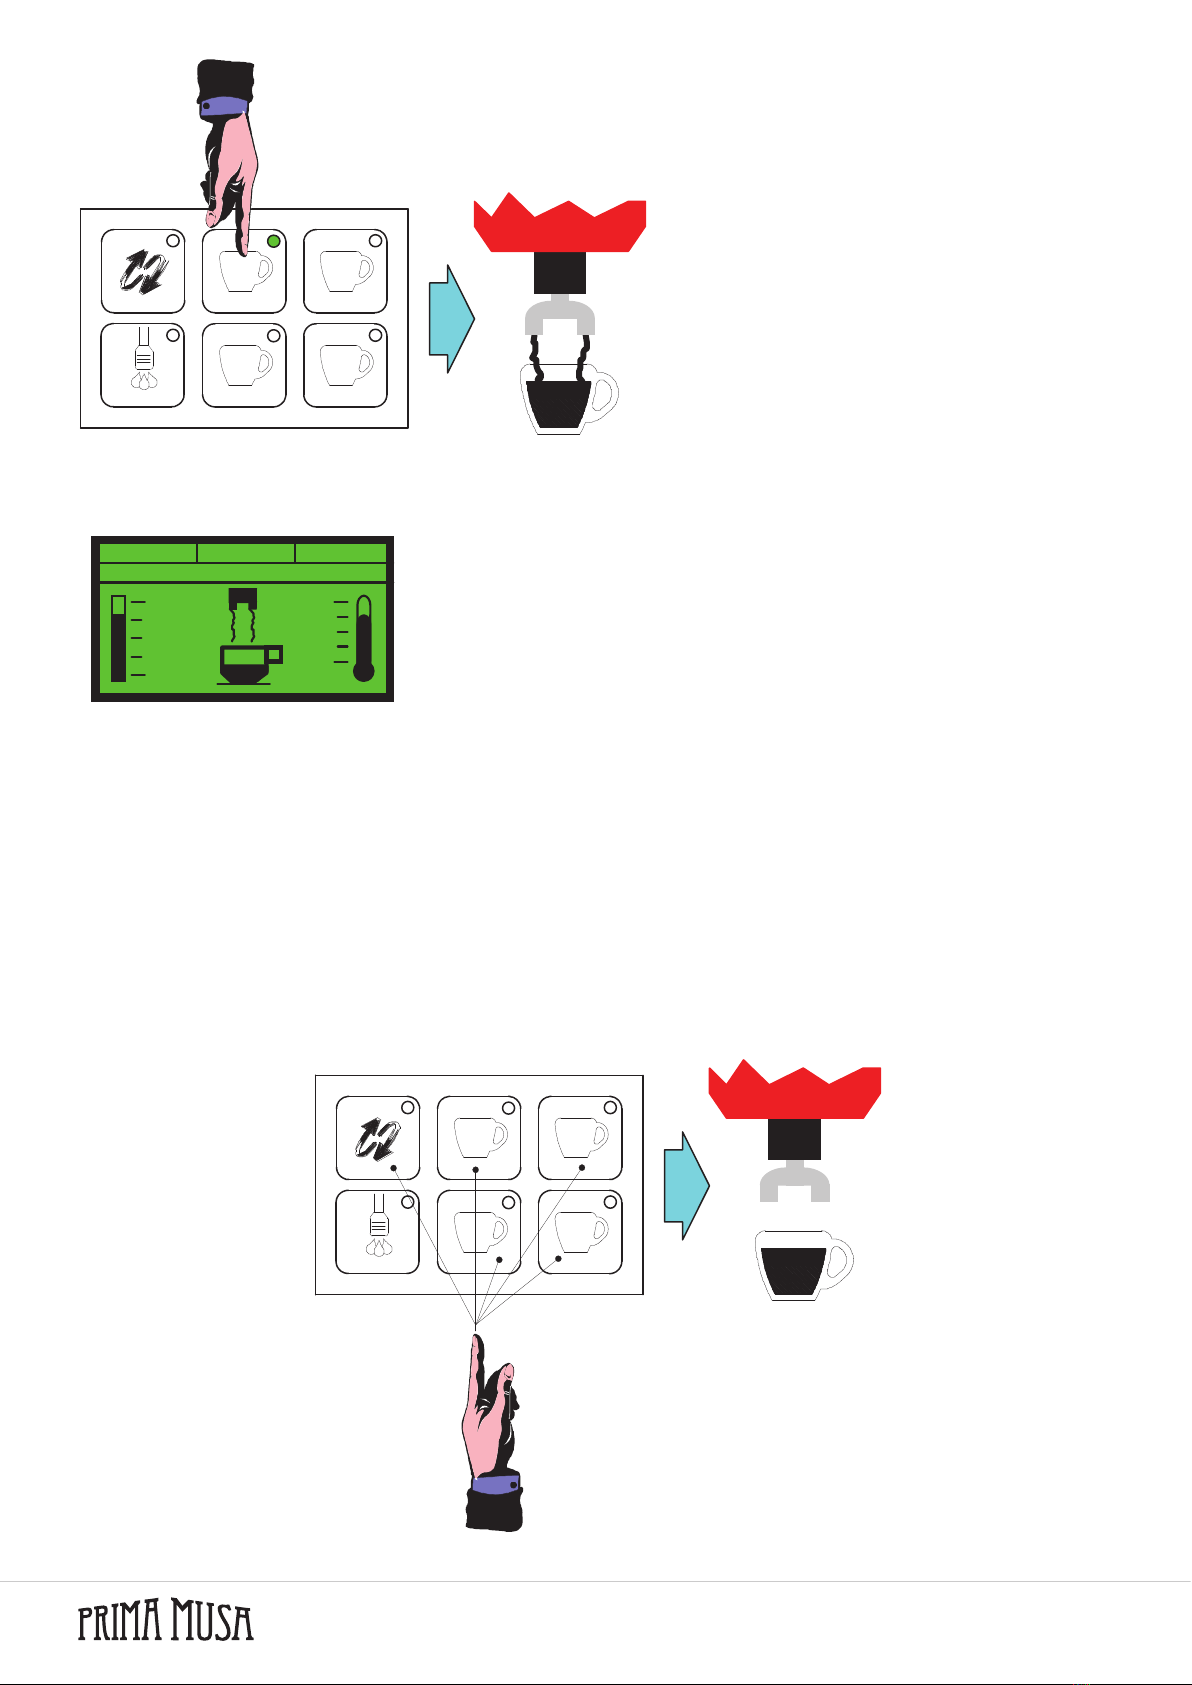
START DELIVERY
While dispensing is in progress, the display shows
the ICON of the dose running with the cup that fills
up:
MaxLiv
Min
T°Cald
T°gr1 T°gr2 T°gr3
xxxxxxxxxxxxxxxxx
Once the dose is complete, the display keeps the icon displayed for 5
seconds.
NOTE 1: The dosage allows the simultaneous dispensing of coffee, tea and steam from all the groups required by the
dosage. The display shows the icon of the first selected dose.
NOTE 2: If the BUZZER function is enabled from the technical menu (see dedicated chapter), at each delivery start the
buzzer on the back of the RGB display board emits an acoustic signal.
15.3 STOP COFFEE BREWING IN EXECUTION PHASE
There is the possibility of interrupting the delivery in progress before reaching the pulses relating to the volumetric counter
programmed by pressing any of the dose keys on the keyboard of the group used for dispensing the product.
This operation de-energizes with immediate effect both the EVx delivery solenoid valve and the PUMP, interrupting the
product delivery and returning the dosage to the IDLE-ON state
1 2
34
a a
aa
STOP DELIVERY

Apollo
Pag. 10
15.4 PRE INFUSION
The dosage can be configured in such a way that the delivery relative to the volumetric control coffee doses is preceded by
the pre-infusion.
At the start of the dose, after the time t1 (on) the solenoid valve group EVx turns off and remains off for the time t2 (off), only
to then re-energize itself to bring the dose to an end as scheduled. This timed on / off does not apply to the PUMP actuator.
By pressing one of the volumetric control dose keys, the "normal" dispensing cycle is preceded by a short timed jet of water
used to moisten the coffee tablet before the actual dispensing step.
CAUTION: the times of t1 (on) and t2 (off) can be set in the TECHNICAL Programming for all coffee doses. If one or more
data are set to zero, this function is not performed even if it is active! For enabling see TECHNICAL Programming.
EVx
PUMP
t1 (on) t2 (off) scheduled dose
total duration of delivery
15.5 COFFEE BREWING IN CONTINUOUS MODE
From the IDLE-ON state, by pressing one of the dose keys K5GRx (continuous / programming) both the EVx delivery
solenoid valve and the PUMP are energized, starting the delivery phase. The L5GRx LED relating to the button for the
selected dose remains lit for the duration of the coffee dispensing.
1 2
34
a a
aa
START DELIVERY
To stop dispensing in continuous mode, perform the STOP dose by pressing any dose button on the keyboard of the group
used for dispensing the product. The de-energization of the solenoid valve and pump occurs with the consequent turning off
of the signaling LED.
1 2
34
a a
aa
STOP DELIVERY
Continuous delivery is automatically stopped (if no stop is performed) when the maximum quantity of product is reached;
this quantity can be controlled both in volumetric mode when 6000 pulses are reached, and through a delivery time-out (see
ALARMS paragraph).
IMPORTANT: THE START CONTINUOUS TO THE "CONTINUOUS" CYCLE IS ON THE RELEASE (WITHIN 5 SECONDS
PENALTY TO THE PROGRAMMING PHASE) OF THE K5GRx KEY AND NOT ON ITS PRESSURE.
THE POSSIBLE STOP DOSE, ON THE OTHER HAND, OCCURS ON PRESSING THE BUTTON ITSELF.

Apollo Pag. 11
15.6 TEA CYCLE
15.7 DELIVERY
By pressing the button for the Tea dose (K6GRx), the Tea solenoid valve (EVTEA) is activated, initiating the delivery of hot
water. The operation is highlighted by the lighting up of the LED (L6GRx) corresponding to the button pressed.
1 2
34
a a
aa
START DELIVERY
At the time of the cycle start, a timer is
activated which, once the value set in the
programming phase is reached, interrupts
the supply of the product.
While dispensing is in progress, the
display shows the icon of the dose running
with the cup that fills up.
Once the dose is completed, the display
keeps the icon displayed for 5 seconds.
NOTE 1: The dosage allows the simultaneous dispensing of coffee, tea and steam from all the groups required by the
dosage. The display shows the icon of the first selected dose.
NOTE 2: If the BUZZER function is enabled from the technical menu (see dedicated chapter), at each start of delivery the
buzzer on the back of the RGB display board emits an acoustic signal.
15.8 STOP TEA DELIVERY IN EXECUTION PHASE
There is the possibility of interrupting the delivery in progress before reaching the programmed time by pressing the same
button used to start dispensing the tea dose.
1 2
34
a a
aa
STOP DELIVERY
This operation de-energizes the EVTEA
solenoid valve with immediate effect,
interrupting product delivery and returning
the dosage to the IDLE-ON state.
CAUTION:
DOSAGE PROVIDES THREE DIFFERENT TEA DOSES (ONE PER GROUP)
15.9 TEA + PUMP
It is possible to combine tea delivery with the pump (See TECHNICAL Programming).
15.10 STEAM PUMP DELIVERY CYCLE
Through a temperature probe positioned appropriately on the steam wand and connected to the STLVAP input, the
temperature of the liquid heated by the steam is measured.
Pressing the K6GRx key (of the group
selected in the TECHNICAL
Programming, see paragraph) activates
the EVVAP until the temperature set in the
Simulation Programming has been
reached (see paragraph below).
1 2
34
a a
aa
START DELIVERY
However, you can stop early by pressing
the steam button.
Apollo
Pag. 12
It is possible to continue dispensing steam which has arrived at the programmed temperature by keeping the steam button
pressed.
If the temperature is not reached within a time-out of 120seconds, the steam supply is automatically terminated.
NOTE 1: The dosage allows the simultaneous dispensing of coffee, tea and steam from all the groups required by the
dosage. The display shows the icon of the first selected dose.
NOTE 2: If the BUZZER function is enabled from the technical menu (see dedicated chapter), at each start of delivery the
buzzer on the back of the RGB display board emits an acoustic signal.
16. LEVEL MANAGEMENT AND ADJUSTMENT
16.1 MINIMUM LEVEL PROBE
At the time of the Power-on, the dosing detects the status relative to the minimum level probe. In case of lack of water, the
ON / OFF / HEATING / TEA actuator (which the customer will have connected to the remote control switch and / or power
relay at will) is kept de-energized to preserve the heating element from dry running.
NOTE: On power-up, the control of the minimum level probe is enabled after about 6 seconds.
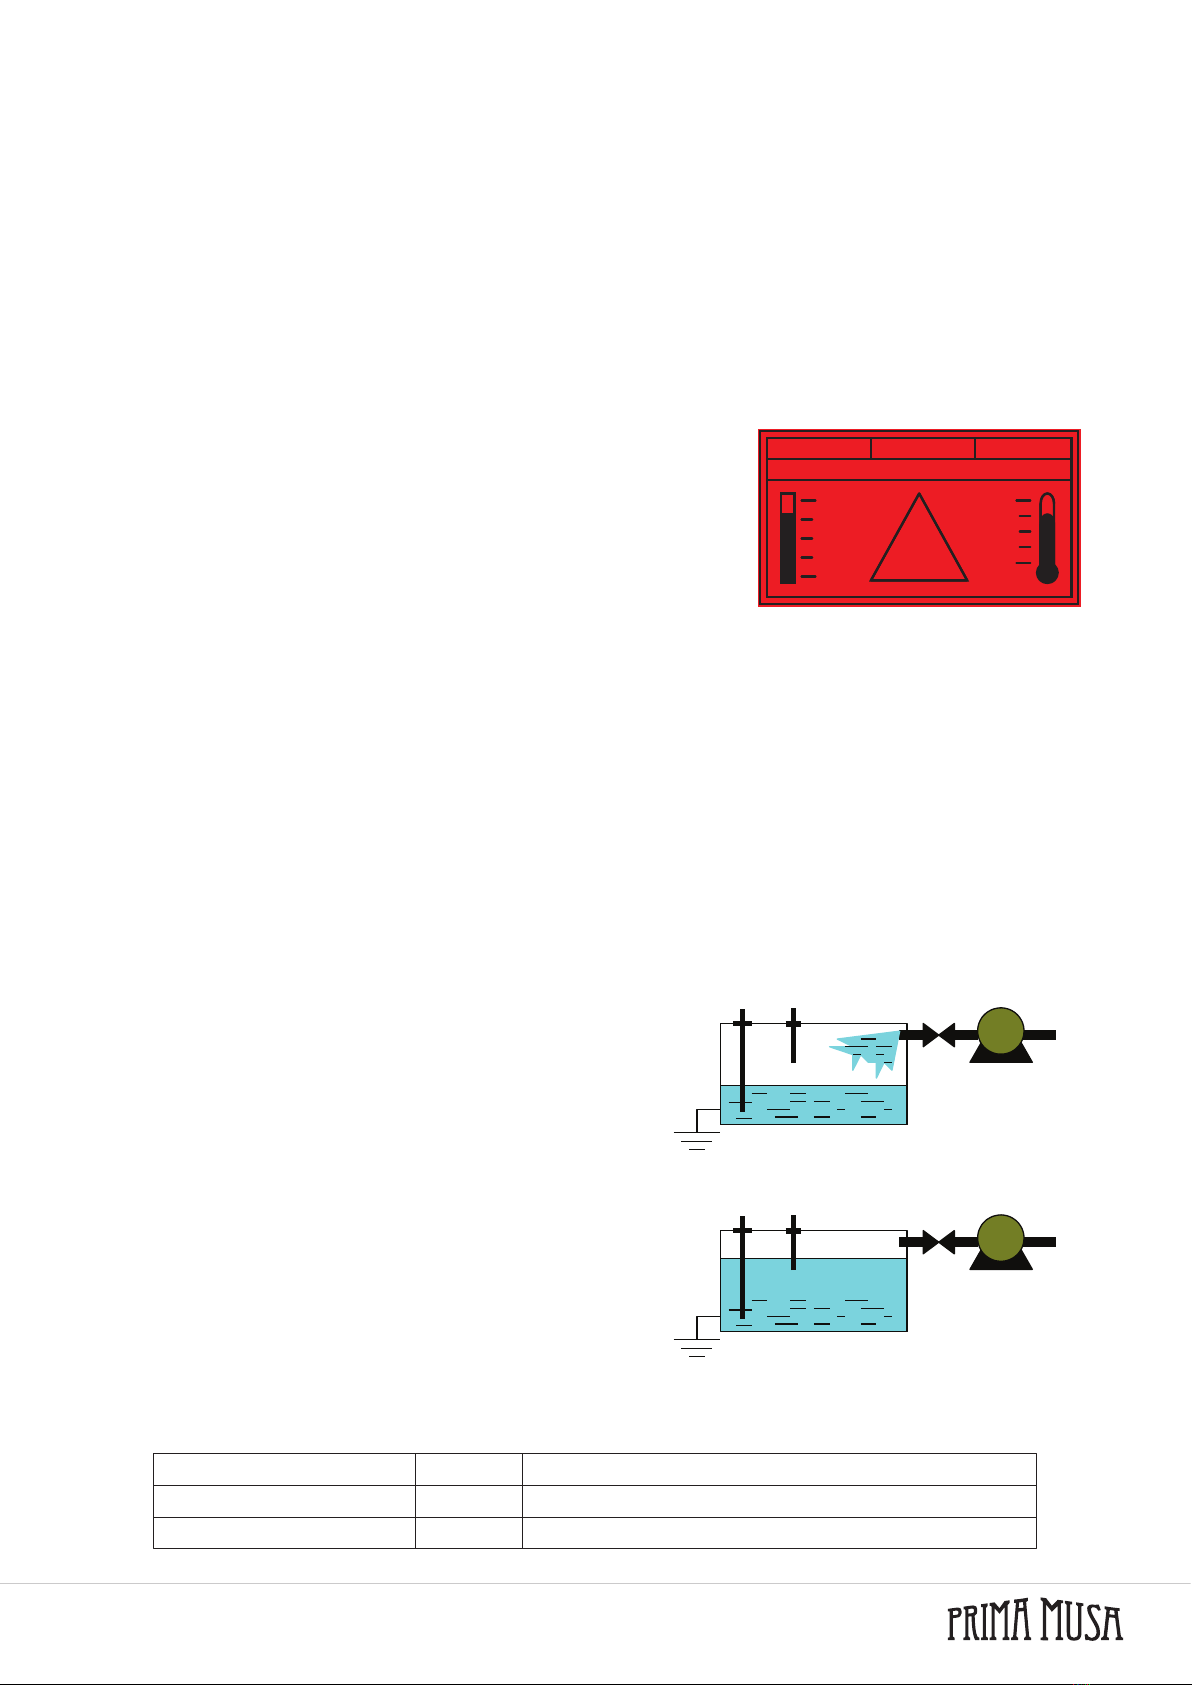
Max
Min
T°Cald
Boiler Empty
T°gr1 T°gr2 T°gr3
!
(RED display background)
Whenever the minimum level probe placed in the boiler does not
detect the presence of liquid for 3 seconds, it is de-energized ON /
OFF / HEATING / TEA2 to preserve the heating element and the
message '' 'BOILER EMPTY' '' is shown on the display
When the minimum level probe returns to detect the presence of
water for 3 consecutive seconds, the ON / OFF / HEATING / TEA2
actuator is re-enabled and consequently the heating and the alarm
disappears on the display.
NOTE 1: The minimum level probe does not perform filling control or management tasks, as this function is performed by
the level probe. (next paragraph)
NOTE 2: If the BUZZER function is enabled from the technical menu (see dedicated chapter), every time the minimum level
probe is discovered as described above, in addition to the signaling on the display, the buzzer on the back of the RGB
display board will also report the acoustic signal. , through 5 consecutive "beeps".
16.2 LEVEL PROBE
At the time of the Power-on, the dosing detects the status relative to the level probe placed in the boiler and, if necessary
(lack of water), arranges the execution of the filling phase by energizing the EVLIV filling solenoid valve and the PUMP until
the correct water level in the boiler is restored.
(Time-out foreseen in the programmable filling phase - see TECHNICAL Programming)
NOTE: When the system is turned on, the level control and adjustment is enabled after about 6 seconds.
Whenever the level probe placed in the boiler does not detect
the presence of liquid for 3 seconds, the filling phase is
arranged by energizing the EVLIV loading solenoid valve and
the PUMP. When the probe returns again to recognize the
presence of water for 3 consecutive seconds, the filling phase
is interrupted by de-energizing the EVLIV loading solenoid
valve and the PUMP.
BOILER LEVEL KO EVLIV + PUMP = ON
BOILER LEVEL OK EVLIV + PUMP = OFF
SLIVSLIV Min
SLIV Min SLIV EVLIV
EVLIV
PUMP
PUMP
The filling phase does not affect the possibility of making both
coffee or tea or steam selections and a new programming of
the same. Only the intervention of the Time-out combined
with the filling phase inhibits the functionality of the keyboard
and actuators.
In the first adjustment of the water level in the boiler, the level
probe is waited for before activating the ON / OFF / HEATING
/ TEA2 relay.
It is possible to vary the sensitivity of the level probes through a parameter in the TECHNICAL Programming in the following
possibilities:
-> LOW sensitivity
-> MEDIUM sensitivity
-> HIGH sensitivity
150 kΩ
400 kΩ
1 MΩ
for example in the presence of a softener
normal water
for example in the case of mountain water or level glass
Apollo Pag. 13
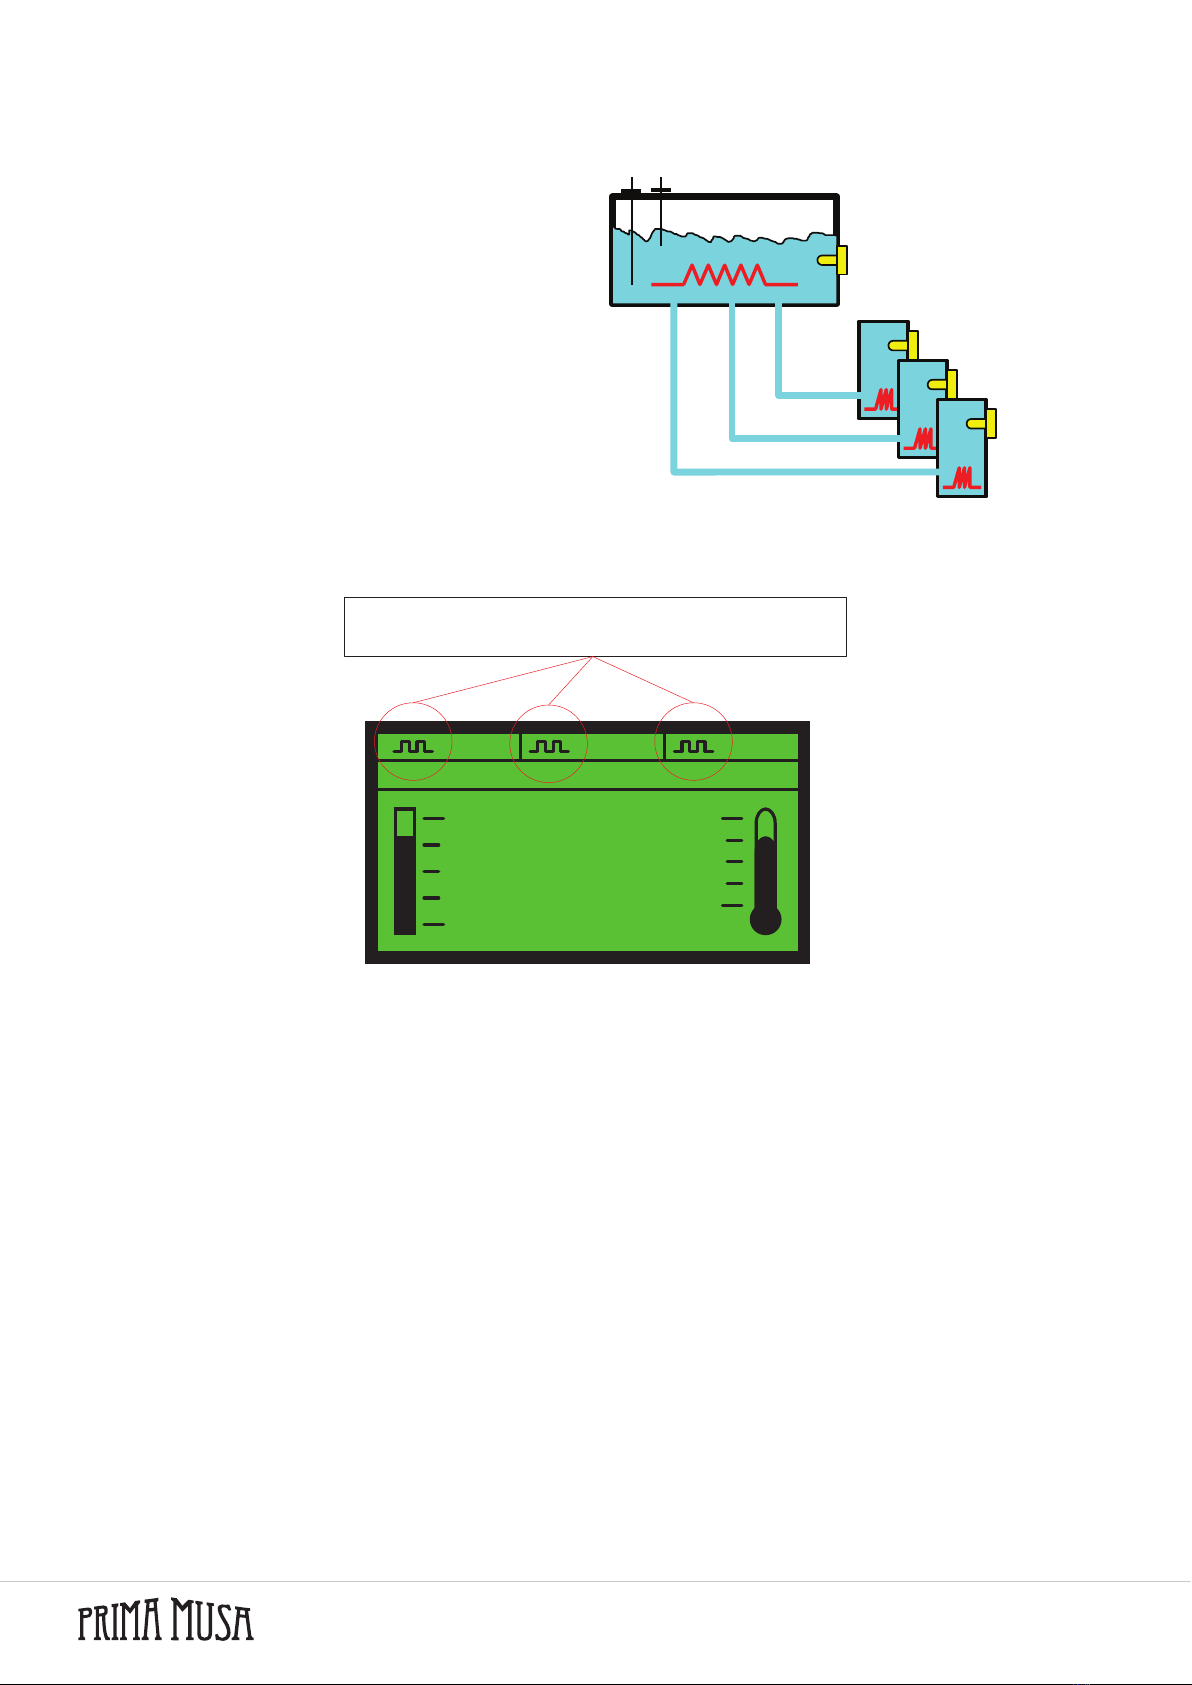
17. HEATING STEAM BOILER AND COFFEE BOILER *
17.1 FEATURES
* ONLY ON MACHINE WITH MULTI BOILER SYSTEM
The dosage controls the heating of the steam boiler and up to
3 coffee boilers.
STEAM BOILER
BOILERS
Resistance
Ntc 1st Group
Ntc 2nd Group
Ntc 3rd Group
NTC Boiler
Resistance
Heating control of all boilers is enabled in IDLE-ON;
each uses an NTC type probe and a 4 ÷ 30Vdc low voltage
command which excite solid state relay (SSR) type actuators
or specific triac modules which in turn control the heating
resistors.
In the first setting, the heating is activated only AFTER
the level in the boiler has been reached to safeguard the
resistance.
In all other cases, heating is active if necessary except when
the minimum level probe is discovered ... condition in which
heating is immediately blocked.
During the activation of the group heaters, the resistance symbol appears on the display
hh:mm
Max
Min
T°Cald
day
xxxxxxxxxxxxxxxxx
T°gr2 T°gr3T°gr1
when this symbol is present on the display it
means that heating is active
SEQUENTIAL HEATING
The system provides the possibility to enable the "Sequential heating" function through a technical menu (see dedicated
chapter) which, when only one group heating SSR is activated, these have priority over the SSR output of the coffee boiler
which is
In the condition in which the "Sequential heating" function is deactivated from the technical menu, the management of the
SSRs present in the system (Coffee boiler + groups) will be without priority constraints between them.
CAUTION:
- in the first setting (temperatures not at full capacity) the heating priority will be of the boiler.
- any request for steam or tea dispensing without a coffee in progress keeps the boiler temperature active regardless of
whether the coffee group heaters are active or not
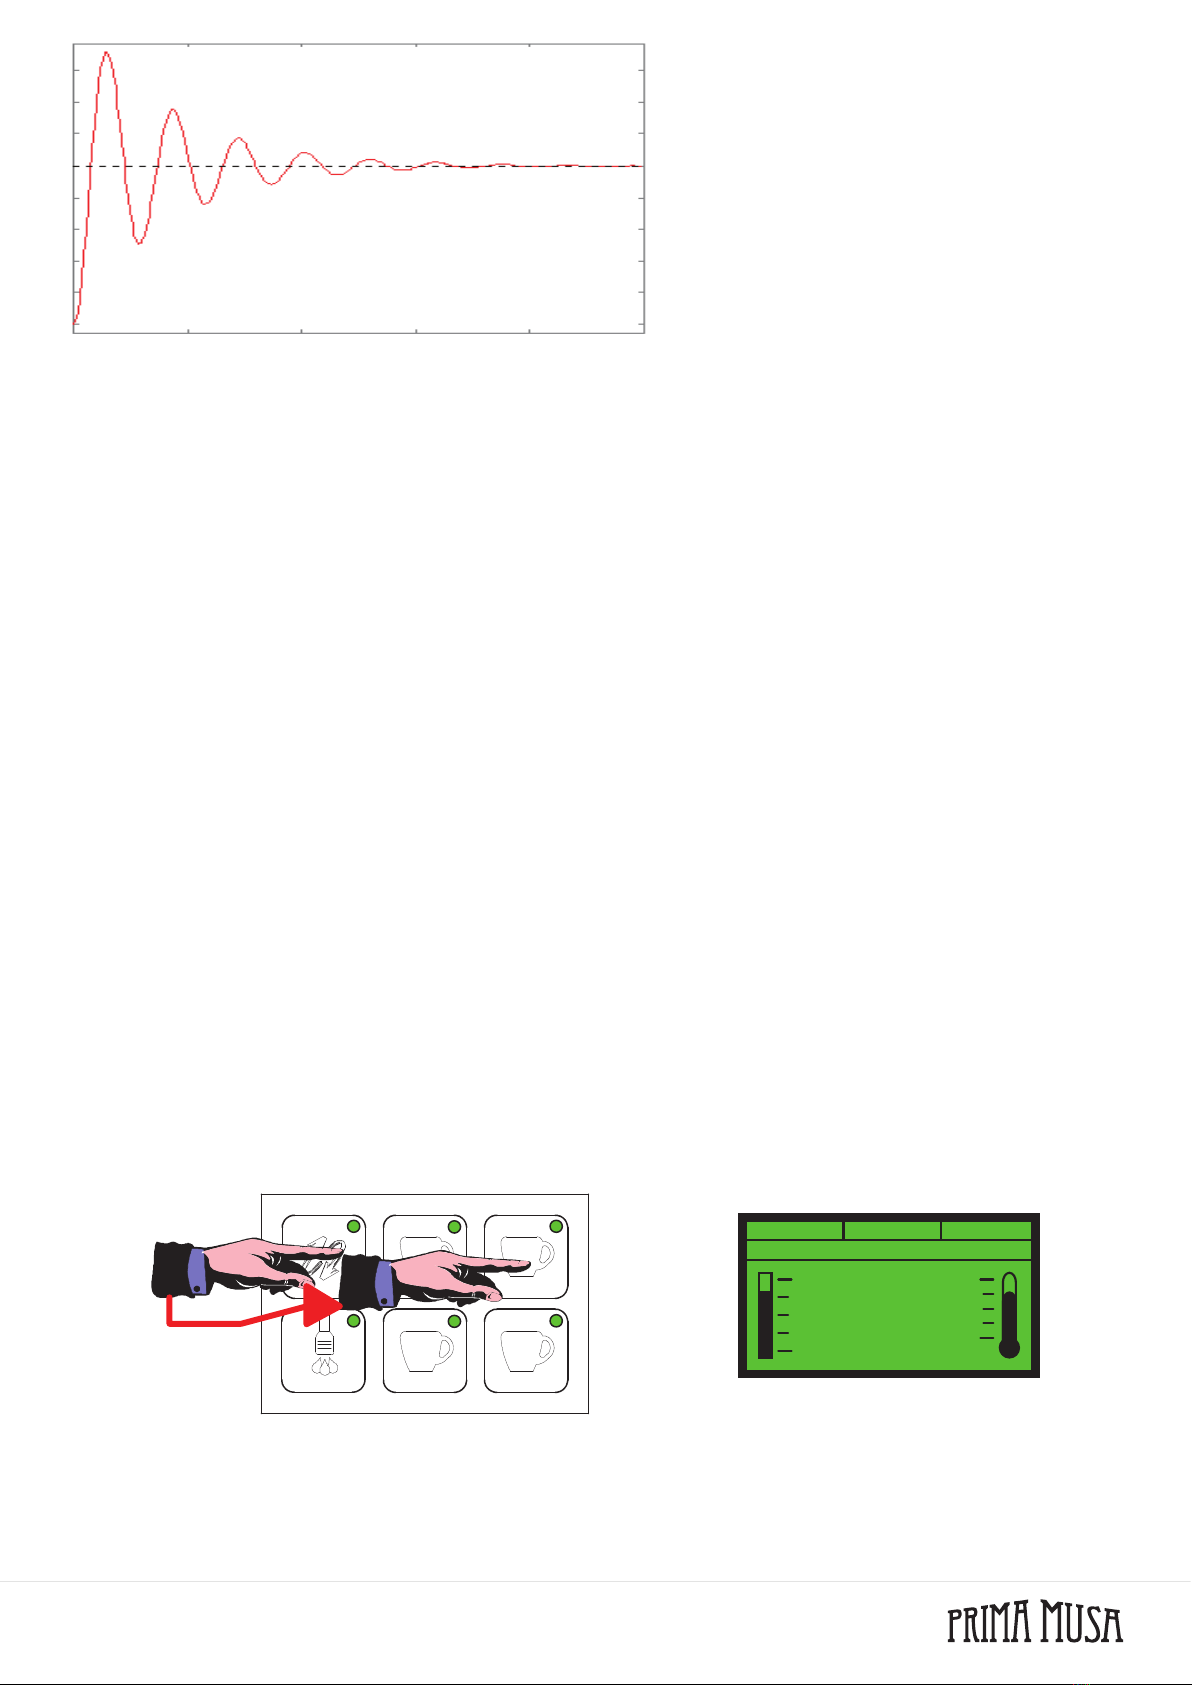
17.2 PID ADJUSTMENT (DEFAULT SETTING)
The default temperature adjustment is made following an algorithm called PID.
The constants that determine thermoregulation are called
Apollo
Pag. 14
PID T°SET
Proportional constant
Integrative constant
Derived constant
Proportional range
Kp
Ki
Kd
is the range within which
the PID is managed
outside of it the resistance
is controlled in ON / OFF
mode
The three constants and the proportional range must be adapted to each type of coffee machine based on the power
characteristics of the resistance, the size of the boiler, the fluidics, its dispersion, etc., etc ... and it is usually a job that also
requires some time to get the best possible result.
"Setpoint value or T ° SET" is defined as the temperature that the boiler must be in normal operation
- If during the heating or maintenance phase the temperature fluctuates excessively around the T ° SET, with peaks of
value that does not decrease over time, it is necessary to decrease the proportional constant: Kp
- If during the maintenance phase the temperature fluctuates excessively around the T ° SET, with a very long period
of oscillation and with peaks that do not decrease over time, it is necessary to decrease the integrative constant: Ki
- If during the heating or maintenance phase the temperature fluctuates excessively and often greater than the T °
SET, but which decreases over time, it is necessary to decrease the derivative constant: Kd
- If during heating the temperature tends to stay below the T ° SET value, moving further and further away from it, it is
necessary to increase the derivative constant: Kd
- If during heating the temperature tends to stay constantly below T ° SET, it is necessary to increase the proportional
constant: Kp and also slightly increase the integrative constant: Ki
- If during the maintenance phase the temperature tends to stay below or above the value of T ° SE T it is necessary
to increase the integrative constant: Ki and slightly increase the proportional constant: Kp
(see TECHNICIAN programming for parameter setting)
17.3 ON / OFF REGULATION WITH HYSTERESIS OF 2 ° C ONLY FOR STEAM BOILER
The temperature regulation of the steam boiler can also take place in another mode and more precisely with a hysteresis
of 2 ° C. The resistance is controlled by the ON / OFF / RISC / TEA2 actuator (which the customer will have connected to
the remote control and / or power relay at will) which de-energises when the programmed temperature T ° SET is reached
(see TECHNICAL Programming) and it re-energizes when it has decreased by 2 ° C. To avoid vibrations on the intervention
threshold, a time filter is also inserted.
To activate this function, it is necessary to set all pid constants to 0 in TECHNICAL Programming (see dedicated
paragraph).
17.4 SWITCHING OFF AND SWITCHING ON OF INDIVIDUAL GROUPS
It is possible to switch off the heating of the individual boilers of the groups by pressing first the K5GRx key and immediately
after the K2GRx key. OFF is displayed instead of the temperature.
1 2
34
a a
aa
1° 2°
hh:mm
Max
Min
T°Cald
day
xxxxxxxxxxxxxxxxx
OFF T°gr2 T°gr3
supposing to turn off group 1 we will have:
To turn on the heating, first press the K5GRx button and immediately after the K1GRx button.
It is possible to switch off the heating of the steam boiler by following a specific procedure described in TECHNICAL
Programming.
Apollo Pag. 15
17.5 ECONOMY MODE
The ECONOMY mode is activated when the inactivity time set in the technical menu under "ECONOMY TIME" is exceeded.
The ECONOMY mode provides for the automatic lowering of the steam boiler tset to the value set by the technical menu
(see dedicated paragraph).
With economy mode active, the display shows the wording "ECO" instead of the steam boiler temperature (on the right of
the display).
Economy mode is deactivated when:
1. the measured temperature is 2 ° C lower than the set economy tset
2. any delivery is made
3. the level probe does not detect water and the loading phase is activated
18. PROGRAMS AND READINGS
18.1 COFFEE DOSES PROGRAMMING
It is possible to modify and memorize the quantities relating to the volumetric coffee doses by following the procedure below
1. In IDLE-ON state, press the K5GRx key (1..3) and keep it pressed for 5 seconds; check the transition from fixed to
flashing of the LEDs L5GRx (1..3)
The display shows the writing
hh:mm
Max
Min
T°Cald
day
xxxxxxxxxxxxxxxxx
T°gr1 T°gr2 T°gr3
1 2
34
a a
aa
KEY PRESSURE > 5 seconds
Flashing
3. Once the quantity of coffee with which you want to program the dose is reached, press any of the "coffee" buttons on the
keyboard relating to the group being programmed to stop dispensing the product with the consequent de-excitation of EVx
+ PUMP.
The new dose value expressed in pulses of the volumetric meter is stored in EEPROM.
At the same time the LED relative to the programmed dose turns off and the remaining LEDs turn on; it is therefore possible
to proceed with the programming of the remaining doses (also tea and steam doses if enabled) without having to repeat the
entry operation (see point 1).
1 2
34
a a
aa
START DELIVERY
LED ON
LEDS OFF
2. Within 30 seconds (exit time-out from the programming phase) press any of the keys associated with the 4 doses that
can be programmed (for example K1GRx). The LED relating to the K5GRx key remains lit as is the dose LED during
programming (in our example L1GRx). EVx + PUMP actuators are enabled for the entire duration of coffee dose
programming.

Apollo
Pag. 16
NOTE: during the programming of a group the other groups remain disabled and the delivery of tea and steam if enabled.
1 2
34
a a
aa
STOP DELIVERY
EVx + PUMP = OFF
· To proceed with the programming of the remaining coffee doses (if the programming time-out of 30 seconds has
not been exceeded) repeat steps 2 and 3 in sequence.
· In case of intervention of the time-out (30 seconds) on the programming phase, to proceed with the execution of
the same it is necessary to repeat the entire sequence described in points 1, 2 and 3
· ILEDs relating to the "already programmed" doses are off if you decide to return to the programming
environment. However, this does not prevent a "new" programming of the already programmed doses (this
condition is not verifiable if an ON / OFF operation of the dosage has been carried out after programming).
IMPORTANT:
the programming carried out on the FIRST GROUP is ALWAYS transferred automatically for convenience also to
all the other groups. However, this does not affect the possibility of programming the remaining groups
independently of the first one by means of the operations described in points 1, 2 and 3 also to remedy any
difference in water in the cup caused by possible "fluidic differences" with the various groups.
18.2 IF A VOLUMETRIC COFFEE DOSE IS NO LONGER ACTIVATED ...
Solving problems
if after programming a volumetric dose, it is no longer carried out, IT IS NOT TO BE attributable to the inability to store the
dose by the dosage but it is really possible that, for some reason, the dosage itself has not received the impulses from the
volumetric counter and has therefore programmed a dose equal to 0 pulses.
IMPORTANT AND VERIFY THAT THE LED OF THE DOSE SELECTED DURING PROGRAMMING DOES NOT FLASH
THE POSSIBLE CAUSE IS TO BE SEARCHED IN:
- volumetric meter wrongly connected
- volumetric meter exchanged with that of another group
- water circuit not working
- coffee filter and blocked water passages that need cleaning
- solenoid valve group that does not allow enough water to pass
- ground coffee too fine or too pressed which allows a little water to filter
18.3 TEA DOSING PROGRAMMING
It is possible to modify and memorize the quantities related to the tea doses (through timed control) following the following
procedure:
CAUTION:
IF THE "PRE-INFUSION" FUNCTION IS ACTIVATED (SEE DEDICATED PARAGRAPHS), THE DOSING IN THE
PROGRAMMING PHASE ENABLES THIS PARTICULAR FUNCTION IN ANY CASE. WAIT THEREFORE THAT THE
SAME IS COMPLETED BEFORE STOPPING THE CURRENT PAYMENT

Apollo Pag. 17
1. In IDLE-ON state, press the K5GRx key (1..3) and keep it pressed for 5 seconds; check the transition from fixed to
flashing of the LEDs L5GRx (1..3).
The display shows the wording '' Doses Setting Select within 30sec '' in the xxxxxxxxxxxxxx zone.
2. Within 30 seconds (exit time-out from the programming phase) press the K6GRx key associated with the tea dose. The
LED relating to the K5GRx key remains on
The EVTEA actuator is enabled for the entire duration of the tea dose programming.
3. Upon reaching the amount of tea with which you want to program the dose, press the K6GRx key used previously to stop
dispensing the product with the consequent de-excitation of EVTEA.
The new time relating to the duration of the tea dose is memorized.
· To proceed with the programming of the other tea doses (if the programming time-out of 30 seconds has not been
exceeded and you have entered the programming environment from group 1 by pressing the K5GR1 key) repeat steps 2
and 3 in sequence.
· In case of intervention of the time-out (30 seconds) on the programming phase, to proceed with the execution of the same
it is necessary to repeat the entire sequence described in points 1, 2 and 3.
· The LEDs relating to the "already programmed" doses are off if you decide to return to the programming environment.
However, this does not prevent a "new" programming of the already programmed doses (this condition cannot be verified if
an ON / OFF operation of the dosage has been carried out after programming).
IMPORTANT:
the programming of the tea dose carried out on the FIRST GROUP is NEVER automatically transferred to all the
other groups. To program the tea dose on the remaining groups, simply repeat the operations described in points
1, 2 and 3.
NOTE: during the programming of a Tea, the groups and the delivery of the other teas remain disabled.
18.4 CLOCK PROGRAMMING
In IDLE-ON state, press the K5GRx key (1..3) and keep it pressed for 5 seconds; check the transition from fixed to flashing
of the LEDs L5GRx (1..3)
The display shows the wording 'Clock Adjust'.
NOTE: when the "Doses Setting" screen is displayed, keep the K5GRx button (1..3) pressed to go to the "Clock Adjust"
phase.
the display shows in the foreground
Clock adjust
Press K3GR1 (ENTER) to confirm
1 2
34
a a
aa
the display shows in the foreground
Clock adjust
hh.mm XXXXXXXXX
where is it hh = current time (0...23)
mm = current minute
XXX = day of the week
If you want to change the parameter, use the K1GR1 (+) or K2GR1 (-) keys then confirm with K5GR1.
Pressing the K5GR1 key again switches to the automatic ignition setting.

Apollo
Pag. 18
18.5 AUTO ON / OFF - AUTOMATIC SWITCHING ON / OFF
Allows the definition of the automatic switching on and off times of the dosage and the weekly closing day.
the display shows in the foreground
Auto ON/OFF
aaa : hh.mm
They are programmed in the order:
- ignition time (AAA = On)
- minute of ignition (AAA = On)
- time of shutdown (AAA = Off)
- minute of shutdown (AAA = Off)
- day of rest
To switch from one to the other, press the K5GR1 button.
1 switch on and 1 switch off can be set and are valid for all days of the week.
If you do not wish to have automatic switching on or off, go to the corresponding time programming and press K1GR1 (+)
or K2GR1 (-) until the following appears on the display:
the display shows in the foreground
Auto On/Off
On : --.--
Auto On/Off
Off : --.--
Or
the display shows in the foreground
(pressing K2GR1 (-) when the time 00 is indicated on the display or pressing K1GR1 (+) when the time 23 is indicated).
In this case:
- if the ignition has been disabled, the shutdown and the day off are also automatically disabled, pressing K5GR1 skips the
relative settings and goes directly to the next parameter. Switching on and off can thus only be done manually through the
procedure described in the previous paragraph.
- if the ignition is enabled, pressing K5GR1 switches to the setting of the shutdown and subsequently of the closing day, if
necessary.
18.6 DAY OF REST
It is possible to define a weekly rest day, in which the dosage ignores the automatic ignition and can only be turned on
manually.
The automatic switch-off is also active on the day off.
the display shows in the foreground
Closed On
xxxxxxxx
With K1GR1 (+) or K2GR1 (-) the day (XXX) is selected.
If you do not wish to set a day off, select "------------".
Only one day off can be set.
18.7 CONSUMPTION READING, LITERS, MAINTENANCE
the display shows in the foreground
Clock adjust
pressing the K5GR1 key again switches to the reading of the counts:
Table of contents


