manuals.online logo
Brands
  1. Home
  2. •
  3. Brands
  4. •
  5. prima terra
  6. •
  7. Indoor Furnishing
  8. •
  9. prima terra infinita User manual

prima terra infinita User manual

© www.primaterra.at 2017
2 x
4 mm
10 mm
Schränke / cupboards / armoires
infinita
Art.Nr.
03 003 221
Art.Nr.
03 003 222
Art.Nr.
03 003 223
Art.Nr.
03 003 224
20 min
Packungsinhalt / package content / contenu de l'emballage
34 Schrauben und Muttern
34 srews and nuts
34 vis et ecrous
4 ckwinkel
4 corner angles
4 cornières d'angle
M 6 x12
2 Versteifungsbleche
2 plates for stiffening
2 plaques de rigidification
1 Rückwand
1 rear wall
1 paroi arrière
2 Verstellwinkel
2 adjustable angles
2 angles de réglage
2 Seitenwände
2 side walls
2 parois latérales
1 Tür
1 rear door
1 paroi porte
1 Bodenblech, 1 Deckel
1 base sheet, 1 lid
1 base feuille, 1 couvercle
1 Verriegelungsset
1 locking device set
1 ensemble pour verrouiller
Seite 1 von 3
1 Scharnierblech oben
1 hinge-part top
1 charnière partie supérieure
1 Scharnierblech unten
1 hinge-part bottom
1 fond partie de charnière
2 Scharnierbleche für Tür
2 hinge-parts for door
2 charnières pour porte
1 Scheibe M6
1 washer M6
1 rondelle M6
1 Scharnierset
1 hinge set
1 kit de la charnière
1 Riegel
1 bolt for door
1 loquet de la porte
1 Fixteil
1 fixed part
1 partie fixe
A
e
c
f
d
b
a
2 Schrauben
2 screws
2 vis
2 Muttern
2 nuts for screws
2 écrous pour vis
M 6 x 20
2 Sicherungsmuttern
2 securing nuts
2 écrous de fixation
Zwischenböden
intermediate levels
feuilles intercalaires
Aufbauanleitung / Assembly instruction / Instruction de montage
2 Kleinteilesackerl
2 small parts bags
2 petites pièces sacs
1 Bodenbefestigungsset
1 floor mounting set
1 montage au sol set
1 Wandbefestigungsset
1 wall mounting set
1 montage au mur set
B
C
D
ace
bdf
2 Scheiben M6
2 washers M6
2 rondelles M6
© www.primaterra.at 2017
Schränke / cupboards / armoires
Aufbauanleitung / Assembly instruction / Instruction de montage
infinita
Seite 2 von 3
Schritt 1 / Step 1 / Étape 1 Schritt 2 / Step 2 / Étape 2
Schritt 3 / Step 3 / Étape 3
Auf der Seite, an der später die Tür montiert werden soll, wird oben das
S harnierble h Aund unten das S harnierble h Dbefestigt. Auf der anderen Seite
werden die beiden Versteifungsble he befestigt.
On the side where later the door will be mounted the hinge part Aand below the
hinge part Dare s rewed up. On the other side, the two stiffening plates are
s rewed up.
Du ôté où le plus tard, la porte doit être montée, la plaque de harnière Aet en
dessous la plaque de harnière Dsont vissé. D'autre part, les deux plaques de
rigidifi ation sont vissé.
D
A
Montieren Sie wie abgebildet die beiden Verstellwinkel im Inneren Ihres S hrankes.
Mount both adjustable angles as shown on the inside of your upboard.
Assemblez les deux angles de réglage à l'intérieur de votre armoire omme illustré.
Schritt 4 / Step 4 / Étape 4
Zuerst sollten Sie den Außenmantel bestehend aus Boden, De kel, zwei
Seitenwänden und Rü kwand mithilfe der E kwinkel und S hrauben
zusammens hrauben.
First, you should s rew the outer mantle onsisting of base, lid, two side panels
and rear wall using the orner angles and s rews.
En premiere vous assemblez la base, le ouver le, les deux parois latérales et
paroi arrière à l'aide des ornières d'angles et vis.
Montieren Sie jeweils 4 S hrauben als Auflageflä he für einen Zwis henboden.
Die Zwis henböden werden ans hließend nur eingelegt.
Mount 4 s rews ea h as a support surfa e for an intermediate level.
The intermediate levels are then only inserted.
Assemblez 4 vis omme une surfa e d'appui pour un feuille inter alaire.
Ensuite les plan hers intermédiaires peuvent inserer simplement.
© www.primaterra.at 2017
Schränke / cupboards / armoires
Aufbauanleitung / Assembly instruction / Instruction de montage
infinita
Seite 3 von 3
B
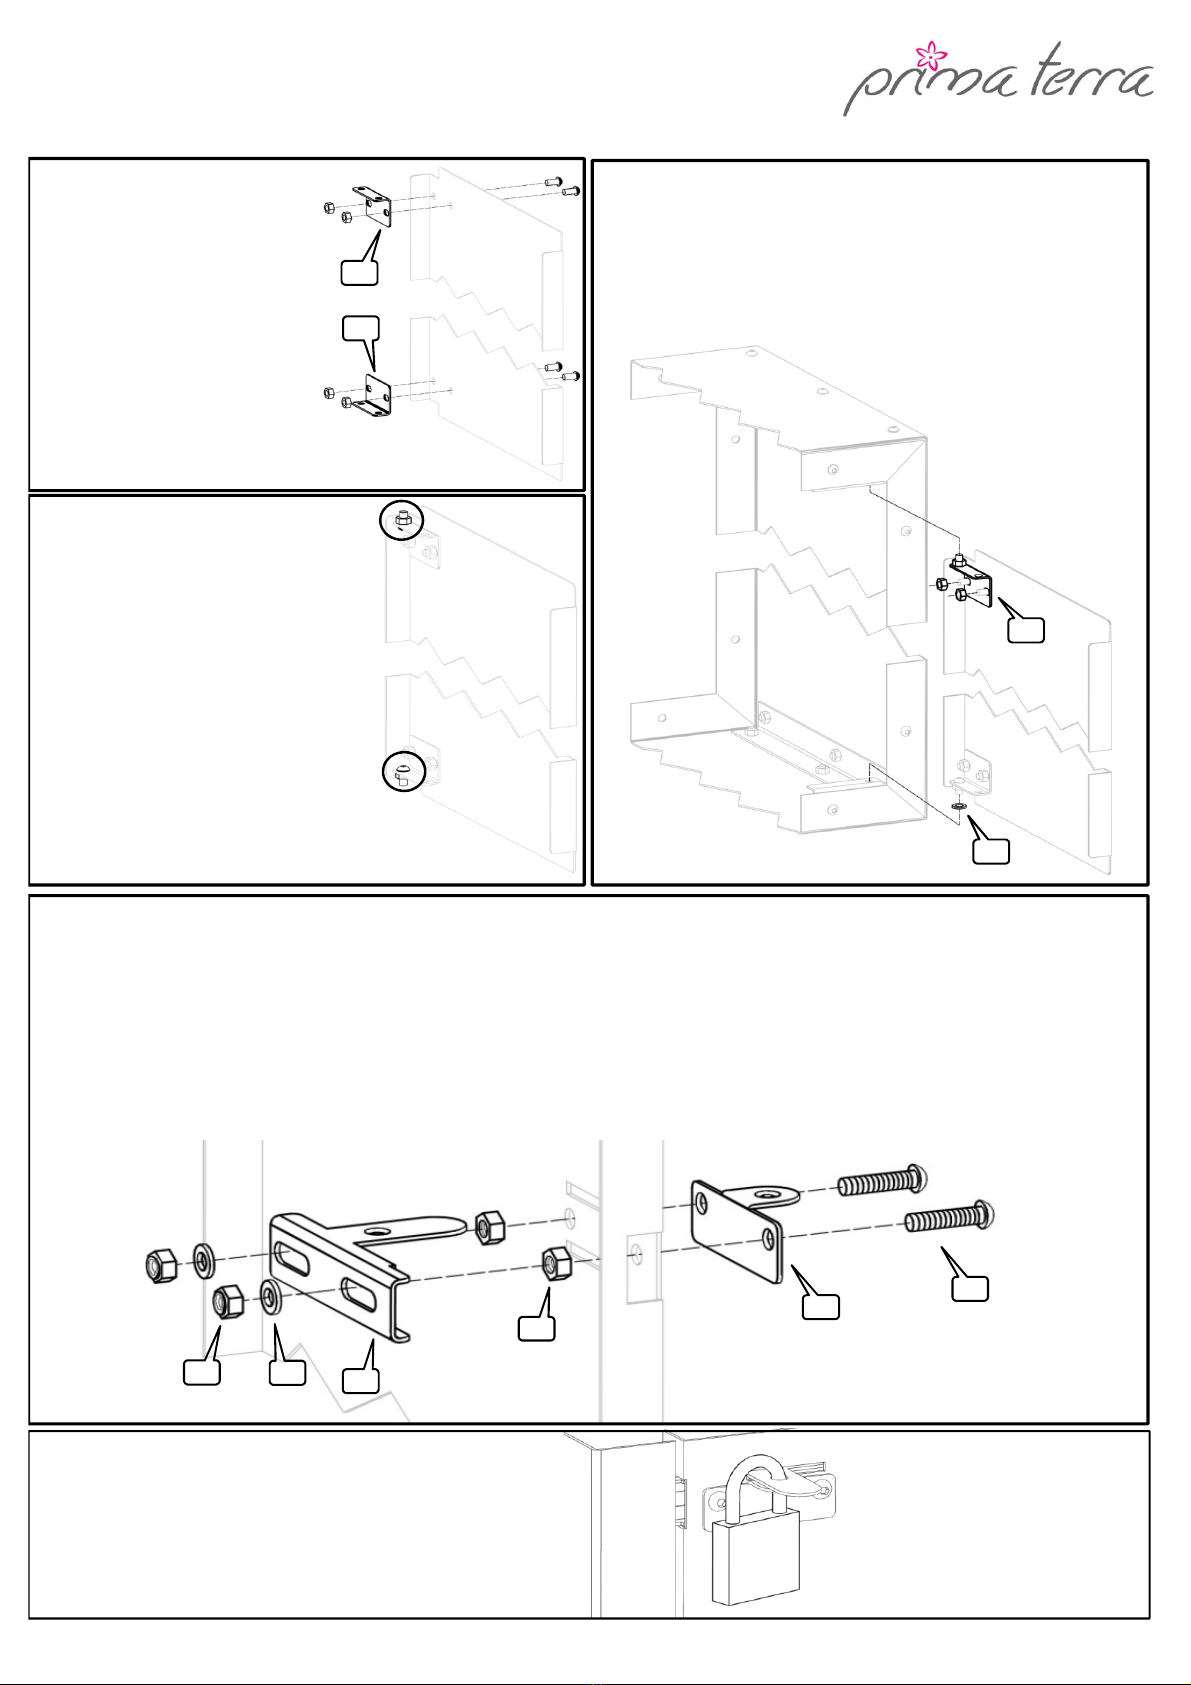
Zur Vorbereitung des Türeinbaus
werden zuerst die beiden
Sc arnierblec e Bfest mit der Tür
versc raubt.
In preparation for t e door installation
at first t e two inge parts Bs ould be
screwed wit t e door.
En préparation pour le montage de la
porte les deux plaques de c arnières
Bsont vissés avec la porte.
Schritt 5a / Step 5a / Étape 5a
Schritt 5b / Step 5b / Étape 5b
B
Als Dre ac se werden ansc ließend oben und
unten an der Tür Sc rauben gemäß Abbildung
fest versc raubt.
As t e axis of rotation, screws are screwed
above and below at t e door as s own at t e
illustration.
Comme axe de rotation vis sont vissés en aut
et en bas de la porte comme représenté sur
l'image.
B
C
Dazu benötigen Sie das Verriegelungsset. Zuerst muss mit den Sc rauben fund den Muttern ddas Fixteil efest mit der Tür versc raubt werden. Ansc ließend den Riegel c
und die Beilagsc eiben baufstecken. Als näc stes werden die selbstsic ernden Muttern aversc raubt. Achtung: Die selbstsic ernden Muttern nic t zu fest anzie en, damit
der Riegel noc leic t in und er gesc oben werden kann. Prüfen Sie absc ließend, ob die Tür gesc lossen und verriegelt werden kann. Bei Bedarf können Einstellarbeiten
vorgenommen werden.
You need t e locking device set. At first t e fixed part eas to be screwed wit t e screws fand t e nuts dwit t e door. T en put t e bolt cand t e was ers bon. Next, t e
securing nuts aare screwed. Attention: Do not over tig ten t e securing nuts so t at t e bolt can still be easily pus ed back and fort . Finally, c eck w et er t e door can be
closed and locked. If necessary you can make adjustments.
Pour cela, vous avez besoin de l'ensemble de verrouiller. D'abord, il faut visser la partie fixe eavec les vis f et les écrous davec la porte. Ensuite, mettre le loquet cet les
rondelles b. Ensuite, les écrous de fixation asont vissées. Attention: Ne serrez pas trop afin les écrous de fixation que le loquet peut encore être facilement poussé en
arrière. Enfin, vérifiez si la porte peut être fermée et verrouillée. Si nécessaire vous pouvez faire des ajustements.
Schritt Türverriegelung / Step Locking device set / Étape Dispositif de blocage
f
e
d
c
b
a
I r Sc rank kann ideal mit einem Vor ängesc loss versperrt werden.
Das passende Vor ängesc loss ierfür er alten Sie im örtlic en Handel.
Your cupboard can be ideally locked wit a padlock.
T e appropriate padlock for t is is available in t e local store.
Votre armoire peut être verrouiller idéalment avec une cadenas.
Le cadenas à cet effet obtenu à partir du commerce local.
Schritt 6 / Step 6 / Étape 6
Nun können Sie die Tür einsetzen und unten die Sc eibe Cmit einbauen. Um die
Dre ac se oben einzustecken, müssen Sie das Sc arnierblec Bwieder etwas
lockern.
Now you can insert t e door and install t e was er C below. To insert t e axis of
rotation above you need to loosen t e inge part B.
Maintenant, vous pouvez insérer la porte et au-dessous installez la rondelle C.
Pour insérer l'axe de rotation ci-dessus vous avez besoin de desserrer la c arnière B.
Unser Tipp / Our tip / Notre conseil

Popular Indoor Furnishing manuals by other brands

MAISONS DU MONDE MAUPITI 186908 manual

MAISONS DU MONDE

MAISONS DU MONDE MAUPITI 186908 manual

Ameriwood HOME 4574GM manual

Ameriwood HOME

Ameriwood HOME 4574GM manual

Ave Six YIELD YLD14 Assembly instructions

Ave Six

Ave Six YIELD YLD14 Assembly instructions

designer's image 211-4525 Assembly instructions

designer's image

designer's image 211-4525 Assembly instructions

blinds first LIFT&LOCK installation instructions

blinds first

blinds first LIFT&LOCK installation instructions

VISIONARY DESIGNS MOD-1327 Assembly

VISIONARY DESIGNS

VISIONARY DESIGNS MOD-1327 Assembly

Furniture of America FOA3779PC-2PK Assembly instructions

Furniture of America

Furniture of America FOA3779PC-2PK Assembly instructions

Blooma 3663602418993 manual

Blooma

Blooma 3663602418993 manual

Walker Edison BT40TB Assembly instructions

Walker Edison

Walker Edison BT40TB Assembly instructions

Coaster 704148 Assembly instructions

Coaster

Coaster 704148 Assembly instructions

MAISONS DU MONDE KAZACHOK 198971 manual

MAISONS DU MONDE

MAISONS DU MONDE KAZACHOK 198971 manual

OVE ZAYDEN 60 installation manual

OVE

OVE ZAYDEN 60 installation manual

Case Eos Bar Table Care Instructions

Case

Case Eos Bar Table Care Instructions

Allibert 823135 quick start guide

Allibert

Allibert 823135 quick start guide

Lightolier 1050RN_3D specification

Lightolier

Lightolier 1050RN_3D specification

CS Schmal 89 40 Series manual

CS Schmal

CS Schmal 89 40 Series manual

Better Homes and Gardens Bankston BHW-10005 manual

Better Homes and Gardens

Better Homes and Gardens Bankston BHW-10005 manual

Cello Toulun instruction manual

Cello

Cello Toulun instruction manual

manuals.online logo
manuals.online logoBrands
  • About & Mission
  • Contact us
  • Privacy Policy
  • Terms and Conditions

Copyright 2025 Manuals.Online. All Rights Reserved.