PrimeLight Design VoxBox Pro User manual

®
Operating Instructions
www.voxbox.pro

2
Table of contents
Chapter 1 Intended use & Warnings............................................................................3
Chapter 2 Identifying the parts................................................................................4-5
Chapter 3 How to attach the main box to the camera................................................6-7
3.1. How to attach to 15mm rails.................................................................6
3.2. How to attach if the camera has no rails (such as DSLR)........................6
Chapter 4 How to insert the two-way mirror................................................................8
Chapter 5 Positioning the interviewer.................................................................... 9-11
5.1. To position the interviewer camera right (recommended) .......................9
5.2. To position the interviewer camera left..................................................9
5.3. Interviewing while operating the camera .............................................10
5.4. Fourth position for the interviewer ......................................................11
5.5. Lighting the interviewer......................................................................11
Chapter 6 Filming the interview & tips for success....................................................12
Chapter 7 Using the VoxBox Pro®as a Teleprompter device ......................................13
Chapter 8 Warranty ..................................................................................................14
Chapter 9 Support and parts ....................................................................................15

3
The VoxBox Pro® is a two-way mirror box which is positioned in front of the camera lens. It allows lm
makers to shoot down-the-lens interviews while maintaining eye contact between the interviewer and
the subject. The tablet holder accessory allows the unit to be converted into a Teleprompter.
Warnings
This product contains sheet glass. To avoid serious injury, handle with extreme care at all times.
Do not allow any part of the product to get wet.
1. Intended Use
4
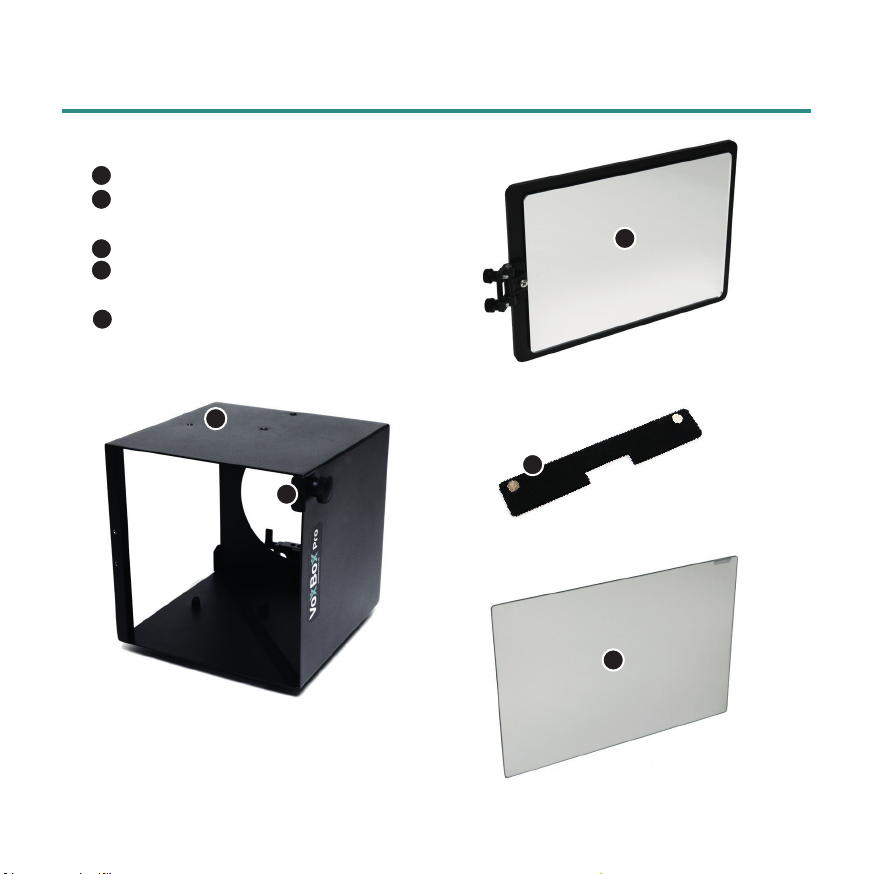
• Main box - positions in front of the lens
• Two-way mirror - inserts into the VoxBox Pro®
main box
• Glass retainer
• Side mirror - optional use depending on
position of interviewer
• Side ag - optional use with side mirror
2. Identifying the parts
1
1
4
4
5
5
6
6
7
7

5
2. Identifying the parts
• Rail block - to slide onto 15mm rails
• L-bracket - supports the main box
• Tablet holder - to convert the unit into a
Teleprompter
• Doughnuts (63, 76 & 112mm) - ts on lens
to prevent light entering the main box
• Cleaning cloth - for handling and cleaning
the mirrors
• 16mm receiver - optional to allow the unit
to be mounted on a standard lighting stand
• Hex key to adjust Rail block
2
2
8
8
3
3
9
9
10
10
11
11
12
12

6
3.1. How to attach to 15mm rails
There are two ways to attach the main box
depending on the camera setup. We strongly
encourage you to mount the unit to your existing
standard 15mm rails as detailed.
NOTE: It is recommended to insert the two-way
mirror after the main box is securely attached to
the camera.
1. Remove your matte box if tted.
2. Ensure the rails do not extend beyond the
front of the lens. For best results, rail ends
should be in line the front of the lens.
3. Choose a suitable doughnut and t around
the rim of the lens.
4. Loosen the two levers on the rail block,
slide the main box onto the rails. The front
of the lens should be in line with the hole
in the main box. (The height of the main
box can be adjusted by re-positioning the
rail block to so that the lens is centred in
the hole.)
5. Tighten the two levers on the rail block to
secure the main box.
6. Re-balance tripod head.
3. How to attach the main box to the camera
7
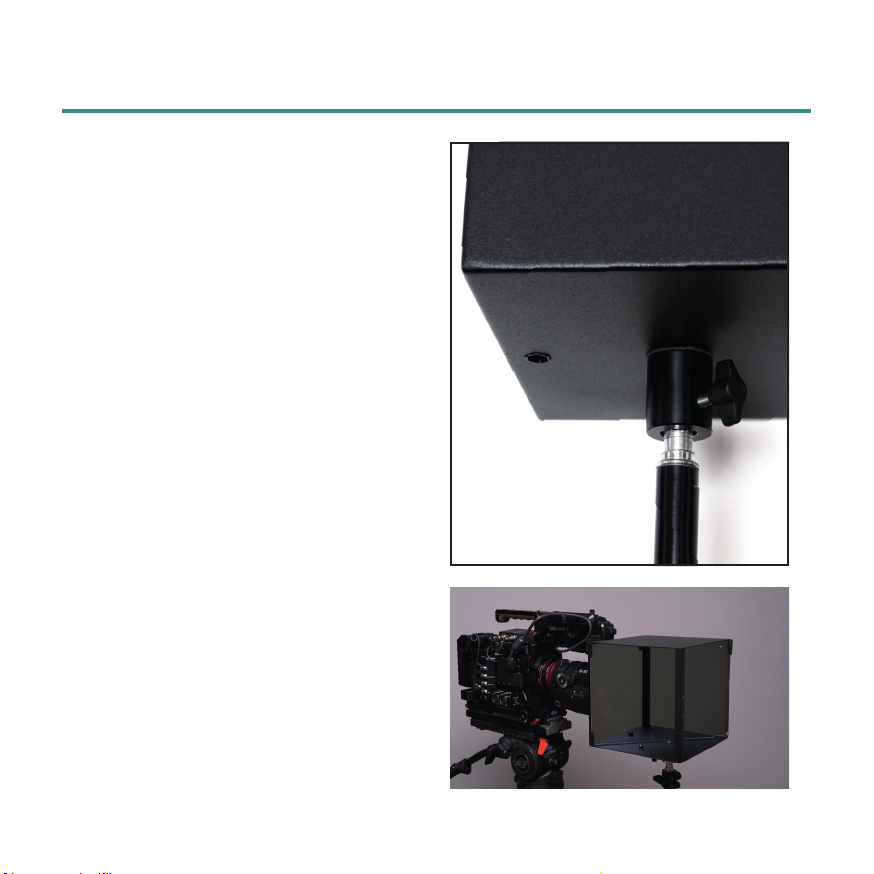
3.2. How to attach if the camera does not have rails
(such as DSLR)
The main box can be mounted onto a standard
lighting stand having a 16mm spigot.
NOTE: This mounting method will require more
accurate positioning of the subject and interviewer.
See later chapter for more details.
1. Remove the L-bracket using the two hand
wheels.
2. Screw the 16mm receiver through the centre
hole on the main box. Tighten by hand.
3. Slide the 16mm receiver onto your lighting
stand.
4. Choose a suitable doughnut and t it around
the rim of the lens.
5. The main box is now ready to be positioned
in front of the lens.
3. How to attach the main box to the camera
8
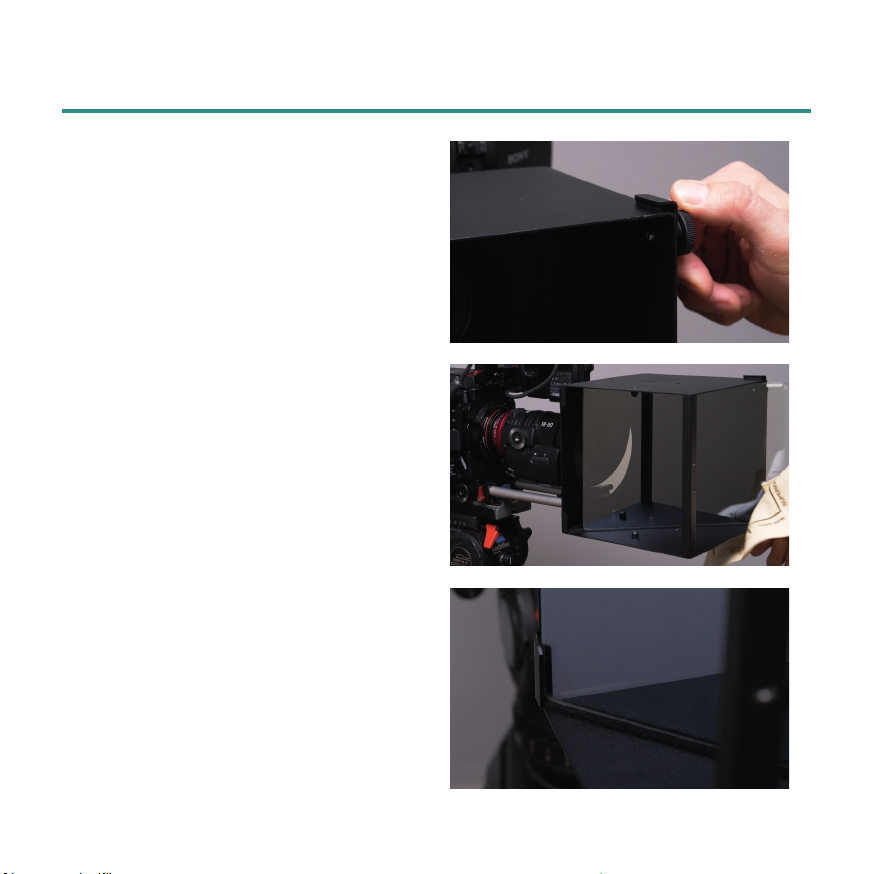
4. How to insert the two-way mirror
Warning - handle the two-way mirror with extreme
care. Treat these surfaces like you would a lens.
Handle using the cleaning cloth.
One side of the two-way mirror has a reective
coating; the other side is non-reective and faces the
lens, indicated by a label on the glass.
1. Loosen the thumbscrew on the glass retainer
and rotate 90 degrees.
2. Observe the label on the two-way mirror.
Slide the two-way mirror into the main box
using the felt strips as a guide. DO NOT let
any part of the glass come into contact with
the metal surfaces of the main box.
3. Push the mirror all the way to the corners of
the main box, so that glass in seated into the
V-shape of the foam pads.
4. Rotate the glass retainer to back to its
original position and push towards the edge
of the two-way mirror to create a rm hold.
Whilst rmly holding the glass retainer in this
position, re-tighten the thumbscrew.
The two-way mirror can remain tted in the main
box when packed away for transportation.
To clean, brush or wash loose debris away. Clean
using only the Selvyt cleaning cloth, using non-
greasy window cleaner.

9
5. Positioning the interviewer
The VoxBox Pro®allows the interviewer to sit at one
of four possible positions, depending on the layout
of the lming area or whether the interviewer is also
operating the camera.
The interviewer’s position is determined by the
position of the L-bracket (or the 16mm receiver,
if using) and the use of the side mirror. Both
mounting options can be tted on either the top or
bottom of the main box.
NOTE: In all circumstances, set the height of the
camera to the eye line of the interviewer (just as
you would with a traditional off-camera interview).
5.1. To position the interviewer camera right
(recommended) (Fig 1)
For best results, we recommend the interviewer sits
camera right, at a 90 degree angle to the subject
as shown in g 1. The interviewer should sit 1-2
metres from the main box.
5.2. To position the interviewer camera left (Fig 2)
1. Detach the main box from the L-bracket (or
16mm receiver, if using).
2. Invert the main box and re-attach to the
L-bracket (or 16mm receiver, if using).
Main Box
Two-way Mirror
Camera
Operator
Interviewer
Subject
Courtesy Flag
Main Box
Two-way Mirror
Camera
Operator
Interviewer
Subject
Courtesy Flag
Fig 1
Fig 2
10
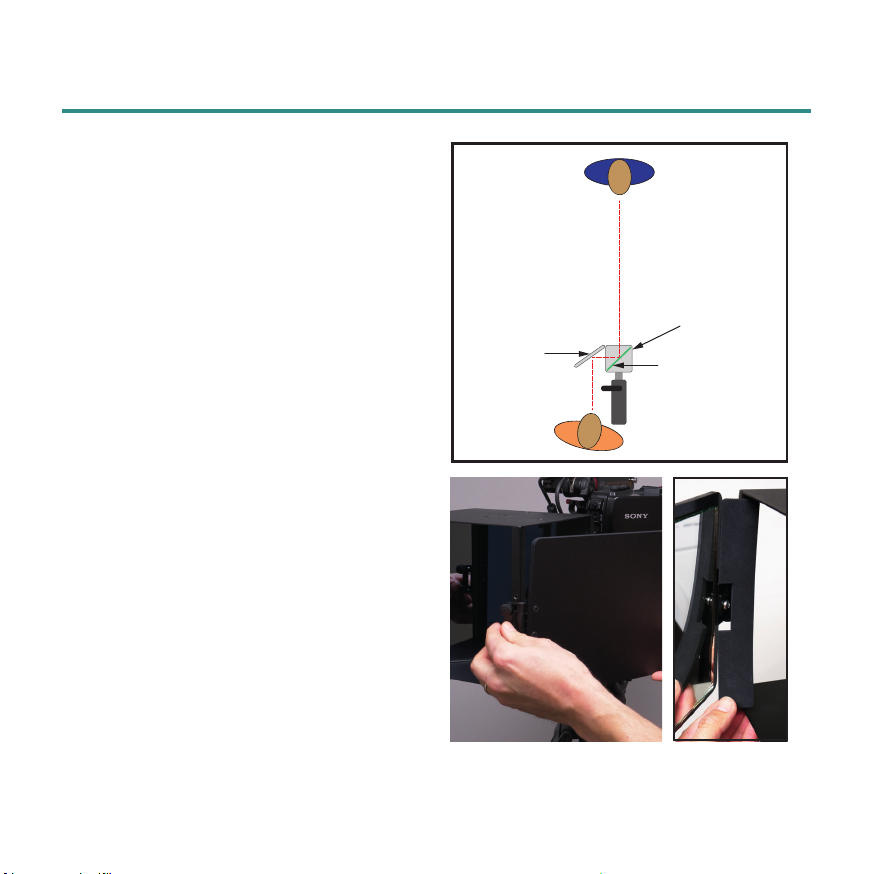
5.3. Interviewing while operating the camera
1. Fit the L-bracket so the two-way mirror is
positioned as shown in g 3.
2. Attach the side mirror to the main box using
the thumbscrews. See photo, bottom left.
3. Adjust the side mirror until the interviewer
and subject can see each other. (See next
chapter for details).
4. In some circumstances, the interviewer and
subject may see each other through the small
gap between the side mirror and main box.
This gap can be lled using the magnetic side
ag, if required. See photo, bottom right.
5. Positioning the interviewer
Main Box
Two-way Mirror
Side Mirror
Interviewer
Subject
Fig 3

11
5. Positioning the interviewer
5.4 Fourth position for the interviewer
1. Fit the L-bracket so the two way mirror is
positioned as shown in g 4.
2. Attach the side mirror to the main box using
the thumbscrews. See photo, bottom left.
3. Adjust the side mirror until the interviewer
and subject can see each other. (See next
chapter for details).
4. In some circumstances, the interviewer and
subject may see each other through the small
gap between the side mirror and main box.
This gap can be lled using the magnetic side
ag, if required. See photo, bottom right.
5.5 Lighting the interviewer
In most circumstances, the interviewer will be in
darkness and will need to be lit in order for the
subject to see the face of the interviewer properly.
This can be achieved by using a small camera top
light or similar.
Main Box
Two-way Mirror
Camera
Operator
Interviewer
Subject
Side Mirror
Fig 4

12
6. Filming the interview & tips for success
Filming the interview
1. With the main box positioned in front of the
lens and with the two-way mirror in place,
set the height of the camera lens to the same
eye level as the interviewer (as you would a
traditional off-camera interview).
2. Position the subject at a similar height to the
interviewer, if possible.
Tips for success
• The interviewer needs to be aware of their
position at all times during lming. The
subject and interviewer should always be
able to see the each other’s full face through
the mirror/s so that the eyes are positioned
over the lens (see photo, right). If either the
interviewer or subject deviate from this, it will
result in an undesirable off-camera eye-line.
• When congured without the side mirror, it is
recommended that a courtesy ag is placed
near the interviewer so that the subject does
not make direct eye contact off-camera. (See
chapter 5 for more details).
• When using outdoors (or indoors near large
or bright natural light sources), light can enter
the two-way mirror from the open side and
cause an undesirable contrast shift. This can
be reduced by repositioning the unit, using
ags or can be corrected in post production.
• Using outdoors on uneven terrain can result
in the subject and interviewer being at a
substantially different height to each other.
This will make it uncomfortable to make eye
contact through the VoxBox Pro®.
• The simplicity of the VoxBox Pro®relies
on mounting the unit to your 15mm rails. If
mounting to a lighting stand, it will be more
crucial that the interviewer and subject are at
the same height.
• Always remember to light the interviewer too.

13
7. Using the VoxBox Pro as a Teleprompter device
The VoxBox Pro®can very quickly be converted into
a Teleprompter or to conduct interviews using video
calling applications.
1. Attach the tablet holder to the main box
using the thumbscrew.
2. Loosen the thumbscrews on the two V-blocks
on the tablet holder.
3. Position your mobile phone or tablet in the
V-block grooves, re-adjust and tighten the
thumbscrews to clamp the device rmly.
Ensure the device cannot easily slide out of
the clamp.
There are many free and paid-for Teleprompter
software applications available. We recommend
applications with the following features:
• Flip mirrored text horizontally
• Text justication (recommended if using a
tablet larger than the two-way mirror)
For recommended applications, please check out our
website or social media feeds for latest news.

14
Warranty provisions for this product are listed below
• Guarantee this product for one year against defects in product and components, under normal
installation and usage to the nal customer who purchased from the manufacturer or outlet.
• During the warranty period, repair the defects using new or renovated parts without any charge, or
exchange the defective product with a new product or a product which has been manufactured by
new or refurbished components and is functionally equivalent to the normal product.
Inapplicable Warranty
• Expired warranty period.
• Breakage or damage caused by inappropriate usage, repair, maintenance and accident
• Installation and removal with improper external equipment or improper usage.
• Fall and external shock.
• Exposure to the extreme environment of abnormal temperature, a solvent, an acid, ood and
humidity.
• External damage such as scratch, dent and breakage.
• Disrepair and damage caused by installation, repair, improvement, addition, disassembly by
unauthorised persons.
• Modied, replaced, removed information identifying the original product.
• Absence of valid proof of purchase.
8. Warranty
15
9. Support and parts
For the fastest response to support queries, please
contact us via our website:
www.voxbox.pro
Manufactured in the UK by
PrimeLight Design is a trading style of
PrimeLight Films Ltd.
Registered in England & Wales: 06036110.
Ilkley, LS29 9JB, United Kingdom.
Patent Pending. “VoxBox Pro®” is a registered
trademark of PrimeLight Films Ltd.
Design

Version 3.1. Images and text © 2019 PrimeLight Films Ltd.
Table of contents


