Prio AVANTGARDE SDX Series User manual

USER'S GUIDE
SDX600, SDX_____
AVANTGARDE

Before operating this appliance,
please read the instructions careful-
ly. You may want to save this guide
for your future reference. Failure to
follow the instructions or meet the
operating requirements may lead
to the product’s failure, malfunction,
property damage or personal injury.
Safety Warning
■Plug the appliance into an electri-
cal outlet only aer you nish the
installation.
■Check if the voltage indicated on
the appliance corresponds to the
local mains voltage before you
connect the appliance.
■Do not use the appliance if it is
damaged in any way. Take it to
an authorized service center for
repair.
■Do not open the appliance. There
are no serviceable parts inside.
■When unplugging the appliance
from the mains, do not pull on
the power cord. Avoid touching
the plug with wet hands.
■Do not place any items on the
appliance. Do not place it near
the sources of heat, radiators,
etc. Do not place it in a tightly
closed space where it may over-
heat.
■Keep the appliance out of reach
of pets or other animals.
■In case of leakage malfunction or
water presence around the appli-
ance shut o the electrical power
to the circuit rst, then pull the
plug out of the electrical outlet.
■Remove the plug from the elec-
trical outlet and shut o the inlet
valve during your vacations or
other extended periods of time
when the appliance is not in use.
■Unplug the appliance from the
electrical outlet while servicing
it, and changing the membrane
or lters.
■Do not use the appliance if oper-
ating requirements such as wa-
ter temperature/water pressure/
electrical supply, etc. are not met.
There may be other local regula-
tions to comply with.
■Do not use the appliance with
water that is microbiological-
ly unsafe or of unknown quality
without adequate disinfection be-
fore or aer the system.
■The appliance was not designed
to be used with power cord ex-
tenders, power lters, external
transformers, outlet splitters, etc.
■Do not use the waste water pro-
duced by the appliance for drink-
ing or cooking.
■Never store or operate the appli-
ance in direct sunlight.
■This appliance is not intend-
ed for use by persons (including
children) with reduced physical,
sensory or mental capabilities,
or lack of experience and knowl-
edge, unless they have been
given supervision or instruction
concerning use of the appliance
by a person responsible for their
safety.
■Children should be supervised to
ensure that they do not play with
the appliance.
■At the end of its life, the appli-
ance should be disposed o in
anappropriate manner.
Disposal
Old appliances still contain many
recyclable materials. Therefore,
please take used unit to your retail-
er or recycling center so that it can
be recycled.
Warranty
1 year limited warranty. Please see
the warranty sheet for details.

Description Specication
■Supply water pressure: 7.25-48
psi (0.05-0.4 MPa)
■Maximum supply water
pressure: 192 psi (1.6 MPa)
short-term
■Supply water temperature: 41-95
°F (5-35 °C)
■ Ambient air temperature: 41-105
°F (5-40.5 °C)
■Water source: tap water supply,
chlorinated or non-chlorinated,
bacteriologically safe
■Maximum supply water TDS:
1000 ppm
■Filtered water production rating:
600 gpd (2270 lpd) without
bypass
■ Filtered water delivery rate,
typical: 0.40-0.53 gpm (1 5-2.0 l/
min)
■Membrane rejection rate1, typical:
95%
■Recovery rate (system
eciency2), typical: 65%
■Drain water ow restrictor: 800
cc (ml/min) nominal, up to 900
cc in working mode, open ow in
ush mode.
■Auto-ush duration: 15±5% s,
manual ush duration: 30±5% s
■Idling protection: 60 minutes
■Indoor use only
■Electrical input: AC 100-240V
50/60 Hz
Ready Filtration Auto-ush - 15 s every 4 gal
(15 l) of permeate
Idling protection - over 60 min
continious work
Leak protection
Select (-)
Flush (—)
Reset (—)
1 Mode 2
Select (-)
Flush (—)
Reset (—) Select (-)
Flush (—)
Reset (—)
S ect (-)
Reset (—)
S ect ( )
F s ( )
s ( )
1 Mode 2 1 Mode 2
2
Select (-)
Flush (—)
Reset (—) Select (-)
Flush (—)
Reset (—)
1 Mode 2 1 Mode 2
u (
(
us (—
ect (-
eset
Select (-)
Flush (—)
Reset (—) Select (-)
Flush (—)
Reset (—)
sh ( )
e t ) le t )
u h (
1 Mode
1 Mode 2 1 Mode 2 1
Select (-)
Flush (—)
Reset (—)
1 Mode 2
Hold Flush for 30 s for
manual ush
Filter 1 life is less than 10% Filter 1 life is out
1For all dissolved solids combined as measured by TDS or conductivity meter.
2 Eciency rating means the percentage of the inuent water to the system that is available to the user
as reverse osmosis treated water under operating conditions that approximate typical daily usage.

5
220v
2
3
6
7
8
1
4
Connections
Package contents
1. Filtration unit
2. Power adapter
3. Faucet
4. Adapter ball valve
5. Drain saddle
6. Bypass connection kit
7. Tubing: 3/8" – 10 / 3 m,
1/4" – 16 / 5 m
8. Union check valve
9. Wrench
10.User’s guide
24V DC (2)
Waste (5)
Bypass (6)
Inlet (4)
Faucet (3)
A
B
C
D
E
F
G
H
I
J
K
Faucet mounting chart
A. faucet
B. top washer
C. sealing
D. counter
E. spacer
F. washer
G. nut
H. tube insert
I. collar
J. nut
K. tubing
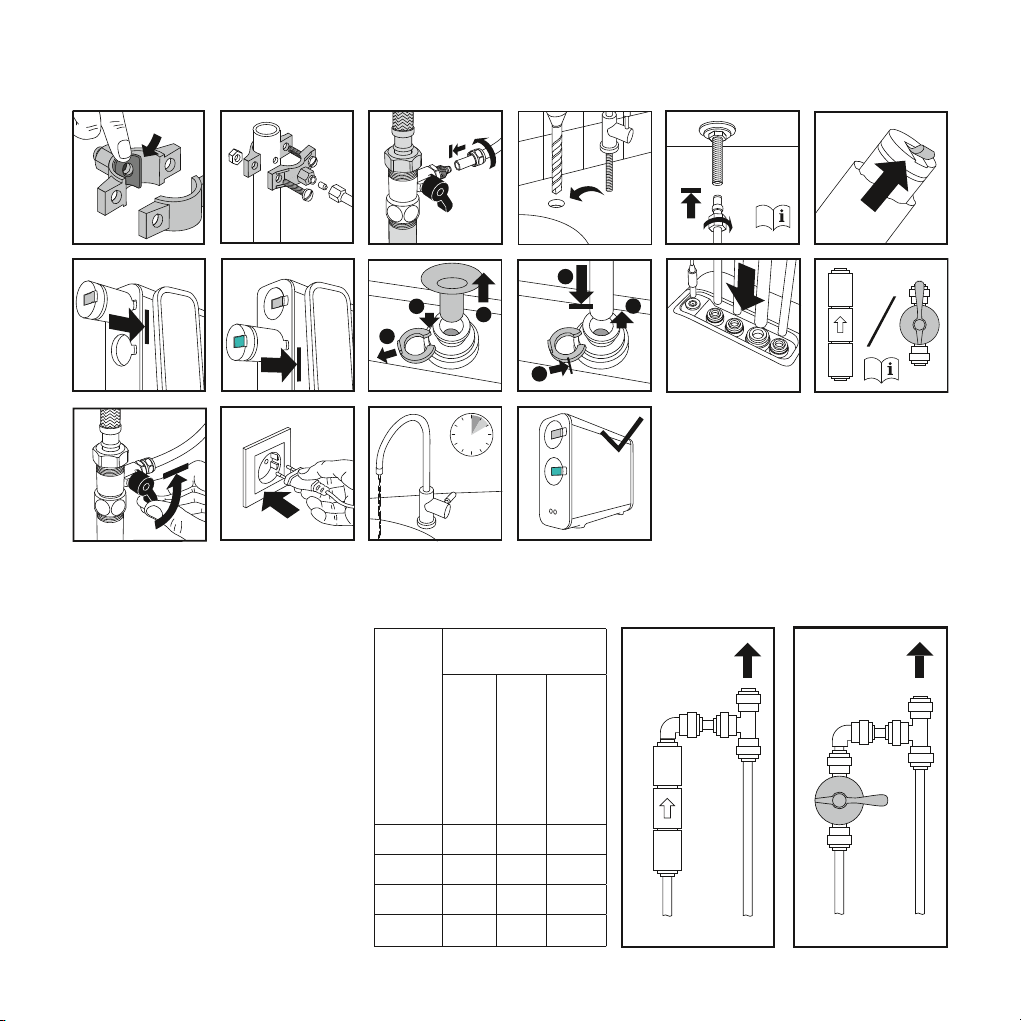
Installation
5-10 min
24V Waste Bypass Inlet Faucet
Pre-filter
R.O.
4
5
6
1
3
2
Bypass
This reverse osmosis water ltra-
tion system allows you to nely tune
ltered water TDS according to sup-
ply water quality and your person-
al preferences. Use supplied bypass
connection kit, for installation refer
to mentioned charts. To choose pre-
ferred option refer to the table. Take
all data as a recommendation only,
real numbers depends on multiple
conditions as supply water contents,
pressure and temperature, lter’s and
membrane’s life, etc.
Supply water TDS, ppm
Filtered water TDS, ppm
Without bypass
Bypass 150 cc
Bypass 300 cc
200 10 27 42
300 15 41 63
400 20 55 83
500 25 68 104
With bypass: Without bypass:
FaucetBypass
To faucet
150 /300
... s
t
d
)
1
Byp s
FaucetBypass
To faucet
Fl
)
ese

Stage Type Capacity Model No. Link
1 Pre-lter: sediment + carbon block ~4000 gal / 15000 l or 1 year K820
2 R.O. Membrane ~13200 gal / 50000 l of
permeate or 4 years K852
To change lter or membrane
Filter and membrane changing
e
... 5 s
6
6
Select (-)
Flush (—)
Reset (—)
1 Mode 2
Select (-)
Flush (—)
Reset (—)
1 Mode 2
Select (-)
Flush (—)
Reset (—)
1 Mode 2
Select (-)
Flush (—)
Reset (—)
1 Mode 2
Filter's life counter reset
Filter 2 life is out Hold Reset
to enter the
reset mode
Press Select to
choose the lter
Hold Reset
to update
the counter

Attention notes
■Aer initial installation
or changing the lters or
membrane, air contained in the
new dry system or lter may go
out sometimes producing foamy,
white ltered water. Water may
look white due to tiny air bubbles
in it. If you leave the water to
stand for few minutes all bubbles
will surface and eliminate. Such
aerated water is clean and safe.
Gradually over the coming days
all air inside your system will nd
its way out. To make this process
faster you may repeat the initial
washing procedure until you’re
pleased with the result. Also note
that if for some reason the water
supply contains a lot of dispersed
air, your R.O. system may start
producing aerated water again.
The system’s internal pipes and
components never take air from
outside as they are completely
air and water sealed and leak-
free.
■R.O. membrane needs up to 50
hours of active operation before
reaching peak performance in
terms of water ow, recovery
and rejection rates.
■Failure to replace the
disposable lters & membrane
at recommended intervals
may lead to reduced system
performance and cracks in the
lter housings, causing water
leakage or ooding.
■Please note the capacity of the
lters and membrane is limited.
Their service life depends on
the degree of contamination of
the water supply and system
usage. All terms apply to
normal household use. Actual
performance may vary. You
may need to change lters or
the mem- brane sooner than
indicated if you notice chlorine
or other tastes or smells, etc.
Manufacturer recommends a
TDS test every six months.
■To prevent leakage or cracks and
ensure the safety of operation
and top performance do not
disassemble the lters or try to
regenerate them.
Tips
■You may install the optional
union tee tting to the tubing line
prior to the ltered water faucet
to get another line of clean water
going to the other point-of-use
(such as a sink in a bathroom or
ice maker in your fridge).
■Operating the system using
soened feed water greatly
reduces the chances of
membrane failure and prolongs
lters and membrane service life.
■If you want to use a storage
tank for some reasons, you can
connect it to the ltered water
line between “faucet” outlet of
ltration unit and the faucet with
optional tee tting. Appliance will
work great with a tank and you
don’t need to change anything
in the system. Drain full tank
aer rst rell. Shut o the tank
valve during the initial washing
procedure.

www.prio.pro
Copyright © 2023 DWT Deutsche Wassertechnologien GmbH. Rev. 0323.
This manual suits for next models
1
Table of contents
Other Prio Water Filtration System manuals


Popular Water Filtration System manuals by other brands

resideo
resideo FF40 installation instructions

Litree
Litree LUSA1-1C user manual

Hayward
Hayward Salt & Swim 3C owner's manual

Abocom
Abocom Powerline Filter for PLC Communication... Specification sheet

HYDAC International
HYDAC International RFD Series Service and Parts

Brita
Brita mypure SLIM V-MF Instructions for use


NOVO WATER
NOVO WATER 485 SIMTAN owner's manual

Hidro-Water
Hidro-Water XENA 10.1 User& installer's manual

Morton
Morton MCWF Installation and operation manual

Moen
Moen MicroTech 9000 Replacement instructions

WCC
WCC PS-5 Series manual

Clean Water Systems
Clean Water Systems Upflow Carbon Series Installation & start?up guide