Prism Medical UK Mackworth M80 User manual
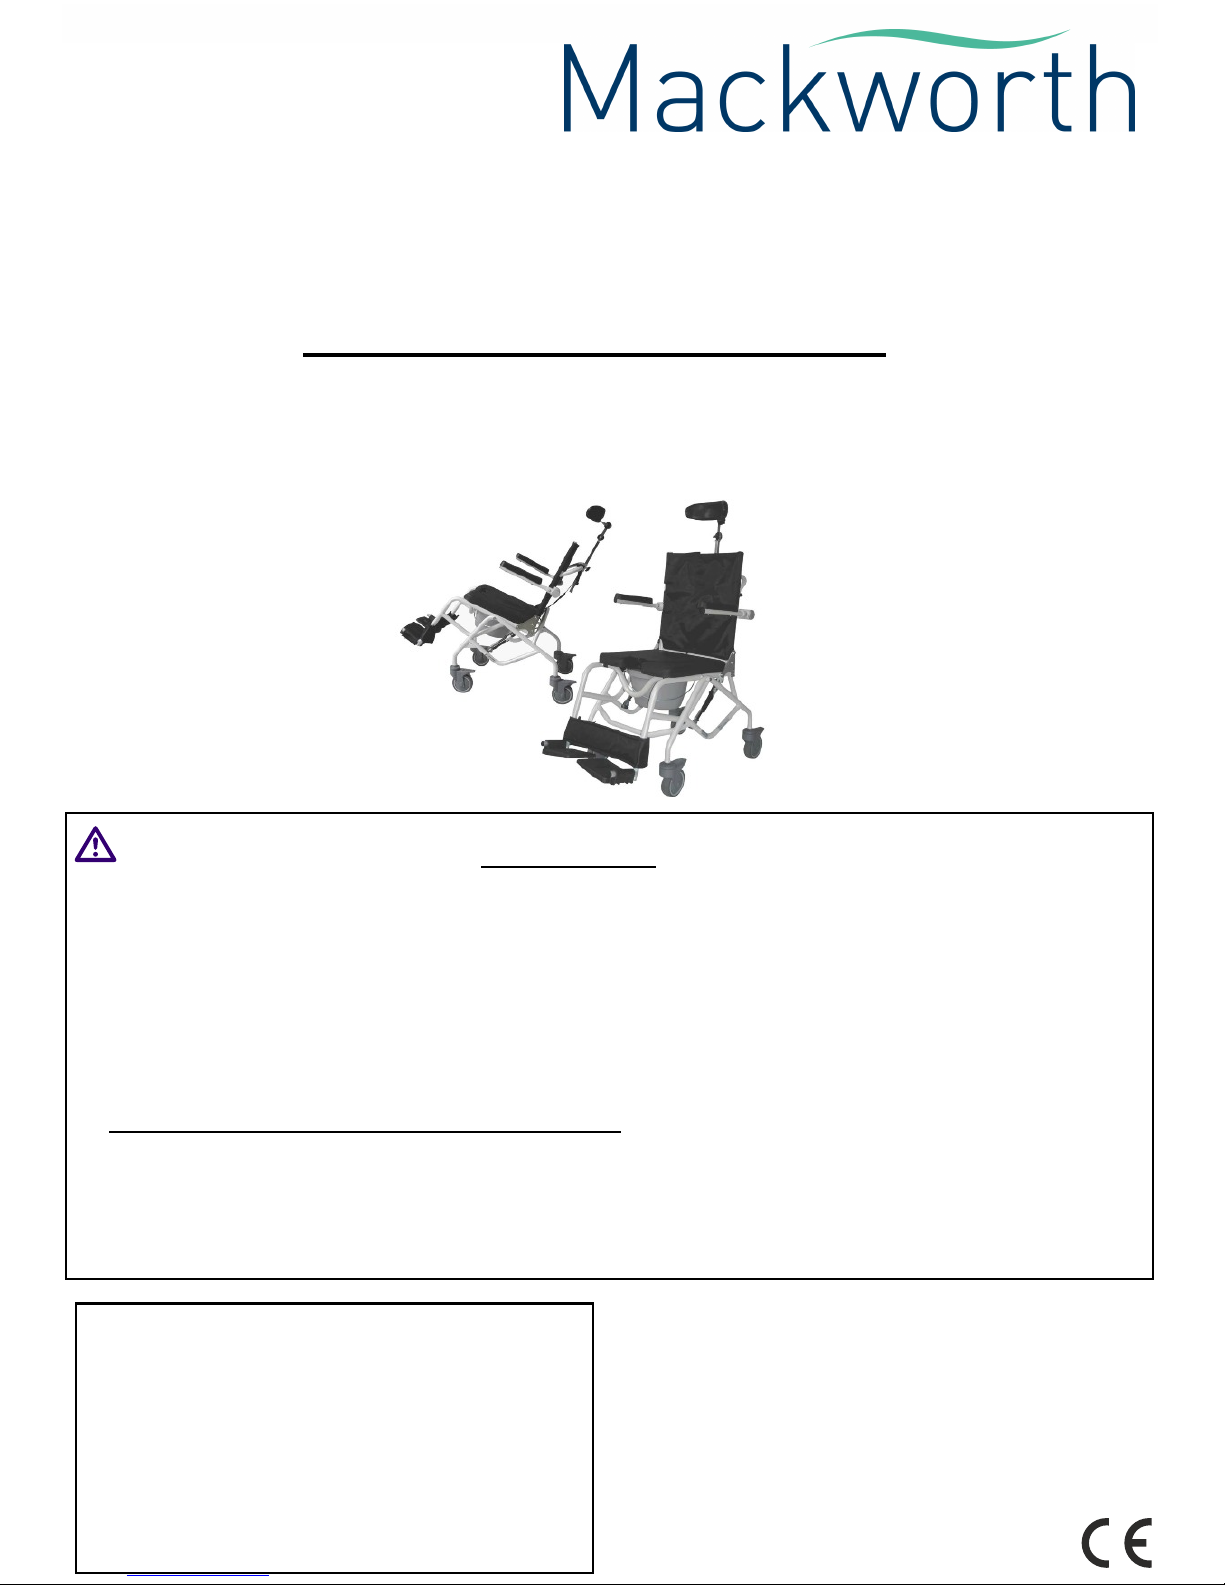
MACKWORTH M80™
TILT-IN-SPACE SHOWER/COMMODE CHAIR
USER GUIDE
PRIOR TO USE
Please ensure that these User Instructions are read prior to first use of any moving and handling practice. Prism
Medical UK recommend that prior to using any transfer equipment, a full risk assessment must be completed by a
qualified professional, in order to determine that the correct equipment, positioning and transfer procedure is suitable
for each individual.
●Ensure you are aware of the chair manufacturer's fitting instructions.
●Inspect the chair for wear and damage, with particular attention being paid to the frame, seat and wheels.
Be Aware of LOLER 1998 - (Lifting Operation and Lifting Equipment). For further information please visit:
www.hse.gov.uk/work-equipment-machinery/loler.htm
●Please ensure the arm rests and foot rests are fastened securely. Please test the brakes to ensure they are
functioning properly, before the patient is seated in the chair.
●If following inspection, there is any doubt (points 1-3), the chair should be placed aside and not used.
Your contact :
User Manual - M80 Shower/Commode Chair V1.0 April 2015

Page No. Information
3. Welcome & Warranty Terms
4. Illustration of Key Parts
5. Introduction to the Chair
6-9. Chair Assembly Instructions
10-13. Fitting Instructions
14. Chair Safety Advice
15-16. Maintenance & Cleaning
17. Maintenance Log
18. Technical Specifications
19. Spare Parts Listing
20. Company Details & Contact Information
CONTENTS
2

WARRANTY TERMS
WELCOME
Congratulations on your purchase.
Prism Medical UK are proud that you have purchased our high quality tilt-in-space shower/
commode chairs. This product has been manufactured to the highest standards to ensure
optimum product strength and performance as an assistive aid.
3
1.Prism Medical UK warrants this product against any defects in manufacturing and assembly of
mechanical and component parts. This warranty is for devices used only in accordance with
our terms of use.
This warranty, whose terms of use are defined below, is valid for the following:-
*1 year only - extended warranties are available upon request.
2.The warranty entitles free replacement for defective parts only, exclusive of labour .
3.Prism Medical UK will bourne all return costs if the warranty claim is valid after a full
investigation. Additional information may be required to support such a claim.
4.Out of warranty items - The return costs will be bourne by the customer and the repair will
be priced and a purchase order will be required prior to the work commencing.
5.The warranty does not apply if the claims are consecutive to:-
* Accident, misuse or neglect of the unit by the end user / customer.
* Shipping performed without suitable packaging / protection.
* Alteration or transformation of the original design.
* The impact of external elements (Natural Disasters, Fire, Humidity, Floods Etc)
* Lack of routine maintenance / care inline with our daily checks / the information within
this user guide.
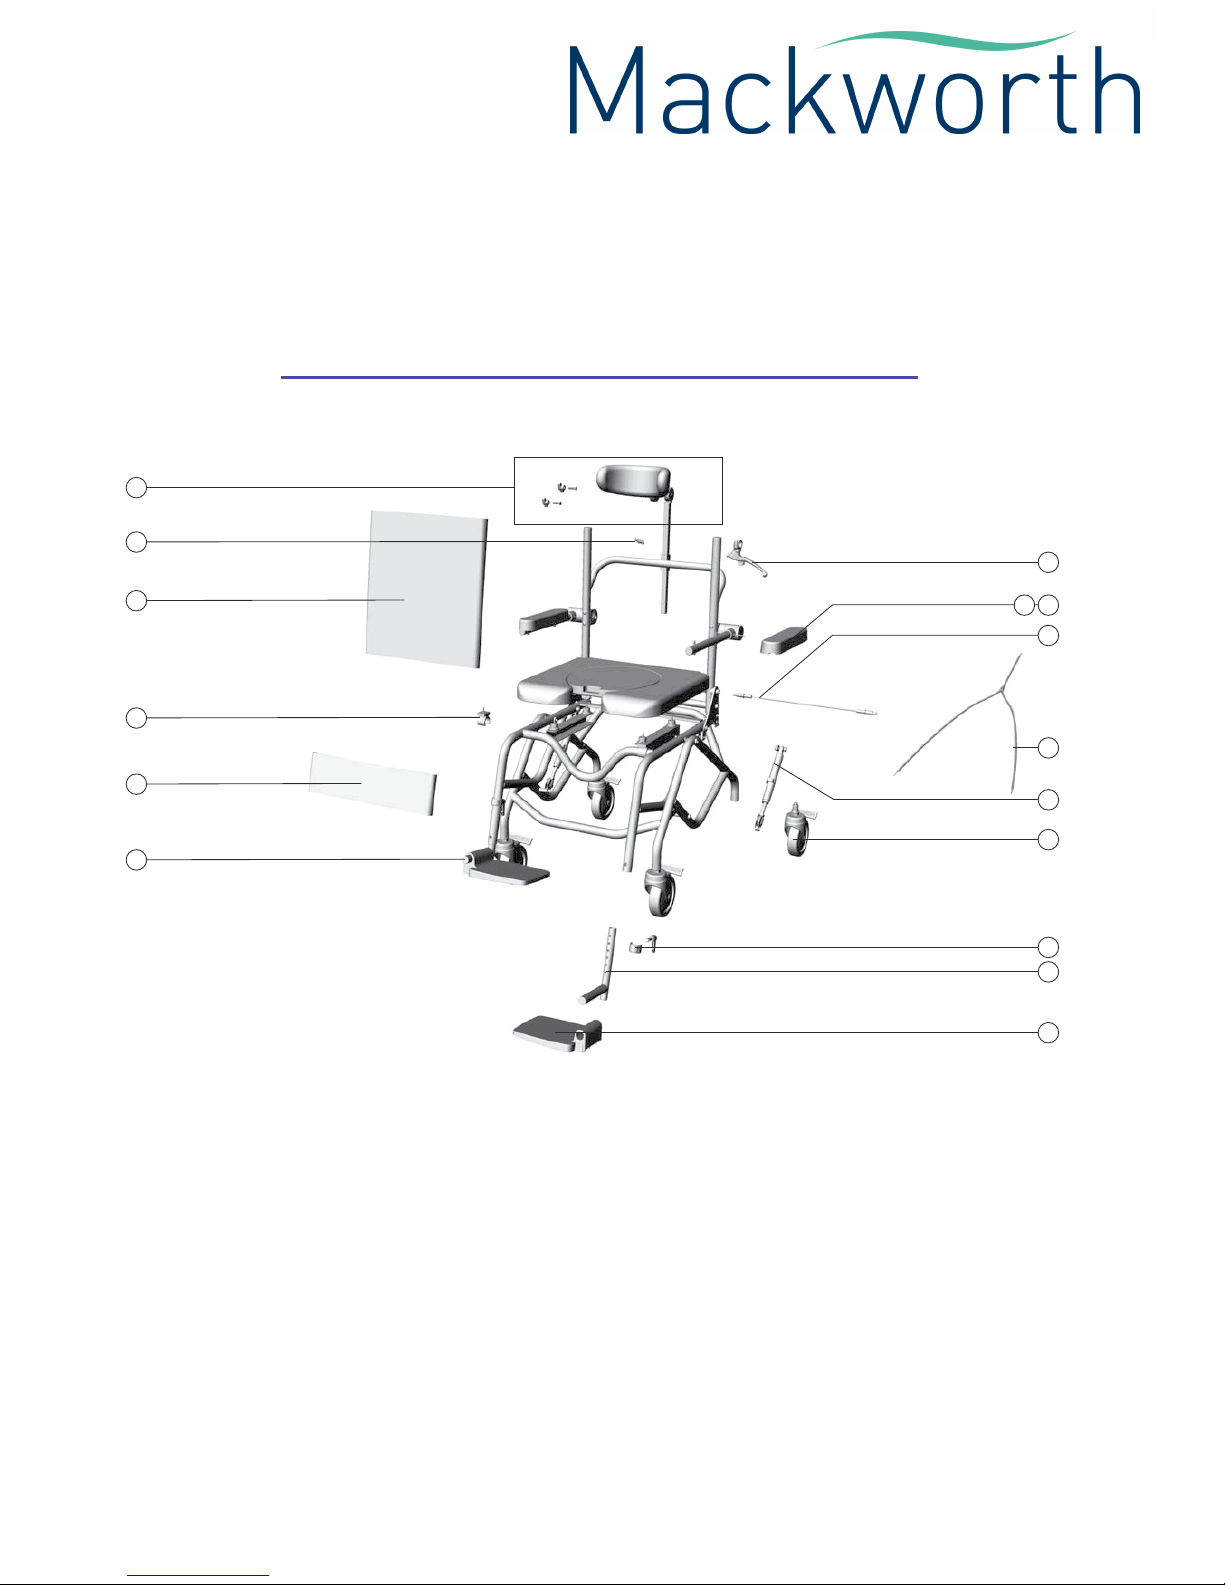
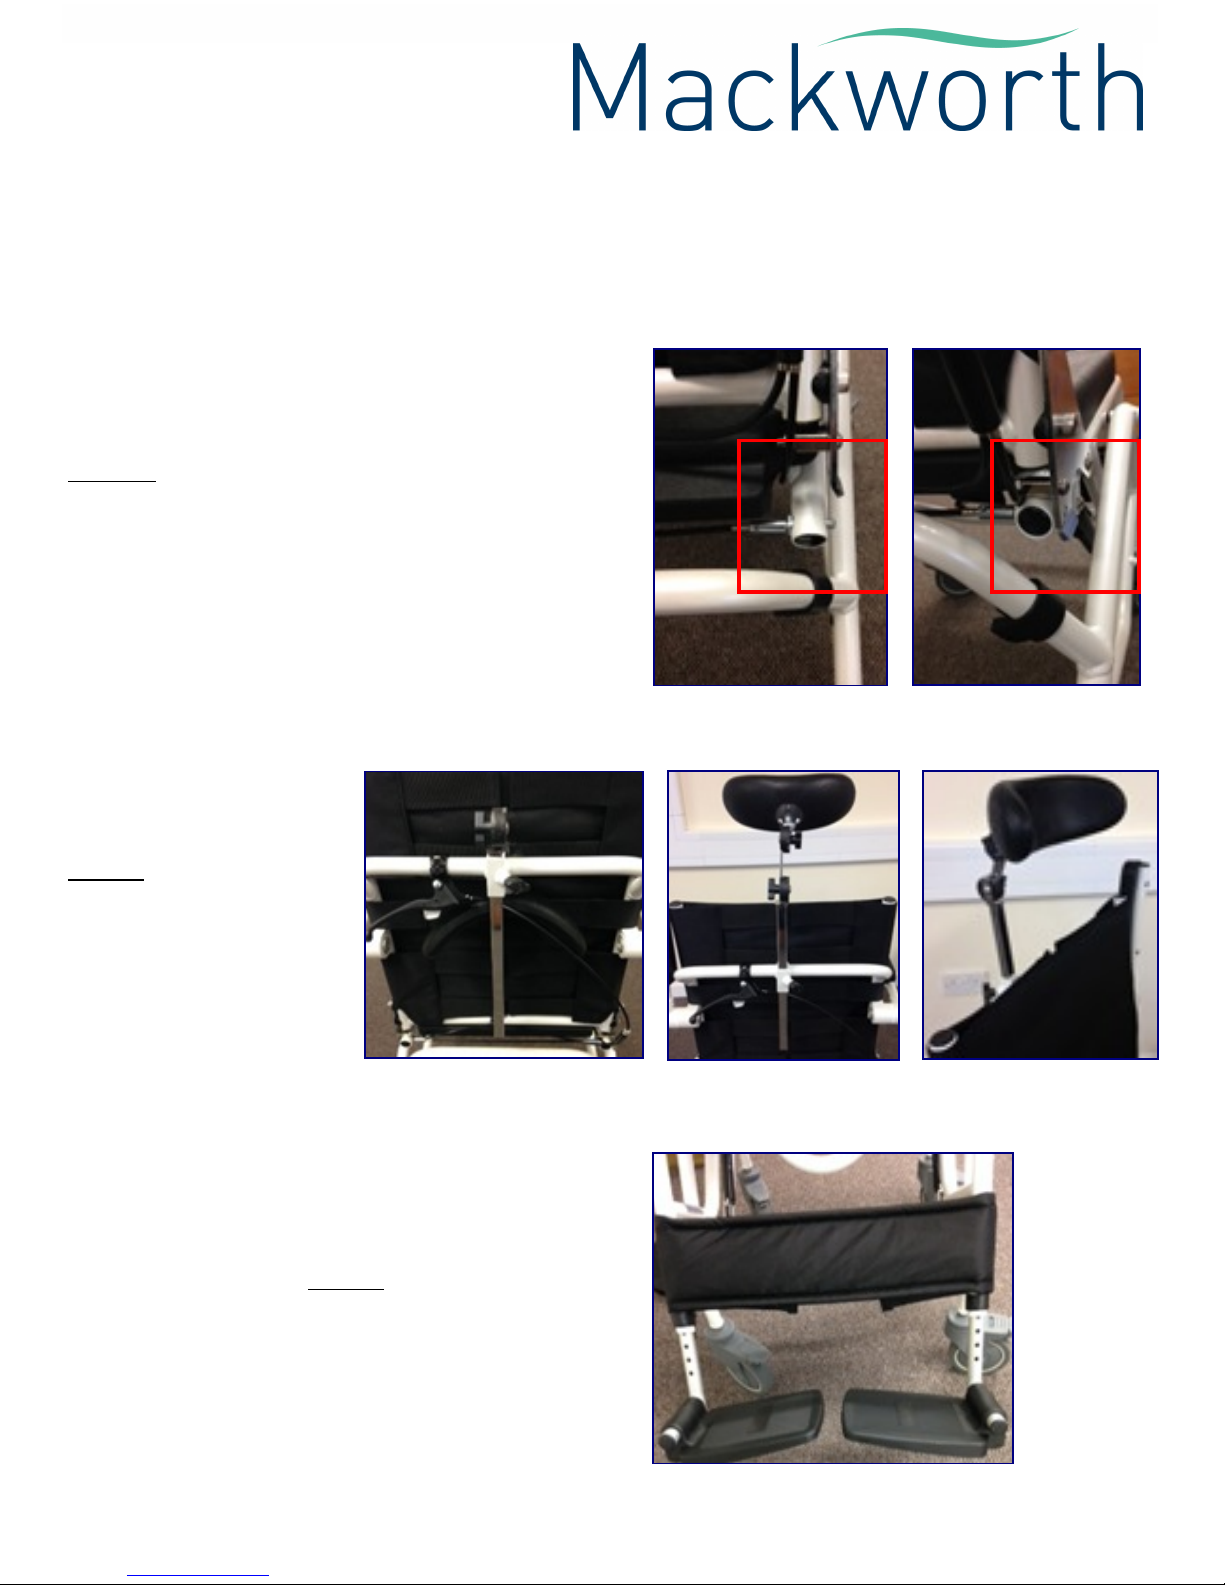
ILLUSTRATION OF KEY PARTS
4
8
5
6
10
3
4
9
7
1
2
16
12
17
1413
15
1. Leg Support 10. Calf Strap
2. Footrest 11. Complete Seat with Bracket
3. Cable Set for Unlocking the Back 12. Back Upholstery
4. Cable Set for Seat Tilt 13. Right Armrest Pad
5. Wing Nut with Screw for Headrest Adjustment 14. Left Armrest Pad
6. Retaining Clip for Seat Plate 15. Gas Spring
7. Clamping Lever for Head Support 16. Release Lever for Seat Tilt
8. Headrest Set 17. End Plug for Leg Support Base
9. Rear Castor with Brake

The Tilt-in-Space shower/commode chair will arrive to you in a robust box and requires full
assembly. Please be careful when removing the parts from the box. The assembly process may
require two people.
Please read the User Guide in full BEFORE assembling and using.
All staff/carers should read this guide as a basis to ensure safe and secure use of the
shower/commode chair.
This User Guide contains information for the assembly,handling, use, care and maintenance of the
product.
Please keep this User Guide safe for future reference.
INTENDED USE
The shower/commode chair is an assistive product designed for use to aid toileting
and bathing procedures, in both the home and healthcare environments. Do NOT use
it, or allow it to be used for any other purpose.
The M80 chair is suitable for those with:
●Severe walking disability
●Paralysis
●Loss of limbs
●Other physical impairments.
It is not suitable for those with:
•Inability to sit properly
• Perception disorders
• Disturbance of equilibrium
Please ensure a risk assessment is carried out before using this equipment if
necessary.
INTRODUCTION
5
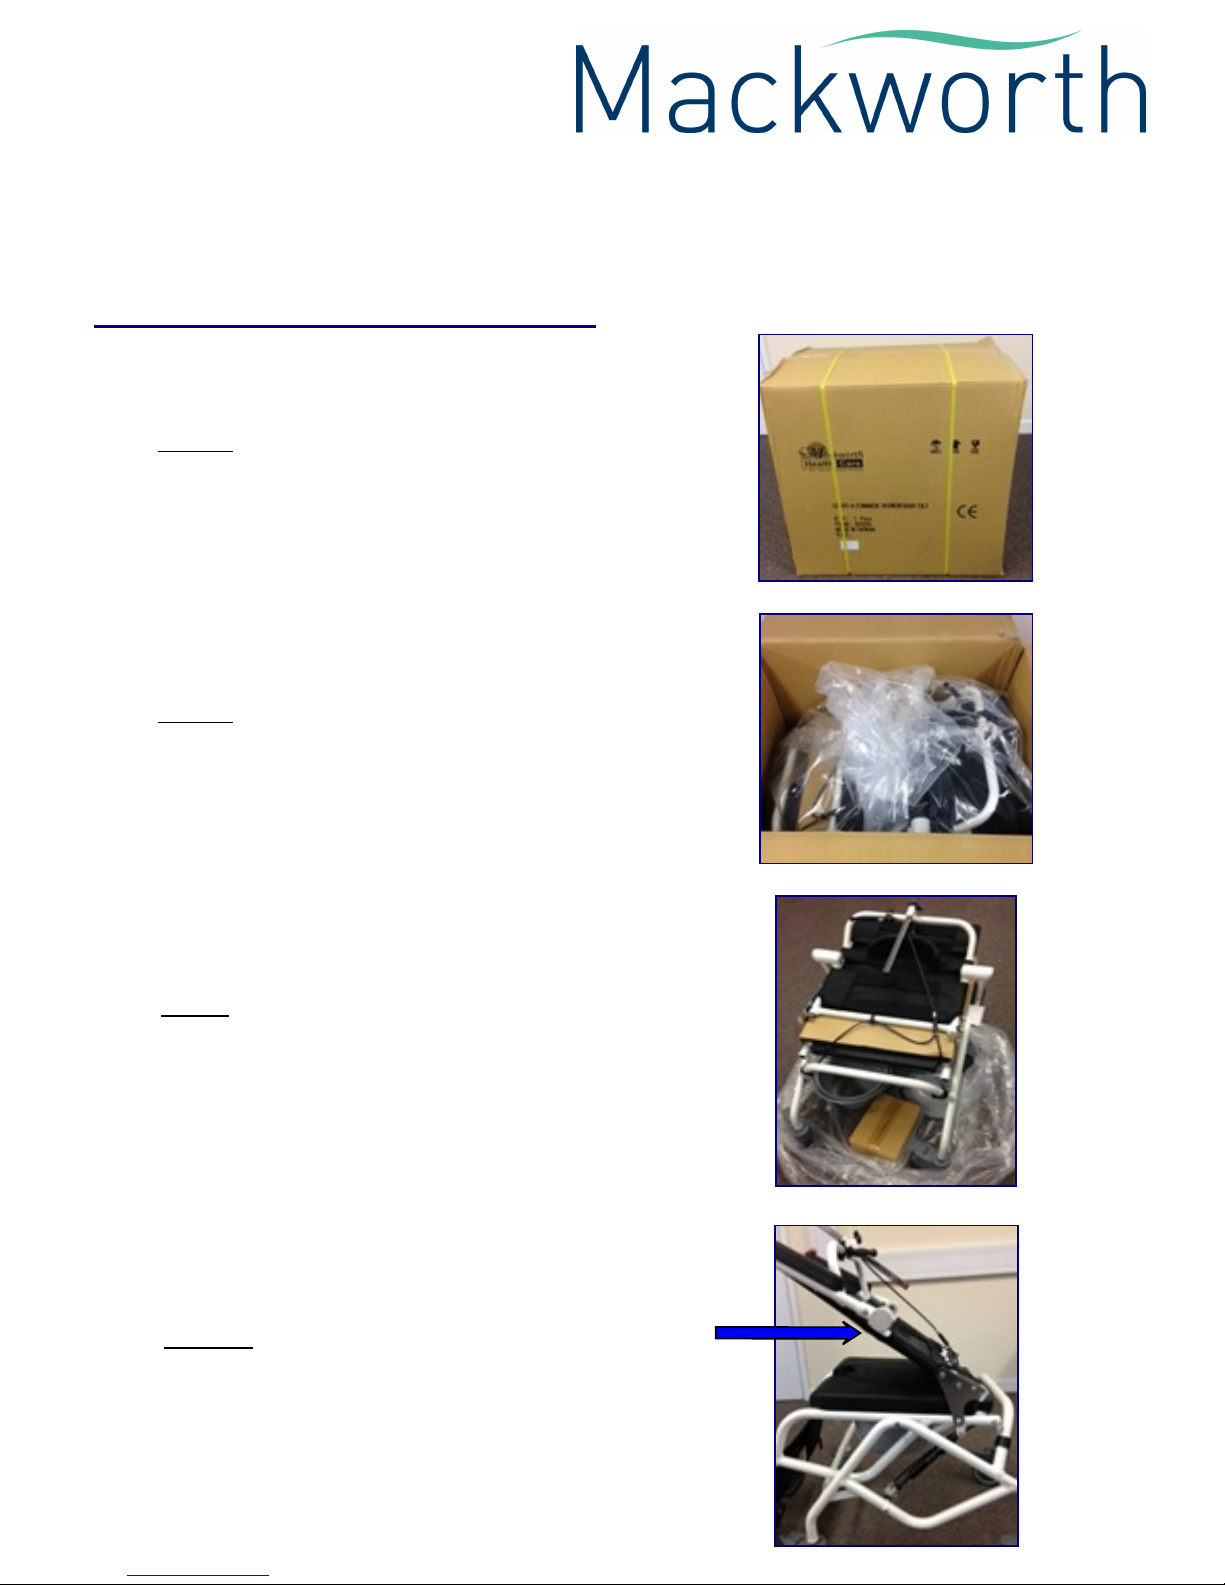
Carefully open the box (SAFETY NOTICE - Do not use a sharp knife / edge) remove all loose
parts/excess packaging from the carton.
The Chair Carton Contains:-
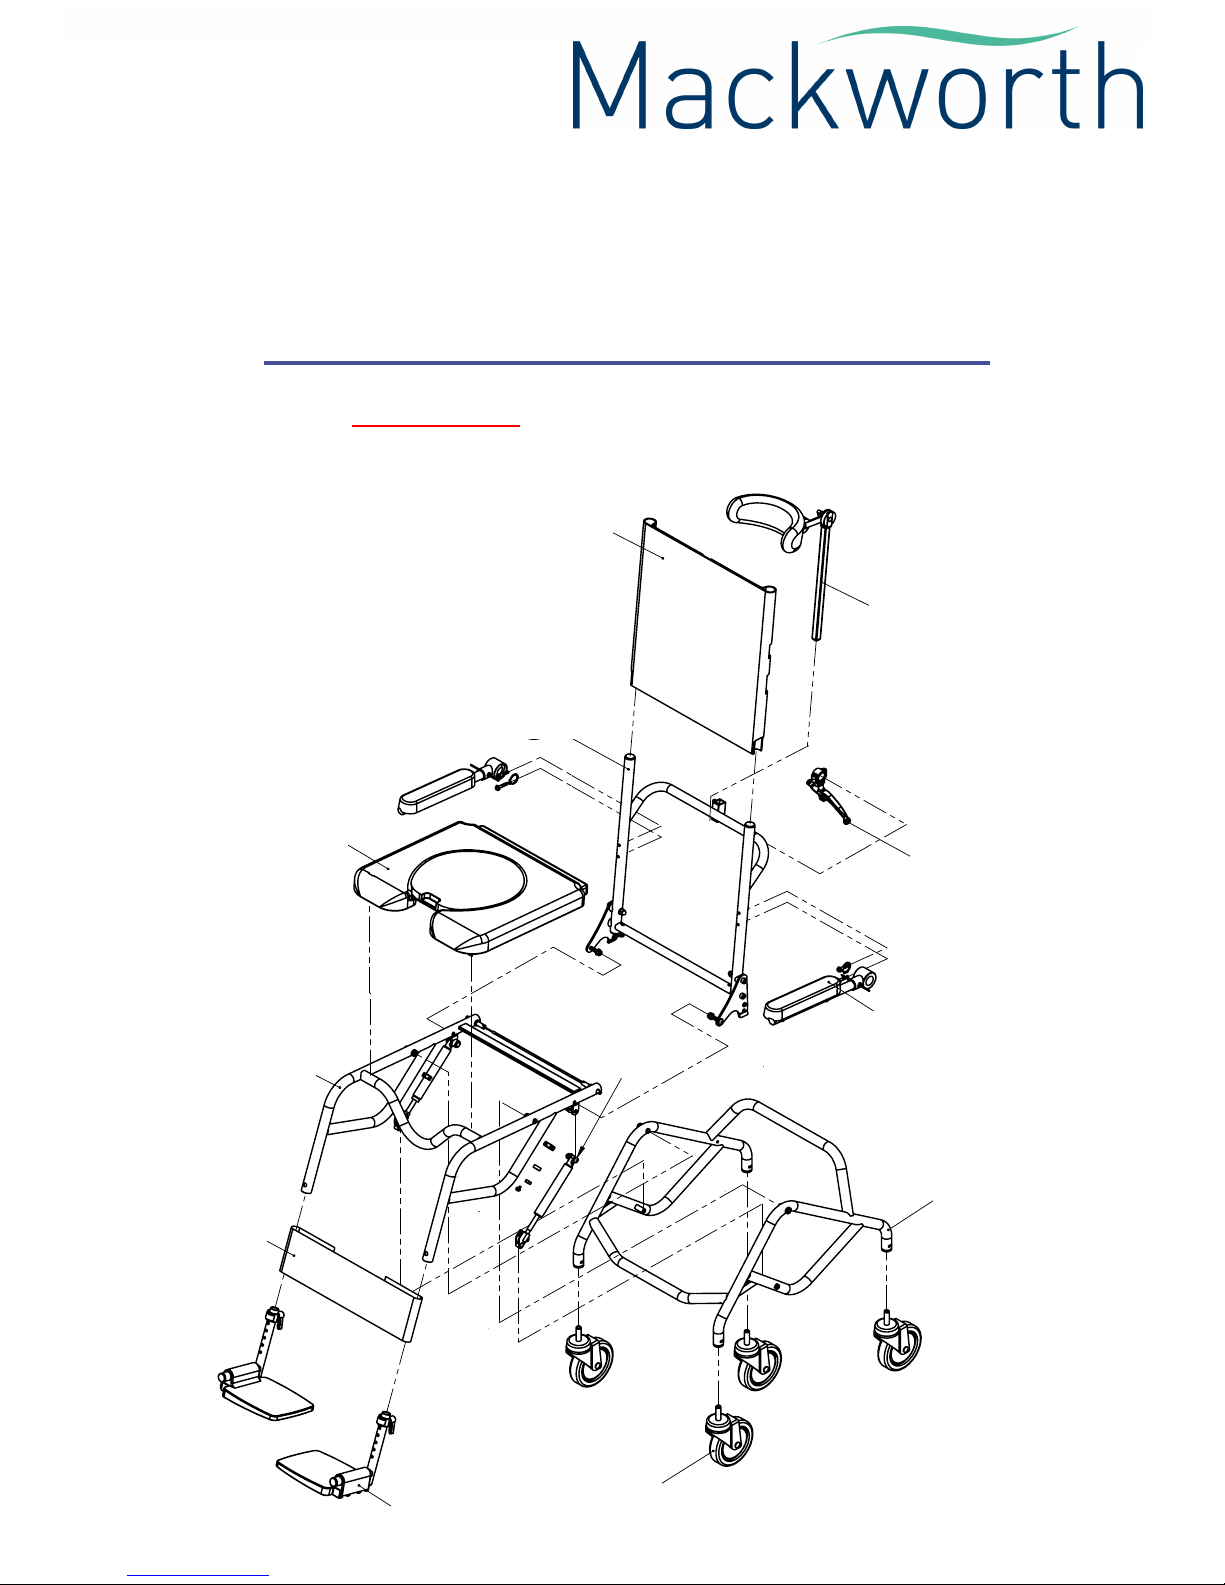
CHAIR ASSEMBLY INSTRUCTIONS
6
02
16
09
15
11
07
16
13
04
00
16
11
Back Upholstery
Headrest Set
Hand Brake
Backrest
PU Seat Pad
Armrest
Gas Spring
Seat Frame
Seat Frame
Calf Strap
Footrest 5” Wheel
Base Frame
Assembly Instructions
7
Step 1. Carefully cut the banding and open the box.
Step 2. Carefully remove the chair from the box.
Step 3. Remove outer bag and all other packaging,
retain bowl and footrest box.
Step 4.1 Gently push the seat back into position.
Step 4.2 Ensure the pins locate into the brackets, on
both sides of the chair.
Step 5. Position the
headrest to the required
height and angle. Tighten
the handle to lock the
headrest in position.
Step 6. Attach the footrests.
8
Step 6. 1 Remove black screw and bracket.
Step 6. 2 Insert footrest and adjust height
accordingly. Replace screw and bracket.
Step 6. 3 Ensure black screw is not protruding out,
you can pull and turn to adjust the position.
Step 7. Insert the round bowl. Ensure not to trap the
cable when inserting and removing the bowl.
9
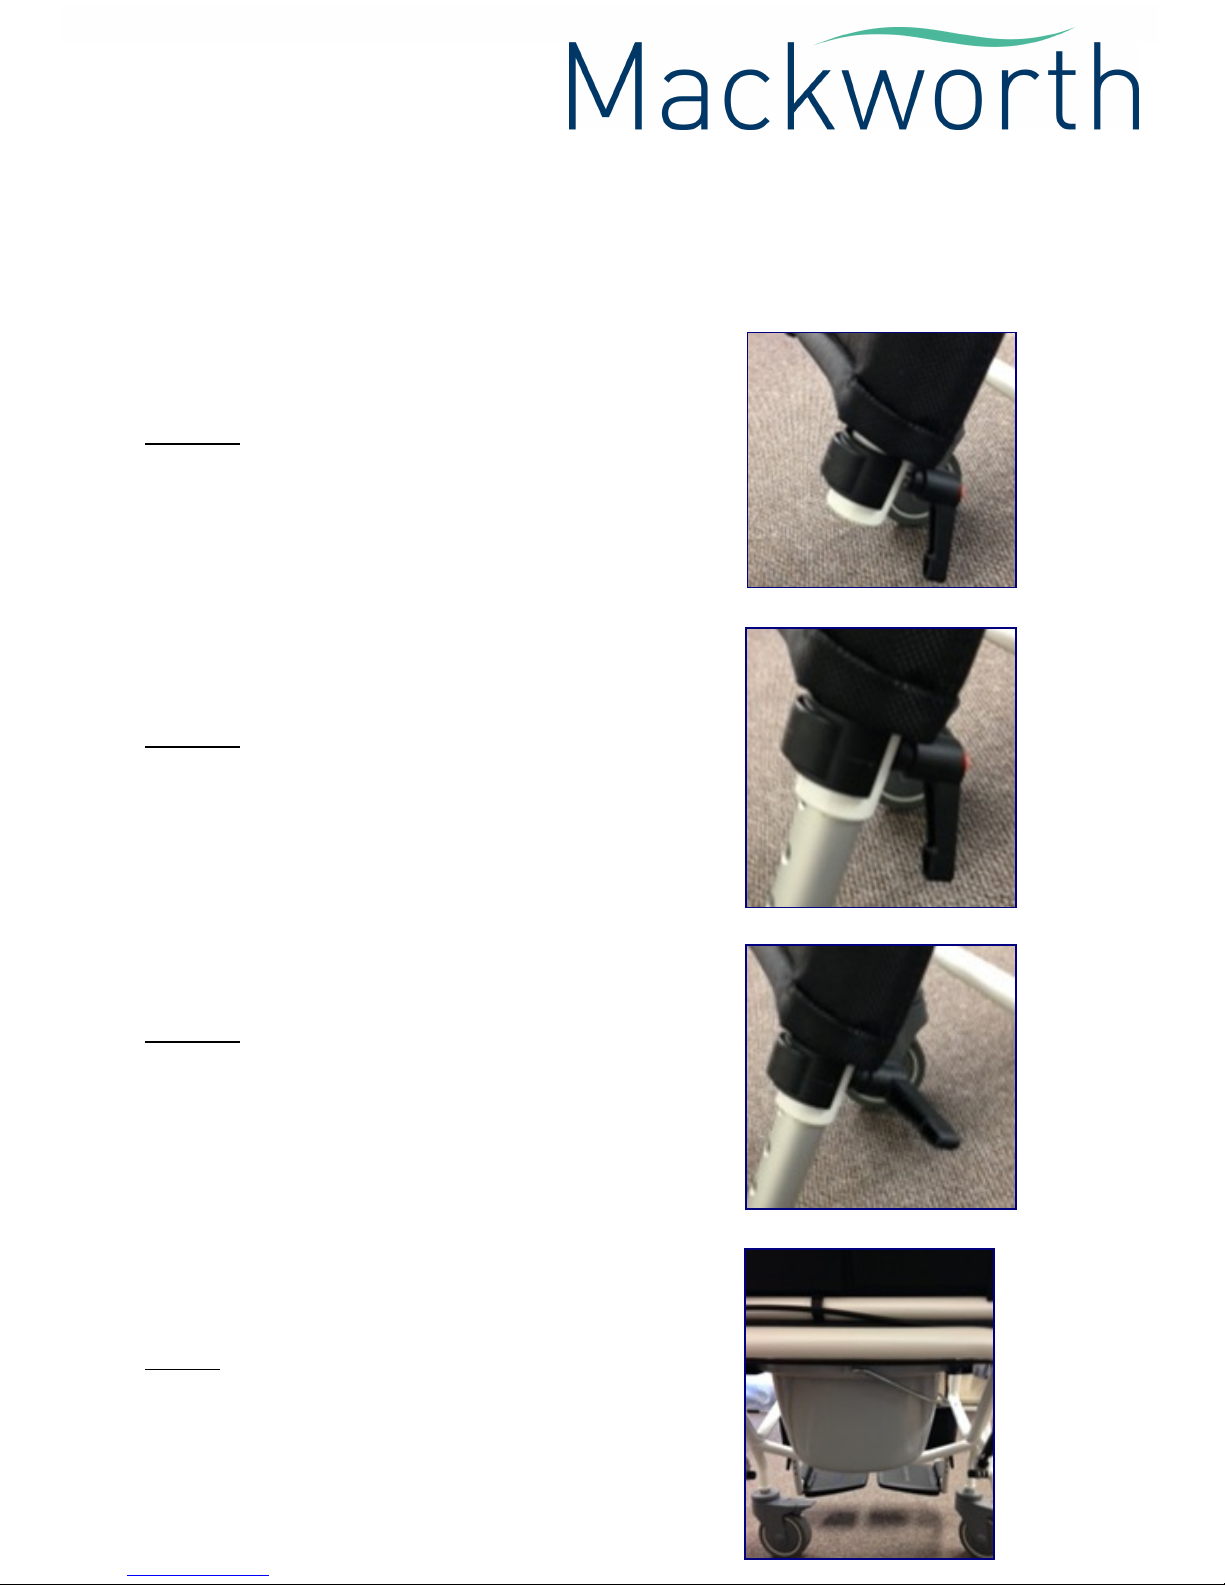
Fitting Instructions
Attaching the Backrest
1. Attach the back upholstery using the Velcro® fasteners.
2. Tighten according to the patient’s requirements.
3. Simply undo the Velcro® fasteners to loosen the
backrest.
Attaching the Seat Pad
1. Slide the seat cover under the strut of the backrest.
2. Press the front seat cover down, as shown in Arrow 2.
3.To dismantle simply reverse the procedure.
Be careful when installing the Seat Pad not to trap
your fingers.
10
Positioning the Footrest
1. Simply fold the footrests down until the desired position is
achieved to provide a comfortable seating platform for the patient.
Raising the Footrests
1. Fold the footrests for ease of
entry/exit for the patient.

11
Positioning the Calf Strap
1. Simply attach the Calf Strap with the Velcro® fasteners to
the desired position.
Adjusting the Leg Length
1. The patients legs should be in a horizontal position with their
Feet resting flat on the footrests.
2. To adjust, simply turn the lever and remove the mounting clip.
3. Set the required leg support length and re-insert the clip once
the desired height is reached.
4. Turn the lever to fasten it securely.
Adjusting the Armrests
1. Simply raise the armrest to its top position parallel to the
backrest to allow for easy side transfers.
2. Return the armrest to its original position once the patient is
seated.
Folding the Backrest
The backrest can be folded for storage purposes when not in use.
1. Pull the cable under the backrest and fold it into position.
2. When required, simply return the backrest into an upright
position where it will click into place.
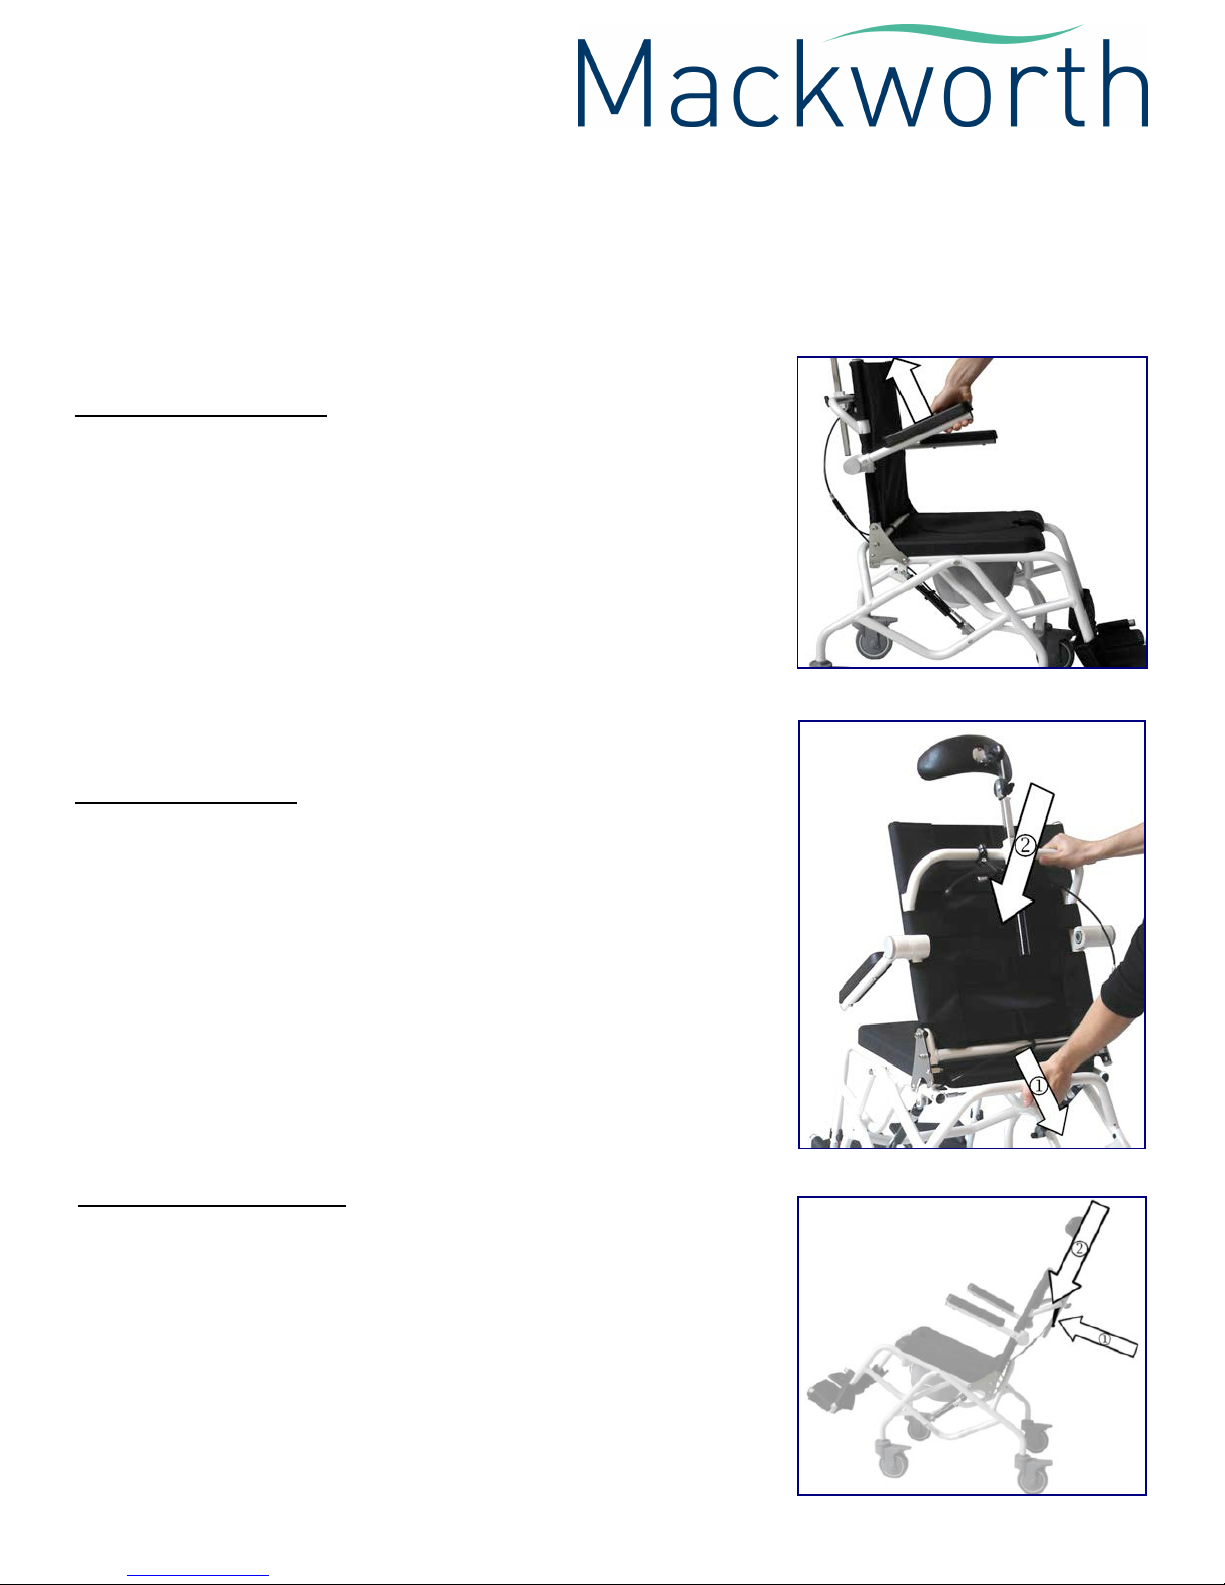
12
Adjusting the Seat Angle
For ease of maintenance and during bathing, the seat can be
tilted at an angle of 6° - 25°.
1. Firstly, ensure the parking brake is on.
2. Press the lever on the push handle (Arrow 1) and press the
seat (Arrow 2).
3. The seat is now locked into position.
4. To return the seat to its upright position, simply press the
lever again.
Use as a Commode Chair
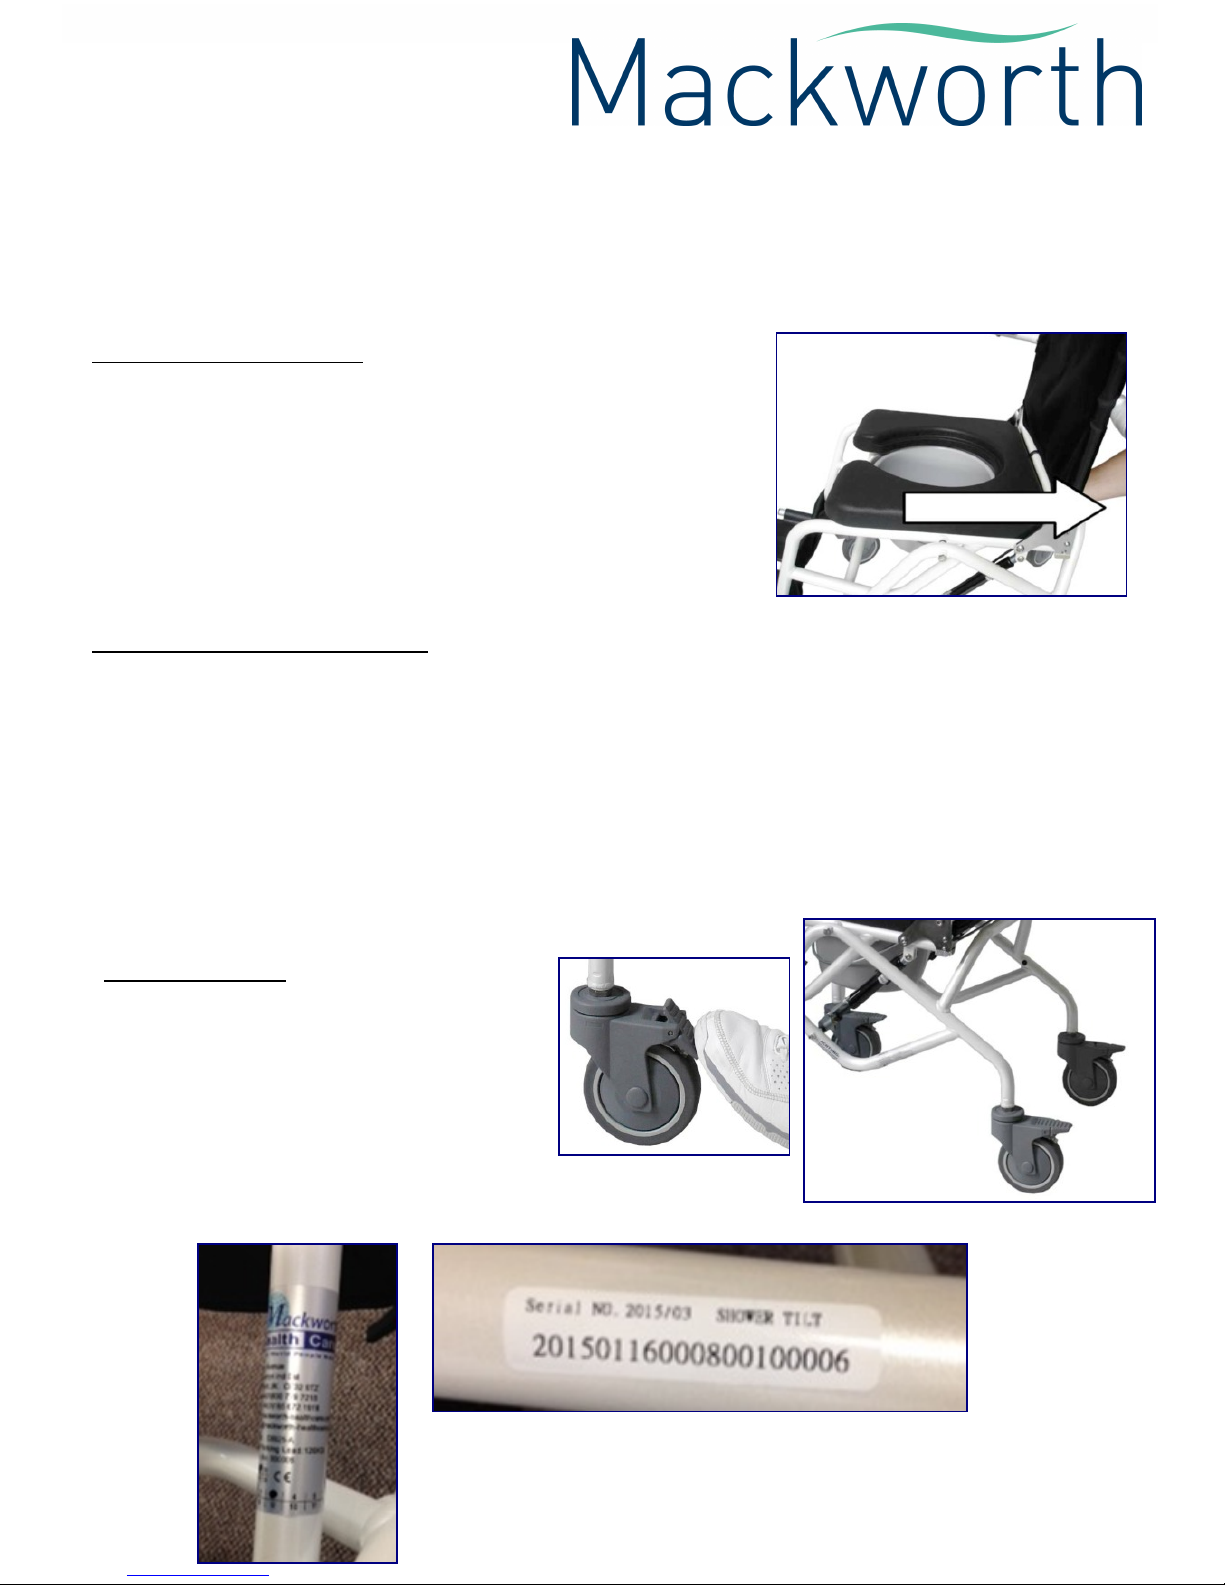
1. Firstly, ensure the parking brakes are on.
2. Place the round bowl without the lid, under the seat.
3. Slide the bowl from behind until it stops in its final position.
4. Remove the hygiene opening.
5. Use as required.
6. Remove the bowl once the patient is no longer seated.
7. Clean the seat and disinfect the bowl.
Use with a Conventional Toilet
1. Remove the bowl from the chair.
2. Remove the hygiene opening.
3. Fold back the lid of the toilet.
4. Place the chair over the toilet and engage the parking brakes.
5. Use as required.
6. Remove the bowl once the patient is no longer seated.
7. Clean the seat and disinfect the bowl.
Using the Brakes
Whenever stationery, always apply the
parking brake.
1. Press the lever with your foot on the
respective wheel to activate the
brake.
2. To remove, simply flip the lever back
up with your foot.
13
Example serial number and brand labels showing
manufacturing date.

Please ensure you read the following safety advice. This will ensure all procedures are made
easy and trouble free.
● Alwayscarryouttheriskassessmentandplanyourprocedurebeforecommencingamoving
& handling practice.
● Alwayscarryoutthedailychecklistbeforeusingthechair.
● Alwaysreadtheusermanualandensureyouarefamiliarwiththeuserinstructionsandsafety
features of the chair before transporting a patient.
● Alwayscheckthesafeworkingload(SWL)ofthechairissuitablefortheweightofthepatient.
● Alwayscarryoutadjustmentsinaccordancewiththeinstructionsintheusermanual.
● Neverforceanoperatingorsafetycontrol,excessforcecoulddamagethefeature.
● Alwaysmanoeuvrethechairusingthehandles/wheelsprovided,thesearedesignedtoaid
ease of transport.
● Donotpushaloadatexcessspeed.
● Donotpushthechairoverroughorunevenground.
● Donotpushthechairdownsteps.
● Alwaysapplythebrakeswhenparkingthechairorduringbathingprocedures.
●Always ensure the armrests and footrests are securely locked before transportation or use.
●A patient should never be allowed to sit on the chair for extended periods of time.
●Children and young people should never be left unsupervised in the shower/commode chair.
●Please note that because of the equilibrium shift, body movement, adjustment of the seat
angle and loading of the chair, it may increase the risk of tipping.
●In order to overcome obstacles such as steps, always use ramps.
CHAIR SAFETY ADVICE
14

These are recommended to be checked on a daily basis and the chair should be serviced
annually by an authorised agent.
1. CHECK any screws/bolts are fastened securely.
2. CHECK the wheels/tyres for excessive wear and damage.
3. CHECK the brake mechanism is working appropriately.
4. CHECK the armrest adjustment mechanism operates correctly.
5. CHECK the footrest adjustment mechanism operates correctly.
6. CHECK the gas spring is working correctly and adjustment of the seat angle works freely.
5. CHECK all castor fixing points. Check that the castor runs free and rotates easily. Remove any
build up of hair, fluff, dust etc. Lubricate if necessary with a very light mineral based grease.
6. CHECK that all attached components are properly secured.
7. CHECK the backrest for excessive wear and damage.
8. CHECK the headrest is fastened securely and is in the appropriate position for the patient.
IF IN DOUBT DO NOT USE - ANY DAMAGED PARTS SHOULD BE
REPLACED IMMEDIATELY.
MAINTENANCE & CLEANING
15

1. Clean the seat and backrest thoroughly with a damp cloth and warm soapy water after each use.
2. Use a damp cloth to wipe clean the frame parts and armrests also.
3. For heavier stains a mild diluted solution may be used. A solution of 0.1% Sodium Hypochlorite is
recommended but ensure the seat/backrest is rinsed thoroughly with clean water to ensure full
removal of the solution. It should have no adverse reaction to the material. Over a long period of
time some fading may occur, but this will have no effect on product longevity and integrity.
4. Please ensure you thoroughly dry the chair after each use.
5. Harsh cleaning liquids, chemicals or abrasives such as a wire brush should not be used as these
may damage the surface finish of the chair.
6. Do NOT clean with phenols, acids or bleach.
7. Disinfect the round commode bowl after each use.
8. Wheels can be cleaned using a damp brush with soft bristles.
9. Check that any castors run free and rotate easily. Remove any build up of hair, fluff, dust etc.
lubricate if necessary with a very light mineral based grease.
10. DO NOT use a high pressure or steam cleaner.
16
MAINTENANCE & CLEANING

MAINTENANCE LOG
Date
Part
Checked
Brakes
Headrest
Gas Spring
Push Handle
Armrests
Seat Pad
Back
Upholstery
Seat Frame
Round Bowl
Please use the maintenance abbreviations highlighted below when completing this log.
A = Adequate
R = Repaired
D = Damaged and replaced
Comments
___________________________________________________________________________
___________________________________________________________________________
___________________________________________________________________________
___________________________________________________________________________
___________________________________________________________________________
___________________________________________________________________________
___________________________________________________________________________
___________________________________________________________________________
17

TECHNICAL SPECIFICATIONS
Chair Dimensions & Weight Limit
18
Weight Limit 23 Stone / 150 kg
Seat Angle 6° to 25°
Seat Width 45 cm
Seat Height 55 cm
Seat Depth 42 cm
Overall Width 65 cm
Overall Height 110 - 140 cm
Overall Length 100 cm
Back Height From Seat 100 cm
Armrest Height From Seat 25 cm
Armrest Width 5 cm
Armrest Length 24 cm
Lower Leg Length 39 - 49 cm (6 levels)
Wheel Height 5 inches
Product Weight 16 kg

M80™ Spare Parts List
For pricing information, please contact Customer Services
on 01924 840100.
19
Item Number Description
N8925-A40-RS01 PU Seat Pad
N8925-A86 Back Upholstery
A8925-A30 Headrest Set
N8925-A80-A01 Hand Brake Set
N8925-A93 Cable For Gas Spring
N8925-A60-A01 Gas Spring
NWH0514BT-A Braked Wheel

For further information on our full range of shower/commode chairs, please visit
www.mackworth-healthcare.com.
Alternatively, for any further help, information or advise please contact us at:
CONTACT DETAILS
20
Prism Medical UK Registered Office, Unit 4, Jubilee Business Park, Grange Moor, Wakefield. WF4 4TD
01924 840100 Email: [email protected] www.prismmedical.co.uk
Prism Medical UK Manufacturing Centre Millers Avenue, Brynmenyn Industrial Estate, Brynmenyn, Bridgend. CF32 9TD
01924 840100 Email: [email protected] www.mackworth-healthcare.com
Table of contents


