Pro-Cut KS-116 User manual

MEAT SAW
OWNER´S MANUAL
OPERATION INSTRUCTIONS MODELS
KS-116
READ THIS MANUAL BEFORE USING THE EQUIPMENT FOR THE FIRST TIME. 507251-A
KS-116
MEAT SAW
INSTRUCTIONS FOR OPERATION, SERVICE AND MAINTENANCE OF THIS EQUIPMENT
I.- INTRODUCTION:
Congratulations!, you have acquired a Meat Saw, which is made of high quality long lasting materials that should give you years
of trouble free operation and durable service. Before you unpack your new band saw, please, read completely this manual.
IMPORTANT!:it is of vital importance that you or any person that will operate this unit thoroughly read this manual.
WARNING!:
This machine is designed to cut food products and is by nature dangerous,
if not used and maintained properly for optimum safety.
This equipment must be connected to athermal connection, not use the equipment if it is not properly grounded.
1
The appliance is not be used by persons (including children) with reduced physical, sensory or mental
capabilities, or lack of experience and knowledge, unless they have given supervision or instruction. Children
being supervised not play with the appliance.
Never perform service, cleaning or maintenance on this unit while connected to a power source.
Never use hands or fingers to feed products to cut; or introduce hands in to the blade track area, within 4 " (four
inches ) close to the blade, while in operation.
Do not leave the machine unattended while in operation & turn it off when it is not being used.
CONTENTS: PAGE
I. INTRODUCTION 1
II. UNPACKING 2
III. INSTALLATION 2
IV. OPERATION 4
V. KEY ELEMENTS IN CUTTING QUALITY PRODUCT 6
VI. CLEANING 6
VII. MAINTENANCE 8
VIII. EQUIPMENT SPECIFICATIONS 9
IX. ELECTRICAL DIAGRAM 9
X. ELECTROMAGNETIC BRAKE (SOME MODELS ONLY) 10

II.- UNPACKING
While unpacking the machine take special care in removing these components to be assembled later. Make sure that all are
accounted for *.
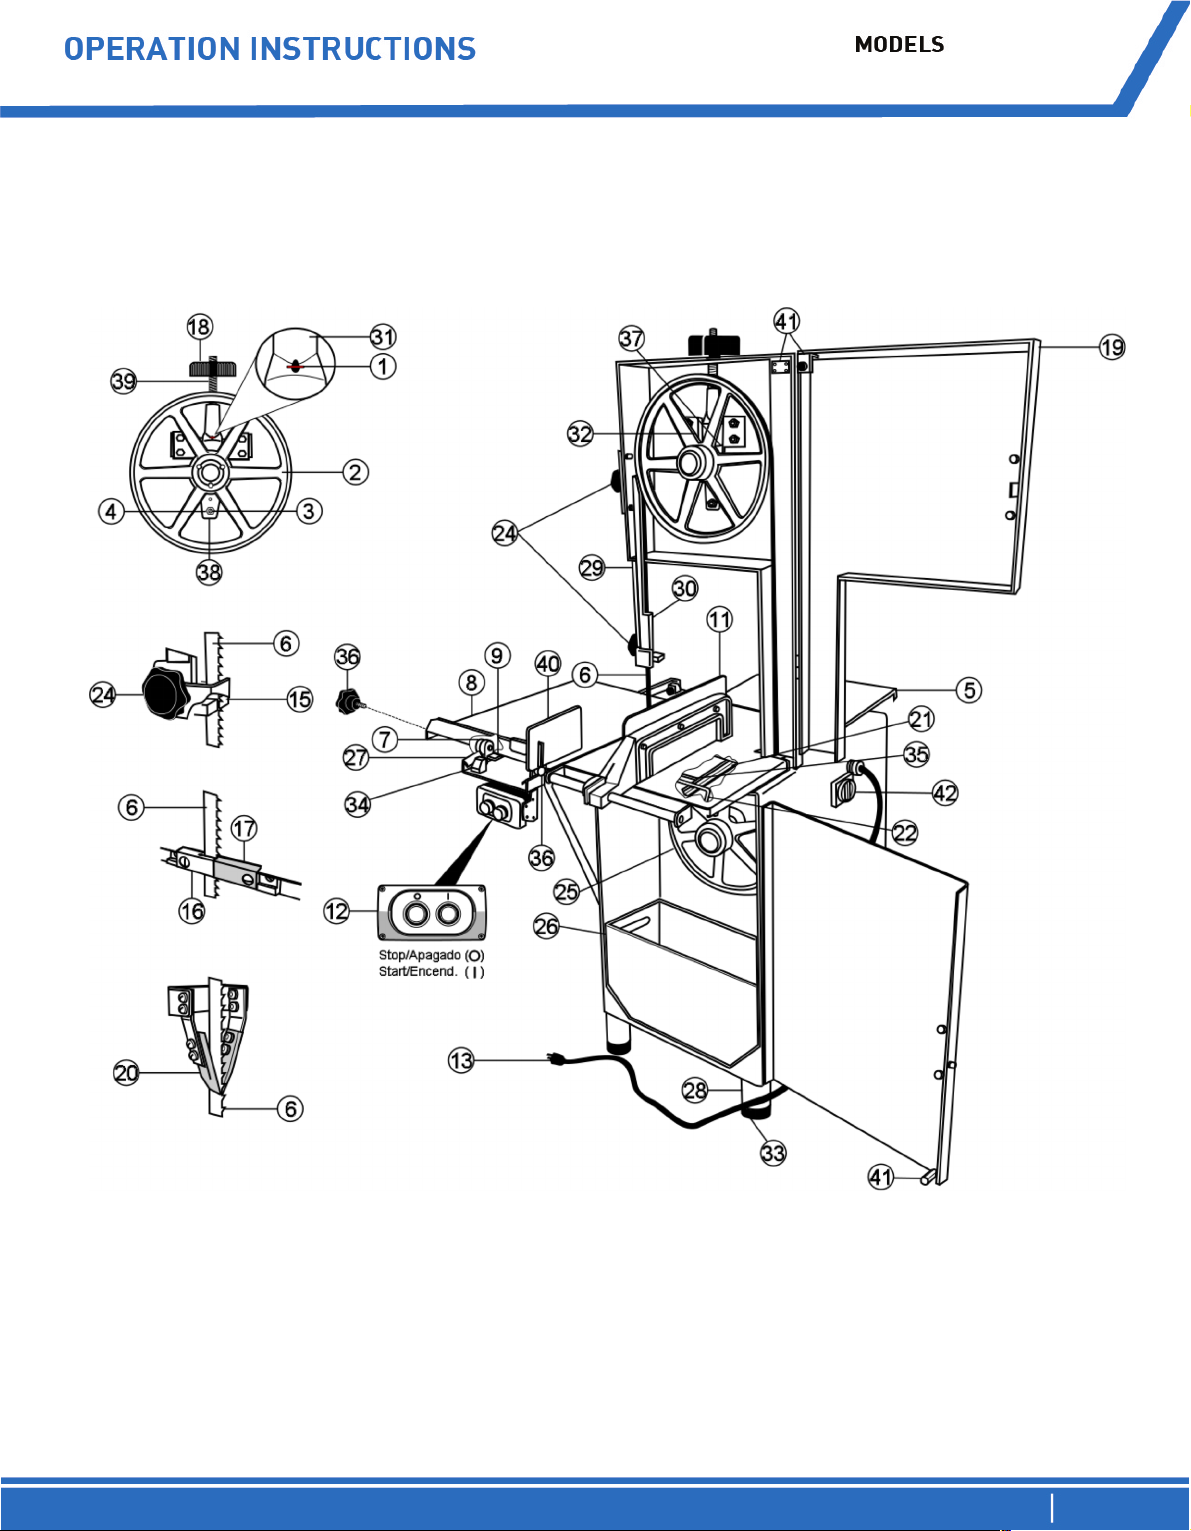
1 spare band saw (6) 1 Last Cut Pusher (40 - some models only)
1 spare fiber guide (17) 4 Rubber legs (33 - some models only)
1 scrap pan (26)
1 carriage (8)
1table assembly (5)
*Note:for reference numbers see “Meat saw diagram for components” (central pages).
III.- INSTALLATION:
Before connecting to the power source follow these easy assembly and preparation steps. (Never execute these procedures
with the cord plugged to the power source).
1.- Set the saw on a clean and level floor, using the leveling legs (28)
2.- Be sure that the pulleys (2 & 25)and blade (6) run free of objects.
3.- It is possible to assemble the table (5) directly, but in order to avoid blade (6) damage, we suggest to remove it, to do this,
follow these easy steps.
A.- Open the head door (19)and the lower (right )door (23).
B.- Rotate-up the fiber or Zytel guide (17)(see fig. 1).
C.- Turn the tension handle (18) counter clock wise, until blade (6) is lose.
D.- Pull out the blade from the wheels (2 & 25), guides (15,16 &17)and scrapers (20).
4.- Now you can Install the table assy. (5), following these steps (see fig. 2):
A.- Be sure that the head door (19)and the right door (23)are still open.
KS-116
2
MEAT SAW

3
MEAT SAW
B.- Carefully take the table assy. (5), place it on the table base guides (21).
C.- First insert one rod on the base-slot as shown on step " a “ (Fig. 2), then put the other rod, on the other slot as shown on step
" b “.
D.- Assure the rods of the table assy. (35)firmly into the slots of the table base (21).
E.- Turn the handle (22)under the table (towards you ), to lock the table assy (5).
5.- To Install the carriage (8) on its guide (27), the steps are as follow (see fig. 3)
A.- Take the carriage (8).
B.- Taking the picture of Fig 3as reference, get the rear wheels (7) close to the carriage guide (27)and assure to put both wheels
(7) into the guide.
C.- Move the carriage (8) all the way in, the carriage-lock (9) will engaged automatically. To take out the carriage, lift up the lock to
release it and then pull the carriage completely.
Note: You can fix the carriage and avoid movement using the Stopper knob (36).
6.- Installing the saw blade (6).
A.- Be sure of the direction of the cut (teeth must face down, see detail "a" on fig. 4).
B.- Put the blade (6) on the wheels (2 & 25), into the guides (15,16 &17)and into the scrapers(20).
C.- Turn the tension handle (18) clock wise until the red spot (1) is in the center of the hole, of the tension gauge housing (31).
D.- Turn the upper wheel (2) counter clock wise 2 or 3 revolutions by hand, very slowly and with caution to be sure everything is
ok.
E.- Be sure the blade is correctly aligned (must have a separation of 1/32” against the pulley´sedge.Fig 5).
Note:do not over tighten the blade, the excessive tension will cause overheat and the blade might brake with potential
personal injury.
7.- Close all the doors
8.- Select the work place, and:
A.- Be sure that the surface is leveled and clean.
B.- If you need to level the meat saw, use leveling legs (28 ).
C.- Connect the saw to the power source (it must be close to the saw as much as possible).
Note:check the power source of your facility, and be sure it matches the requirements of the unit, the voltage of the motor
can be changed by aqualified electrician or authorized dealer.
KS-116

WARNING!:
Never operate this machine while the doors are open.Serious injury may
happen .
4
MEAT SAW
Before completing the electrical connection, verify the direction of movement of the band saw (6). When the on button is pressed,
the band saw must moves from top to bottom in the sliding bar side (Fig. 5A).If the band saw moves from bottom to top, push the
stop button and unplug the equipment. Interchange 2 of 3in coming power supply wires (Fig. 5B).
Reconnect the meat saw to the power supply, turn it on and verify the direction of movement again.If the good operation is
confirmed, then fix the connection to the power supply. If you have any question regarding to the connection of the equipment,
contact to your authorized dealer.The above procedure only applies to meat saws with three phase connection.
IV.-OPERATION
Do not use the equipment if it is not properly grounded.
Important: for the first time usage you must cut a couple of pounds of scrap clean product to clean the blade (6) of any dirt or
foreign debris.
Normal operation of the saw:
1.- Select the desired thickness to cut, using the gauge plate assy (11).
2.- Put the product on the carriage (8)
3.-Turn on the machine (do not leave machine unattended while in operation).
Your saw is equipped with a thermo magnetic triple phase switch box, ( which is the same for single phase ) press the green button
to start and the red button to turn off the power.
4.- Placing the product against the gauge plate ( 11) you can start to cut, it is recommended to work front face to the gauge
plate, once again, never put your hands or fingers close to the blade, serious personal injury may happen.
5.- You may start to cut the product.
Fig. 5A Fig. 5B
CAUTION!:
Unplug or disconnect the machine from the power supply before changing wires.
CAUTION!:
Turn off and disconnect the equipment when is not in use
KS-116

CAUTION!:
Do not remove or customize any of the safety devices included in your Meat saw, this could cause
malfunction or may represent a risk to your personal integrity. If you notice that any of these devices
are not operating properly, please call to your authorized dealer
5
MEAT SAW
SAFETY FEATURES
This Meat saw has special features to guarantee your own safety. Must of them are proximity switches (41) located in the
equipment´s main accesses, like head (19)and lower (23)doors.The other switch is located below of table assy (5). In all cases,
the operation of the meat saw will stop immediately if any door is open or if the table assy is not correctly located at the time of
normal operation.
Another extra device is the General interrupter (42), when is in OFF position, de-energizes the complete equipment even though
is connected to the main power source (See Fig. 6).
In addition to the mentioned devices, the meat saw comes
with aband saw guard too.It is to prevent any unwanted
contact from the band saw while the equipment is working
even if the equipment is turned off due the band saw is
dangerous by nature.
For adjusting the band saw guard, turn counterclockwise the
superior handle (24)(Fig 6a) for releasing and adjusting the
height enough to cut meat.Turn clockwise the superior handle
to fix again the band guard saw.
If the meat saw is not been used, slide down the band saw
guard until the table assy (5) for covering completely the band
saw.
KS-116

6
MEAT SAW
CAUTION!:
Always disconnect the machine from the power source before executing any service or
maintenance
V.-KEY ELEMENTS IN CUTTING QUALITY PRODUCT:
1.- Do not force the cut against the blade ( 6 ).
2.- Be sure of using always sharp saw blades.
To know if you are still using a sharp blade, pay attention to the feel of the cut. If you have to force feed the product to cut into the
blade then you need a new sharp blade, if the cut feels smooth and without much effort then your blade is still ok.
Note: if you need to replace it, follow the procedure described on INSTALLATION section.
3.- Keep clean and free of any product or scrap, the guides (15, 16 & 17), wheels ( 2 & 25 ) and cleaners ( 20 ), never attempt any
cleaning while the machine is connected to the power source.
Note: it is not recommended to use re-sharpened blades because you will create more scrap in your product. And have a
less efficient operation.
For the daily cleaning remove all the scrap of the machine with the scrap pan and a brush and then wash down the machine
with a soft damp cloth or a soft brush with amild detergent and then water.Do not clean the machine with awater hose.
Also it is recommended to do at least once aweek amore through cleaning following this procedure:
1.- Remove the blade (see INSTALLATION section).
2.- Hold the upper wheel (2) with one hand and with your other hand turn the tension handle (18) counter clock wise until is
completely out of the rod.
3.- Slide the upper wheel (2) down, out of the tension guides (32)and remove it, be careful because it's heavy and if it falls may
cause apersonal injury.
4.-The upper wheel (2) is assembled to the tension gauge assy. (Fig.7). Disassemble the tension guide assy by removing the
tension gauge pin (37)with your hands.This will let you to take out the tension gauge housing (31), tension gauge spring (39), the
rod an indicator (1), and the upper wheel hanger (38 ). Clean these parts using a soft brush and amild detergent, rinse with water.
VI.-CLEANING
CAUTION!:
Never use abrasives cleaners with chlorine, vinegar, acid ofibers, since they can affect
the protective coating of the meat saw and its components and generate oxidation!.
KS-116
7
MEAT SAW
Assemble again, reversing the disassemble order, taking care that the red color painted side of the rod and indicator (1) face the
hole at the tension gauge housing (31).
5.- Move the carriage (8) to your right until stop, then with your finger, lift the carriage-lock ( 9 ) and slide again to your right to
remove the carriage from its guide (see fig. 3 ).
6.- Now remove the table assy.
7.- Now you can clean the saw easier. (We recommend to do this at least once a week) or often if you want it.
8.-.After a very deep cleaning and drying of the machine, assemble back in reverse order following the steps on INSTALLATION
section
STAINLESS STEEL SPECIAL CARE
This is aguideline of cleaning methods for stainless steel.
Requirement Suggested Method
Routine cleaning of light
soiling
Wash with Soap
or detergent in warm clean water. Apply with a clean sponge, soft cloth or soft-fiber
brush then rinse in clean water and dry.
Fingerprints Use Detergent. Rinse with warm water. Dry totally
Watermarks Use clean rinsing water, such as reasonable quality potable (tap) water. Drying marks may be
avoided using an air blower or wiping with clean disposable wipes.
Grease marks Use clean rinsing water , you could add white vinegar or soft water solution. Rinse with warm water
again and dry.
Rust stains
Wash surface with CLR (calcium, lime & rust remover) type cleaner. Use not acid and recommended
solution. Apply using a soft non
-abrasive
sponge. Rinse surface thoroughly with clean soft water after application.
Dirt and debris
Wash surface with a mild liquid soap. Apply using a soft, non
-
abrasive cloth. Rinse surface thoroughly
with clean soft water.
Note:To guarantee the right operation of the equipment, keep lubricated the next elements:
Tension gauge Spring (39)
Rod and indicator (1)
KS-116

8
MEAT SAW
VII. - MAINTENANCE.
1.- Blade:after cleaning the saw, check the sharpness of the blade, if it is not sharp enough replace it.
2.- Fiber guide:the purpose of this guide is to keep the blade straight to help you in the cut of the product, if you see the blade is
not cutting in a straight path, or you see the clearance of groove in the fiber guide (17 )to be more than 1/8 of an inch, it's time to
replace it.
Also it is advisable to replace this component at least once every 2 months depending on work load.
To replace the fiber guide follow these steps (fig 8):
A.- Stop the machine and disconnect from the power source.
B.- Slide the carriage ( 8 ) all the way to the left.
C.- With a screwdriver remove the screw from its place and replace the used fiber guide (17)for anew one included as a spare
part.
Note:it is recommended that an authorized dealer technician performs acomplete maintenance at least once ayear.
If the power cable is damaged, it must be replaced by your authorized technical service or qualified personnel to avoid risk of
electric shock.
Part revision
(Serviceable) Frequency Remarks
Band saw Daily When the cut is not fine.
When the cuttng noise is increasing.
Cleaners Weekly
Cleaners must have contact with band and pulleys all the time, this will
give a good performance to the equipment. In case of cleaners got
damaged because of wear excees, replace them.
Pulley´s ball bearing Weekly It is recommended to lubricate the pulley’s ball bearing for an optimum
performance.
Lower steel and fiber guide Daily It is recommended replacing if it resulted broken. A fiber guide damaged
could tear and break the band saw causing poor cut quality.
Membranes
(ON-OFF) Daily
A membrane damaged allows moisture and product residues accumulation
in button´s structure. This is one of the reasons for equipment malfunction.
If this happen, replace membrane immediately.
Gauge housing
(Top pulley tension) Daily After cleaning, it is recommended to lubricate these components for an
optimum performance.
Parts to be careful to review and /or replace due that are subject to wear.
KS-116

9
MEAT SAW
VIII.-EQUIPMENT SPECIFICATION
A) ELECTRICAL SPECIFICATIONS (Depends on your equipment. See ID plate):.
B) GENERAL DIMENSIONS.
IX. -ELECTRICAL DIAGRAM:
The electrical diagram for this unit is located inside the cabinet.
WARNING!:
The cabinet for this equipment must be opened by qualified personnel only.
For any problem or doubt related to electric specifications and
connections, please call to your authorized dealer.
KS-116
Equipment Voltage Current Frequency Capacity
Meat Saw
115 V~ 21 A60 Hz 1,1 KW (1,5 HP)
220 V~ 11 A 50 ó 60 Hz 1,1 KW (1,5 HP)
220 V3~ 8.4 A 50 ó 60 Hz 2.2 KW (3 HP)

10
MEAT SAW
X.- ELECTROMAGNETIC BRAKE (SOME MODELS ONLY):
Your meat saw may be equipped with an electromagnetic brake
(see Fig. A1).If so, please refer to this information for proper
operation and maintenance.
The brake motor is installed on the transmission system of the
meat saw. It stops the motor and the saw band in less than 3
seconds.
A. OPERATION
The band saw stays locked when the meat saw is off.When the
meat saw is turned on the brake releases the transmission pulley
and the band saw can rotate.
If you turn the meat saw off the brake will lock the transmission
pulley making that the motor stops.
B. ELECTRICAL CONNECTION
The brake is connected to the control box through a rectifier. (See Fig A2).
C. STEPS FOR UNINSTALLING
1. Unplug the meat saw. Locate the brake on the transmission system.
2. Loosen the screws from the upper support.
3. Pull the brake and remove it from de shaft pulley.
D. STEPS FOR INSTALLING
1. Verify the concentricity between the friction plate and the rear plate (See Fig A3) before assembling the brake.For this
operation refer to “Centering the Friction Plate” section .
2. If it is necessary adjust the Air Gap, refer to “Air gap adjustment” Section.
3. Mount the brake on the shaft pulley until all edges are aligned with the edge of the pulley.
4. Screws the upper support hinge and the base of the brake to the cabinet Support.
E. CENTERING THE FRICTION PLATE
The friction plate is aligned from factory, but in some cases, due to transportation or if the equipment is drastically moved, the
friction plate could loose this alignment.If this happen, uninstall the brake and follow these steps to center it again.
KS-116

11
MEAT SAW
1. Release the brake (Fig A5) turning clockwise the screw in the lever of brake’s ring.
2. After this, the friction plate (cylinder shown in Fig A3 at back side of brake), will freely move.
3. Use your hand to center the cylinder into the circumference.
4. Turn screw counter-clockwise to lock the friction plate and carefully install the brake again.
D. AIR GAP ADJUSTMENT
After along time usage, the brake will need to be adjusted. Using a 5/32”allen wrench (included), turn the adjustment screws
(see Fig A4) counterclockwise a quarter turn.
Turn the meat saw on and then turn it off to verify the braking time (lees than 3 seconds). Turn aquarter turn more the screws if it
is necessary.
E. MAINTENANCE
If the equipment requires aband saw adjustment, you will need to
release the pulley. Use a 5/32”allen wrench (included) and turn the
screw (see Fig A5) clockwise a whole turn.Complete service and
screw back to previous position to lock the pulley again.
If you have any doubt regarding the brake operation or installation, please contact your authorized dealer.
IMPORTANT!:
The gap must be the same along the brake´s circumference. A correct adjust will avoid overheating.
WARNING!:
Before aservice and maintenance you must unplug the meat saw from the power supply.
KS-116
12
MEAT SAW
MEAT SAW DIAGRAM FOR COMPONENTS (SEE CENTRAL PAGES)
(*) Apply only for some models
ITEM DESCRIPTION QTY
1
ROD & INDICATOR ½”
1
2
UPPER PULLEY
1
3
ADJUST SCREW
1
4
HEX NUT 3/8”
1
5
TABLE ASSY
1
6
BLADE (BAND SAW)
1
7
WHEEL (BIG ROLLER)
4
8
TABLE CARRIAGE
1
9
LOCK
2
10
MOTOR (NOT SHOWN)
1
11
GAUGE PLATE ASSY
1
12
ON/OFF INTERRUPTOR
1
13
POWER CORD
1
14
MOTOR
PULLEY (NOT SHOWN) 1
15
UPPER SAW GUIDE
1
16
LOWER GUIDE (STEEL)
1
17
FIBER GUIDE
1
18
TENSION HANDLE
1
19
HEAD DOOR
1
20
WHEEL SCRAPER (CLEANER)
5
21
TABLE BASE
1
22
LEVER
1
23
LOWER DOOR (RIGHT)
1
24
HANDLE
2
25
LOWER PULLEY
1
26
PAN
1
27
CARRIAGE GUIDE
1
28
LEVELING LEGS
4
29
SLIDING BAR
1
30
BLADE GUARD
1
31
TENSION GAUGE HOUSING
1
32
TENSION GUIDES
2
33
RUBBER LEGS
(4)
34
STOPPER
2
35
TABLE ASSY RODS
2
36
CARRIAGE STOPPER KNOB
(1)
37
TENSION GAUGE PIN
1
38
UPPER WHEEL HANGER
1
39
TENSION GAUGE SPRING
1
40
LAST CUT PUSHER
(1)
41
INTERLOCK*
(1)
42
GENERAL INTERRUPTER*
1
KS-116
11
MEAT SAW KS-116
MEAT SAW DIAGRAM FOR COMPONENTS

THANKS FOR READING THIS MANUAL. IF YOU HAVE ANY DOUBT REGARDING
THE OPERATION OF THIS MEAT SAW, PLEASE CONTACT TO YOUR PRO CUT
AUTHORIZED DEALER.
Table of contents


