Pro's Kit MT-4606 User manual

MT-4606
INFRARED THERMOMETER
User’s Manual
1st Edition,
©2016 Copyright by Prokit’s Industries Co., Ltd.
1
1. Specifications
Temperature Range -50~380℃(-58~716℉)
Accuracy ≧100℃±2% / ≦100℃±2℃
Unit ℃/ ℉
Resolution 0.1℃(0.1℉)
Response Time ≤0.5S
Emissivity Adjustable (0.1 to 1.0)
Distance To Spot Ratio 12: 1
Storage Temperature -20 to 50℃(-4~122℉)
Operating Temperature 0 to 50℃(32~122℉)
Operating Humidity 10~95%RH (Non-condensing)
Power 9V battery (not included)
Warning!
Do not point laser directly or indirectly (through reflective surfaces)
at eye.
2. Operation
1) Turn on
Install the battery and press the measurement button, then the
thermometer will be turned on and show the temperature reading
automatically.
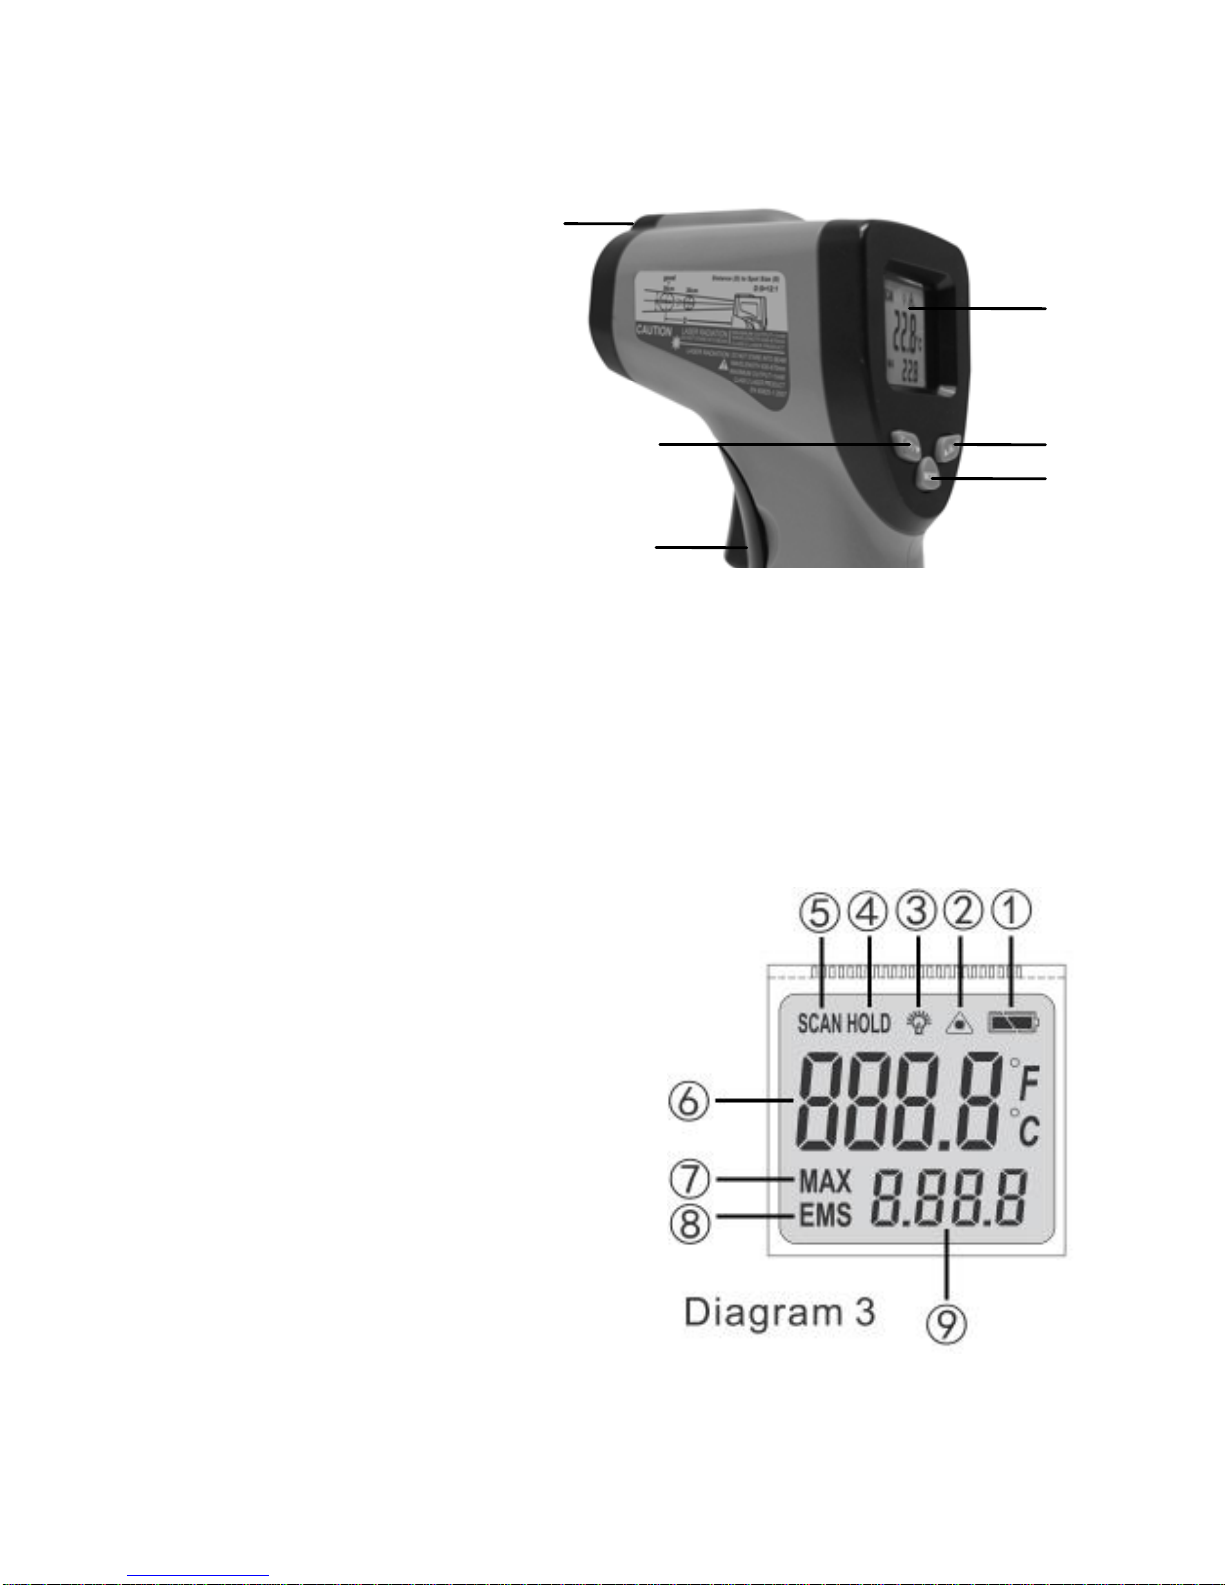
2) LCD display
The LCD will display the signal of functions (as in diagram 3)
3) Measurement
Aim at target with thermometer head, and press the measurement
trigger, then release the button (need to press the button for at least
0.5 second), the display will show the current temperature, or press
and hold the button for continuous testing with more temperature
results
4) Turn off
The thermometer will turn off automatically after 15 seconds of no
operation
2
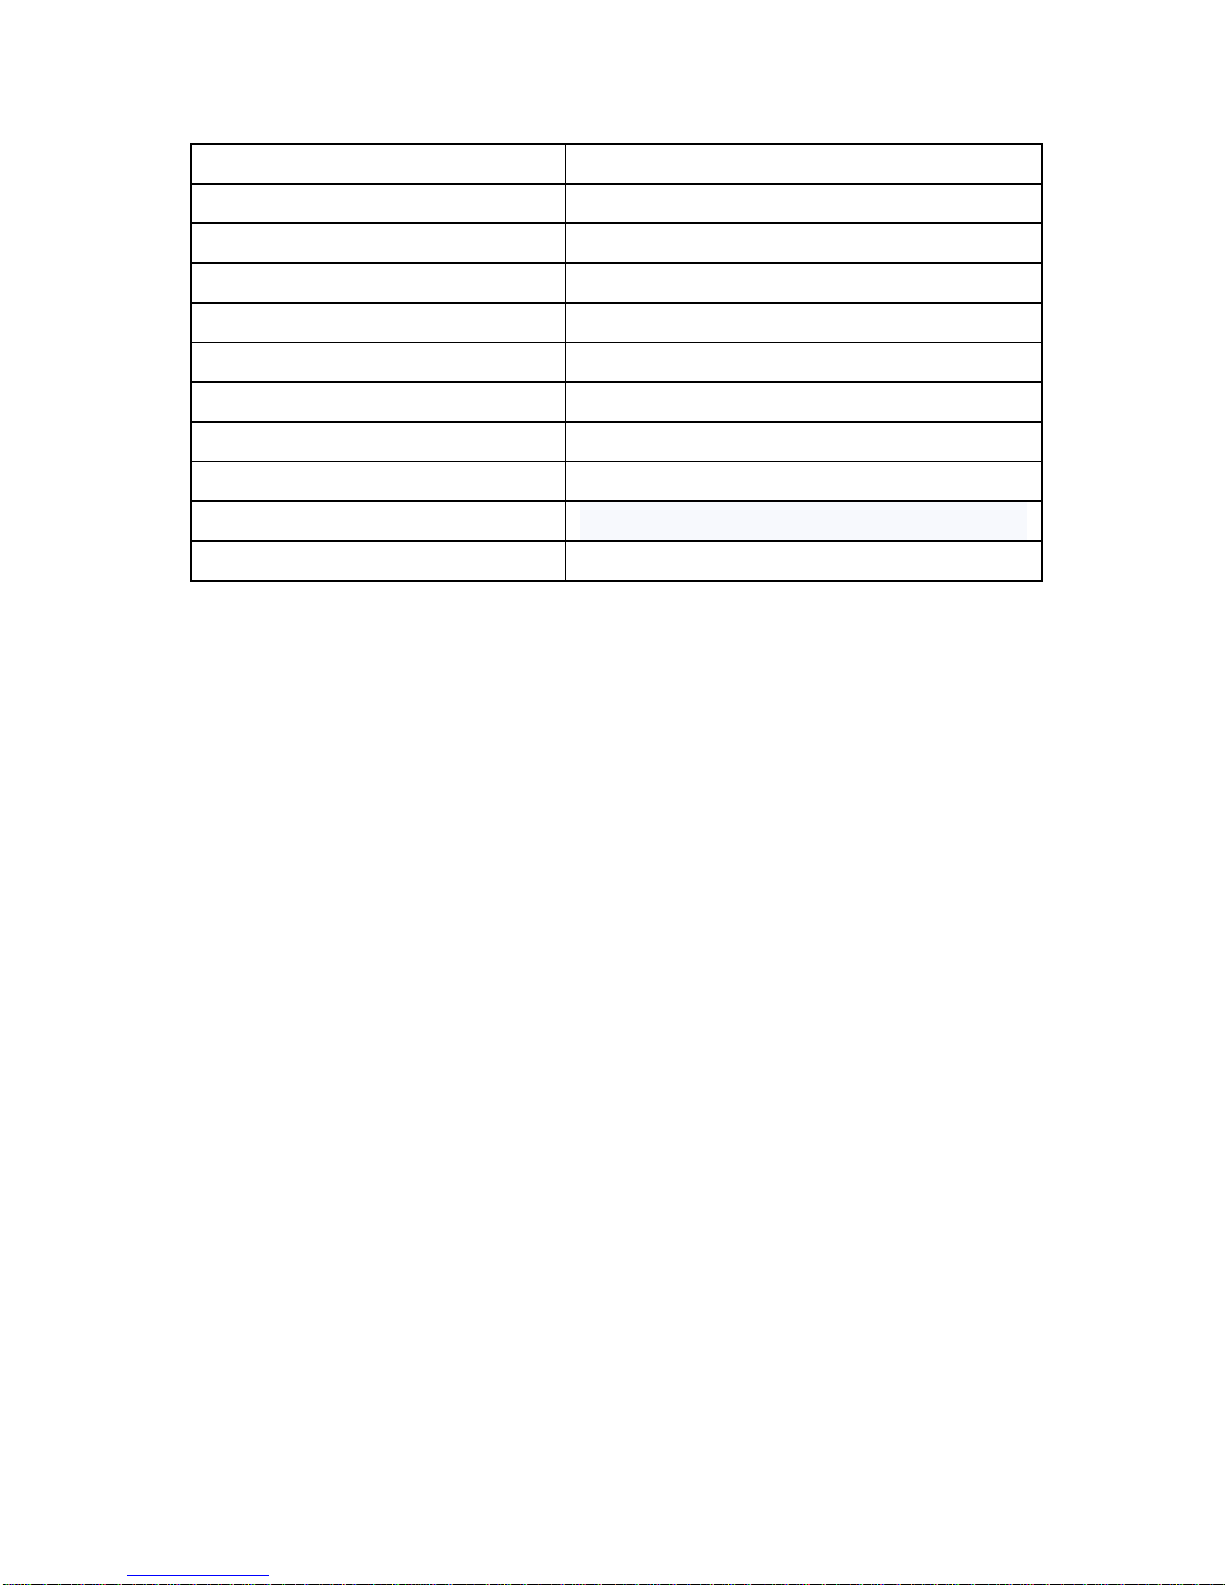
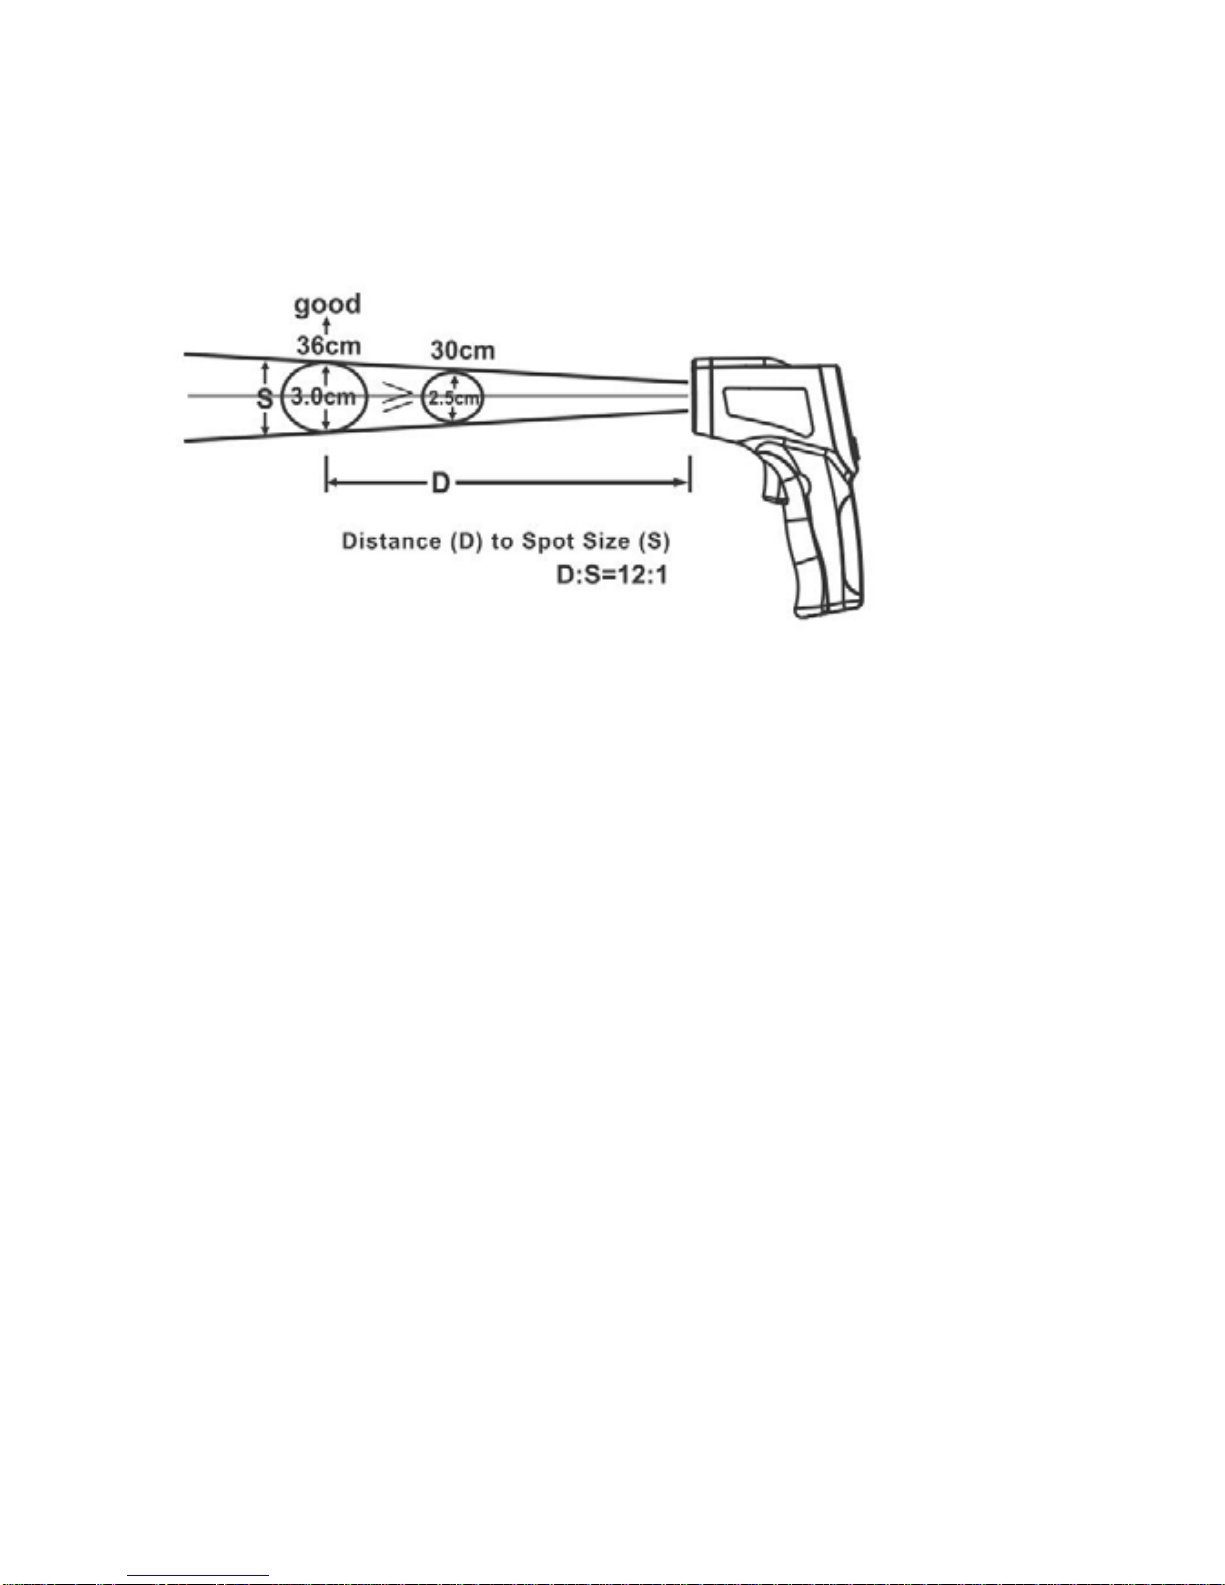
3. Distance Spot Ratio
The farther the target, the larger the testing spot area, it means: As
the distance from thermometer to the object increases, the spot size
of measuring area becomes larger, (as in diagram 1) it is named as
“D:S” (Distance Spot Ratio). The diameter of the target spot area is
3.0cm when you test from distance 36cm, and the thermometers will
show the average temperature of target spot area with diameter
3.0cm.
4. Emissivity
Most organic materials, painted or oxidized surfaces have an
emissivity of 0.95 (pre-set in the unit). Inaccurate readings will occur
if the surface to be measured is shiny or polished such as stainless
steel or aluminum. To obtain better accuracy, please cover the
surface with masking tape or flat black paint before measuring.
Measure the tape or painted surface when the tape or painted reach
the same temperature of the material underneath. Please kindly
note: thermometer can not measure the temperature of target
objects through the surface of glass. And steam, dust, smog will
lower the accuracy.
3
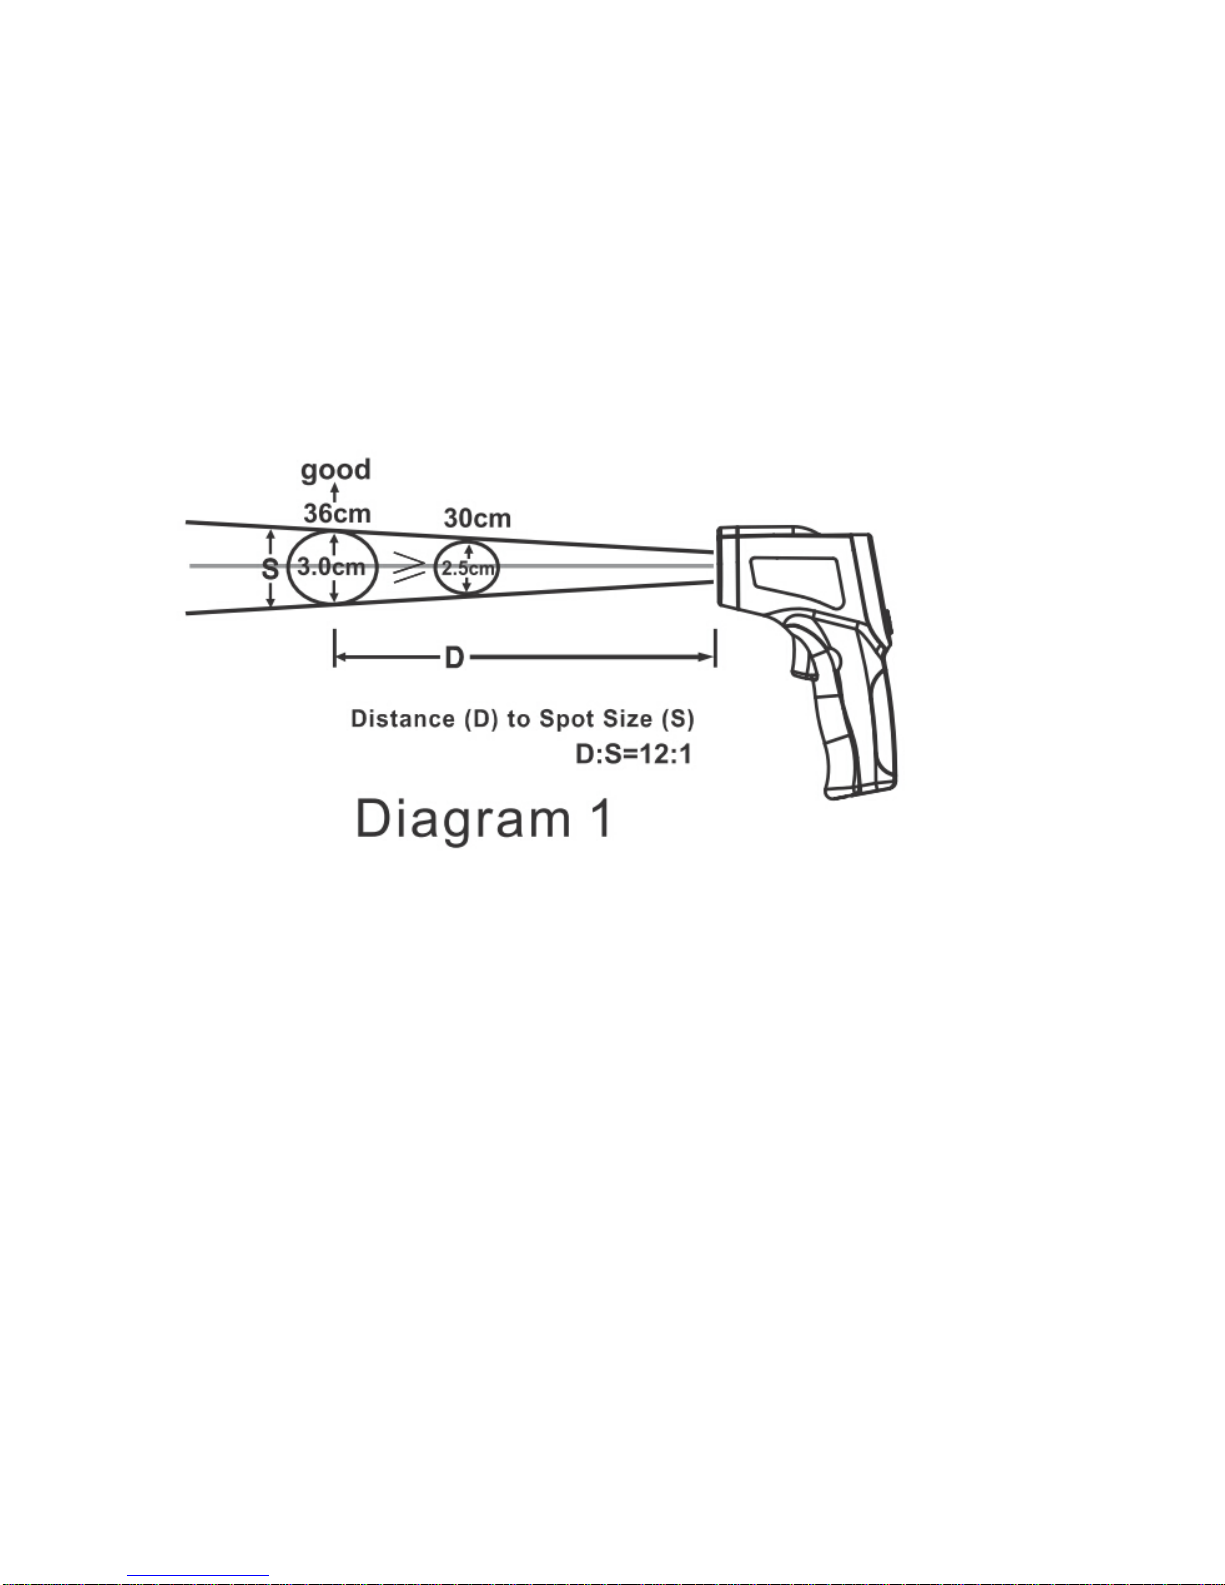
5. Detailed function
1: LCD
2: laser button
3: function button
4: ℃/℉button
5: infrared lens
6: measurement
trigger
Button Function:
After power on
1) Press button 4 (℃/℉button), switch the ℃/℉
2) Press button 2 (laser button), test with laser
3) Press button 3 (function button) to get into the emissivity adjust,
and then press button 2 or 4 to adjust emissivity
4) Press and hold button 6 (measurement trigger) and then the
same time press button 2 to turn on or turn off the backlight
Display
1.Low Battery Indication: to remind
user to change battery
2.Laser Sign: test with laser
3.Backlight Indication: working with
backlight
4.Data Hold: to keep current
reading
5.Scan Mode: shows on LCD when
testing
6.Measuring Result: current
temperature reading
7.Max Measuring Reading: it
shows maximum temperature reading after pressing the measure
button and holding for a while
1
2
3
6
4
5
Diagram2

4
8.Emissivity: adjustable from 0.1 to 1.0 for testing of different articles
9.Setting Display: display the related information you set
6. Infrared thermometer should be protected in the following:
--EMF (electro-magnetic fields) from arc welders, induction
heaters.
--Thermal shock (caused by large or abrupt ambient temperature
changes, it allows 30 minutes for unit to stabilize before use).
--Do not leave the unit on or near objects of high temperature.
7. Maintenance
1. Lens cleaning: use clean compressed air to blow off loose
particles, use a soft brush to remove debris, at last clean it with
damp cotton cloth.
2. Case cleaning: clean the case with a damp sponge/cloth and
mild soap.
NOTE:
1. Do not use solvent to clean lens.
2. Do not submerge the unit in water

5
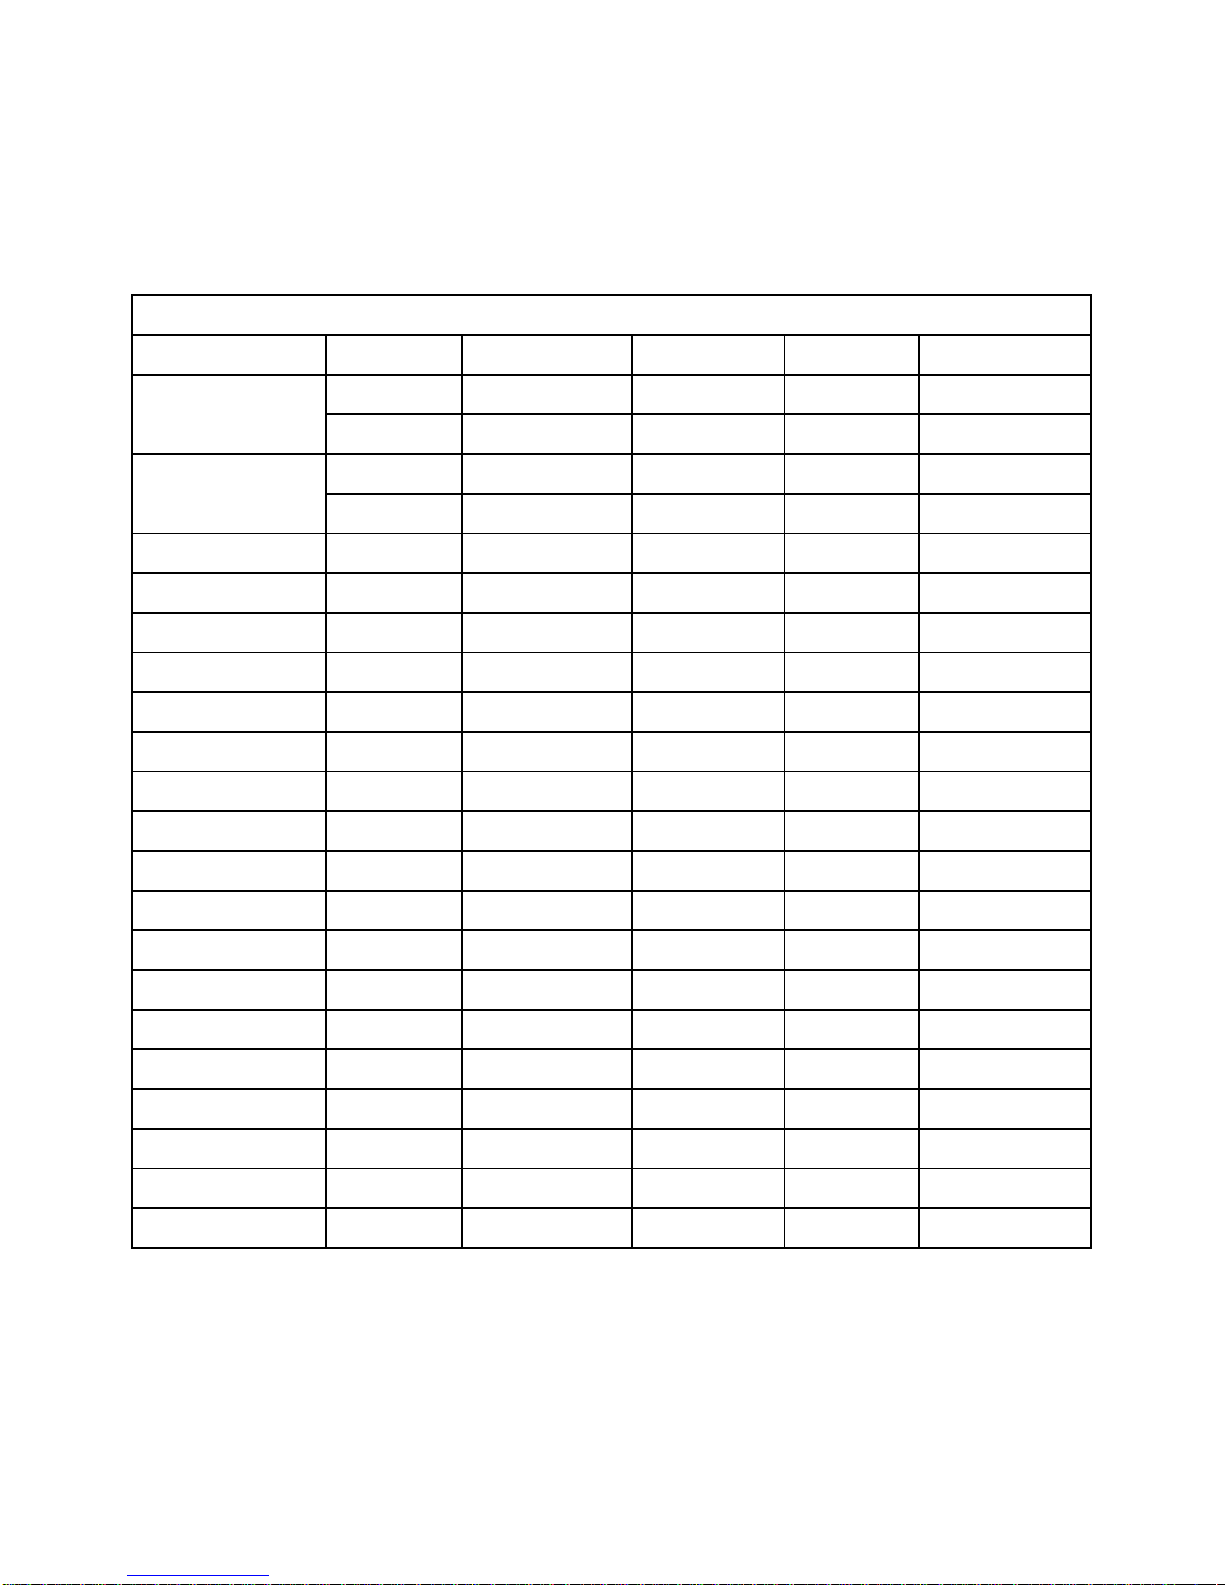
Emissivity of Articles
Material Feature Emissivity Material Feature Emissivity
Oxidized 0.3 Limestone 0.98
A
luminum
Polished 0.02-0.04 Paint 0.93
Oxidized 0.5 Human skin 0.98Brass
Polished 0.02-0.05 Graphite Oxidized 0.20-0.60
Gold 0.01-0.10 Rubber 0.95
Iron Oxidized 0.7 Plastic cement 0.85-0.95
Steel Oxidized 0.70-0.90 Concrete 0.95
A
sbestos 0.95 Cement 0.96
Plaster 0.80-0.90 Soil 0.90-0.98
A
sphalt 0.95 Mortar 0.89-0.91
Rock 0.7 Brick 0.90-0.96
Wood 0.90-0.95 Marble 0.94
Charcoal powdered 0.96 Textile 0.95
Carbon 0.85 Paper 0.95
Lacquerwork lackluster 0.97 Sand 0.90
Carbon
Cement
0.90 Clay 0.92-0.96
Soap Bubble 0.75-0.80 Glass 0.85-0.92
Water 0.93 Heated food 0.95
Snow 0.83-0.90 Oil 0.94
Ice 0.96-0.98 Steel and iron 0.80
Frozen Foods 0.95 Wool Natural 0.94
Ceramics 0.95 Lead Oxidized 0.5

6
MT-4606 紅外線測溫槍
使用說明書
一、概述
紅外線測溫儀採用非接觸紅外線傳感技術對目標進行安全、準確、快
速、可靠的測量。廣泛適用於測量機械、化工、陶瓷、輕工、食品、
冶金、電力、熱處理等行業高溫、危險及難以接近物體表面的溫度。
二、工作原理
任何溫度大於絕對零度的物體都會輻射紅外能量,此能量以光速向四
周傳輸。紅外線測溫儀的透鏡收集並彙集紅外能量到感測器上,感測
器產生一個低電壓輸出,此電壓與目標物體的溫度成正比,電壓輸出
經過處理後顯示為溫度值。
三、操作說明
測溫儀基本外觀由幾個部分組成,使用時請按以下說明進行操作:
1、開機
按下“測量”鍵,儀器開機自檢並自動測量顯示溫度值。
2、液晶顯示
紅外線測溫儀開機後,螢幕上顯示詳細功能說明符號。(如圖2)
3、測量
將探頭對準目標,按下“測量”鍵進行單次測量,或按住“測量”鍵進行
連續測量。(註:進行測量時,按住“測量”鍵時間不能少於約 0.5 秒)。
4、關機
開機後,如超過15秒未操作紅外線測溫儀,儀器將自動關機。

7
外觀介紹:
螢幕顯示:
圖2
功能設定:
1、電池電量:電池電量低狀態。
2、鐳射指示:鐳射開啟狀態。
3、背光指示:背光開啟狀態。
4、溫度保持:測量溫度值鎖定保持狀態。
5、測量指示:測量進行中。
6、測量溫度值:顯示測量的溫度值。
7、測量最大值(MAX):最大值顯示模式,在測試的過程中,此區域會
1.顯示螢幕
2.鐳射開關鍵
3.功能鍵
4.℃/℉轉換鍵
5.感測器
6.測量鍵
1.電池電量
2.鐳射指示
3.背光指示
4.溫度保持
5.測量指示
6.測量溫度值
7.測量最大值
8.發射率
9.設置顯示
1
2
3
6
4
5
圖1

8
顯示本次測量最大值。
8、發射率(EMS): 發射率調整模式,可修改發射率。
9、設置顯示:根據設定的模式顯示相關內容。
10、按鍵功能說明(如圖 1)
1) 開機後,按4號鍵(℃/℉轉換鍵),溫度單位轉換(攝氏與華氏)
2) 開機後,按2號鍵(鐳射開關鍵),鐳射開關轉換
3) 開機後按3號鍵(功能鍵),進入發射率調整介面,按2、4號鍵進
行調節
4) 開機後按住6號鍵(測量鍵)後,再按2號鍵進行背光燈的開關調
節
四、規格
溫度測試範圍 -50~380℃(-58~716℉)
測量精度 ≧100℃±2%℃/ ≦100℃±2℃
單位 ℃/ ℉切換
分辨率 0.1℃(0.1℉)
測試回應時間 ≤0.5 秒
發射率 可調(0.1~1.0)
距離系數比 12:1
儲存溫度 -20 to 50℃(-4~122℉)
操作溫度 0 to 50℃(32~122℉)
操作濕度 10~95%RH (無凝結)
電源 9V 電池
五、發射率
大多數有機材料和塗有油漆或氧化的表面具有 0 . 1 - 1 . 0 的發射率,
测温儀中發射率為 0 . 1 - 1 . 0 可調, 测量光亮或抛光的金屬表面將
導致讀數不準。解决方法是用黑膠帶或黑色油漆蓋住測試表面,當膠
帶達到與覆蓋材料相同的温度後,測量膠帶或油漆的表面温度
**注意**
不要使測試光亮的金屬表面(如不鏽鋼或鋁),本產品無法隔著玻璃測
試,測試到的溫度為玻璃表面的溫度,蒸氣、煙霧,灰塵會影響測量
的精準度。
9
六、距離系數比
測量目標越遠,測試的範圍越大,距離與測量範圍的比值常用 D:S 來
表示。當測量距離為 36cm 時,測量範圍的直徑為 3.0cm,測溫槍量
測的是量測範圍的平均溫度。(如圖 3)
圖3
七、保養
鏡頭清洗方法:
使用乾淨的壓縮空氣或吹塵球吹掉鬆散的顆粒,再用柔軟毛刷輕輕地
去除殘留碎屑後,用沾濕的棉花球小心擦拭。注意!不可使用溶劑清
洗鏡頭。
外殼清洗方法:
用沾有肥皂水的軟布擦拭,不可將產品浸泡水中。
八、安全須知
!警告:為避免對人體造成傷害,請嚴守下列指示
1. 請勿將鐳射直接對準人的眼睛或是從反射面間接照射眼睛
2. 使用前請先檢查機殼是否完整無缺少任何塑件,請勿使用損壞的
產品
3. 顯示器出現電池符號請立刻更換電池
4. 若產品失常請勿使用,產品的保護功能可能已經損壞,若有疑問
應將產品送修
5. 請勿在有爆炸氣體、蒸氣或灰塵的地方使用
6. 為避免灼傷,請記得發射率高的物體上所測得的溫度要低於實際
溫度
7. 若未按照本說明書規定使用,產品提供的保護功能可能會失效
10
8. 為避免損害測溫儀或被測之設備,請保護它們免受以下影響:
* 1、弧焊機或感應式加熱器等產生電磁磁場。
* 2、熱衝擊(如環境溫度發生較大變化或突然有較大改變,在使用
前要等待 2 0 ~ 3 0 分鐘使測溫儀達到穩定狀態)。
* 3、請勿將測溫儀靠近或放在高溫物體上。
常見名稱物體發射率對照表
材料 規格 發射率 材料 規格 發射率
氧化 0.3 石灰 0.98鋁
拋光 0.02-0.04 油漆 0.93
氧化 0.5 人體皮膚 0.98黃銅
拋光 0.02-0.05 石墨 氧化 0.20-0.60
黃金 0.01-0.10 橡膠 0.95
鐵氧化 0.7 塑膠 0.85-0.95
鋼氧化 0.70-0.90 混凝土 0.95
石棉 0.95 水泥 0.96
石膏 0.80-0.90 土壤 0.90-0.98
瀝青 0.95 灰泥 0.89-0.91
岩石 0.7 磚0.90-0.96
木材 0.90-0.95 大理石 0.94
木炭 粉末 0.96 紡織品 0.95
碳0.85 紙0.95
漆器 無光澤 0.97 沙子 0.90
碳膠 0.90 泥土 0.92-0.96
肥皂泡 0.75-0.80 玻璃 0.85-0.92
水0.93 熱食物 0.95
雪0.83-0.90 油0.94
冰0.96-0.98 鋼鐵 0.80
冷凍食品 0.95 羊毛 自然的 0.94
陶瓷 0.95 鉛氧化 0.5

11
MT-4606 红外线测温枪
使用说明书
一、概述
红外线测温仪采用非接触红外线传感技术对目标进行安全、准确、快
速、可靠的测量。广泛适用于测量机械、化工、陶瓷、轻工、食品、
冶金、电力、热处理等行业高温、危险及难以接近物体表面的温度。
二、工作原理
任何温度大于绝对零度的物体都会辐射红外能量,此能量以光速向四
周传输。红外线测温仪的透镜收集并汇集红外能量到传感器上,传感
器产生一个低电压输出,此电压与目标物体的温度成正比,电压输出
经过处理后显示为温度值。
三、操作说明
测温仪基本外观由几个部分组成,使用时请按以下说明进行操作:
1、开机
按下“测量”键,仪器开机自检并自动测量显示温度值。
2、液晶显示
红外线测温仪开机后,屏幕上显示详细功能说明符号。(如图2)
3、测量
将探头对准目标,按下“测量”键进行单次测量,或按住“测量”键进行
连续测量。(注:进行测量时,按住“测量”键时间不能少于 0.5 秒)。
4、关机
开机后,如超过15秒未操作红外线测温仪,仪器将自动关机。

12
外观介绍:
屏幕显示:
图2
功能设定:
1、电池电量:电池电量低状态。
2、激光指示:激光开启状态。
3、背光指示:背光开启状态。
4、温度保持:测量温度值锁定保持状态。
5、测量指示:测量进行中。
6、测量温度值:显示测量的温度值。
1.显示屏幕
2.激光开关键
3.功能键
4.℃/℉转换键
5.传感器
6.测量键
1.电池电量
2.激光指示
3.背光指示
4.温度保持
5.測量指示
6.测量温度值
7.测量最大值
8.发射率
9.设置显示
1
2
3
6
4
5
图1

13
7、测量最大值(MAX):最大值显示模式,在测试的过程中,此区域会
显示本次测量最大值。
8、发射率(EMS): 发射率调整模式,可修改发射率。
9、设置显示:根据设定的模式显示相关内容。
10、按键功能说明(如图 1)
1) 开机后,按4号键(℃/℉转换键),温度单位转换(摄氏与华氏)
2) 开机后,按2号键(激光开关键),激光开关转换
3) 开机后按3号键(功能键),进入发射率调整接口,按2、4号键进
行调节
4) 开机后按住6号键(测量键)后,再按2号键进行背光灯的开关调
节
四、规格
温度测试范围 -50~380℃(-58~716℉)
测量精度 ≧100℃±2%℃/ ≦100℃±2℃
单位 ℃/ ℉切换
分辨率 0.1℃(0.1℉)
测试响应时间 ≤0.5 秒
发射率 可调(0.1~1.0)
距离系数比 12:1
储存温度 -20 to 50℃(-4~122℉)
操作温度 0 to 50℃(32~122℉)
操作湿度 10~95%RH (无凝结)
电源 9V 电池
五、发射率
大多数有机材料和涂有油漆或氧化的表面具有 0 . 1 - 1 . 0 的发射率,
测温仪中发射率为 0 . 1 - 1 . 0 可调, 测量光亮或抛光的金属表面将
导致读数不准。解决方法是用黑胶带或黑色油漆盖住测试表面,当胶
带达到与覆盖材料相同的温度后,测量胶带或油漆的表面温度
**注意**
不要使测试光亮的金属表面(如不锈钢或铝),本产品无法隔着玻璃测
试,测试到的温度为玻璃表面的温度,蒸气、烟雾,灰尘会影响测量
的精准度。

14
六、距离系数比
测量目标越远,测试的范围越大,距离与测量范围的比值常用 D:S 来
表示。当测量距离为 36cm 时,测量范围的直径为 3.0cm,测温枪量
测的是量测范围的平均温度。(如图 3)
图3
七、保养
镜头清洗方法:
使用干净的压缩空气或吹尘球吹掉松散的颗粒,再用柔软毛刷轻轻地
去除残留碎屑后,用沾湿的棉花球小心擦拭。注意!不可使用溶剂清
洗镜头。
外壳清洗方法:
用沾有肥皂水的软布擦拭,不可将产品浸泡水中。
八、安全须知
!警告:为避免对人体造成伤害,请严守下列指示
1. 请勿将激光直接对准人的眼睛或是从反射面间接照射眼睛
2. 使用前请先检查机壳是否完整无缺少任何塑件,请勿使用损坏的
产品
3. 显示器出现电池符号请立刻更换电池
4. 若产品失常请勿使用,产品的保护功能可能已经损坏,若有疑问
应将产品送修
5. 请勿在有爆炸气体、蒸气或灰尘的地方使用
6. 为避免灼伤,请记得发射率高的物体上所测得的温度要低于实际
温度
7. 若未按照本说明书规定使用,产品提供的保护功能可能会失效
8. 为避免损害测温仪或被测之设备,请保护它们免受以下影响:
15
* 1、弧焊机或感应式加热器等产生电磁磁场。
* 2、热冲击(如环境温度发生较大变化或突然有较大改变,在使用
前要等待 2 0 ~ 3 0 分钟使测温仪达到稳定状态)。
* 3、请勿将测温仪靠近或放在高温物体上。
常见名称物体发射率对照表
材料 规格 发射率 材料 规格 发射率
氧化 0.3 石灰 0.98铝
抛光 0.02-0.04 油漆 0.93
氧化 0.5 人体皮肤 0.98黄铜
抛光 0.02-0.05 石墨 氧化 0.20-0.60
黄金 0.01-0.10 橡胶 0.95
铁氧化 0.7 塑料 0.85-0.95
钢氧化 0.70-0.90 混凝土 0.95
石棉 0.95 水泥 0.96
石膏 0.80-0.90 土壤 0.90-0.98
沥青 0.95 灰泥 0.89-0.91
岩石 0.7 砖0.90-0.96
木材 0.90-0.95 大理石 0.94
木炭 粉末 0.96 纺织品 0.95
碳0.85 纸0.95
漆器 无光泽 0.97 沙子 0.90
碳胶 0.90 泥土 0.92-0.96
肥皂泡 0.75-0.80 玻璃 0.85-0.92
水0.93 热食物 0.95
雪0.83-0.90 油0.94
冰0.96-0.98 钢铁 0.80
冷冻食品 0.95 羊毛 自然的 0.94
陶瓷 0.95 铅氧化 0.5
寶工實業股份有限公司 http://www.prokits.com.tw
©2016 Prokit’s Industries Co., LTD. All rights reserved 2016001(C)
Other Pro's Kit Thermometer manuals


