TFA 14.1509 User manual

Bedienungsanleitung
Instruction manual
Mode d’emploi
Istruzioni per l'uso
Gebruiksaanwijzing
Instrucciones de uso
Kat. Nr. 14.1509
RoHS
TFA_No. 14.1509_anl_01_17 30.01.2017 13:58 Uhr Seite 1

32
Fig. 1 Fig. 2
D 2
D 3
A 1
A 2
D 1B 1 B 2 B 3 B 1 B 2 B 3
A 3
TFA_No. 14.1509_anl_01_17 30.01.2017 13:58 Uhr Seite 2

54
Digitales Grill-Bratenthermometer
Vielen Dank, dass Sie sich für dieses Gerät aus dem Hause TFA entschieden haben.
1. Bevor Sie mit dem Gerät arbeiten
•Lesen Sie sich bitte die Bedienungsanleitung genau durch.
So werden Sie mit Ihrem neuen Gerät vertraut, lernen alle Funktionen und Bestandteile kennen, erfahren wichtige Details
für die Inbetriebnahme und den Umgang mit dem Gerät und erhalten Tipps für den Störungsfall.
•Durch die Beachtung der Bedienungsanleitung vermeiden Sie auch Beschädigungen des Gerätes und die Gefährdung
Ihrer gesetzlichen Mängelrechte durch Fehlgebrauch.
•Für Schäden, die aus Nichtbeachtung dieser Bedienungsanleitung verursacht werden, übernehmen wir keine Haftung.
•Ebenso haften wir nicht für inkorrekte Messwerte und Folgen, die sich aus solchen ergeben können.
•Beachten Sie besonders die Sicherheitshinweise!
•Bewahren Sie diese Anleitung gut auf!
2. Lieferumfang
• Digitales Grill- Bratenthermometer
• Edelstahlfühler mit ca. 100 cm Kabel
• Bedienungsanleitung
3. Einsatzbereich und alle Vorteile Ihres neuen Gerätes auf einen Blick
• Mit farbigem Display, Hintergrundbeleuchtung und Sensortasten
• Zur Überwachung der Kerntemperatur
Fig. 3
C 2
C 1
C 3 C 3
TFA_No. 14.1509_anl_01_17 30.01.2017 13:58 Uhr Seite 3

76
Digitales Grill-Bratenthermometer
• Zur optimalen Zubereitung von Fleisch und Geflügel
• Verwendbar für den Backofen oder Grill, ideal auch zum Garen bei Niedrigtemperatur
• Individuelle Temperaturvorgabe einstellbar
• Alarmton beim Erreichen der Zieltemperatur
• Einstichfühler aus Edelstahl mit ca. 100 cm Kabel
• Mit Befestigungsmagnet und ausklappbarem Ständer
4. Zu Ihrer Sicherheit
• Das Produkt ist ausschließlich für den oben beschriebenen Einsatzbereich geeignet. Verwenden Sie das Produkt nicht
anders, als in dieser Anleitung dargestellt wird.
• Das eigenmächtige Reparieren, Umbauen oder Verändern des Gerätes ist nicht gestattet.
• Dieses Gerät ist nicht für medizinische Zwecke geeignet.
Vorsicht!
Verletzungsgefahr:
• Tragen Sie hitzebeständige Schutzhandschuhe, wenn Sie den Messfühler während oder nach dem Kochvorgang berühren.
Verbrennungsgefahr!
• Benutzen Sie das Gerät nicht in der Mikrowelle.
• Vorsicht beim Umgang mit dem spitzen Einstichfühler. Immer mit der Schutzkappe aufbewahren.
• Bewahren Sie das Gerät und die Batterien außerhalb der Reichweite von Kindern auf.
Digitales Grill-Bratenthermometer
• Batterien nicht ins Feuer werfen, kurzschließen, auseinandernehmen oder aufladen. Explosionsgefahr!
• Batterien enthalten gesundheitsschädliche Säuren. Um ein Auslaufen der Batterien zu vermeiden, sollten schwache Batte-
rien möglichst schnell ausgetauscht werden. Verwenden Sie nie gleichzeitig alte und neue Batterien oder Batterien unter-
schiedlichen Typs.
• Beim Hantieren mit ausgelaufenen Batterien chemikalienbeständige Schutzhandschuhe und Schutzbrille tragen!
Wichtige Hinweise zur Produktsicherheit!
• Setzen Sie das Anzeigegerät keinen extremen Temperaturen, Vibrationen und Erschütterungen aus. Nur der Fühler ist bis
300°C hitzebeständig, das Kabel bis 250°C. Halten Sie niemals den Fühler direkt über Feuer.
• Tauchen Sie das Anzeigegerät, den Fühler und das Kabel nicht in Wasser, sonst kann Feuchtigkeit eindringen und zu Fehl-
funktionen führen. Nicht in der Spülmaschine reinigen.
• Vorsicht bei scharfkantigen Rahmen und Scharnieren! Das Kabel nicht knicken oder daran ziehen.
5. Bestandteile
A: Display (Fig. 2):
A 1: Aktuelle Temperatur A 2: Zieltemperatur
A 3: Batteriesymbol
TFA_No. 14.1509_anl_01_17 30.01.2017 13:58 Uhr Seite 4

98
Digitales Grill-Bratenthermometer
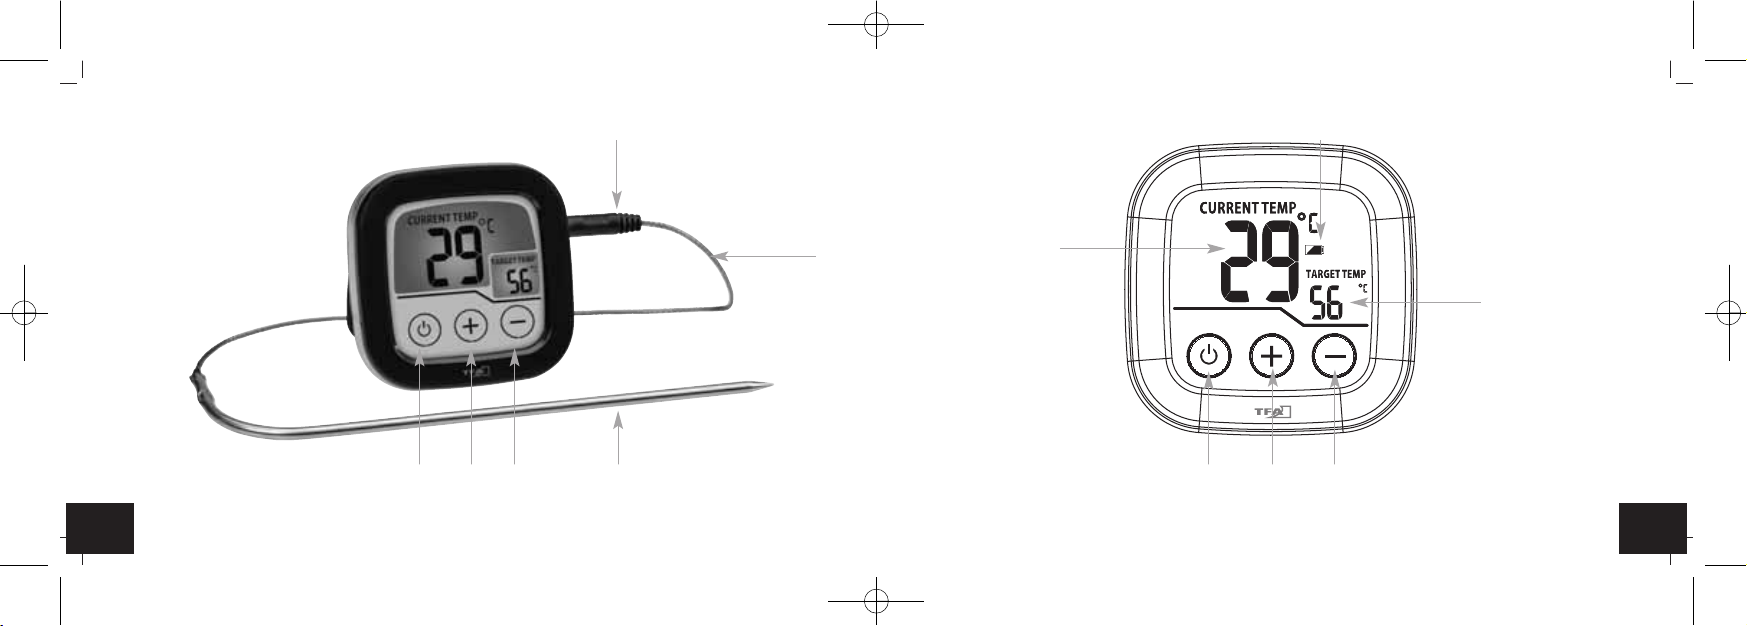
B: Sensortasten (Fig. 1+2):
B 1: ON/OFF Taste B 2: + Taste
B 3: – Taste
C: Gehäuse (Fig. 3):
C 1: Batteriefach C 2: Ständer (ausklappbar)
C 3: Befestigungsmagnet
D: Fühler (Fig. 1):
D 1: Einstichfühler D 2: Kabel
D 3: Anschlussstecker
6. Inbetriebnahme
• Ziehen Sie die Schutzfolie vom Display.
• Entfernen Sie die Gummi-Schutzkappe des Edelstahlfühlers.
• Stecken Sie den Verbindungsstecker für das Fühlerkabel in den Anschluss.
• Öffnen Sie das Batteriefach und legen Sie zwei neue Batterien 1,5 V AAA ein. Achten Sie auf die richtige Polarität beim
Einlegen der Batterien. Es werden alle LCD Segmente kurz angezeigt.
• Schließen Sie das Batteriefach wieder.
• Die aktuelle Temperaturanzeige und die Zieltemperatur (77°C Voreinstellung) erscheinen im Display.
• Das Gerät ist betriebsbereit.
Digitales Grill-Bratenthermometer
7. Bedienung
• Schalten Sie das Gerät mit der ON/OFF Taste ein.
• Wenn 10 Sekunden lang keine Taste gedrückt wird, schaltet sich die Hintergrundbeleuchtung automatisch aus.
• Drücken Sie kurz die ON/OFF Taste, um die Hintergrundbeleuchtung wieder zu aktivieren.
• Jede Tastenbedienung wird mit einem Piep-Ton quittiert.
• Halten Sie die + oder – Taste gedrückt, gelangen Sie in den Schnelllauf.
• Drücken Sie die ON/OFF Taste für 2 Sekunden, um das Gerät auszuschalten.
7.1 Messvorgang
• Stecken Sie den Fühler mindestens 2,5 cm tief in die Mitte des dicksten Bratenteils, bei Geflügel zwischen Rumpf und
Schenkel; er sollte weder Knochen noch Knorpel berühren und nicht aus dem Braten herausragen. Schieben Sie den Bra-
ten in den Ofen und stellen Sie die entsprechende Ofentemperatur ein.
• Führen Sie das Kabel einfach nach außen. Es passt sich der Form der Ofendichtung an. Vorsicht bei scharfkantigen Rah-
men und Scharnieren!
• Das Thermometer in Ofennähe (Kabellänge ca. 100 cm) mit den Magneten befestigen oder stellen Sie das Gerät mit dem
Ständer auf eine glatte Oberfläche.
• Stellen Sie mit der + oder – Taste die gewünschte Kerntemperatur ein.
• Ist die eingestellte Temperatur erreicht, ertönt ein Alarmton.
• Die Hintergrundbeleuchtung schaltet sich ein.
• Entfernen Sie den Fühler und schalten Sie das Gerät aus, um den Alarm zu beenden.
• Der Alarmton ertönt solange weiter, bis die Temperatur wieder unter den eingestellten Alarmwert gesunken ist.
TFA_No. 14.1509_anl_01_17 30.01.2017 13:58 Uhr Seite 5

1110
Digitales Grill-Bratenthermometer
8. Pflege und Wartung
• Reinigen Sie das Gerät und den Fühler mit einem weichen, leicht feuchten Tuch. Keine Scheuer- oder Lösungsmittel ver-
wenden! Vor Feuchtigkeit schützen.
• Sollte Wasser oder Dampf in die Buchse eindringen, kann dies den Kontakt mit dem Fühlerkabel beeinträchtigen. Trock-
nen Sie den Stecker vor Gebrauch mit einem Tuch ab, bevor Sie ihn am Anzeigegerät anschließen.
• Schalten Sie das Gerät nach Gebrauch aus.
• Entfernen Sie die Batterien, wenn Sie das Gerät längere Zeit nicht verwenden.
• Bewahren Sie Ihr Gerät an einem trockenen Platz auf.
8.1 Batteriewechsel
• Sobald das Batteriesymbol erscheint, wechseln Sie bitte die Batterien.
• Öffnen Sie das Batteriefach und legen Sie zwei neue Batterien 1,5 V AAA polrichtig ein.
• Schließen Sie das Batteriefach wieder.
9. Fehlerbeseitigung
Problem Lösung
Keine Anzeige ➜ Gerät mit der ON/OFF Taste einschalten
➜ Batterien polrichtig einlegen
➜ Batterien wechseln
Digitales Grill-Bratenthermometer
Unkorrekte Anzeige ➜ Batterien wechseln
➜ Kontakt des Steckers mit der Buchse prüfen, gegebenenfalls abtrocknen
Anzeige LLL ➜ Kontakt des Steckers mit der Buchse prüfen
➜ Kabelfühler einstecken
Temperaturanzeige zu hoch ➜ Sitz des Messfühlers im Braten prüfen
Wenn Ihr Gerät trotz dieser Maßnahmen immer noch nicht funktioniert, wenden Sie sich an den Händler, bei dem Sie das Pro-
dukt gekauft haben.
10. Entsorgung
Dieses Produkt wurde unter Verwendung hochwertiger Materialien und Bestandteile hergestellt, die recycelt und wiederver-
wendet werden können.
Batterien und Akkus dürfen keinesfalls in den Hausmüll!
Als Verbraucher sind Sie gesetzlich verpflichtet, gebrauchte Batterien und Akkus zur umweltgerechten Entsorgung
beim Handel oder entsprechenden Sammelstellen gemäß nationaler oder lokaler Bestimmungen abzugeben.
Die Bezeichnungen für enthaltene Schwermetalle sind:
Cd=Cadmium, Hg=Quecksilber, Pb=Blei
TFA_No. 14.1509_anl_01_17 30.01.2017 13:58 Uhr Seite 6

1312
Digitales Grill-Bratenthermometer
Dieses Gerät ist entsprechend der EU-Richtlinie über die Entsorgung von Elektro- und Elektronik-Altgeräten
(WEEE) gekennzeichnet.
Dieses Produkt darf nicht mit dem Hausmüll entsorgt werden. Der Nutzer ist verpflichtet, das Altgerät zur
umweltgerechten Entsorgung bei einer ausgewiesenen Annahmestelle für die Entsorgung von Elektro- und
Elektronikgeräten abzugeben.
11. Technische Daten
Messbereich -30 °C…300°C
Auflösung 1°C
HHH/LLL Temperatur außerhalb des Messbereichs
Spannungsversorgung 2 x 1,5 V AAA Batterien (nicht inklusive)
Gehäusemaße 76 x 25 x 76 mm
Gewicht 66,6 g (nur das Gerät)
Diese Anleitung oder Auszüge daraus dürfen nur mit Zustimmung von TFA Dostmann veröffentlicht werden. Die technischen Daten entsprechen dem Stand
bei Drucklegung und können ohne vorherige Benachrichtigung geändert werden.
Die neuesten technischen Daten und Informationen zu Ihrem Produkt finden Sie unter Eingabe der Artikel-Nummer auf unserer Homepage.
www.tfa-dostmann.de
TFA Dostmann GmbH & Co.KG, Zum Ottersberg 12, D-97877 Wertheim, Deutschland 01/17
Digital BBQ meat thermometer
Thank you for choosing this instrument from TFA.
1. Before you use this product
•Please make sure you read the instruction manual carefully.
This information will help you to familiarize yourself with your new device, to learn all of its functions and parts, to find
out important details about its first use and how to operate it and to get advice in the event of a malfunction.
•Following and respecting the instructions in your manual will prevent damage to your instrument and loss of your
statutory rights arising from defects due to incorrect use. We shall not be liable for any damage occurring as a result
of non following of these instructions.
•Likewise, we take no responsibility for any incorrect readings or for any consequences resulting from them.
•Please take particular note of the safety advice!
•Please keep this instruction manual safe for future reference.
2. Delivery contents
• Digital BBQ meat thermometer
• Stainless steel probe with approx. 100 cm cable
• Instruction manual
3. Range of application and all the benefits of your new instrument at a glance
• With coloured display, backlight and sensor buttons
• For checking the internal temperature
TFA_No. 14.1509_anl_01_17 30.01.2017 13:58 Uhr Seite 7

1514
Digital BBQ meat thermometer
• For the optimal preparation of meat and poultry
• Can be used for the oven or grill, also ideal for cooking at low temperatures
• Individual temperature requirements can be programmed
• Alarm warning when the target temperature is reached
• Stainless steel probe with approx. 100 cm cable
• With magnet and table stand (fold out)
4. For your safety
• This product is exclusively intended for the range of application described above. The product should only be used as
described within these instructions.
• Unauthorized repairs, alterations or changes to the product are not permitted.
• This product is not be used for medical purpose.
Caution!
Risk of injury:
• Wear heat-resistant protective gloves when touching the probe during or after cooking. Risk of burning!
• Do not use the instrument in the microwave.
• Be careful when handling the sharp probe. Store the probe with its protective cap.
• Keep these devices and the batteries out of reach of children.
• Batteries must not be thrown into a fire, short-circuited, taken apart or recharged. Risk of explosion!
Digital BBQ meat thermometer
• Batteries contain harmful acids. Low batteries should be changed as soon as possible to prevent damage caused by leak-
ing. Never use a combination of old and new batteries together, nor batteries of different types.
• Wear chemical-resistant protective gloves and safety glasses when handling leaking batteries.
Important information on product safety!
• Do not expose the device to extreme temperatures, vibrations or shocks. Only the probe is heat resistant up to 300 °C,
the cable up to 250°C. Never hold the probe directly over a fire.
• Do not immerse the display unit, the probe and the cable in water. Water can penetrate and cause malfunction. Not suit-
able for dishwasher.
• Be careful with sharp-edged frames and hinges. Do not pull or bend the cable.
5. Elements
A: Display (Fig. 2):
A 1: Actual temperature A 2: Target temperature
A 3: Battery symbol
B: Sensor buttons (Fig. 1+2):
B 1: ON/OFF button B 2: + button
B 3: – button
TFA_No. 14.1509_anl_01_17 30.01.2017 13:58 Uhr Seite 8

1716
Digital BBQ meat thermometer
C: Housing (Fig. 3):
C 1: Battery compartment C 2: Stand (fold out)
C 3: Magnet
D: Probe (Fig. 1):
D 1: Probe D 2: Cable
D 3: Probe connector
6. Getting started
• Remove the protective film from the display.
• Pull the rubber protection from the stainless steel probe.
• Plug the connector for the sensor cable into the socket.
• Open the battery compartment and insert two new AAA 1,5 V batteries. Make sure the polarity is correct. All segments
will be displayed briefly.
• Close the battery compartment again.
• The current temperature and the target temperature (77°C default) appear on the display.
• The device is ready for use.
7. Operation
• Press the ON/OFF button to switch on the device.
• If no button is pressed within 10 seconds, the backlight switches off automatically.
Digital BBQ meat thermometer
• Press the ON/OFF button briefly to activate the backlight again.
• Each button operation is acknowledged with a beep.
• Press and hold the + or – button for fast mode.
• Press ON/OFF button for 2 seconds to deactivate the device.
7.1 Measuring procedure
• Plunge the probe at least 2.5 cm into the middle of the thickest part of the meat, for poultry between the torso and the
thigh; it should not touch bones or cartilage and it should not protrude from the meat. Put the meat into the oven and set
the relevant oven temperature.
• Simply run the cable to the outside. The cable adapts to the oven seal. Be careful with sharp-edged frames and hinges.
• Use the magnet to fasten the thermometer in position near the oven (cable length 100 cm) or fold out the stand and place
the device onto a flat surface.
• Press the + or – button to set the desired internal temperature.
• When the target temperature is reached, an alarm tone will sound.
• The backlight turns on.
• Remove the probe and turn off the instrument to stop the alarm.
• The alarm tone continues sounding until the temperature drops below the selected alarm value.
8. Care and maintenance
• Clean the instrument and the probe with a soft damp cloth. Do not use solvents or scouring agents. Protect it from mois-
ture.
TFA_No. 14.1509_anl_01_17 30.01.2017 13:58 Uhr Seite 9

1918
Digital BBQ meat thermometer
• Should water or steam enter the device’s jack, it could affect the contact with the probe. Dry the probe connector with a
cloth before you connect it to your instrument.
• Turn off the instrument after use.
• Remove the batteries if the device will not be used for an extended period of time.
• Keep the device in a dry place.
8.1 Battery replacement
• Change the batteries when the battery symbol appears on the display.
• Open the battery compartment and insert two new AAA 1.5 V batteries, polarity as illustrated.
• Close the battery compartment again.
9. Troubleshooting
Problem Solution
No display ➜ Switch on the device with the ON/OFF button
➜ Ensure the batteries' polarity are correct
➜ Change the batteries
Incorrect indication ➜ Change the batteries
➜ Check the contact of the plug to the socket, optionally dry
Digital BBQ meat thermometer
Indication LLL ➜ Check the contact of the plug to the socket
➜ Plug in the sensor cable
Temperature display is too high ➜ Check the position of the sensor in the meat
If your device fails to work despite these measures contact the retailer where you purchased the product.
10. Waste disposal
This product has been manufactured using high-grade materials and components which can be recycled and reused.
Never dispose of empty batteries and rechargeable batteries with ordinary household waste. As a consumer,
you are required by law to take them to your retail store or to an appropriate collection site depending on
national or local regulations in order to protect the environment.
The symbols for the contained heavy metals are:
Cd = cadmium, Hg = mercury, Pb = lead
This product is labelled in accordance with the EU Waste Electrical and Electronic Equipment Directive
(WEEE).
Please do not dispose of this product in ordinary household waste. As a consumer, you are required to take
end-of-life devices to a designated collection point for the disposal of electrical and electronic equipment, in
order to ensure environmentally-compatible disposal.
TFA_No. 14.1509_anl_01_17 30.01.2017 13:58 Uhr Seite 10

2120
Digital BBQ meat thermometer
11. Specifications
Measuring range -30 °C…300°C
Resolution 1°C
HHH/LLL Temperature is outside measuring range
Power consumption 2 x AAA 1,5 V batteries (not included)
Housing dimension 76 x 25 x 76 mm
Weight: 66.6 g (device only)
No part of this manual may be reproduced without written consent of TFA Dostmann. The technical data are correct at the time of going to print and may
change without prior notice.
The latest technical data and information about your product can be found by entering the product number on our homepage.
www.tfa-dostmann.de
TFA Dostmann GmbH & Co.KG, Zum Ottersberg 12, D-97877 Wertheim, Germany 01/17
Thermomètre de cuisson digital
Nous vous remercions d'avoir choisi l'appareil de la société TFA.
1. Avant d'utiliser votre appareil
•Veuillez lire attentivement le mode d'emploi.
Vous vous familiariserez ainsi avec votre nouvel appareil, vous découvrirez toutes les fonctions et tous les éléments qui le
composent, vous noterez les détails importants relatifs à sa mise en service et vous lirez quelques conseils en cas de dys-
fonctionnement.
•En respectant ce mode d'emploi, vous éviterez d'endommager votre appareil et de perdre vos droits légaux en cas de
défaut si celui-ci résulte d’une utilisation non-conforme. Nous n'assumons aucune responsabilité pour des domma-
ges qui auraient été causés par le non-respect du présent mode d'emploi.
•De même, nous n’assumons aucune responsabilité pour des relevés incorrects et les conséquences qu’ils pourraient
engendrer.
•Suivez bien toutes les consignes de sécurité!
•Conservez soigneusement le mode d'emploi!
2. Contenu de la livraison
• Thermomètre de cuisson digital
• Sonde en acier inoxydable avec câble d’env. 100 cm
• Mode d'emploi
TFA_No. 14.1509_anl_01_17 30.01.2017 13:58 Uhr Seite 11

2322
Thermomètre de cuisson digital
3. Aperçu du domaine d'utilisation et de tous les avantages de votre nouvel appareil
• Avec écran couleur, éclairage et touches tactiles
• Contrôle de la température à cœur
• Pour une préparation parfaite des viandes et des volailles
• Adapté pour le four ou le grill et idéal pour les cuissons à faible température
• Température cible réglable individuellement
• Son d'alarme lorsque la température désirée est atteinte
• Sonde en acier inox avec câble d’env. 100 cm
• Avec aimant et support (dépliable)
4. Pour votre sécurité
• Le produit est destiné uniquement à l'utilisation décrite ci-dessus. N'utilisez jamais l’appareil à d'autres fins que celles
décrites dans le présent mode d'emploi.
• Vous ne devez en aucun cas réparer, démonter ou modifier l'appareil par vous-même.
• Cet appareil ne convient pas à une utilisation médicale.
Attention!
Danger de blessure:
• Portez toujours des gants de protection contre les risques de brûlures, lorsque vous manipulez la sonde pendant ou après
la cuisson. Risque de brûlure!
Thermomètre de cuisson digital
• N'utilisez jamais votre appareil dans un four à micro-ondes.
• Faites attention en utilisant la sonde pointue. Pour garder l'appareil, remettre le bouchon protecteur en place.
• Gardez votre appareil et les piles hors de la portée des enfants.
• Ne jetez jamais de piles dans le feu, ne les court-circuitez pas, ne les démontez pas et ne les rechargez pas.
• Les piles contiennent des acides nocifs pour la santé. Une pile faible doit être remplacée le plus rapidement possible afin
d'éviter toute fuite. N'utilisez jamais simultanément de piles anciennes avec des piles neuves ou des piles de types différents.
• Pour manipuler des piles qui ont coulé, utilisez des gants de protection chimique spécialement adaptés et portez des
lunettes de protection !
Conseils importants de sécurité du produit !
• Évitez d’exposer l’appareil d'affichage à des températures extrêmes, à des vibrations ou à des chocs. Seule la sonde est
résistante à une chaleur de 300°C, le câble à 250°C. Ne placez jamais la sonde directement sur le feu.
• N'immergez pas l’appareil d'affichage, la sonde ou le câble dans l'eau car l'humidité pourrait pénétrer et causer un dys-
fonctionnement. Votre instrument ne peut pas être lavé au lave-vaisselle.
• Attention aux charnières à arêtes vives! Ne pas plier ou tirer sur le câble!
5. Composants
A: Affichage (Fig. 2):
A 1: Température actuelle A 2: Température cible
A 3: Symbole de pile
TFA_No. 14.1509_anl_01_17 30.01.2017 13:58 Uhr Seite 12

2524
Thermomètre de cuisson digital
B: Touches tactiles (Fig. 1+2):
B 1: Touche ON/OFF B 2: Touche +
B 3: Touche –
C: Boîtier (Fig. 3):
C 1: Compartiment à piles C 2: Support (dépliable)
C 3: Aimant
D: Sonde (Fig. 1):
D 1: Sonde D 2: Câble
D 3: Connecteur
6. Mise en service
• Retirez les films de protection de l'affichage.
• Retirez le capuchon en caoutchouc de la sonde.
• Insérez le connecteur de branchement du câble de la sonde dans la prise.
• Ouvrez le compartiment à piles et insérez deux piles neuves de type 1,5 V AAA. Veillez à la bonne polarité des piles. Tous
les segments s'allument brièvement.
• Refermez le compartiment à piles.
• L'affichage de la température actuelle et la température cible (77°C - par défaut) apparaissent sur l'écran.
• Votre appareil est maintenant prêt à fonctionner.
Thermomètre de cuisson digital
7. Utilisation
• Mettez l’appareil en marche à l’aide de la touche ON/OFF.
• Si aucune touche n’est pressée pendant 10 secondes, l'éclairage de fond s'éteindra automatiquement.
• Appuyez sur la touche ON/OFF brièvement pour activer de nouveau l'éclairage de fond.
• Chaque opération est signalée par un bip sonore lorsqu’on appuie sur une touche.
• Si vous maintenez la touche + ou – appuyée, vous passez en déroulement rapide.
• Appuyez sur la touche ON/OFF pendant 2 secondes pour arrêter l'appareil.
7.1 Procédé de mesure
• Insérez la sonde au minimum à 2,5 cm de profondeur dans la partie la plus épaisse de la viande, pour les volailles entre la
carcasse et la cuisse; la pointe ne doit pas être en contact avec les os ou avec le cartilage. Elle ne doit pas dépasser du
morceau de viande. Placez la viande dans le four et réglez le four sur la température voulue.
• Dirigez simplement le câble vers l'extérieur. Le câble s’adapte à la forme de l’isolant du four. Attention aux charnières à
arêtes vives!
• Fixez le thermomètre à proximité du four (longueur du câble env. 100 cm) avec les aimants ou placez l'appareil avec le
support sur une surface plane.
• Réglez la température à cœur désirée avec la touche + ou – .
• Lorsque la température souhaitée est atteinte, un signal sonore retentit.
• L’éclairage de fond est activé.
• Retirez la sonde et éteignez votre appareil pour couper l'alarme.
• L'alarme continue de sonner jusqu'à ce que la température mesurée soit inférieure à la température souhaitée.
TFA_No. 14.1509_anl_01_17 30.01.2017 13:58 Uhr Seite 13

2726
Thermomètre de cuisson digital
8. Entretien et maintenance
• Pour le nettoyage de votre appareil et la sonde, utilisez un chiffon doux et humide. N’utilisez pas de solvants ou d'agents
abrasifs! Protégez-le contre l'humidité.
• Si de l’eau ou de la vapeur pénètre dans la prise, cela peut empêcher un bon contact avec la sonde. Essuyez la prise avec
un chiffon avant de la brancher dans votre appareil.
• Eteignez votre appareil.
• Retirez les piles si vous n'utilisez pas votre appareil pendant une durée prolongée.
• Conservez votre appareil dans un endroit sec.
8.1 Remplacement des piles
• Si le symbole de piles apparaît sur l'écran, changez les piles.
• Ouvrez le compartiment à piles et insérez deux nouvelles piles de type 1,5 V AAA en respectant la polarité +/-.
• Refermez le compartiment à piles.
9. Dépannage
Problème Solution
Aucun affichage ➜ Mettez l’appareil en marche avec la touche ON/OFF
➜ Contrôlez la bonne polarité des piles
➜ Changez les piles
Thermomètre de cuisson digital
Affichage incorrect ➜ Changez les piles
➜ Vérifiez le contact de la fiche avec la prise, sécher au besoin
Indication LLL ➜ Vérifiez le contact de la fiche avec la prise
➜ Connecter la sonde
Température trop élevée ➜ Vérifiez l'emplacement de la sonde de mesure
Si votre appareil ne fonctionne toujours pas malgré ces mesures, adressez-vous au vendeur chez qui vous l'avez acheté.
10. Traitement des déchets
Ce produit a été fabriqué avec des matériaux de haute qualité qui peuvent être recyclés et réutilisés.
Les piles usagées ne doivent pas être jetées dans les détritus ménagers. En tant qu'utilisateur, vous avez
l'obligation légale de rapporter les piles et piles rechargeables usagées à votre revendeur ou de les déposer
dans une déchetterie proche de votre domicile conformément à la réglementation nationale et locale.
Les métaux lourds sont désignés comme suit: Cd=cadmium, Hg=mercure, Pb=plomb
Cet appareil est conforme aux normes de l'UE relatives au traitement des déchets électriques et électroniques
(WEEE).
L'appareil usagé ne doit pas être jeté dans les ordures ménagères. L’utilisateur s’engage, pour le respect de
l’environnement, à déposer l’appareil usagé dans un centre de traitement agréé pour les déchets électriques et
électroniques.
TFA_No. 14.1509_anl_01_17 30.01.2017 13:58 Uhr Seite 14

2928
Thermomètre de cuisson digital
11. Caractéristiques techniques
Plage de mesure -30 °C … 300 °C
Résolution 1°C
HHH/LLL Température mesurée hors de portée de la plage de mesure
Alimentation Piles 2 x 1,5 V AAA (non incluses)
Dimensions du boîtier 76 x 25 x 76 mm
Poids 66,6g (appareil seulement)
La reproduction, même partielle, du présent mode d'emploi est strictement interdite sans l'accord explicite de TFA Dostmann. Les caractéristiques techni-
ques de ce produit ont été actualisées au moment de l'impression et peuvent être modifiées sans avis préalable.
Les dernières données techniques et les informations concernant votre produit peuvent être consultées en entrant le numéro de l'article sur notre site Inter-
net.
www.tfa-dostmann.de
TFA Dostmann GmbH & Co.KG, Zum Ottersberg 12, D-97877 Wertheim, Allemagne 01/17
Termometro digitale per arrosti
Vi ringraziamo per aver scelto l'apparecchio della TFA.
1. Prima di utilizzare l'apparecchio
•Leggete attentamente le istruzioni per l'uso.
Avrete così modo di familiarizzare con il vostro nuovo apparecchio, di scoprirne tutte le funzioni e le componenti, di
apprendere importanti dettagli sulla sua messa in funzione, di acquisire dimestichezza nel suo utilizzo e di usufruire di
alcuni validi consigli da seguire in caso di guasti.
•Seguendo le istruzioni per l'uso, eviterete anche di danneggiare il prodotto e di pregiudicare, a causa di un utilizzo
scorretto, i diritti del consumatore che vi spettano per legge. Decliniamo ogni responsabilità per i danni derivanti
dal mancato rispetto delle presenti istruzioni per l'uso.
•
Allo stesso modo, non siamo responsabili per eventuali misurazioni errate e per le conseguenze che ne possono derivare.
•Prestate particolare attenzione alle misure di sicurezza!
•Conservate con cura queste istruzioni per l'uso.
2. La consegna include
• Termometro digitale per arrosti
• Sonda in acciaio inossidabile con cavo di ca. 100 cm
• Istruzioni per l'uso
3. Tutte le applicazioni e tutti i vantaggi del vostro nuovo apparecchio
• Con display a colori, retroilluminazione e tasti sensore
• Monitoraggio della temperatura interna
TFA_No. 14.1509_anl_01_17 30.01.2017 13:58 Uhr Seite 15

3130
Termometro digitale per arrosti
• Adatto per la preparazione ottimale di carne e pollame
• Adatto per il forno o la griglia, ideale anche per la cottura a basse temperature
• Temperatura regolabile individualmente
• L’allarme suonerà al raggiungimento della temperatura desiderata
• Sonda in acciaio inossidabile con cavo di ca. 100 cm
• Con magnete e supporto (pieghevole)
4. Per la vostra sicurezza
• Il prodotto è adatto esclusivamente agli utilizzi di cui sopra. Non utilizzate il prodotto in maniera diversa da quanto
descritto in queste istruzioni.
• Non sono consentite riparazioni, alterazioni o modifiche non autorizzate del dispositivo.
• Questo apparecchio non è adatto a scopi medici.
Attenzione!
Pericolo di lesioni:
• Indossare guanti resistenti al calore quando si entra in contatto con la sonda durante o dopo la cottura. Pericolo di ustio-
ne!
• Non utilizzare il dispositivo nel forno a microonde.
• Maneggiare con attenzione la sonda appuntita. Tenete sempre la sonda nel cappuccio protettivo.
Termometro digitale per arrosti
• Tenere il dispositivo e le batterie lontano dalla portata dei bambini.
• Non gettare le batterie nel fuoco, non polarizzarle in maniera scorretta, non smontarle e non cercare di ricaricarle. Perico-
lo di esplosione!
• Le batterie contengono acidi nocivi per la salute. Sostituite quanto prima le batterie quasi scariche, in modo da evitare che
si scarichino completamente. Non utilizzate mai contemporaneamente batterie usate e batterie nuove né batterie di tipi
diversi.
• Quando si maneggiano batterie esaurite indossare sempre guanti resistenti alle sostanze chimiche e occhiali di protezione.
Avvertenze sulla sicurezza del prodotto!
• Non esporre l'unità di display a temperature estreme, vibrazioni e urti. Solo la sonda è resistente alle alte temperature fino
a 300 °C, il cavo a 250°C. Non tenere mai la sonda direttamente sopra la fiamma.
• Non immergere l'unità di display, la sonda e il cavo in acqua: l’umidità può penetrare e causare errori di funzionamento.
Non adatto per lavastoviglie.
• Attenzione a spigoli vivi e cerniere. Non piegare né tirare il cavo.
5. Componenti
A: Display (Fig. 2):
A 1: Temperatura attuale A 2: Temperatura desiderata
A 3: Simbolo della batteria
TFA_No. 14.1509_anl_01_17 30.01.2017 13:58 Uhr Seite 16

3332
Termometro digitale per arrosti
B: Tasti sensore (Fig. 1+2):
B 1: Tasto ON/OFF B 2: Tasto +
B 3: Tasto –
C: Struttura esterna (Fig. 3):
C 1: Vano batteria C 2: Supporto (pieghevole)
C 3: Magnete
D: Sonda (Fig. 1):
D 1: Sonda D 2: Cavo
D 3: Connettore a spina
6. Messa in funzione
• Rimuovere il foglio protettivo dal display.
• Rimuovere il coperchio di protezione di gomma della sonda.
• Inserire il connettore per il cavo della sonda nella presa.
• Aprire il vano batteria e inserire due batterie nuove tipo AAA da 1,5 V. Accertarsi di aver rispettato le corrette polarità.
Tutti i segmenti appaiono brevemente.
• Richiudere il vano batteria.
• Sul display vengono visualizzati la temperatura attuale e la temperatura desiderata (77°C predefinita).
• L'apparecchio è pronto per l'uso.
Termometro digitale per arrosti
7. Uso
• Attivare il dispositivo con il tasto ON/OFF.
• Se non si preme alcun tasto per 10 secondi la retroilluminazione si spegne automaticamente.
• Premere il tasto ON/OFF brevemente per attivare di nuovo la retroilluminazione.
• Ogni volta che viene utilizzato un tasto viene emesso un segnale acustico.
• Tenere premuto il tasto + o –per procedere velocemente.
• Tenendo premuto per 2 secondi il tasto ON/OFF il dispositivo si spegne.
7.1 Misurazione
• Inserire la sonda ad almeno 2,5 cm di profondità al centro della parte di carne più spessa, per il pollame tra il petto e le
cosce; la punta non deve toccare né le ossa né la cartilagine e non deve sporgere dall’arrosto. Mettere l’arrosto nel forno
e impostare la temperatura corrispondente del forno.
• Semplicemente mettete all'esterno il cavo. Il cavo si adatta alla guarnizione della guarnizione del forno. Attenzione a spi-
goli vivi e cerniere.
• Fissare il termometro vicino al forno con il magnete (lunghezza del cavo 100 cm) o collocare l'apparecchio su una super-
ficie piana con il supporto.
• Impostare con il tasto + o –la temperatura interna desiderata.
• Quando sarà raggiunta la temperatura impostata suonerà un segnale acustico.
• La retroilluminazione si accende.
• Rimuovere la sonda e spegnere il dispositivo per arrestare l’allarme.
• Il tono di allarme suona fino a quando la temperatura scende sotto la temperatura impostata.
TFA_No. 14.1509_anl_01_17 30.01.2017 13:58 Uhr Seite 17

3534
Termometro digitale per arrosti
8. Cura e manutenzione
• Per pulire l'apparecchio e la sonda utilizzare solo un panno morbido leggermente inumidito. Non usare solventi o abrasivi.
Proteggere dall’umidità.
• Nel caso in cui acqua o vapore dovessero penetrare nella presa, questi potrebbero danneggiare il contatto con il cavo del
sensore. Asciugate la presa con un panno prima dell'uso, prima di connetterlo all'unità di display.
• Spegnete il dispositivo dopo l'uso.
• Rimuovere le batterie, se non si utilizza l'apparecchio per un periodo prolungato.
• Collocare il dispositivo in un luogo asciutto.
8.1 Sostituzione delle batterie
• Cambiare le batterie, se il simbolo della batteria appare sul display.
• Aprire il vano batteria e inserire due batterie nuove tipo AAA da 1,5 V, rispettando le corrette polarità.
• Richiudere il vano batteria.
9. Guasti
Problema Risoluzione del problema
Nessuna indicazione ➜ Accendere l'apparecchio con il tasto ON/OFF
➜ Inserire le batterie rispettando le corrette polarità
➜ Sostituire le batterie
Termometro digitale per arrosti
Indicazione non corretta ➜ Sostituire le batterie
➜ Controllare il contatto della spina con la presa, eventualmente asciugare.
Indicazione LLL ➜ Controllare il contatto della spina con la presa
➜ Connettere la sonda
Temperatura troppo alta ➜ Controllare la sede del sensore
Qualora il vostro apparecchio continui a non funzionare nonostante queste procedure, rivolgetevi al rivenditore presso il quale
lo avete acquistato.
10. Smaltimento
Questo prodotto è stato realizzato utilizzando materiali e componenti di alta qualità che possono essere riciclati e riutilizzati.
È assolutamente vietato gettate le batterie tra i rifiuti domestici. In qualità di consumatori, siete tenuti per
legge a consegnare le batterie usate al negoziante o ad altri enti preposti al riciclaggio in conformità alle vigen-
ti disposizioni nazionali o locali, ai fini di uno smaltimento ecologico.
Le sigle dei metalli pesanti contenuti sono:
Cd=cadmio, Hg=mercurio, Pb=piombo
TFA_No. 14.1509_anl_01_17 30.01.2017 13:58 Uhr Seite 18

3736
Termometro digitale per arrosti
Questo apparecchio è etichettato in conformità alla Direttiva UE sullo smaltimento delle apparecchiature elet-
triche ed elettroniche (WEEE).
Questo prodotto non deve essere smaltito insieme ai rifiuti domestici. Il consumatore è tenuto a consegnare il
vecchio apparecchio presso un punto di raccolta per lo smaltimento di apparecchiature elettriche ed elettroni-
che ai fini di uno smaltimento ecologico.
11. Dati tecnici
Campo di misura -30 °C … 300 °C
Risoluzione 1 °C
HHH/LLL Temperatura fuori dal campo di misura
Alimentazione 2 batterie AAA da 1,5 V (non incluse)
Dimensioni esterne 76 x 25 x 76 mm
Peso 66,6 g (solo apparecchio)
È vietata la pubblicazione delle presenti istruzioni o di parti di esse senza una precedente autorizzazione della TFA Dostmann. I dati tecnici corrispondono
allo stato del prodotto al momento della stampa e possono cambiare senza preavviso.
È possibile trovare dati tecnici e informazioni aggiornate sul prodotto inserendo il numero di articolo sul nostro sito.
www.tfa-dostmann.de
TFA Dostmann GmbH & Co.KG, Zum Ottersberg 12, D-97877 Wertheim, Germania 01/17
Digitale vleesthermometer
Hartelijk dank dat u voor dit apparaat van de firma TFA hebt gekozen.
1. Voordat u met het apparaat gaat werken
•Leest u a.u.b. de gebruiksaanwijzing aandachtig door.
Zo raakt u vertrouwd met uw nieuw apparaat en leert u alle functies en onderdelen kennen, komt u belangrijke details te weten
met het oog op het in bedrijf stellen van het apparaat en de omgang ermee en krijgt u tips voor het geval van een storing.
•Door rekening te houden met wat er in de handleiding staat, vermijdt u ook beschadigingen van het product en ris-
keert u niet dat uw wettelijke rechten door verkeerd gebruik niet meer gelden. Voor schade die wordt veroorzaakt
doordat u geen rekening houdt met de handleiding aanvaarden wij geen aansprakelijkheid.
•Ook zijn wij niet verantwoordelijk voor verkeerde metingen en de mogelijke gevolgen die daaruit voortvloeien.
•Volg in elk geval de veiligheidsinstructies op !
•Deze gebruiksaanwijzing goed bewaren a.u.b.!
2. Levering
• Digitale vleesthermometer
• Sonde uit roestvrijstaal met een kabel, lengte ca. 100 cm
• Gebruiksaanwijzing
3. Hoe u uw nieuw apparaat kunt gebruiken en alle voordelen ervan in één oogopslag
• Met kleurendisplay, achtergrondverlichting en tiptoetsen
• Bewaking van de interne temperatuur
TFA_No. 14.1509_anl_01_17 30.01.2017 13:58 Uhr Seite 19

3938
Digitale vleesthermometer
• Voor het optimaal toebereiden van vlees en gevleugelde
• Te gebruiken voor de bakoven of grill, ideaal ook voor het garen bij een lage temperatuur
• Individuele temperatuurinstelling
• Alarmtoon om aan te geven dat de gewenste temperatuur bereikt is
• Sonde uit roestvrijstaal met een kabel, lengte ca. 100 cm
• Met magneet en standaard (uitklapbaar)
4. Voor uw veiligheid
• Het product is uitsluitend geschikt voor de hierboven beschreven doeleinden. Gebruik het product niet anders dan in deze
handleiding is aangegeven.
• Het eigenmachtig repareren, verbouwen of veranderen van het apparaat is niet toegestaan.
• Het apparaat is niet geschikt voor medische doeleinden.
Voorzichtig!
Kans op letsel:
• Draag hittebestendige handschoenen als u de meetvoeler tijdens of na het koken aanraakt. Gevaar voor verbrandingen!
• Gebruik het apparaat niet in de magnetron.
• Wees erg voorzichtig met de scherpe meetsonde om ongelukken te voorkomen. Bewaar de sonde altijd in de beschermkap.
• Bewaar het apparaat en de batterijen buiten de reikwijdte van kinderen.
Digitale vleesthermometer
• Batterijen niet in het vuur gooien, niet kortsluiten, niet uit elkaar halen of opladen. Kans op explosie!
• Batterijen bevatten zuren die de gezondheid schaden. Zwakke batterijen moeten zo snel mogelijk worden vervangen om
lekkage van de batterijen te voorkomen. Gebruik nooit tegelijkertijd oude en nieuwe batterijen of batterijen van een ver-
schillend type.
• Draag handschoenen die bestand zijn tegen chemicaliën en een beschermbril wanneer u met uitgelopen batterijen han-
teert!
Belangrijke informatie voor de productveiligheid!
• Stel het afleesinstrument niet bloot aan extreme temperaturen, trillingen en schokken. Alleen de voeler is hittebestendig
tot 300°C, de kabel tot 250°C. Houdt de voeler nooit vlak boven het vuur.
• Dompel het afleesinstrument, de voeler en de kabel niet in het water, anders kan er vocht binnendringen en dit tot functie-
storingen leiden. Niet geschikt voor de vaatwasser.
• Let op bij scherpkantige kozijnen en scharnieren! De kabel niet knikken en er ook niet aan trekken.
5. Onderdelen
A: Display (Fig. 2):
A 1: Momentane temperatuur A 2: Doeltemperatuur
A 3: Batterijsymbool
TFA_No. 14.1509_anl_01_17 30.01.2017 13:58 Uhr Seite 20
Table of contents
Languages:
Other TFA Thermometer manuals
Popular Thermometer manuals by other brands

Extech Instruments
Extech Instruments 42545A user manual

OPTEX FA
OPTEX FA Thermo-Hunter PT-S80 instruction manual

Roadpro
Roadpro Ice Warner 3172 installation instructions

Lutron Electronics
Lutron Electronics TM-946 manual

Ponpe
Ponpe Saf-T-Log operating instructions

Sper scientific
Sper scientific 800118C instruction manual