Pro-Star PS-90XD User manual
1
PS-90XD PROSTAR
User’s Manual
PS-90XD
9 Channel HD Output Splitter
1920 x 1080
A-703 HagyeTecnotown 250-3 Hagye-Dong Nowon-Gu Seoul Korea
TEL 82-2 972 0230 FAX 82-2 972 0232 http:// www.prostar.co.kr
Prostar Co.,Ltd.

2
PS-90XD PROSTAR
Index
1. MAIN FEATURES AND FUNCTIONS ‐‐‐‐‐‐‐‐‐‐‐‐‐‐‐‐‐‐‐‐‐‐‐‐‐‐‐‐‐‐‐‐‐‐‐‐‐‐‐‐‐‐‐‐‐‐‐‐‐‐‐‐‐‐‐‐‐‐‐‐‐‐‐‐‐‐‐‐‐‐‐‐‐‐‐‐‐‐‐‐‐‐‐‐‐ 3
2. PS‐90XD SPECIFICATION ‐‐‐‐‐‐‐‐‐‐‐‐‐‐‐‐‐‐‐‐‐‐‐‐‐‐‐‐‐‐‐‐‐‐‐‐‐‐‐‐‐‐‐‐‐‐‐‐‐‐‐‐‐‐‐‐‐‐‐‐‐‐‐‐‐‐‐‐‐‐‐‐‐‐‐‐‐‐‐‐‐‐‐‐‐‐‐‐‐‐‐‐‐‐‐ 4
2‐1. REAR PANNEL SPEC
2‐2. FRONT PANNEL SPEC
2‐3. ELECTRICAL AND PHYSICAL CHARACTERISTICS
2‐4. CATEGORIZED SPECS
3. OUTER APPEARANCE AND FEATURES ‐‐‐‐‐‐‐‐‐‐‐‐‐‐‐‐‐‐‐‐‐‐‐‐‐‐‐‐‐‐‐‐‐‐‐‐‐‐‐‐‐‐‐‐‐‐‐‐‐‐‐‐‐‐‐‐‐‐‐‐‐‐‐‐‐‐‐‐‐‐‐‐‐‐‐‐‐‐‐‐ 5
3‐1. PS‐90XD FRONT
3‐2. PS‐90XD REAR
4. MAIN FEATURES DESCIPTION‐‐‐‐‐‐‐‐‐‐‐‐‐‐‐‐‐‐‐‐‐‐‐‐‐‐‐‐‐‐‐‐‐‐‐‐‐‐‐‐‐‐‐‐‐‐‐‐‐‐‐‐‐‐‐‐‐‐‐‐‐‐‐‐‐‐‐‐‐‐‐‐‐‐‐‐‐‐‐‐‐‐‐‐‐‐‐‐‐‐‐‐‐‐ 6
4‐1. MONITOR SCREEN
4‐2. MOTION DETECTION
4‐3. VIDEO LOSS ARARM
4-4. Serial REMOTE CONTROL
4-5. Paralell REMOTE CONTROL
5. MENU SETUP ‐‐‐‐‐‐‐‐‐‐‐‐‐‐‐‐‐‐‐‐‐‐‐‐‐‐‐‐‐‐‐‐‐‐‐‐‐‐‐‐‐‐‐‐‐‐‐‐‐‐‐‐‐‐‐‐‐‐‐‐‐‐‐‐‐‐‐‐‐‐‐‐‐‐‐‐‐‐‐‐‐‐‐‐‐‐‐‐‐‐‐‐‐‐‐‐‐‐‐‐‐‐‐‐‐‐‐‐‐‐‐‐ 7
5‐1. TIME/DATE SETUP
5‐2. CAMERA NAME SETUP
5‐3. SEQUENTIAL DISPLAY SETUP
5‐4. DISPLAY SETUP
5‐5. MOTION DETECTION SETUP
5‐6. OTHERS
6. INSTALLATION ‐‐‐‐‐‐‐‐‐‐‐‐‐‐‐‐‐‐‐‐‐‐‐‐‐‐‐‐‐‐‐‐‐‐‐‐‐‐‐‐‐‐‐‐‐‐‐‐‐‐‐‐‐‐‐‐‐‐‐‐‐‐‐‐‐‐‐‐‐‐‐‐‐‐‐‐‐‐‐‐‐‐‐‐‐‐‐‐‐‐‐‐‐‐‐‐‐‐‐‐‐‐‐‐‐‐‐‐‐‐‐ 10
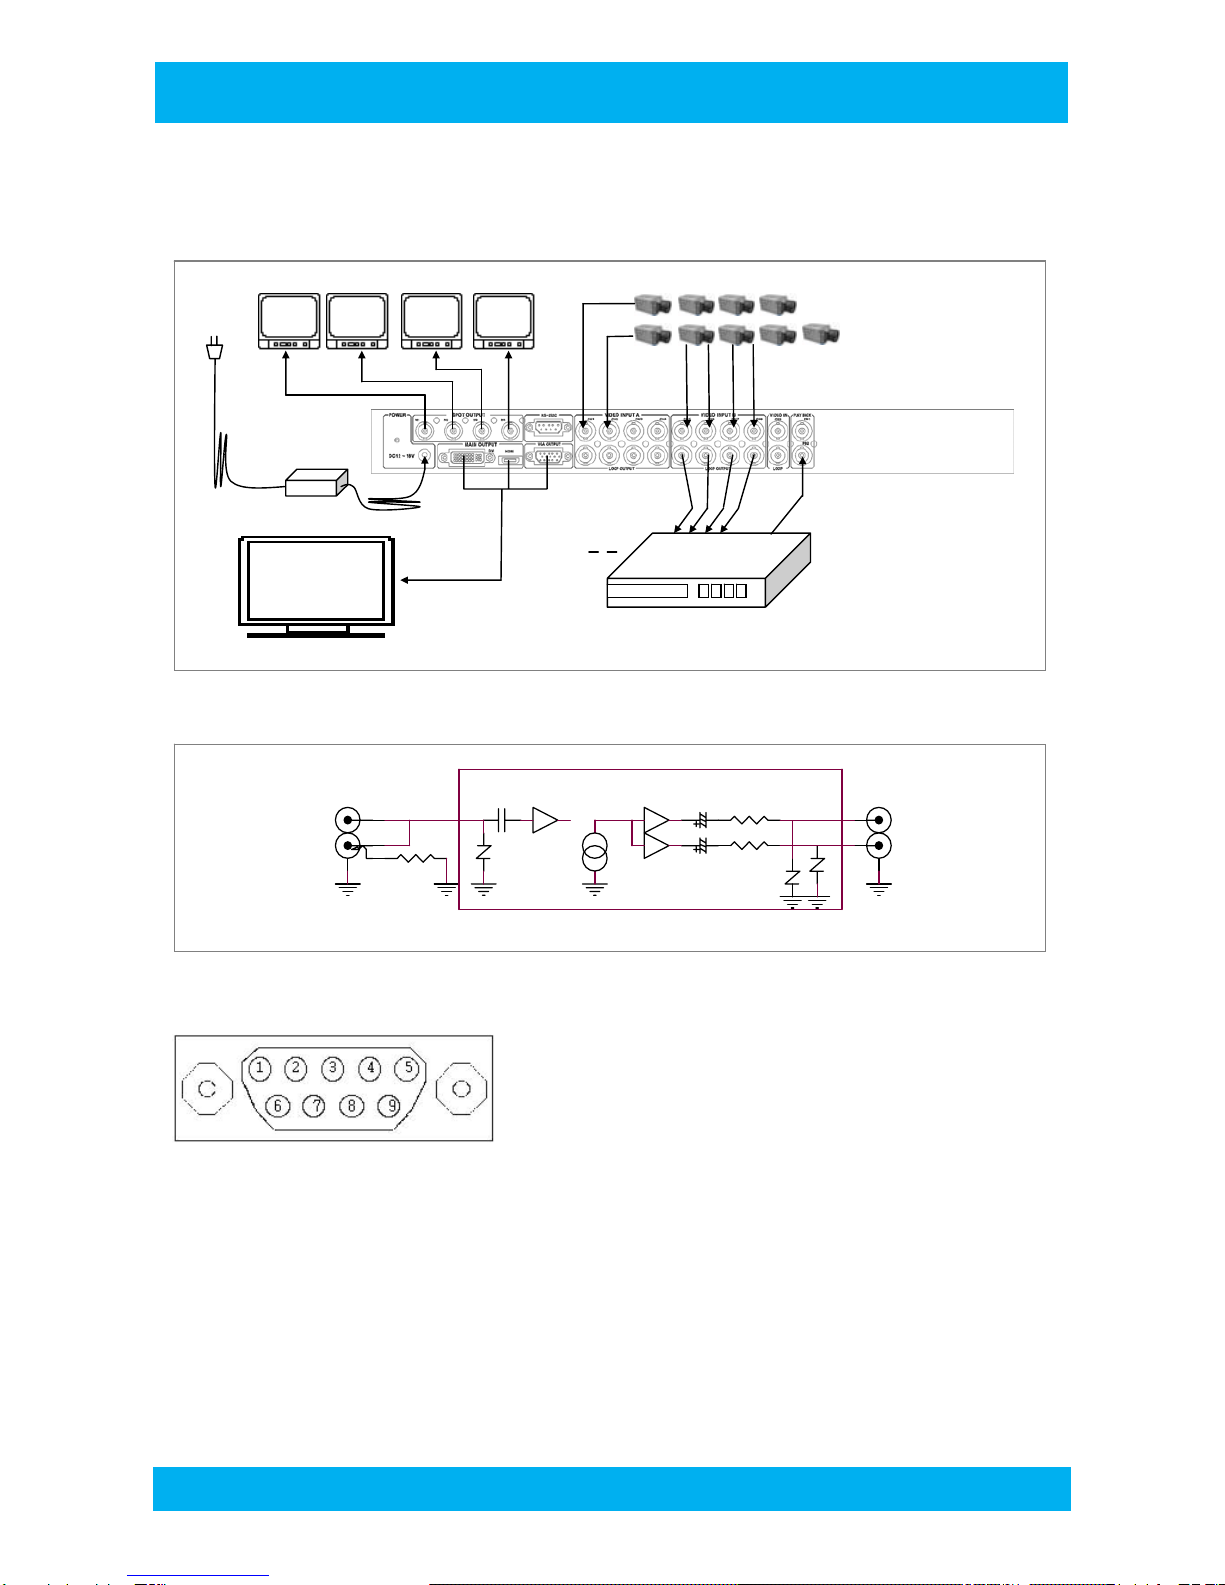
6‐1. VIDEO SIGNAL CONNECTION
6‐2. VIDEO SIGNAL INPUT/OUTPUT PROTECTION
6‐3. RS‐232C REMOTE CONTROL PORT
6-4. RS-232C Remote Control Code
7. INITIAL MODE SETUP‐‐‐‐‐‐‐‐‐‐‐‐‐‐‐‐‐‐‐‐‐‐‐‐‐‐‐‐‐‐‐‐‐‐‐‐‐‐‐‐‐‐‐‐‐‐‐‐‐‐‐‐‐‐‐‐‐‐‐‐‐‐‐‐‐‐‐‐‐‐‐‐‐‐‐‐‐‐‐‐‐‐‐‐‐‐‐‐‐‐‐‐‐‐‐‐‐‐‐‐‐‐ 11

3
PS-90XD PROSTAR
XDMI
DVI
VGA
CVBS
X 4
HD Monitor
SPOT Monitor (CVBS)
Camera
CVBS
x 9
1. Main features and functions
PS-90XD is a high-quality 9ch screen splitter manufactured with Prostar Co., Ltd.’s long experience and know-how.
All-in-one board design and high-density digital components guarantee excellent display quality.
PS-90XD supports such functions as alarm, buzzer, remote control, motion detection, etc.
Main features
◈ 9 channels split displayed on a Ful HD monitor(1920x1080)
◈ NTSC 720x480 / PAL 720x576
◈ NTSC / PAL
◈ Auto Sequence and Video Loss Auto Skip
◈ Video Motion Detection
◈ OSD – On Screen Display and Real Time Clock
◈ 1:1(FULL)Screen Call up
◈ Freeze
◈ Variable Monitor Output: HDMI, DVI, VGA
◈ Spot Monitor Output
◈ Remote Control Port (RS‐232C)
◈ 19” Rack Mount type
◈ Low Poewer Consumption (Less then 6 W)
PS-90XD
Splitter Diagram

4
PS-90XD PROSTAR
2. PS‐90XD Specigication
2‐1. PS‐90XD Rear Pannel
Name 갯수 Type Signal Description
Camera Input 9 BNC CVBS 1Vpp @75 Ohm Load, CH1~CH9
Loop Output 9 BNC CVBS Auto Switch type, CH1~CH9
Play Back Input 2 BNC CVBS 1Vpp @75 Ohm Load, PB1,PB2
Main Monitor
Output
1 XDMI XDMI Digital Signal
1 DVI DVI Digital Signal
Secondry
Monotor Outpu 1 DSUB-15 VGA Analog VGA Signal
Spot Monitor 1 BNC CVBS 1Vpp @75 Ohm Load, only Quad Split
Remote Control
Serial 1 DSUB-9 RS-232C Prostar Protocol
Power 1 DC Jack DC12~24V DC12~24V Power Input
Ground 1 Bolt 3Px7mm Ground Terminal
2‐2. Front pannel
Name Button No. Description
Camera 1,2,3,4,~9 9 1~9 FULL Screen / Cutsor Move
Display
4 SPLIT 1 4 Split Mode
9 SPLIT 1 9 Split Mode or 6 Split Mode
FREEZE 1 All Channel Freeze
SEQUENCE 1 Sequential Display
External Input PLAY 1 Select PB(Play back) Input
MENU MENU 1 Menu Mode / Exit from Menu
2‐3. Electrical and Physical size and characteristics
Name Description
Input Resolution NTSC - 720x480 60field, 30frame/Sec
PAL - 720x576 50field, 25frame/Sec
Display Output Resolution XDMI, DVI - 1920x1080
CVBS - 720x480 60field, 30frame/Sec
Size W 300mm x D 200(+10)mm x H 44mm
Weight 2Kg
Power DC12V / 0.48A / Less then 6W
Operation Temperature/ Humedity ‐10 °C ~ +50 °C / 20~85 % RH
2‐3. Categorized Specs
Name Values Description
Time/date Asia‐Euro‐US, Disp. ON/OFF Three display modes, 24-hour display (On/Off)
Camera Title 12 Character, Disp. ON/OFF OSD type diplay (English,Number,Special Character) On/Off
Switching Time in
Sequence Off‐59Sec Sequential channel switching time (split mode included, and
video loss channel excluded)
Split Screen mode 4 Type FULL, 4,9 or 6
Motion Detection ON/OFF Motion detection and motion sensitivity setup according to
the program-set areas. (ON/Off)
5
PS-90XD PROSTAR
3. Outer Appearance and Features
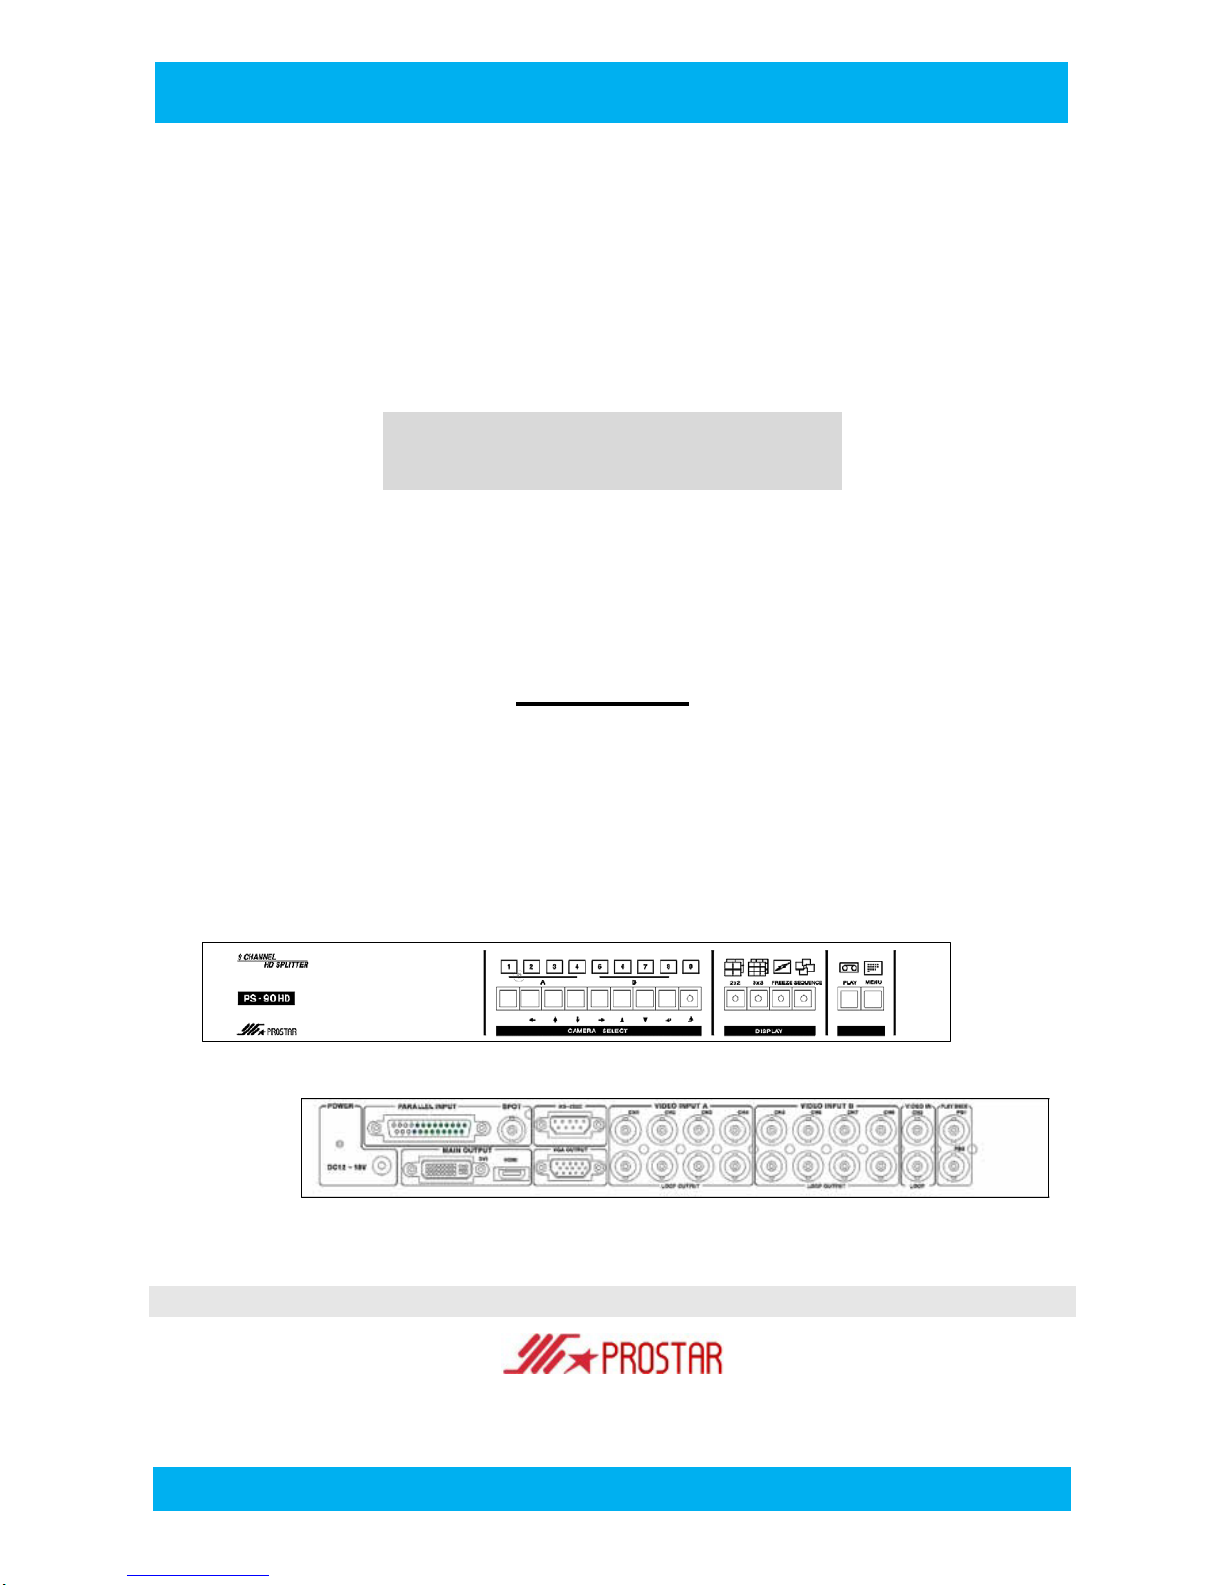
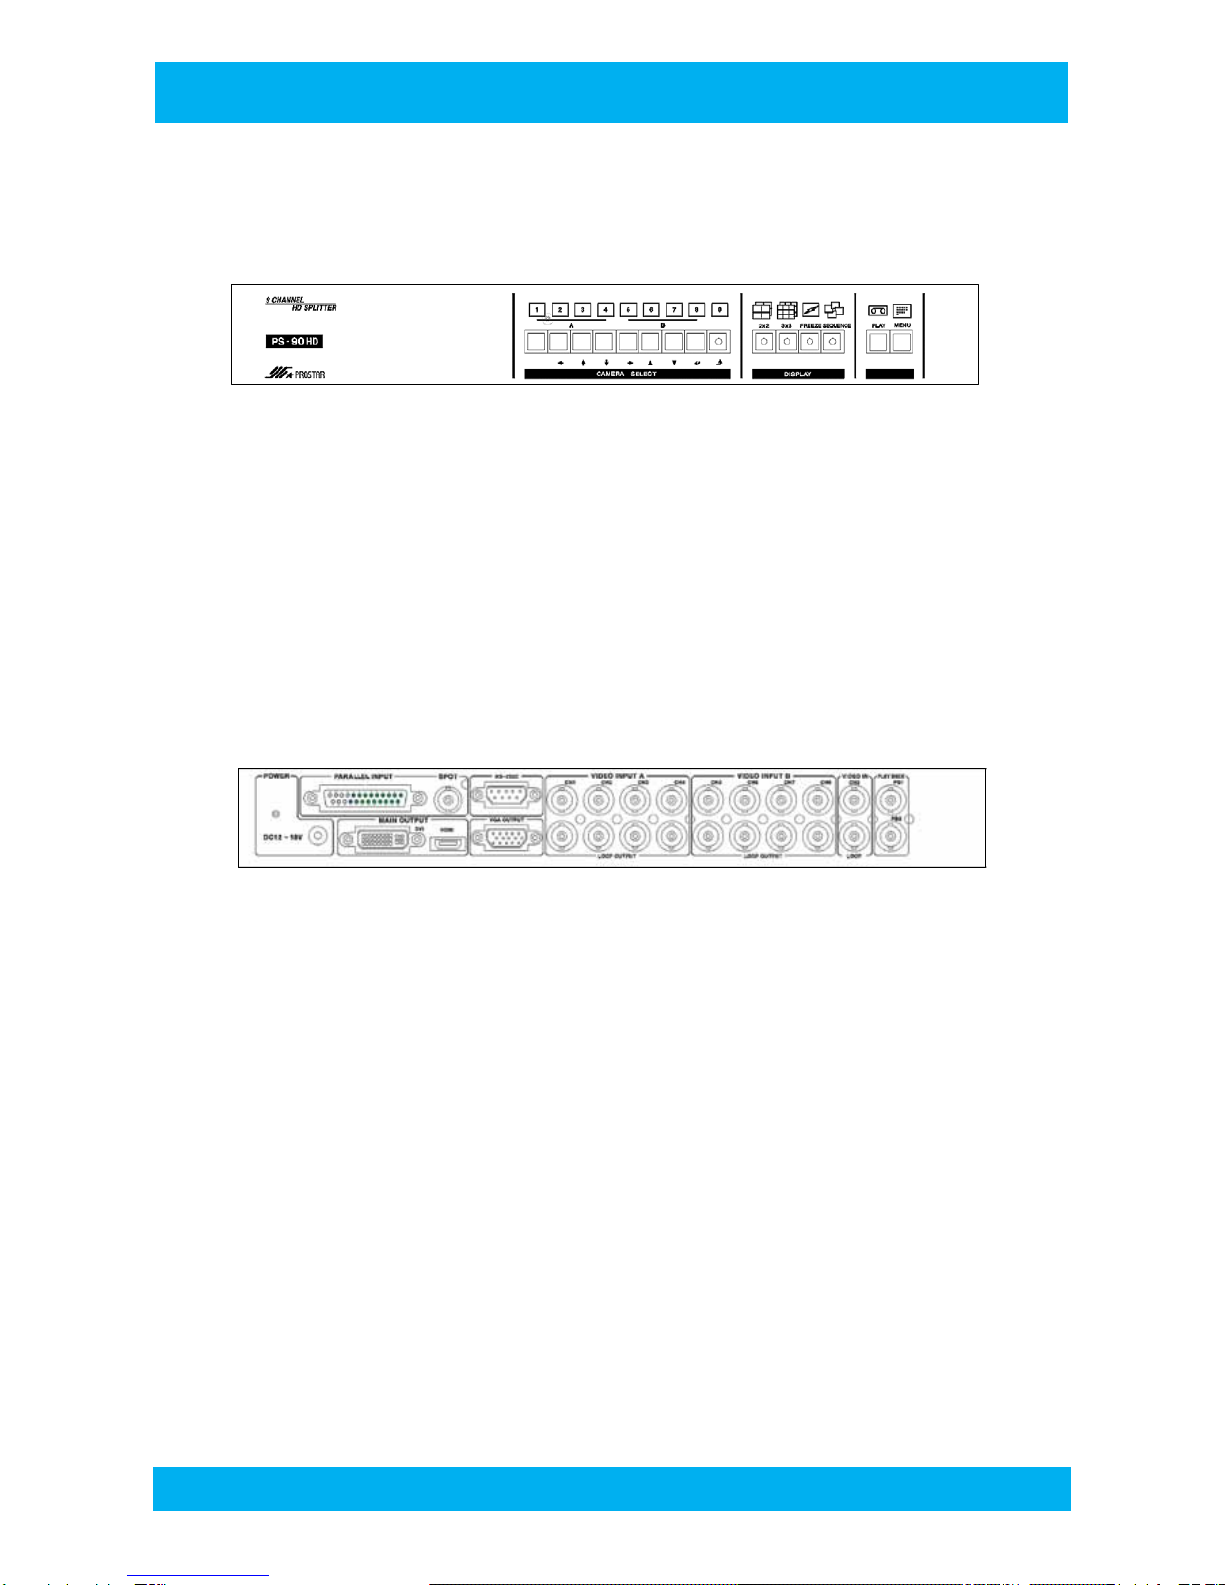
3‐1. PS‐90XD Front Pannel
① ② ③ ④ ⑤
①Model / Logo
②Full Screen Select button Ch1∼9
③4, 9 Split (6 Split) Selection Button and FREEZE / SEQUENCE Button
④Play-Back from Rear BNC PB1~2
⑤Menu Mode
3‐2. PS‐90XD Rear Pannel
① ② ③ ④ ⑤ ⑥ ⑦ ⑧
⑨ ⑩ ⑪ ⑫ ⑬ ⑭ ⑮
① Earth Terminal
② Paralell Remote control
③ SPOT Output
④ RS-232C Terminal
⑤ Video Input (CH. 1‐4)
⑥ Video Input (CH. 5‐8)
⑦ Video Input (CH. 9)
⑧ Play-Back Input (PB1)
⑨ Power Input DC12V~24V
⑧ Monitor Output DVI
⑨ Monitor Output HDMI
⑩ Monitor Output VGA
⑪ LOOP OUT (CH.1-4)
⑫ LOOP OUT (CH.5-8)
⑬ LOOP OUT (CH.9)
⑭ Play-Back Input (PB1,2)

6
PS-90XD PROSTAR
4. Main features Decription
4-1. Monitor Output
1). Main Monitor Output : DVI and HDMI is the only one to use.
2). The main output and VGA output, the same split-screen output.
3). SPOT output will operate as separate from the main output. Only Quad Split Screen is provided.
4-2. Video Motion Detaction
You can activate the alarm when there’s a motion within the set area and the letter “M” appears on
the screen with the beep.
4-3. Video Loss Alarm
In case of a video loss because of a possible camera malfunction, the letter “L” or appears on the screen
with the beep.
4-4. Serial Remote Control
RS-232C port by using a computer or other device that can be controlled using the specified protocol.
4-5. Paralell Remote Control
You can use this port to control other devices' contacts or switches as shown in the diagram below.
The operation differs according to the state of S15.
Operation Table
Items Operation
Short S1~S9 to Gnd Full screen corresponding to contact point
Short S1~S9 to Gnd
( Multiple points)
S15-Gnd Open Full Screen corresponding to final contact point
S15-Gnd Short Multiple channels switch sequentially full screen.
Sequential conversion interval: menu setting 5-3-1
S11- Gnd Short Sequential full-screen switching - Same operation as the front SEQ button.
S12- Gnd Short Switch to Quad Split A screen. (CH1,2,3,4) - Same operation as front 4 Split button
S13- Gnd Short Switch to Quad Split A screen. (CH5,6,7,8) - Same operation as front 4 Split button
S14- Gnd Short Switch to 3 x 3 Split screen. - Same operation as front 4 Split button
Ofen all No response.
7
PS-90XD PROSTAR
5. Menu Setup
You push MENU Button to enter the Menu mode. The values set in Menu remain unchanged even after power-off.
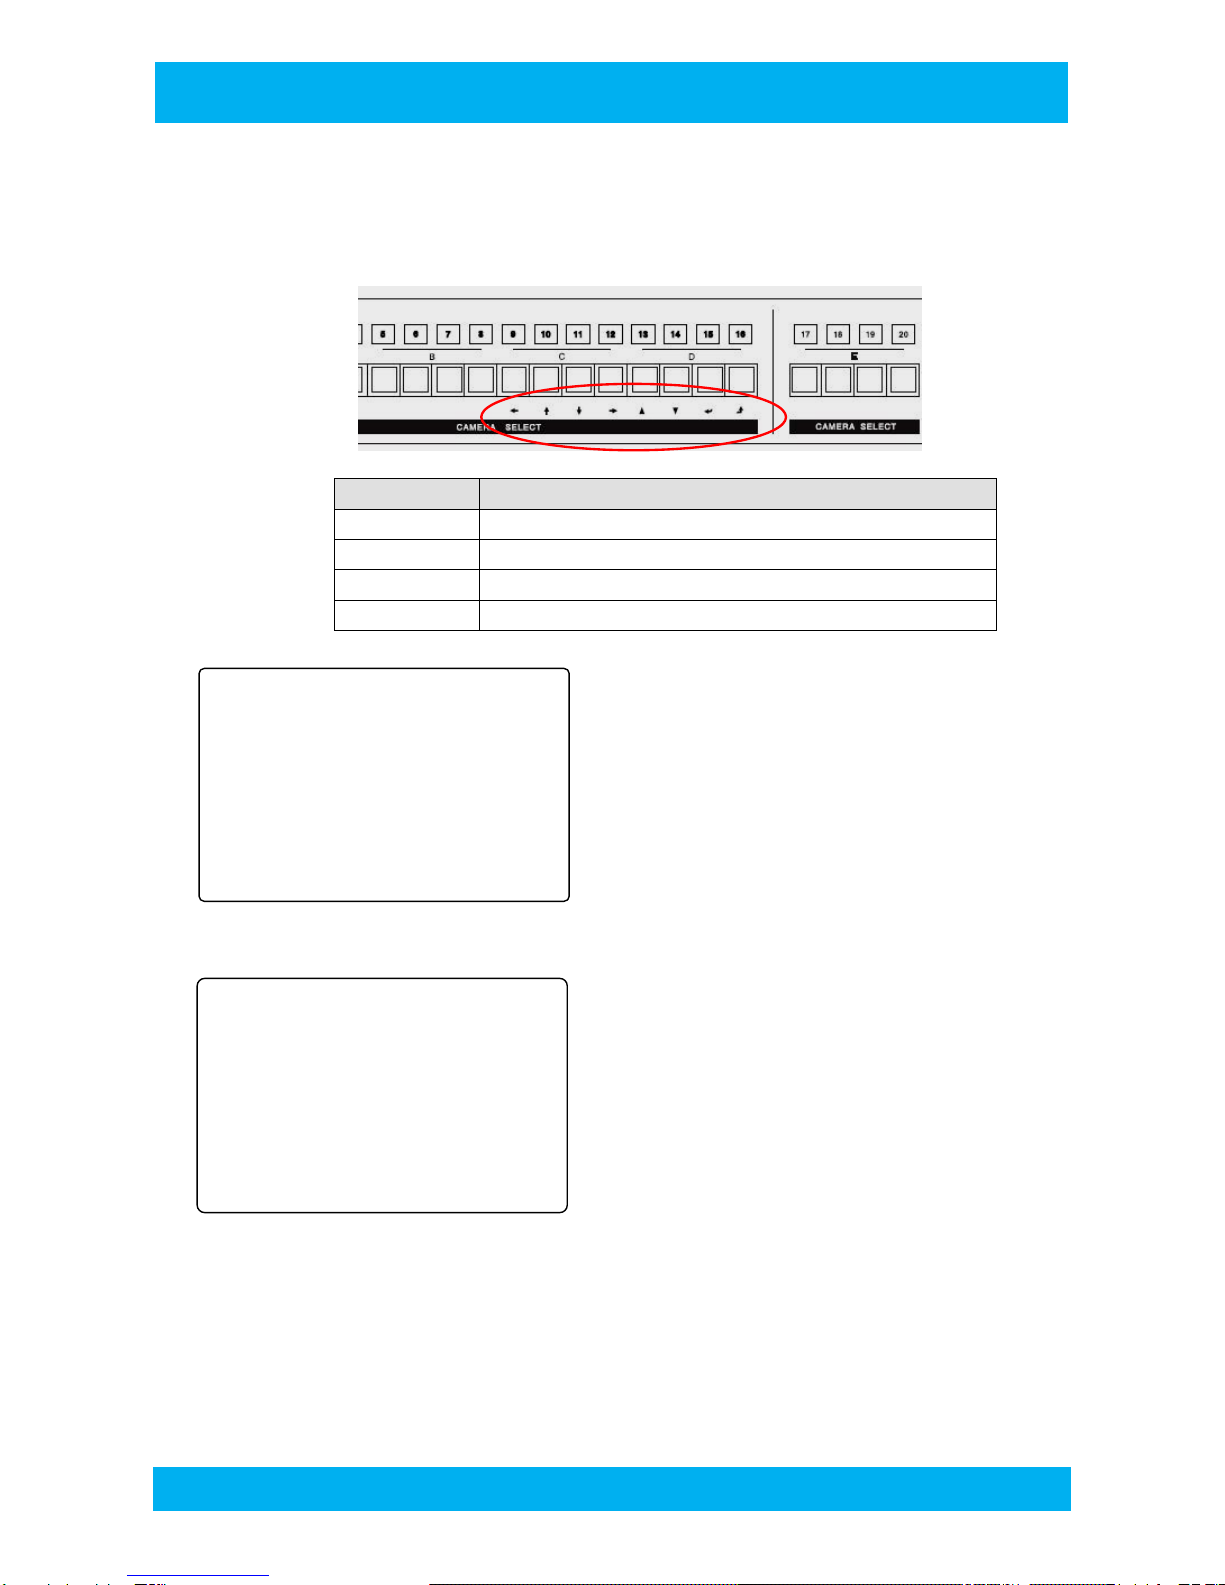
You can move cursors to set values with the keys as below:
You select any menus with the cursors (× Ø) and enter (©)
to have sub menus.
5-1. Time/Date Setup
1. TIME: Time Setup.
2. DATE: Date Setup.
3. TIME/ DATE DISPLAY: You can set the time Time or Display
on or off.
4. DATE FORMAT: You can choose any one of three Date
formats (ASIA, US, EURO).
1) ASIA: yyyy - mm - dd
2) USA : mm - dd – yyyy
3) EURO: dd - mm – yyyy
5. TIME CORRECT: You can set time correction values(seconds) to maintain the most correct time. The set values
will be added to or subtracted from the current time every day or month.
6. TIME/DATE OSD SIZE : The size of the letter is x1, x1.5, x2
7. TIME/DATE OSD LOCATION : You can change the date time display position to one of A, B, or C
Button Button Function
Õ × Ø Ö Move cursor
▲▼ Incriease or Decrease the Value
© Enter Key (confirmation) / Enter Submenu.
® Exit / Enter Uppermenu.
- MAIN MENU-
1.
TIME/DATE
2.
CAMERA
3.
AUTO SEQUENCE
4.
DISPLAY
5.
MOTION DETECTION
6.
MISCELLANEOUS
- TIME/DATE -
1. TIME : 12:25:30(HH:MM:SS)
2. DATE: 2001-01-09(YY-MM-DD)
3. TIME/DATE DISPLAY : ON
4. DATE FORMAT : ASIA
5. TIME CORRECT: DAY+00SEC
6.TIME/ DATE OSD SIZE : 1.5X
7. TIME/DATE OSD LOCATION :B

8
PS-90XD PROSTAR
5-2. Camera Name Setup
1. 1~: To change the camera name, you select any channel using
cursors and push the enter button ©. Now you can choose characters
for the channel you have selected. You move cursors Õ,Ö to place
the cursor on the character you’d like to choose, and then you push
the enter button ▲,▼. You repeat the same process until you finish
inputting the whole words.
2. DISPLAY CH_NAME: If you choose OFF the name does not appear
on the screen.
5‐3. Sequencial Display Setup
1. FULL: You set the switching time of channels for the Sequence
mode. If a camera is set in off mode, the corresponding channel does
not appear in the Sequence mode.
2. 4SPLIT: You can include 4SPLIT mode in the Sequence by setting
time values for it.
5. LOSS AUTO SKIP : Loss Auto Skip: If it’s ON, video loss channels do
not appear in the Sequence. If it’s OFF, even the video loss channels
appear in the Sequence.
5‐4. Display Setup
1. RESOLUTION : The resolution sets the main output.
Choose one of AUTO, 1920X1080, 1650X1050, 1280X1024.
AUTO is to scale to moitor resolution automatically .
2. OSD DISPLAY: Set to OFF, the camera name, time, date, etc,
characters on the screen does not display information.
3. OSD SIZE: Set to font size to one of 1, x1.5, x2 or Auto.
4. OSD POSITION: Select the place on which you will place the one
among A, B, C, D, E , and F 6 type of the OSD.
A B C D E F
5. 9 SPLIT MODE: You can select 9 Split mode or 6 Split mode.
9 SPLIT button in front follow this setting, showing 9 split mode or 6 split mode.
CAM 1
CAM 2
CAM 3
01/30
CAM 4
10:01
CAM 1
CAM 2
CAM 3
01/30
CAM 4
10:01
CAM 1
CAM 2
CAM 3
01/30
CAM 4
10:01
01
/
30
CAM 1
10:01
CAM 2
CAM 3
CAM 4
01
/
30
C AM 1
10:01
CAM 2
CAM 3
CAM 4
01
/
30
CAM 1
10:01
CAM 2
CAM 3
CAM 4
‐CAMERA ‐
1. CH01_NAME: CAM01
2. CH01_NAME: CAM02
3. CH01_NAME: CAM03
4. CH01_NAME: CAM04
5. CH01_NAME: CAM05
6. CH01_NAME: CAM06
7. CH01_NAME: CAM07
8. CH01_NAME: CAM08
9. CH01_NAME: CAM09
10. DISPLAY CH_NAME: ON
‐DISPLAY ‐
1. RESOLUTION: 1920X1080
2. OSD DISPLAY: ON
3. OSD SIZE : AUTO
4. OSD POSITION : A
5. 9 SPLIT MODE : 9 SPLIT
6. CH BOUNDARY :GRAY
‐AUTO SEQUENCE -
1. FULL : 03SEC
2. 4SPLIT : 03SEC
3. LOSS AUTO SKIP: ON
9
PS-90XD PROSTAR
- MOTION DETECTION ‐
1.CH01:OFF/AREA 6.CH06:OFF/AREA
2.CH02:OFF/AREA 7.CH07:OFF/AREA
3.CH03:OFF/AREA 8.CH08:OFF/AREA
4.CH04:OFF/AREA 9.CH09:OFF/AREA
5.CH05:OFF/AREA
10.MOTION SENSITIVITY : 10
11.MOTION DISPLAY TIME: 05
12.CALL MODE: SPLIT
- MISCELLANEOUS -
1.REMOCONID :OFF
2. VIDEO LOSS BUZZER TIME : 03
3. VIDEO LOSS DISPLAY :OFF
F/W: v1.6.2
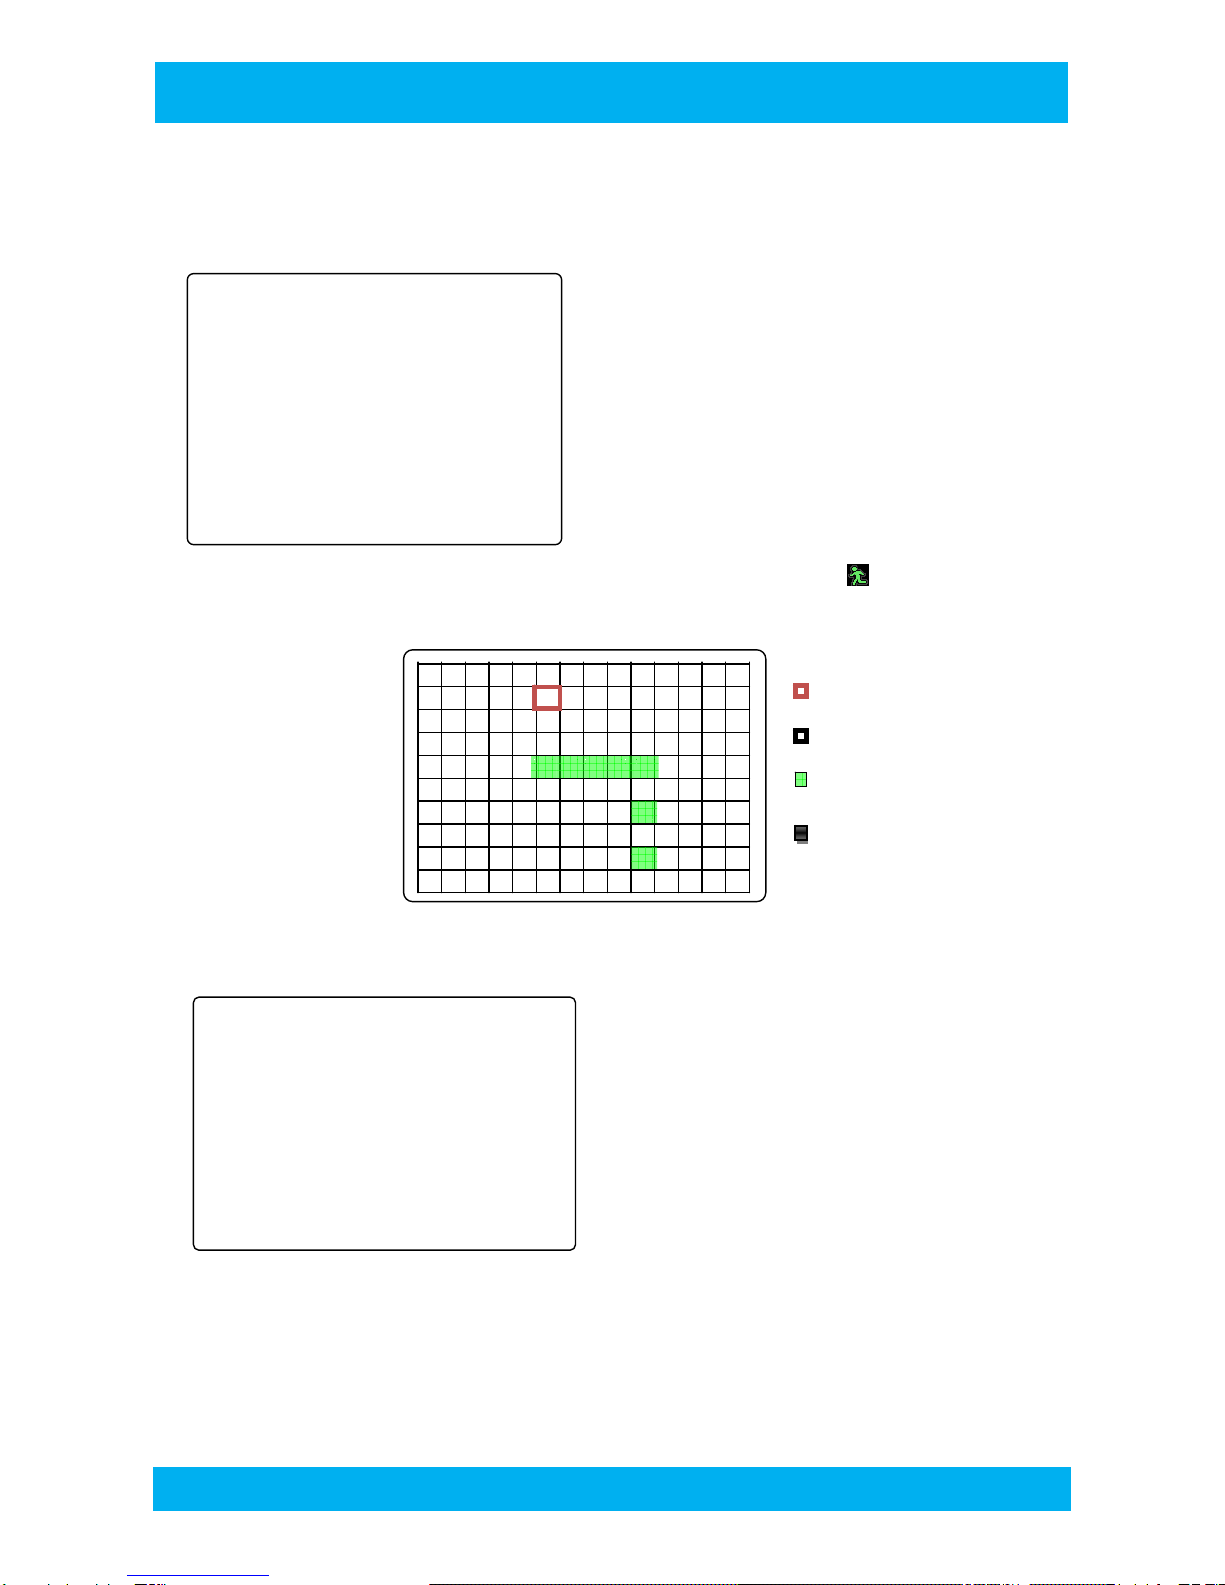
5-5. Motion Detection Setup
Each channel can detect individual program Motion Detection areas and each channel can you turn this feature
On and off.
1~9 CHxx: OFF/AREA : You can set the motion detection area
and motion sensitivity for each channel. You can deactivate
it(OFF) if you are not going to use it. If you select ‘AREA’, you
are required to mark areas for motion detection.
17. MOTION SENSITIVITY: Set the motion sensitivity. As the
sensitivity gets closer to ‘1’, the more sensitive it becomes.
18. MOTION DISPLAY TIME: After motion is detected,
whether to set how long to display.
19. CALL MODE: When motion is detected on a certain
channel, the channel becomes a full screen in FULL mode. In QUAD mode ‘M’ or appears on the
motion-detected channel to identify the channel.
Motion Detaction Area:
Cell Size: 16X12 Red : Cursor
Black : Detection Area
Green : Detection Display
Black: Ignore Area
5-6. Others
1. REMOTE CONTROL ID: When controlling more than one
device using RS232C, you assign different device numbers
to each device to control them remotely.
2. F/W : version indicates
10
PS-90XD PROSTAR
6. Installation
6-1. Video Signal Connection
---
6-2. Video Input Output Signal Protection
6-3. RS-232C Pin Assignment
2 TXD
3 RXD
5 GND
1) data bit = 8
2) parity = None
3) stop bit = 1
4) board rate =9,600 bps
5) flow control = Harf Simplex (Only Recieve)
LOOP OUT
75
75
OUTPUT
BNC
1
2
3
75 TO MONITOR
2Vpp
ESD PROTECTORESD PROTECTOR
CAMERA INPUT
BNC
1
2
3
4
CIRCUITPROCESSING
12V Adapter
Spot Monitor 1, 2, 3, 4
Main Monitor
4 Channel or 9 Cahnnel DVR

11
PS-90XD PROSTAR
6-4. RS-232C Remote Control Code
① STAND ALONE: You can use the following three codes when using one serial port. You should check MULTI
REMOTE ID off after entering MISCELLANEOUS in menu.
② MULTI COMMUNICATION: If you want to control more than one multiplexer with one port, you should have
HEADER codes to distinguish the multiplexers from one another. The maximum number of multiplexers to be
combined is 16. You have to set each multiplexer with different MULTI REMOTE ID from 1~16, after entering
MISCELLANEOUS in menu.
SOH HEADER STX OPCODE ETX
③ The following codes show each of their functions.
CONTROL CODE OP CODE
INITIAL CODE CODE FUNCTION CODE FUNCTION
SOH 0x01
0x01 CH1
0x21 2X2
STX 0x02
0x02 CH2
0x22 3X3
ETX 0x03
0x03 CH3
0x04 CH4
0x05 CH5
0x25 FREEZE
0x06 CH6
0x26 SEQ
0x07 CH7
0x08 CH8
0x28 MENU
0x09 CH9
7. Initial Mode Seup
After a possible malfunction or repair of a device, the status of inner programs might change. In this case,
you can retrieve the initially setup mode.
To go back to the initially setup mode, you turn the power on and off while you keep pushing the “MENU”
button
STX OP CODE ETX

12
PS-90XD PROSTAR
INSTRUCTIONS
1. READ ALL SAFETY AND OPERATING INSTRUCTIONS BEFORE OPERATING THIS PRODUCT.
2. RETAIN THE SAFETY AND OPERATING INSTRUCTIONS FOR FUTURE REFERENCE.
3. UNPLUG THE PRODUCT BEFORE CLEANING. DO NOT USE LIQUID OR AEROSOL CLEANERS. USE A DAMP CLOTH FOR CLEANING.
4. ONLY MANUFACTURER-RECOMMENDED ATTACHMENTS ARE TO BE USED. OTHERWISE, IT MAY RESULT IN THE RISK OF FIRE,
ELECTRIC SHOCK OR INJURY.
5. KEEP THE PRODUCT AWAY FROM LIQUID OR ANY OTHER TYPE OF MOISTURE.
6. DO NOT PLACE THIS PRODUCT ON AN UNSTABLE CART, STAND OR TABLE. OTHERWISE, IT MAY CAUSE SERIOUS INJURY TO A
CHILD OR ADULT AND SERIOUS DAMAGE TO THE PRODUCT. ANY MOUNTING OF THE PRODUCT SHOULD FOLLOW THE
MANUFACTURER'S INSTRUCTIONS AND SHOULD USE A MOUNTING ACCESSORY RECOMMENDED BY MANUFACTURER.
7. THE PRODUCT SHOULD BE OPERATED ONLY FROM THE TYPE OF POWER SOURCE INDICATED ON THE LABEL.
8. DO NOT PUT ANYTHING ON THE POWER CORD AND PREVENT IT FROM ANY TYPE OF ABUSE.
9. IF THE PRODUCT IS NOT USED FOR A LONG TIME, PLEASE UNPLUG IT FROM THE POWER SUPPLY AND DISCONNECT IT FROM
OTHER EQUIPMENT. THIS WOULD PREVENT FROM DAMAGE TO THE PRODUCT DUE TO LIGHTING AND POWER-LINE SURGES.
10. DO NOT OVERLOAD WALL OUTLETS AND EXTENSION CORDS TO PREVENT FROM THE RISK OF FIRE OR ELECTRIC SHOCK.
11. DO NOT INSERT ANY KIND OF OBJECTS INTO THE PRODUCT.
12. DO NOT TOUCH ANY PARTS INSIDE FOR REPAIR. THERE ARE NO USER SERVICEABLE PARTS. IT MAY EXPOSE YOU TO
DANGEROUS VOLTAGES OR OTHER HAZARDS. REFER TO QUALIFIED PERSONNEL FOR REPAIR.
13. REPLACEMENT PARTS ARE TO BE PROVIDED BY THE AUTHORIZED TECHNICIANS DESIGNATED BY THE MANUFACTURER. THE USE
OF UNAUTHORIZED SUBSTITUTE COMPONENTS MAY RESULT IN FIRE, ELECTRIC SHOCK OR OTHER HAZARDS.
14. ASK THE SERVICE TECHNICIAN AS FOR SAFETY CHECK UPON COMPLETION OF ANY SERVICE OR REPAIR OF THE PRODUCT.
WARRANTY AND LIABILITY
WARRANTY
PROSTAR CO., LTD WARRANTS THAT THE GOODS ARE FREE FROM DEFECTS IN MATERIAL AND WORKMANSHIP AND WILL
SUBSTANTIALLY CONFORM TO PROSTAR’S PUBLICLY AVAILABLE SPECCIFICATIONS DURING THE PERIOD OF ONE YEAR FROM THE DATE
OF PURCHASE.
EXTENT OF LIMITED WARRANTY
THIS LIMITED WARRANTY DOES NOT COVER THE DAMAGES DUE TO EXTERNAL CAUSES, INCLUDING ACCIDENT, PROBLEM WITH
ELECTRICAL POWER, AND USAGE NOT IN ACCORDANCE WITH PRODUCT INSTRUCTIONS, MISUSE, NEGLECT, ALTERATION, REPAIR,
IMPROPER INSTALLATION, OR IMPROPER TESTING.
LIMITATIONS OF LIABILITY
PROSTAR CO., LTD’S RESPONSIBILITY UNDER THIS OR ANY OTHER WARRANTY,
IMPLIED OR EXPRESSED, IS LIMITED TO REPAIR, REPLACEMENT OR REFUND, AS SET FORTH ABOVE.
PROSTAR IS NOT RESPONSIBLE FOR DIRECT, SPECIAL, INCIDENTAL OR CONSEQUENTIAL DAMAGES RESULTING FROM ANY BREACH OF
WARRANTY OR UNDER ANY OTHER LEGAL THEORY INCLUDING, BUT NOT LIMITED TO, LOST PROFITS, DOWNTIME, GOODWILL, DAMAGE
TO OR REPLACEMENT OF EQUIPMENT AND PROPERTY, AND ANY COSTS OF RECOVERING, REPRODUCING ANY DATA STORED IN OR
USED WITH A SYSTEM CONTAINING THE GOODS.
Prostar Co., Ltd.
Table of contents


