Pro-Tronik ENERGY EPP PRO User manual

Manueldel’utilisateur/Usermanual :ENERGY
Caractéristiques:
1. Modèled’aviond’entrainementetdecompétitionpourvoltigeIndoorF3P.
2. FabriquéenEPPdécoupéavecprécisionaulasersurmachineàcommandenumérique.
L
’
EPP est très résistant aux crashs
Fuselage Aile/Wing
LEPP
est
très
résistant
aux
crashs
.
3. Modèleéquipéd’aérofreinspermettantunvolàvitesseconstante,mêmeenphase
descendanted’unefigure.
4. Designefficaceetoptimiséoffrantunegrandesurfacedeportancelatéralepourune
excellentestabilitéenvoltranche.
5. Quevoussoyezunprofessionnelduvol3Doudébutantdégrossi,cetmodèleseralechoix
que vous ne regretterez pas
que
vous
ne
regretterez
pas
.
Features :
1. TrainingandcompetitionmodeldesignedforindoorF3Paerobatics.
2. LaserCNCmadeofEPP,almostcrashproofmaterial.
3. Themodelisequippedwithairbrakesthatallowsthespeedtobethesameineveryflight
configuration even in vertical position
configuration
even
in
vertical
position
.
4. Optimizedandefficientdesignofferingagreatsidesurface,perfectforknifeedgeflight.
5. Whetheryou'reaprofessional3Dflyeroratrainedbeginner,thisplanewillbethechoice
youwillnotregret.
Longueur(Length): 84.5mm(33.2in.)
Envergure(Wingspan): 830mm(32.6in.)
Masse(Flying weight): 140‐170g
Moteur(Motor): DM2204‐1600
Contrôleur(ESC): BlackFet8A
Hélice(Propeller): APCSF8x3.8
Servos: 3x5gor6g
1
www.a2pro.fr
Batterie(Battery): 2SliPo 350‐500mAh
Produitsrecommandés:
A2Pro– Promodel proposeunegammedeproduitscomplètequivouspermettrademeneràbienlaconstructionde
votremodèle.Lesproduitssuivantssontparfaitementcompatiblesaveclesmatériauxconstituantsvotre
dèl
Manueldel’utilisateur/Usermanual :ENERGY
mo
dèl
e.
Recommended products :
A2Pro‐ Promodel offersanexhaustiverangeofproductsthatwillallowyoutocompletetheconstructionofyour
model.Thefollowingproductsarefullycompatiblewithyourmodelconstituentmaterials.
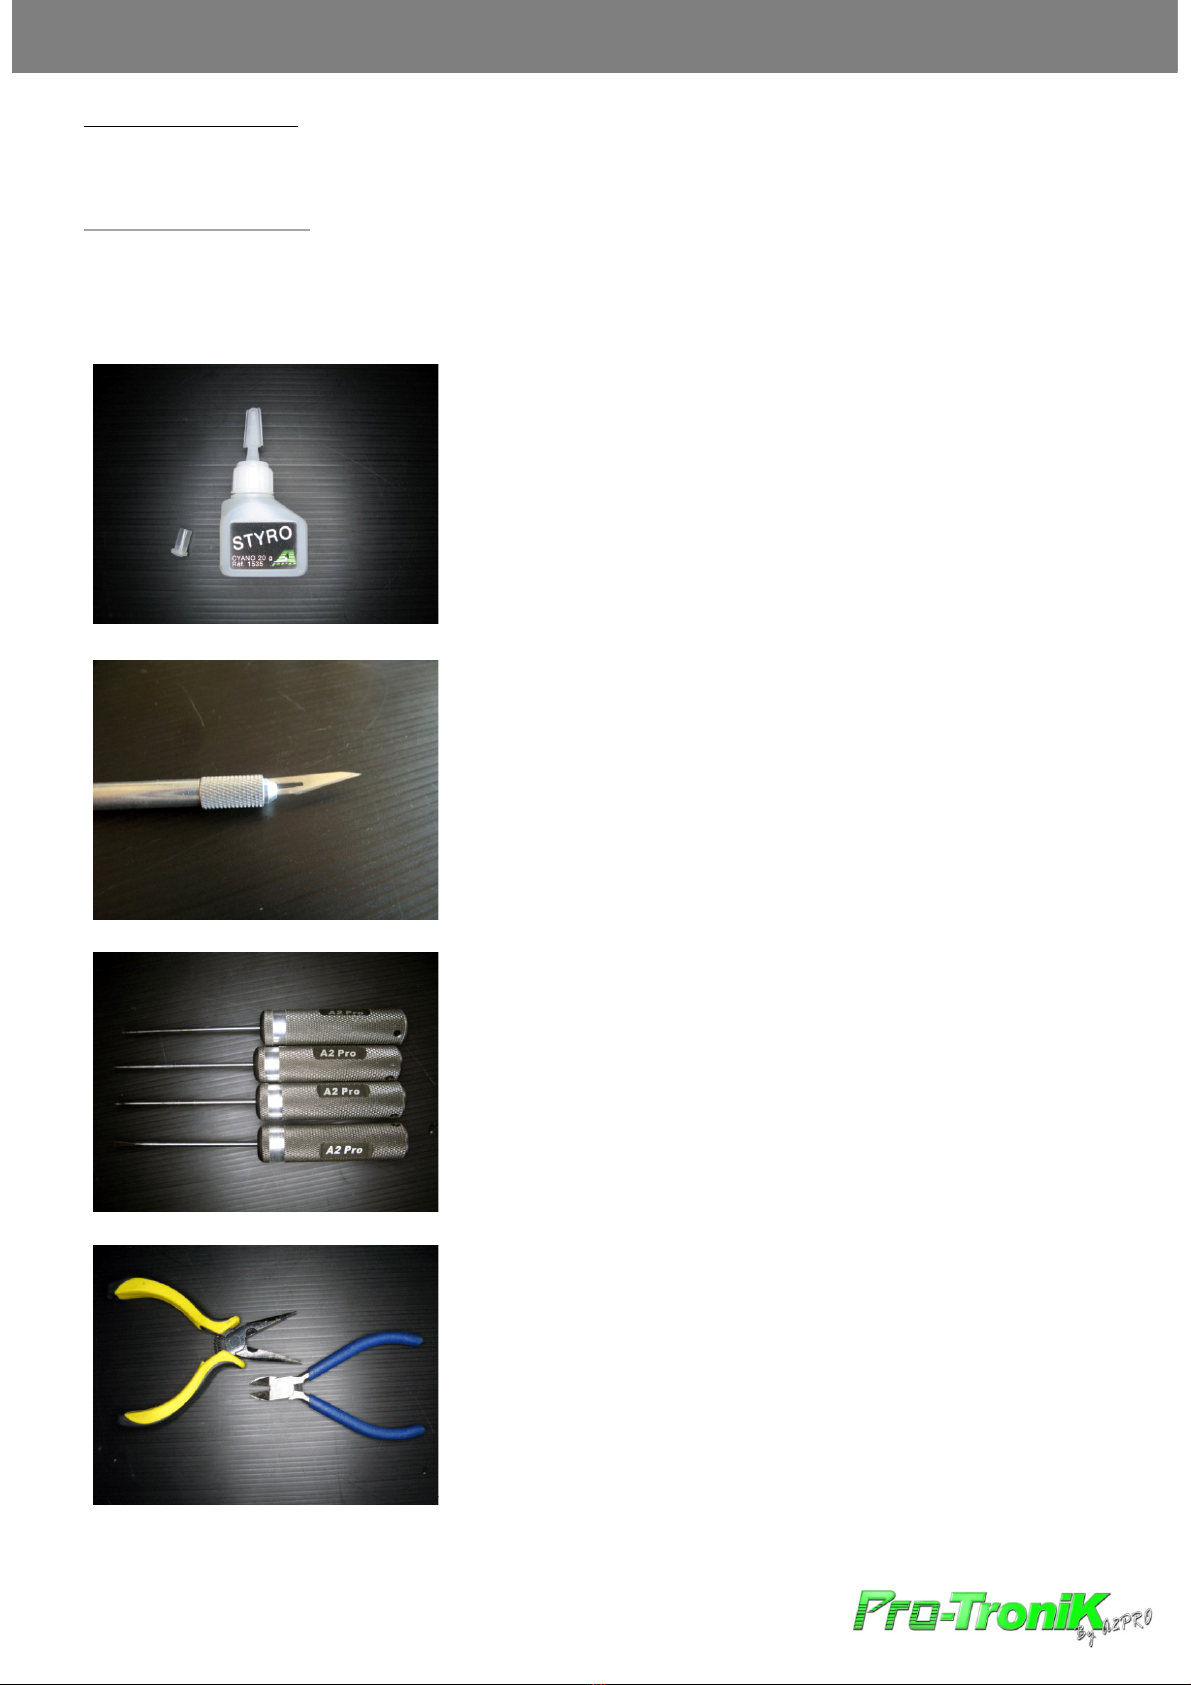
‐LacollecyanoacrylateSTYROréf.1535deA2Proconvientàtousles
collagesdevotremodèle,nousvousrecommandonsdel’associerà
l’usagedel’activateurenbomberéf.1540.
‐TheCASTYROglue(ref.1535)byA2Procan be used fortheassembly
oftheentire model.We strongly recommend touseit wih theCA
ACTIVATOR(ref.1540).
‐Vousaurezbesoind’unscalpelbienaffûté.
‐Youwill need asharp Xacto knife.
‐Vousaurezbesoind’unsetdetournevisclassique(ref A2Pro:9957).
‐Youwill need asetofusual screw drivers(A2Pro’s 9957).
‐Vousaurezbesoind’unjeudepinces.
‐Youwill need asetofpliers.
2
www.a2pro.fr
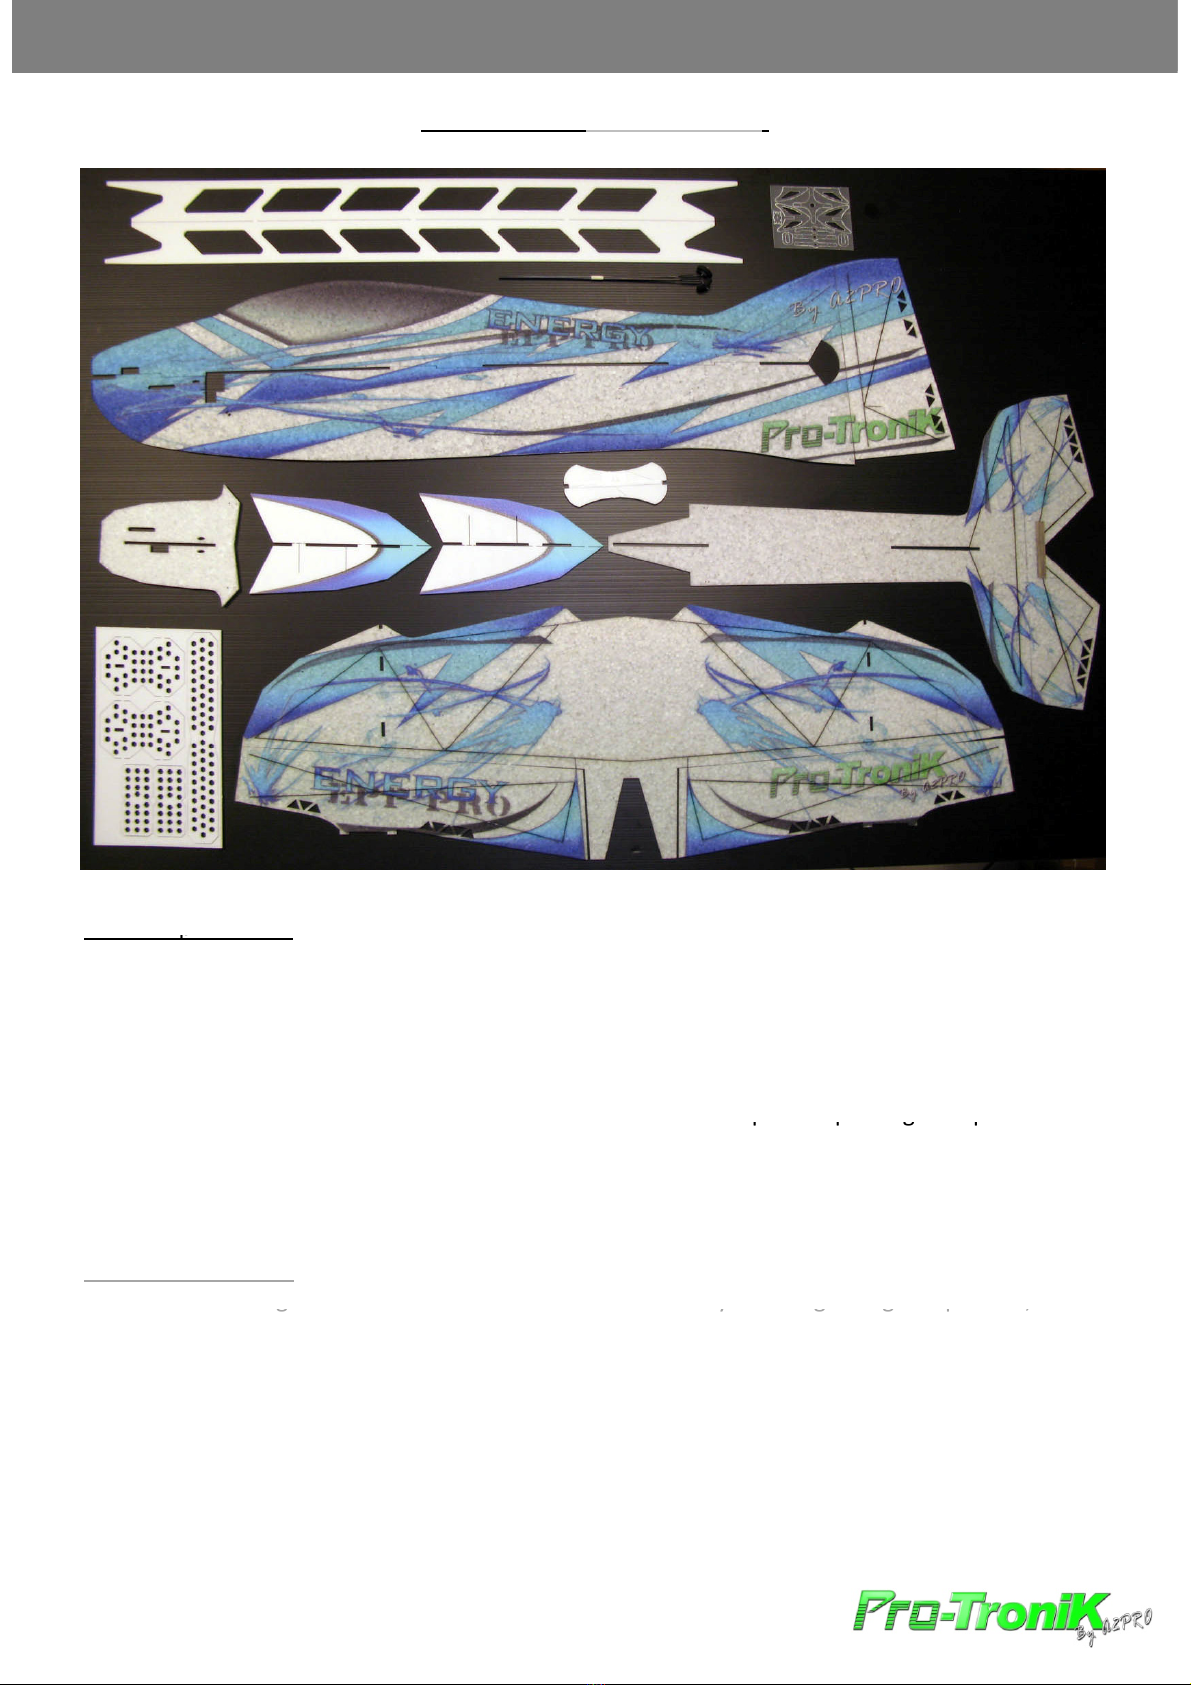
Contenudukit/Partsincluded :
Manueldel’utilisateur/Usermanual :ENERGY
Notesim
p
ortantes:
p
1. Lamassefinaled’unaviondevoltigeindoorestdirectementliéeàsesqualitésdevol,ne
surchargezpasinutilementvotremodèleparl’ajoutderenfortssupplémentaires(scotch
armé,carbone…)lekitestconçudefaçonoptimiséeettoutestsuffisammentsolideet
rigide.
2. Danscetteoptiquedemasselamoinsélevéepossible,nousvousrecommandons
sérieusementl’utilisationdebatteriesLithiumPro‐Tronik
q
uisont
p
luslé
g
ères
q
ueles
q p g q
autresbatteriesdumarché.
3. Faitesattentionaustockageetautransportdevotremodèle,c’estsouventàcesmoments
làqu’ilyaleplusdecasseoudedéformation.
Importantremarks :
1. Thefinalwei
g
htofanindooraerobaticmodelisdirectl
y
affectin
g
itsfli
g
htca
p
acities
,
do
g y g g p,
nottrytoreinforceyourmodel,thiswillbringuselessoverload.Everythinghasbeenmade
onyourmodeltomakeitstrongandrigid.
2. Talkingabouttheweight,westronglyrecommendthePro‐Tronik Lithiumbatteriesasthey
arelighterthanotherbatteriesonthemarket.
3. Takegreatcarewhenstockingorcarryingyourmodeltotheflyingarea,damagescanbe
numerousinthisconditions.
3
www.a2pro.fr
41
Manueldel’utilisateur/Usermanual :ENERGY
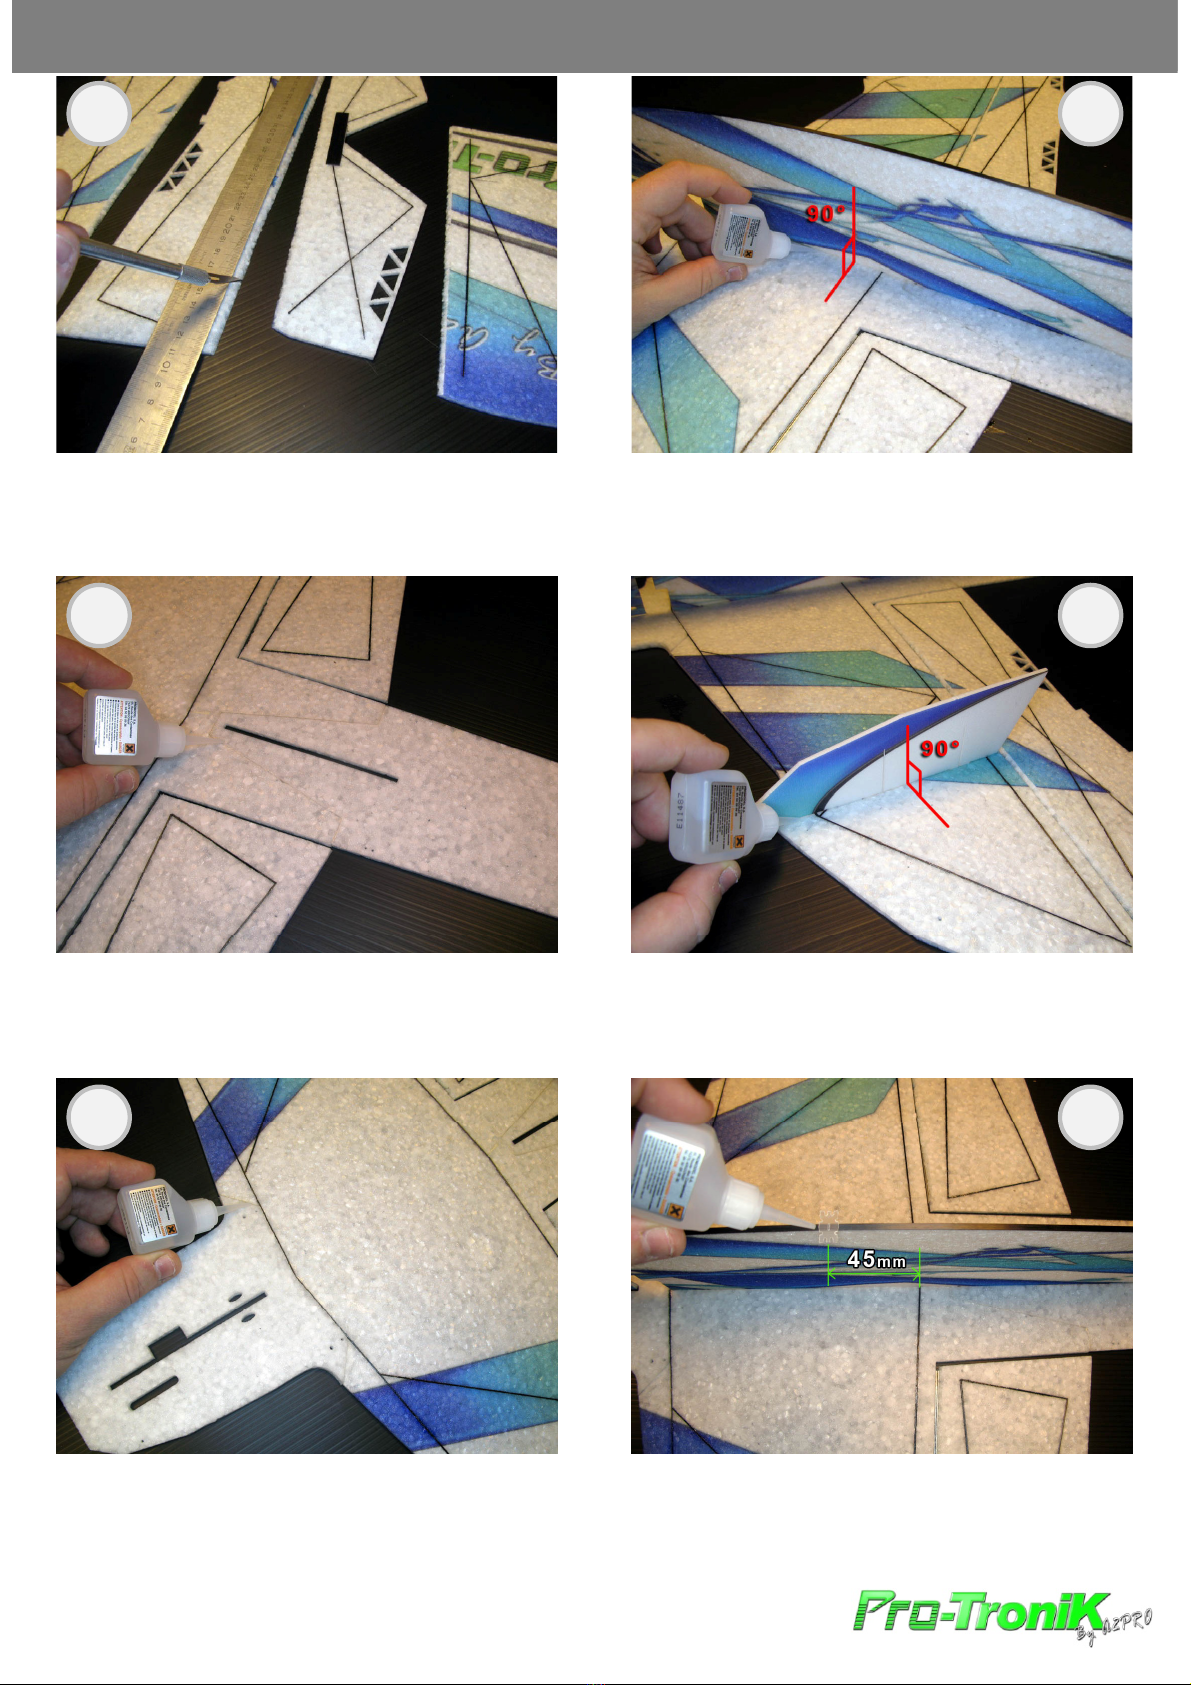
‐CollezCollez lapartiebassedufuselage.
‐Gluethelower partofthefuselage.
‐Coupezleszonescharnièresdetouteslesgouvernesen
biseau.
‐Cut abevel shape onevery hinge side ofthecontrol
surface.
52
‐Posezlesaileronsaveclerubanadhésifpuiscollezla
partiearrièredufuselagesurlesailes.
‐Gluetheaileronsusing adhesive tapeandthen gluethe
rear partofthefuselageonthewing.
6
3
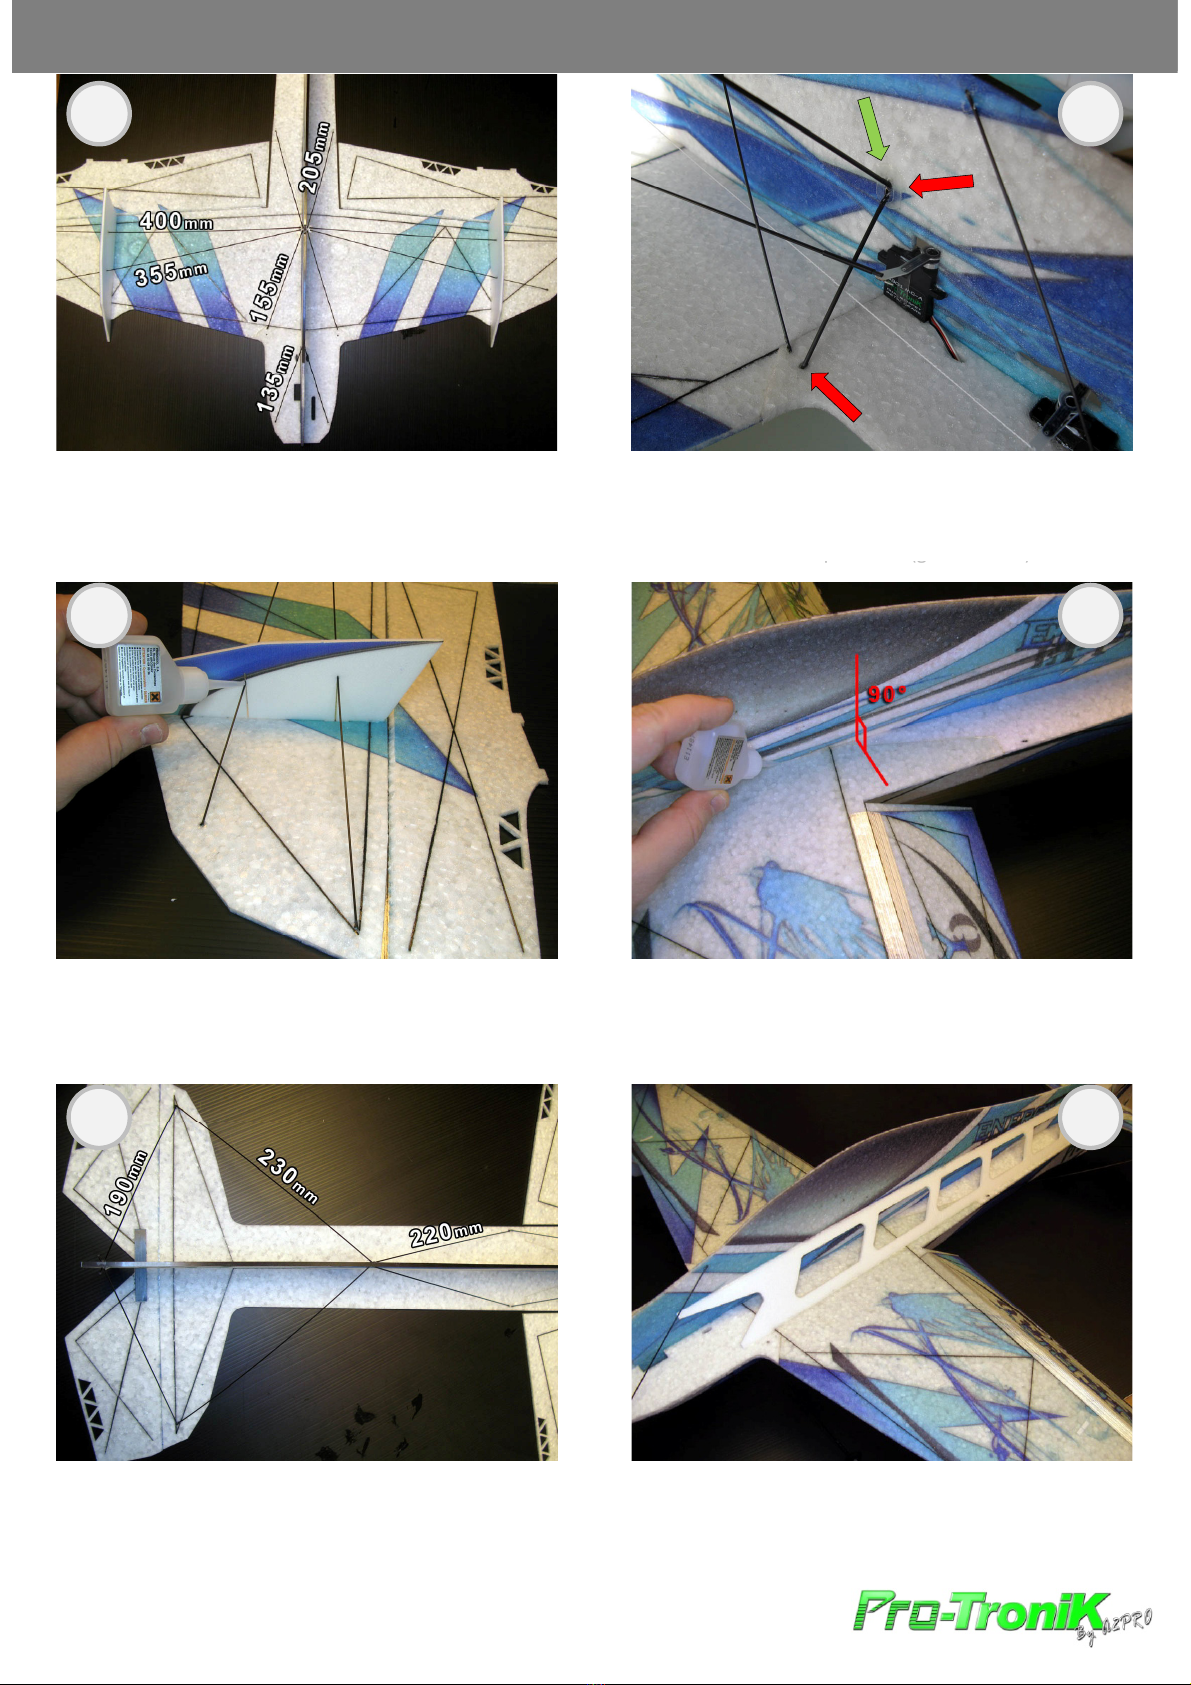
‐Collezlapartieinférieuredesdérivesd’aile.
‐Gluethelower partofthewing fences.
6
3
‐Collezlapartieavantdufuselageetcollezlevoletde‐Collezlapiècedejonctiondeshaubanscommeindiqué
4
www.a2pro.fr
stabilisateuraveclerubanadhésif.
‐Gluethefrontpartofthefuselageandgluetheelevator
moving partusing adhesive tape.
cidessus.
‐Gluetheglassfiber wing struts jointpartasshown
above.
107
Manueldel’utilisateur/Usermanual :ENERGY
‐Collezletraind’atterrissage(flèchesrouges)ainsiquela
piècederenfortenU(flècheverte).
‐Gluethelandinggear (red arrows)andthe
reinforcement U
p
iece too
(g
reenarrow
)
‐Coupezetcollezleshaubansdansducarbon de1mm.
‐Cut andgluethe1mmcarbon rod wing struts.
p
(g
)
118
‐Collezlapartiesupérieuredufuselage.
‐Gluetheupper partofthefuselage.
‐Collezlessurlesdérivesverticales.
‐Gluethem onthewing fences.
12
9
12
9
‐Coupezlesrenfortsdefuselageenbiseauetcollezles.‐Coupezetcollezlesrenfortsarrière.
‐Cut abevel onthefuselagestringersandgluethem on
thefuselage.
5
www.a2pro.fr
‐Cut andgluetherear struts.
1613
Manueldel’utilisateur/Usermanual :ENERGY
‐Réalisezlacommandedesaileronsavecducarbone,de
lagainethermoetdespiècesenZ.
‐Make theaileronspushrods using heat shrink tube,
carbon rods andZ‐bend.
‐Collezladériveaveclerubanadhésif.
‐Gluetherudder using adhésivetape.
1714
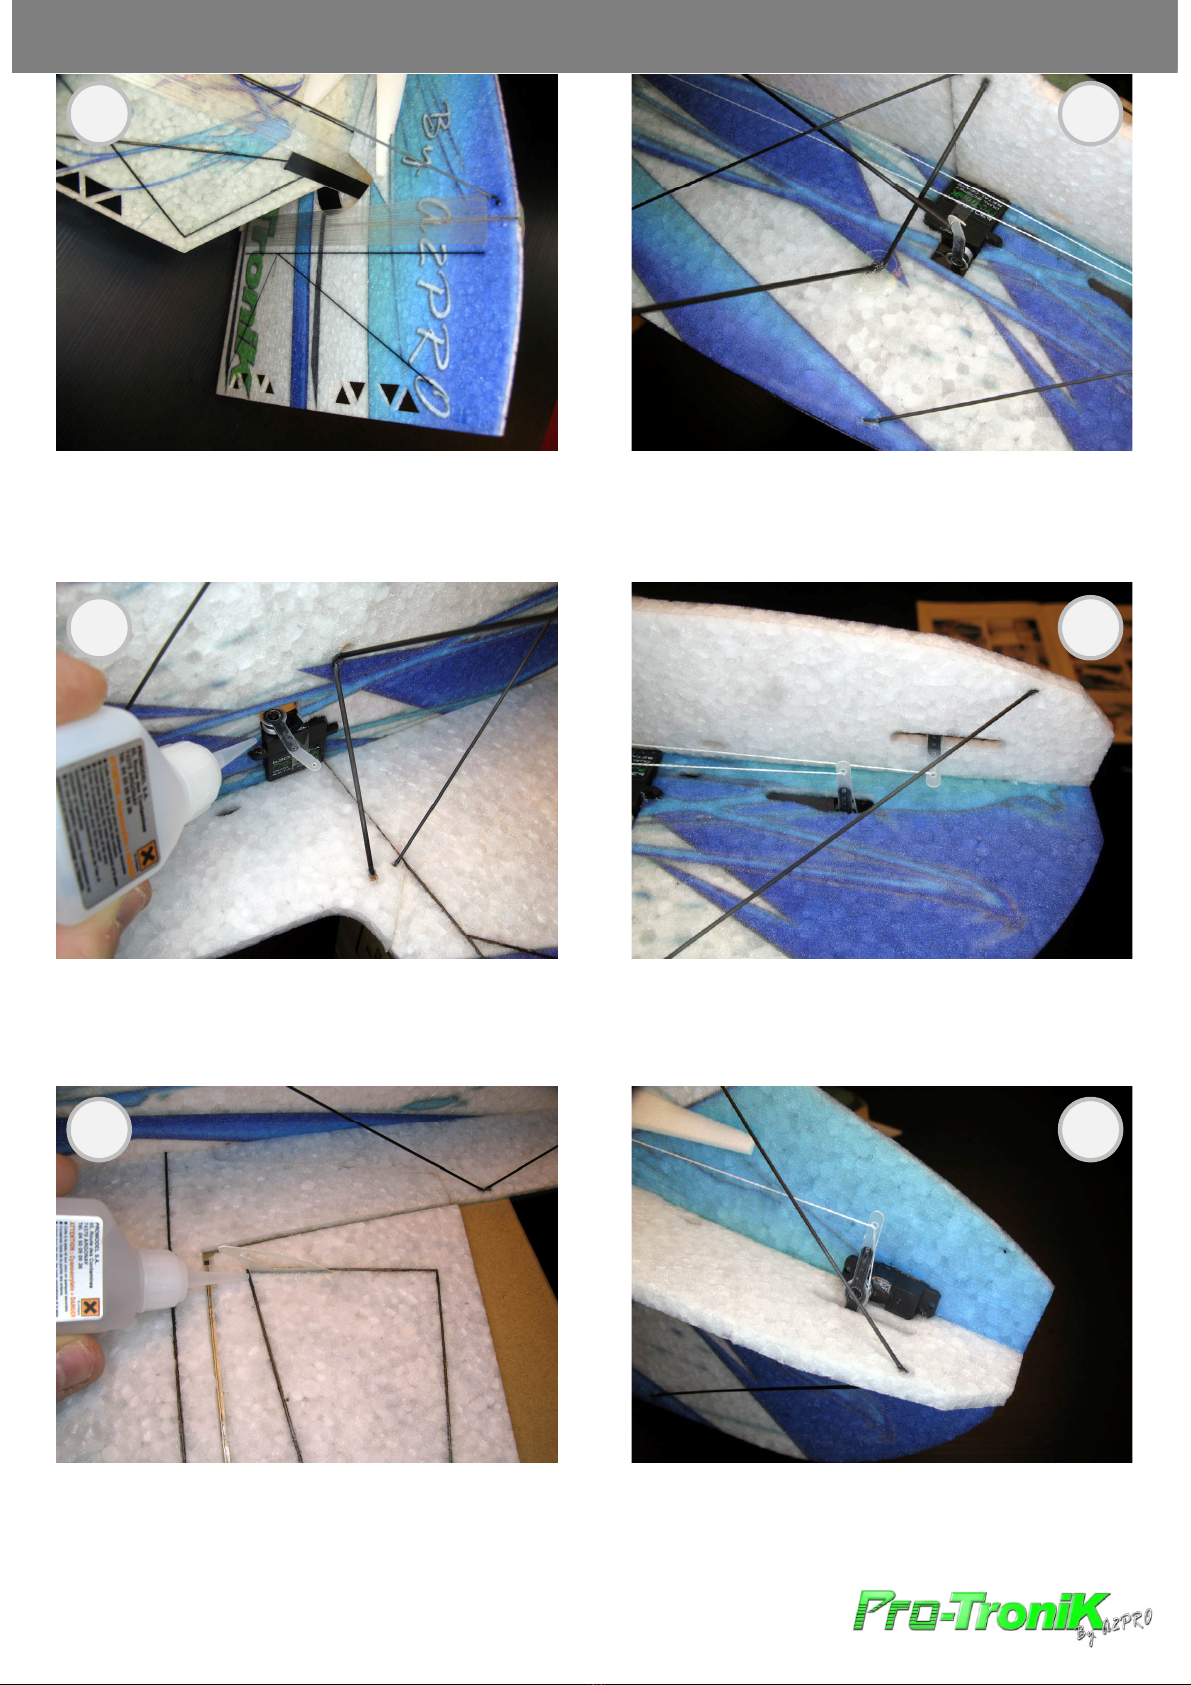
‐Mettezlesservos d’empennageauneutreetcollezles
extensionsdepalonniers.Collezlesservos enplace.
‐Setrear servos toneutral positionandgluetheservo
horns extensions.Gluetheservos inplace
‐Mettezleservo auneutrepuiscollezlarallongede
palonnierduleservo d’aileronspuiscollerleservo.
‐Settheaileronsservo toneutral position,gluetheservo
horn extensionandgluetheservo onthefuselage.
18
15
18
15
‐Passezlefildecommandedanslespalonniers.‐Coupezuneentaillelelongdurenfortencarbone,
‐Pass thethe commandcable through theservo horns.
6
www.a2pro.fr
placezleguignold’aileronetcollezle.
‐Cut aslotnear thecarbon reinforcement ontheaileron
andgluethecontrolhorn on.

2219
Manueldel’utilisateur/Usermanual :ENERGY
‐Collezlesaérofreinssurlesailesetlestabilisateur.
‐Gluetheairbrakes ontheelevator andthewing.
‐Collezlesguignolsdestabilisateuretdedérive.
‐Gluetherudder andelevator controlhorns.
2320
‐Collezlesupportmoteuretrenforcezavecunpeude
rubanadhésif.
‐Gluethemotor mount andreinforce it using some
adhésivetape.
‐Reliezlesservos auxgouvernesaveclecâblede
commande.
‐Linktheservos tothecontrolsurfacesusing the
commandcables.
24
21
24
21
‐Montezlemoteuretl’hélice,utilisezlevelcrofourni
p
ourfixer
‐Collezl’aérofreinsurladériveainsiquelesparties
p
lerestedel’électroniqueenfonctionducentrage.
‐Mountthemotor andthepropeller,usethesupplied hook
andloop tomount theRx,battery andESCdepending on
theCG.
7
www.a2pro.fr
supérieuresdesdérivesd’aile.
‐Gluetheairbrake ontherudder andtheupper partsof
thewing fences.

Centrageetdébattements/Balancing andcontrols throws
Manueldel’utilisateur/Usermanual :ENERGY
100
‐
110mm
100
‐
110mm
SPORT (Expo:20%)
‐DébattementdesAILERONS(aileronsthrow):±30°
‐DébattementdelaPROFONDEUR(elevator throw): ±30°
‐DébattementdelaDERIVE(rudder throw): ±30°
3D (Expo:45%)
‐DébattementdesAILERONS(aileronsthrow):±50°
‐DébattementdelaPROFONDEUR(elevator throw): ±50°
‐DébattementdelaDERIVE(rudder throw): ±65°
8
www.a2pro.fr
Other Pro-Tronik Toy manuals


Popular Toy manuals by other brands


Smoby
Smoby B+D BRICOLO TRUCK quick start guide

PARKZONE
PARKZONE Vapor BNF instruction manual

Mattel
Mattel miracle baby instructions

Hasbro
Hasbro Playskool Heroes Transformers Rescue Bots Academy Electronic Hot... quick start guide

Faller
Faller 130158 manual

THUNDER TIGER
THUNDER TIGER P-51D MUSTANG Assembly manual