Pro LR-500H User manual

LR-500H
C AT. NO : PRO-L1106
LASER ROTACYJNY
ROTARY LASER
ROTATIONSLASER
LASER ROTATIF
INSTRUKCJA PL
USER MANUAL EN
BEDIENUNGSANLEITUNG DE
MANUEL D'UTILISATION FR

SPIS TREŚCI / CONTENTS /
INHALTSVERZEICHNIS / CONTENU:
INSTRUKCJA PL
USER MANUAL EN
BEDIENUNGSANLEITUNG DE
MANUEL D'UTILISATION FR
03
06
09
12
2ver. 2.1

OPIS URZĄDZENIA
OBSŁUGA URZĄDZENIA
- Laser rotacyjny z promieniem widzialnym.
- Do użytku na zewnątrz oraz wewnątrz pomieszczeń.
- Klasa szczelnośći IP54.
- Funkcja alarmu przechyłu (TILT), będącego wynikiem wstrząsu.
lub naruszenia pierwotnego położenia przyrządu, po którym przyrząd
należy zrestartować ręcznie.
- Odbiornik (detektor) laserowy z dwoma podświetlanymi wyświetlaczami,
regulacją sygnału akustycznego, przełączaniem dokładności - dokładna
lub zgrubna.
- Dioda laserowa klasy 2 M, < 1mW 635 nm.
Dziękujemy za zakup produktu PRO, niezawodnego i wytrzymałego
narzędzia dla profesjonalnych użytkowników.
Włączanie/wyłączanie. Przycisk (1) służy do włączania i wyłączania urządzenia. Dioda (2) świeci się na
czerwono, gdy urządzenie jest włączone, a zacznie migać gdy poziom naładowania baterii jest niski –
należy naładować lub wymienić baterie.
Automatyczne samopoziomowanie. Laser po włączeniu automatycznie przechodzi w tryb
samopoziomowania – wiązki laserowe zaczną migać. Szybkie miganie diody (4) oraz wiązek lasera
oznacza, że urządzenie jest poza zakresem samopoziomowania ±5°; należy ręcznie poprawić ustawienie
urządzenia. Po osiągnięciu poziomu praca rozpocznie się automatycznie.
Tryb ręczny (do wyznaczania skosów). Aby wyłączyć samopoziomowanie i przejść do trybu ręcznego
należy nacisnąć przycisk (5) do momentu zapalenia się diody (4).
Prędkość rotacji. Urządzenie po włączeniu automatycznie uruchomi się z prędkością 600 obr./min.
Naciśniecie przycisku (6) zmieni prędkość kolejno na 0-60-120-300-600-0 obr./min.
Alarm przechyłu (TILT). Jest to funkcja, którą można aktywować celem zapobieżenia automatycznemu
powrotowi do poziomu po wytrąceniu z ustalonej pozycji, kiedy to nastąpiłoby samoczynne
wypoziomowanie z prawdopodobną zmianą wysokości ustawienia. W celu aktywacji funkcji alarmu
przechyłu należy nacisnąć przycisk (7) – dioda (3) zacznie wolno migać potwierdzając pracę z alarmem
przechyłu. Po zakłóceniu pracy lasera promień się zatrzyma (wyłączenie rotacji) i zacznie szybko błyskać
wraz z diodą (3). W takiej sytuacji laser musi być ponownie załączony ręcznie przez naciśnięcie
przycisku (7) lub wyłączenie i włączenie lasera przyciskiem (1). Po zrestartowaniu należy sprawdzić
wysokość wyznaczaną przez laser, czy jest taka sama jak przed zatrzymaniem się.
1
4
5
3
2
7
6
3ver. 2.1

Laser rotacyjny PRO LR-500H może być stosowany do szeroko zakrojonych prac budowlanych
oraz wykończeniowych, takich jak prace niwelacyjne, stolarskie, instalacyjne czy dekoracyjne.
ZASTOSOWANIE
URZYMANIE I KONSERWACJA
- Laser rotacyjny podczas użytkowania na przestrzeni otwartej trzeba chronić przed silnymi opadami
atmosferycznymi.
- W przypadku zamoczenia urządzenia należy je starannie wytrzeć przed włożeniem do walizki lub etui.
Niezastosowanie się do powyższego może spowodować uszkodzenie wewnętrznych instalacji urządzenia.
- Do czyszczenia urządzenia, a zwłaszcza okienek emiterów wiązek laserowych, nie wolno używać
benzyny, rozcieńczalnika do tarć, żadnych innych rozpuszczalników, papieru toaletowego ani chusteczek
higienicznych. W przeciwnym razie może dojść do porysowania lub uszkodzenia, a w konsekwencji
do rozkalibrowania urządzenia.
- Jeśli urządzenie spadnie lub zostanie uszkodzone mechanicznie, może utracić swoje właściwości
pomiarowe.
- W razie podejrzenia o rozkalibrowanie zaleca się odesłanie urządzenia do producenta na powtórną
kalibrację w celu przywrócenia fabrycznych parametrów technicznych.
- Należy chronić mechanizm samopoziomujący, wyłączając urządzenie na czas przenoszenia oraz
po zakończeniu pracy.
Kontrola. Umieścić laser ok. 15 m od ściany, tak by móc rzutować na nią oś X. Włączyć laser.
Zaznaczyć linię X1 na ścianie. Przekręcić laser o 180° bez zmiany wysokości. Zaznaczyć poziom linii
X2. Różnica poziomu X1 i X2 nie może przekraczać 3 mm przy dystansie 15 m. Wykonać podobny
test z osiami Y1 i Y2.
Kalibracja. W celu skalibrowania urządzenia zalecamy odesłanie go do serwisu fabrycznego
PRO sp. z o.o. Pierwsza kalibracja w trakcie 24 miesięcznej gwarancji wykonywana jest bezpłatnie,
zgłoszenia można dokonać m.in. za pomocą strony internetowej: www.firma-pro.com
Ładowanie akumulatora. Podłączyć ładowarkę do sieci 230 V, a wtyczkę kabelka do gniazdka
znajdującego się na spodzie lasera. Podczas ładowania kontrolka LED świeci się na czerwono,
a po całkowitym naładowaniu akumulatora zmienia kolor świecenia na zielony. Czas ładowania ok. 4 h
(przy pierwszym ładowaniu nowego, nienaładowanego ok. 6 h). Przed pierwszym ładowaniem należy
zdjąć ew. plomby ochronne z gniazda baterii aby umożliwić przepływ prądu. Jedno naładowanie
wystarcza na około 20 h pracy. Gdy akumulator rozładuje się poniżej pewnego poziomu laser przestaje
się obracać i zaczyna migać. Dla zapewnienia maksymalnej żywotności akumulatora NI-MH należy
ładować go do pełna po całkowitym rozładowaniu. Należy pamiętać, że na pojemność akumulatora
ma wpływ temperatura.
Odbiornik laserowy. Jeżeli odbiornik ma być używany z łatą niwelacyjną należy do gwintowanej tulejki,
usytuowanej na jego tylnej ściance, przykręcić zacisk mocujący. Bateria zasilająca 9 V 6F22.
Czas pracy baterii 40 godzin.
Włączenie / Wyłączenie. Automatyczne wyłączenie następuje po 10 minutach od ostatniego
odebranego sygnału laserowego lub naciśnięcia przycisku.
Wybór dokładności. Węższe pole odbiorcze ±1,0 mm, szersze pole ±2,5 mm.
Włączenie lub wyłączenie sygnału akustycznego. Zawsze po włączeniu odbiornika sygnał jest
domyślnie załączony.
Podświetlenie wyświetlacza aktywuje się samoczynnie po uruchomieniu oraz za każdym razem
po odebraniu sygnału laserowego lub naciśnięciu przycisku.
4ver. 2.1

Urządzenie powinno zostać poddane odpowiednim procesom utylizacji. Zużyte urządzenie należy oddać
do utylizacji w specjalnym punkcie, zbierającym tego typu odpady. W celu uzyskania dodatkowych Informacji
należy skontaktować się z przedstawicielem firmy PRO sp. z o.o. lub lokalnymi władzami odpowiedzialnymi
za zarządzanie odpadami.
-Nie patrzeć bezpośrednio na źródło promienia laserowego. Może to spowodować uszkodzenie wzroku.
Z tego powodu nie ustawiać przyrządu na wysokości oczu.
- Po transporcie, również po upadku, sprawdzić czy ustawienia przyrządu nie uległy naruszeniu.
Dokładność pracy leży całkowicie po stronie użytkownika, dlatego przypominamy o regularnym kontrolowaniu
poprawności działania przyrządu. Sposób kontroli opisany jest w sekcji „Kontrola”.
- Obchodzenie się z przyrządem. Jest to przyrząd precyzyjny i dlatego należy obchodzić się z nim ze specjalną
troską. Chronić przyrząd przed wstrząsami, upadkami i wibracjami. Transportować zawsze w futerale
z tworzywa sztucznego. Użytkować i przechowywać w temperaturach podanych w danych technicznych.
Chociaż laser jest wodoodporny należy starać się utrzymywać go w stanie suchym.
- W przypadku zamoczenia nie wkładać do futerału na dłuższy czas. Jeżeli przyrząd ma być przez dłuższy czas
nieużywany należy wyjąć baterie, zarówno z lasera jak i z akcesoriów. Czyścić miękką, suchą ściereczką.
W celu uzyskania stabilnej pozycji
pracy laser może być mocowany
na statywie. Służy temu specjalne
mocowanie na gwint w podstawie
urządzenia. Mocowanie jest
przystosowane dla statywów
oraz akcesoriów na gwint 5/8".
źródło lasera
moc
dokładność
dokładność pionownika
promień obszaru działania
zakres roboczy
prędkość obrotowa
zakres samopoziomowania
zasilanie
czas pracy
klasa szczelności
wymiary
waga (z bateriami)
kąt niwelatora
temperatura pracy
dioda półprzewodnikowa 635 nm
< 1 mW, klasa II M
±1,0 mm / 10 m (±0,1 mm / 1 m); ±20"
±1,0 mm / 1,5 m
250 m
500 m (średnica)
0 - 60 -120 - 300 - 600
±5°
akumulator NI-MH
ok. 20 godzin
IP54
160 mm × 160 mm × 185 mm
3,0 kg
360°
-20°C ÷ 50°C
W celach gwarancyjnych oraz wsparcia serwisowego należy kontaktować
się z lokalnym sprzedawcą urządzenia.
Gwarancja udzielana na akumulatory przez PRO wynosi 6 miesięcy i liczy
się od daty zakupu. Po tym czasie pozostaje serwis pogwarancyjny.
PRO sp. z o.o.
ul. Strażacka 76,
43-382 Bielsko-Biała, POLSKA
tel. +48 33 818 39 09
NIP 644-14-23-158
www.firma-pro.com
SPECYFIKACJA TECHNICZNA ZESTAW ZAWIERA:
OCHRONA ŚRODOWISKA
ZASADY BEZPIECZEŃSTWA UŻYTKOWANIA
MOCOWANIE NA STATYWIE
ORAZ TYCZCE
GWARANCJA I SERWIS
- laser LR-500H
- walizka
- odbiornik (detektor) laserowy
z uchwytem
- tarcza celownicza laserowa
- okulary laserowe
- akumulator Ni-MH
- ładowarka
- instrukcja.
5ver. 2.1

Thank you for choosing a PRO product,
reliable and durable tool for the PROfessional user.
DESCRIPTION OF THE INSTRUMENT
OPERATION
- LR-500H rotary laser with a visible beam.
- For indoor and outdoor use.
- Class of protection: IP54.
- The function of tilt alarm, resulting from vibrations or changes to the
original position of the instrument, after which the instrument should
be manually reset.
- Laser receiver (detector) with two illuminated displays, adjustment
of the acoustic signal, switching of precision - fine-tuning or rough
adjustment.
- Laser diode in 2 M class, < 1m W 635 nm.
ON/OFF. The button (1) is used to turn the device on and off. The LED (2) lights up red when the device
is turned on and will start flashing when the battery level is low - the batteries should be charged or
replaced.
Automatic self-leveling. After turning on the laser, it will automatically go into the self-leveling mode -
the laser beams will start blinking. Fast blinking of the LED (4) and the laser beams means that the
device is outside the self-leveling range of ±5°; you need to manually adjust the device. When the level
is reached, the rotation will start automatically.
Manual mode (for determining slopes). In order to turn off the self-leveling and switch to the manual
mode, press the button (5) until LED (4) lights up.
Rotation speed. After turning on the device, it will automatically start up at a speed of 600 rpm.
Pressing the button (6) will change the speed successively to 0-60-120-300-600-0 rpm.
Tilt alarm (TILT). It is a function that can be activated to prevent automatic return to level after losing it
from a predetermined position, where it would self-level with a possible change in the height of the
setting. To activate the tilt alarm function, press the button (7) - the diode (3) will start flashing slowly,
confirming operation with the tilt alarm. After the laser’s position is interrupted, the beam will stop
rotating and start flashing quickly together with the diode (3). In such a case, the laser must be
switched on manually by pressing the button (7) or by switching the laser off and on again using the
button (1). After restarting, check fi the laser line’s altitude is the same as before stopping.
1
4
5
3
2
7
6
6ver. 2.1

MAINTENANCE AND CARE
- Protect the rotary laser against strong atmospheric precipitation when using it outdoors.
- When the instrument gets wet, wipe it dry before placing it in the case. Failure to do so may cause
failure of internal systems of the unit.
- Do not use petrol, paint thinners or other solvents, toilet paper or tissues for cleaning of the
instrument, particularly laser beam emitter windows. Otherwise there is a risk of scratching
or damage, and, as a consequence, changes in calibration of the instrument.
- If the instrument is mechanically damaged, its measuring properties may be diminished or lost.
- Protect the self-leveling mechanism by switching the instrument off for transport and after the work
is finished.
- If de-calibration is suspected, it is recommended to send the unit to the manufacturer
for re-calibration in order to restore the original technical parameters.
APPLICATIONS
The LR 500H rotary laser can be used in a wide range of construction and finishing works, such as
leveling, carpentry, installation works and others.
Checking. Position the laser approx. 15 m from a wall to be able to project the X axis on the wall.
Switch on the laser. Mark the X1 line on the wall. Rotate the laser by 180 degrees without changing
the height. Mark the X2 line level. The difference between X1 and X2 levels should not exceed 3 mm
over a 15 m distance. The Y axis can be tested the same way with Y1 and Y2 lines.
Calibration. For calibration of the instrument please send it to the PRO service point. The first
calibration within the 24 month term of guarantee is performed free of charge. Calibration can be
ordered on the website: www.firma-pro.com
Battery charging. Connect the charger to the 230 V mains and plug the cable to the socket on the
aser panel. During charging, the LED is lit in red. When the battery is full, red switches to green.
Time of charging is approx. 4 h (for the first charging of a new, empty battery, it is 6 h). Before the
first charge, remove the seals from the battery socket to allow current flow. A single charging cycle
allows approx. 24 h of operation. When battery capacity drops below a certain level, the laser stops
rotating and starts pulsing. To ensure the maximum operating life of the NI-MH battery, charge it fully
each time it gets empty. Please remember that temperatures impact battery capacity.
Laser receiver. When using the receiver and level staff, attach the mounting bracket to the bushing
with a thread located on its rear plate. The battery is 9 V 6F22. Battery operation time is 40 hours.
Switching on and off. Automatic shutdown occurs after 10 minutes from the last laser signa
received or button pressed.
Selection of the accuracy level. Tighter receiving field ±1,0 mm, wider field ±2,5 mm.
Switching on and off of the acoustic signal. The receiver signal is active by default.
The illumination turns on automatically after each start and everytime a laser signal is received
or any button is pressed.
7ver. 2.1

The device should be subjected to appropriate disposal processes. For this purpose, the used device
should be disposed of at a special collection point for this type of waste. For more information, contact
PRO sp. z o.o. representative or the local authorities responsible for waste management.
For warranty purposes and service support, please contact your
local dealer.
The PRO guarantee for batteries and chargers is 6 months from
the date of purchase. After that period, users can order post-
guarantee service.
PRO sp. z o.o.
ul. Strażacka 76
43-382 Bielsko-Biała, POLAND
tel. +48 33 818 39 09
NIP 644-14-23-158
www.firma-pro.com
ENVIRONMENTAL PROTECTION (DISPOSAL)
WARRANTY AND TECHNICAL SUPPORT
- Do not look directly at the source of the laser beam due to the risk of sight damage.
Therefore, do not position the instrument on the level of human eyes.
- Before use. After transport and following a drop or impact, check if instrument settings
are not changed. The user is fully responsible for accuracy of operation, therefore, remember about
regular functional checks. The checking procedure is described in the "Checking" section.
- Handling the instrument. The instrument is a precision device and should be handled with care.
Protect it against vibrations, fall and impacts. For transport always use the plastic case.
Use and store in temperatures provided in the technical specifications. Although the laser is
water-tight, try to keep it dry. Should the device get wet, do not store it in the case - let it dry first.
If the instrument is not going to be used for more than 30 days, remove the batteries both from
the laser and accessories. For cleaning use a soft and dry cloth.
If the laser is to be suspended
on a wall, attach the mount bracket
with its opening on the outside
to the instrument side wall.
Laser source:
Power:
Precision in horizontal plane:
Vertical plane:
Radius of the operating area:
Working range:
Rotating speed:
Range of self-leveling:
Power supply:
Working time:
Protection class:
Dimensions:
Weight (incl. batteries):
Angle of the level:
Working temperature:
semiconductor diode = 635 nm
< 1 mW class II M
±1,0 mm / 10 m (±0,1 mm / 1 m); ±20"
±1,0 mm / 1,5 m
250 m
500 m (diameter)
0 - 60 -120 - 300 - 600
±5°
NI-MH rechargeable battery
approx. 20 h
IP54
160 mm × 160 mm × 185 mm
3,0 kg
360°
-20°C ÷ 50°C
TECHNICAL SPECIFICATION THE KIT INCLUDES:
SAFETY OF USE
WALL-MOUNT BRACKET
/ FLOOR PLATE
- LR-500H laser
- transport case
- laser Glasses
- NI-MH rechargeable battery
- charger
- laser receiver (detector)
with a holder
- reflective target plate
- alcaline battery basket
- user manual.
For setup on the floor and operation of the laser vertically, attach the bracket with its opening on
the inside. The plate is set in the axis with the laser spot and can be placed on the floor, which can
make laser setup easier.
8ver. 2.1

EIN/AUS. Mit der Taste (1) wird das Gerät ein- und ausgeschaltet. Die LED (2) leuchtet rot, wenn das
Gerät eingeschaltet ist und beginnt zu blinken, wenn der Akkustand niedrig ist - die Akkus sollten
geladen oder ersetzt werden.
Automatische Selbstnivellierung. Nach dem Einschalten geht der Laser automatisch in den
Selbstnivellierungsmodus - die Laserstrahlen beginnen zu blinken. Schnelles Blinken der LED (4) und der
Laserstrahlen bedeutet, dass sich das Gerät außerhalb des Selbstnivellierbereichs von ±5° befindet;
Sie müssen das Gerät manuell anpassen. Bei Erreichen des Levels startet die Rotation automatisch.
Manueller Modus (zur Bestimmung von Steigungen). Um die Selbstnivellierung auszuschalten und in den
manuellen Modus zu wechseln, drücken Sie die Taste (5) bis die LED (4) aufleuchtet.
Drehgeschwindigkeit. Nach dem Einschalten startet das Gerät automatisch mit einer Geschwindigkeit
von 600 U/min. Durch Drücken der Taste (6) wird die Drehzahl sukzessive auf 0-60-120-300-600-0
U/min geändert.
Neigungsalarm (TILT). Es ist eine Funktion, die aktiviert werden kann, um eine automatische Rückkehr
zur Nivellierung zu verhindern, nachdem sie aus einer vorbestimmten Position verloren wurde, in der sie
sich bei einer möglichen Änderung der Höhe der Einstellung selbst nivellieren würde. Um die
Neigungsalarmfunktion zu aktivieren, drücken Sie die Taste (7) - die Diode (3) beginnt langsam zu
blinken und bestätigt den Betrieb mit dem Neigungsalarm. Nachdem die Position des Lasers
unterbrochen wurde, hört der Strahl auf zu rotieren und beginnt schnell zusammen mit der Diode (3)
zu blinken. In diesem Fall muss der Laser manuell durch Drücken der Taste (7) oder durch Aus- und
Wiedereinschalten des Lasers über die Taste (1) eingeschaltet werden. Überprüfen Sie nach dem
Neustart, ob die Höhe der Laserlinie dieselbe ist wie vor dem Stoppen.
Wir danken für den Kauf des PRO-Produkts,
eines zuverlässigen und robusten Werkzeugs für Professionelle.
BESCHREIBUNG DES GERÄTES
BETRIEB
- Rotationslaser LR-500H mit sichtbarem Strahl.
- Für den Innen - und Außenbereich geeignet.
- Schutzklasse IP54".
- Funktion des Neigungsalarms nach Erschütterung oder Störung.
ursprünglicher Gerätelage, nach der das Gerät manuell erneut
gestartet werden muss.
- Laserempfänger (Detektor) mit zwei beleuchteten Anzeigen,
Einstellung des akustischen Signals und Umschaltung
der Genauigkeit – fein / grob.
- Laserdiode Klasse 2 M, < 1 mW 635 nm.
1
4
5
3
2
7
6
9ver. 2.1

INSTANDHALTUNG UND WARTUNG
- Der Rotationslaser soll beim Betrieb im Außenbereich vor starkem Niederschlag geschützt werden.
- Wird das Gerät nass, ist es sorgfältig abzuwischen, bevor es in den Koffer oder die Schutztasche
eingepackt wird. Durch Nichteinhaltung der vorstehenden Hinweise können die Einrichtungen im Inneren
des Gerätes beschädigt werden.
- Zur Reinigung des Gerätes, insbesondere der Fenster der Austrittsöffnungen für Laserstrahlung, dürfen kein
Benzin, keine Verdünner, keine anderen Lösemittel, kein Toilettenpapier und keine Taschentücher verwendet
werden. Durch Einsatz dieser Mittel kann das Gerät verkratzt oder beschädigt werden, was zur
Entkalibrierung des Lasers führt.
- Wenn das Gerät herunterfällt oder mechanisch beschädigt wird, kann dies seine Messeigenschaften
beeinträchtigen.
- Beim Verdacht auf Dekalibrierung empfohlen wird Zusendung des Geräts dem Hersteller zwecks erneuter
Kalibrierung und Rücksetzung auf fabrikmäßige Parameter.
- Schalten Sie das Gerät aus, wenn Sie es transportieren oder die Arbeit beenden, um den
Selbstnivellierungsmechanismus zu schützen.
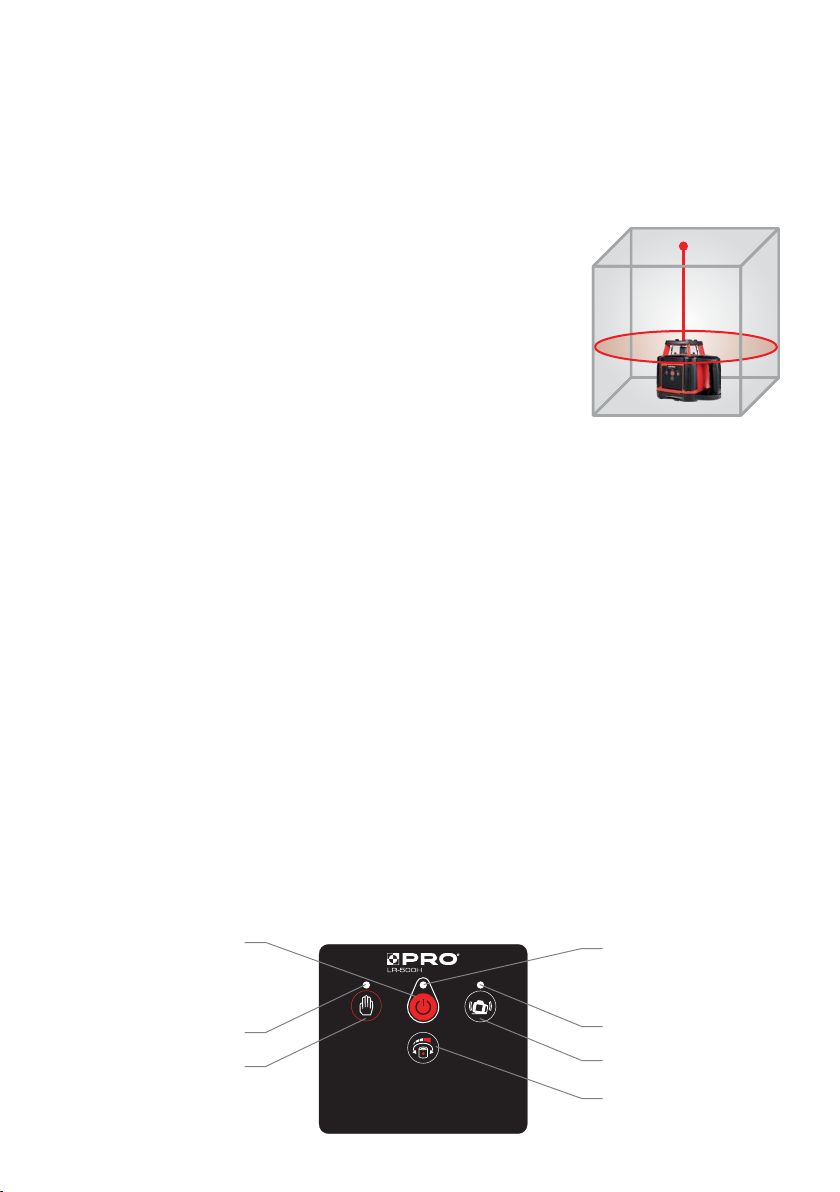
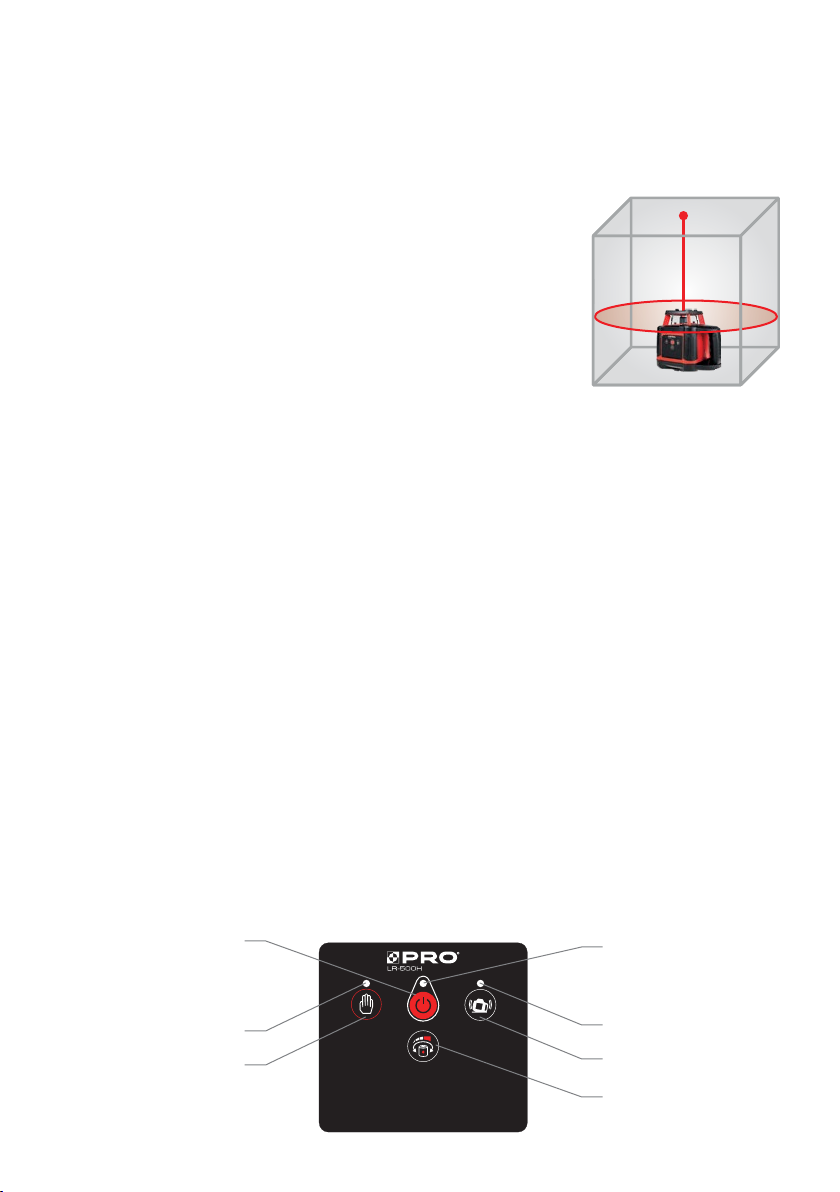
Kontrolle. Den Laser etwa 15 m von der Wand stellen, um die X-Achse darauf projiziert werden kann.
Laser einschalten. Die X1-Linie auf der Wand markieren. Der Laser um 180° ohne Änderung der Höhe
drehen. Die Höhe der X2-Linie markieren. Der Niveauunterschied X1 und X2 darf bei 15 m Entfernung
3 mm nicht überschreiten. Analogen Test mit den Achsen Y1 und Y2 ausführen.
Kalibrierung. Um das Gerät zu kalibrieren empfehlen wir seine Einsendung zum Werksservice von
PRO sp. z o.o. Die erste Kalibrierung innerhalb der 24 - Monate-Garantie ist kostenlos, die Anmeldung kann
über die Webseite erfolgen: www.firma-pro.com
Ladung de Akkus. Ladegerät ans Netz 230 V anschließen, Stecker des Kabels in die Öffnung in der
Unterseite des Lasers. Beim Laden leuchtet die Kontroll - LED rot, nach voller Aufladung wird sie grün.
Ladezeit etwa 4 h (erste Ladung eines neuen, leeren Akkus etwa 6 h). Vor erster Ladung etwaige
Schutzplomben des Akkufachs abnehmen, um Stromfluss zu sichern. Eine Ladung reicht für etwa 18
Betriebsstunden. Wenn der Akku sich unter bestimmtes Niveau entlädt, hört der Laser zu rotieren auf und
beginnt zu blinken. Um maximale Lebensdauer des NI-MH-Akkus zu verlängern, soll er nach jeder Entladung
voll aufgeladen werden. Hinweis: Die Ladekapazität des Akkus wird durch die Temperatur beeinflusst.
Laserempfänge. Wenn der Empfänger mit der Nivellierlatte verwendet werden soll, soll an die Gewindetülle
in seiner Hinterwand die Befestigungsklemme angeschraubt werden. Versorgungsbatterie 9 V 6F22.
Betriebsdauer der Batterie 40 h.
Einschaltung / Ausschaltung. Automatische Ausschaltung 10 Minuten nach letztem empfangenem
Lasersignal oder Tastendruck.
Wahl der Genauigkeit. Schmaleres Empfangsfeld ±1,0 mm, breiteres Feld ±2,5 mm.
Ein- oder Ausschaltung des akustischen Signals. Nach jeder Einschaltung des Empfängers ist das
Signal fabrikmäßig eingeschaltet.
Hinterleuchtung der Anzeige aktiviert sich automatisch nach dem Einschalten des Geräts, nach
jedem Empfang eines Lasersignals und nach dem Tastendruck.
Der Kreuzlinienlaser LR-500H kann bei größeren Bau- und Ausbauarbeiten im Innenbereich, wie Tischler-,
Montagearbeiten oder Dekorieren, zum Einsatz kommen.
ANWENDUNGSBEREICHE
10 ver. 2.1

Das Gerät sollte einer entsprechenden Wiederverwertung zugeführt werden. Nicht mehr gebrauchsfähige
Geräte sind über eine spezielle Wertstoffsammelstelle zu entsorgen. Für zusätzliche Informationen kontaktie-
ren Sie bitte einen Vertreter der Firma PRO sp. z o.o. oder wenden sich an örtliche, für die Abfallwirtschaft
zuständige Behörden.
- Nicht direkt in die Quelle des Laserstrahls schauen. Dies kann zu einer Schädigung des Sehvermögens
führen. Aus diesem Grunde das Gerät nicht in Augehöhe aufstellen.
- Vor dem Gebrauch. Prüfen Sie nach dem Transport, auch nach einem Sturz, ob die Geräteeinstellungen nicht
gestört wurden. Die Genauigkeit des Betriebs liegt ausschließlich in der Verantwortung des Nutzers,
weshalb wir Sie daran erinnern, den korrekten Betrieb des Geräts regelmäßig zu überprüfen.
Die Kontrollmethode ist im Abschnitt "Kontrolle" beschrieben.
- Handhabung des Geräts. Das Gerät ist ein Präzisionswerkzeug und muss sorgfältig behandelt werden.
Das Gerät vor Erschütterungen, Fall und Vibrationen schützen. Immer im Kunststoffetui transportieren.
Bei in den technischen Daten angegebenen Temperaturen betreiben und lagern. Obwohl der Laser
wasserbeständig ist, trocken halten.
- Falls das Gerät nass werden sollte, nicht für längere Zeit ins Etui legen. Wenn das Gerät längere Zeit
nicht benutzt wird, Batterien herausnehmen – sowohl aus dem Laser als auch aus dem Zubehör. Mit
weichem, trockenem Tuch reinigen.
Laserquelle
Leistung
Genauigkeit horizontal und vertikal
Genauigkeit des Lots
Radius des Arbeitsbereichs
Arbeitsbereich
Rotationsgeschwindigkeit
Selbstnivellierbereich
Stromversorgung
Betriebszeit
Schutzklasse
Größe
Gewicht (mit Batterien)
Nivelliererwinkel
Betriebstemperatur
Halbleiterdiode 635 nm
< 1 mW, Klasse II M
±1,0 mm / 10 m (±0,1 mm /1 m); ±20"
±1,0 mm / 1,5 m
250 cm
500 m (Durchmesser)
0 - 60 -120 - 300 - 600
±5°
NI-MH-Akku
etwa 20 Stunden
IP54
160 mm × 160 mm × 185 mm
3,0 kg
360°
-20°C ÷ 50°C
Wenn Sie Fragen zu Garantie haben oder Service-Unterstützung
brauchen, wenden Sie sich an den örtlichen Händler.
Die von PRO gewährte Garantie für Akkus beträgt 6 Monate und gilt ab dem
Kaufdatum. Danach gilt der Nachgarantie-Service.
PRO sp. z o.o.
ul. Strażacka 76
43-382 Bielsko-Biała, POLEN
tel. +48 33 818 39 09
NIP 644-14-23-158
www.firma-pro.com
TECHNISCHE SPEZIFIKATION LIEFERUMFANG
UMWELTSCHUTZ
SICHERHEITSREGELN FÜR DIE VERWENDUNG
BEFESTIGUNG AUF DEM STATIV
GARANTIE UND SERVICE
- LR-500H
- Transportkoffer
- Laserempfänger (Detektor) mit Griff
- Laserziel
- Laserbrille
- NI-MH-Akku
- Ladegerät
- Benutzerhandbuch
Um stabile Position beim Betrieb
zu erreichen, kann der Laser auf
einem Stativ befestigt werden.
Dazu dient die Gewindebefestigung
im Unterteil des Geräts. Sie ist für
Stative und Zubehör mit Gewinde
5/8" bestimmt.
11ver. 2.1

DESCRIPTION DE L'APPAREIL
UTILISATION DE L'APPAREIL
- Laser rotatif avec un rayon visible.
- Pour une utilisation en extérieur et en intérieur.
- Classe d'étanchéité IP54.
- Fonction d'alarme d'inclinaison (TILT), résultant d'un choc ou d'une
violation de la position initiale de l'appareil, après quoi l'appareil
doit être redémarré manuellement.
- Récepteur (détecteur) laser avec deux écrans rétroéclairés,
réglage du signal sonore, commutation de précision
- précise ou grossière.
- Diode laser de classe 2 M, < 1mW 635 nm.
Allumage / extinction. Le bouton (1) sert à allumer et éteindre l'appareil. La diode (2) s'allume en rouge
lorsque l'appareil est allumé et commence à clignoter lorsque le niveau de charge de la batterie est
faible - il faut charger ou remplacer les batteries.
Nivellement automatique. Après l'allumage, le laser passe automatiquement en mode de nivellement
automatique - les faisceaux laser commencent à clignoter. Un clignotement rapide de la diode (4)
et des faisceaux laser indique que l'appareil est hors de la plage de nivellement automatique ±5°;
il faut ajuster manuellement le réglage de l'appareil. Une fois le niveau atteint, le travail commencera
automatiquement.
Mode manuel (pour définir les pentes). Pour désactiver le nivellement automatique et passer en mode
manuel, appuyez sur le bouton (5) jusqu'à ce que la diode (4) s'allume.
Vitesse de rotation. L'appareil, une fois allumé, démarrera automatiquement à une vitesse
de 600 tr/min. En appuyant sur le bouton (6), la vitesse changera successivement
à 0 - 60 - 120 - 300 - 600 - 0 tr/min.
Alarme d'inclinaison (TILT). C'est une fonction qui peut être activée pour empêcher le retour
automatique à l'horizontale après avoir été délogé de sa position fixe, ce qui entraînerait un nivellement
automatique avec un changement probable de la hauteur de réglage. Pour activer la fonction d'alarme
d'inclinaison, appuyez sur le bouton (7) - la diode (3) commencera à clignoter lentement, confirmant le
fonctionnement avec l'alarme d'inclinaison. Lorsque le fonctionnement du laser est perturbé, le faisceau
s'arrête (arrêt de la rotation) et commence à clignoter rapidement avec la diode (3). Dans une telle
situation, le laser doit être rallumé manuellement en appuyant sur le bouton (7) ou en éteignant et
rallumant le laser avec le bouton (1). Après le redémarrage, vérifiez la hauteur définie par le laser, pour
voir si elle est la même qu'avant l'arrêt. 1
4
5
3
2
7
6
12ver. 2.1
Merci pour l'achat du produit PRO, un outil fiable
et durable pour les utilisateurs professionnels.

ENTRETIEN ET CONSERVATION
Contrôle. Placez le laser à environ 15 m du mur, afin de pouvoir projeter l'axe X dessus. Allumez
le laser. Marquez la ligne X1 sur le mur. Tournez le laser de 180° sans changer de hauteur. Marquez
le niveau de la ligne X2. La différence de niveau entre X1 et X2 ne doit pas dépasser 3 mm à une
distance de 15 m. Effectuez un test similaire avec les axes Y1 et Y2.
Calibration. Pour calibrer l'appareil, nous recommandons de le renvoyer au service d'usine PRO. La
première calibration pendant la garantie de 24 mois est effectuée gratuitement, vous pouvez faire une
demande notamment via le site internet : www.firma-pro.com.
Chargement de la batterie. Connectez le chargeur au réseau 230 V et la fiche du câble à la prise située
au bas du laser. Pendant la charge, le voyant LED s'allume en rouge, et après une charge complète de
la batterie, il change de couleur pour passer au vert. Le temps de charge est d'environ 4 heures (pour
la première charge d'une nouvelle batterie non chargée, environ 6 heures). Avant la première charge,
il faut retirer les éventuels scellés de protection de la prise de la batterie pour permettre le passage
du courant. Une seule charge suffit pour environ 20 heures de travail. Lorsque la batterie se décharge
en dessous d'un certain niveau, le laser cesse de tourner et commence à clignoter. Pour assurer une
durée de vie maximale à la batterie NI-MH, il faut la charger complètement après chaque décharge
complète. Il faut se rappeler que la capacité de la batterie est affectée par la température.
Récepteur laser. Si le récepteur doit être utilisé avec une plaque de nivellement, il faut visser une pince
de fixation dans le manchon fileté situé à l'arrière. Batterie d'alimentation 9 V 6F22. Le temps de
travail de la batterie est de 40 heures.
13 ver. 2.1
- Le laser rotatif doit être protégé des fortes précipitations lorsqu'il est utilisé en extérieur.
- En cas de mouillage de l'appareil, il faut le sécher soigneusement avant de le ranger dans une valise
ou un étui. Le non-respect de cette consigne peut endommager les installations internes de l'appareil.
- Pour nettoyer l'appareil, et en particulier les fenêtres des émetteurs de faisceaux laser, il ne faut pas
utiliser d'essence, de diluant à friction, d'autres solvants, du papier toilette ou des mouchoirs. Sinon,
cela pourrait entraîner des rayures ou des dommages, et par conséquent, le décalibrage de l'appareil.
- Si l'appareil tombe ou est endommagé mécaniquement, il peut perdre ses propriétés de mesure.
- En cas de suspicion de décalibrage, il est recommandé de renvoyer l'appareil au fabricant pour une
recalibration afin de restaurer les paramètres techniques d'usine.
- Il faut protéger le mécanisme d'auto-nivellement en éteignant l'appareil pendant le transport et après
la fin du travail.
Activation / Désactivation. L'arrêt automatique se produit 10 minutes après le dernier signal
laser reçu ou l'appui sur un bouton.
Choix de précision. Champ de réception plus étroit ± 1,0 mm, champ plus large ± 2,5 mm.
Activation ou désactivation du signal sonore. Après chaque activation du récepteur, le signal
est toujours activé par défaut.
L'éclairage de l'affichage s'active automatiquement après la mise en marche et à chaque fois
après la réception d'un signal laser ou l'appui sur un bouton.

Afin d'obtenir une position de travail
stable, le laser peut être fixé sur un
trépied. Un support spécial pour le
filetage à la base de l'appareil est
utilisé à cet effet. Le support est
adapté pour les trépieds et les
accessoires avec un filetage de 5/8".
source du laser
puissance
précision
précision du niveau à bulle
rayon de la zone d'action
portée de travail
vitesse de rotation
plage d'auto-nivellement
alimentation
temps de travail
classe d'étanchéité
dimensions
poids (avec les batteries)
angle du niveau
température de travail
diode semi-conductrice 635 nm
< 1 mW, classe II M
±1,0 mm / 10 m (±0,1 mm / 1 m); ±20"
±1,0 mm / 1,5 m
250 m
500 m (diamètre)
0 - 60 -120 - 300 - 600
±5°
accumulateur NI-MH
env. 20 heures
IP54
160 mm × 160 mm × 185 mm
3,0 kg
360°
-20°C ÷ 50°C
SPÉCIFICATION TECHNIQUE LE KIT CONTIENT
FIXATION SUR UN TRÉPIED
ET UNE PERCHE
- laser LR-500H
- valise
- récepteur (détecteur) laser
avec support
- cible laser
- lunettes laser
- batterie Ni-MH
- chargeur
- instruction.
14ver. 2.1
L'appareil doit être soumis à des processus de recyclage appropriés. L'appareil usagé doit être déposé pour
recyclage dans un point spécialisé, collectant ce type de déchets. Pour obtenir des informations
supplémentaires, veuillez contacter le représentant de la société PRO sp. z o.o. ou les autorités locales
responsables de la gestion des déchets.
Pour des raisons de garantie et de support de service, vous devez
contacter votre revendeur local de l'appareil. La garantie offerte sur les
batteries par PRO est de 6 mois et commence à partir de la date d'achat.
Après cette période, le service après-garantie reste.
PRO sp. z o.o.
ul. Strażacka 76,
43-382 Bielsko-Biała, POLOGNE
tel. +48 33 818 39 09
NIP 644-14-23-158
www.firma-pro.com
PROTECTION DE L'ENVIRONNEMENT
GARANTIE ET SERVICE
- Ne pas regarder directement la source du rayon laser. Cela peut endommager la vue. Pour cette raison,
ne pas placer l'appareil à hauteur des yeux avant de commencer à l'utiliser.
- Après le transport, y compris après une chute, vérifiez si les réglages de l'appareil n'ont pas été modifiés.
La précision du travail repose entièrement sur l'utilisateur, c'est pourquoi nous vous rappelons de vérifier
régulièrement le bon fonctionnement de l'appareil. La méthode de contrôle est décrite ci-dessous.
- Manipulation de l'appareil. C'est un appareil de précision et il faut donc le manipuler avec un soin particulier.
Protégez l'appareil contre les chocs, les chutes et les vibrations. Toujours transporter dans un étui
en plastique. Utiliser et stocker à des températures indiquées dans les spécifications techniques. Bien que
le laser soit étanche, il faut essayer de le garder au sec.
- En cas de mouillage, ne pas le mettre dans l'étui pendant une longue période. Si l'appareil doit rester inutilisé
pendant une longue période, retirez les piles, à la fois du laser et des accessoires. Nettoyer avec un chiffon
doux et sec.
RÈGLES DE SÉCURITÉ D'UTILISATION
Le laser rotatif PRO LR-500H peut être utilisé pour des travaux de construction et de finition de grande
envergure, tels que les travaux de nivellement, de menuiserie, d'installation ou de décoration.
APPLICATION

15 ver. 2.1

PRO sp. z o. o. ul Strażacka 76, 43-382 Bielsko-Biała, POLAND www.firma-pro.com
This manual suits for next models
1
Table of contents
Languages:
Other Pro Laser Level manuals