Procopi Piscines Bois ODYSSEA OCTO User manual

Jetzt Angebot anfordern auf www.poolseller.de
Installation instructions
To be read carefully and kept for future reference
ODYSSEA
OCTO & OCTO +
PROCOPI
Les Landes d’Apigné
B.P.45328
35650 LE RHEU Cedex
FRANCE
Piscines Bois
Notice Odyssea Octo & Octo+ GF-3/2012
FR-GB - Indice de révision : A - Code : 97199999
Jetzt Angebot anfordern auf www.poolseller.de
Jetzt Angebot anfordern auf www.poolseller.de
»NOTICE DE MONTAGE / OCTO & OCTO +
42
»INSTALLATION INSTRUCTIONS / OCTO & OCTO +
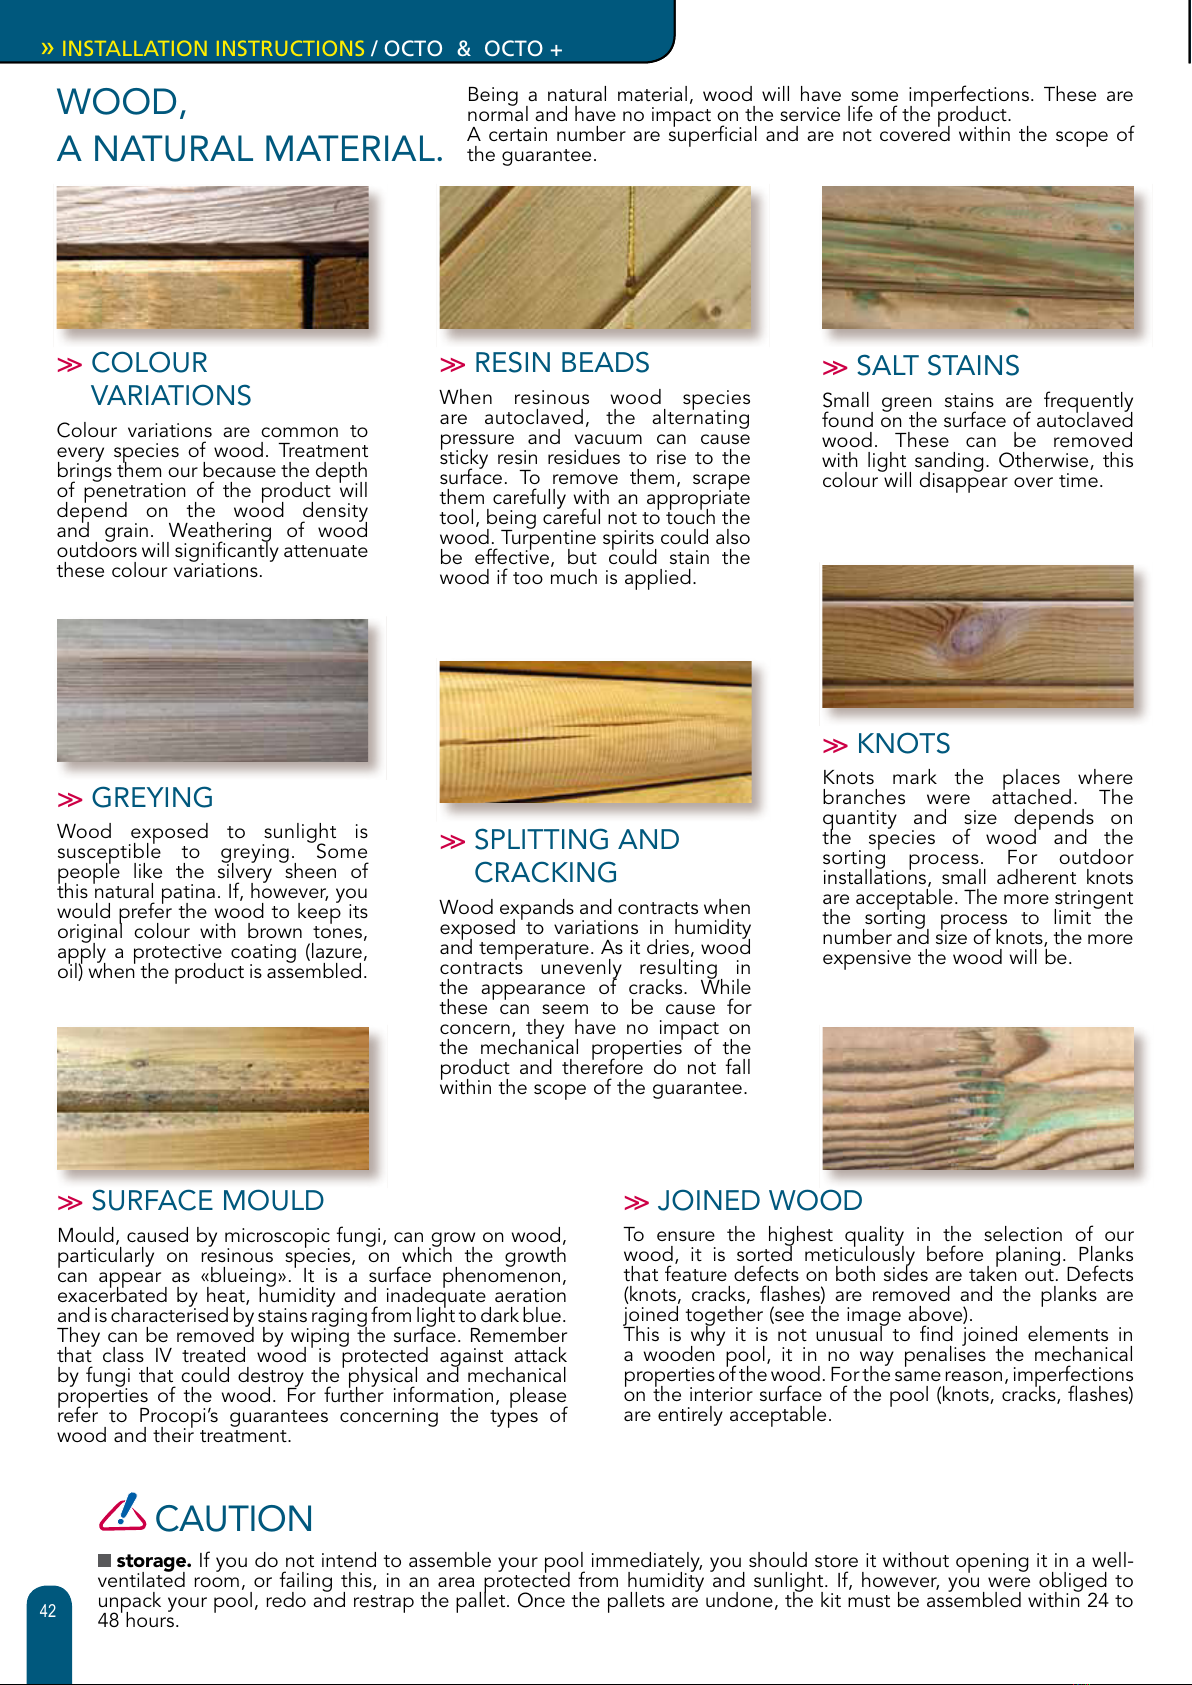
>> RESIN BEADS
When resinous wood species
are autoclaved, the alternating
pressure and vacuum can cause
sticky resin residues to rise to the
surface. To remove them, scrape
them carefully with an appropriate
tool, being careful not to touch the
wood. Turpentine spirits could also
be effective, but could stain the
wood if too much is applied.
>> SALT STAINS
Small green stains are frequently
found on the surface of autoclaved
wood. These can be removed
with light sanding. Otherwise, this
colour will disappear over time.
>> GREYING
Wood exposed to sunlight is
susceptible to greying. Some
people like the silvery sheen of
this natural patina. If, however, you
would prefer the wood to keep its
original colour with brown tones,
apply a protective coating (lazure,
oil) when the product is assembled.
>> SPLITTING AND
CRACKING
Wood expands and contracts when
exposed to variations in humidity
and temperature. As it dries, wood
contracts unevenly resulting in
the appearance of cracks. While
these can seem to be cause for
concern, they have no impact on
the mechanical properties of the
product and therefore do not fall
within the scope of the guarantee.
>> KNOTS
Knots mark the places where
branches were attached. The
quantity and size depends on
the species of wood and the
sorting process. For outdoor
installations, small adherent knots
are acceptable. The more stringent
the sorting process to limit the
number and size of knots, the more
expensive the wood will be.
>> JOINED WOOD
To ensure the highest quality in the selection of our
wood, it is sorted meticulously before planing. Planks
that feature defects on both sides are taken out. Defects
(knots, cracks, flashes) are removed and the planks are
joined together (see the image above).
This is why it is not unusual to find joined elements in
a wooden pool, it in no way penalises the mechanical
properties of the wood. For the same reason, imperfections
on the interior surface of the pool (knots, cracks, flashes)
are entirely acceptable.
>> SURFACE MOULD
Mould, caused by microscopic fungi, can grow on wood,
particularly on resinous species, on which the growth
can appear as «blueing». It is a surface phenomenon,
exacerbated by heat, humidity and inadequate aeration
and is characterised by stains raging from light to dark blue.
They can be removed by wiping the surface. Remember
that class IV treated wood is protected against attack
by fungi that could destroy the physical and mechanical
properties of the wood. For further information, please
refer to Procopi’s guarantees concerning the types of
wood and their treatment.
>> COLOUR
VARIATIONS
Colour variations are common to
every species of wood. Treatment
brings them our because the depth
of penetration of the product will
depend on the wood density
and grain. Weathering of wood
outdoors will significantly attenuate
these colour variations.
WOOD,
A NATURAL MATERIAL.
Being a natural material, wood will have some imperfections. These are
normal and have no impact on the service life of the product.
A certain number are superficial and are not covered within the scope of
the guarantee.
CAUTION
storage. If you do not intend to assemble your pool immediately, you should store it without opening it in a well-
ventilated room, or failing this, in an area protected from humidity and sunlight. If, however, you were obliged to
unpack your pool, redo and restrap the pallet. Once the pallets are undone, the kit must be assembled within 24 to
48 hours.
Jetzt Angebot anfordern auf www.poolseller.de

Jetzt Angebot anfordern auf www.poolseller.de
»NOTICE DE MONTAGE / OCTO & OCTO +
43
>> CONTENTS
Foreword ............................................................................. p.43
Storage & time required for assembly............................... p.44
Siting and preparation of the ground
for Octo & Octo + pools................................................. p.45,46
Assembly of the OCTO pool structure ..........................p.47-49
Assembly of the OCTO + pool structure .......................p.50-54
Fitting and cutting out the liner .................................. p.55,57
Filtration group components ........................................ p.58,59
Mounting the rigid descending pipes................................ p.60
Filling the filter with sand .................................................. p.61
Hydraulic connections.................................................... p.62,63
Commissioning & using the filtration system............... p.64,65
Assembling coping on OCTO pools............................... p.65,66
Assembling coping on OCTO + pools................................. p.67
Assembling and installing the ladders.......................... p.68,69
Implementation of in-ground & partially in-ground pools
.. p.70,72
Maintenance and use..................................................... p.73,74
Safety ................................................................................... p.75
Guarantee....................................................................... p.76,77
Exploded view of the wooden structure ...................... p.78,79
»INSTALLATION INSTRUCTIONS / OCTO & OCTO +
Jetzt Angebot anfordern auf www.poolseller.de

Jetzt Angebot anfordern auf www.poolseller.de
»NOTICE DE MONTAGE / OCTO & OCTO +
44
We shall now explain how to assemble your pool, but first some instructions before you begin.
Please read these instructions carefully, this will allow you to prepare each stage to achieve optimum efficiency.
Please keep these instructions for future reference.
You should take the time to go through the components using the nomenclature page that you will find in the
waterproofing kit and make sure that no items are missing.
Keep the following documents;
- the productions sheets for the various kits
- proofs of purchase
STORAGE
If you do not intend to assemble your pool immediately, you should store it without opening it, in a well ventilated
room, or failing this, in an area protected from humidity and sunlight. Once the pallets are undone, the kit must be
assembled within 24 hours. Once work has begun, try to avoid leaving the structure exposed to significant climatic
variations that could cause the wood to “work” too quickly. This could lead to deformations that could render the item
unusable. By preference, the wooden structure should be assembled in one go on a day that is not too hot. The liner
should be stored at a minimum of 20°C for at least 24 hours before it is fitted. This is to render the liner more supple
and thus facilitate fitting. The liner should only be fitted if the ambient temperature is higher than 20 °C.
TOOLS AND TIME REQUIRED TO MOUNT AN OCTO POOL
- To prepare the ground (does not include pouring a concrete slab): shovel, rake, pick axe, cord, aluminium ruler
and a spirit level.
- To assemble the structure: spirit level, screw gun, mallet, measuring tape, stanley knife, metal saw, flat head and
cross head screw drivers, sanding paper and a fine grain file.
- The time taken for assembly is 2 days for 2 people (does not include excavation, pouring the slab or filling of the
pool).
keep on hand: sand and cement for tamping the soil
TOOLS AND TIME REQUIRED TO MOUNT AN OCTO + POOL
- To prepare the ground (does not include pouring a concrete slab): shovel, rake, pick axe, cord, aluminium ruler
and a spirit level.
- To assemble the structure: spirit level, screw gun, mallet, measuring tape, stanley knife, metal saw, flat and
socket wrenches, flat head and cross head screw drivers, sand paper and a fine grain file.
- The time taken for assembly is 3 days for 2 people (does not include excavation, pouring the slab or filling of the
pool).
keep on hand: sand and cement to support the cradles and tamp the soil
>> STORAGE & TIME REQUIRED FOR ASSEMBLY
»INSTALLATION INSTRUCTIONS / OCTO & OCTO +
Congratulations on acquiring your pool. We have taken great care with the design and manufacture of your pool to
provide you with a top quality product.
The wood used to make the various elements (interlocking walls, coping, ladder, etc.) was carefully selected. Outdoors,
these wooden elements are subject to constant weathering: contact with the ground, temperature variations, exposure
to sunlight, rain and frost, insect attack, etc. The wood’s ability to withstand this treatment depends on the origin of the
wood and the method used to treat it.
For this reason, we choose pine from extensive, sustainably managed forests in northern Europe. Why do we insist
on this? Because the more rigorous climates above the 57th parallel favour very slow tree growth, making the wood
stronger and more resilient.
The wood is autoclaved, this involves subjecting the wood alternately to pressure and vacuum in order to drive
the treatment chemicals into the heart of the wood as opposed to other more superficial treatment techniques such as
soaking.
Class IV treated wood in contact with the ground is immune to insect attack and rotting caused by humidity.
Autoclave treatment is guaranteed 10 years, in accordance with standards currently in effect.
The pool coping is made of grooved planks of either exotic wood or composite wood depending on the pool
model.
Wood is a living material, variations in temperature and humidity can cause it to expand or contract so take care to
follow the storage and assembly instructions concerning the wooden structure. Similarly, prolonged exposure to UV light
can cause wood to grey. These are natural phenomena that in no way effect the service life of the products.
To preserve the original colour, use a colourless wood finish. You could alternatively opt for a coloured finish or treat
the wood with a colourless oil to slow the decoloration process. Before applying the finish, check that it is microporous
and will allow the wood to breathe. Make sure that the product will not migrate (wet wood) over time to the interior of
the structure and damage the liner. Ideally, the finish should be applied before assembling the pool structure.
>> FOREWORD
Jetzt Angebot anfordern auf www.poolseller.de
Jetzt Angebot anfordern auf www.poolseller.de
»NOTICE DE MONTAGE / OCTO & OCTO +
45
This is the most important step in the procedure as the pool site will determine the service life of your pool. There are
some rules that must be respected.
Given the vast variation possible (slope, type and homogeneity of the ground, possible issues with drainage, etc) we
cannot provide recommendations for every possible permutation here. Some optional steps, such as pouring a concrete
slab, laying foundations, footing, laying drains, etc will require assistance from professionals who will be able to advise you
on solutions best suited to your configuration.
We will explain how to prepare the ground without any concrete, the objective being to achieve a flat, level bearing
surface. In as far as possible, avoid siting your pool under trees (to stop you pool from being filled with leaves) or near rises
or dips in the ground that could expose children to danger. Do not assemble your pool under electrical cables. The pool
should be at least 3.50m from any electrical source (French safety standard C15-100). On a slope, never back fill under your
pool to bring the bearing surface level, always cut into the upward slope.
Lastly, avoid preparing the ground and assembling the pool while a strong wind is blowing.
How should the pool be oriented? Ideally, the pool should be oriented so that the skimmers are facing into the
prevailing wind.
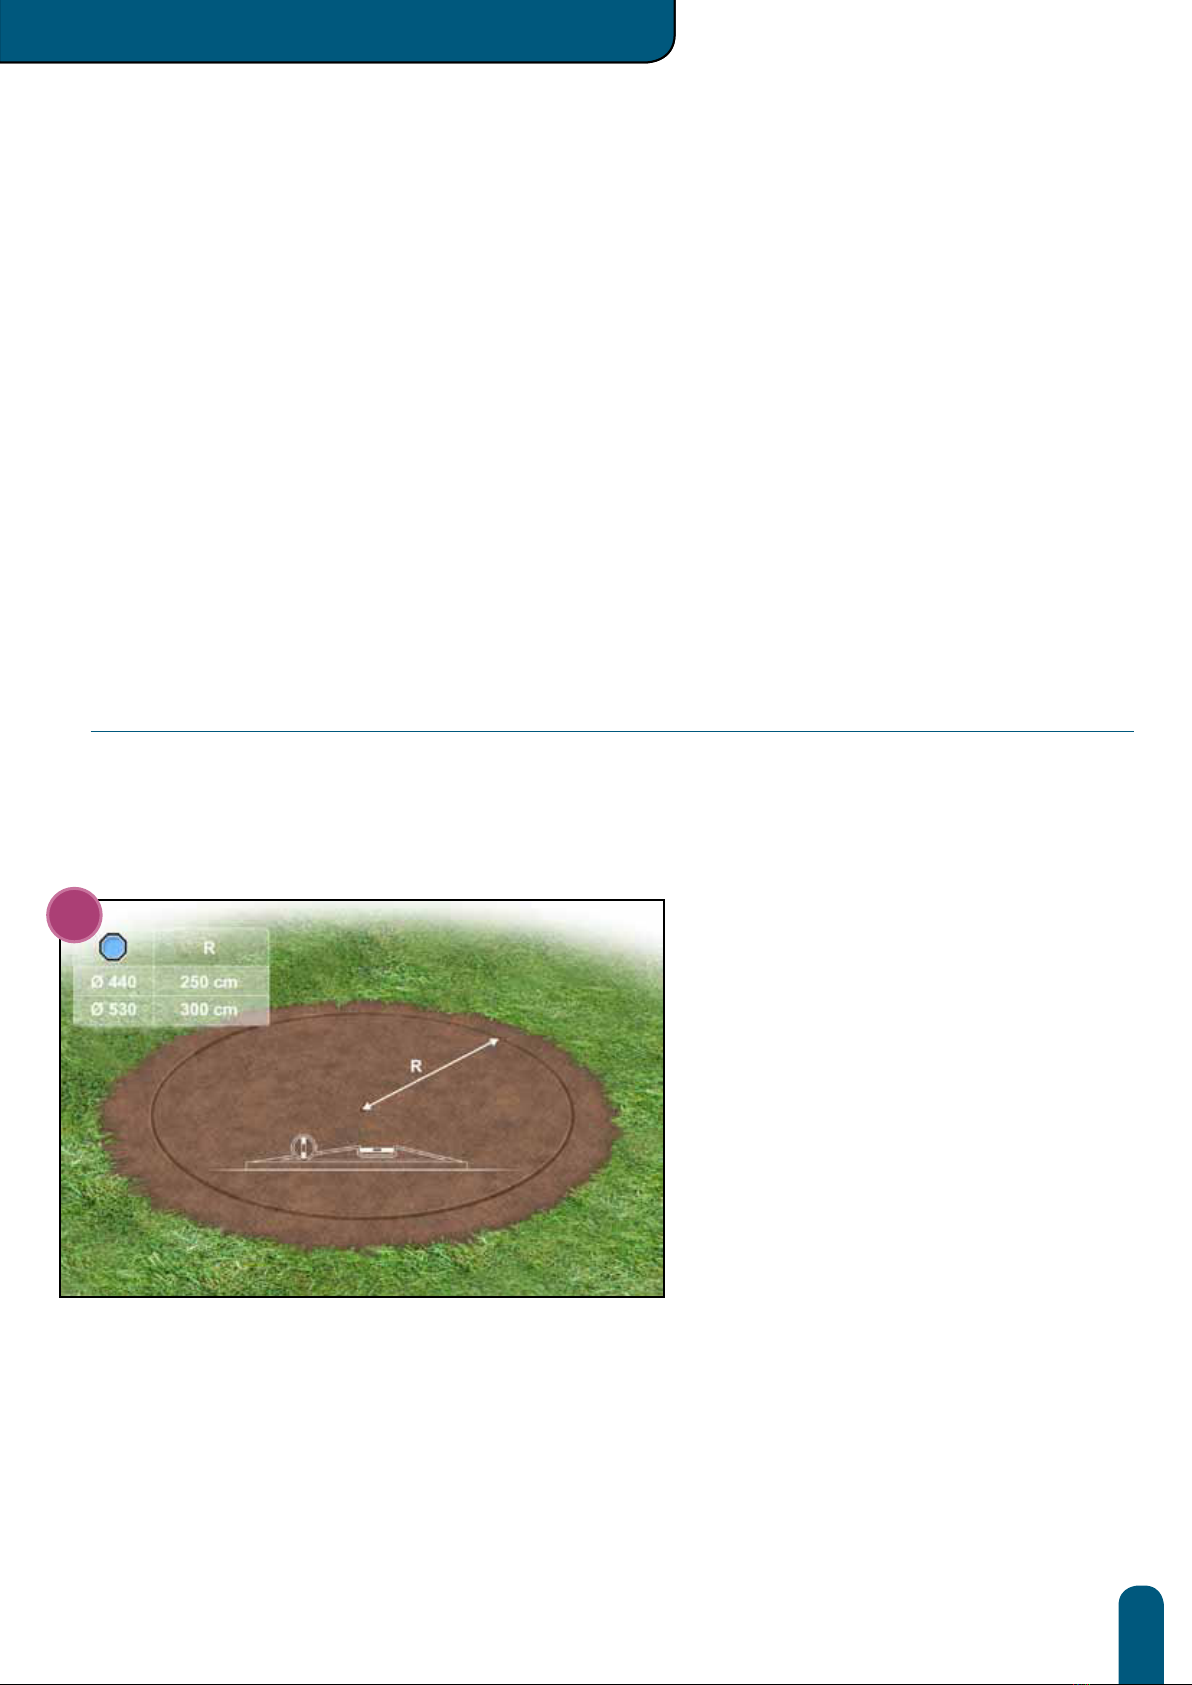
>> OCTO POOLS
ABOVE-GROUND CONFIGURATION ONLY. ADVICE AND INSTRUCTIONS FOR IN-GROUND OR PARTIALLY
SUNKEN CONFIGURATIONS ARE ILLUSTRATED AT THE END OF THIS DOCUMENT.
To begin, clear the ground of plants and other
miscellaneous objects. Next, level and smooth
the surface using a spade, rake and a pickaxe (if
necessary). Make sure that you smooth out any
bumps or rough areas that could damage the
underlay, or more seriously, the liner.
After a rough preparation of the surface,
plant a stake in the centre of the circle and mark
the point where it comes into contact with the
ground.
Next, using a flat, straight piece of wood
longer than the radius of your pool, go around
the circle checking that the ground is level. This
operation requires two people (one to make
sure that the bottom of the wood corresponds
to the mark on the stake, and the other to check
the level and move the wood around the entire
circumference to ensure that the surface is
perfectly level).
1
>> SITING & PREPARATION OF THE GROUND FOR
OCTO & OCTO + POOLS
»INSTALLATION INSTRUCTIONS / OCTO & OCTO +
Jetzt Angebot anfordern auf www.poolseller.de
This manual suits for next models
2
Table of contents
Other Procopi Swimming Pool manuals

Procopi
Procopi ODYSSEA RECTANGLE User manual

Procopi
Procopi ProSwell Weva octo 440 User manual

Procopi
Procopi ProSwell TROPIC JUNIOR User manual

Procopi
Procopi Delta STARDECK User manual

Procopi
Procopi OCTO+ PRO User manual

Procopi
Procopi Proswell Tropic OCTO User manual

Procopi
Procopi Wooden Pools Rectangular Pro User manual


