Prodeco Technologies Outlaw SS 2013 User manual

Some of the content of this manual may differ from
your bicycle depending on the options of the bicycle
and what your dealer provided.
© 2013 PRODECO TECHNOLOGIES. All rights
reserved. PRODECO TECHNOLOGIES and the
PRODECO TECHNOLOGIES logo are trademarks of
PRODECO TECHNOLOGIES. Printed in USA.
USER GUIDE
You have purchased one of the highest quality
electric bicycles available today. It is important
you read this manual to understand your new
bicycle. All riders including experienced non-
electric bicycle riders should read this manual.
This manual explains the functions of your new
electric bicycle and details on performing basic
maintenance. All riders must read the section
on throttling prior to mounting the bicycle due
to the nature of how to power the bicycle
forward. Please take the time to register your
new Prodeco Technologies electric bicycle for
the warranty to take effect.
2
2
20
0
01
1
13
3
3

2
DISCLAIMER FOR OFF ROAD USE ONLY
THE PURCHASER IS SOLELY RESPONSIBLE FOR DETERMINING THE RIDING
SAFETY AND SUITABILITY OF THE OUTLAW ELECTRIC BICYCLE.
This is a high performance trail riding electric bicycle. USE AT YOUR OWN RISK.
The Outlaw electric bicycle is equipped with a state-of-the-art high-power 750W motor
equivalent to 1 horsepower and is strictly intended for OFF ROAD use. When using electric
power, the Outlaw electric bicycle does not follow the Federal Guidelines for electric bicycles
due in part to its 28mph top speed. It is NOT allowed on pedestrian walkways, bike paths or
roadways when using electric power. Prodeco Technologies and its Authorized Dealer make no
representation or warranty, express or implied that the use of the bicycle will comply with local,
state, or Federal laws with regard to street legality, off road use or safety standards regarding
motorized vehicles. The Outlaw electric bicycle can become bike path legal upon the removal of
the battery. When not under electric power, the Outlaw electric bicycle follows the applicable
federal, state, local laws, statues and ordinances of most states. It is the responsibility of the
purchaser rider to familiarize themselves with their local laws regulating motorized bicycles.
While not under power, the Outlaw electric bicycle performs similar to a traditional pedal power
bicycle and can be pedaled as such.
Prodeco Technologies cannot control the challenges of off road terrain, riding abilities, riding
habits and bicycle repairs and maintenance by the purchaser. The Outlaw electric bicycle is not
designed for extreme riding conditions other than light trail riding. The purchaser is responsible
to fully understand the capabilities and limitations of the bicycle as well as their riding abilities.
The purchaser is also responsible to understand and obey all applicable federal, state, local
laws, statutes and ordinances before operating their Outlaw electric bicycle.
The purchaser further understands, recognizes and agrees that the appropriateness of the
Outlaw electric bicycle for a particular application is solely the purchaser’s responsibility and that
the purchaser is not relying on Prodeco Technologies or its Authorized Dealers regarding
suitability of use. The purchaser agrees to indemnify and hold harmless Prodeco Technologies
and its Authorized Dealers from any claim, action or demand outside of the limited warranty
arising out of an incident in regards to the purchaser’s use of the Outlaw electric bicycle.
PRODECO TECHNOLOGIES AND ITS AUTHORIZED DEALERS SHALL NOT BE LIABLE
FOR AND HEREBY EXCLUDES ANY AND ALL INDIRECT, INCIDENTAL, SPECIAL OR
CONSEQUENTIAL DAMAGES RELATING THE USE OF THE OUTLAW ELECTRIC BICYCLE
COVERED BY THIS DISCLAIMER. PURCHASER HEREBY RELEASES AND FOREVER
WAIVES AND DISCHARGES PRODECO TECHNOLOGIES AND ITS AUTHORIZED
DEALERS FROM ANY AND ALL ACTIONS, INCLUDING BUT NOT LIMITED TO ANY
ACTION, COVENANTS, CLAIMS, DEMANDS OR BODILY INJURIES, DEATH, COST OR
LOSSES, DAMAGES TO THE BICYCLE, ANY PERSON OR ANY OTHER PROPERTY
DAMAGE, HOWEVER ARISING, WHICH MAY HAVE BEEN OR MAY BE SUSTAINED BY, OR
IN ANY WAY ARISING OUT OF, CONNECTED WITH OR RESULTING FROM THE RIDING
OF THE OUTLAW ELECTRIC BICYCLE.
Before operating the Outlaw electric bicycle or any bicycle, always utilize safety gear.

3
Table of Contents
1) Chapter 1: Introduction ………………………………………………………………………………………………..5
a. About this manual …………………………………………………………………………………………………..5
b. Important notices ……………………………………………………………………………………………………5
c. General warning …………………………………………………………………………………………………….5
d. A special note to parents …………………………………………………………………………………………..6
2) Chapter 2: Getting Started …………………………………………………………………………………………… 6
a. Unpacking your box ……………………………………………………………………………………………….. 6
b. Contents of the box ………………………………………………………………………………………………... 6
c. A guideline of your Outlaw tool set …………………………………………………………………………... 6
d. Registering your new bike…………………………………………………………………………………………. 6
e. Familiarize yourself with your bicycle’s parts………………………………….………………………………… 7
3) Chapter 3: Basic Instructions ……………………………………………………………………………………….. 7
a. Bicycle fit ……………………………………………………………………………………………………………. 7
b. Adjusting the saddle …….………………………………………………………………………………………….8
c. Installing the handlebar and stem …………………………………………………….……………….………….9
d. Your local electric bicycle and bicycle laws …………………………………………………………………..….9
e. Safety first …………………………………………………..……………………………………………………….10
f. Mechanical safety check ………………………………………………….………………………………………. 10
g. Before your first motorized ride ……………………………………………..……………………………………. 11
h. First motorized ride ……………..…………………………………………………………………………………. 11
i. Riding an electric bicycle …………………………………………….…………………………………………….11
j. Using your throttle …….…………………………………………………………………………………………….11
k. Using your brakes …………….…………………………………………………………………………………….11
l. Pedaling ……………………….……………………………………………………………………………………. 12
m. Shifting gears ………………………………………………………………………………………………………. 12
n. Watching for obstacles around you ……………………………………………………………………………….12
o. Safe riding in various conditions ……………………………………………………………………………….….12
p. Charging your battery ……………………………………..………………………………………………………. 12
4) Chapter 4: Safety ………………………………………………………………………………………………………. 13
a. The basics ………………………………………..………………………………………………………………….13
b. Riding safety ………………………..……………………………………………………………………………….13
c. Wet weather riding ………………………………………………………………………………………………….14
d. Reflectors ……………………...…………………………………………………………………………………….14
e. Night riding …………….…………………………………………………………………………………………….14
f. Adding accessories ……..…………………………………………………………………………………………. 14
5) Chapter 5: Perfect Fit and Ride ……………………………..………………………………………………………. 14
a. The basics …………………...……..………………………………………………………………………………. 14
b. Frame size ………………………..……………………………………………………………………………...….15
c. Recommended sizing ……………..………………………………………………………………………………. 15
d. Control position adjustments ………………………..……………………………………………………………. 15
e. Brake lever adjustments ………………………………..………………………………………………………….15
f. Suspension fork adjustment ………………………..……………………….……………………………………. 16
6) Chapter 6: Tire, Tube, Wheel or Axle Repair ………………………………………………………………………16
a. Removing the rear motor wheel ………………………..………………………..………………………………. 16
b. Installing the rear motor wheel ………………………..……………………………………………………….….16
c. Removing and installing the front wheel ……………………..………………………………..……………..…. 17
d. Replacing a tube or tire …………...………………………………………………………………………………. 17
7) Chapter 7: Maintenance and Replacement ………...………………………………………………………………18
a. Keeping your bike clean ………………..………………..………………………..……………………………….18
b. Avoid scratching your bike …………………..…………..………………………..……………………………….19
c. Brake pad bed-in process.……………………………..……………..…………..………………………………. 19
d. Brake pad replacement ………………………………….………………………..………………………………. 20
e. Derailleur adjustments ………………………..…………………………….……..……………………………….21
f. Wheel check ………………………………..……………..………………………..……………………………….22
g. Lubricating ………………………..…………………………….…………………..……………………………….22
h. Crankset …………………………………….……………..………………………..……………………………….22
i. Headset …………………………………..………………..………………………..……………………………….22
j. Maintenance schedule …………………………….……..………………………..……………………………….23
k. Torque specifications for common parts ……………....………………………..………………………………. 23

4
8) Chapter 8: Battery Management ……………………………………………………………………………………..24
a. About your battery ………………………………………..………………………..……………………………….24
b. Removing the battery …………………..………………..………………………..………………………………. 24
c. Installing and locking the battery …………..…………..………………………..………………………………. 25
d. Charging the battery ………………………..……………………………………..………………………………. 25
e. Storing the battery ………………………………………..………………………..……………………………….26
f. Battery power indicator ………………………..………………………..………………………………………….26
g. Battery replacement ……………….……………………..………………………..……………………………….26
h. Battery disposal …………………………………………..………………………..………………………………. 26
9) Chapter 9: Electrical Components ………………………..…………………………………………………………26
a. HUB motor ………………………………………….……..………………………..……………………………….26
b. Brushless hall sensor controller ……………….………..………………………..……………………………….27
c. Wiring harness ……………………………………………………………………..………………………………. 27
d. Throttle ………………………..………………………..………………………………………………………...….27
10) Chapter 10: Warranty Service and Repair ………………………………………………………………………….28
a. 2 year limited warranty …………………………………..………………………..………………………………. 28
b. Registering your bike ……..…………………….………..………………………..……………………………….29
c. Serial numbers and where to find them ………………..………………………..……………………………….29
d. Registration card …………………..……………………..………………………..……………………………….29
e. Part replacement procedure …………...………………..………………………..……………………………….30
f. Contacting Prodeco Technologies ……………………..…………….…………..……………………………….30
11) Chapter 11: Specifications …………………….………………………………...……………………………………30
12) Chapter 12: Parts ……………………………………………………..…….…………………………….…………… 31

5
OPERATIONAL INSTRUCTIONS
Chapter 1: Introduction
Prodeco Technologies thanks you for your purchase of your new Outlaw. Your bicycle is a high quality and environmentally
friendly light electric vehicle. This manual will serve to provide you with the information needed to operate, maintain and enjoy it
safely. Your electric bicycle should provide you with years of healthy enjoyment provided you follow these steps.
For technical questions or customer service, please contact PRODECO TECHNOLOGIES at 800.943.6190 or e-mail us
at service@prodecotech.com.
a) About this manual
To prevent serious injury to yourself and others, and to prevent damage to the bicycle please read and understand these
instructions completely before operating your Prodeco Technologies Outlaw. Your new bicycle is a powerful and reliable
electric bicycle. You should use caution and care while getting accustomed to your bicycle’s riding characteristics. The
following manual will provide basic instructions regarding your bicycle’s care and maintenance, battery management,
operating procedures, and other important information. You should read it thoroughly before riding your new bicycle for
the first time. If you have any questions that are not answered in this manual, contact your local authorized Prodeco
Technologies dealer or you can call customer service at 800.943.6190.
b) Important notices
Always remove the key from the battery when your bicycle is not in use, replacing a component or performing maintenance.
Make sure your electric bicycle is properly fitted to you as described in Chapter 3 “Basic Instructions”.
Perform the mechanical safety check described in Chapter 3 “Basic Instructions” section f “Mechanical safety check”
before each ride.
You should ride your Outlaw as a traditional bicycle under pedal power prior to riding under motor power for the first time.
This will allow for the familiarization of how your Outlaw rides and balances.
When riding under power for the first time, press the variable throttle very slowly only after pedaling to a slow speed to
understand the strength of the front motor’s performance and grip on the road surface.
Always apply full front & rear brake lever pressure when attempting to mount or dismount the bicycle.
When attempting to mount or dismount the bicycle, the key should be in the off position on the battery.
Please read the battery pack and detailed charging instructions found in Chapter 8 “Battery Management” before
charging the battery pack for the first time.
You should fully charge the Li-ion LiFEPO4 battery according to the charging instructions before your first ride.
You should always fully charge your Li-ion LiFEPO4 battery every 8 miles regardless of the amount of small trip distances.
You should always fully charge your Li-ion LiFEPO4 battery pack after each round trip ride exceeding 4 miles.
Always store the battery pack in a cool and dry place.
During periods of prolonged storage, the battery pack should be charged at least once every 6 months at a minimum of
60% or every 3 months at 40%. Do not charge higher than 60% when storing.
Your Outlaw can be ridden as a traditional bicycle; it is strongly recommended that you also assist with pedaling when
riding which can greatly increase the distance between battery charges.
When riding under power, you can enhance distance in between charges by holding the throttle at 10% below full throttle.
When riding under power, add as much non-powered coasting (similar to traditional pedaling) by releasing the throttle and
allowing the bicycle to freely coast under its own momentum. This will greatly increase the distance between charges.
Familiarize yourself with throttling (10% below full), pedaling and momentum coasting to optimize the distance being
available per charge. If planning a long trip, applying a combination of the 3 distance enhancing methods mentioned
above will allow for an uninterrupted power supply for the entire ride.
c) General warning
Like any sport, bicycling involves the risk of injury and damage. By choosing to ride a bicycle, you assume the
responsibility for that risk, so you need to know — and to practice — the rules of safe and responsible riding and of
proper use and maintenance. Proper use and maintenance of your bicycle reduces risk of injury.
This Manual contains many “Warnings” and “Cautions” concerning the consequences of failure to maintain or inspect
your bicycle and of failure to follow safe cycling practices.
WARNING: This image followed by the word WARNING indicates a potentially hazardous situation that,
if not avoided, could result in serious injury or death.
CAUTION: This image followed by the word CAUTION indicates a potentially hazardous situation, which,
if not avoided, may result in minor or moderate injury, serious, damage to the bicycle or the voiding of your
warranty or is an alert against unsafe practices.

6
Many of the Warnings and Cautions say, “you may lose control and fall”. Because any fall can result in serious injury or
even death, we do not always repeat the warning of possible injury or death. Because it is impossible to anticipate every
situation or condition that can occur while riding, this Manual makes no representation about the safe use of the bicycle
under all conditions. There are risks associated with the use of any bicycle which cannot be predicted or avoided, and
which are the sole responsibility of the rider.
d) A special note to parents
The Prodeco Technologies Outlaw is intended for use by adult riders only and not children. Many state laws require electric
bicycle riders to be a minimum age of 16 with some states having minimum ages set at 18 years old (at the time of the
writing of this manual). As a parent or guardian, you are responsible for the activities and safety of your minor child including
the following of your state and local laws in regards to the riding of an electric bicycle by a minor (under the age of 18). That
includes, if your state allows a minor to ride, making sure that your minor child can safely ride and control all of the
operations of the bicycle, and fully understands all warnings and cautions as indicated in this User Guide. Please read on if
you have determined that your minor child can legally and safely ride and control all of the operations of the bicycle. That
includes making sure that the bicycle is properly fitted to the child; that it is in good repair and safe operating condition; that
you and your child have learned and understand the safe operation of the bicycle; and that you and your child have
learned, understand and obey not only the applicable local motor vehicle, bicycle and traffic laws, but also the common
sense rules of safe and responsible bicycling. As a parent or guardian, you should read and understand this manual.
Before letting any child ride the Outlaw or any of Prodeco Technologies electric bicycles, review with them all warnings and
cautions; as well as the information on the proper usage of your battery pack, charger and bicycle. You must first confirm
the laws, rules and regulations regarding electric bicycles in your state, city and local municipality.
WARNING: riders of the Outlaw must always wears an approved bicycle helmet and safety gear when riding.
Chapter 2: Getting Started
CAUTION: If you have purchased your bicycle by mail order or through a sales channel whereas your
new Outlaw is still in the box, it is recommended you read Chapter 3 “Basic Instructions” section g “Before
your first ride” prior to your first ride. There may be additional adjustments required due to shipping by the
freight carrier.
a) Unpacking your box
Your Outlaw arrives fully assembled in it’s box and only requires the installation of the handlebar. You can learn how to
install the handlebar in Chapter 3 “Basic Instructions’ section c “Installing the stem and handlebar”.
The Outlaw has been fully tested and adjusted prior to being packed in the Heavy Duty double wall box with a form fitting
interior support system. To remove the Outlaw from it’s box, open the top flap of the box and remove the top protection
insert. Place one hand under the front portion of the frame and the other hand under the center of the frame. Pull up
slowly and the bicycle will lift out of the box. Remove the additional inserts (if attached to bicycle) and set the bicycle
down by balancing the bicycle on both wheels.
b) Contents of the box
Check the contents of your box. Your new Outlaw should include the following items in the box or your dealer should
have included these items with your purchase:
Outlaw electric bicycle
Gyes Leather saddle (attached to seat post)
Prodeco Tech 48V9Ah LiFePO4 Battery
48V LiFePO4 charger & power cable
2 keys
Multi-use nickel plated tool set
3 Arm Y tool (4, 5 & 6mm)
2 cable ties (for future use)
c) A guideline of your Outlaw tool set
The Outlaw includes a multi-use tool set. This tool set includes all the tools necessary to make adjustments and service
your new bicycle. The only additional tool you will ever need is an 18mm wrench to remove the front wheel. All other
tools are included with the tool kit. The tool kit includes the following tools:
Philips Screwdriver
Flat Head Screwdriver
2mm Hex Key
2.5mm Hex Key
3mm Hex Key
4mm Hex Key (multi & Y)
5mm Hex Key (multi & Y)
6mm Hex Key (multi & Y)
8mm Hex Key
Torx 25
Chain Pin Removal
Spoke Nipple Wrenches
d) Registering your new bike
For the warranty to take effect, you must register your new bicycle. Registration of your electric bicycle is the only way we
can acknowledge and verify the established owner. Your bicycle has 3 individual and unique serial numbers (frame,
motor and battery). Each serial number must be registered when filling out the registration form. The serial number on
the frame is located under or on top of the crank/bottom bracket portion of the frame. The serial number for the motor is
found on the motor’s side. The serial number for the battery is located on the barcode label adhered to the underside of
the battery. These numbers should be recorded and registered in case of warranty issues or theft. Please review
Chapter 10 “Warranty Service and Repair” section c “Registering your bicycle” on how to register your Outlaw. You can
register by either filling out the online registration form at www.prodecotech.com/register-your-bike/ or by sending the
registration card found in Chapter 10 “Warranty Service and Repair” section d “Registration card”.

7
e) Familiarize yourself with your bicycle’s parts
Chapter 3: Basic Instructions
a. Bicycle Fit
It is very important your Outlaw is properly adjusted for comfort and to avoid the possibility of losing control while riding. The
saddle will adjust to allow riders from 5’ 8” to 6’ 6” to set the proper measurement allowing for a safe and comfortable riding
position. If you plan to use your electric bicycle also as a traditional pedal bicycle, it is recommended you adjust the saddle
height to allow for a full leg extension when pedaling. The ball of your foot when resting on the pedal should only allow for a
slight bend at the knee when seated. Please review the following points in determining how to make the correct adjustments.
The subsequent sections will assist you with making these adjustments.
1) Is your bike adjusted to your size?
2) To check, see Chapter 5 “Perfect Fit and Ride”. If your bicycle is not properly adjusted for you, you may lose
control and fall.
3) Is the saddle at the right height? To check, see Chapter 5 “Perfect Fit and Ride” section a “Stand over height”.
4) Are saddle and seat post securely clamped? A correctly tightened saddle will allow no saddle movement in
any direction. See Chapter 3 “Basic Instructions” section b “Adjusting the saddle” for details.
5) Can you comfortably operate the brakes? If not, you have the ability to adjust their angle and reach. See
Chapter 5 “Perfect Fit and Ride” section e “Brake lever height adjustments” for details.
6) Do you fully understand how to operate your new bicycle? If not, before your first ride, have your dealer or
contact us to explain any functions or features that you do not understand after fully reading this manual.

8
b. Adjusting the saddle
You have the ability to adjust the height of your saddle instantly via the quick
release clamp. There is also the ability to tilt the nose of the saddle up or down
and adjust your riding position to be further or closer to the handlebar. The latter
two require the use of the multi-use tool included with the purchase of your
Outlaw. Please review the following details on adjusting your saddle.
To adjust the height of the saddle or remove the seat post, no tools are required.
The quick release lever is opened by pulling the lever away from the seat tube
allowing for the seat tube clamp to loosen the grip around the post. This will allow
you to raise or lower the saddle to the desired height. There is a minimum
insertion line on the seat post which must be followed and you must not extend
the seat post past this mark. It is also important the seat tube clamp is tightened
sufficiently around the seat post for it not to slide downwards after the quick
release lever is closed. This can be accomplished by tightening the quick release
nut clock wise which is located on the opposite end of the quick release lever.
WARNING: The seat post includes a minimum insertion mark. It is important you do not allow the seat
post to be clamped below this mark. This mark must be inserted into the frame pass the top of quick release
clamp. If clamping below this mark, it can cause the seat post to break, failure to follow this warning could
result in serious injury or death.
CAUTION: The seat tube quick release clamp must be checked for tightness to ensure the saddle will not
accidentally slide into the seat tube when riding. This can cause a rider to lose balance and may result in a fall.
To tilt the nose of your saddle upwards or downwards, you will need to use the 5mm hex key included with your multi-
use tool kit that came with your bicycle. The saddle mounting clamp attaches the saddle to the seat post via a front and
rear barrel nut and bolt. To bring the nose of the saddle down, loosen the rear bolt by 1 full counter clockwise rotation
and tighten the front bolt by 1 full clockwise rotation. Check for comfort and if the nose is still too high, attempt the above
step again. Continue to adjust by repeating the step above until the desired nose height is established. If you prefer to
raise the nose, you can follow the above step but in the opposite direction (loosen the front bolt counter clockwise 1
rotation and tighten the rear bolt clockwise 1 rotation). All bolts should be tightened to 140 in*lb. (SEE PHOTOS)
CAUTION: The saddle mounting clamp front and rear barrel nut and bolt must remain tight at all times.
Test saddle for looseness or play in the rotation of the nose. If saddle is loose, tighten the bracket bolts to
ensure the saddle will not accidentally rotate up or down when riding. Both bolts should be tightened to 140
in*lb. If loose, this can cause a rider to lose balance and may result in a fall.
Your saddle can be adjusted to be closer or further away from the steering tube/handlebar (you will need to use the 5mm
hex key included with your multi-use tool kit). This adjustment is minimal but allows a 7.5mm adjustment in either
direction from center mount (15mm total, close to 5/8”). To adjust the saddle closer or further, you must loosen the rear
and front barrel nut and bolt set which connects the saddle rails to the saddle mounting clamp located at the top of the
seat post. Loosen both bolts by rotating 2 times counter clockwise each. This should allow for sufficient looseness to
slide the saddle rails in either direction on the saddle mounting clamp. You must not allow the edge of the saddle
mounting clamp to meet with the saddle rail bends. The edge of the clamp must be a minimum of 5mm from the saddle
rail bends. Upon establishing the correct position, tighten the saddle mounting clamp bolts 2 times in clockwise direction.
Check for tightness of bolts and continue turning if loose. All bolts should be tightened to 140 in*lb. (SEE PHOTOS)
CAUTION: The edge of the saddle mounting clamp must have a minimum of 5mm of clearance from the
saddle rail bends. If the edge of the clamp is mounted to close the saddle rail bends and the rider does not
position themselves properly on the saddle, this could result in the rails becoming unstable due to the leverage
of the riders weight. The rails can bend and can cause a rider to lose balance and may result in a fall.

9
c. Installing the handlebar and stem (SEE PHOTOS)
The handlebar of the Outlaw is not secured to the stem when shipped. The handlebar is temporarily attached to the frame with
shipping ties. Using scissors, cut the ties to free the handlebar from the frame. You will need to place the center of the handlebar
into the stem’s concaved center and attach the handlebar clamp plate to the stem. There are 4 stem binder bolts which tighten the
plate to the stem, securing the handlebar in place. You will also want to rotate the handlebar to a comfortable riding position prior
to your final tightening / torqueing of the stem binder bolts. The stem binder bolts require torqueing of a minimum 60 lb*in. The
brake levers, throttle and shifter positions can be adjusted afterwards for proper control.
WARNING: The handlebar should be properly rotated for comfort and control. Loosen the 4 stem binder bolts
and rotate the handlebar downwards or upwards to a preferred riding position. Tighten stem binder bolts to 60-90lbs*in.
d. Your local electric bicycle and bicycle laws (The OUTLAW does not qualify due to its 28mph speed)
Your new Outlaw does not follow the federal guidelines due to its 28mph speed. Without battery power, the Outlaw can be
traditionally pedaled as a standard bicycle within most states and be allowed on bicycle pathways. However, electric bicycle laws
change often and you are responsible to confirm legal status of the riding of your electric bicycle on bicycle pathways. Below is a
reference section on the USA electric bicycle federal guidelines:
Electric Bicycle Laws (please contact your local transportation department for the specific laws in your state and city regarding
riding electric bicycles on bike pathways)
Prodeco Technologies offers the following information as guidance and does not guarantee or assure riders they are
following the rules and regulations of their state.
Electric bicycle laws may vary by state to state with most states following the classification of that by the CPSC
(Consumer Product Safety Commission), DOT & NHSTA. Further, the US NHSTA (National Highway Traffic Safety
Administration) defines low-speed electric bicycles (under 20mph) also as consumer products and not Motor Vehicles for
safety standards. The NHSTA adheres for the most part to the CPSC guidelines. We included reference below on how
electric bicycles are perceived by the Federal Government’s most important agencies. We do believe new regulation and
rules will apply in the future upon the electric bicycle becoming one of the standard forms of transportation for the
masses. Prodeco Technologies will continue to follow new rules and guidance set forth by these agencies, always
welcoming and adhering to the guidelines they feel are required to assure safety for the electric bicycle rider.
On October 22, 2008, the Federal Highway Administration (FHWA) updated the Bicycle and Pedestrian Provisions of
Federal Transportation Legislation to make technical corrections and clarifications.
Below are the important updates reflecting electric bicycles:
Motorized Vehicle Use: In general, motorized vehicles are not permitted on non-motorized trails and pedestrian walkways funded
under Title 23. Exceptions to this general rule exist for maintenance vehicles; motorized wheelchairs; when State or local
regulations permit, snowmobiles; and electric bicycles (weighing under 100 pounds and a top speed of less than 20 miles per
hour); "and such other circumstances as the Secretary deems appropriate" (except the Recreational Trails Program which
specifically provides funds for motorized trails). In 2008, FHWA developed a Framework for Considering Motorized Use on Non-
motorized Trails and Pedestrian Walkways to implement the "other circumstances" provision.
Framework for Considering Motorized Use on Non-motorized Trails and Pedestrian Walkways under 23 U.S.C. § 217
The purpose of this document is to provide guidance to Federal Highway Administration (FHWA) division offices and a consistent
framework for determining when to permit an exception for motorized use onnon-motorized trails and pedestrian walkways under
23 U.S.C. § 217(h)(5). The relevant legislation reads as follows:
23 U.S.C. § 217. Bicycle Transportation and Pedestrian Walkways (h) Use of Motorized Vehicles.--Motorized vehicles may
not be permitted on trails and pedestrian walkways under this section, except for-- (1) maintenance purposes; (2) when snow
conditions and State or local regulations permit, snowmobiles; (3) motorized wheelchairs; (4) when State or local regulations
permit, electric bicycles; and (5) such other circumstances as the Secretary deems appropriate.
(j) Definitions.--In this section, the following definitions apply:
(2) Electric bicycle.--The term "electric bicycle" means any bicycle or tricycle with a low-powered electric motor
weighing under 100 pounds,with a top motor-powered speed not in excess of 20 miles per hour.
(4) Wheelchair.--The term "wheelchair" means a mobility aid, usable indoors, and designed for and used by individuals with
mobility impairments, whether operated manually or motorized.

10
HR 727
SECTION 1, CONSUMER PRODUCT SAFETY ACT
The Consumer Product Safety Act (15 U.S.C. 2051 et seq) is amended by added at the end of the following:
LOW-SPEED ELECTRIC BICYCLES
SEC. 38.(a) Notwithstanding any other provision of law, low-speed electric bicycles are consumer products within the meaning of
section 3(a)(1) and shall be subject to the Commission regulations published at section 1500.18(a)(12) and part 1512 of title 16,
Code of Federal Regulations.
(b) For the purpose of this section, the term `low-speed electric bicycle' means a two or three-wheeled vehicle with fully operable
pedals and an electric motor of less than 750 watts (1 h.p.), whose maximum speed on a paved level surface, when powered
solely by such a motor while ridden by an operator who weighs 170 pounds, is less than 20 mph.
(c) To further protect the safety of consumers who ride low-speed electric bicycles, the Commission may promulgate new or
amended requirements applicable to such vehicles as necessary and appropriate.
(d) This section shall supersede any State law or requirement with respect to low speed electric bicycles to the extent that such
State law or requirement is more stringent than the Federal law or requirements referred to in subsection (a).
SEC. 2. MOTOR VEHICLE SAFETY STANDARDS.
For purposes of motor vehicle safety standards issued and enforced pursuant to chapter 301 of title 49, United States Code, a
low-speed electric bicycle (as defined in section 38(b) of the Consumer Product Safety Act) shall not be considered a motor
vehicle as defined by section 30102(6) of title 49, United States Code.
Local Bicycle Laws
Most states have their own set of bicycle laws regarding traditional pedal powered bicycles. With most states recognizing electric
bicycles as traditional pedal powered bicycles you must know the applicable laws for your area. Your Department of
Transportation or Cycle Clubs in your area will have the details involving riding a bicycle in your area and your city’s bike
pathways. Requirements for riding change depending upon your location. Most cities require LED lights, hand signals, riding on
the correct side of the road, riding behind and not parallel to other cyclist, etc…
e. Safety first
It is important you follow your local bicycle laws but also it is important you ride safely. Below are examples of
understanding how to ride your new Outlaw safely.
Always wear an approved helmet when riding your bike and follow the helmet manufacturer’s instructions
for fit, use and care of your helmet.
Do you have all the other required and recommended safety equipment for your area? It’s your responsibility
to familiarize yourself with the laws of the areas where you ride, and to comply with all applicable laws.
Do you know how to correctly check your wheel axle? Do you understand proper braking techniques? Is your
saddle properly adjusted? How do you power your new electric bicycle? These are all questions you should have
the answers to prior to riding for the first time. This USER GUIDE will answer most of the questions you have in
regards to your new bicycle and assist you in ensuring your electric bicycle remains safe to ride. You should first
read the USER GUIDE in its entirety and familiarize yourself with your new bicycle prior to riding.
For further safety guidelines, please read Chapter 4: Safety
f. Mechanical safety check
Check the condition of your bicycle before every ride.
Nuts, bolts and straps: Make sure nothing is loose. Lift the front wheel off the ground by two or three
inches then let it bounce on the ground. Anything sound, feel or look loose? Do a quick visual and tactile
inspection of the whole bike. Are there any loose parts or accessories? If so, secure them. If you’re not
sure, ask someone with bike experience to check.
Tires and Wheels: Make sure tires are correctly inflated, see Chapter 6. Check by placing one hand on the
saddle and the other on the intersection of the handlebars and stem, then bounce your weight on the bike
while looking at tire deflection. Compare what you see with how it looks when you know the tires are
correctly inflated; and adjust if necessary. Are the tires in good shape? Spin each wheel slowly and look for
cuts in the tread and sidewall. Replace damaged tires before riding the bike. Spin each wheel and check for
brake clearance and side-to-side wobble. If a wheel wobbles side to side even slightly, or rubs against or
hits the brake pads, take the bike to a qualified bike shop to have the wheel trued.
Brakes: Check the brakes for proper operation. Squeeze the brake levers. Are the brakes properly releasing?
All control cables seated and securely engaged? Do the disc brake pads grasp the rotors within an inch of
brake lever movement? Can you apply full braking force at the levers without having them touch the
handlebar? If not, your brakes need adjustment. Do not ride the bike until the brakes are properly adjusted.
Quick Releases: Make sure seat post, rear axle & frame quick release levers are properly adjusted and all
are in the locked position.
Handlebar and saddle alignment: Make sure the saddle and handlebar stem are parallel to the bike’s center line,
clamped and bolts tightened enough so that you can’t twist them out of alignment. If not, align and tighten them.
Handlebar ends: Make sure the left handlebar grip and right throttle grip are secure and in good condition.
If not, replace them.
Battery Pack Attachment: Ensure your battery pack is firmly attached to your bicycle before riding. To test
battery attachment, pull up on the battery pack handle after battery is locked in place. If attached properly
you will not be able to slide the battery off the bike. If not, the battery pack will slide off the bike.
CAUTION: The braking of your bicycle is one of the highest concerns in safety. Proper brake lever
mounting and cable adjustment is crucial for your brakes to work properly.
WARNING: All Quick release levers must be closed and the clamps or axles tight. One loose quick
release lever can cause the rider to lose control and cause serious injury or death.
WARNING: Loose or damaged handlebar grips or extensions can cause you to lose control and fall.
Unplugged handlebars can cut your body, and can cause serious injury in an otherwise minor accident.

11
g. Before your first motorized ride
Before your first ride study this manual in its entirety. Make sure you are comfortable and confident when sitting on the
bicycle. If an adjustment does not feel right or something feels loose, check to ensure you are properly fitted to the bike and
do a mechanical safety check as explained in the previous section. Make sure you fully charge your battery with the
appropriate charger included with your bicycle. Be sure to firmly attach the battery to the bicycle. Try to slide the battery off
the bike by the battery handle to confirm proper installation. Read Chapter 3, section h. (the following section) again.
h. First motorized ride
When you buckle on your helmet and go for your first familiarization motorized ride on your new bicycle, be sure to pick a
controlled environment, away from people, other cyclists, obstacles or other hazards. Ride to become familiar with the
brake levers against throttling, variable throttle performance while pedaling your new bike and not pedaling. The first
motorized ride should be initially pedaling and then slowly pressing down on the throttle to feel the engagement of the
HUB motor. Familiarize yourself with the sensation of power.
Familiarize yourself with the braking action of the bike. To test the brakes at slow speed, shift your weight towards the rear
and gently apply the brakes, rear brake first. Sudden or excessive application of the front brake could pitch you over the
handlebars. Applying brakes too hard can lock up a wheel, which could cause you to lose control and fall (see section k.).
Your bike has a front suspension system, familiarize yourself with how the suspension responds to braking
application and rider weight shifts.
Check out the handling and response of the bike; and check the comfort.
If you have any questions, or if you feel anything about the bike is not as it should be, take the bike back to your
dealer for advice or contact Customer Service at Prodeco Technologies.
i. Riding an electric bicycle
Riding an electric bike is similar to riding a non-electric bike but there are some differences to note. An electric bike is
slightly heavier and requires more time to stop due to higher traveling speeds. Your bike is also equipped with a powerful
motor that provides a noticeable boost when starting from a stop. The boost is exhilarating, but you must be comfortable
with the sensation before riding in crowded or congested areas. To maximize battery life, assist with pedaling, engage
throttle to 90% or less and add considerable coasting with no throttle to your riding. Your battery is a finite resource and
proper riding techniques will prolong its distance per charge.
j. Using your thumb throttle (SEE PHOTO)
The variable throttle on your Outlaw was designed to allow you the ability
to choose the speed to ride atand determine the amount of torque off the
line. The throttle operates similar to an automobile; the pressing of the
thumb throttle mimics the depressing of the accelerator. The throttle is
located on the right side grip and considered a variable thumb throttle.
The grip itself does not twist. Using your thumb, press the throttle lever
down to propel the bike forward. A thumb throttle is used to avoid
accidentally twisting a grip when mounting and dismounting the bicycle.
Your throttle also includes a Power ON and Power OFF button. It is the
red button located underneath the LED lights. Depressing the button in
activates the throttle and pressing the button out will deactivate the
throttle. The ON / OFF button is for further safety. There is also an LED
set of lights which assist in determining the amount of battery storage
capacity remaining. This is discussed in further detail later in the manual.
Throttling is an important factor with any electric bicycle and the distance
of traveling available per charge. The higher the speed, the less distance
per charge, hard accelerations also decrease distance per charge. Multiple stops and take offs in a ride also affect the range of
distance per charge. It is recommended you become accustomed to your style of riding and adjust the style depending on
distance needed per charge. For example: if you are planning a short local trip, full throttle at takeoff and top speed will not be an
issue due to your ability to beable to recharge the battery prior to the next trip. If you are planning a longer trip, 8 miles or more, it is
suggested you add pedaling, hold throttle back 10% and whenever possible allow the bicycle to coast under no power. Coasting
under no power is similar to riding a traditional pedal powered bicycle. When riding, a rider will pedal for a few seconds and then
stop pedaling, allowing the bike to coast with no power being used. This will greatly increase your distance between charging.
k. Using your brakes
Your Outlaw is equipped with a high performance Avid Elixir 5 Hydraulic Disc Brake system. The Elixir 5 front and rear disc
brakes allow your new Outlaw to stop quickly and accurately. Oversized Avid HS “Heat Shedding” stainless steel disc rotors
were utilized for the axles for increased heat dissipation. Hydraulic brakes are self-adjusting. No adjustments are required
once the calipers are properly installed utilizing Avid’s Tri Align spherical and concave CPS bolt system. When properly
mounted, the Outlaw high performance disc brake system offers tremendous stopping power. Prior to leaving the factory,
the Outlaw brakes were properly mounted and tested. Disc brakes however do require a bed-in process which occurs
naturally after 20-40 stops. It can be sped up by following the bed-in guidelines detailed in Chapter 7 “Maintenance and
Replacement”, section c “Brake pad bed in”.
When braking, both brake levers should be applied simultaneously. Your left brake lever manages your front brake and
your right brake lever manages your rear brake. You should become accustomed to the stopping power of each brake
(front & rear). Test each brake separately in a controlled environment for their ability to stop the bicycle. Front brakes when
locked can cause the rear wheel to come off the ground and the rider can be thrown off the bicycle. In emergency
situations, apply pressure to each brake lever, shift your weight to the back of the bicycle and only attempt to use full force
on the front brakes when the bicycle is not stopping quickly enough. Always keep a safe distance between other vehicles,
pedestrians and other riders.
WARNING: Locking the front wheel during braking can cause the rear wheel to lift off the ground and
throw the rider off the bicycle. Both brake levers should be applied simultaneously. In an emergency situation
shift your weight to the back of the bicycle. Locking the front wheel can cause the rider to lose control, be
thrown off the bicycle and cause serious injury or death.
12
l. Pedaling
Pedaling your Outlaw is the same as pedaling a traditional bicycle. It is recommended you add pedaling to the power of
the bicycle to enhance the distance per charge. The Outlaw is a 8 speed bicycle and has the ratio of a 42T front chain
ring (sprocket) against a 11-28T rear freewheel which is designed to offer an easy pedaling pace at any speed from 1
MPH to 18 MPH. It is recommended on steep inclines, the rider utilizes the throttle to assist in powering the bicycle up
the incline while simultaneously dropping the bicycle to a lower gear. If a rider’s style of riding is throttle only with no
pedaling, distance per charge will be decreased. Upon a steep incline, the rider is required to assist the motor by
pedaling to power up the incline.
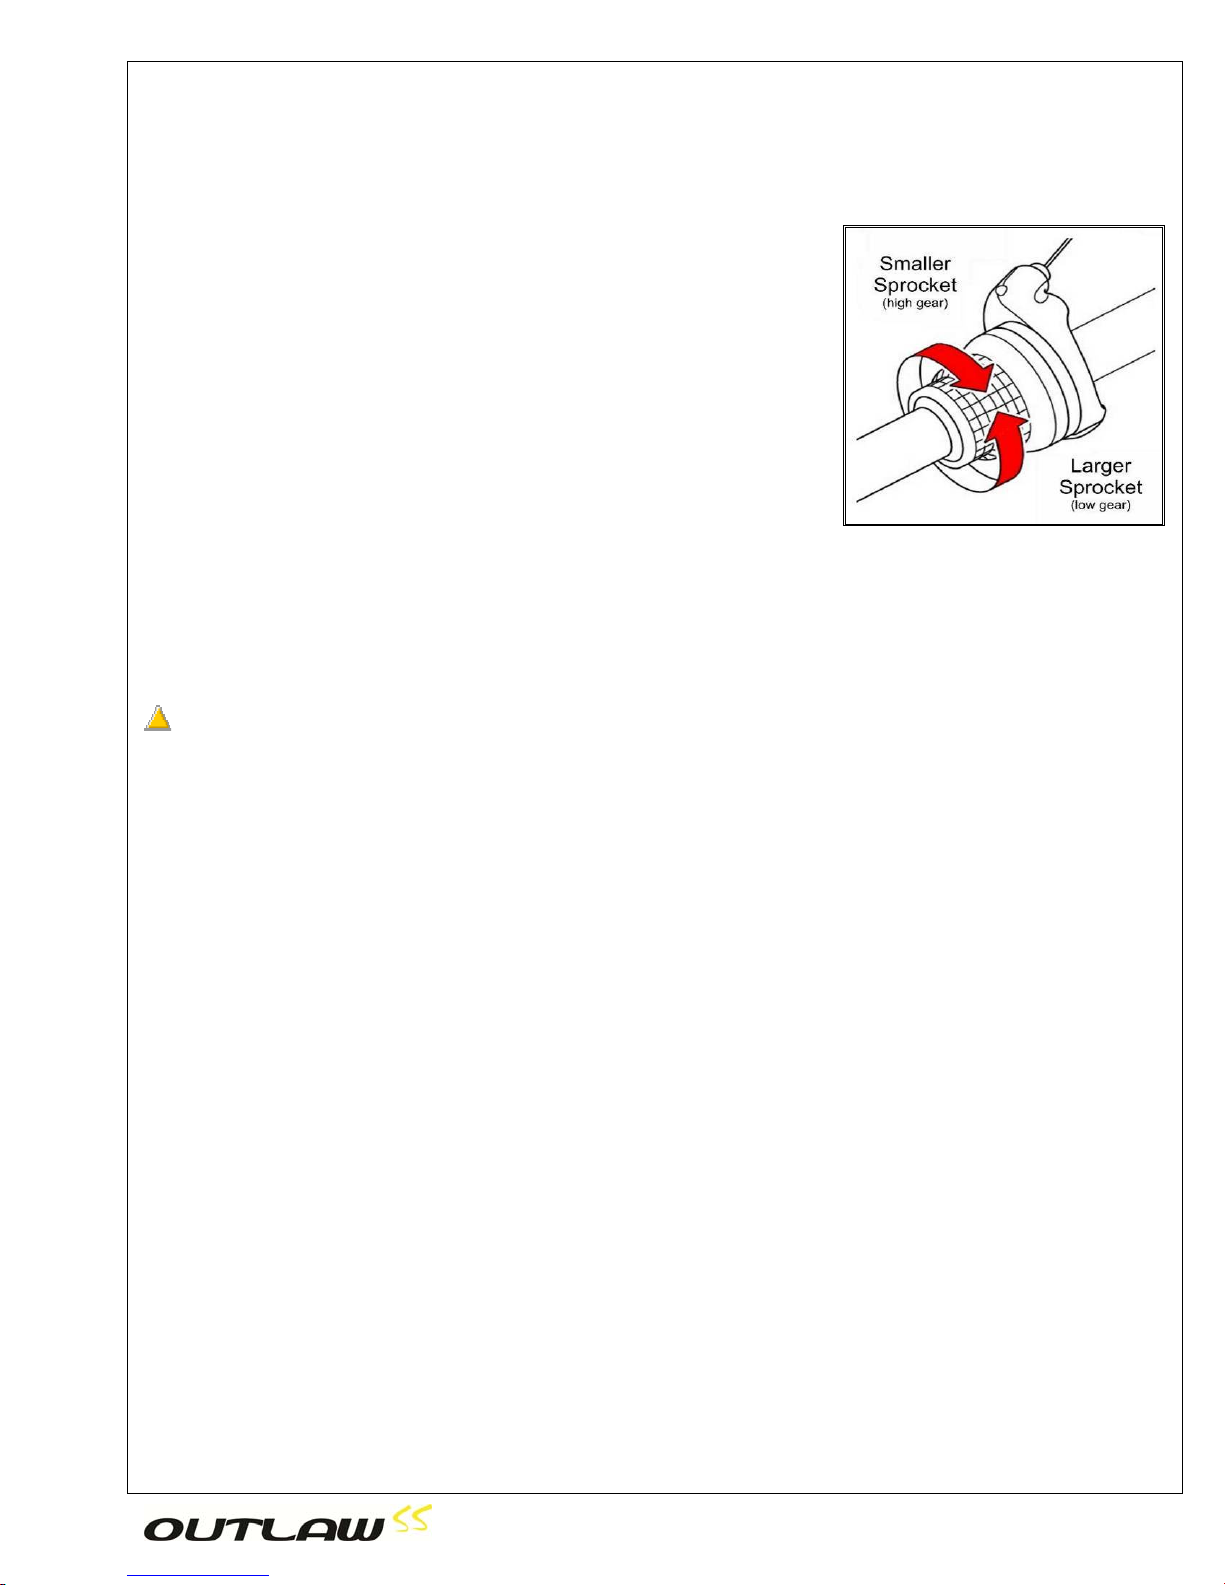
m. Shifting gears (SEE PHOTO)
The shifting of gears is required to change the ratio of the rotation of pedaling to
allow more or less torque and lower or higher speeds according to one
complete rotation of the crank set. If requiring more torque, you will shift to a
larger rear sprocket for a higher rotation of pedaling to a lower speed of the rear
wheel. To switch to a larger rear sprocket, you will need to shift to a lower gear.
Gear 1 is the largest sprocket which is 28 Teeth and your lowest gear. One full
crank rotation creates a 1.57 turn of the rear wheel. For higher speeds from less
rotation of the crankset on flat pathways, you will shift to a smaller rear sprocket
for a higher wheel rotation to a lower crankset speed. To shift to a smaller
sprocket, you will need to shift to a higher gear. Gear 8 is the smallest sprocket
with 11 Teeth and your highest gear. One full crank rotation creates a 3.8 turn of
the rear wheel.
n. Watching for obstacles around you
Your new Outlaw travels at higher speeds than most riders are accustomed to; as compared to pedaling a traditional
bicycle. It is very important you are aware of your surroundings and obstacles which may appear near you. You must watch
the path surface you are traveling on which could cause the tires to slip or cause a flat. Examples are soft shoulders, rocks,
holes, uneven paths, grates, construction sites. Due to the higher rate of speed when riding under motor power versus
pedaling, objects will advance into your path at a faster rate. Pay attention to other riders in your area, vehicles,
motorcycles, pedestrians, poles, cross paths and signs to name a few. The Outlaw resembles a traditional bicycle and
people walking, driving or standing may not realize you are on a motor powered vehicle and misjudge your traveling speed.
WARNING: Hitting a pot hole, soft shoulder or other road deviation may cause you to lose control, be
thrown and cause serious injury or death.
o. Safe riding in various conditions
Riders may find themselves riding in a condition they did not plan on encountering. It is important your new Outlaw is
maintained properly for optimum performance. Please read Chapter 7 on the details required to keep your electric bicycle at its
best. An unexpected rain storm, snow flurry or night ride could arise during a day’s trip and you should always be prepared.
Please read Chapter 4 on Safety, so upon encountering an unexpected riding condition, you will be confident and ready.
p. Charging your battery
The Outlaw’s battery system is the safest and latest technology in Lithium Ion battery cells and was designed to be easily
charged. Chapter 8 offers a detailed explanation on battery management but the following information is a basic guide in
charging your battery. The battery is a removable device and can be charged on or off the bicycle. If removing the battery
to charge it, please follow these instructions.
Locate the key ignition on the battery and turn the key in a counter clockwise rotation to the “UNLOCK”
position. You must push the key in to turn from the “OFF” position to the “UNLOCK” position.
Grab the handle at the back of battery and carefully pull towards the back of the bicycle to slide off.
The battery is now transportable and can be charged away from the bicycle when in “UNLOCK” position.
For charging, please review the following instructions.
Locate the RCA charging input at the front of the battery and open the charger input cover.
Insert the charging plug from the charger into the battery’s RCA charging input.
Insert the charger’s power cord into a wall outlet.
The charger’s LED light will light RED while the charger is charging the battery.
The charger’s LED light will light GREEN upon the battery being fully charged.
There is also a battery indicator for checking a full charge. Press the indicator button to display the battery’s
energy storage. The indicator is located on top of the battery.
Once the battery is fully charged, you should discontinue charging and remove the charger.
Unplug the charger’s power cord from the wall and remove the charging plug from the battery.
You are ready to install the battery pack back onto your bicycle.
To install the battery, first align the bottom of the battery with the battery base rail.
Once aligned, slide the battery firmly into the battery base and until the battery base terminals insert into the
battery’s terminal outlets. The battery’s locking slots must slide properly onto the mount’s 3 metal tabs.
Once the battery is properly slid into place, you can then turn the key to the “ON” position.
The LEDs on the throttle in the “ON” position will display a charged battery’s energy capacity.

13
Chapter 4: Safety
The manual has detailed safety riding methods. In this chapter we will further discuss additional safety guidelines.
a. The basics
Below is a safety guideline according to the CPSC (US Consumer Product Safety Commission) in regards to riding a bike.
The Outlaw may only fall under traditional bike guidelines when not powered. If powered (battery installed), the Outlaw is
not street or bike path legal and for off road riding only mainly due to speeds up to 28mph. Check your local bicycle laws
regarding electric bicycles.
Always wear a helmet to help prevent head injuries.
Observe all traffic laws and signals, just as automobiles must do.
Don’t ride double or attempt stunts.
Ride near the curb in the same direction as traffic.
Find alternate routes, rather than ride through busy intersections and heavy or high-speed traffic.
Walk -- don't ride -- your bicycle across busy intersections and left turn corners.
Avoid riding in wet weather. When wet, handbrakes may require a long distance to stop.
Avoid riding in the dark. If you do, be sure the bike is equipped with a headlight, a taillight and reflectors.
Apply retro-reflective trim to clothing, or wear reflective vests and jackets.
Avoid loose clothing or long coats that can catch in pedals or wheels. Leg clips or bands keep pants legs
from tangling in the chain.
Avoid crossing raised sewer grates.
Regular maintenance is essential for safe riding. Refer to the maintenance recommendations. If you do not
have basic mechanical skills, an authorized dealer should perform repairs and maintenance.
Align (or "true") wobbly wheels for better control. Spokes also may need adjustment.
Replace all missing, damaged, or worn parts; for example, brake pads, chainguards, chain links, spokes,
screws and bolts, handlebar grips.
Tighten and/or adjust loose parts.
Periodically inspect frame, fork, spindles and other components for cracking.
Parts should be adjusted to manufacturer's torque specifications.
Inflate tires to recommended pressure, and replace worn tires.
Lightly oil and clean moving parts. Keep oil off rubber.
Keep bicycle indoors when not in use.
b. Riding Safety
Below are guidelines according to the NHSTA (National Highway and Traffic Safety Administration) on bicycle safety.
The Outlaw may only fall under traditional bike guidelines when not powered. If powered (battery installed), the Outlaw is
not street or bike path legal and for off road riding only mainly due to speeds up to 28mph. Check your local bicycle laws
regarding electric bicycles.
Protect Your Head: Wear a Helmet - Never ride a bicycle without wearing a properly fitted helmet. Helmets are
proven to be 85-88 percent effective in preventing traumatic brain injury, the primary cause of death and disabling
injuries resulting from cycling crashes. Wear a helmet that meets the U.S. Consumer Product Safety Commission
(CPSC) standard (see inside of helmet for presence of a label).
Assure Bicycle Readiness: Ensure Proper Size and Function of Bicycle - Make sure the bicycle fits you: Stand
over the top of the Outlaw bicycle – there should be minimum 3 inches of clearance from the frame bar. Seat height —
as previously mentioned, with the ball of your foot on the pedal, the fully extended leg should have a slight bend.
Check all parts of the bicycle to make sure they are secure and working well: The Handlebar should be firmly in place
and turns easily. The wheels must be straight and secure; the quick release rear axle must be secured.
Stop It: Always Check Brakes Before Riding - Always control your speed by using your brakes. Apply the rear
brake slightly before the front brake. Always keep your brakes adjusted. If you cannot stop quickly, adjust your brakes.
Review Chapter 7 “Maintenance and Replacement” section c “Brake adjustments” to adjust the brakes. When your
hand brake levers are fully applied, they should not touch the handlebars. Ride slowly in wet weather and apply your
brakes earlier, it takes more distance to stop.
See and Be Seen - Wear clothes that make you more visible. Always wear neon, florescent, or other bright colors
when riding a bicycle.
Avoid Biking at Night - It is far more dangerous to ride a bicycle at night than during the day. The Outlaw requires
LED lights for night time riding. If you must ride at night, you should also do the following: wear retro-reflective clothing
or material, not just white or florescent, especially on your ankles, wrists, back, and helmet. Only ride in areas familiar
to you. Brightly lit streets are best. Always assume you are not seen by a driver. Children should NOT ride at night.
Go With the Flow: The Safe Way is the RIGHT Way - Ride on the right side in a straight, predictable path. Always
go single file in the same direction as other vehicles. Riding against traffic puts you where motorists don't expect you.
They may not see you, and may pull across your path, or turn into you.
Check for Traffic: Always Be Aware of the Traffic Around You - Over 70 percent of car-bicycle crashes occur at
driveways or other intersections. Before you enter any street or intersection, check for traffic. Always look left-right-left,
and walk your bicycle into the street to begin your ride. If you are already in the street, always look behind you for a
break-in traffic, then signal before going left or right. Watch for left or right turning traffic.

14
The Outlaw may only fall under traditional bike guidelines when not powered. If powered (battery installed), the Outlaw
is not street or bike path legal and for off road riding only mainly due to speeds up to 28mph. Check your local bicycle
laws regarding electric bicycles.
Learn Rules of The Road: Obey Traffic Laws - Bicycles are considered vehicles. Bicyclists must obey the same
rules as motorists. Read your State drivers handbook, and learn and follow all the traffic signs, laws, and rules for
operating a vehicle on the road. Always signal your moves. Be courteous to pedestrians and other vehicle operators.
Never wear headphones while riding as they impair your ability to hear traffic. Become familiar with the
accommodations that are available for bicyclists in your area. These include bicycle lanes and routes as well as off-
road paths. Take advantage of these whenever possible.
“Drive” with Care: Share the Road - When you ride, consider yourself the driver of a vehicle and always keep safety
in mind. Choose to ride in the bike lane, if available. If the roadway or bike lane is wide, ride to the right; if the lane is
narrow, you may choose to ride in the middle of the lane. Take extra precautions when riding on a roadway. Bicycles
are smaller than automobiles, and don’t protect the operator like an automobile. You should: Make eye contact, smile,
or wave to communicate with motorists. Courtesy and predictability are a key to safe cycling; be considerate and
aware of motorists and pedestrians. Learn to anticipate their actions. Remember, pedestrians have the right of way;
Ride far enough away from the curb to avoid the unexpected from parked cars (i.e. opening doors or drivers pulling out
without checking); Keep control of your bicycle: look behind you while maintaining your bicycle in a straight path; be
able to ride with one hand on the handlebars and signal a turn. (Practice these skills in a parking lot); Always look over
your shoulder, and if possible, signal before changing lanes; Make sure that books, clothes, and other items are
securely attached to the bicycle or carried in a backpack; and Use bells, horns, or your voice to alert pedestrians and
bicyclists that you are approaching or passing.
Stay Focused: Stay Alert - Never wear headphones; they hinder your ability to hear traffic. Always look for obstacles
in your path (potholes, cracks, expansion joints, railroad tracks, wet leaves, drainage grates, or anything that could
make you fall). Before going around any object, scan ahead and behind you for a gap in traffic, signal your intentions to
move, and then follow through with your intentions. Be aware of the traffic around you. Ride defensively. Use extra
care when riding in wet weather, ice, frost, or snow. Slow your speed and allow extra time and space to stop. Use
extra care when crossing bridges which are extra slippery under wet conditions. Use caution when crossing a railroad
track; cross tracks at a 90-degree angle and proceed slowly.
c. Wet weather riding
Whenever possible, you should avoid riding your bicycle in the rain. Riding a bicycle in the rain is like driving a car in the snow. You
will not be able to stop as fast and must leave a larger distance between you and the obstacles around you. Your brakes will not
work as efficiently when they are wet. You will not be able to turn as sharp without the danger of slipping. You must also ride away
from or be cautious around painted lines, pot holes, sewer or drain grates, rail road crossings, bridges, wet leaves and any other
area where a slippery surface can appear with water. Keep an eye out for puddles and turn your lights on if you have them. If you
live in an environment where rain riding is expected, you should install front and rear fenders if you have not already done so. Use
a cover for your bicycle if leaving it outdoors. Extensive rain can seep into the controller and battery and cause water damage.
d. Reflectors
The CPSC (US Consumer Product Safety Commission) requires front, rear, wheel and pedal reflectors. Your Outlaw includes
federal regulated reflectors and they should not be removed. If needing to be replaced, replace them with authorized Prodeco
reflectors or reflectors approved by the CPSC.
e. Night riding
Almost anywhere in the world today, bicycle night riding requires front and rear lights on your bicycle. You must install front and
rear lights if you plan on riding at night. Check your local laws on what is required for night riding. Always wear retro-reflective
clothing or material, not just white or florescent, especially on your ankles, wrists, back, and helmet. Only ride in areas familiar
to you. Brightly lit streets are best. Always assume you are not seen by a driver. Children should NOT ride at night.
f. Adding accessories
When adding accessories to your bicycle you must check to confirm they do not lower the safety value of your bicycle.
Prodeco Technologies offers authorized accessories for your bicycle which have been approved not to lower the safety value.
Ask your authorized dealer or contact us if you are not sure about adding an accessory to your bicycle and the possibility of
lowering your bicycle’s overall safety.
Chapter 5: Perfect Fit and Ride
It is very important your new Outlaw is adjusted properly for your size and for comfort. The Outlaw has multiple adjustments
available to offer a comfortable and safe position for riding. A properly sized and adjusted bicycle allows the rider to remain fully
alert and avoid injury. Review this chapter carefully and all the adjusting points of your new Outlaw. If you have difficulty in
obtaining the most comfortable riding position or performing available adjustments, contact your authorized dealer for advice.
You can contact Prodeco Technologies directly by phone or email and we will assist you with the proper adjustments for your
bicycle and your size. The following list is the areas of adjustability the Outlaw offers:
Saddle height
Saddle nose angle
Saddle distance to handlebar
Handlebar height
Fork height
Brake lever angle
Brake lever reach
Fork suspension firmness
a. The basics
Understanding the basics of a bicycle frame size will help in determining the correct positions and adjustments for your body
size and comfort. The Outlaw’s frame was designed to easily accommodate all riders from 5’ 8” to 6’ 6” utilizing the available
adjustments. The frame size can be considered anywhere from an 18” to 23” if comparing to traditional measurements. The
most important information to remember when sizing your bicycle is that you are comfortable riding, especially when pedaling.
With throttled electric bicycles some riders may choose not to pedal and the measurement will be different than for a rider who
chooses to pedal and is the same size. Scooters for instance have a much lower saddle height than bicycles due to scooters
not being pedaled. A higher saddle height is only recommended for riders who pedal allowing them a full extension of their leg
per rotation of the crank.

15
b. Frame size
The Outlaw is considered an 18” MTB frame. The typical measurement number when choosing a correct frame size for a rider
is the seat tube length. This number usually is between 17” to 19” for categorizing MTB bicycle measurements. The seat tube
length is measured from the centerline of the crank (bottom bracket) to the top of the seat tube (seat tube clamp). There is
another measurement sometimes forgotten which is actually more important and this is the top tube length (seat tube to the
steering tube). Most manufacturers will proportionally adjust the top tube length according to the seat tube length and with
stems being available in various lengths, fine tuning of this measurement is easily accomplished.
Prodeco Technologies Outlaw’s frame measurement will differ from traditional bicycle frames due to the seat tube being longer
than a traditional bicycle. The addition of the battery mount required an extension to the seat tube by 2 inches; therefore the
measurement is 20”. The measurement of the top tube and other frame components however follow the principals of an 18”
MTB frame. The Outlaw’s further has a high rake seat tube angle. With the high angle seat tube, as a tall rider raises their
saddle to accommodate their longer legs, the saddle will pull back offering a longer distance to the steering tube.
c. Recommended sizing
In today’s bicycle industry, the top tube length is actually more important than the seat tube length. With seat posts now
available over 300mm, the seat tube length is no longer the most important number. The distance of the bottom bracket to
the road should also be taken into consideration when sizing a bike. The top tube length is traditionally the distance from the
center of the seat tube to the center of the steering tube. For purposes of sizing the Outlaw, we will name the distance of the
center of the saddle to the center of the handlebar the steering length (similar to the top tube length).
You can adjust the steering length of your Outlaw by establishing the saddle position and seatpost height. The saddle
position can be adjusted for height and distance from the steering tube via the quick release clamp and the saddle clamp.
Keep in mind by increasing the height of the saddle, this will also increase the steering length due to the high rake angle of
the seat tube. If you choose to use your bicycle as a scooter style vehicle only, you should establish saddle height at a
lower position to reduce the center of gravity. Saddle height can be reduced to just above your inseam. Your inseam is the
measurement of the inside of your leg.
d. Control position adjustments
The Outlaw includes a variable thumb throttle with an LED battery indicator on
the right side and an 8 Speed twist shifter on the left side of the handlebar. The
throttle can be adjusted on the handlebar to rotate further up or down, using
the 3mm hex key included with your multi-piece tool kit. The shifter can be
adjusted on the handlebar to rotate also using the multi-tool included with the
bicycle. The brake lever assembly and throttle mount together and at a certain
point of rotation, one will not rotate further without the other requiring to be
rotated. If the factory settings on the throttle or shifter are uncomfortable for you
or you cannot view the LED battery, you can loosen the throttle clamp and
move it into a preferred position. As stated above, you may have to loosen the
brake assemble to move the throttle to your desired position. Please see
section e “Brake lever height adjustments” following this section to loosen and
adjust the brake lever assembly and maintain correct brake lever height
adjustments. To loosen and adjust the throttle, locate the 3mm hex bolt at the
front underside of the LED battery indicator on the throttle. Use your 3mm hex
key and insert it into the hex bolt and rotate a minimum of 3 times counter
clockwise. The throttle will now be loose enough to move. Throttle clamp
bolts should be tightened to 25 lb*in.
e. Brake lever adjustments
The preferred level of the brake lever assemblies will vary from rider to rider.
The brake lever assemblies can be rotated to a desired riding position. The
optimal position can be found by extending your fingers straight while sitting
in the saddle. Your fingers, when extended straight, should rest on top of the
levers or slightly above the levers.
The brake lever assembly has a clamp bolt (see 1 in photo) accessible from
the top of the bracket. Using the T-25 Torx ® wrench included within your
multi-use tool, loosen the brake lever assembly by turning the T-25 bolt
counter clockwise. The lever assembly will now be loose and you can rotate
it up or down to establish the preferred position to apply the brakes. A brake
lever assembly may require the throttle clamp or shifter clamp to be
loosened to allow the brake lever assembly to rotate. The brake lever
assembly, throttle and shifter mount can prevent each other not to rotate at a
certain point; one will not rotate further without the other requiring to be
rotated. A compromise may be required when attempting to align the brake
levers and establishing the preferred throttle and /or shifter position. The
optimum position to set your brake levers depends on your riding position but
it should be the extension of your arm. Your brake lever should be located at
the point where your fingers extend straight out from your arms. Upon finding
preferred brake lever position, tighten the T-25 Torx ® bolt using your multi-
use tool. Brake lever clamp bolts should be tightened to 55 lb*in.
The reach can also be adjusted which determines the position of the lever in
relation to the grip. The reach can be reduced or increased. It is important to
note the decrease length of reach will result in reduced brake pad travel.

16
f. Suspension fork
The Outlaw uses a dual pre-load
double crown adjustable suspension
fork. The fork’s dual leg adjustment
offers either a softer of firmer ride
for smoothing out the bumps in
your path. The pre-load can be
adjusted according to your weight
and preference. You can easily
adjust the suspension performance
by rotating the knobs at the top of
each leg at the crown.
The fork can also be adjusted for
height in relation to the frame.
Depending on riding style, the fork
can be adjusted for an increased
rake by adjusting the crown further
up the stanchions. The higher crown adjustment would create a more upright riding position. For aggressive riding trail
riding, the fork must have the crown adjusted to the lowest stanchion setting. The higher crown adjustment diminishes
steering control and it is not recommended. The Outlaw ships with the crown in the lowest setting. (SEE PHOTOS)
Chapter 6: Tire, Tube, Wheel and Axle Repair
The Outlaw was designed for ease of servicing. Repairs are no more difficult than on a traditional bicycle. Any
neighborhood bicycle shop should be able to repair a flat, change a tire or replace a wheel. Please review the following
chapter on how to remove and replace the front and rear wheel of your Outlaw.
a. Removing the rear motor wheel
The wheel incorporates a motor wire quick disconnect for removing the wheel. To remove the wheel following these
instructions will only take a few minutes. Read the instructions fully before first attempting to remove the wheel.
Prior to removing the wheel, shift the bicycle into gear 7 or 8 (the small COG/sprocket on the rear cassette. It will be
easy to remove the wheel if the chain is at the end of the cassette. Make sure to spin the crank while shifting gears.
Next, turn the battery ignition key to the “UNLOCK” position and remove the battery.
To work on your bicycle, it may be easier to turn the bicycle upside down by placing blankets on the ground
and resting the bicycle on the saddle and handlebar.
Locate the motor disconnect weather proof plug on the left side of the bike frame 6 inches from the motor
axle and separate the connector.
Locate the cable tie which ties the motor wire to the frame. Cut the cable tie with snips.
On each axle nut there is a rubber nut protector, remove these protectors simply by pulling on them. On the
wired side of the axle, slide the rubber protector up the wire only a few inches.
Using a wrench, turn counter clockwise each axle nut until the axle washers are loose.
Remove the wheel from the frame by pulling on the wheel.
The 8 speed freewheel mounted to the motor can be slid out away from the chain with no issue. The spring of
derailleur may cause the lower pulley to get in the way of removing the wheel. Simply pull the pulley out of the way.
CLOSED MOTOR CONNECTION OPEN MOTOR CONNECTION
b. Installing the rear motor wheel
The rear motorized wheel easily installs onto the rear frame dropouts within a few minutes. Follow the instructions below on
installing the rear motor wheel. Additional cable ties are included with the Outlaw SS. One cable tie will be needed to install
the motor.Read the instructions fullybefore attempting to install the wheel. (SEE PHOTOS)
Pull or push the rear derailleur lower pulley with chain out of the way of the dropouts.
Now check to make sure the chain is not in the way and align the wheel above (below if bike is not upside
down) the dropouts and pay attention to the lining up of the disk brake rotor into the brake caliper (between
the pads).
Prior to inserting the wheel into the dropouts, pull the chain onto the cassette.

17
Slide the motor into the frame dropouts by aligning the axle into the dropouts. The axle has flat edges which
require the axle to enter the dropouts with the flat edges facing front and back. The axle with the motor wire
protruding is to enter the left side dropout (the left side is when standing behind the handlebar).
Now check to make sure the chain is not in the way and align the wheel above (below if bike is not upside
down) the dropouts and pay attention to the lining up of the disk brake rotor into the brake caliper (between
the pads).
Each axle side has washers and a nut. Slide the washers over the axles and tighten nuts by hand.
Using a wrench, fully tighten axle nuts. Axle nuts should be tightened to 250 lb*in.
Plug motor connection by aligning arrows on each end of the connector and slide together.
Once connectors are plugged, you must test the connection. Install the battery as described in Chapter 8
“Battery Management” section c “Installing and locking the battery”. Turn the ignition key to “ON” at the
battery mount. LED lights on throttle will light up displaying power to the motor. Pull the rear motor wheel off
the ground (if the bicycle is not turned upside down) and turn the throttle to test the motor. If the motor turns,
the connection is solid. If motor does not turn, turn key to “OFF” position at battery mount and then check
the motor connector to ensure a solid connection has be made. Test again after checking.
After confirming a solid connection, use a new cable tie to connect the motor cable to the side of the frame
and once tightened, cut off any excess amount.
c. Removing and installing the front wheel (20mm thru axle)
The front axle on your Prodeco Outlaw is a 20mm thick thru axle utilizing a
sealed bearing hub. The sealed bearing hub slides over the axle. The axle
requires to be slid out to remove the front hub. The axle is a smooth hollow
aluminum pipe threaded at each end with a 6mm hex safety bolt. The axle is
further held in place by the compression of the forks dropouts at the lower
legs. The dropouts contain 2 bolts at the underside of each leg which upon
tightening, lock the axle in place. Please follow these steps when removing
the axle. To install the axle, simply reverse the steps. (SEE PHOTO)
On the end of each axle there is a 6mm hex socket bolt. You will need to
loosen one of the bolts from either side of the axle 50% for now.
At the underside of each fork leg at the dropout, there are 2 hex bolts. The
hex bolts compress the fork dropout to lock the axle in place. All 4 bolts (2 at
each leg’s dropout) are required to be loosened for the 20mm thruaxle to be
slid out.
Once the 4 dropout bolts have been loosened, tap inwards on the safety
bolt which has been extended 50%. This will cause the axle to start
sliding thru the hub. After partially sliding the axle, completely remove the
safety 6mm hex bolt and pull the axle out from the opposite side. The
front wheel will then slide out.
d. Replacing a tube or tire
Read the previous sections to learn how to remove and replace the front and rear wheel. You will need to understand
how to remove the wheel prior to replacing a tube or tire. This section only explains how to remove the tire from the rim
and how to replace a tube.
Before explaining how to replace a tube and tire, details on the Outlaw’s tubes and tires are discussed. Tubes and tires
are 2 of the most important components on your new bicycle and must always be in optimum condition. It is important
you understand about the tubes and tires equipped on your bicycle.
The Outlaw uses high-performance Continental Trail King tires with a 45 PSI rating. Bicycle tires are available in many
designs and specifications, ranging from general-purpose designs to tires designed to perform best under very specific
weather or terrain conditions. If, once you’ve gained experience with your new bicycle, you feel that a different tire might
better suit your riding needs; your dealer can help you select the most appropriate design.
The size, pressure rating, and on some high-performance tires the specific recommended use, are marked on the
sidewall of the tire. The most important part of this information for you is Tire Pressure. The best and safest way to inflate
a bicycle tire to the correct pressure is with a bicycle pump that has a built-in pressure gauge.
WARNING: Never inflate a tire beyond the maximum pressure marked on the tire’s sidewall. Exceeding
the recommended maximum pressure may blow the tire off the rim, which could cause damage to the bike and
injury to the rider and bystanders.
WARNING: There is a safety risk in using gas station air hoses or other air compressors. They are not
made for bicycle tires. They move a large volume of air very rapidly, and will raise the pressure in your tire very
rapidly, which could cause the tube to explode.
Tire pressure is given either as maximum pressure or as a pressure range. How a tire performs under different terrain or weather
conditions depends largely on tire pressure. Inflating the tire to near its maximum recommended pressure gives the lowest rolling
resistance; but also produces the harshest ride. High pressures work best on smooth, dry pavement. Very low pressures, at the
bottom of the recommended pressure range, give the best performance on smooth, slick terrain such as hard-packed clay, and
on deep, loose surfaces such as deep, dry sand. Tire pressure that is too low for your weight and the riding conditions can cause
a puncture of the tube by allowing the tire to deform sufficiently to pinch the inner tube between the rim and the riding surface.
CAUTION: Pencil type automotive tire gauges can be inaccurate and should not be relied upon for
consistent, accurate pressure readings. Instead, use a high quality dial gauge.

18
Ask your dealer to recommend the best tire pressure for the kind of riding you will most often do, and have the dealer inflate
your tires to that pressure. Then, visually check inflation by sitting on the saddle with your weight and noticing your tires
response. You should also squeeze tires and feel resistance so you’ll know how correctly inflated tires should look and feel.
Some tires may need to be brought up to pressure every week or two. Other high-performance tires may also have
unidirectional treads, similar to the factory tires on your Outlaw: their tread pattern is designed to work better in one direction
than in the other. The sidewall marking of a unidirectional tire will have an arrow showing the correct rotation direction. When
replacing your tires with tires that are unidirectional, be sure that they are mounted to rotate in the correct direction.
There are primarily two kinds of bicycle tube valves: The Schrader Valve and the Presta Valve. The bicycle pump you use
must have the fitting appropriate to the valve stems on your bicycle. The Outlaw uses Schrader valves. The Schrader valve is
like the valve on a car tire. To inflate a Schrader valve tube, remove the valve cap and clamp the pump fitting onto the end of
the valve stem. To let air out of a Schrader valve, depress the pin in the end of the valve stem with the end of a key or other
appropriate object. The Presta valve has a narrower diameter and is only found on bicycle tires. To inflate a Presta valve tube
using a Presta headed bicycle pump, remove the valve cap; unscrew (counterclockwise) the valve stem lock nut; and push
down on the valve stem to free it up. Then push the pump head on to the valve head, and inflate. To inflate a Presta valve with
a Schrader pump fitting, you’ll need a Presta adapter (available at your bike shop) which screws on to the valve stem once
you’ve freed up the valve. The adapter fits into the Schrader pump fitting. Close the valve after inflation. To let air out of a
Presta valve, open up the valve stem lock nut and depress the valve stem.
WARNING: Patching a tube is an emergency repair. If you do not apply the patch correctly, the tube can
possibly fail, which could cause you to lose control and fall. Replace a patched tube as soon as possible.
To remove a tire or tube, follow these instructions (you will need tire levers or a similar tool to hold open the bead of the tire):
Let all the air out from the tube of the wheel having the replacement.
Remove the wheel as described in detail in the previous sections.
Remove the inner tubes air valve cover.
Pull back the tire bead away from the rim. You will see the tube and the inside of the tire. If it requires too high
pressure to pull back the tire bead, there may be still air in the tube. Check to confirm all the air is out of the tube.
Using 2 tire levers or similar tools, insert one lever end in between the tire bead and the rim but make sure
the lever is on top of the tube and you are not pinching the tube.
Slide the second lever about 4-6 inches to the side of the first lever. Be sure not to pinch the tube and to
confirm you have the lever on top of the tube and not under the tube. Slide the lever down the side of the
wheel between the tire bead and rim edge while lifting the tire bead and sidewall over the rim edge.
If removing only the tube, you can now pull the tube outside the side of the tire wall. If replacing the tube,
you can now install the new tube.
If removing the tire, use the tire levers and repeat the previous steps and remove the opposite side of the
tire’s sidewall bead on the same side of the rim you removed the first tire bead. The tire may easily come off
the rim if you pull the tire bead over the edge of the rim and the tire levers may not have to be used.
To install a new tire, follow these instructions:
When installing a new tire you should first insert the tube into the tire. The tube should have been partially
inflated to a soft but full feel removing any wrinkles in the tube.
Check the mounting side of the rim and confirm the directional path of the tire. High performance tires are
usually directional tires and the arrow on the sidewall represents the rotation of the tire.
Place the valve of the tube into the valve hole of the rim and slide the bead of the tire over the edge of the rim.
Push the one side wall and bead of the tire around the edge of the wheel’s rim. The tire will slide into place
and may become tight as you finish.
Once one side of the tire is inserted in the rim, check to make sure the valve stem lines up properly and the
tube is smooth across the rim and inside of tire. The tube should not be bunched up in any area.
Where the tube valve is, slide the second wall and bead of the tire into the edge of time rim. Follow pushing
the tire wall and bead into the inside edge of the rim.
You will get to an area of only a few inches left and you will need to apply pressure to push the tire side wall
and bead behind the edge of the rim.
Once the tire is fully inserted, check for any areas on both sides if the tube is exposed. The tube must not
get trapped between the tire bead and rim edge.
Locate the tube valve and use your hand to push on the tire on the outside of the valve to help push the
valve further out through the rim.
Fill the tube with 50% air and then check the tire bead and rim edge again to see if the tube is protruding
anywhere. Once you confirm the tube is not protruding, you can fill the tire to your desired air pressure.
You are now ready to install the wheel back onto the bicycle according to the previous sections.
Chapter 7: Maintenance and Replacement
Your new Outlaw was designed for ease of use and owner servicing. There are no tasks which require advanced skills.
Most maintenance and replacing of parts were designed to be accomplished by the typical bicycle rider. Please read this
section to learn how to keep your Outlaw performing like new.
a. Keeping your bike clean
Your new Outlaw is an outdoor friendly electric bicycle but should be kept clean and free from dirt. Dirt on and around
seals and drive train components can cause premature wear and dirt on paint and part finishes can cause premature
aging. If storing your bicycle outdoors under the elements, you must keep it covered with a high quality bicycle cover to
avoid rain, snow or dirt damaging your new bicycle.

19
To clean your bicycle, follow these instructions:
Your bicycle incorporates electrical components; it is advised when washing your bicycle you should first cover the
throttle and battery base. Use a plastic bag or a piece of plastic wrap to cover the components. Place the bag or wrap
around the complete throttle assembly and use a rubber band or tape to secure. The battery should be removed prior
to cleaning and a plastic bag or wrap secured by tape can be used to cover the battery base. If you are planning for a
ride after washing, it is recommended the saddle also be covered. The saddle has miniature holes where there is
stitching and water can seep into these small holes.
To wash your bicycle you will need a small bucket of warm water with car soap, sponge, small brush, chain lube and a
few rags or towels.
Rinse your bicycle off with a light spray of water to remove any dirt on the surface. Using the sponge and warm soapy
water, wash the frame and frame components which include the forks, handlebar and seat post. Start from the top of
the bicycle working your way down.
Once the frame is washed, use the sponge to clean the motor, spokes, chain guard and rims.
The tires, pedals, crankset and chain will be the remaining items needing to be washed. Use the brush first on the tires
and then the pedals. Rinse the brush and then using the warm soapy water, clean the chain ring, freewheel and finally
the chain. If the chain and drive train are very dirty or greasy, a bicycle degreaser should be utilized.
After washing, spray the bicycle down with fresh water.
Use the rags or towels to dry off the bicycle. Start by drying the frame first, followed by the components, the wheels,
tires and then the drive train.
Once the drive train is dry, use a chain lube to lubricate the chain.
b. Avoid scratching your bike
Your new Outlaw is a high quality bicycle has been designed to withstand the elements by utilizing stainless steel, anodized
and painted aluminum alloys, brass plus galvanized or painted metals. Stainless steel and brass are used in their natural forms
and can withstand the elements with no additional protection required. The majority of your bicycle however is fabricated from
aluminum alloys which have either a painted finish or have been anodized. Aluminum does not rust but can discolor and
corrode over time. The frame has a 3 layer paint finish which protects the aluminum and graphics. Components such as the
handlebars, crank arms, chain guard, seat post and more have been anodized through an electrolytic process which increases
corrosion and wear resistance. If the frame or components become scratched, these items could slightly corrode around the
scratched area. Depending on the care of your bicycle, a scratch could take month or years for corrosion to appear. To
maintain future value and years of beauty, it is best to be careful when folding and moving your bicycle not to scratch the metal
surfaces. If a surface is scratched, use clear nail polish or black nail polish to cover and seal the scratch.
c. Brake bed-in process and information
Both brakes on your Outlaw are high performance Avid Elixir 5 Hydraulic Disc Brakes. No adjusting is required as hydraulic
brakes self-adjust. They have powerful stopping power but must be bed in for maximum performance. Please review the
following guideline and you can also refer to the included Avid Elixir 5 brake guide included with your starter kit. If you are
unsure as to a component or installation procedure, please contact your local authorized dealer or Prodeco Technologies.
AVID SAFETY INFORMATION
Brakes are a safety-critical item on a bicycle. Improper setup or use of brakes can result in loss of control or an accident,
which could lead to a severe injury.
Avid brakes are a performance product that offers increased stopping power over brakes that you may be used to. This
greater power requires less effort to lock-up a wheel when braking. A wheel lock up might cause you to lose control and
possibly cause injury.
It’s your responsibility to learn and understand proper braking techniques. Consult the owner’s manual for your bicycle
and a professional bike dealer.
ALWAYS RIDE UNDER CONTROL
Remember, it takes longer to stop in wet conditions. To reduce the possibility of an accident and minimize trail erosion,
you should avoid locking-up your wheels.
FOLLOW THESE INSTRUCTIONS CAREFULLY
If you do not understand the instructions, have the brakes serviced by a professional bicycle mechanic.
Disc brakes are OIL SENSITIVE! Do not spray any solvents or lubricants in the vicinity of the rotors or brake pads.
NEVER touch the pad surface or rotor surface with your fingers. Doing so will significantly degrade braking performance.
AVID WARNING
Do not touch the braking surface of any rotor with your bare hands, because the oils from your fingers will degrade its
performance. Always wear gloves, or handle the rotor by its spokes. Disc brakes become very hot during use. Do not
touch the caliper or rotor immediately after use. Make sure the brake has cooled down before making any adjustments.
Hydraulic brake information
Use only DOT 4 or DOT 5.1 fluids with Avid brakes. DOT 5.1 fluids provide enhanced braking performance.
Do not use a fluid other than DOT fluids suggested. Doing so will damage the system make the brakes unsafe to use.
DOT fluids will damage painted surfaces. If any fluid comes in contact with a painted surface (i.e. your frame), wipe it
off immediately and clean with isopropyl.
Do not allow any brake fluid to come in contact with the brake rotors. If this occurs, clean the rotors with isopropyl alcohol.
Do not allow any brake fluid to come in contact with the brakes pads. If this occurs, the pads are contaminated and
must be replaced.
Used DOT fluid should be recycled or disposed of in accordance to local and federal regulations.
NEVER pour used DOT fluid down a sewage or drainage system or into the ground or a body of water.

20
Before each ride
Check houses for signs of wear. Squeeze the brake lever firmly and check for proper brake function. Check pads for wear
and replace if necessary. Ensure rotors are free of foreign substances and oils.
Pad Break In and Noise
It may take anywhere from 20 to 40 complete stops to break in Avid pads. You may begin to notice an increase in
braking power after the first ride. Brake noise can occur not only during the break-in period but off and on throughout the
life of the brake pads. Noise is dependent upon factors such as brake setup, rider weight, riding style, braking style, and
riding conditions (i.e. dust, soil, and contamination of friction surfaces).
Care and Cleaning
Extreme care must be taken when cleaning both the bicycle and its new disc brakes. Under normal use, it is not
necessary to clean the caliper rotor or pads. If necessary, use only water and dish detergent to wash the caliper and
rotor being sure to thoroughly rinse all soap residues from the rotor. Dry with a clean paper towel.
d. Pad Replacement
A pad should be replaced when its total thickness (backing plate and friction material) is less than 3mm.
This manual suits for next models
2
Table of contents
Other Prodeco Technologies Bicycle manuals

Prodeco Technologies
Prodeco Technologies Mariner 500 v4 User manual

Prodeco Technologies
Prodeco Technologies Storm 2013 User manual

Prodeco Technologies
Prodeco Technologies G Storm User manual

Prodeco Technologies
Prodeco Technologies Mariner User manual

Prodeco Technologies
Prodeco Technologies Stride 500 User manual

Prodeco Technologies
Prodeco Technologies G Plus Mariner 7 User manual

Prodeco Technologies
Prodeco Technologies Phantom X2 2013 User manual

Prodeco Technologies
Prodeco Technologies Genesis 500 User manual

Prodeco Technologies
Prodeco Technologies G Stride R User manual

Prodeco Technologies
Prodeco Technologies Outlaw SE User manual


