PRODIS MD693 User manual

MD693/ HD-1688 WOODEN RADIO-CONTROLLED GRANDFATHER CLOCK WITH
“WESTMINSTER” CHIMES
INSTRUCTIONS
PLEASE READ ALL THE INSTRUCTIONS CAREFULLY BEFORE YOU SET YOUR
CLOCK GOING AND ENSURE YOU KEEP HOLD OF THESE INSTRUCTIONS SHOULD
YOU NEED TO REFER TO THEM.
- PRIOR TO USE: Please remove the pointer at the centre of the movement, located on
the back of the clock, to ensure that the clock works once the batteries are inserted.
- The assistance of a second person is required for the assembly of the clock.
DESCRIPTION OF THE CLOCK AND ITS ELEMENTS
Description of the elements that make up this clock:
A
Base (x1)
E
Glass door (x1)
B
Left-hand case side (x1)
F
Top section (clock) (x1)
C
Right-hand case side (x1)
G
Cover for the battery
compartment (x1)
D
Rear door (x1)
H
I
Pendulum (x1)
Weight (x2)
Chain (x1)
Fixings
J
K
Screws and washers
(x8)
Long screws for the glass door (x2)
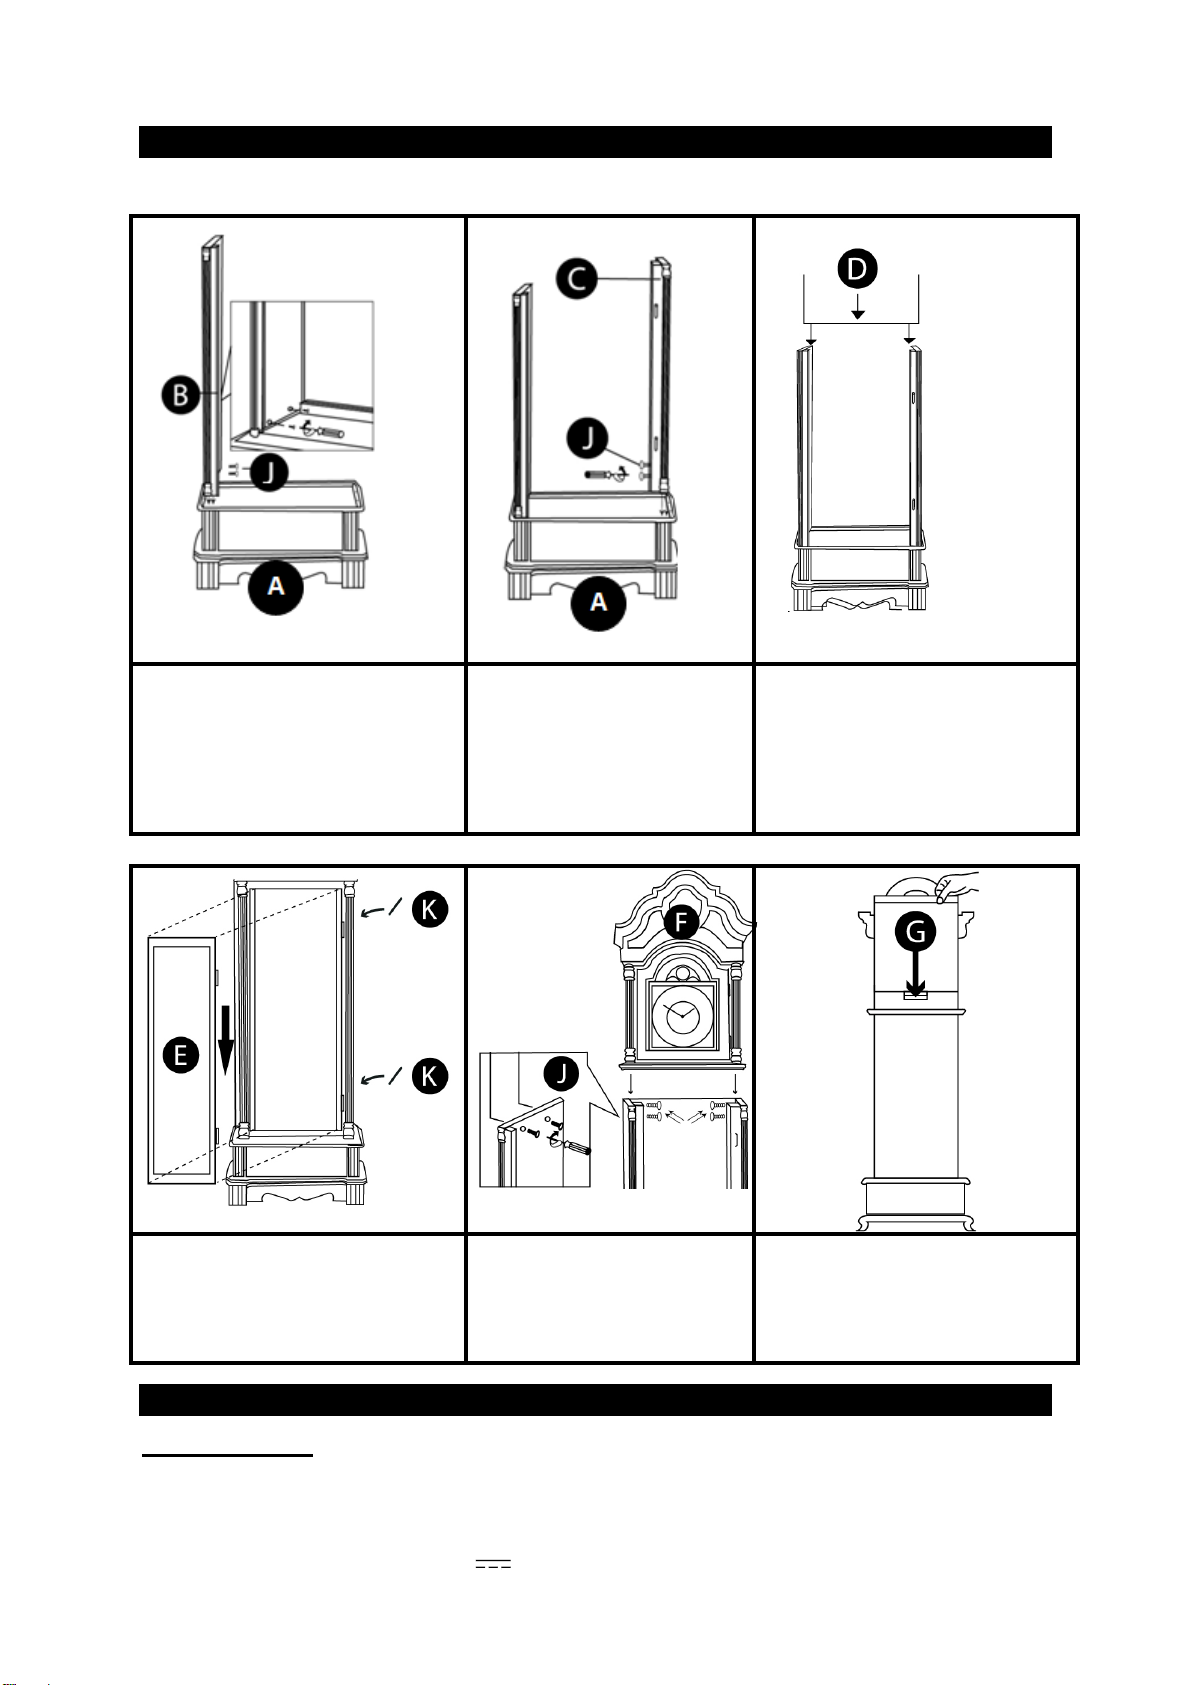
ASSEMBLY OF THE CLOCK
1
2
3
Position the left-hand case side (B)
on the base (A).
Screw in the two screws (J)
avoiding overtightening them.
Do the same for the right-hand
case side (C) (the one with the
hinges).
Position the rear case (D) into the
grooves located inside the case
sides (B and C). Next, slide the
case down as far as the base.
Once you’ve ensured that it is
properly inserted, finish tightening
the screws (J) on the case sides (B
and C).
4
5
6
Install the glass door (E) and insert
the long screws (K) in the hinges.
NB: Proceed with caution to carry
out this operation.
Delicately and carefully
position the top section (F) on
the top and screw in the
screws (J) on the left-hand and
right-hand case sides (see
illustration above).
Insert the cover of the battery
compartment (G) on the back of
the clock and push downwards.
TECHNICAL SPECIFICATIONS
Batteries required:
Movement: 1 x AA/LR06, 1.5V
Speaker: 2 x AA/LR06, 1.5V each
Pendulum: 2 x C/ LR14, 1.5V

SETTING UP OF THE PENDULUM
Before hanging the pendulum, remove the plastic packaging from around the metal
chains and fasten the weights (I) to the latter.
Comment: The weights are for decorative purposes only and must not be
placed in the middle as this is where the pendulum is sited.
Next, pull the cover of the battery compartment (G) upwards.
NB: A hook positioned on the side (see illustration opposite) enables you to lock the
cover so it doesn’t suddenly drop down. To do this, turn the hook towards you. Next,
position the cover over the gold hook so as to lock the cover in place.
1
2
3
Insert 2x C or LR14 batteries in
the pendulum’s battery
compartment at the back of the
clock, respecting the polarities.
To site it, see illustration 2
above, letter c. Before hanging
the pendulum, gently swing the
crutch.
Hang up the pendulum.
Your clock is assembled.
SETTING UP THE CLOCK
Before setting up your clock, familiarise yourself with the different battery compartments on the back of
the clock.
a. Movement
a1. MSET button
a2. RESET button
a3. REC button
a4. Battery compartment (movement)
b. Speaker
b1. Volume test button
b2. Battery compartment (speaker)
b3. Volume test button
c. Battery compartment (pendulum)

1. Locate the movement (a) and remove the pointer at the centre of the latter to ensure that the
clock works once the batteries are inserted.
2. Install the LR06 battery in the movement’s battery compartment (a4), respecting the polarities
indicated on the base of the compartment.
3. A few seconds after the batteries are inserted, the hands will turn. See the procedure below.
AUTOMATIC RECEPTION
DURING AUTOMATIC RECEPTION, DO NOT MOVE THE HANDS OF THE
CLOCK!
DO NOT HANDLE THE DEVICE AT ALL DURING THE AUTOMATIC TIME
SETTING!
The clock automatically receives the DCF signal during insertion of the battery in the battery
compartment (a). The hour, minute and second hands automatically reboot at the 04:00am or 12:00
noon position and the clock enters signal receipt mode. The complete procedure lasts around 3 to 15
minutes. The time will be automatically updated where the signal reception is successful.
POOR RECEPTION
During the first 24 hours, the clock will attempt to pick up the signal every hour until it sets itself
automatically.
If the clock still hasn’t set itself within this timeframe, this may be due to the following reasons:
-If you’re located over 1,500km from the transmitter in Frankfurt,
-The region’s topography and weather conditions can affect the reception of the signal.
-The proximity of electrical appliances without an anti-jamming device
-The proximity of a television set (within 2 metres)
-The proximity of a high frequency transmitter device
-The proximity of a metal structure
Where no signal is received, you can either activate the manual, forced reception of the signal by
pressing the REC button for 10 seconds, or set the clock manually by pressing the "M.SET" button
(see procedure for manual setting below).
MANUAL SETTING
Using the tip of a pen if necessary, press the “M.SET” (a1) button on the back of the clock to manually
set the time. If you press it once, the time goes forward a minute. If you press twice, the time goes
forward two minutes. If you press and hold, the minute hand moves forward quickly. Continue to press
it until you reach the desired time. Once the time has been set, release the M.SET (a1) button.
Press the “REC” (a3) button to come out of manual setting mode and the clock will then operate in
automatic mode. The device comes out of setting mode if no button is pressed for a few seconds.
MANUAL AND FORCED RECEPTION
Using the tip of a pen if necessary, press the “REC” (a3) button on the back of the clock for 10
seconds. The hour, minute and second hands automatically reboot at the 12:00 noon position and the
clock enters into automatic signal reception mode. The complete procedure lasts around 3 to 15
minutes.
If the hands don’t move forward to the current time after receiving the signal, press on the “REC” (a3)
button again for 10 seconds so that the clock automatically sets itself to the exact time.
COMMENT: In the event that the signal reception is interrupted, the clock repositions itself at the
12:00 noon position.
Using the tip of a pen if necessary, press on the "REC" (a3) button for 4 seconds to receive the signal.
If the clock still doesn’t work after an hour, press the "REC" button once again for 10 seconds.
It may be necessary to wait for 4, 12 or 24 hours before receiving the signal. On receipt of the
DCF signal, the hands move forward until they reach the current time. This process may take between
5 to 15 minutes.

REBOOTING
Using the tip of a pen press the “RESET” (a2) button to reboot the clock. The hour, minute and second
hands automatically reboot at the 12:00 noon position and enter into automatic signal reception mode.
SETTING THE CHIME (WESTMINSTER CHIMES):
This clock is set to chime from 06:00am to 21:00pm. As such it does not chime between 22:00pm and
05:00am.
Insert 2x LR6 batteries in the speaker’s (b2) battery compartment respecting the polarities. The clock
will chime on the hour. The number of strikes after the melody corresponds with the time indicated on
the clock.
NB: If the volume is low, adjust the volume of the chime.
RESOLVING FREQUENT PROBLEMS
Problems
Solutions
- The hands of the clock still don’t move forward once
the batteries are inserted.
- The clock doesn’t show the correct time because it
didn’t receive a signal within 15 minutes of inserting
the batteries.
Procedure: check that the batteries are correctly
inserted. Place the clock in another room or several
metres away from any computer, television, air
conditioner or other device and preferably near a
window. Hold down the “REC” button to restart
reception.
The clock doesn’t chime on the hour every hour.
Procedure: check whether the volume is set to OFF
(Stop) and that the batteries are not the wrong way
round. Where this is not the case, change the
batteries.
IMPORTANT ADVICE
Keep your clock clean and protected from moisture and corrosive elements.
If you position the clock in a different place to usual, this may lead to minor time inaccuracies
due to the change of longitude, temperature and altitude.
Keep hold of these instructions so you can consult them at a later date.
WARNING
1. To prevent the clock from toppling over, the latter must be placed on a flat, solid surface.
2. Thoroughly check the stability of the clock before leaving it in its place, especially if it is
positioned on a carpet.
3. Check its stability again within the next hour making sure it hasn’t moved.
4. Incorrect installation may damage the clock and/or cause injury.
5. Once you’ve finished the setting up your clock and you’ve noted that it is working correctly, get
rid of all the packaging and place this out of the reach of children.
6. Don’t let children climb on the clock or pull the pendulum. They might damage the clock,
cause it to fall over and injure themselves.
7. Don’t place anything on top of the clock as it might destabilise it. This might affect the chiming
and the clock could fall over.
8. When you move the clock, you must take care not to topple it as you could damage it and/or
injure yourself.
MAINTENANCE
Wax and maintain the clock’s wooden casing as often as you do for your other wooden
furniture. Regularly clean the outside of the glass on your clock.
WARNING ABOUT THE BATTERIES
Do not mix alkaline, ordinary (carbon-zinc) and rechargeable (nickel metal hydride)
batteries.

Do not mix new and used batteries.
Do not try to recharge non-rechargeable batteries.
Remove rechargeable batteries from the device (if possible) before charging them.
The rechargeable batteries must always be recharged under adult supervision.
Remove used batteries.
Do not short-circuit the supply terminals.
Always use batteries of the recommended or equivalent type.
Respect the polarity of the batteries.
WARNING: You should not dispose of this device with your household waste. A selective
collection system for this type of product is implemented by your local authorities. Please
contact your local authorities to find out how and where collection takes place.
These restrictions apply because electrical and electronic devices contain dangerous
substances that have harmful effects on the environment or on human health and must be
recycled.
This symbol indicates that electrical and electronic devices are collected selectively. The
symbol shows a waste container crossed out with an X symbol.
Imported by Prodis SAS 1 rue de Rome 93110 ROSNY SOUS BOIS-
France/ Made in PRC
Marketed by EUROTOPS VERSAND GMBH D-40764 LANGENFELD
This manual suits for next models
1
Table of contents
Other PRODIS Clock manuals


Popular Clock manuals by other brands

Silicon Laboratories
Silicon Laboratories SI5324 manual

Heathkit
Heathkit GC-1005 Assembly manual

Oregon Scientific
Oregon Scientific PRYSMA RMR221P manual

Andrew O'Malley
Andrew O'Malley DOTKLOK Assembly instructions

ALGE-Timing
ALGE-Timing ASC3 manual

Bodet
Bodet Profil 960 Installation and operating instructions


Progetti
Progetti KALIMERO Directions

La Crosse Technology
La Crosse Technology WT-3141b Quick setup instructions

La Crosse Technology
La Crosse Technology W86531 owner's manual

Sharp
Sharp SPC900 instruction manual

La Crosse Technology
La Crosse Technology 404-50447 quick start guide

Datexx
Datexx DF0063 quick guide