Prodium XXL Pro User manual
User manual: Prodim XXL Pro
User manual: Prodim XXL Pro
Version 2.0
May 2015

User manual: Prodim XXL Pro - version 2.0 - www.prodim-systems.com -
2
1. Content
1. Content............................................................................................................................................ 2
2. Welcome to the world of 3D printing ............................................................................................. 3
3. Safety............................................................................................................................................... 4
4. Specifications................................................................................................................................... 5
Printing ................................................................................................................................................ 5
Dimensions.......................................................................................................................................... 5
Temperature........................................................................................................................................ 5
Electrical .............................................................................................................................................. 5
5. FFF 3D-print technology .................................................................................................................. 6
6. Setting up the Prodim XXL Pro ........................................................................................................ 7
7. Computer preference and settings ................................................................................................. 9
8. Installing the software................................................................................................................... 10
9. Printer Settings.............................................................................................................................. 13
10. Prepare G-code for printing ...................................................................................................... 14
11. How to calculate the amount of filament used in weight......................................................... 16
12. Prepare G-code for printing with dual extruder ....................................................................... 18
13. Preparing your print profile....................................................................................................... 20
14. Printing ...................................................................................................................................... 24
15. Replacing material..................................................................................................................... 28
16. Calibrating the 2nd extruder....................................................................................................... 29
17. Troubleshooting ........................................................................................................................ 30
18. Warranty and repair.................................................................................................................. 32

User manual: Prodim XXL Pro - version 2.0 - www.prodim-systems.com -
3
2. Welcome to the world of 3D printing
Thank you for choosing Prodim as supplier for your 3D printing partner!
This user manual is designed to show you some basic steps in the 3D printing world. A world that is
our future, full of challenges and opportunities.
It is essential that you read through this manual, as there are also some tips how to work safe and
secure.
Let’s start making amazing things!
User manual: Prodim XXL Pro - version 2.0 - www.prodim-systems.com -
4
3. Safety
Safety alert symbols precede each safety message in this manual. These symbols
indicate potential safety hazards that could harm you or others or cause product or
property damage.
Warning:
The Prodim XXL Pro generates high temperatures. Do not reach inside
the machine when operating. Always allow the Prodim XXL Pro to cool
down first.
Warning:
The Prodim XXL Pro includes moving parts. Never reach the Prodim XXL
Pro when the machine is in operation.
Warning:
Do not leave the Prodim XXL Pro unattended during operation.
Caution:
Only use the power supply provided with your Prodim XXL Pro.
Caution:
We recommend only to use materials supplied by Prodim XXL Pro. Other
materials can have unexpected properties with can influence the quality
or worse.
Caution:
In case of emergency disconnect power supply from wall socket.
Caution:
Prodim XXL Pro melts plastic during printing. Plastic odors are emitted
during this operation. Make sure to set up the Prodim XXL Pro in a well-
ventilated area.

User manual: Prodim XXL Pro - version 2.0 - www.prodim-systems.com -
5
4. Specifications
Printing
Print technology: Fused Filament Fabrication (FFF)
Layer resolution: 50 µm
Position resolution: 50 µm
Nozzle diameter: 0,40 mm (default)
Filament: 1,75mm Prodim XXL Pro filament
Dimensions
Build volume: 360x280x230mm
Frame dimensions: 620x400x520mm
Total weight: 20,5 kg
Temperature
Ambient operating temperature: 10˚C - 40 ˚C
Storage temperature: 0˚C - 50 ˚C
Electrical
AC input: 88-264 VAC
Frequency range: 47-63 Hz
DC Voltage: 24V
Rated Current: 13A

User manual: Prodim XXL Pro - version 2.0 - www.prodim-systems.com -
6
5. FFF 3D-print technology
Fused filament fabrication (FFF) is an additive manufacturing technology commonly used for
modeling, prototyping, and production applications.
FFF works on an "additive" principle by laying down material in layers; a plastic filament or metal
wire is unwound from a coil and supplies material to produce a part.
The technology was developed by S. Scott Crump in the late 1980s and was commercialized in 1990.

User manual: Prodim XXL Pro - version 2.0 - www.prodim-systems.com -
7
6. Setting up the Prodim XXL Pro
After unpacking the Prodim XXL Pro, the next step is setting up the printer. A few things are
important:
-The Prodim XXL Pro must be placed on a smooth and level surface
-There must be an electric socket available
-It is recommended to choose a room or place which has a decent ventilation. Although, try to
avoid draught.
Before testing and connecting the printer to the computer, choose a solid table or desk, to put the
printer on. Next step is to install the glassplate (use the 4 clamps), spool holders and tube holders
including tube at the right side of the machine.
Glassplate Tubeholder Spoolholder
Next step is to connect the power cable. You can find the
connection on the right side of the machine (at the
bottom). Here you can also find the On/Off switch.
Power cable and On/Off switch.
User manual: Prodim XXL Pro - version 2.0 - www.prodim-systems.com -
8
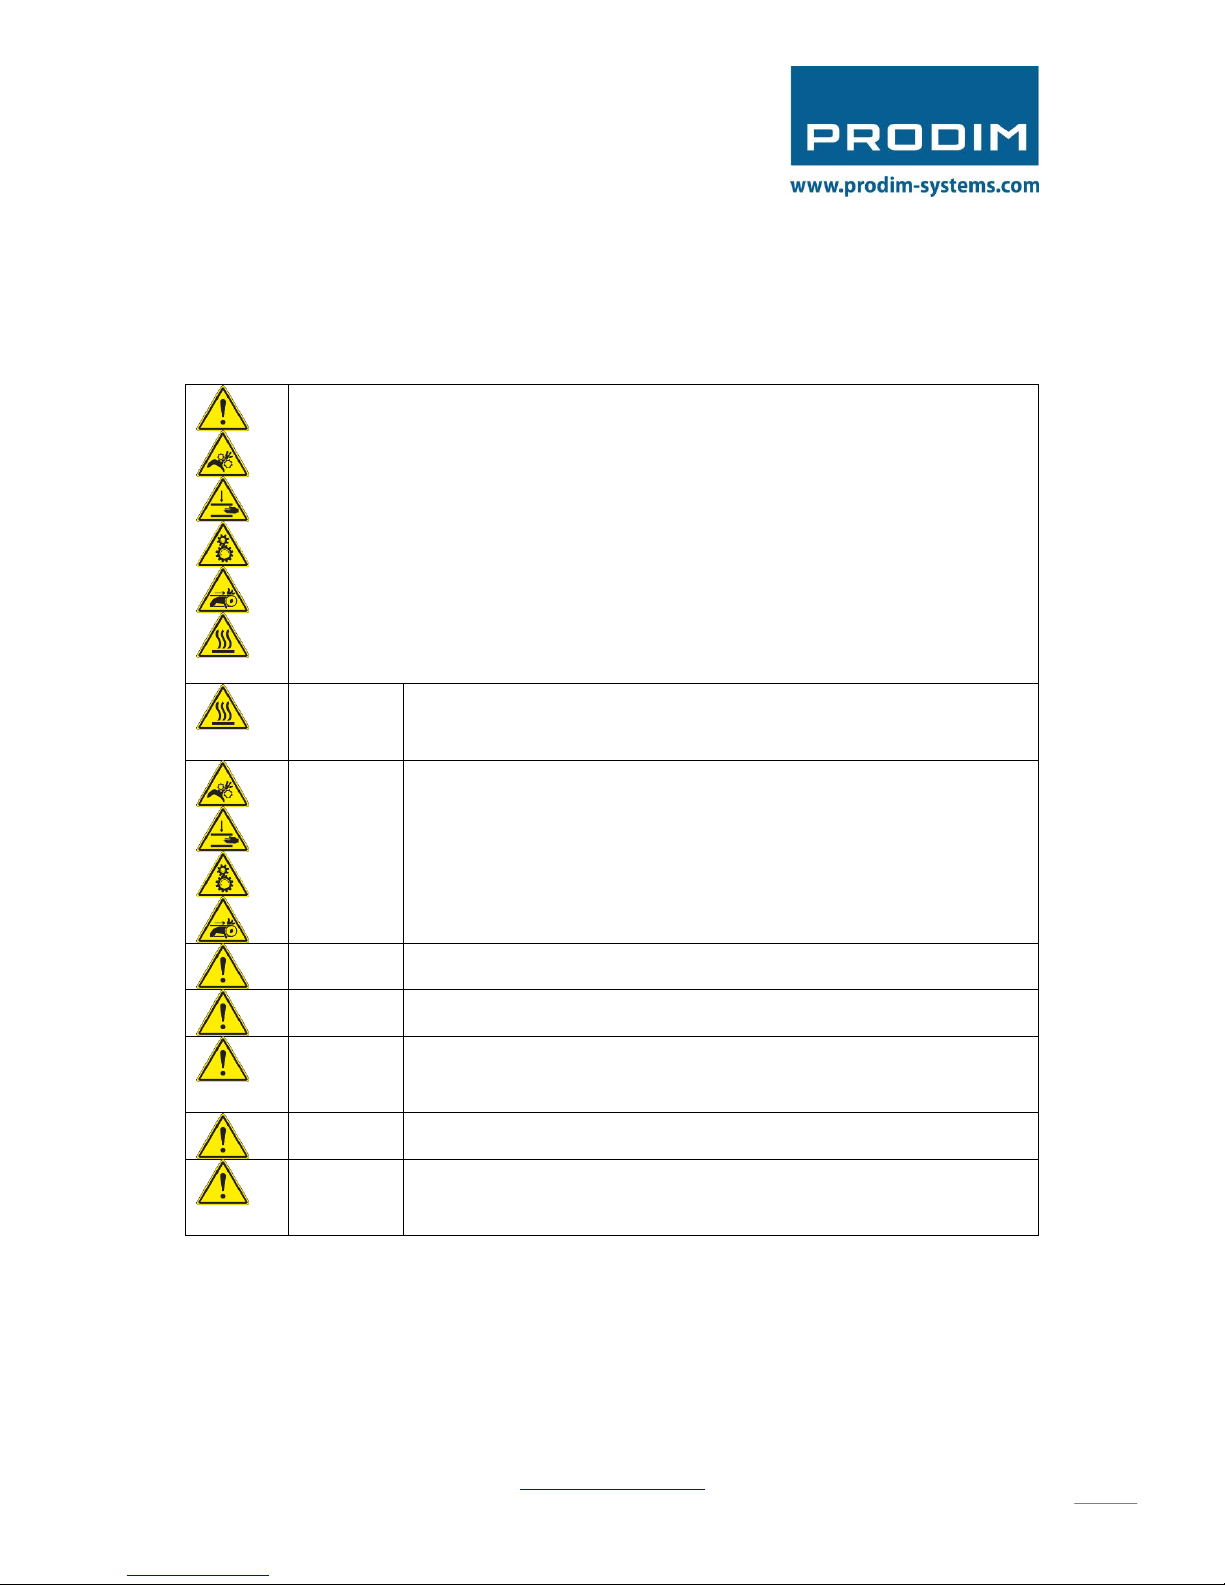
Switch the machine on and connect the Prodim XXL Pro with a computer
via the USB cable. You can find the USB port at the back of the machine.
Above the USB port, there is another On/Off switch for safety.
Once the USB cable is connected, the computer will detect a new USB
device on one of the COM ports. In the next chapter you can find the
description how to install the printer driver and software.

User manual: Prodim XXL Pro - version 2.0 - www.prodim-systems.com -
9
7. Computer preference and settings
To use your Prodim XXL Pro you will need a laptop or desktop computer with at least Windows 7 and
several USB Ports.
It is also important that:
-All windows updates are disabled
-Energy saving mode is off
-The computer or laptop is not connected to the internet during (longer) print jobs.
Most communication problems are caused by faulty settings.
User manual: Prodim XXL Pro - version 2.0 - www.prodim-systems.com -
10
8. Installing the software
Windows only, there is also an Apple OS package.
On the Prodim XXL Pro website you can download the driver and software to control your Prodim
XXL Pro 3D printer. Always install the software as administrator.
Make sure when installing the software that the printer is not connected via the usb cable.
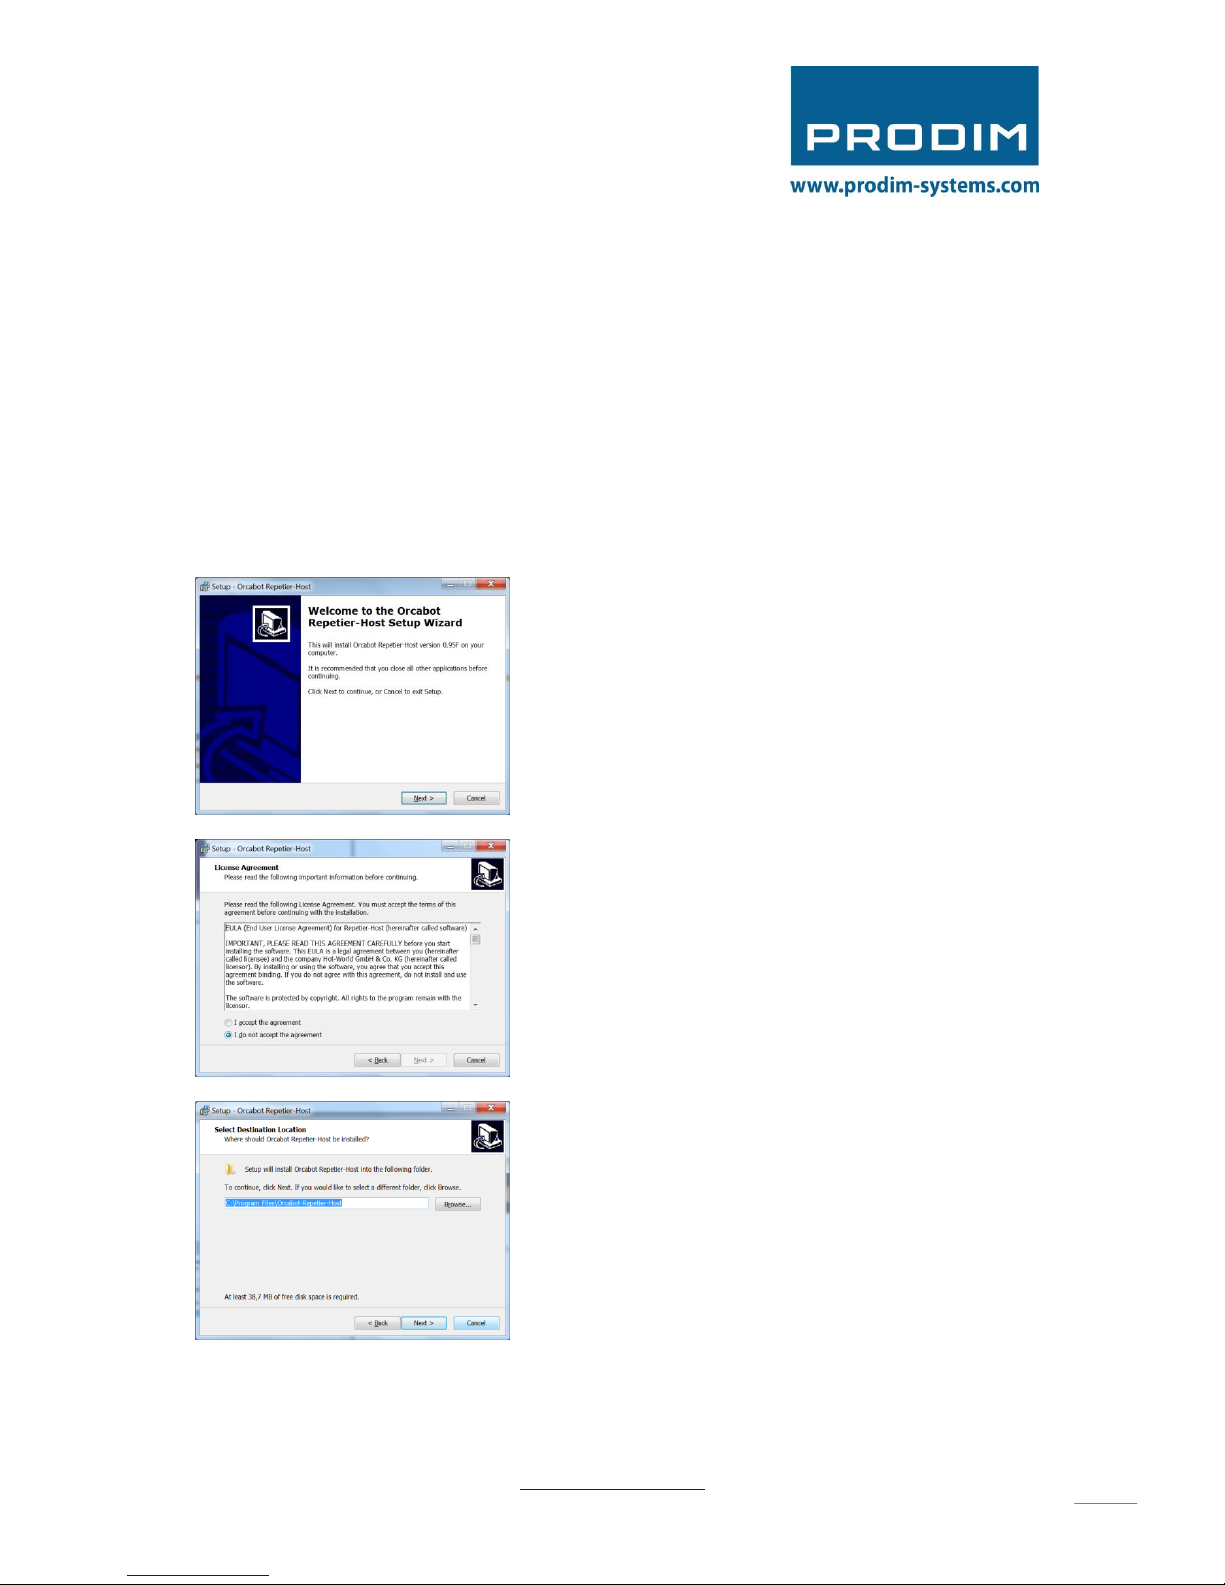
Go to Support; Downloads and click on: Orcabot Repetier Host Setup. The software will be
downloaded. When double clicking on the executable, the software will start the installation.
First, choose your preferred language for the installation.
The following dialog will appear:
Click: “Next”
If you agree with the license agreement,
select “I accept the agreement” and click
“Next”.
Select the destination folder and click “Next”.

User manual: Prodim XXL Pro - version 2.0 - www.prodim-systems.com -
11
Select the start menu folder and click “Next”.
Make sure you have selected all options and
click “Next”.
Select the Start Menu folder and click “Next”.
If you would like to create a desktop icon click
“Next”.
User manual: Prodim XXL Pro - version 2.0 - www.prodim-systems.com -
12
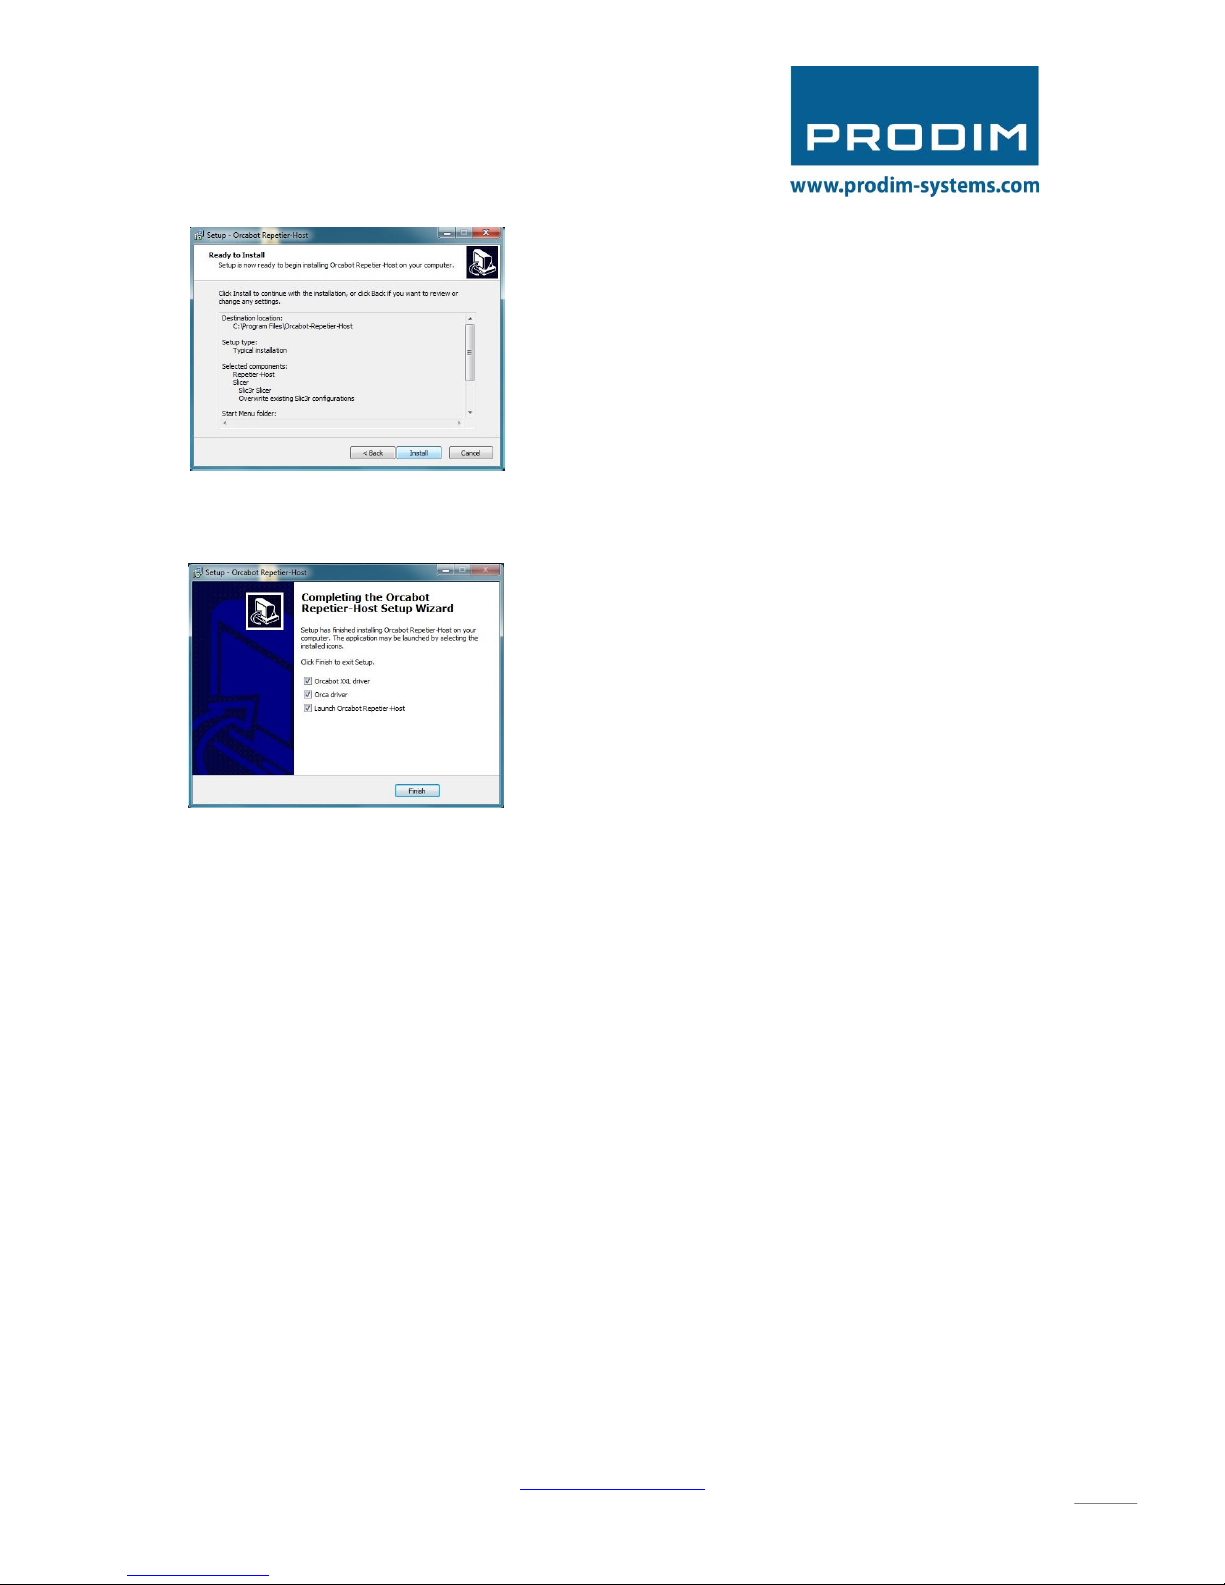
Click install
Make sure you select ALL the boxes and then
click “Finish”.

User manual: Prodim XXL Pro - version 2.0 - www.prodim-systems.com -
13
9. Printer Settings
Start Orcabot Repetier Host.
To check if the correct printer has been selected, press “Printer settings” in the right top corner.
Please Check if the right printer is selected : Orcabot XXL
It could be that the computer has
made a new COM port for your
Printer. You can select the com
port by clicking the drop down box
that says auto. If 1 printer is
connected, select auto. If 2 or more
printers are connected select the
COM port you want to use.

User manual: Prodim XXL Pro - version 2.0 - www.prodim-systems.com -
14
10. Prepare G-code for printing
Before anything can be printed, a 3D (which you can draw in a cadcam program) file must be
exported to or saved as a “.STL” file. These files are suitable for 3D printing. Make sure when saving
the file, that the Z-axis is pointing in the right direction (UP).
In Repetier STL files can be loaded and will be shown in 3D. Just click on the button “Add object” in
the TAB Object Placement and choose the STL file or files. Everytime when a new object is loaded, it
will be placed automaticaly in the screen and will be show in the list of STL objects. You can now copy
your model or centrate, scale, rotate or mirror them.
Make sure your 3D drawing is perfect before adding the .stl file to your software. The software tell
you when there is a problem with your drawing. Ïf there is a hole in the drawing, repetier will say
that the object is not Manifold an the area that is incorrect will be shown in green (as shown on the
picture below). If an area turns green you will have to adjust the .stl file in your Cadcam program.
You can also
fix the file by
clicking the
link that is
stated in the
orange box.
User manual: Prodim XXL Pro - version 2.0 - www.prodim-systems.com -
15
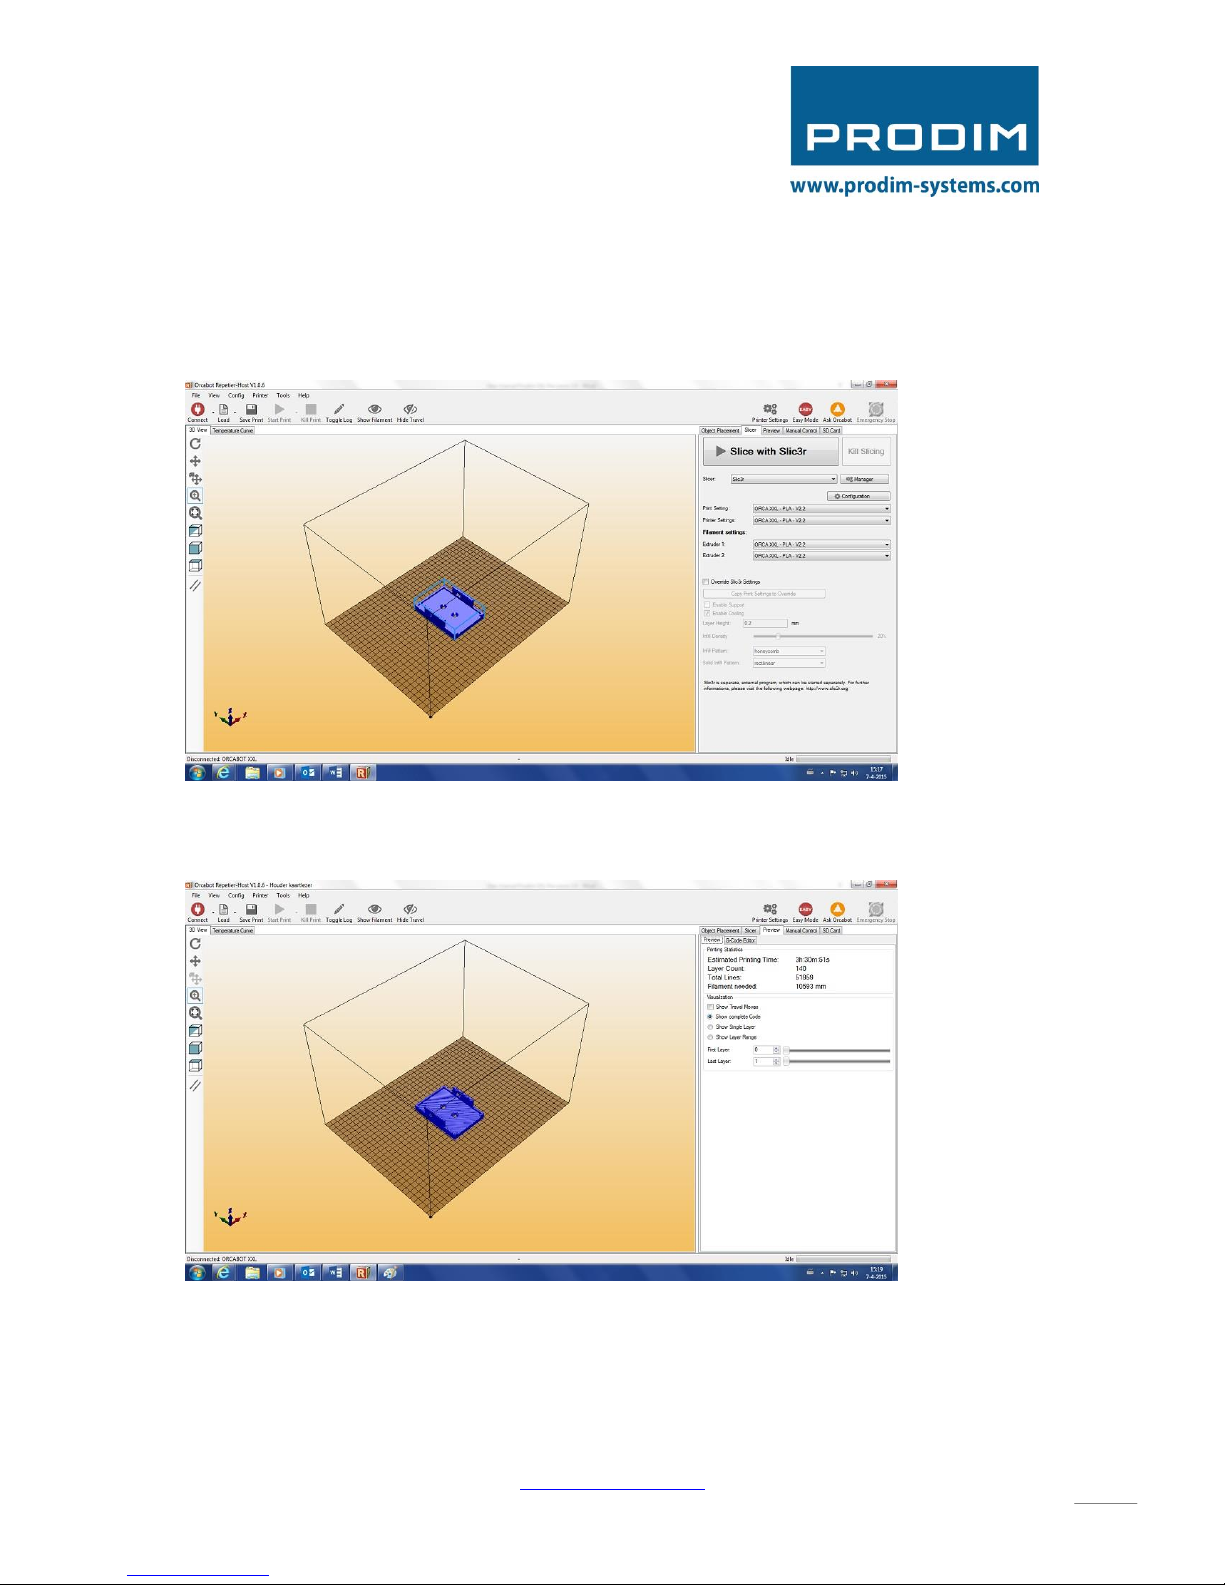
Next step is to Slice the Object. Make sure you have selected the right profile for your printjob. To
learn how to adjust a profile to the “adjusting a print profile” chapter. Go to the Slicer TAB and click
“Slice with Slic3r”. This can take some time depending on how big your object is.
After the slicing is done, the program will automatically change to the tab Preview. It will show you
how much filament is needed for the print job and also the Estimated Printing Time (this can vary!)
In the object screen a blue “layered” object will show up (if not click on the “Show Filament” button).
The dark blue lines show the object layer by layer. The light blue lines show the Z-movements (if you
have activated “show travel”).
You can save the G-code by pressing the Save Job button on top of the screen.
User manual: Prodim XXL Pro - version 2.0 - www.prodim-systems.com -
16
11. How to calculate the amount of filament used in weight
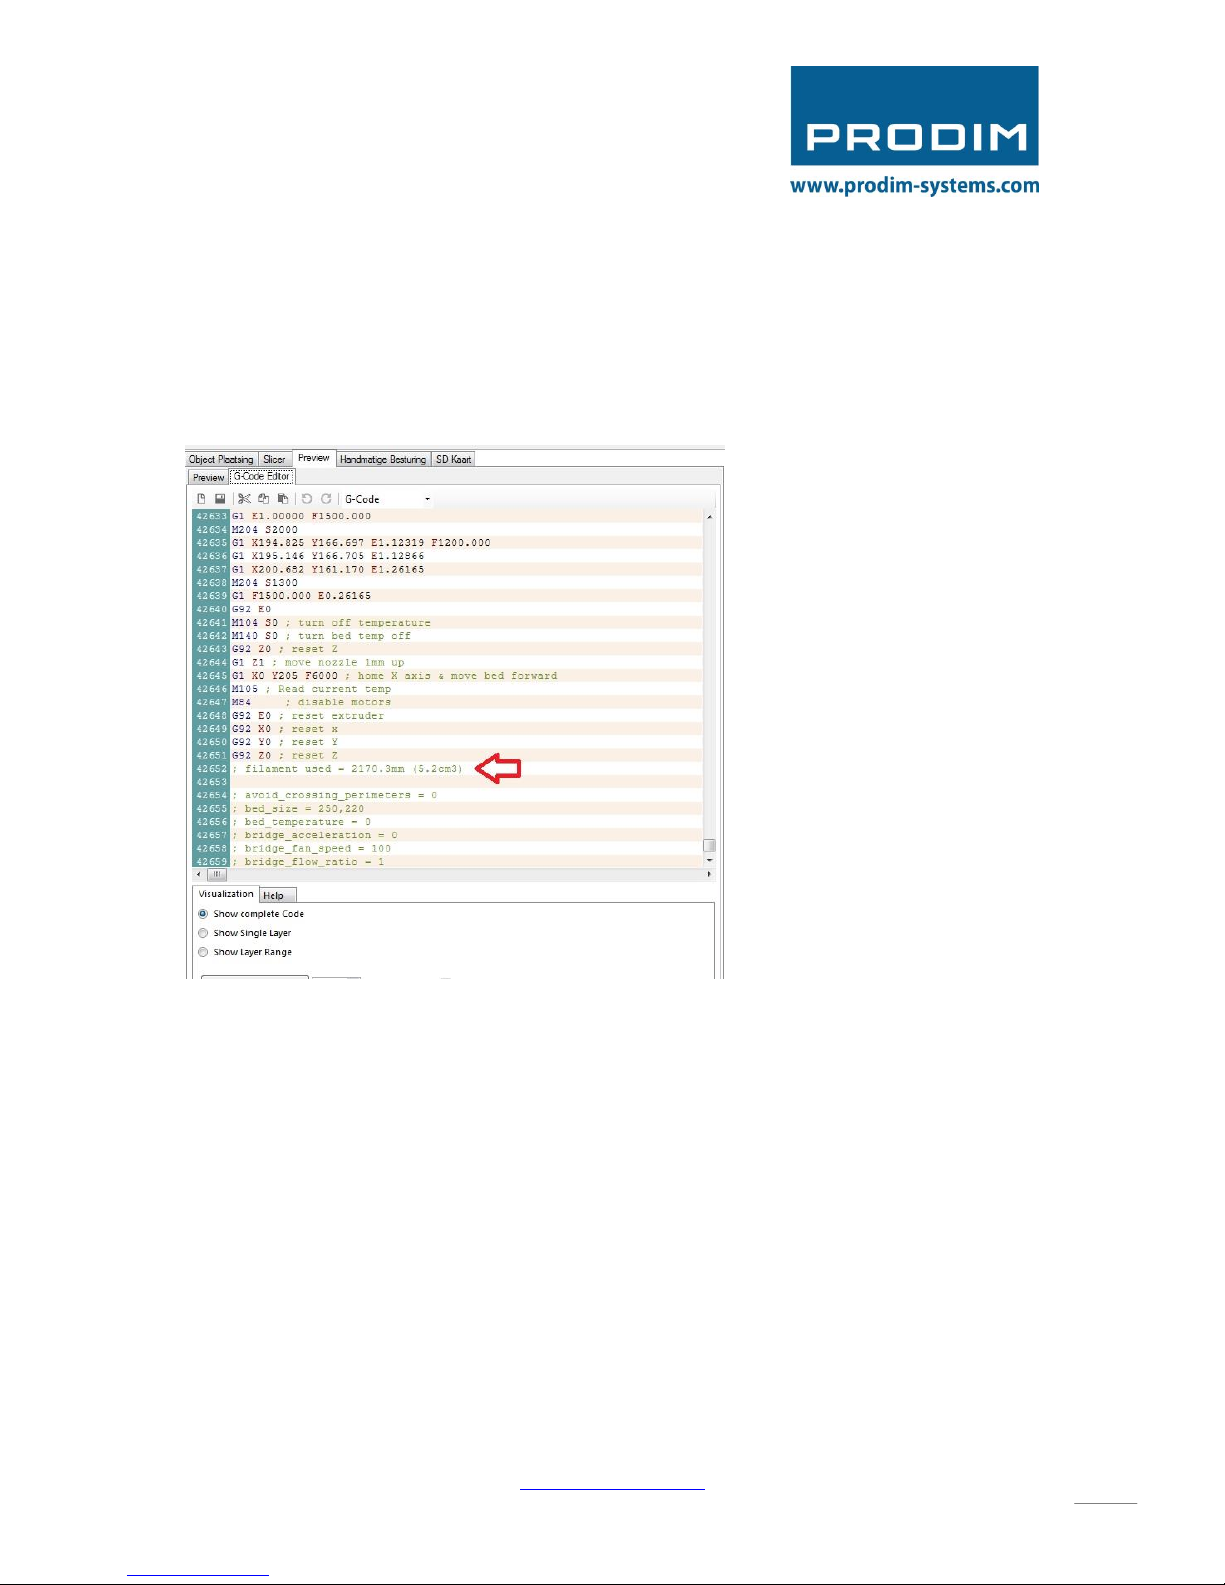
When you have loaded a G-code the preview screen will automatically pop up. In this preview screen
you can see what the ETA of the print job is and how much filament will be used. Because the
description of the needed filament will always be in mm you can use the formula below to calculate
the amount of filament in weight.
The density of the filament you are using is important, most of the densities can be found online.
For example:
-PLA = approx. 1,24 gram / cm3
-ABS = approx. 1,03 gram / cm3
-PET = approx. 1,38 gram / cm3

User manual: Prodim XXL Pro - version 2.0 - www.prodim-systems.com -
17
The formula goes as follows:
total cm3 required × density of the used material = ……. Needed amount of filament that has to be
on the spool to complete the print job.
Only the spool (excl. the filament) will weigh 250 grams : 250 + …. + 40 (security range) = …. Gram
needed on spool
For example:
5.2 cm3 × 1,24 (density PLA) = 6,44 gram of filament needed on spool to complete the printjob.
250 gram (spool weight) + 6,44 + 40 (security range) = 296.44 = 297 gram total weight of spool
User manual: Prodim XXL Pro - version 2.0 - www.prodim-systems.com -
18
12. Prepare G-code for printing with dual extruder
For printing with dual extruder you will need two STL files. Make sure the origin of both .stl files are
the same before converting them.
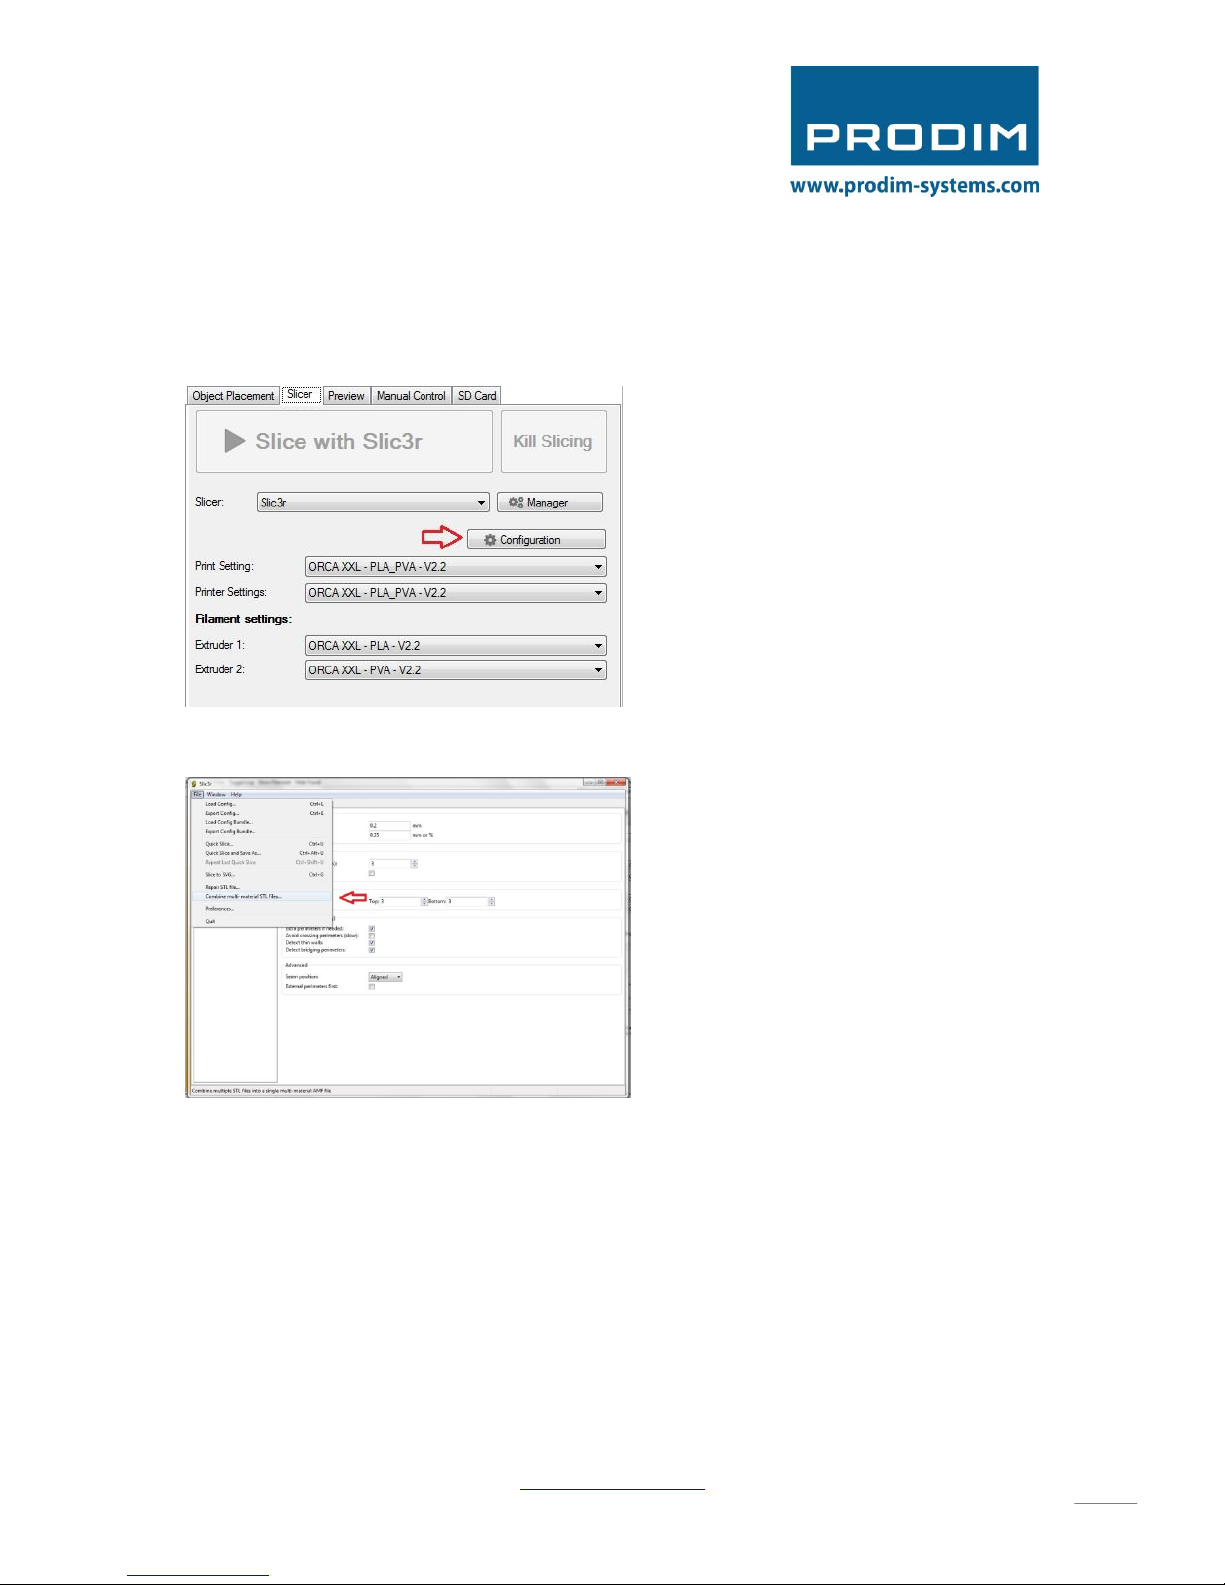
Open Slic3r via the button “Configuration” on the TAB Slicer.
Go to File; Combine multi-material STL files…
Step 1. select the first file and click open
Step 2. select the second file and click open
Step 3. Click Cancel
(This sequence is also defining which spool will be used. Spool 1 / Extruder 1 will be used for file 1 and
Spool 2 / Extruder 2 will be used for file 2. You can change this later in the “object placement” screen
by using the drop down box next to the files.)
Step 4. save the new file as an AMF file. (If .xml is stated in the subject name, remove it!)
Step 5. Close Slicer.
Step 6. Go back to the “object placement”.
Step 7. Click the + button and select your prepared AMF file.
User manual: Prodim XXL Pro - version 2.0 - www.prodim-systems.com -
19
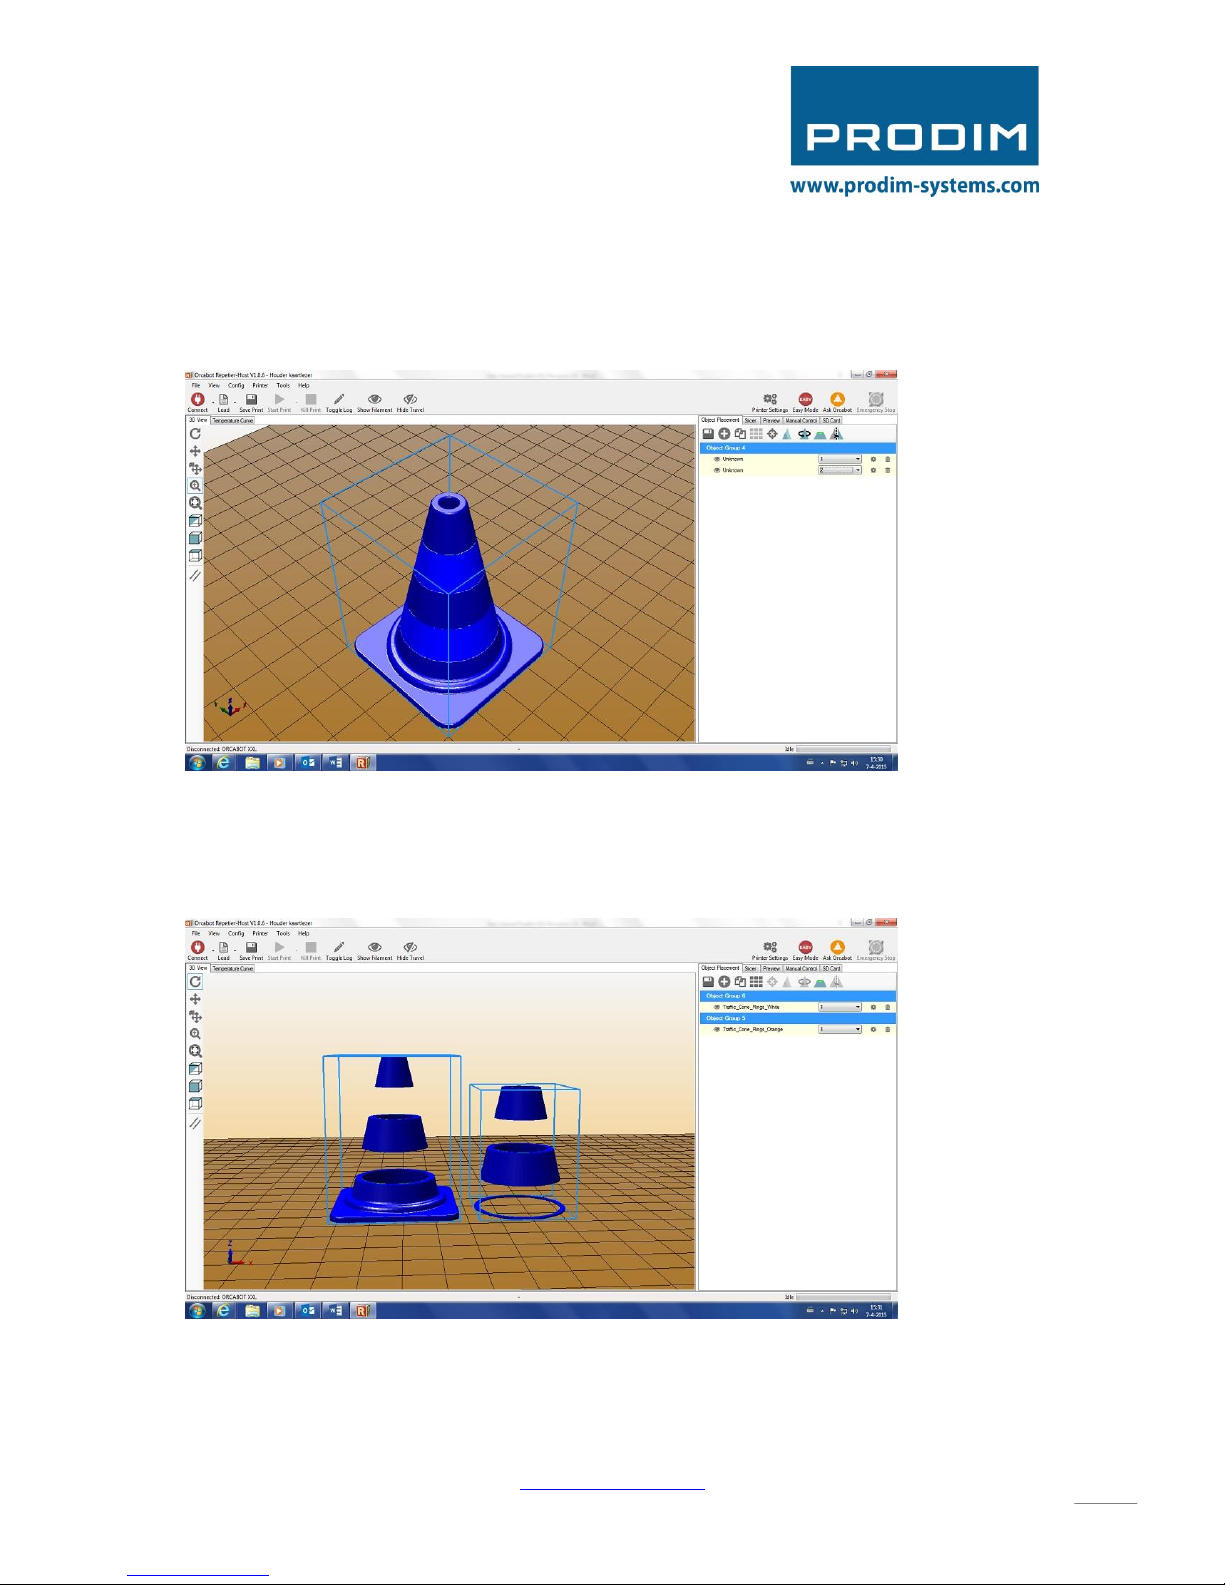
You will now see that the 2 files have been combined.
Correct!
If you did not follow the step for combining both files and just added the 2 .stl files to the “object
placement” you will not be able to print it as one object (figure 2).
False!
User manual: Prodim XXL Pro - version 2.0 - www.prodim-systems.com -
20
13. Preparing your print profile
When you have downloaded the Orcabot Repetier Host Software correctly, you will find all print
profiles for the XXL in your drop down box in the slicer tab. These profiles are standard profiles made
for our customers who want to start printing without making adjustments.
If you would like to change settings in your profiles or make a new profile, please follow the following
steps.
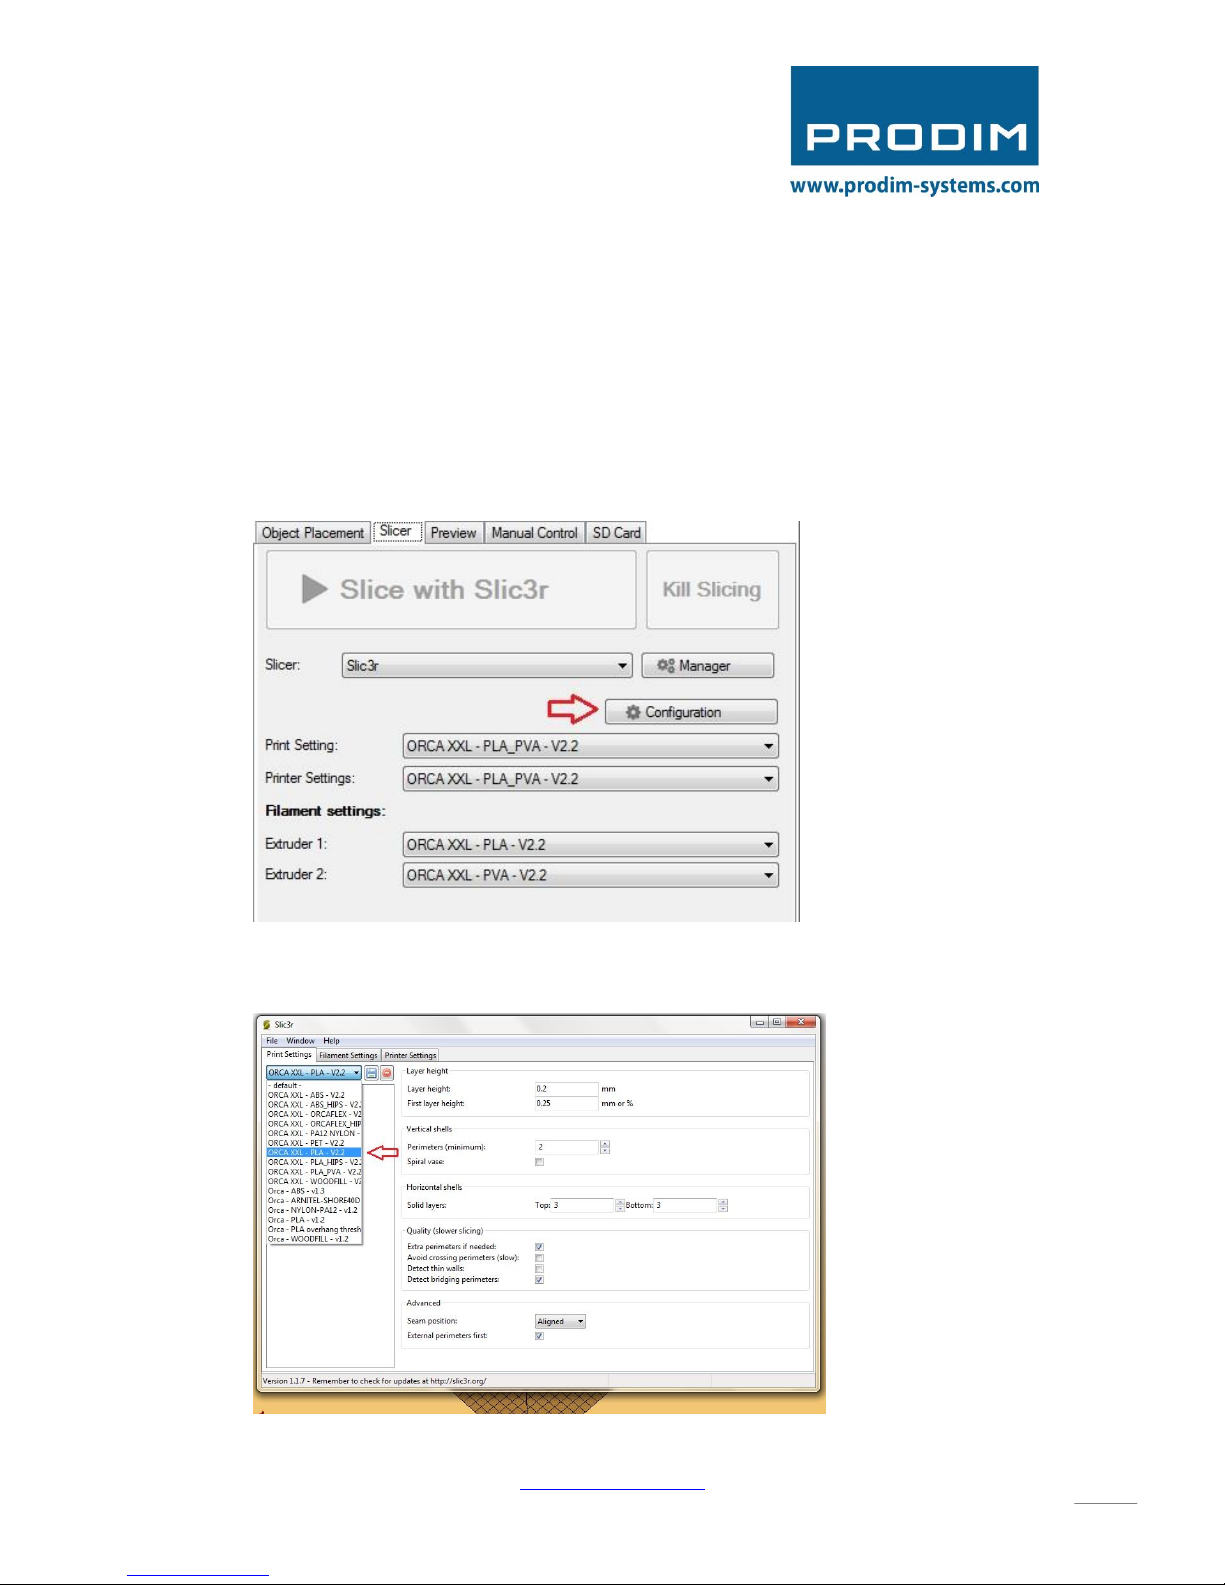
1. Click configuration in the slicer tab. Slicer will open in a new window.
2. Select the profile in which you would like to adjust your settings. For example, we have used
the PLA profile.
Table of contents


