Nexa3D NXE400 User manual

NXE400.OM_EN.2.6
NXE400 Operation Manual

NXE400.OM_EN.2.6 3© Copyright 2020 Nexa3D
Contents
1. Overview4
1.1. Safety Warnings .......................................................................................................................4
1.2. Technical Specifications ...........................................................................................................5
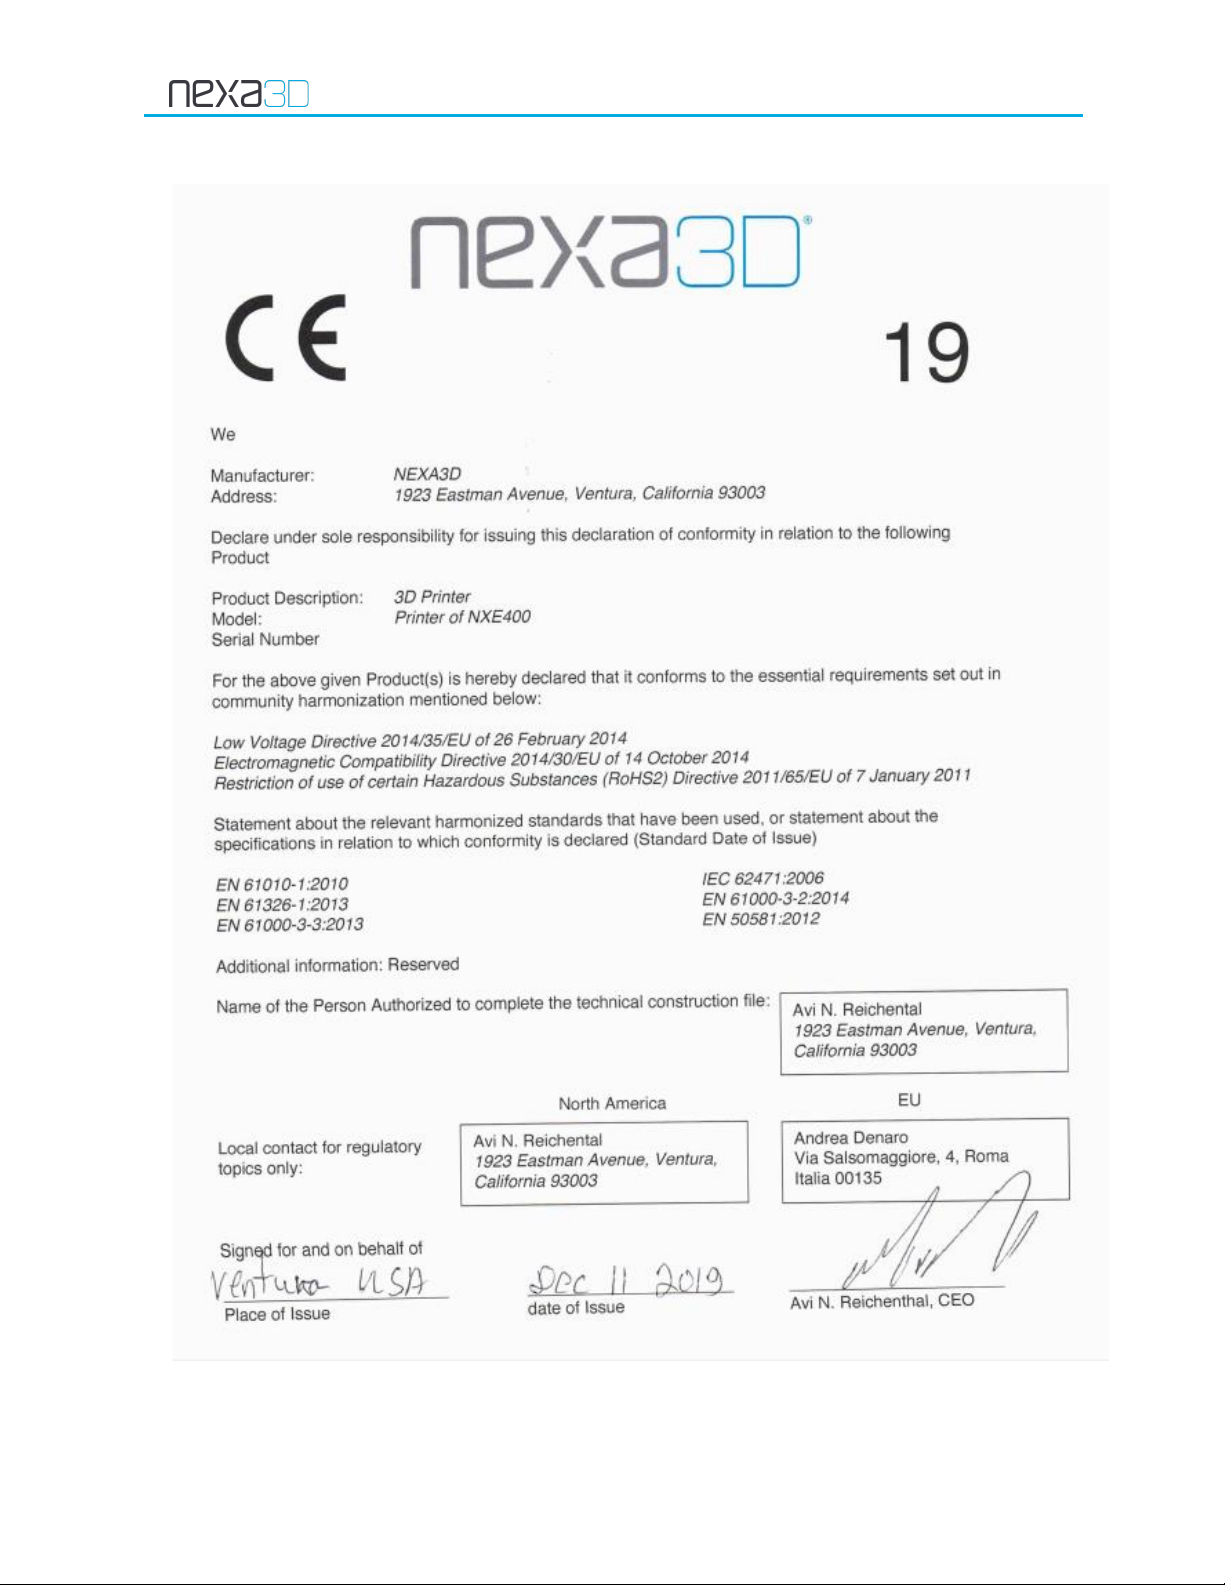
1.3. Certifications ............................................................................................................................6
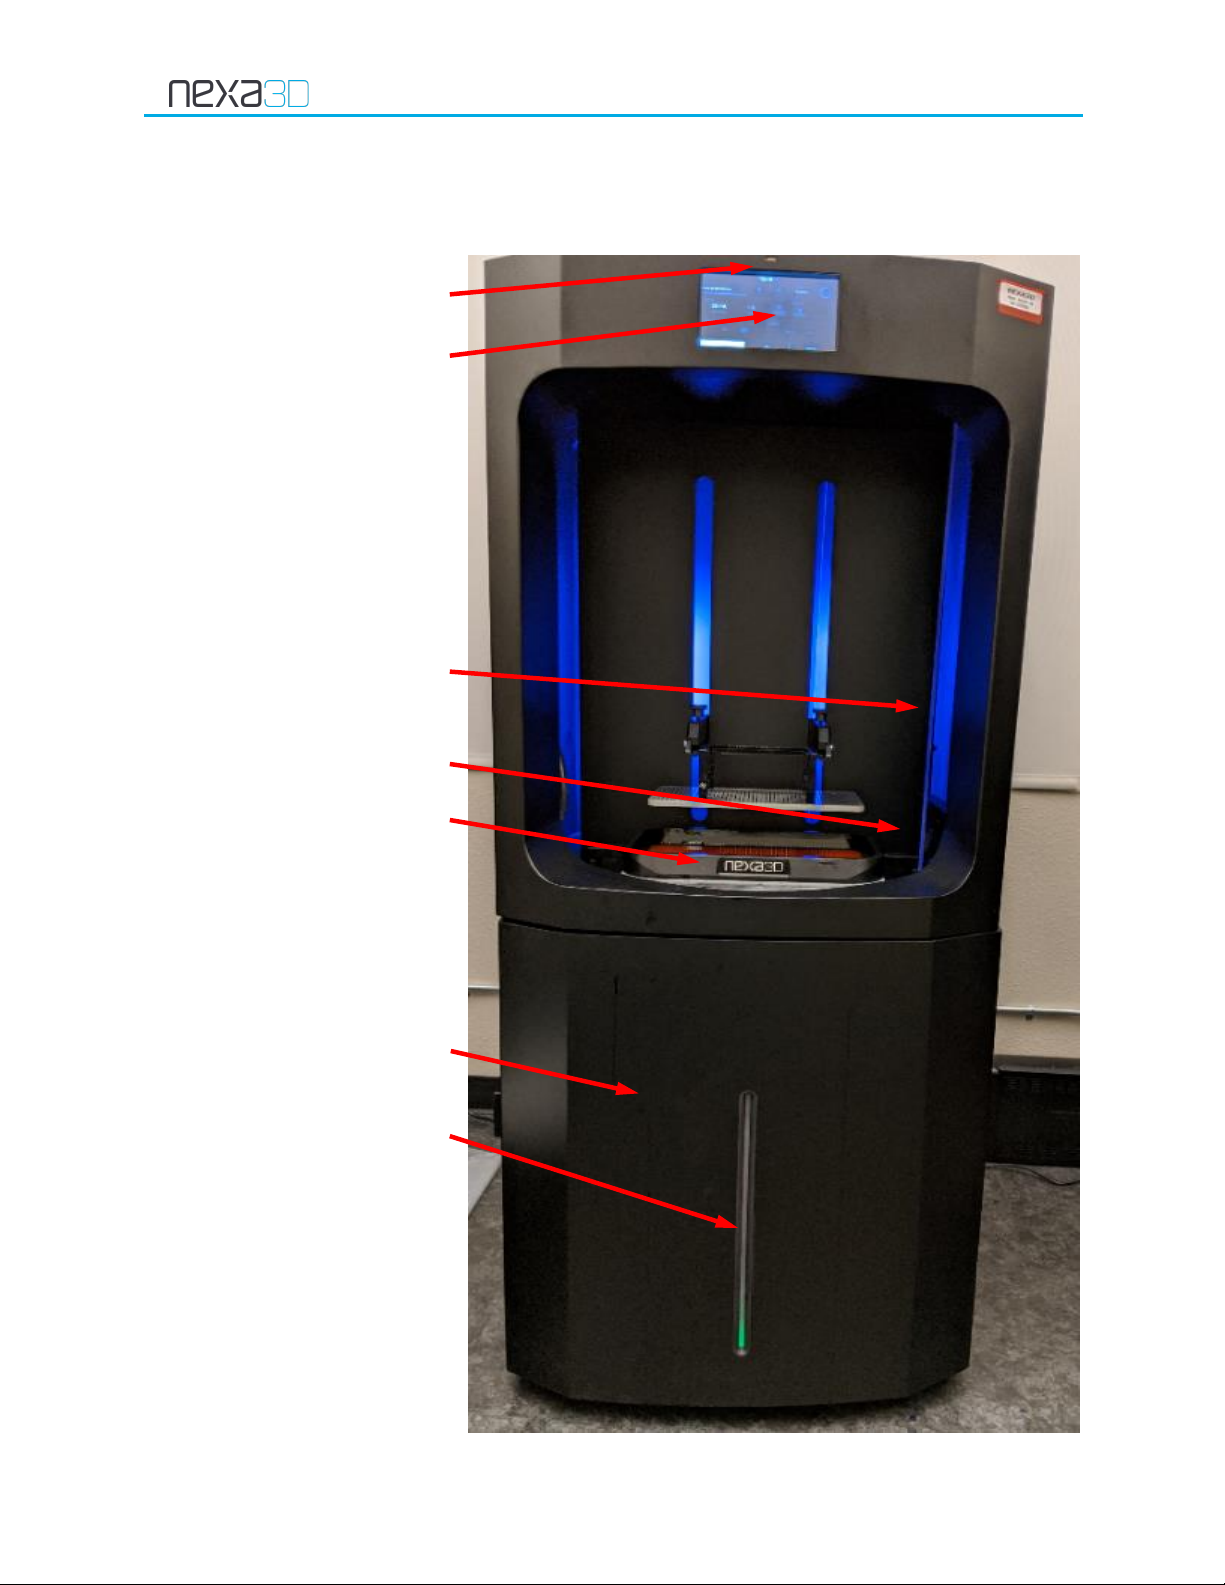
1.4. Product Elements .....................................................................................................................7
2. User Resources............................................................................................................... 12
2.1. Software .................................................................................................................................12
2.2. Instructions For Use ...............................................................................................................12
2.3. Unboxing & Setup...................................................................................................................12
3. NXE400 Systems............................................................................................................. 17
3.1. Light Engine............................................................................................................................17
3.2. Resin System...........................................................................................................................17
3.3. Z-Axis ......................................................................................................................................18
4. Post Processing .............................................................................................................. 19
4.1. Washing..................................................................................................................................19
4.2. Curing .....................................................................................................................................19
4.3. Support Removal....................................................................................................................19

NXE400.OM_EN.2.6 4© Copyright 2020 Nexa3D
1. Overview
1.1. Safety Warnings
Danger: Read this operation manual prior to using the NXE400 printer.
Failure to do so can result in injury or death.
Caution: Do not modify the NXE400 without factory authorization.
Modifications to the NXE400, including the override of safety features or
interlocks, can result in damage to the printer or injury to operators.
Unauthorized modifications invalidate your warranty.
Caution: Use appropriate protective equipment when handling resin and
solvents, including cut & abrasion resistant gloves, safety goggles, smock,
and vapor respirator if recommended by SDS of resin or solvent.
Caution: The NXE400 light engine emits UV-A radiation which can damage
eyes or skin with prolonged exposure. Use protective glasses rated for 99.9%
UVA protection when working around the NXE400 or post-cure equipment.
Warning: It is the user responsibility to verify suitability of material and
process for application requirements. In no case shall Nexa3D be liable for
loss, death, or injury caused by products produced on Nexa3D printers or
with Nexa3D materials. Nexa3D expressly disclaims any implied or explicit
warranty of fitness for any particular usage.
Warning: Immediately clean spilled resin from the printer, or it may cure
and cause surface damage when removed. Most surfaces may be cleaned
with IPA or other similar solvents (Yellow Magic 7, Window Cleaner, xClean).

NXE400.OM_EN.2.6 5© Copyright 2020 Nexa3D
1.2. Technical Specifications
Printing Technology
Continuous LSPc
Light Source
Structured Light Matrix
Build Volume
275 x 155 x 400mm (10.8 x 6.1 x 15.7 inch)
XY Resolution
76.5 μm(4K)
Z Resolution
50/100/200 microns
Interface
7” Touchscreen
Input File Format
.stl, .3mf
Materials
xGPP-Blue, xGPP-Transparent, xGPP-Grey, xABS-
HT-Orange, 3843-ABS-Black, xCE-Black, xMED412
Weight
160kg (350lb)
Dimensions
710 x 710 x 1675 mm (28 x 28 x 66 inch)
Crated Weight
250 kg (550lb)
Crated Dimensions
990 x 990 x 1905mm (39 x 39 x 75 inch)
Electrical Requirements
US: 100-130V, 8A, NEMA 15-5R
EU: 200-240V, 4A, CEE7/7 (Schuko)
Connectivity
WiFi, USB, Ethernet
Operating Environment
Air temperature between 20-25˚C (60-80˚F) and
RH below 70%

NXE400.OM_EN.2.6 6© Copyright 2020 Nexa3D
1.3. Certifications

NXE400.OM_EN.2.6 7© Copyright 2020 Nexa3D
1.4. Product Elements
1.4.1 NXE400
USB
Touchscreen
Transparent Door
Camera
Vat
Lower Door
Progress Bar

NXE400.OM_EN.2.6 8© Copyright 2020 Nexa3D
Buildplate
Thumbscrews
Build-plate
Vat Clamps
Vat
Membrane
Door Track
Nozzl e Holder
Elevator Arms
Resin Vacuum Nozzle
Vat

NXE400.OM_EN.2.6 9© Copyright 2020 Nexa3D
Light Engine
Resin Pump
Computer Reset
Carboy Container
LE Filter
Rear Filter Panel
Main Power Switch

NXE400.OM_EN.2.6 10 © Copyright 2020 Nexa3D
1.4.2 Shipped Separate
Accessory Kit
An accessory kit is included to facilitate post processing and adjustments to the printer.
Plastic Bin –for cleaning build plate and
small parts
Plastic Drip Tray –prevent resin from
dripping when removing build plate
Nitrile Gloves –protect hands from irritation
Safety Glasses –protect eyes
Flush-cut Snips –support removal
Plastic Squeege –direct resin towards
pickup nozzle
Funnel and Filters –filter used resin
Steel flexible putty knife –removing residue
from build plate
Steel picks –cleaning residue from slots in
build plate
Allen Wrenches for removing shipping
bracket and leveling build plate
Caps –for resin hoses when disconnected
Membranes
5pk Membranes
Build Plate
Build Plate

NXE400.OM_EN.2.6 11 © Copyright 2020 Nexa3D
Resin Container
5L Carboy Container w/ tube kit
Vat
Aluminum Vat
Resin Cartridge
Resin Cartridge

NXE400.OM_EN.2.6 12 © Copyright 2020 Nexa3D
2. User Resources
2.1. Software
Software required to operate NXE400 may be found at nexa3d.com/downloads.
MagicsPrint for Nexa3d with .bpprof file of parameter settings and NexaX with .nxr file with
parameter settings are both required for file preparation.
2.2. Instructions For Use
Usage instructions and training may be found at the Nexa3d service center,
nexa3d.atlassian.net/servicedesk/customer/portal/2
Prior to scheduling installation, review and sign the site preparation requirements.
2.3. Unboxing & Setup
No tools are needed to unpack the NXE400. If the printer will be relocated, remove all resin,
secure the z-stage and use original packaging.
Unlatch the front panel/ramp and place
as shown in the picture. Line up the holes
and place bolts (found in a plastic bag
inside the crate) to secure the ramp
before unloading.

NXE400.OM_EN.2.6 13 © Copyright 2020 Nexa3D
Unscrew and remove the three bracing
boards
Remove the hatch door on the back of the
crate
Raise the foot pads by turning the orange
nuts
Roll the NXE400 down the ramp to the
desired location.
Remove the plastic wrap from the printer
and discard.

NXE400.OM_EN.2.6 14 © Copyright 2020 Nexa3D
Prior to plugging in the unit, remove tape
securing the doors and resin vacuum
nozzle. Place the nozzle in the magnetic
cradle on the inside wall of the printer.
Install the carboy container, using the lid
with tube-insert assembly.
Remove the red bracket securing the
elevator on the Z-stage
Drop the feet of the printer and adjust
height until a bubble-level on the glass of
the light engine shows horizontal

NXE400.OM_EN.2.6 15 © Copyright 2020 Nexa3D
Screw in the WiFi antenna taped to the
side of the printer chassis
Plug in the power cord and turn on the
power switch on the back of the machine
Navigate in the touchscreen to System >
Network Settings menu and connect to
the network if desired
The build plate was aligned with the light
engine at the factory, however it should
be checked after shipping. Follow the
instructions online at the Service Center
to check if adjustment is required

NXE400.OM_EN.2.6 16 © Copyright 2020 Nexa3D
Install the build platform and secure with
2 thumb screws
Wipe the top surface of the light engine
clean, install a membrane with screws
facing down, then the vat on top of the
membrane and close the vat clamps to fix
it in position

NXE400.OM_EN.2.6 17 © Copyright 2020 Nexa3D
3. NXE400 Systems
3.1. Light Engine
Maintaining the NXE400 light engine is critical to get best printer performance.
There is a protective film on the top surface of the light engine. Keep it clean and free of
streaks. It may be cleaned with xClean, isopropyl alcohol, or glass cleaner. Don’t use sharp
objects or abrasive materials to clean it. Keep the build plate clean of burrs and the resin
free of cured shards of resin. Detailed care and maintenance enstructions may be found
online.
The LCD is delecate and should be protected from damage. Don’t drop objects on the light
engine top surface to avoid cracking the glass. Remove the build plate before turning off the
printer to avoid it falling on the light engine. Don’t apply pressure to the edges of the LCD to
avoid damage to the data conducters.
The light engine will become ineffective if dust is allowed to build up. Always keep a filter
installed and change 3-6 months depending on air quality.
After removing resin and membrane, run the cleaning job from the System screen to inspect
the light engine for damage (dead zones, contamination). Keep the door closed or use
protetive eyewear. It should look like this:
3.2. Resin System
The NXE400 membrane is separate from the vat. Never load resin in the printer if the
membrane and vat are not installed and the clamps are not secured. Failure to do so may
result in a resin leak. The o-ring face seal must be in place to ensure resin seal, and must be
replaced if damaged.
Warning, Spill Risk: Never unlock the vat clamps with resin in the vat. Drain
resin prior to unlocking the vat.
Use the black tray provided when removing a build to prevent dripping resin on the printer.
If resin is dripped on the printer, clean it immediately with Isopropyl Alcohol or xClean.

NXE400.OM_EN.2.6 18 © Copyright 2020 Nexa3D
The membrane must be replaced if damaged. Filter the resin removed from the printer and
run the cleaning print job (full exposure layer) after failed builds. Peel off the cured layer and
remove before running a new job.
Pumps and hoses must be free of air to pump efficiently. Replace hoses if cracks develop.
Tighten the connectors until fully seated.
The section of hose in the pump must be pulled taught before closing the pump, and must
be worked-in before using to avoid stalling the pump motor.
3.3. Z-Axis
The z-axis has a resistance feature to protect the light engine from damage. It must be
disengaged and allowed 5 seconds to self-calibrate before moving by hand, or the resistance
will be excessive. Remove the build plate before disengaging for best results.
Note: Membrane Handling Precautions.
•Only handle membranes by the frame, avoid touching membrane
•Keep resin off light-engine side of membrane, clean light engine
before installing
•Membrane can easily be punctured, keep away from sharp objects
•Avoid contact with any surface other than the light engine - keep
membranes in the resealable bag when not in use.
•If need to change different type of resin. Clean the resin side only
using a lint free wipe moistened with IPA.
•To prevent membrane damage:
oCheck build plates for cured resin or burrs before use
oFilter resin or run Clean cycle after any failed build.
•Inspect membrane between builds by dragging a rubber or silicone
spatula across the surface. Replace as necessary. You may need to
drain resin to under 1cm depth to allow visual inspection in wake of
the spatula movement.

NXE400.OM_EN.2.6 19 © Copyright 2020 Nexa3D
4. Post Processing
4.1. Washing
Parts must be cleaned of uncured resin after printing. Nexa3D recommends washing parts
with xClean or Isoporpyl Alcohol. Washing should be done immediately following printing for
best results.
Wash in a bath using gentle agitation for 5-10 minutes total. Consult local jurisdiction to
determine requirements for safety and disposal in your area.
If parts remain tacky after washing, the solvent may need to be refreshed. Use 2 baths of
progressive cleanliness will help ensure final bath has limited resin contamination. If using
xClean, rinse in water for up to 1 min. In case of 3843-ABS-Black and xMED412, don’t rinse in
water –allow to air dry or rinse in IPA.
Danger: Most cleaning solvents are flammable. Don’t use near open flame
and ensure adequate ventilation and spill containment measures are are in
place.
4.2. Curing
To achieve advertised mechanical properties curing is required in a UV chamber with
>2.5mW/cm2 of UV light in the 405-365nm spectrum. Duration may need to be extended for
thicker section parts. If warping occurs during cure, then cure attached to buildplate and/or
at room temperature.
xGPP-Blue, xGPP-Grey,
xGPP-Transparent,
xMED412
30-60 minutes
Room Temperature
xABS-HT-Orange, xCE-
Black, xCE-White
30-60 minutes
60°-80°C
3843-ABS-Black
30-60 minutes
30°C
4.3. Support Removal
Supports may be broken off by hand or with snips, then sanded down to improve finish if
desired. They may be removed before or after washing and curing. Progressivly sanding with
220 and 400 grit paper works well. Mineral oil is recommended for wet sanding and cleaning
excess dust.
Table of contents
Other Nexa3D 3D Printer manuals
Popular 3D Printer manuals by other brands

Dremel
Dremel 3D40 Idea Builder instructions

3D Systems
3D Systems Duraform ProX PA Original instructions

SINTERIT
SINTERIT Lisa X Translation of the original user manual

Tinkerine Studio
Tinkerine Studio Ditto Pro Setup & operation manual

3DKreator
3DKreator Kreator Motion user manual

Dremel
Dremel DigiLab 3D45 manual