Professional Picture Frame Equipment Onyx 90 User manual

Onyx 90 Media Cutter
The World’s Best Media Cutter 828-388-5782
Know Your Onyx 90 Media Cutter
Professional Picture Frame Equipment
441 South Whitted Street
Hendersonville, North Carolina 28739
Vol318
Owner’s Manual

Onyx 90 Media Cutter
The World’s Best Media Cutter 828-388-5782
Page 2
Congratulations and thank you! You have just purchased what we believe is the best
wall mounted media cutter in the world. The Onyx 90 will provide you with a lifetime
ofdependableservicewithonlyminimalmaintenance.
We know you are anxious to begin using it. But before you do anything, please take
the necessary time to read and understand this manual. It will answer a lot of your
questionsand avoid possible problems.
Table of Contents
1.0 SafetyPrecautions&Recommendations Page 3
2.0 Registration&Warranty Page 3
3.0 KnowYourMachine Page 3
4.0 Installation of the Onyx 90 Page 5
5.0 CuttingTool Holders Page 9
6.0 Using theOnyx 90 Page 10
7.0 RoutineMaintenance Page 13
8.0 Adjustments Page 13
9.0 Troubleshooting Page 17
Every Onyx 90 machine is made using computer controlled (CNC) machiney here in North
Carolina. Every machine is assembled from the parts made here and assembled on a wall by
experienced assembly technicians.
It is adjusted and set up for cutting glass, mat board and acrylic. There is a form that comes
with each machine showing it was checked and approved by a supervisor.
Please DO NOTADJUST the machine.
Onyx 90 Media Cutter
The World’s Best Media Cutter 828-388-5782
1. Safety Precautions & Recommendations
WhenusingtheOnyx90, basicsafetyprecautions shouldalwaysbe followedtoeliminate theriskof damageorinjury to
personsormaterials. Wearsafetyglasses,glovesandprotectiveclothing. Usecaution when using,transporting,
storingordisposing ofdangerousobjects,such ascuttingtools,glass, etc. Makesurethemachine is mountedsecurely.
Manysituations exist thatwecan not predict,butit iscriticalthatyour Onyx90isattached securelyandsolidlyto the
wall.Keepthe machine and theworkareaaround the machineclean. Neverplaceyourhand or fingersbehindthe
mediaclamp. For what it is worth – be safe!
2.0 Registration & Warranty
YourOnyx 90hasa5yearmanufacturer’s warranty from the date of purchase. Please takeamomenttocompleteand
mailtheenclosed warranty card. Proofofpurchasemust be submittedwiththe warranty card.
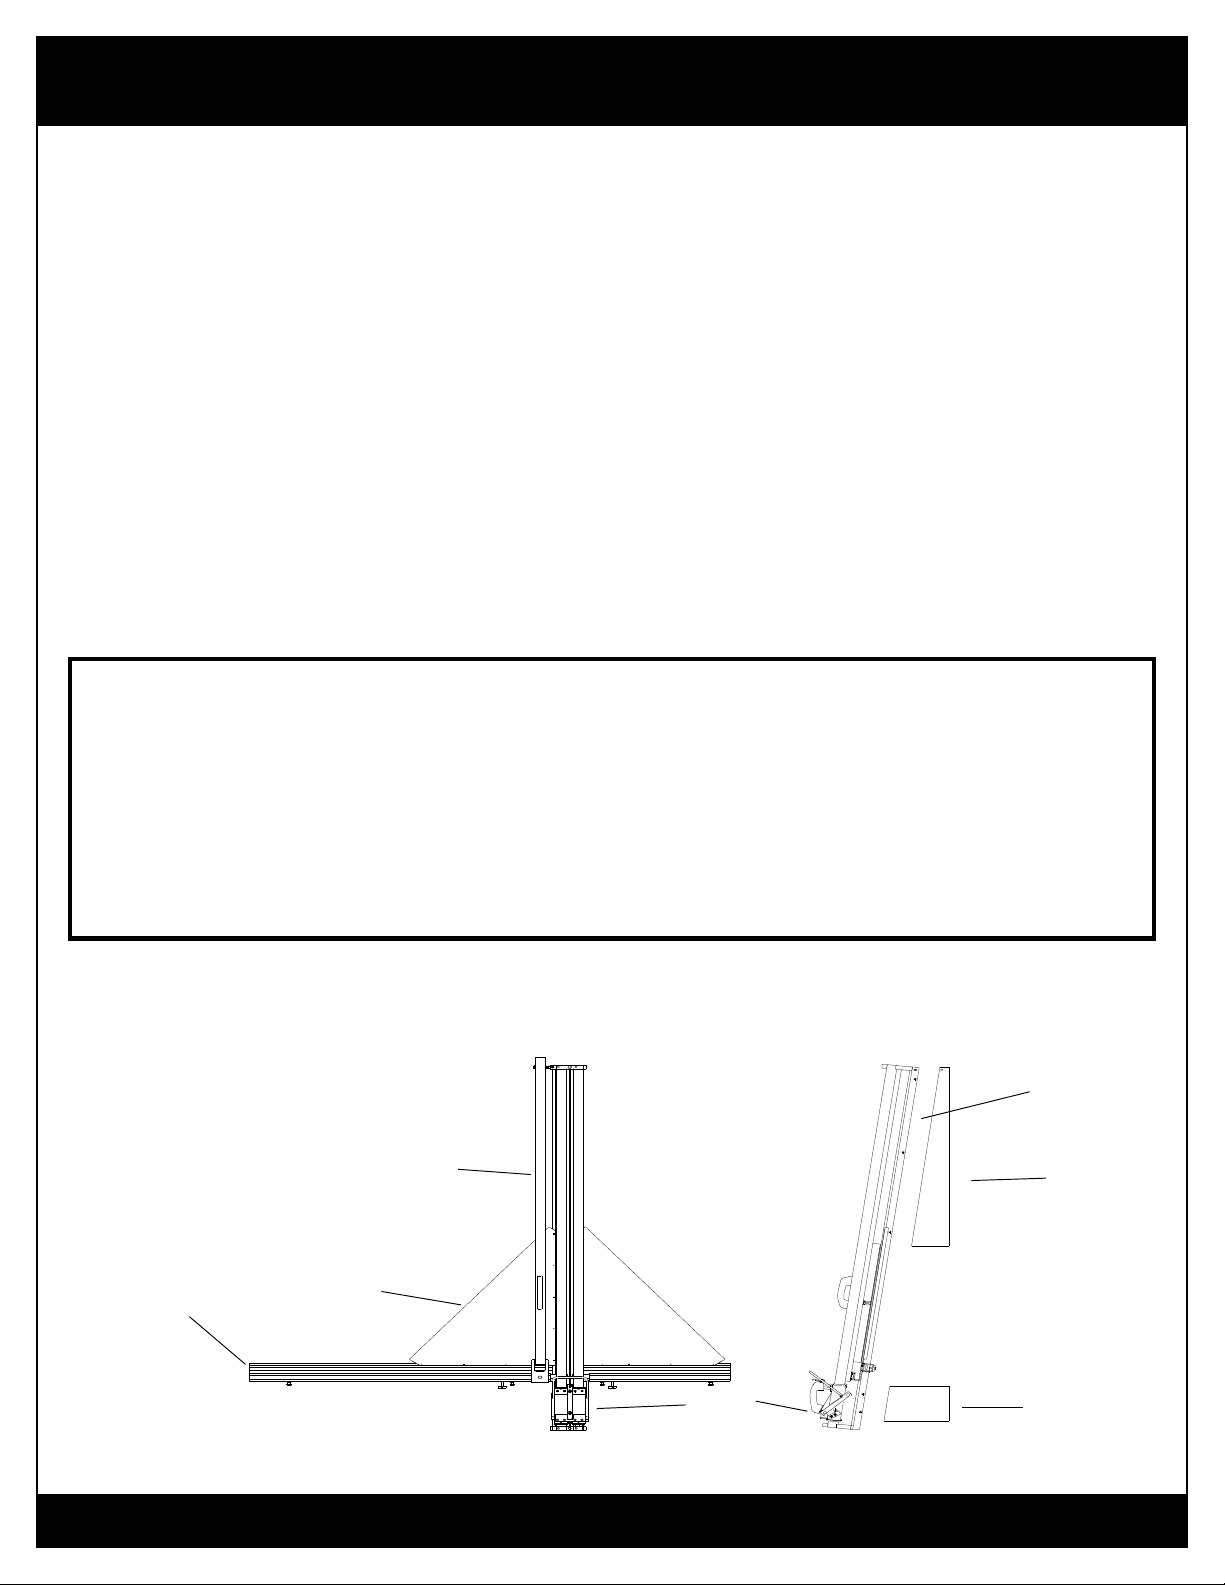
Verticalaxis
extrusion
Top hanging
bracket
Bottom hanging
bracket
Cutting
Cart
Lefthorizontal
extrusion Left stainless
steel gusset
plate
Mediaclamp
assembly
Page 3
3.0 Know Your Machine
Diagram of Parts
Professional Picture Frame Equipment warrants the Onyx 90 to be free from defects in workmanship and parts for 5
years from the date of purchase. Professional Picture Frame Equipment warrants it will repair or replace any defec-
tive parts. The Onyx 90 must be subjected to normal use and service. A return merchandise authorization (RMA) must
be requested from Professional Picture Frame Equipment before returning. The transportation to and from the factory
is the customer’s responsibility. This warranty is in lieu of all other agreements. Professional Picture Frame Equipment
is not liable for any damages or losses, incidental or consequential, direct or indirect, arising out of the use of this
product.

Onyx 90 Media Cutter
The World’s Best Media Cutter 828-388-5782
Bearing-tubes and
cart-assembly unit
Horizontal mounting
brackets
Bottom hanging
bracket
Top hanging
bracket
Media clamp
assembly
Left stainless
steel gusset
plate
Right stainless
steel gusset
plate
Lefthorizontal
extrusion Right horizontal
extrusion
Page 4
List of Parts That Were Shipped
Owner’sManual
Box(large cardboardshippingbox)
MediaClampAssembly
Bearing-tubesandCartAssemblywithattachedVerticalAxisExtrusionunit
LeftHorizontalExtrusion
RightHorizontalExtrusion
StainlessSteel Gusset Plates(2)
VerticalWallMountingBrackets(2)
HorizontalWallMountingBrackets(2)
Hardware Packets (4)
GlassCuttingToolHolder
MatBoardCuttingToolHolder
PlasticCuttingToolHolder
ProductionStop
SpareMatCutting Blades

Onyx 90 Media Cutter
The World’s Best Media Cutter 828-388-5782
Builder’s
square
Page 5
Matcuttingtool Glass cutting tool Acryliccuttingtool
BlackHandle Red Handle Blue Handle
4.0 Installation
Toolsyouwillneedto collect beforebeginning installation
An assistant
Ladder
Level,preferably atleast3 ftlong
Electricdrill/screwdriver witheithera1/4”masonrydrillbit or1/8”woodbit
Hammer
Phillipsheadscrewdriver,large
Tape measure
Straightedge,36” orlonger
Builder’s square
Pencil
Step-By-Step Instructions
Thesewritteninstructions areprovidedhere. TheOwner’s Manual andvideoare also availableontheInternet. http://
www.youtube.com/watch?feature=player_detailpage&v=ZmZyR4oX7sM
1. Determineon whattypeof wallyouwill beinstallingyour machine-wood,drywall,steelormasonry? Follow
appropriateinstructions.
2.Determine your personalworkingheight (seebelow).
Cutting Bed Elevation Chart
Generallyspeaking,mostframers determinethe cuttingbed height(theheightthatyourmediarestson)oftheirmachine
asinfluenced by twofactors:employee’s workheight,andthe weightandsizeof thematerialstobe placedontothe
cuttingbed of theOnyx 90.For exampleifyouare tall,thenmounting the machinehighermay bebetterforyou. If you
processalot of largesized glass,acrylicor other sheetmaterials,youmay find alowercuttingbed height better. Al-
waysthinkofsafetywhenliftingandprocessingyourmaterials.Fromthefollowingchart,choosethecuttingbedheight
suitedfor youandyour employees. Onceyouhavedeterminedyour cuttingbedheight, thischartwill indicatethe
measurementof the topholeof the tophangingbracket.

Onyx 90 Media Cutter
The World’s Best Media Cutter 828-388-5782
Page 6
33 inches above the floor 93 inches above the floor
32 inches above the floor 92 inches above the floor
31 inches above the floor 91 inches above the floor
30 inches above the floor 90 inches above the floor
29 inches above the floor 89 inches above the floor
28 inches above the floor 88 inches above the floor
27 inches above the floor 87 inches above the floor
26 inches above the floor 86 inches above the floor
25 inches above the floor 85 inches above the floor
Note: If you have an 8' ceiling, the maximum cutting bed height will be 31” from the floor.
Installation on a Wood Wall
It is very helpful to watch the “How To Install” video
http://www.youtube.com/watch?v=ZmZyR4oX7sM&feature=player_detailpage
1.Removeprotectivepolyethylenefilmfromallstainlesssteel parts.
2.Locatea vertical stud on thewall.
3.Using alevel,draw averticalline 94”inlength onthewalltothefloor.
4.Drill a 1/8”pilothole on theline91” from thefloor. (Seeabovechart to determineyourpersonal working height.)
5.Usingthe top hanging bracketasatemplate, center the topholeofthetop hanging bracket overthedrilledhole on
theline.Tracetwocircles for thetwolower holes.
6.Remove the bracket/templateanddrillthe twolower1/8”pilot holes
7.Placethetophangingbracketover the holes and using the screws and washers from the bracket hardware package,
mountthe tophangingbracket inallthreeplaces.
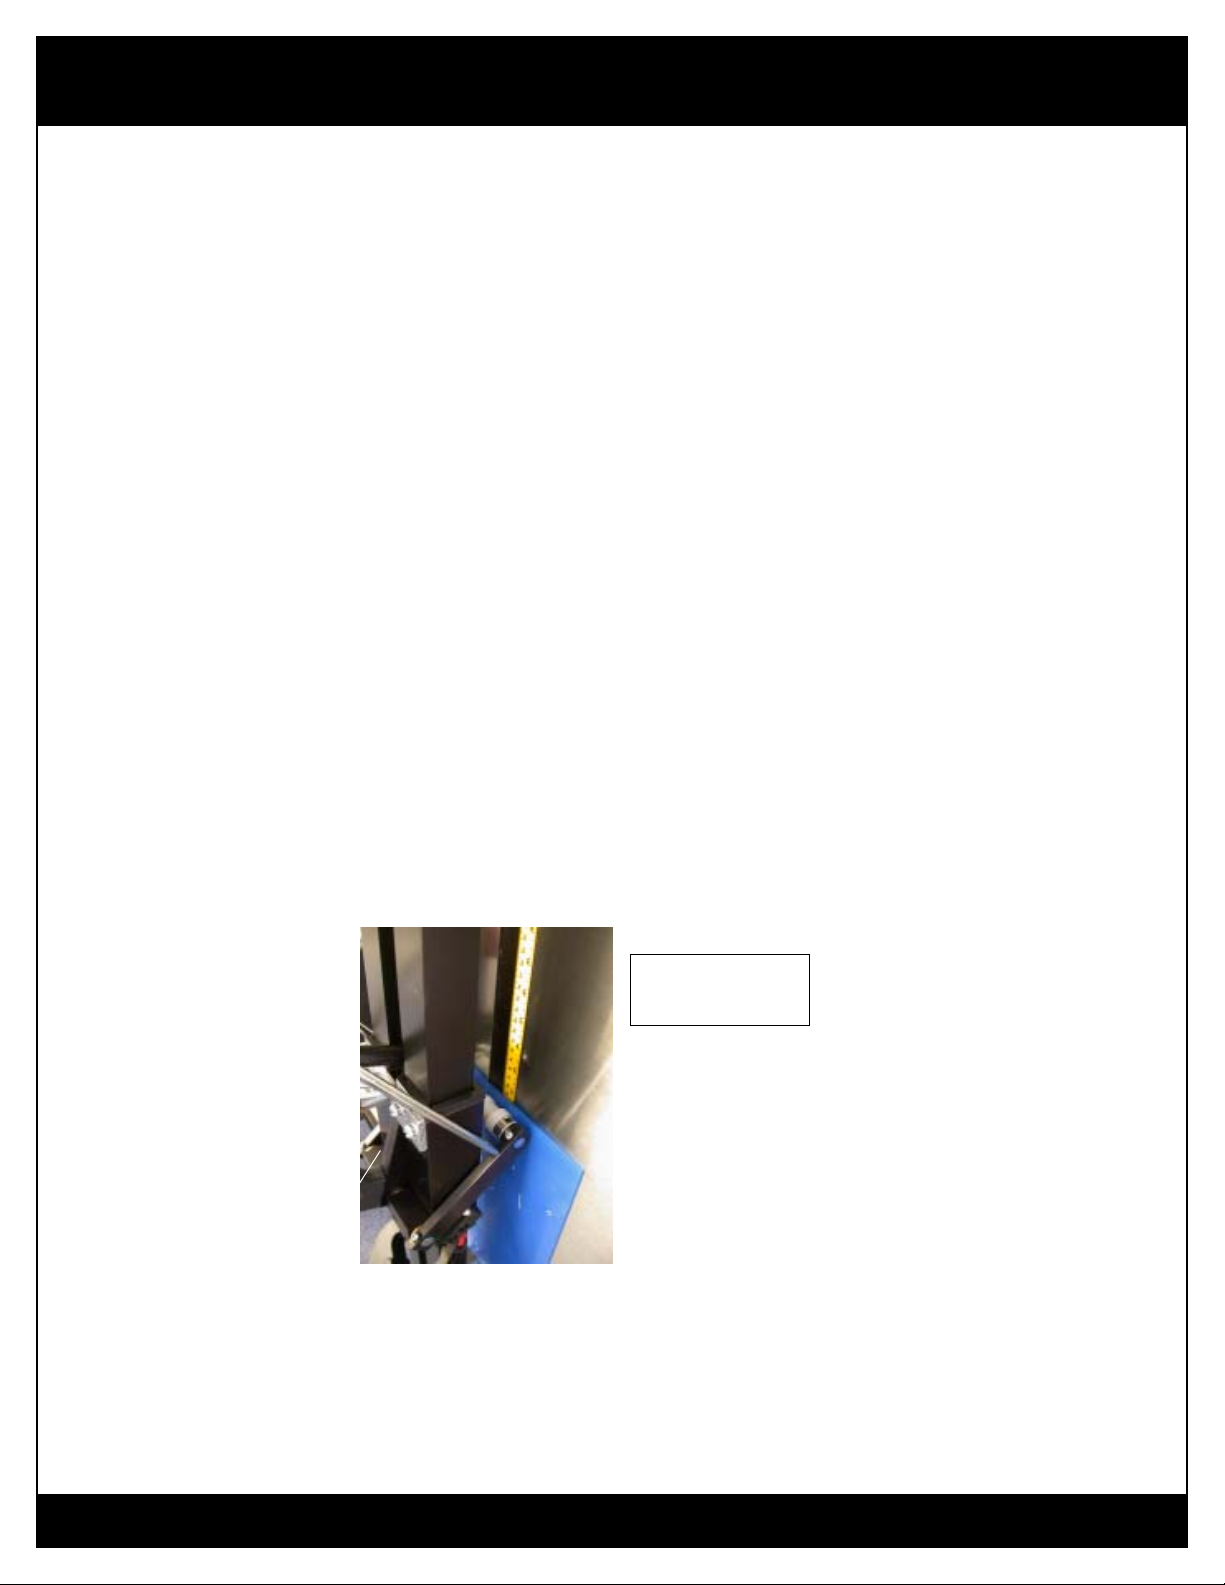
8. Measure 29 1/4” downfrom the bottom of the top hanging bracket and place a mark on the vertical line.
9. Placethetopofthebottomhangingbracketonthatmeasurementline– the one you just marked at 29 1/4”.
10.Usingthe bottomhangingbracketas a template,centerthe two holesinthe bottom hangingbracketoverthevertical
line.
11.Tracethetwoholeswith a pencil.
12.Remove the bottomhangingbracket/ templateanddrill the two1/8”pilot holes.
13.Placethebottom hanging bracket over the holes andusingthescrewsand washersfrom the bracket hardware
package,mount the bottomhangingbracket tothewall.
14.Checkto verify thatthetopand bottom hanging bracketsareinline with eachotherandplumb.
Cutting Bed Elevation Chart

Onyx 90 Media Cutter
The World’s Best Media Cutter 828-388-5782
Page 7
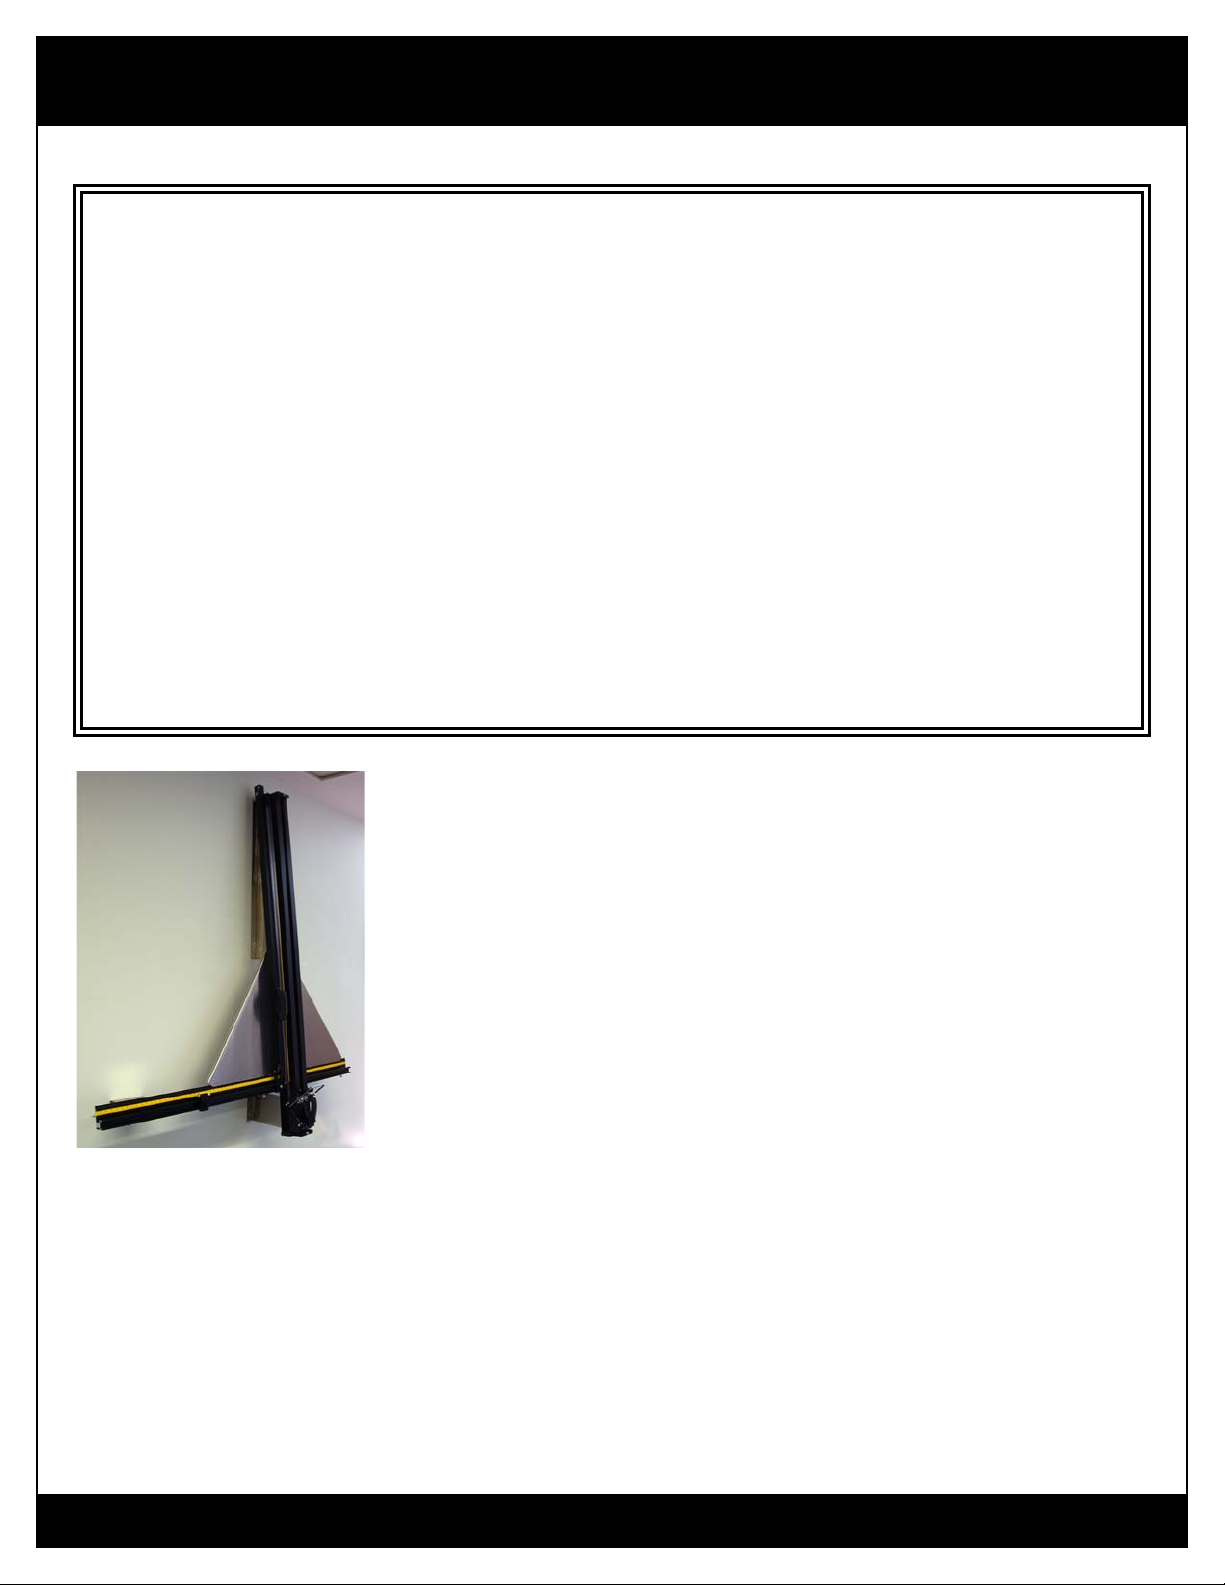
1.Locatethebearing tubes and cart assembly withattachedverticalaxisassembly. Placeit on the topbracketand
insertthesafetyscrew and nut . The screw is ¼-20X1½”long.Thisisveryimportantfor safety.
2. Liftandsituate theverticalaxisextrusion withthebearingtubes andcartassemblyso thattheflangeson the backof
theverticalaxis extrusion straddle thetopandbottom brackets. See aboveimage.
3. Lightlytighten thefivescrews ontheverticalaxisextrusion tothetwo verticalwallbrackets. Therewillbeafurther
adjustmentlater.
4. Locatethe left horizontalextrusion– it ismarked.
5. Attachthelefthorizontal extrusiontotheleftmountingbracket.Note: theleft andrighthorizontalmountingbrackets
areidentical.
6. Placetheleft horizontal extrusion ontotheverticalaxisextrusion. Use two ¼-20 X2”hexheadscrews, washers
andlocking nutstoattach thelefthorizontalextrusionto thesquaretube ontheverticalaxisextrusion.
7. Attachthe leftstainless steelgussetplatetothelefthorizontal extrusionandtheverticalaxisextrusionusing thenine
(smallflat head) #4 x40flathead stainlesssteelscrewsand nuts. Attachtheleft horizontal mountingbracketto the
wall. Makesurethe bracket is perpendicular tothewall.
8. Placetheright horizontal extrusion ontotheverticalaxis extrusion. Use two ¼-20X2”hex head screws, washers
andlocking nutstoattach thelefthorizontalextrusionto thesquaretube ontheverticalaxisextrusion.
9. Attachthe rightstainless steelgussetplatetotherighthorizontal extrusionandtheverticalaxisextrusionusing nine#4
x40flat head stainlesssteelscrewsand nuts.
10. Attachthe righthorizontalextrusionwall mountingbracketto thewall. Again,make surethebracket isperpendicu-
larto thewall.
Mounting the Vertical Axis Extrusion
Installation on a Masonry Wall
It is very helpful to watch the “How To Install” video
http://www.youtube.com/watch?v=ZmZyR4oX7sM&feature=player_detailpage
1.Use a1/4”masonry drillbitto drillallholes intothewall.
2.Insert blueplasticanchorsintodrilled holesinthewall.
3.Followallotherinstructionsforawoodwallinstallation.

Onyx 90 Media Cutter
The World’s Best Media Cutter 828-388-5782
Important
In orderfor the machinetoworkproperly, thecuttingbedsmust be inline. Stand along thesideofthe
Onyx90and look downthecuttingbeds where the leftandrightcutting beds areattachedtothevertical
axisextrusion.Thecuttingbeds must not be bowedeither towardsthe wall orbowed awayfrom thewall.
Everythingmustbeinline. Thisnext adjustment will ensure that.
1. Loosenthefour1/4”x20x 2”screws and nuts located on the back of the vertical axis extrusion. Thefourscrews
arelocatedin the square tube attached totheverticalaxisextrusion. Do not remove thescrews-justloosen them
makingsurethat the safetyscrew& nut areinplace.
2.Loosenthe 5mountingscrewson theverticalaxisextrusion andloosenthe4 screws onthehorizontal wall brackets.
3. Usinga straightedgeplacedagainst thefrontofthe leftandright horizontalextrusions,push orpullas necessaryto
straightenand removeanygapbetweenthe straightedgeand thehorizontalextrusions.
4. Whilemaintainingthepushing/pullingaction,haveanassistant tightenthe fourscrews locatedinthesquaretubeon
theback ofthevertical axisextrusion.
Mounting the Media Clamp Assembly
1.Locatethe¼-20 tapped hole in thetopmountingbracketofthe bearing-tubes and cart assemblyunit.
2.Insertthe¼-20x23/4”screwofthetop mat clamp assembly into the tapped hole in the top mounting bracket of
thebearing-tubesandcart-assembly unit. Tightenthe ¼-20 x23/4”screwinto the hole and jamthenuttosecure.
3.Attachthebottomofthe mediaclampassembly to theT-nutintheleft horizontalextrusionusing¼-20 x1”screw
andlockwasher.
4.Adjustthe mediaclampassemblyso that itisthesame distance from theverticalaxisextrusion at thetopandbot-
tom.When thedistancesarethesame, tighten the screw to theT-nut.
5.Youhave completedtheassemblyand mountingofyournew Onyx90MediaCutter.
6.Doublechecktomake sure all screws and nuts are tight.
Squaring the Cutting Beds
Page 8
Onyx 90 Media Cutter
The World’s Best Media Cutter 828-388-5782
Page 9
5.0 Cutting Tool Holders
Awordabout safety – razorblades,plasticcutting tools and glasswheelscanall cut you.
Be careful whenhandlingthem. ALWAYSWEARSAFETYGLASSES.
Acrylic Cutting Tool Holder (with blue handle)
Plasticsupto 1/4” thickcanbe scored andfracturedonyour Onyx 90machine. Theplasticcutting tool holderutilizesa
double-endedcarbide insert toscoreyour plasticmedia. Thiscarbideinsert providesanextremely durable tool,lasting
manythousandsof cuts. Warning: thiscarbideinsert is very hardandsubjecttobreakage if dropped.
Replacementcuttingblades-PPFE-311
Toremovecarbideinsert,
1.Removethe slottedmachinescrewlocated in thecenterof theinsert withasmallscrewdriver.The carbide inserthas
twoends.The carbideinsertiscaptured via amachinedslot and cannotbecomemisaligned.
Glass Cutting Tool Holder (with red handle)
TheOnyx 90’sglasscutting toolincorporatesasix-positionturret whichcontains sixsolidcarbideglasscutting wheels.
Thisturretis numbered 1through6,giving you meanstokeeptrack of thenewandused carbide wheelsintheturret.
Replacementsixwheelturret - PPFE-7001
Attention:Ifthe turret retainingscrewis loosenedmorethan½ turn,thecarbide wheelsmayfalloff theaxlesand
becomelost. Whenreplacingorremoving the turret, always place a pieceofnewspaperorkraftpaperon your work
surfacebeforeyou begin. In caseawheelfalls off, itwillbeeasy to locate it.
To change to a new wheel (Old Style Tool Holder):
1. Loosentheturret retaining screw ½turnandindex the
turretto thenextposition.
2.Alignthenew wheelsothecenter of thewheelis
alignedwith the holemarkon thefaceof the toolholder.
Itis veryimportantthat theapex(highest point)ofthe
glasswheel is theonlypart oftheholderthat isincontact
withtheglass.
3.Tightenthescrew.
To change to a new wheel (New Style Tool Holder):
1.Loosen thesmallmetal turretretainingscrew ontheside
ofthetool holder ½ turn.
2.Loosenthe screwwiththeplastic turning knobonthe
backofthetoolholder.
3.Turntheturretto thenextavailable glasswheel.
4.Tightenthe screwwiththeplasticturning knob.
5.Then, tightentheturretretaining screwonthe sideofthe
toolholder.
ImportantTip
Toachievethemaximumutilizationfromyourcarbideglasscuttingwheels,thewheels
mustbekept welloiled.WD-40isagoodlubricantfor this purpose. Before each use
oneshould squirt theactivewheel witha“shot” of oil. Werecommendyou use asmall
plasticcontainer withawell oil-soakedclothinthe plasticcontainer. When thetoolis
notin use,placethetool inthecontainer withthewheelsdown againstthecloth. This
willensurethemaximumlife andbestresultsfromyourcarbideglasscuttingwheels.

Onyx 90 Media Cutter
The World’s Best Media Cutter 828-388-5782
Page10
Mat Board Cutting Tool Holder (with black handle)
Thistoolholder is used forcuttingmatboard, foam board, gatorboard,sentra,travicel, cardboardas well as many
othermedia.
Changing and Adjusting Blade Depth
Attention:Usecaution during this processsothat
yourhanddoesnotcomein contact with the
razorblade.
ChangingtheBlade
1. Loosenthe2screwsonthesideofthematboardcuttingtoolholder
2. Discardtheoldbladesafely.
3. Placeanewblade in the mat cuttingtoolholderandtightenthe 2 screws.
4. Notethereis small set screw to support the back of the blade (small arrow).
Replacement Blades
TheOnyx90 uses economical blades – Part Pro-42592
6.0 Using Your Onyx 90
Changing from one type of tool holder to another
Onceyouhave practiced afewtimes,we are sureyouwillagree that theOnyx90’stoolinterlock system allowsyou
veryfast toolchange.
To insert a tool holder into the machine
1. Holdthetoolholderby the handle and place the tool ontothegroovesinthepivotarm.
2. Noticethaton the toolholderthereis a locking rollpinlocatedon the bottomfrontofthe tool holders. Thislocking
pinmust engageorfitintoa matchinggrooveonthepivot arm.
3. Slidethebottom of the tool holderpinintothegrooved pivot arm, pull backanddownonthe spring loaded handle.
Itwilllockinplace.
To remove a tool holder from the machine
1.Liftup on the toolhandleandremove the tool.

Onyx 90 Media Cutter
The World’s Best Media Cutter 828-388-5782
Page11
UsingtheOnyx90 CuttingTools
Cutting Glass
Attention: Rememberto weareyeprotection, glovesandprotectiveclothingwhenhandlingglass.
1. Ifyou use themediaclamp assembly whencuttingglass, place ontheglass very carefully. Manypeopledon’tuse
themediaclampforcuttingglass.
2. Placeyourglass on the leftsideofyour Onyx 90 machine.
3. Placetheglass cutting toolholderonthe pivot arm.
4. Thelargerpiece of glass shouldbeontheleft side of thecutandthesmaller piece of glassshouldbeonthe right side
ofthecut.
5. Useeither therightor leftmeasuringscale onthehorizontal axisextrusionsas necessary.
6. Placeyourleft hand on theglass-applyholding pressure.
7. Withyourrighthand,pull backthehandle.
8. Raise the cutting cart to the topedgeof the glass.
9. Lowerthehandleandplace the glass cutting wheel on the topedgeoftheglass.
Youcan nowtakeadvantageofonethe Onyx 90’sbest features.Youcan vary theamountofpressure
neededtomake an efficientscorejustby adding more orlesspressure. Noglobal machine adjustmentis
necessary.
10. With one slow,smooth,continuous motion, pulldownthe cutting cartpastthebottom edge oftheglass.
11. Youhavejust“scored”the glass. Onlyscoreglassonetime.
12. With your lefthand,applyslight pressureonthebottom leftedgeofthe glassnearthescore.Withyourright thumb,
apply increasingpressureon the bottom right edge of glassnearthescoreuntiltheglass separates.
13. Thebreakwilloccur at the bottom of the score line and run up to the top of the scoreline. The break chases the
score. Youmaydevelopyourownbest technique.
Cutting Mat Board
TheOnyx90 will cut up to 5/8”deep. Whencuttingmaterialsthat deep, a sharp bladeandsuccessivecutsin same
groovearenecessary. The media clamp can not be used on thicknesses greaterthat1/4”. Theuseofthemediaclamp
isnot mandatory,butonthin media,itwillreduce thechanceofmedia buckling.Where itisdeemednecessary tohavea
finecutedge,a slip sheet under the cutsheetmaybedesired.
1.Placethe mat board cutting toolholderonthepivot arm.
2.Slidethe media to becutontotheleft cutting bed oftheOnyx90.Use the right orleftmeasuringscaleas necessary.
3.Pull backthehandleon thecuttingcart untilitlocks.
Youcan nowtakeadvantageofonethe Onyx 90’sbest features.Youcan vary theamountofpressure
neededtomake an efficientscorejustby adding more orlesspressure. Noglobal machine adjustmentis
necessary.
4.Withone slow,smooth,continuous motion,pulldownthe cuttingcartpastthe bottomedgeofthe media.
5.Releasethe mediaclamp.
Onyx 90 Media Cutter
The World’s Best Media Cutter 828-388-5782
Plasticfracture
swingarmhandle
Page12
Cutting Plastic
Onyx90 willcutor“fracture”sensitive plasticupto1/4”thick. This includes acrylic,polycarbonate,“Plexiglas”etc.
1.Placethe plastic cuttingtool holderonthe pivot arm.
2.Slidethe media to becutontotheleft cutting bed oftheOnyx90.Use the right orleftmeasuringscaleas necessary.
3.Engagethemediaclampbylifting,pushingforward andlowering theclampintoposition.
4.Pull backthehandle ofthecuttingcart untilitlocks.
5.Raisethe cuttingcarttothe upper edgeofthe fracture sensitiveplasticmedia.
6.Release thehandleusing thethumbrelease.
You can now takeadvantageofoneoftheOnyx 90’sbest features.You can vary the amount ofpressure
neededtomake efficientscoresjustby adding moreorless pressure. Noglobalmachineadjustment is
necessary.
7.Withone slow,smooth,continuous motion,pulldownthe cuttingcartpastthe bottomedgeofthe media.
Note: youwill hearagouging soundofthe material.
8.Repeatthis procedure twoorthreetimes, depending upondensityofmaterial being scored.
9.To fracture or “crack” the plastic, raise the cuttingcarttothetopedgeofthe plastic.
10.Push in ontheplasticfracture swingarm handle. Atthesame time, alignthewhite rollers withthetop edge ofthe
fracturesensitiveplastic.Whileapplyingincreasingpressuretotheplasticfracture,swingthearmhandleuntilyouhear
theplastic snap.
11. Continuetohold thepressureon theplasticfracture swingarmhandlewhilepulling downthecutting cartpastthe
bottomofthefracture sensitiveplastic inoneslow,smooth continuousmotion.
12.Releasethe mediaclamp.
13.Removetheplasticfrom the Onyx 90 and separate thetwoplasticpieces.
Onyx 90 Media Cutter
The World’s Best Media Cutter 828-388-5782
Page13
Using the Media Clamp
Themedia clamp requiresonlyone handtooperate. Simplylift uptheclamp from itsrestposition andmoveittowards
themedia tobeclamped. Gravitywill pulltheclamp downwardandsecurely lockyourwork againstthestainlesssteel
gussetplate. The clampisreleased byliftingup thehandleand returningtheclamptotheresting position.Themedia
clamphas arubberblanket thatwillhold yourmediavery securely. Ifyoucut largesize(1/2”thick) material,youmay
wantto purchasethe optionalhorizontalmediaclamp.
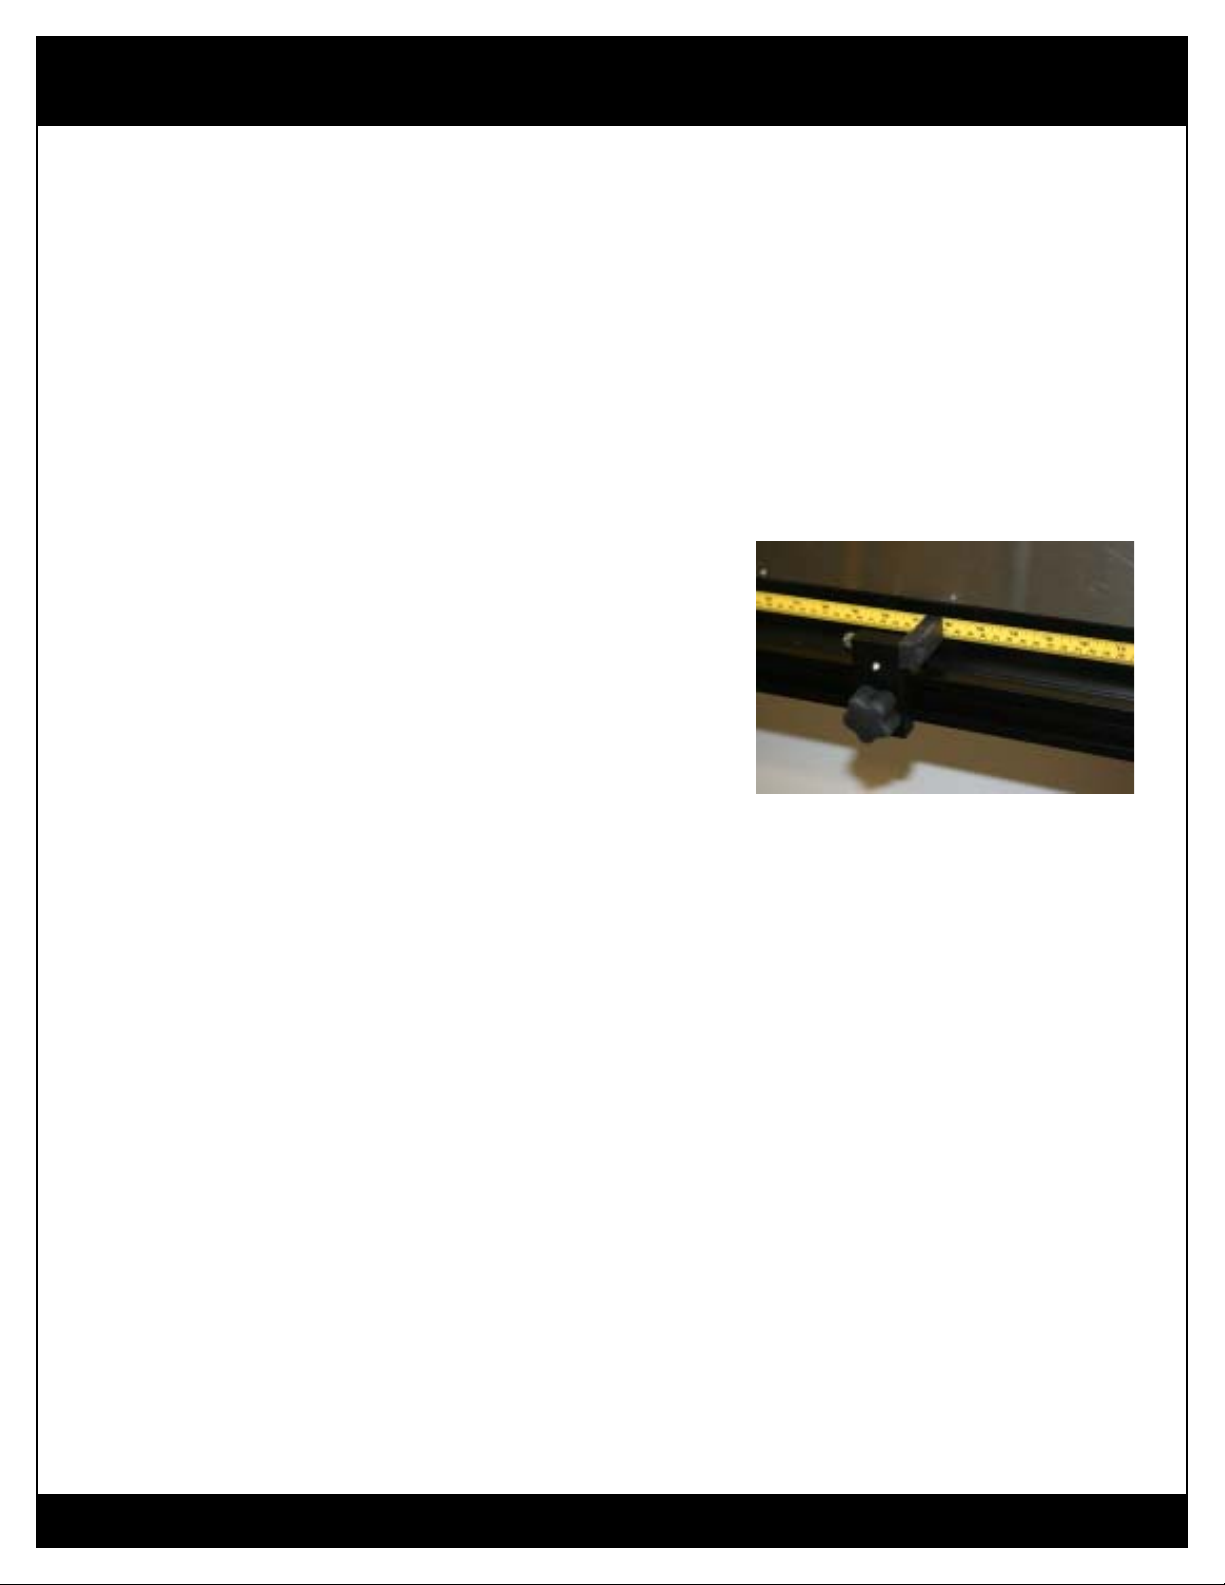
UsingtheProductionStop
Theproduction stop isusedwhen you aremakingseveral consecutivecutsofthe samedimension. Theproductionstop
canbe placedoneither theleftorrighthorizontal extrusion.
1.Simply loosen theplasticlocking knobandinsert theT-nutand
productionstopinto thechannellocatedat thefrontofeither the leftor
righthorizontal extrusion.
2.Rotate theplasticarmuntilitisagainst themeasuringscale.
7.0 Routine Maintenance
1.Brush alldebrisfrom boththeleft andrightcutting beds.
2.Make sure allnutsand boltsremaintight.
3.Donot oil the machine. Use awaxbasedfurniturepolish such as Pledgetoclean.
8.0Adustments-should they become necessary – but not likely
SquaringtheMachine -making the cutting beds perpendicular to the vertical axis extrusion
Your Onyx 90 was squared at the factory and should not require you to make any adjustments.
Ifforsome reason youfinditnecessary to make thisadjustment,hereare the steps:
Tools Needed: Anassistant
builder’ssquare
2 - 7/16” open-end wrench
2 - 9/16” open-end wrench
Onyx 90 Media Cutter
The World’s Best Media Cutter 828-388-5782
Mat cutting blade
resting against
builder’s square
Mat cutting blade
resting against
builder’s square
Page14
Step 1
Thereare twoboltseachonthe rightandlefthorizontalextrusion thatpreventthecuttingbeds frommovingif someone
putsaheavy weight on theendsofthe cutting beds -safetyfeature.
Loosen the jamnutsand bolts beforemakingany adjustmentstoeitherthe leftortheright cuttingbed.
Step 2-SquaringtheLeft Cutting Bed
1.Laythe builder’ssquare on theleftcuttingbed.
2.Put the matcuttingtool in the toolholder. The horizontalportionofthe builder’s square shouldberesting on theleft
cuttingbed.The vertical portionofthe builder’s squareshouldberesting -justtouching thematcuttingrazor blade.
Withoutmovingthebuilder’ssquare,raise the cuttingcartto thetopofthe verticalportionof thebuilder’s square.The
distancefromthe blade to thebuilder’s square mustbethesameat the topandbottomthroughoutthe cutting cart’s
travel.
3.Ifthere is a gap atthetopof the builder’ssquare/blade intersection, then youmustloosenthe jam nut on theleftside
ofthelefthorizontalextrusion. Tightenthe3/8”boltslightlyuntilthegapdisappears.Tightenthejamnut.
4.Ifthereis a gap at thebottomofthebuilder’s square/blade intersection,thenyoumustsquare the left cutting bedthe
otherdirection. Loosen thejamnutonthe leftsideoftheleft horizontalextrusion.Youmustloosen the3/8”boltslightly.
Thiswillchange thegap.Thegapmustbe thesameatthe topandbottomof thebuilder’s squarethroughoutthecutting
cart’s travel.Recheck.
5.Once thegapisthe same,tightenthe jamnut. Youhavecompletedsquaring thelefthorizontalcutting bed.
Step 3- SquaringtheRightCuttingBed
1.Placethe builder’s squareontheleft cutting bed andslidethebuilder’ssquare over totherightcutting bed. There
shouldbeno gapunderthebuilder’s square ontherightcutting bed.
2.Ifthere is agapunderthebuilder’s square ontherightcutting bed, loosenthetwojam nuts undertherighthorizontal
extrusion.Adjustthetwo3/8” boltstomake thesurfaceof therightcuttingbed flushwiththe bottomofthe builder’s
square. Thebuilder’ssquareshouldslidefromleft-to-rightand right-to-leftwithouthittingeithercutting bed.

Onyx 90 Media Cutter
The World’s Best Media Cutter 828-388-5782
3.If thebuilder’s squarehitstheleft orrightcutting bed,youwill need toadjustthe elevationofthe innermostbolton
theright cutting bed. Adjustthe3/8” bolt asneededso thatthebuilder’s square willtravelfrom left-to-right andright-
to-leftwithouthittingeithercuttingbed.
4.Tightenbothofthe rightcuttingbed jamnuts.Recheck.
Setp4-Finish Squaring theCutting Beds
1.Tightenthe 1/4 x20screws.
2.Bringthejam nutsuptothebottomofthehorizontalextrusion andlightlytightenthejamnuts.
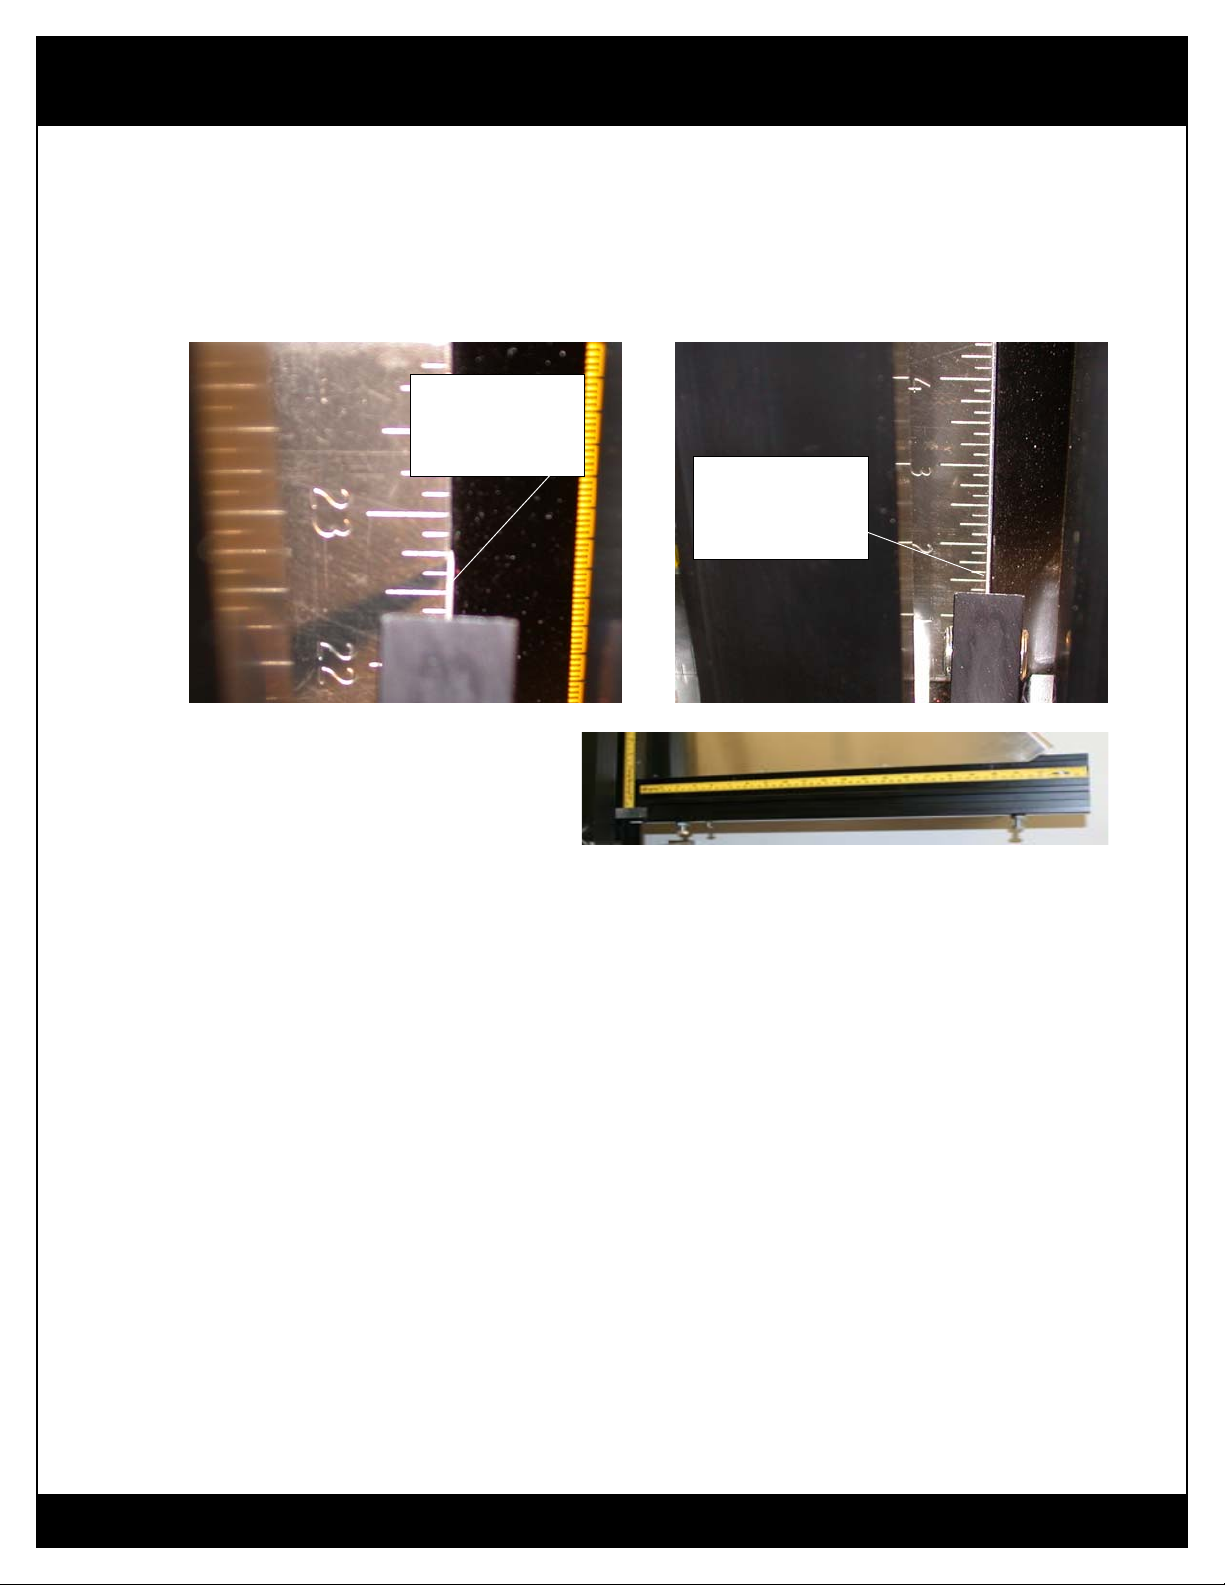
Calibration of the Measuring Tape Scales
Thehorizontaland verticalmeasuringtapescales have beensetatthe factory. Wehavesecuredthe measuring tape
scalesusinga smallscrewandnut applied attheoutside ends ofthemeasuringtape scales.Ifforsome reason youfindit
necessarytomakethis adjustment, here are the steps.
1.Position themeasuringtapescalewhere youfeelit shouldbebyslidingit intheextrusion.
2.Oncein position, re-tightenthescrewand nut.
Global Adjustment of the Cutting Spring Pressure
Thisadjustmenthas been set atthefactory. If for somereasonyoufind it necessary tomakethisadjustment,here are
thesteps:
1.Remove allcuttingtool holdersfromthe cart.
2.Thespring tension adjustmentnutislocatedbetween the bearingtubesonthe very bottom ofthecart. Thisadjust-
mentisbest done ifthebottomof the cuttingcartiselevated. Youshould have anassistantsecurelyhold the cartatthat
elevation. Donottry to holditandadjust by yourself.
3.Usinga7/16” nut driver or deep-wellsocket,reachbehindthe cart from the righthandsideandslide the tool onto
thespring tensionadjustmentnut.If moretension isdesired, tightenthespringtensionadjustment nut. Iflesstensionis
desired,loosenthespring tensionadjustment nut. Thisnut hasaninternalnylonlockingringtokeepitfrommoving.
4.Once youmove it,thenutwillstay inthatpositionuntilyoumoveit again.
5.Inserttheglass tool into the cutting cartandtrythenew pressure. Adjust as required.
Page15

Onyx 90 Media Cutter
The World’s Best Media Cutter 828-388-5782
Springtension
adjustingnut
Page16
Adjustment for Depth of Cut
Thisadjustmenthas been set atthefactory. If for somereasonyoufind it necessary tomakethisadjustment,here are
thesteps:
1.Lookat the handlelocatedonthe cutting cart.Noticea lower handleretainingscrewand an upperhandleretaining
screw. Thesetwoscrewsarecounter-boredintothehandleandattachthehandletothecuttingcart. Just above the
upperhandle retaining screw, youwillseea thirdcomboheadscrew
orallen setscrew. Thisthird screwisthe “adjustmentlocking
screw.”
2.Loosen theadjustmentlocking screwuntil youcaninsert alarge
phillipsheadscrewdriverintotheslot ofthe upperhandle retaining
screw.
3.Insert the glasscuttingtool onto toolpivotarm.
4.Release thehandlewiththe thumbreleaseand allowtheglass
cuttingtool tobottom.
5.Withthe handle inthereleasedorbottomed position, rotate the
upperhandleretaining screw clockwisetodecrease thedepth.
6.Rotatethe upper handleretainingscrew counter clock
wisetoincrease the depth. After you have made the
adjustmenttothe cuttingdepth,besure topushthehandle in
sothatitis resting on the newadjustedstopdistance.
7.Recheckand tighten the adjust-
mentlockingscrew.
Newversionuses allen headset
screw.
Upper handle
retaining screw
Lower handle
retaining screw
Adjustment
locking screw

Onyx 90 Media Cutter
The World’s Best Media Cutter 828-388-5782
Page17
9.0 Troubleshooting
When cutting glass, the glass cutter jumps or skips.
Causes: Dirtyglass Clean glass
Wornglasswheel
Rotate to new wheel
Too littlepressure
Adjust by applying slight pressure with hand
Oil the active wheel
Shardsof glassimparingproper rotationofglasswheel
Blast with aerosol such as WD-40
When cutting glass, chipping or flaking occurs.
Cause: Too much pressure
Oil the active wheel. You may be applying too much pressure on the handle.
Pull back on the handle during cut.
Too much pressure will shorten wheel life.
Never score twice.
When cutting plastic, it skips and/or chatters.
Causes: Scoringtoo fast
Slow down the stroke speed
Scoringtool broken
Rotate cutter if you have not done so previously
Toomuchpressure
Reduce pressure slightly on handle
Notusingmediaclamp
Use media clamp
ImportantTip
Toachievethemaximumutilizationfromyourcarbideglasscuttingwheels,thewheels
mustbekept welloiled.WD-40isagoodlubricantfor this purpose. Before each use
oneshould squirt theactivewheel witha“shot” of oil. Werecommendyou use asmall
plasticcontainer withawell oil-soakedclothinthe plasticcontainer. When thetoolis
notin use,placethetool inthecontainer withthewheelsdown againstthecloth. This
willensurethemaximumlife andbestresultsfromyourcarbideglasscuttingwheels.

Onyx 90 Media Cutter
The World’s Best Media Cutter 828-388-5782
Page18
When cutting mat board, the mat board buckles.
Causes: Matboardnotclamped
Use media clamp
Bladetoodull
Change to new blade
The cut edge of mat board is frayed.
Causes: Dullmatcuttingblade
Change to new blade
Noslip sheet undermediabeing cut
Use slip sheet
When I make my cuts, the dimensions are incorrect.,
Cause: Themeasuringscaleisoff
Recalibrate the measuring scale
The cut edge is not square - not a 90 degree cut.
Causes: Debrisbetween the mediaandcutting bed
Remove debris
Cuttingbed isnot perpendiculartoverticalextrusion.
Square the cutting bed -Not likely-
You are very important to us. Our success depends on your
satisfaction. If you are having any problems or have any
comments, please call us at 828-388-5782.
Onyx 90 Media Cutter
The World’s Best Media Cutter 828-388-5782
Onyx 90 Product Registration CardOnyx 90 Product Registration Card
Onyx 90 Product Registration CardOnyx 90 Product Registration Card
Onyx 90 Product Registration Card
Registering your Onyx 90 media cutter is essential to ensure that you validate your warranty and receive all the
benefits of product ownership.
Date of Purchase ______________________________________________________________________
First Name ___________________________________________________________________________
Last Name ____________________________________________________________________________
Street Address _________________________________________________________________________
Street Address _________________________________________________________________________
City, State, Zip _________________________________________________________________________
Email Address _________________________________________________________________________
Phone Number _________________________________________________________________________
Serial Number __________________________________________________________________________
Mail to Professional Picture Frame Equipment
441 South Whitted Street
Hendersonville, NC 28739
Fastest tool change in the industry Cuts mat board, gator board, glass and acrylic
Anodizedaluminumandstainlesssteel Built to lasta lifetime
Oilimpregnatedbronzebushings FedEx/UPSshippable
Ultrahighmolecularweight polyethylene bearings Five yearwarranty
Productionstopincluded Stainlesssteelwallmounting brackets
Cuttingdepth5/8inches Carbideplastic cutter
Built-inmatboardandacrylicclamp Made in the USA
Page19
Other manuals for Onyx 90
1
Table of contents
Other Professional Picture Frame Equipment Cutter manuals


