Professional Picture Frame Equipment Onyx 90 User manual

Onyx 90 Media Cutter
The World’s Best Media Cutter 828-707-5848
Know Your Onyx 90 Media Cutter
Professional Picture Frame Equipment
1237 Shipp Street
Hendersonville, North Carolina 28791
Vol.411
Owner’s Manual
Page number 1

Onyx 90 Media Cutter
The World’s Best Media Cutter 828-707-5848
Congratulations
and thank you! You have just purchased the best wall mounted media cutter in the
world. The Onyx 90 will provide you with many years of dependable service with
only minimal maintenance.
We know you are anxious to begin using it. But before you do anything, please
take the necessary time to read and understand this manual. It will answer a lot of
your questions and avoid possible problems.
Table of Contents
1.0 Safety Precautions & Recommendations...................Page 3
2.0 Registration & Warranty.............................................Page 3
3.0 KnowYour Machine...................................................Page 3
4.0 Installation of the Onyx 90.........................................Page 5
5.0 Cutting Tool Holders..................................................Page 9
6.0 Using the Onyx 90......................................................Page 9
7.0 Routine Maintenance..................................................Page 13
8.0 Adjustments................................................................Page 13
9.0 Troubleshooting..........................................................Page 17
Page number 2

Onyx 90 Media Cutter
The World’s Best Media Cutter 828-707-5848
1.0 Safety Precautions & Recommendations
WhenusingtheOnyx90,basicsafetyprecautionsshouldalwaysbefollowedto
eliminatetheriskofdamageorinjurytopersonsormaterials.
Wearsafetyglasses,glovesandprotectiveclothing.
Use caution when using, transporting, storing or disposing of dangerous objects, such as
cuttingtools,glass,etc.
Makesurethemachineismountedsecurely. Many situations exist that we can not predict,
butitiscriticalthatyourOnyx90isattachedsecurelyandsolidlytothewall.
Keepthemachineand the work areaaroundthemachine clean.
Neverplaceyourhandorfingersbehindthemediaclamp.
For what it is worth – be safe!
2.0 Registration & Warranty
Your Onyx 90 hasa 5 year manufacturer’swarranty from thedateof purchase. Please
takeamoment to completeandmail the enclosedwarrantycard. Proof of purchasemustbe
submittedwiththewarrantycard.
Professional Picture Frame Equipment warrants the Onyx 90 to be free from defects in workmanship and parts for 2 years from date of purchase.
Professional Picture Frame Equipment warrants it will repair or replace any defective parts. The Onyx 90 must be subjected to normal use and
service. A return merchandise authorization (RMA) must be requested from Professional Picture Frame Equipment before returning.
This warranty is in lieu of all other agreements. Professional Picture Frame Equipment is not liable for any damages or losses, incidental or consequen-
tial, direct or indirect, arising out of the use of this product.
3.0 Know Your Machine
3.1 Diagram of Parts Vertical axis
Top hanging
Bottom hanging
Cutting
Left
horizontial Left stainless
steel gusset
Mediaclamp
Page number 3

Onyx 90 Media Cutter
The World’s Best Media Cutter 828-707-5848
3.2 List of Parts That Were Shipped
Box 1 (Large cardboard shipping box)
Media Clamp Assembly
Bearing-tubes and CartAssembly Unit
Left Horizontal Extrusion
Vertical Axis Extrusion
OwnersManual
StainlessSteelGussetPlates(2)
RightHorizontalExtrusion
VerticalWallMountingBrackets(2)
HorizontalWallMountingBrackets(2)
HardwarePackets (4)
ToolingPackage
GlassCuttingToolHolder
MatBoardCuttingTool Holder
PlasticCuttingToolHolder
ProductionStop
SpareMatCuttingBlades
Bearings-tubes and
cart-assembly unit
Horizontal mounting
brackets
Bottom hanging
bracket
Top hanging
bracket
Media clamp
assembly
Left stainless
steel gusset
plate
Right stainless
steel gusset
plate
Left horizontial
extrusion Right horizontial
extrusion
Page number 4
Onyx 90 Media Cutter
The World’s Best Media Cutter 828-707-5848
4.0 Installation
4.1 Tools you will need to collect before beginning
An assistant
Ladder
Level, preferably at least 3 ft long
Electric drill/screwdriver with either ¼ masonry drill bit or 1/8” wood bit
Hammer
Phillips head screwdriver, large
Tape measure
Straightedge, 36” or longer
Builder’s square
Pencil
4.2 Step-By-Step Instructions
These written instructions are provided as well as a DVD video which requires Windows
MediaPlayer. Thevideo and thisOwnersManual are also availableonthe Internet.
First: Determineon whattype ofwall youwill beinstalling yourmachine -wood or masonry?
Followappropriateinstructions.
Second: Determine your personal working height.
4.3 Cutting Bed Elevation Chart
Generally speaking, most framers determine the cutting bed height (the height that your
media rests on) of their machine as influenced by two factors: employee’s work height,
and the weight and size of the materials to be placed onto the cutting bed of the Onyx
90. For example, if you are tall, then mounting the machine higher may be better for
you. If youprocess a lot of large sized glass, acrylic, or other sheet materials, you may
finda lowercuttingbedheightbetter. Always thinkofsafetywhenlifting andprocessingyour
materials.
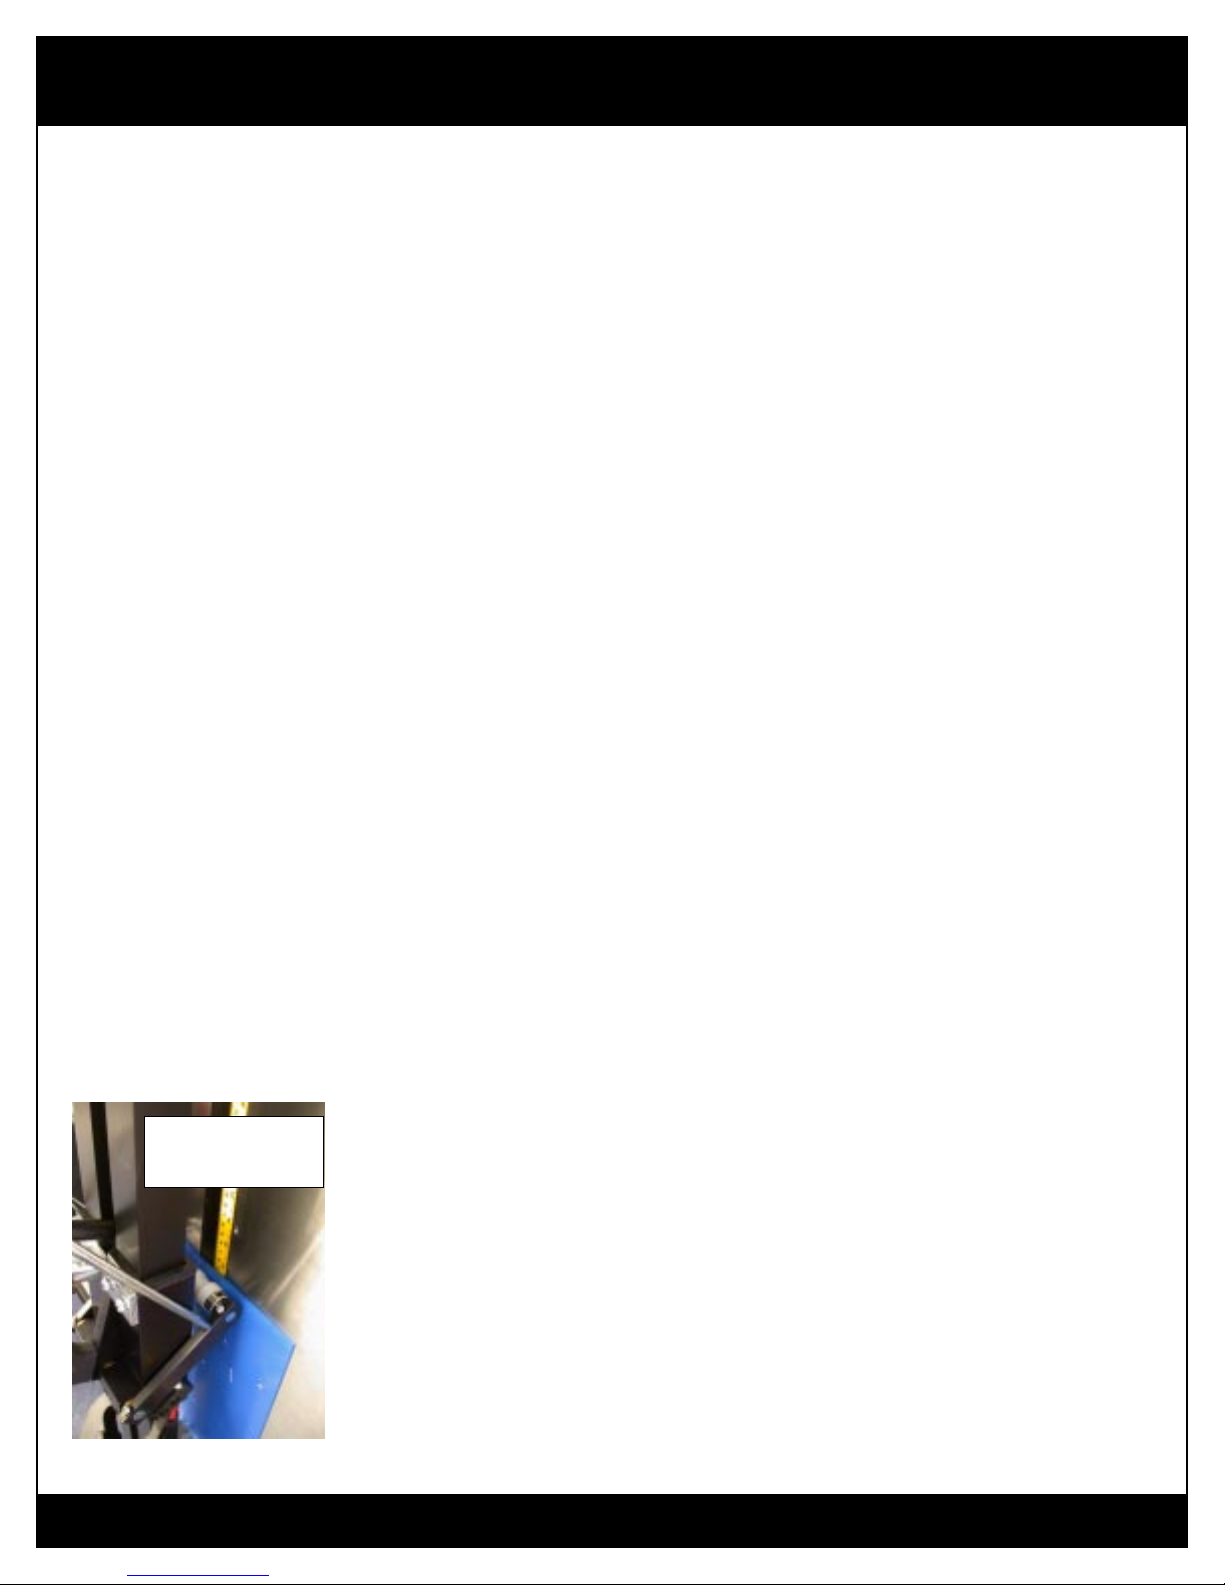
Builders
square
Page number 5
Matcutting tool Glasscutting tool Acryliccuttingtool
Black Handle Red Handle Blue Handle

Onyx 90 Media Cutter
The World’s Best Media Cutter 828-707-5848
Fromthefollowingchart,youchoosethecuttingbedheightsuitedforyou. Onceyouhavedetermined
yourcutting bed height, thischartwillindicatethemeasurementofthe top hole ofthetophangingbracket.
The following measurements are measured vertically, from the floor up.
Cutting Bed Height Top hole of the top hanging bracket
33 inches above the floor 93 inches above the floor
32 inches above the floor 92 inches above the floor
31 inches above the floor 91 inches above the floor
30 inches above the floor 90 inches above the floor
29 inches above the floor 89 inches above the floor
28 inches above the floor 88 inches above the floor
27 inches above the floor 87 inches above the floor
26 inches above the floor 86 inches above the floor
25 inches above the floor 85 inches above the floor
Note: If you have an 8' ceiling, the maximum cutting bed height will be 31” from the floor.
4.4 Installation on a Masonry Wall
1. Use a 1/4” masonry drill bit to drill all holes into the wall.
2. Insert blue plastic anchors into a drilled holes in the wall.
3. Follow all other instructions for a wood wall installation.
4.5 Installation on a Wood Wall
4.5.1 Mounting the Vertical Mounting Brackets
1. Remove protective polyethylene film from all the stainless steel parts.
2. Locate a vertical stud on the wall.
3.Using a level, draw a vertical line 94”inlengthonthewalltothefloor.
4.Drilla1/8”pilot hole on theline91”fromthefloor. (See above chart todetermine
yourpersonalworkingheight.)
5.Usingthetophanging bracket as atemplate,centerthetophole of the tophanging
bracketoverthedrilledhole on the line.Tracetwo circlesforthetwolowerholes.
6.Removethebracket/templateanddrillthetwolower1/8”pilotholes
7.Placethe top hangingbracketover the holesandusing the screwsand washersfrom
Page number 6

Onyx 90 Media Cutter
The World’s Best Media Cutter 828-707-5848
thebracket hardware package,mountthe top hangingbracket in allthreeplaces.
8. Measure 29 1/4” down from the bottom of the top hanging bracket and place a
mark on the vertical line.
9. Place the top of the bottom hanging bracket on that measurement line – the one you
just marked at 29 1/4”.
10. Using the bottom hanging bracket as a template, center the two holes in the bottom
hanging bracket over the vertical line.
11. Trace the two holes with a pencil.
12. Remove the bottom hanging bracket / template, and drill the two 1/8” pilot holes.
13. Place the bottom hanging bracket over the holes and using the screws and washers
from the bracket hardware package, mount the bottom hanging bracket to the wall.
14. Check to verify that the top and bottom hanging brackets are in line with each other
and plumb.
4.5.2 MountingtheVerticalAxisExtrusion
1. Placethevertical axis extrusionwiththe two flanges onthetop bracket andinsertthe
safety screwand nut.The screwis ¼-20X 1½” long.
2. Liftandsituatetheverticalaxisextrusionsothat
theflangesonthebackoftheverticalaxisextru
sion straddlethe top and bottom brackets.
3. Lightlytightenthefivescrewsontheverticalaxis
extrusion.Therewill beafurtheradjustmentlater.
4. Retrievethe left horizontal extrusion – it is marked.
5. Attachthelefthorizontalextrusiontotheleftmounting
bracket.Left andrighthorizontalmountingbracketsare identical.
6. Placethelefthorizontal extrusion onto theverticalaxisextrusion. Use two ¼-20 X
2”hex head screws, washersandlocking nuts tomaketheattachment.
7. Attachtheleftstainlesssteelgussetplatetothelefthorizontalextrusionandthe
verticalaxisextrusionusingthenine#4x40flatheadstainlesssteelscrewsandnuts.
8. Attachthelefthorizontalmounting bracket to thewall.Makesurethebracket is
perpendicularto thewall.
9. Placetherighthorizontalextrusion onto the verticalaxisextrusion. Usetwo¼-20X
2”hexheadscrews, washers and lockingnutstomake the attachment.
10. Attach therightstainlesssteelgusset plate to the righthorizontalextrusionandthe
verticalaxis extrusion using nine #4 x 40 flatheadstainlesssteelscrewsandnuts.
11. Attachtherighthorizontalextrusionwallmountingbrackettothewall.Again,make
surethe bracket is perpendiculartothe wall.
Page number 7

Onyx 90 Media Cutter
The World’s Best Media Cutter 828-707-5848
4.5.3 CuttingBedAdjustment
Inorderforthemachinetowork properly, the cutting bedsmustbeinline.When you stand
alongthesideoftheOnyx90,look down the cutting beds,
wherethe left and right cutting beds attach tothevertical
axisextrusion,thecuttingbedsmustnotbebowed either
towardsthe wall or bowed awayfromthe wall. Every
thingmustbeinline. Thisnextadjustmentwilldothat.
1. Loosen the fourbottom-most screws locatedonthe back
oftheverticalaxisextrusion.
2. Using a straightedge placedagainstthefrontoftheleftand
righthorizontal extrusions, push orpullasnecessarytostraightenandremove any gap between
thestraightedgeandthehorizontalextrusions.
3. Whilemaintainingthepushing/pullingaction,haveanassistanttightenthefourbottom-most
screwslocatedonthebackofthe vertical axis extrusion.
4.5.4 Mountingthe Bearing-tubesand Cart-assemblyUnit
1. Placethebearing-tubesandcart-assemblyunitontotheverticalaxis
extrusion. Thetop andbottomofthisunit willfitpreciselyonto
the machinedsurfacesoftheverticalaxisextrusion.
2. Attachthebearing-tubesandcart-assembly unit with thefour5/16-
18”X 3/4” hexscrews and washersprovided.
4.5.5 Mountingthe MediaClampAssembly
1. Locatethe ¼-20 tappedhole inthe top mounting bracketof the bearing-tubesand cartassem-
bly unit.
2. Insert the ¼-20 x 23/4” screwof the top mat clampassembly into the tapped holein thetop
mounting bracket of the bearing-tubesand cart-assemblyunit. Tightenthe ¼-20 x 2 3/4”
screwinto the holeand jamthe nut tosecure.
3. Attachthe bottomofthemediaclamp assemblytotheT-nutinthelefthorizontal extrusionusing
¼-20 x 1” screw and lock washer.
4. Adjust the mediaclampassemblysothatit is thesamedistancefromthevertical axis extrusion
at thetop and bottom.When the distancesare the same,tighten the screwto the T-nut.
5. You have competed theassembly and mountingof your newOnyx 90 MediaCutter.
6. Double check tomakesureall screws and nutsaretight.
Page number 8

Onyx 90 Media Cutter
The World’s Best Media Cutter 828-707-5848
5.0 CuttingToolHolders
Awordaboutsafety– razor blades, plastic cuttingtoolsandglasswheelscan all
cutyou –becarefulwhenhandling them.
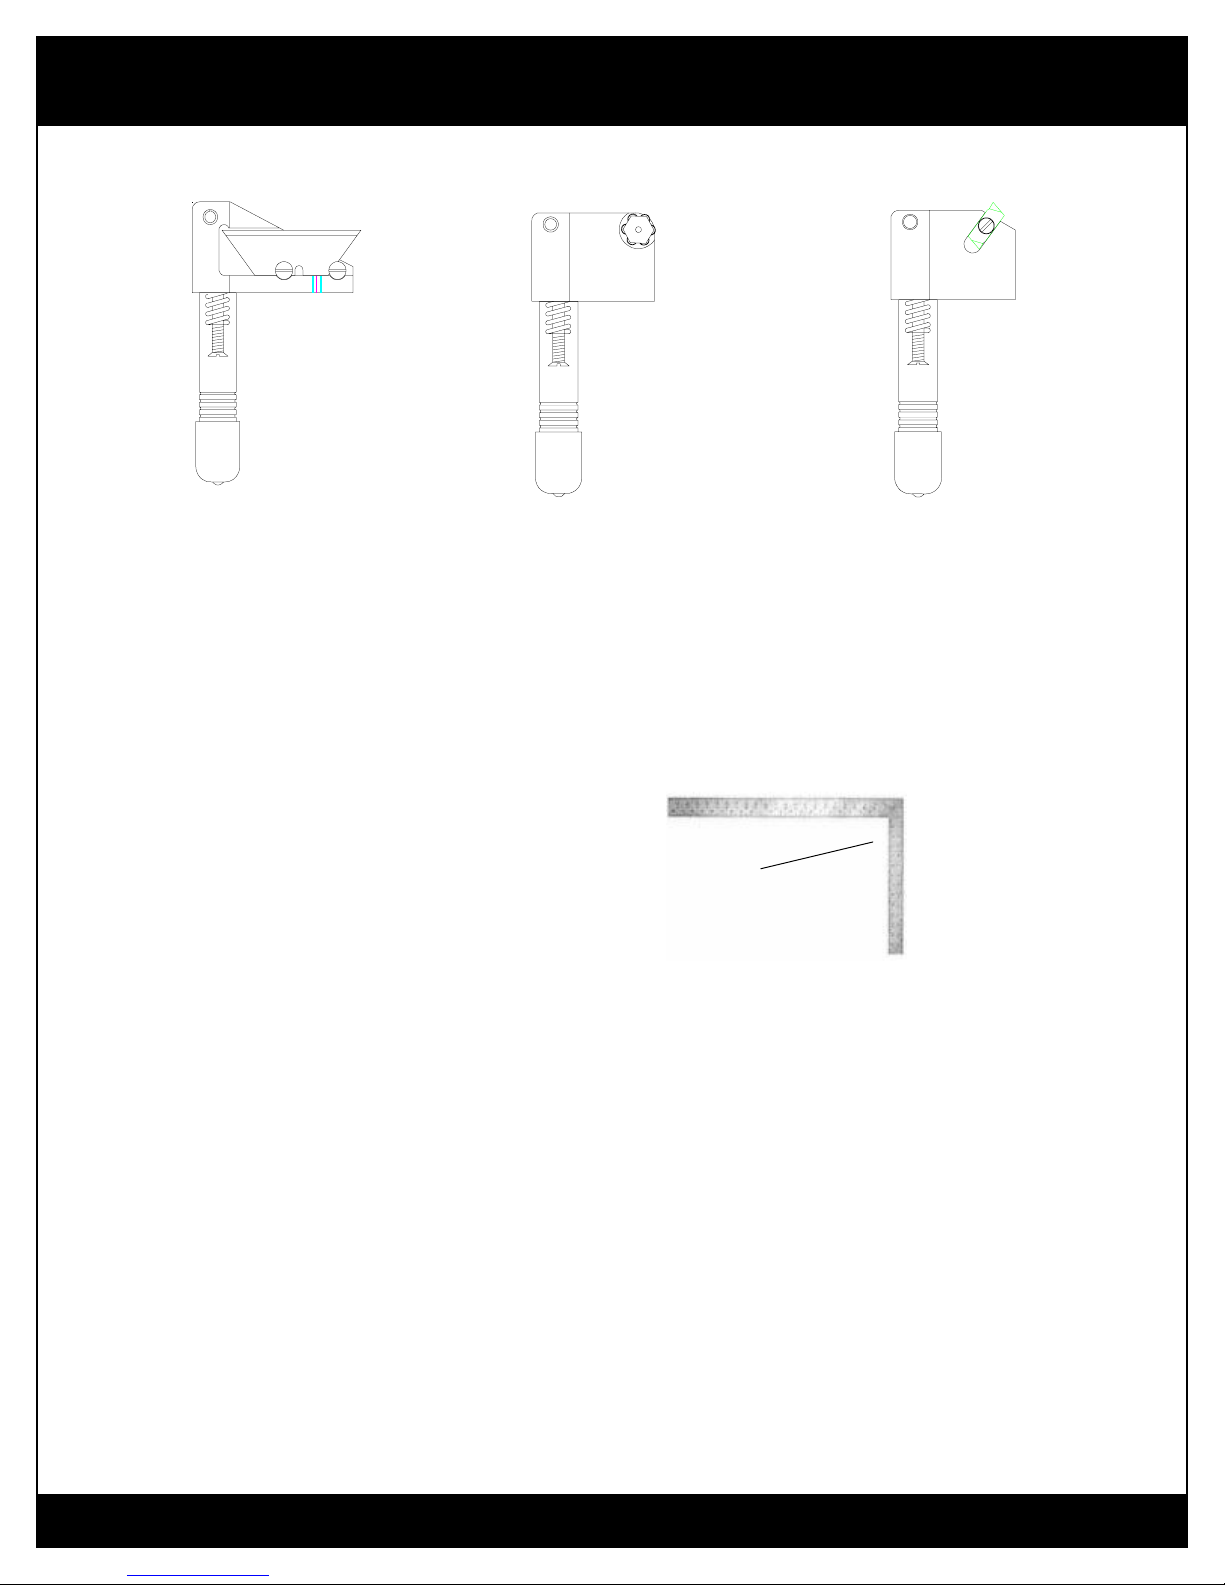
5.1 Acrylic Cutting Tool Holder (with blue handle)
Plasticsup to 1/4”thickcan be scoredand fractured onyourOnyx 90 machine. The
plasticcutting tool holder utilizes a double-ended carbide inserttoscoreyourplastic
media. Thiscarbide insertprovidesanextremelydurable tool,lastingmanythousands
ofcuts. Warning- this carbideinsert is veryhard and subject tobreakage if dropped.
5.1.1 To remove carbide insert, remove the slotted machine screw located in the center
ofthe insertwithasmallscrewdriver.
5.1.2 Thecarbide insert has two ends. Rotateend forend (if you haven’t doneso
previously)andreplacethecarbideinsertin tool holder.Thecarbide insertiscap
turedvia a machined slot and can not becomemisaligned.
5.1.3 Re-inserttheslottedmachinescrew and tighten.
5.2 Glass Cutting Tool Holder (with red handle)
TheOnyx 90’sglasscuttingtoolincorporatesa six-positionturretwhichcontains
six solid carbide glass cutting wheels. This turret is numbered 1 through 6,
givingyoumeansto keep track ofthenewand used carbide wheelsintheturret.
5.2.1 To change toanew wheel, simply loosentheturret retaining screw ½turnand
indextheturrettothenextposition.
5.2.2 Alignthenewwheel so the centerofthewheel is aligned withthecrossmark on
thefaceofthe tool holder.
5.2.3 Tighten thescrew.
Attention: If the turret retaining screw is loosened more than ½ turn, the carbide
wheels may fall off the axles and become lost.
5.3 Mat Board Cutting Tool Holder (with black handle)
Thistoolholderis used for cuttingmatboard,foam board, gator board,sentra,travicel,
cardboardaswell as many othermedia.
Page number 9

Onyx 90 Media Cutter
The World’s Best Media Cutter 828-707-5848
5.4 Changing and Adjusting Blade Depth
Attention:Use cautionduring thisprocess sothat yourhanddoes notcome incontact withthe
razorblade.
5.4.1 Changing the Blade
1. Loosen the adjustable set screw on the side of the mat board cutting tool holder
2. Discard the old blade safely.
3. Placeanew blade inthemat board cuttingtoolholder and tightentheset screw
withthe ¼”allenwrenchprovided.
5.4.2 Adjusting blade depth
Thereisa phillips headsetscrew and jamnutlocated on thebackof the mat
board cutting tool holderwhichmaintainsproperbladecuttingdepth. This
depthisadjustedat the factory andmayneverrequireadjustment.
5.5 Replacement Blades
TheOnyx 90 uses economical blades– Part#PPFE-0024.
5.6 Changing from one kind of tool holder to another
Onceyouhave practiced afewtimes, we aresureyou will agreethatthe Onyx 90’stool
interlocksystem allowsyouveryfasttool change.
5.6.1 To insert atoolholder into the machine
1. Holdthe tool holderby the handleand place thetool onto the
groovedpivot arm.
2. Noticeon the toolholder there isa locking pinlocated on the
bottomfront of the toolholder.This locking pinmustengageorfit
intoa matching groove onthepivotarm.
3. Slidethebottomofthe tool holder pinsintothegroovedpivotarm, pull
backanddownonthe spring loaded handle,itwilllockinplace.
5.6.2 To remove atoolholderfrom the machine, liftuponthe tool handle andremovethe
tool.
6.0 Using theOnyx90CuttingTools
6.1 Cutting Glass
Attention: Rememberto weareyeprotection,glovesandprotectiveclothing whenhandlingglass.
Page number 10

Onyx 90 Media Cutter
The World’s Best Media Cutter 828-707-5848
Do not use the media clamp assembly when cutting glass. That clamp is
only used when cutting mat board and plastic.
6.1.1 PlaceyourglassontheleftsideofyourOnyx90machine.
6.1.2 Place the glass cutting tool holder on the pivot arm.
6.1.3 The larger piece of glass should be on the left side of the cut and the smaller
piece of glass should be on the right side of the cut.
6.1.4 Use either the right or left measuring scale on the horizontal axis extrusions
as necessary.
6.1.5 Place your left hand on the glass - apply holding pressure.
6.1.6 Pull back the handle.
6.1.7 Raise the cutting cart to the top edge of the glass.
6.1.8 Lower the handle and place the glass cutting wheel on the top edge of the
glass.
6.1.9 You can now take advantage of one of the Onyx 90’s best features. You can
vary the amount of pressure needed to make an efficient score just by adding
more or less pressure. No global machine adjustment is necessary.
6.1.10 With one slow, smooth, continuous motion, pull down the cutting cart past
the bottom edge of the glass.
6.1.11 You have just “scored” the glass. Only score glass one time.
6.1.12 After scoring, do not move the glass.
6.1.13 With your left thumb, apply slight pressure on the bottom left edge of the
glass near the score. With your right thumb, apply increasing pressure on
the bottom right edge of glass near the score until the glass separates. The
break will occur at the bottom of the score line and run up to the top of the
score line. The break chases the score.
6.1.14 Never apply pressure to the center or the top of the glass because the break
may not follow the score.
6.2 Cutting Mat Board
6.2.1 The Onyx 90 will cut to up 5/8” deep. When cutting materials that deep, a
sharp blade and successive cuts are necessary. The media clamp can not be
used on thicknesses greater that 1/4”.
6.2.2 The use of the media clamp is not mandatory, but on thin media, it will
reducethe chanceofmediabuckling.
6.2.3 Where it is deemed necessary to have a fine cut edge, a slip sheet under the
cutsheetmay be desired.
6.2.4 Placethematboardcuttingtoolholder on the pivot arm.
6.2.5 Slidethemedia to be cutontothe left cuttingbedofthe Onyx 90.
6.2.6 Usethe right or left measuring scale as necessary.
Page number 11
Onyx 90 Media Cutter
The World’s Best Media Cutter 828-707-5848
6.2.7 Engagethemediaclampbylifting,pushingforwardandloweringtheclamp
intoposition.
6.2.8 Pullbackthe handle on thecuttingcartuntilitlocks.
6.2.9 Raisethecutting cart abovethemedia to becut.
6.2.10 Releasethe handleusingthethumbrelease.
6.2.11 Youcannow take advantageof one ofthe Onyx 90’sbest features.You can
varytheamountofpressureneededtomakeefficientcutsjustbyadding
moreor less pressure. Noglobalmachineadjustmentisnecessary.
6.2.12 With oneslow,smooth, continuousmotion,pulldownthecutting cart past
thebottomedgeofthe media.
6.2.13 Releasethe mediaclamp.
6.3 Cutting Plastic
6.3.1 Onyx90 willcutfracturesensitiveplasticupto 1/4”thick. Thisincludes
acrylic,polycarbonate,Plexiglasetc.
6.3.2 Placethe plastic cutting tool holder on the pivotarm.
6.3.3 Slidethemedia to be cutontothe left cuttingbedofthe Onyx 90.
6.3.4 Usethe right or left measuring scale as necessary.
6.3.5 Engagethemediaclampbylifting,pushingforwardandloweringtheclamp
intoposition.
6.3.6 Pullback thehandleofthecuttingcartuntil itlocks.
6.3.7 Raisethecuttingcarttotheupperedgeofthefracturesensitiveplastmedia.
6.3.8 Releasethehandleusingthethumbrelease.
6.3.9 Youcannow take advantageof one of theOnyx 90’s best features.Youcan
varytheamountofpressureneededto make efficient scores just byadding
moreorlesspressure. Noglobalmachineadjustment is necessary.
6.3.10 Withoneslow,smooth,continuousmotion,pulldownthecutting
cartpast the bottomedgeof the media.
6.3.11 Note: youwillhearagougingsoundofthematerial.
6.3.12 Repeatthisproceduretwoor three times, dependingupondensityof
materialbeingscored.
6.3.13 To fracture “or crack” the plastic,raise the cuttingcart to the top
edgeoftheplastic.
6.3.14 Pushinontheplasticfractureswing arm handle. At the same time, align
thewhite rollers with thetopedgeofthefracturedsensitiveplastic.
6.3.15 Applyincreasing pressure to theplasticfractureswingarmhandleuntil
youheartheplasticsnap. Continue to holdthepressureontheplastic
fractureswingarmhandlewhilepullingdownthecuttingcartpast
bottomof the fractured sensitiveplasticinoneslow,smooth
continuousmotion.
6.3.16 Releasethe mediaclamp.
6.3.17 Removetheplasticfromthe Onyx90 and separate thetwoplastic
pieces.
Plasticfracture
swingarmhandle
Pagenumber 12

Onyx 90 Media Cutter
The World’s Best Media Cutter 828-707-5848
6.4 Using the Media Clamp
6.4.1 Themediaclamprequiresonlyonehandtooperate. Simplyliftuptheclamp from its rest
positionandmoveittowards the media tobeclamped.
6.4.2 Gravitywill pulltheclampdownwardandsecurelylock yourworkagainstthestainless steel
gussetplate.
6.4.3 Theclamp is released byliftingupthehandle and returning the clamptotheresting position.
6.4.4 Themedia clamp has a substance that will holdyourmediaverysecurely.
6.5 UsingtheProductionStop
Theproductionstopisusedwhenyouaremakingseveralconsecutivecutsofthesamedimension. The
production stopcanbeplacedoneithertheleftorrighthorizontalextrusion.
6.5.1 SimplyloosentheplasticlockingknobandinserttheT-nutand production stop into the
channellocated atthefrontofeither theleftorrighthorizontal extrusion.
6.5.2 Rotatethewhiteplasticarmuntilitisagainst
themeasuringscale.
7.0 RoutineMaintenance
7.1 Brushall debrisfromboththeleftandright
cuttingbeds.
7.2 Make sure all nutsandboltsremaintight.
7.3 Donot oilthemachine.
8.0 Adustments-should theybecome necessary –not likely.
8.1 Squaring the Machine / making the cutting beds perpendicular to the
vertical axis extrusion.
Your Onyx 90 was squared at the factory and should not require you to make any adjustments.
If forsomereasonyou find it necessarytomakethis adjustment, here arethesteps:
Tools Needed: An assistant, builder’s square, 7/16”open-end wrench, 9/16” open-endwrench
8.1.1 Brushall chips of glassanddebrisfromthecuttingbeds.
8.1.2 Thereare two plasticknobs thatare used tomake sure thatthe cuttingbeds do not
moveifsomeoneputs a heavy weightontheends of the cuttingbeds. Theseareused
forsafety. Loosen thejamnutsandplasticknobsbeforemakinganysquaringadjustments.
Pagenumber 13
Onyx 90 Media Cutter
The World’s Best Media Cutter 828-707-5848
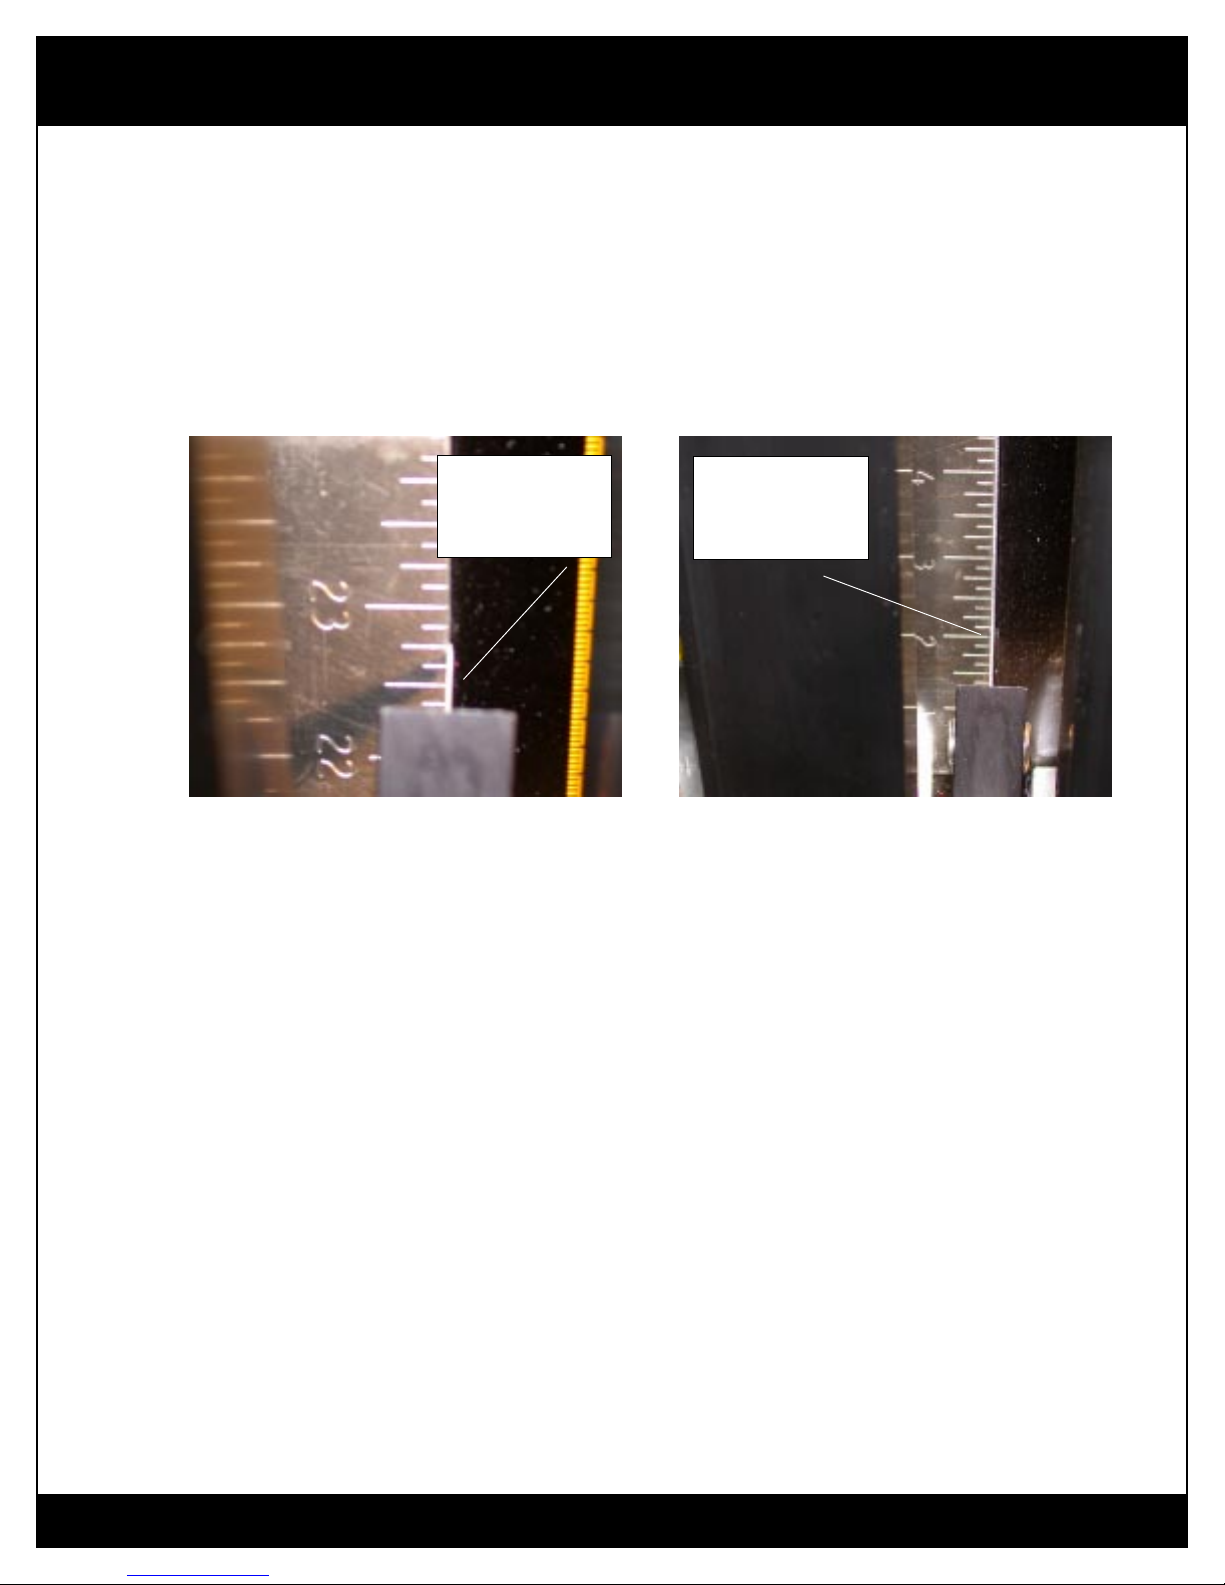
8.1.3 Laythebuilder’s square onthe leftcuttingbed.Putthematcuttingtool in the tool holder. The
horizontalportion ofthebuilder’ssquareshouldberesting ontheleftcuttingbed.Thevertical
portionof the builder’ssquareshouldberesting-justtouching themat cutting blade. Without
movingthebuilder’s square, raise the cuttingcart to thetop of thevertical portion ofthe
builder’s square. Thedistancefrom the blade tothebuilder’s square mustbethe same at the
topandbottomthroughout the cutting cart’stravel. Ifthereis a gap atthetopof the builder’s
square/bladeintersection, thenyoumustloosenthejamnut ontheleftsideoftheleft horizontal
extrusion. Tighten the3/8”boltslightlyuntilthegap disappears.Tighten thejamnut.
8.1.4 Ifthere is agap at thebottom of thebuilders square/blade intersection,then you must
squaretheleftcuttingbed the other direction. Loosenthejamnutonthe left side ofthe
lefthorizontalextrusion.Youmustloosen the3/8”boltslightly.Thiswillchangethegap.The
gapmustbethe same at thetopandbottom of the builder’ssquare throughoutthecutting
cart’stravel.Tightenthejamnut
Youhavecompletedsquaring theleft horizontalcuttingbed.
8.1.5 Tosquarethe right cutting bed, place the builder’s square on the left cutting bedandslidethe
builder’ssquareovertothe right cutting bed. There shouldbenogapunder the builder’s
squareontherightcuttingbed. Ifthere is a gap under thebuilder’ssquareontherightcutting
bed,loosenthetwojamnutsontherighthorizontalextrusion.Adjustthetwo3/8”boltsto
makethesurfaceoftherightcuttingbedflushwiththebottomofthebuilder’s square. The
builder’s squareshouldslidefromleft-to-rightandright-to-left withouthittingeithercutting
beds. Ifthebuilder’ssquarehitstheleft or right cutting bed, youwillneedtoadjustthe
elevationoftheinnermostbolt on the rightcuttingbed. Adjustthe3/8”bolt as needed sothat
thebuilder’ssquarewilltravelfromleft-to-rightandright-to-leftwithouthittingeithercutting
bed.Tightenboththerightcuttingbedjam nuts.
Mat cutting blade
resting aganist
builder’s square
Mat cutting blade
resting aganist
builder’s square
Page number 14
Onyx 90 Media Cutter
The World’s Best Media Cutter 828-707-5848
8.1.6 Fingertighten the plastic knobs until you feel resistance,thenloosenthetwoplasticknobs¼
turn. Bringthe jamnutsuptothe bottomofthehorizontalextrusion andlightlytightenthejam
nuts. Over-tighteningofeithertheplastic knobs or thejamnutscanbowthe cutting bed and
takethecutting bed outofsquare.
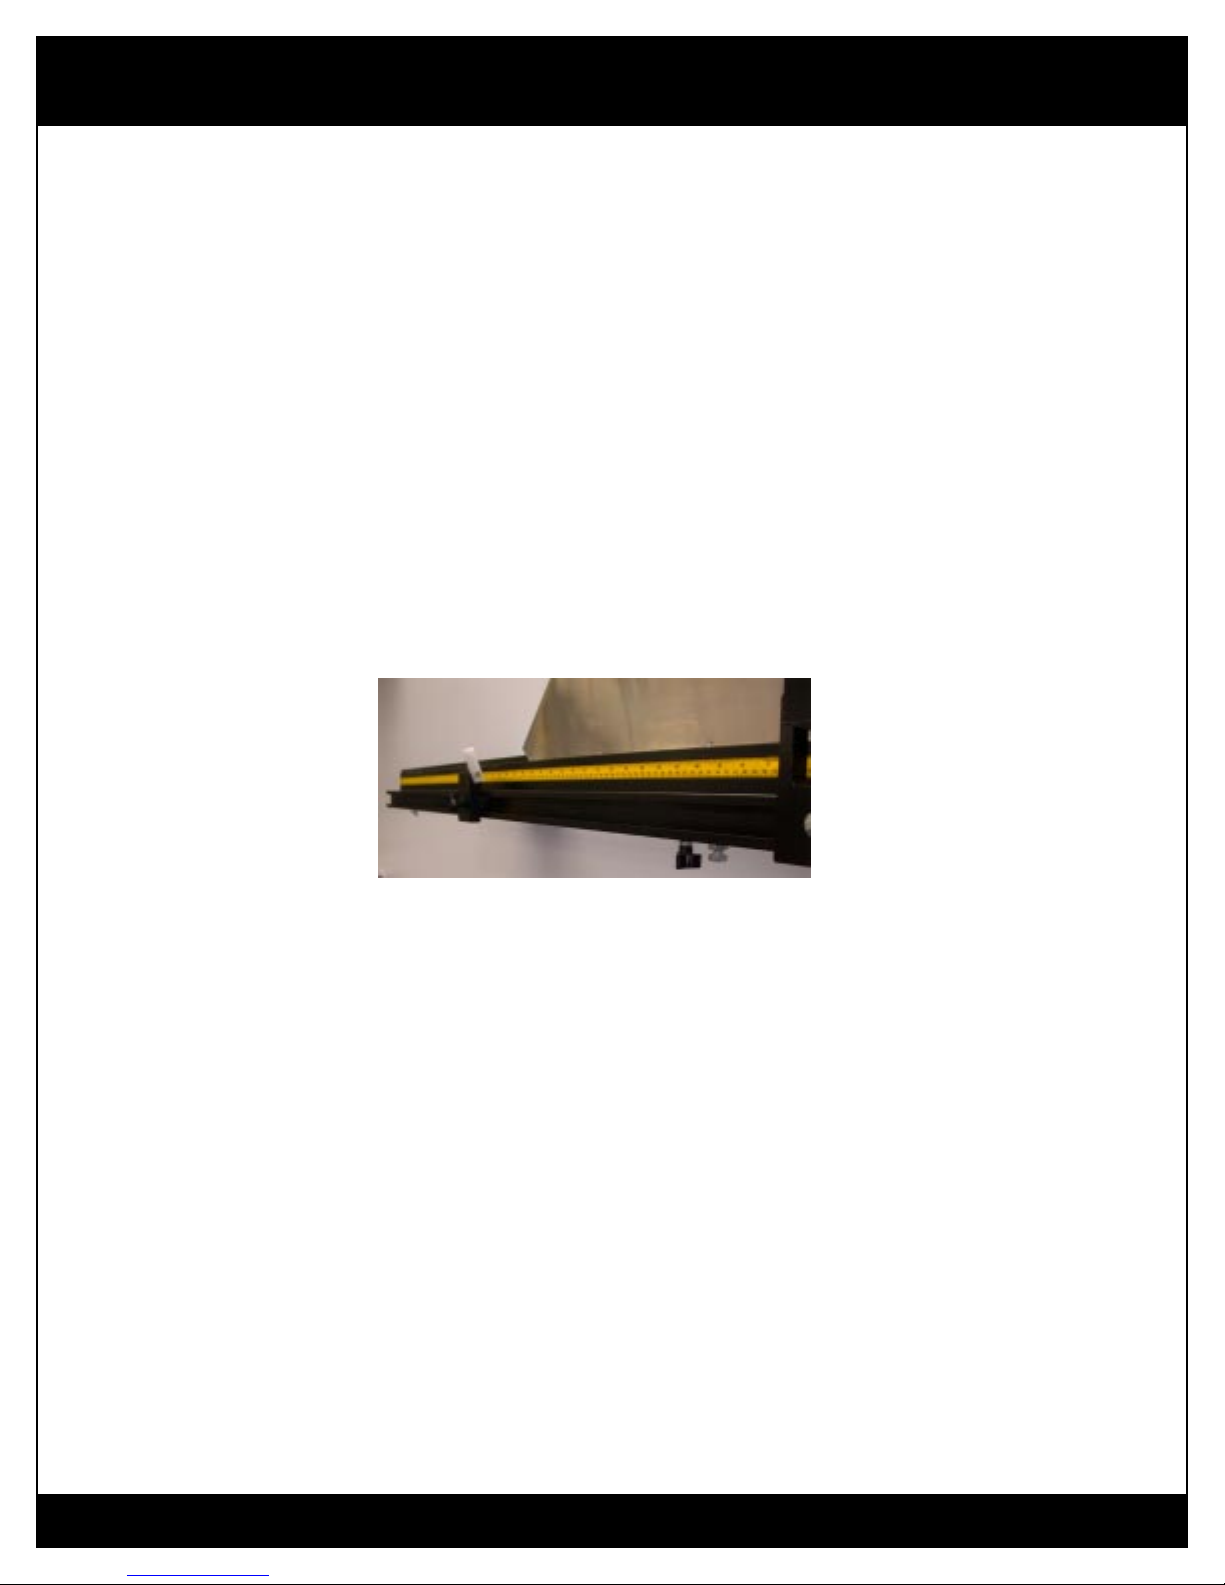
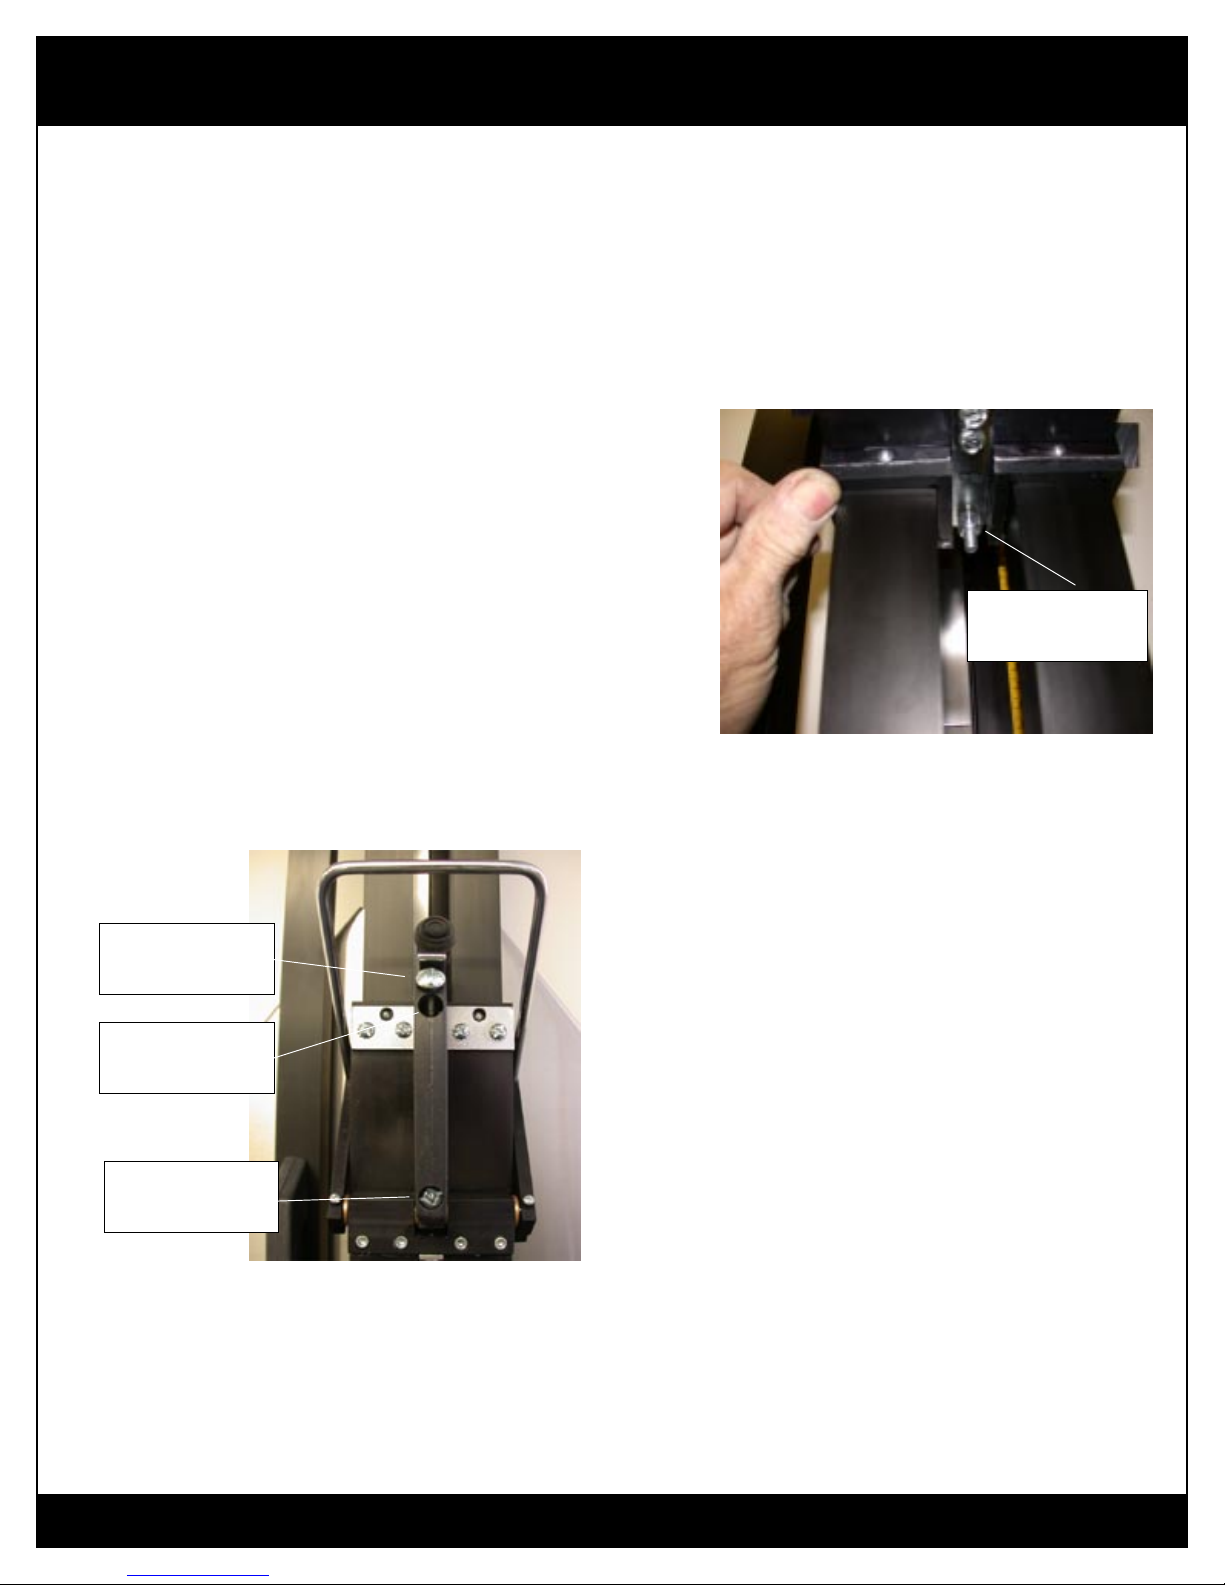
8.2 Calibration of the Measuring Tape Scales
Thehorizontalandverticalmeasuringtapescales have been set at thefactory. If for somereason youfind
itnecessaryto make this adjustment,hereare the steps.
8.2.1 Wehavesecuredthemeasuring tape scales using asmallscrewandnut applied at the outside
endsofthemeasuringtapescales.
8.2.2 Usingasmallscrewdriver, loosen the screw and nut.
8.2.3 Positionthe measuringtapescalewhereyoufeelit shouldbebyslidingitinthe extrusion
8.2.4 Onceinposition,re-tightenthescrewandnut.
8.3 Global Adjustment of the Cutting Spring Pressure
8.3.1 Thisadjustmenthas been set atthefactory. Ifforsome reason youfinditnecessary to make
thisadjustment,herearethesteps:
8.3.2. Removeallcuttingtoolholdersfromthecuttingcart.
8.3.3. Thespringtensionadjustmentnutislocatedbetweenthebearingtubesonthe very bottom of
thecuttingcart. Thisadjustmentisbest done if the bottom ofthe cuttingcartiselevated. You
shouldhaveanassistant securely hold thecartatthat elevation. Do not trytoholdit and
adjustbyyourself.
8.3.4. Usinga7/16”nut driver or deep-wellsocket,reachbehind the cart fromtherighthand side
andslide the tool onto the spring tension adjustmentnut.
8.3.5. Ifmoretensionisdesired,tightenthespringtensionadjustmentnut. If less tension is desired,
loosenthe springtensionadjustmentnut. Thisnut hasaninternalnylonlocking ringtokeepit
frommoving. So onceyoumoveit,the nutwillstayinthat positionuntilyoumoveit again.
8.3.6. Inserttheglass tool into thecuttingcart and trythenewpressure. Adjust as required.
Page number 15
Onyx 90 Media Cutter
The World’s Best Media Cutter 828-707-5848
8.4 Adjustment for Depth of Cut
Thisadjustmenthasbeenset at the factory. Ifforsome reason you find itnecessarytomakethis adjustment,
hereare the steps:
8.4.1 Lookatthehandlelocated on thecutting cart.Noticealowerhandleretaining screw and an
upperhandleretaining screw. These two screws arecounter-boredinto thehandleand attach
thehandleto the cutting cart. Justabovethe
upperhandle retaining screw,youwill see a
thirdscrew. Thisthirdscrewis
the“adjustmentlockingscrew.”
8.4.2 Loosentheadjustmentlocking
screwuntil you can inserta
largephillipsheadscrewdriverinto
theslotoftheupper handle
retainingscrew.
8.4.3 Insertthe glasscuttingtoolonto
toolpivot arm.
8.4.4 Releasethe handle with the thumb release and allowtheglasscuttingtooltobottom.
8.4.5 Withthehandleinthe released or bottomed
position,rotate the upper handle retaining screw
clockwiseto decrease thedepth. Rotatethe
upperhandle retaining screw counter clockwise
toincreasethe depth.
Afteryou have made the adjustment to the
cutting depth,besure to pushthehandle in so
thatitisresting on the newadjustedstop
distance.
8.4.6 Tightentheadjustmentlockingscrew.
Springtension
adjustingnut
Upper handle
retaing screw
Lower handle
retaing screw
Adjustment
locking screw
Page number 16

Onyx 90 Media Cutter
The World’s Best Media Cutter 828-707-5848
9.0 Troubleshooting
9.1 When cutting glass, the glass cutter jumps or skips.
Causes: Dirtyglass
Clean glass
Wornglasswheel
Rotate to new wheel
Toolittlepressure
Adjust by applying slight pressure with hand
Make global adjustment -not likely-
Theglass cutting wheel rotates on an axle. There
maybeshardsofglassbetweentheglasscutting
wheelandthewheelaxle.Thisdebris can cause the
glasscuttingwheeltonotrotatefreely.
Lubricate axle and glass wheel area.
9.2 When cutting glass, chipping or flaking occurs.
Causes: Too much pressure
You may be applying too much pressure on the handle.
Pull back on the handle during cut.
Too much pressure will shorten wheel life.
Never score twice.
9.3 When cutting plastic, it skips and or chatters.
Causes: Scoringtoofast
Slow down the stroke speed
Scoringtoolbroken
Rotate cutter if you have not done so previously
Too much pressure
Reduce pressure slightly on handle
Notusingmediaclamp
Use media clamp
9.4 When cutting mat board, the mat board buckles.
Causes: Matboard not clamped
Use media clamp
Bladetoodull
Change to new blade
Page number 17

Onyx 90 Media Cutter
The World’s Best Media Cutter 828-707-5848
9.5 The cut edge of mat board is frayed
Causes: Dullmatcuttingblade
Change to new blade
Noslipsheetundermediabeingcut
Use slip sheet
9.6 When I make my cuts, the dimensions are incorrect
Cause: Themeasuringscaleisoff
Recalibrate the measuring scale – See Section 8.2
9.7 The cut edge is not square - not a 90 degree cut.
Causes: Debris between the media and cutting bed
Remove debris
Cutting bed is not perpendicular to vertical extrusion.
square the cutting bed -Not likely-
You are very important to us. Our success depends on your
satisfaction. If you are having any problems or have any
comments, please call us at 828-707-5848.
Page number 18
Onyx 90 Media Cutter
The World’s Best Media Cutter 828-707-5848
Onyx 90 Product Registration CardOnyx 90 Product Registration Card
Onyx 90 Product Registration CardOnyx 90 Product Registration Card
Onyx 90 Product Registration Card
Registering your Onyx 90 media cutter is essential to ensure that you validate your warranty and receive all the
benefits of product ownership.
Date of Purchase ______________________________________________________________________
First Name ___________________________________________________________________________
Last Name ____________________________________________________________________________
Street Address _________________________________________________________________________
Street Address _________________________________________________________________________
City, State, Zip _________________________________________________________________________
Email Address _________________________________________________________________________
Phone Number _________________________________________________________________________
Serial Number __________________________________________________________________________
Mail to Professional Picture Frame Equipment
1237 Shipp Street
Hendersonville, NC 28791
Fastest tool change in the industry Cuts mat board, gator board, glass and acrylic
Anodizedaluminumand stainlesssteel Built to lasta life-time
Oil impregnated bronze bushings Ultra high molecular weight polyethylene
FedEx / UPS shippable Stainless steel wall mounting brackets
Production stop included Two year warranty
Cutting depth 5/8 + inches Made in USA
Built-inmatboardandacrylicclamp Carbideplasticcutter
Page number 19
Other manuals for Onyx 90
1
Table of contents
Other Professional Picture Frame Equipment Cutter manuals

Popular Cutter manuals by other brands


Fletcher-Terry
Fletcher-Terry F05221 operating instructions

Clarke
Clarke ETC6 Operating & maintenance instructions

Glomar
Glomar EPG-5-PRO instruction manual

Holmatro
Holmatro SMC 4006 Maintenance instructions

BERGSPORT-STEINLE
BERGSPORT-STEINLE 22CASV6-E Operation manual

Bosch
Bosch PTC 470 Original instructions