Progression Fitness B890P Operation manual
Magnetic Upright Bike
Model: B890P
Owner’s Operating Manual
- 1 -
(L2)Water bottle
(K9) SCREW
M6X15mm
Book Stand
(K10) M6
Adapter
- 2 -
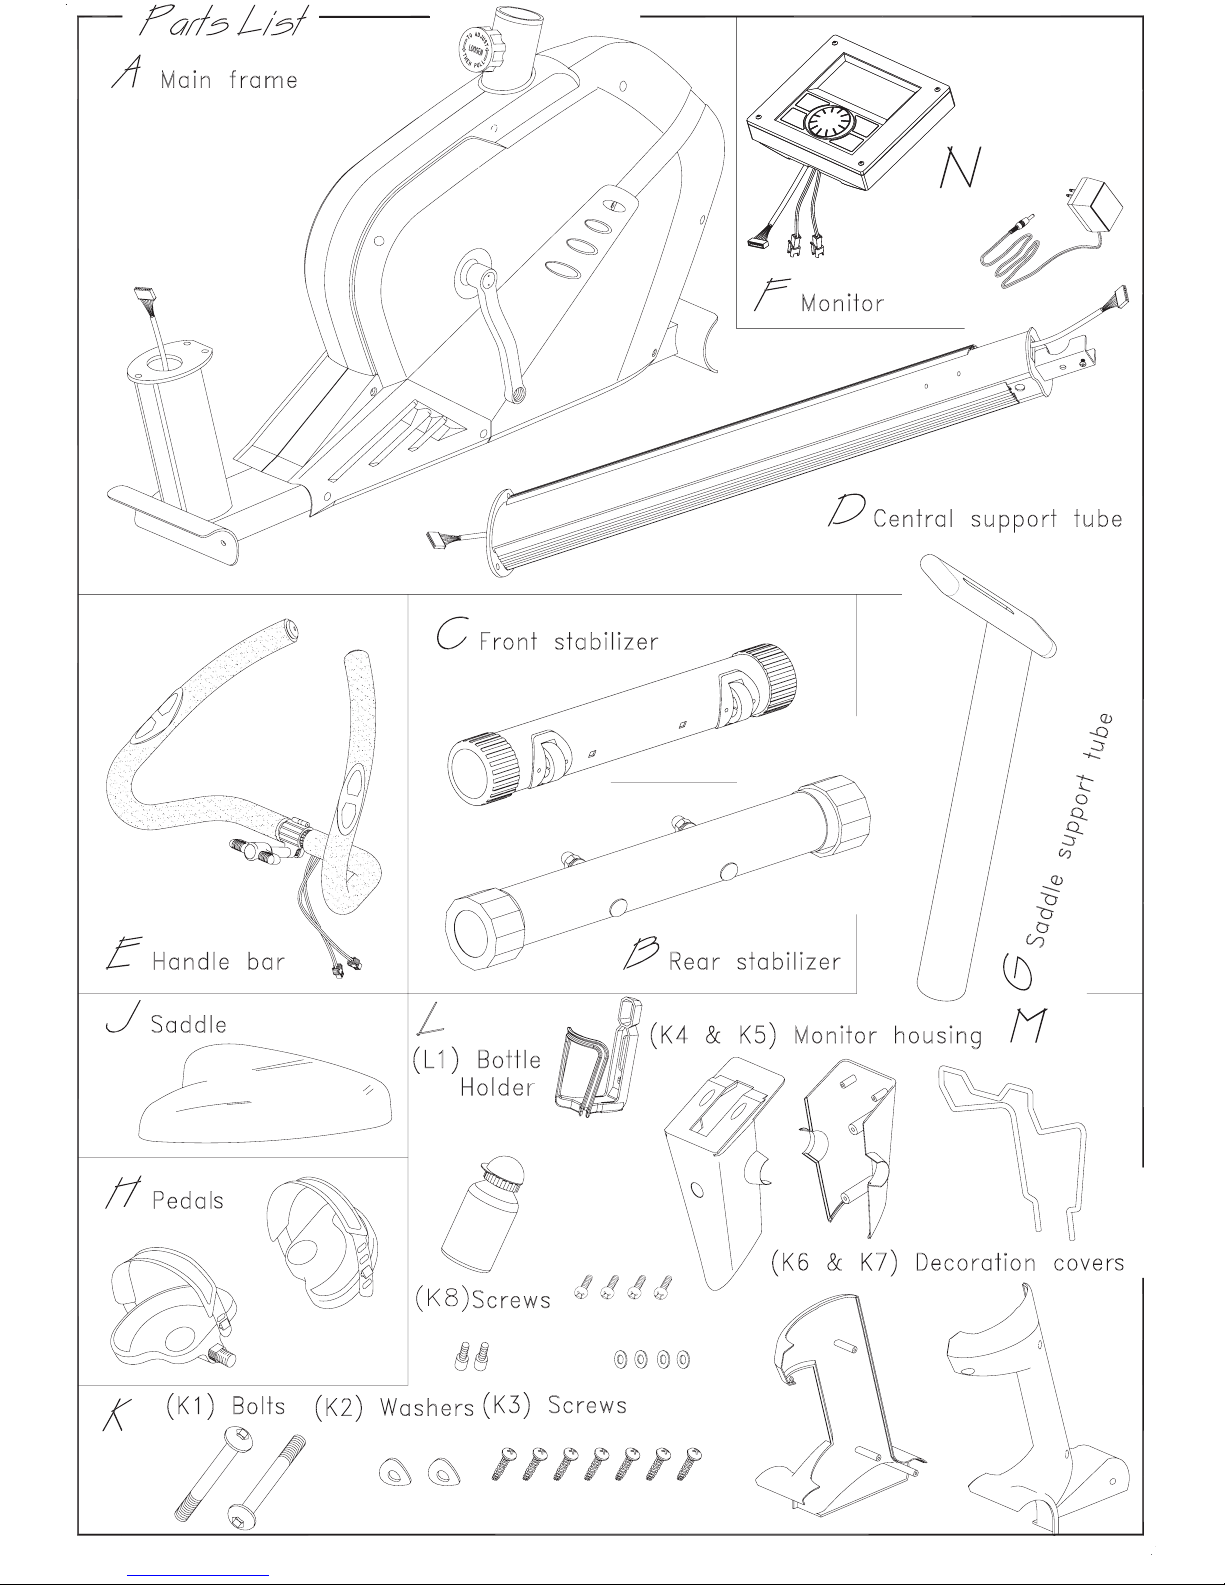
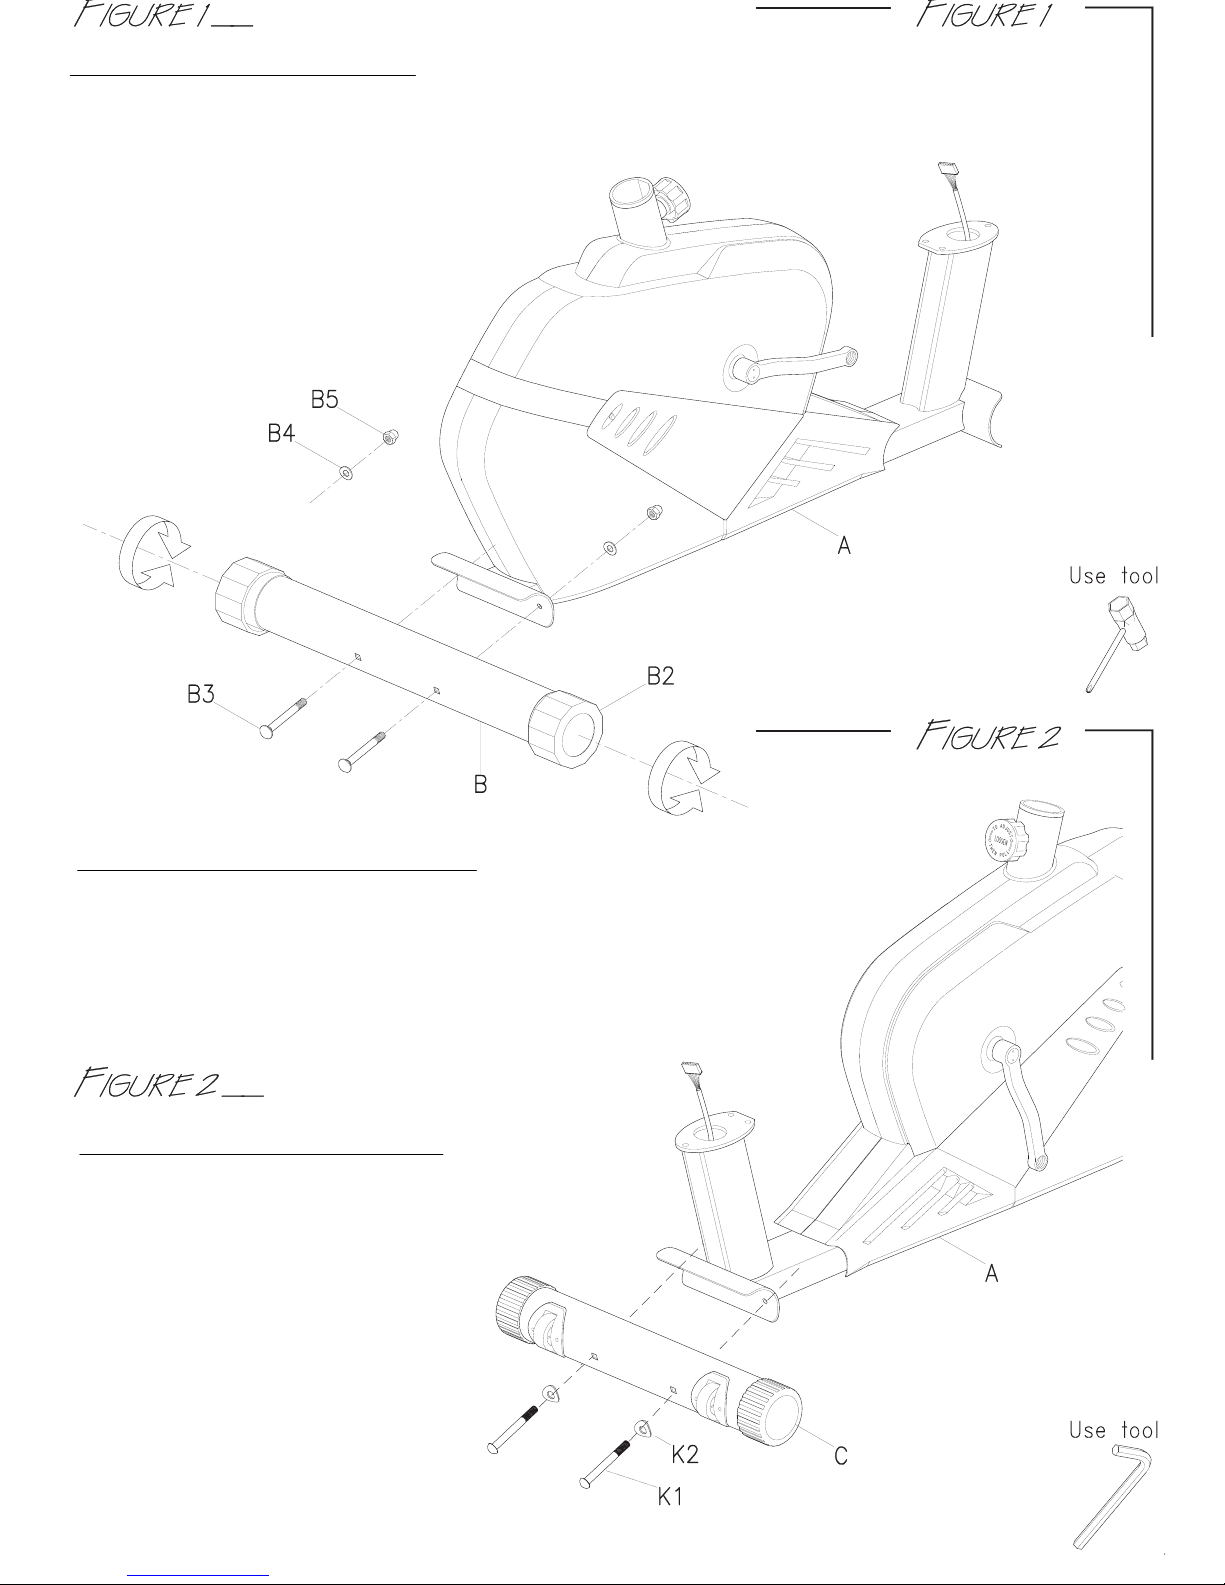
ASSEMBLY OF FRONT STABILIZER
Use two bolts (K1) and two washers (K2)
to secure the front stabilizer to the
front of the main frame (A).
HOW TO KEEP THE MACHINE STABLE
After you complete (Figure 1 & 2), if the machine does not sit level,
you can use the adjustable end caps (B2) to compensate
for uneven floors.
ASSEMBLY OF REAR STABILIZER
First, remove the bolts (B3), washers (B4) and nuts (B5) from the rear stabilizer (B).
Use two bolts (B3) through the rear
stabilizer (B) to attach to the bracket
at the back of the main frame (A).
Then, secure it with
washers (B4) and
nuts (B5).

- 3 -
ASSEMBLY OF CENTRAL SUPPORT TUBE
First, remove the bolts (D4) and washers (D5) from
the central support tube (D).
Step 1. Connect the cable (D2) with cable (AB).
Step 2. Put the central support tube (D) on the
main frame (A). Then secure it with bolts (D4) and
washers (D5).
ATTENTION: Take care when pushing the tubes
together that the cables are not pinched.
ASSEMBLY OF COVER
Connect the decoration cover (K6-L & K7-4) on the
front of the main frame (A). Then secure it with
screws (K3).
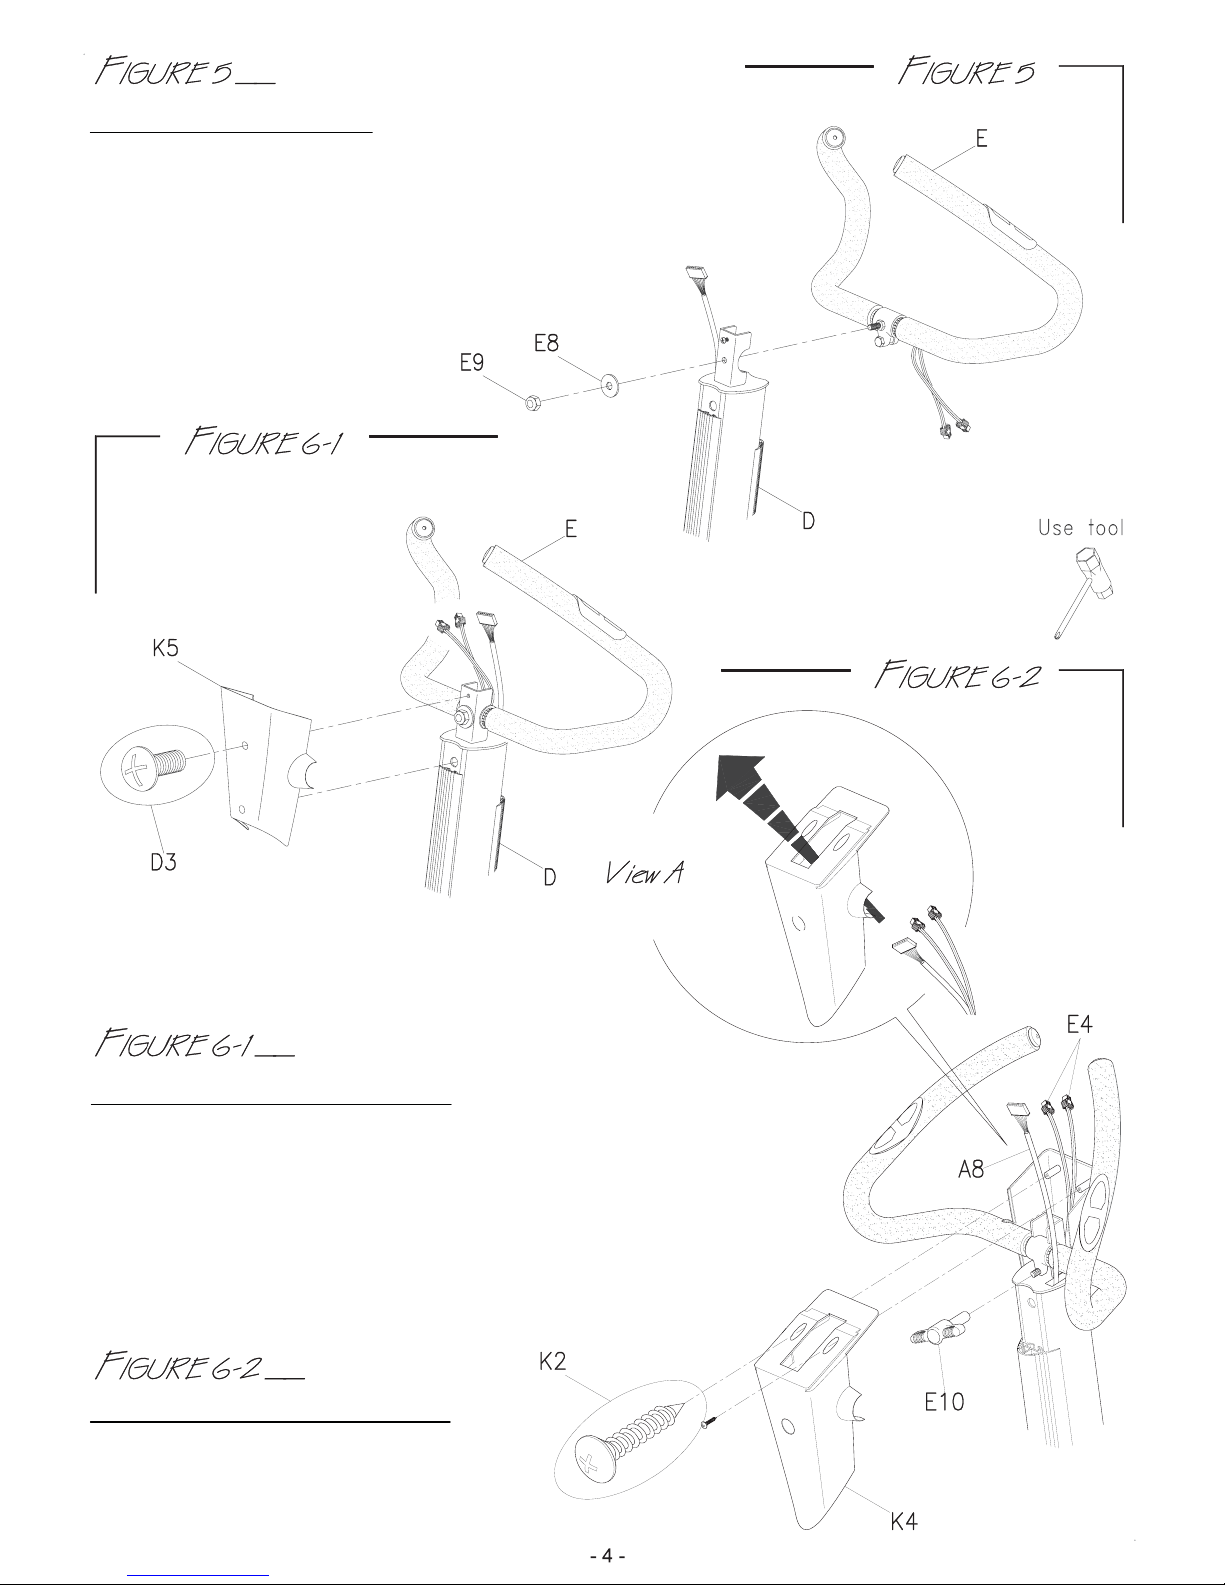
ASSEMBLY OF HANDLEBAR
First remove the washer (E8) and nut (E9) from
the handlebar (E). Secure the handlebar in the housing
using washer (E8) and nut (E9).
ASSEMBLY OF MONITOR HOUSING
First, remove the screw (D3) from the central support tube (D).
Step 1: Put the monitor front housing (K5) into the central
support tube and secure it using screws (D3).
ASSEMBLY OF MONITOR HOUSING
First, remove the knob (E10) from the
handlebar (E).

Step 2: Slide the sensor wires (A8 & E4) through the monitor front housing (K4) as shown in
View A). Then connect the monitor rear housing with monitor front housing by screws (K2).
FINISH THE ASSEMBLY OF MONITOR HOUSING
Attention: Please position all sensors outside of the
monitor housing.
Step 3. Finish the assembly with screw (K2).
ADJUSTING THE HANDLEBAR
Loosen the knob (E10) to adjust the handlebar
position. Once positioned, tighten knob (E10)
securely.
ASSEMBLY OF MONITOR
Connect the sensor wires (A8 & E4) with monitor
wires and put the monitor on the monitor housing.

- 6 -
G6
G4
G3
G3
ASSEMBLY OF SADDLE & SADDLE SUPPORT TUBE
Step 1: Loosen the screw (G6), washer (G4) and knob (G3) from the saddle (J), and position saddle on the top
of the saddle support tube. Then secure the saddle (J) tightly with screw (G6), washer (G4) and knob (G3).
Loosen the knob (A11). Pull the knob and slide saddle support tube to desired position. Release the knob
and tighten to secure saddle support tube.
ADJUST THE SADDLE
Loosen the saddle adjustment knob (G3)
and move the saddle until it is in a
comfortable position. Tighten the saddle
adjustment knob to secure the
saddle.
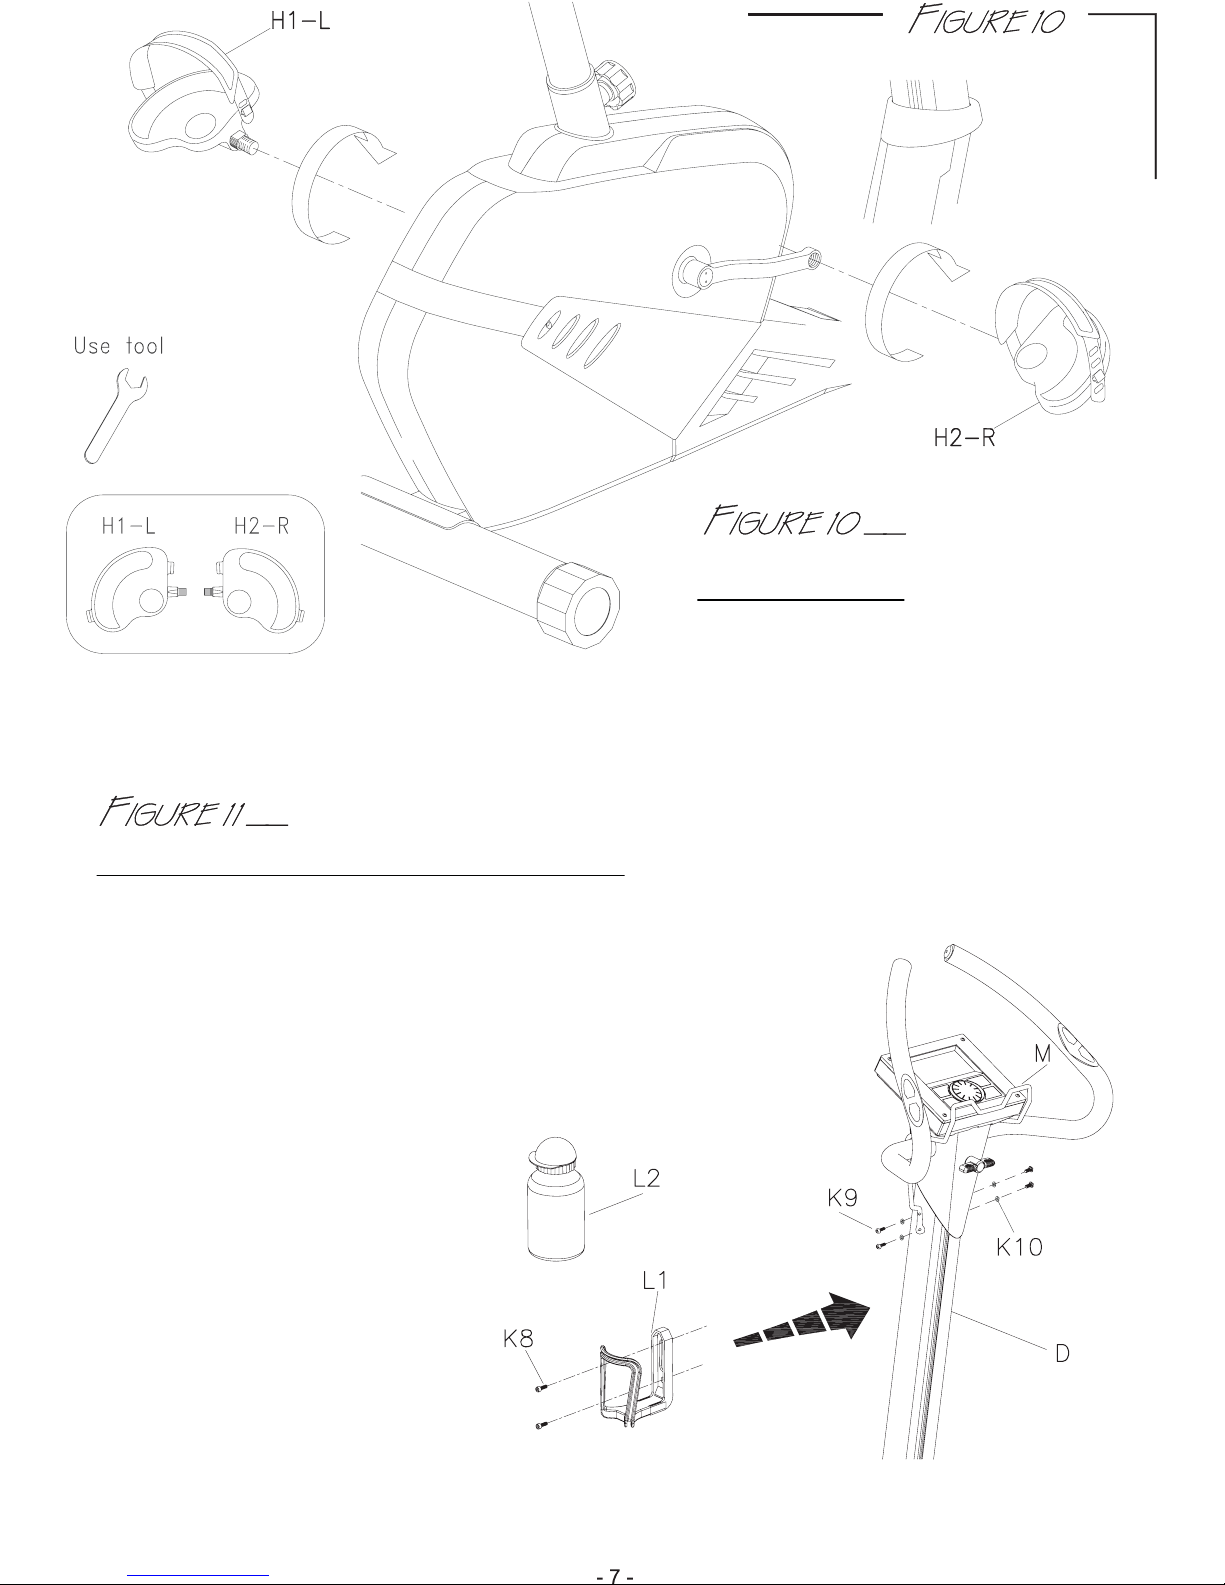
PEDALS ASSEMBLY
Secure the pedal (H2-R) and (H1-L)
to the crank using clockwise (H2-R) and
counter clockwise (H1-L) rotation.
ASSEMBLY FOR BOTTLE HOLDER & BOOK STAND
Step 1: Attach plastic bottle holder (L1) at middle
position of central support tube and secure
with screw (K8).
Step 2: Attach book stand (M)
to central support tube (D) with
washer (K10) and screw (K9).
- 8 -
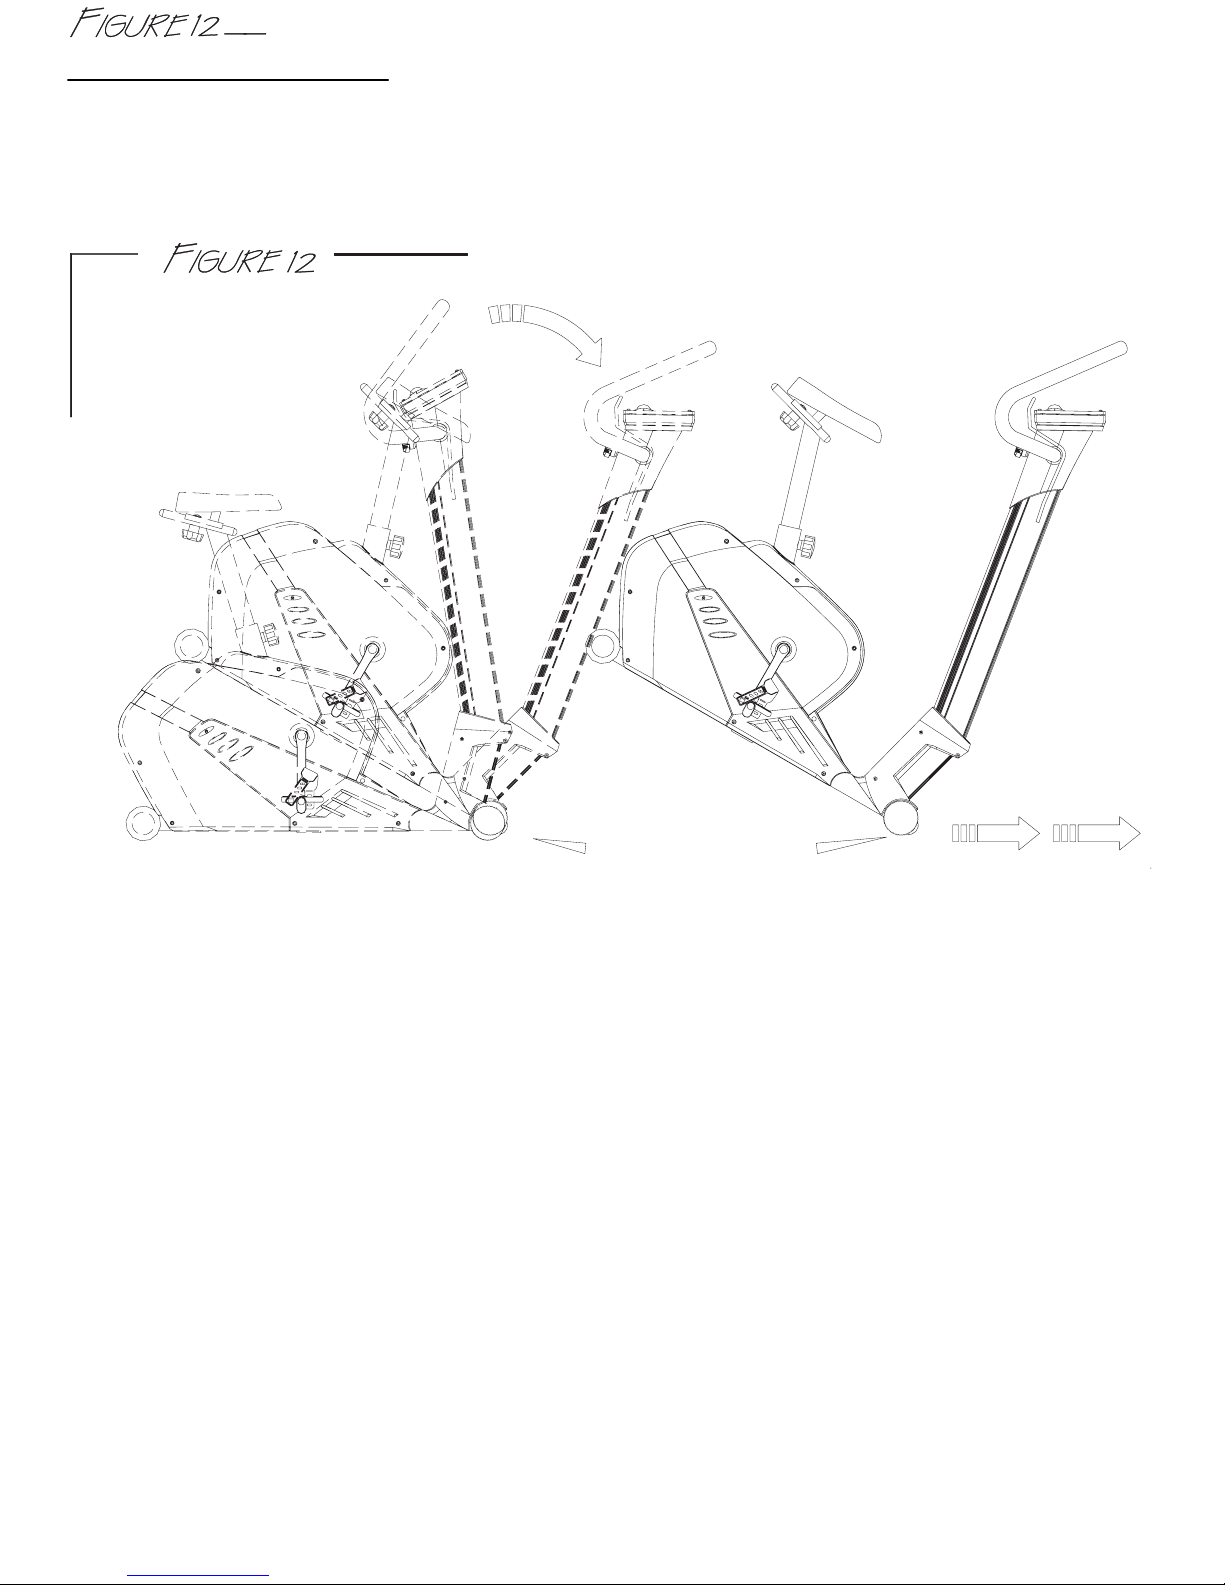
HOW TO MOVE THE MACHINE
Stand at the back of the machine and lift it up until the weight of the machine is transferred to
the transport wheels. You can now easily move the machine to a new location.
TRANSPORTATION
WHEELS
- 9 -
E6
E5
L2
M
K9
K10
N
A20
A21

- 10 -
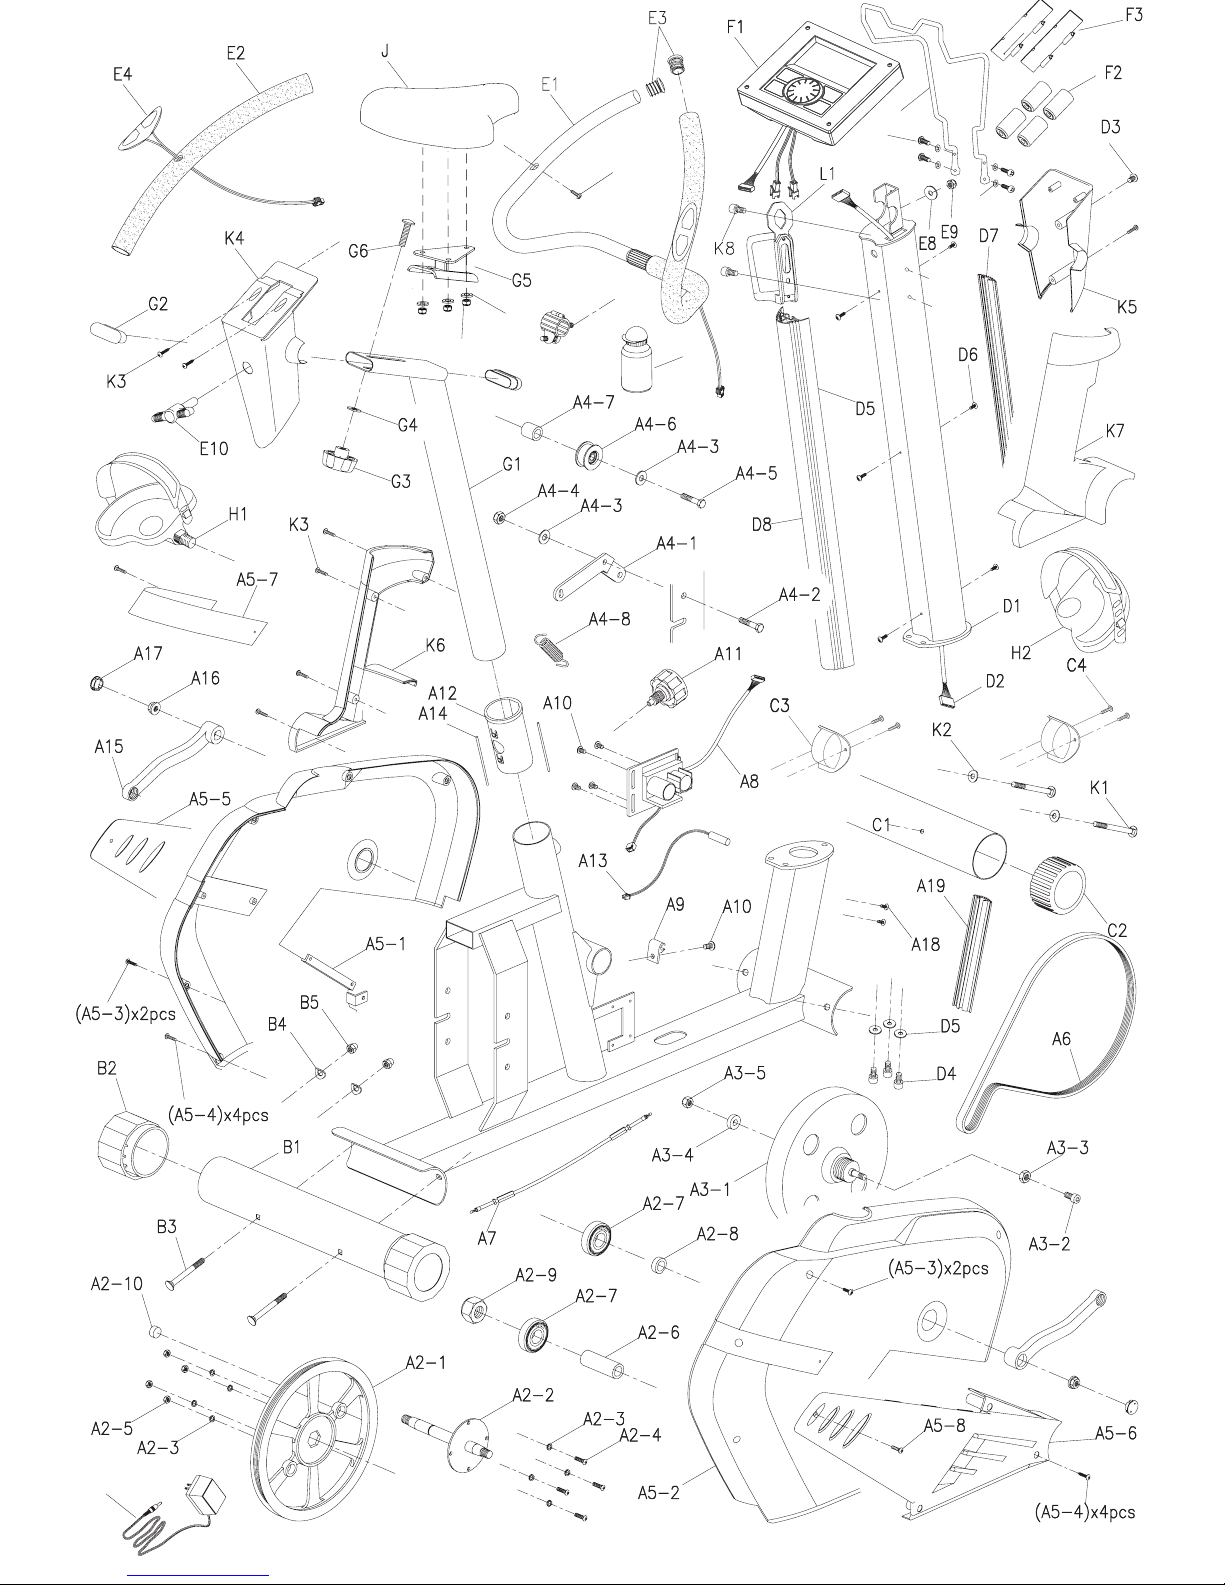
No. Description
A1 Main Frame 1
A2 DRIVING WHEEL SET 1 SET
A2-1 Driving Wheel 1
A2-2 Axle 1
A2-3 Spring Washer 8
A2-4 Screw 4
A2-5 Nut 4
A2-6 Axle Bushing 1
A2-7 Bearing 2
A2-8 Bushing 1
A2-9 Nut 1
A2-10 Magnet 1
A3 FLYWHEEL 1 SET
A3-1 Flywheel 1
A3-2 Bolt 1
A3-3 Flat Washer 1
A3-4 Nut 1
A3-5 Washer 1
A4 PRESSING SET 1 SET
A4-1 Pressing 1
A4-2 Bolt 1
A4-3 Flat Washer 2
A4-4 Nut 1
A4-5 Bolt 1
A4-6 Pressing Wheel 1
A4-7 Bushing 1
A4-8 Spring 1
A4-9 Nut 2
A4-10 Screw 1
A5 CHAIN COVER SET 1 SET
A5-1 Chain Cover-R 1
A5-2 Chain Cover-I 1
A5-3 Screw M4 x 50mm 4
A5-4 Screw M4 x 16mm 8
A5-5 Decoration Cover-L 1
A5-6 Decoration Cover-R 1
A5-7 Aluminum Decoration Strip 1
A5-8 Screw M4 x 15mm 2
A5-9 Screw M4 x 12mm 4
A6 Driving Belt 1
A7 Tension Cable 1
A8 Sensor Wire 1
A9 Fixing Bracket 1
A10 Screw M5 x 10mm 5
A11 Pop-in Knob 1
A12 Plastic Spacer 1
A13 Sensor Pole 1
A14 Iron Line 2
A15 Crank 2
A16 Nut 2
A17 Cover 2
A18 Screw 2
A19 Decoration Strip 1
A20 Nut 3
No. Description
A21 Washer 3
B1 Rear Stabilizer 1
B2 End Cap 2
B3 Bolt 2
B4 Washer 2
B5 Nut 2
C1 Front Stabilizer 1
C2 End Cap 2
C3 Transportation Wheel 2
C4 Screw 4
D1 Central Support Tube 1
D2 Sensor Wire 1
D3 Screw 1
D4 Screw 3
D5 Washer 3
D6 Screw 6
D7 Front Decoration Strip 1
D8 Rear Decoration Strip 1
E HANDLE BAR SET 1 SET
E1 Handle Bar (L & R) @1
E2 Sponge 2
E3 End Cap 2
E4 Heart Rate Sensor Wire 2
E5 Screw 1
E6 Handle Bar Clip 1
E8 Washer 1
E9 Nut 1
E10 Knob Nut 1
M Book Stand 1
N Adapter 1
F1 Monitor 1
F2 Battery 4
F3 Cover 2
G1 Saddle Support Tube 1
G2 End Cap 2
G3 Knob Nut 1
G4 Flat Washer 1
G5 Moving Basement 1
G6 Bolt 1
H1 Pedal-L 1
H2 Pedal-R 1
J Saddle
K1 Bolt 2
K2 Washer 2
K3 Screw 7
K4 Computer Front Housing 1
K5 Computer Rear Housing 1
K6 Decoration Cover-L 1
K7 Decoration Cover-R 1
K8 Screw 2
K9 Screw 4
K10 Washer 4
L1 Bottle Holder
L2 Washer 2

TIME: Count up - No preset target, time will count up from 00:00 to maximum 99:59 with 1 second increments.
Count down - If training with preset time, time will count down from preset to 00:00. Each
preset increment or decrement is 1 minute between 1:00 to 99:00.
SPEED: Display current training speed from 0.0 to maximum 99.9 km or ml.
RPM: Display current training rotation per minute.
DISTANCE: Count up - No preset target. Distance will count up from 0.00 to maximum 99.90 with each
increment 0.1 km.
Count down - If training with preset target, distance will count down from preset to 0.00.
Each preset increment or decrement is 0.1 km (or ml) between 0.00 to 99.90.
CALORIES: Count up - No preset target. Calories will count up from 0 to maximum 990 with 1 calorie
increment.
Count down - If training with preset target, calories will count down from preset time to 0.
Each preset increment or decrement is 10 calories from 0 to 990 calories.
PULSE: To display your current heart rate figures as soon as the pulse sensor has been touched.
The monitor will detect your heart rate through handgrip sensors once you hold on both hands.
RECOVERY: After exercising for a period of time, keep holding on handgrips and preset“RECOVERY” button.
All function display will stop except “TIME” starts counting down from 00:60 to 00:00.
Screen will display your heart rate recovery status with the F1, F2.... to F6. F1 is the best, F6 is
the worst. User may keep exercising to improve the heart rate recovery status.
(Press the RECOVERY button again to return the main display).
TEMPERATURE: Screen will display room temperature in sleep mode.
CALENDAR: Screen will display year/month/day in sleep mode.
CLOCK: Screen will display time in sleep mode.
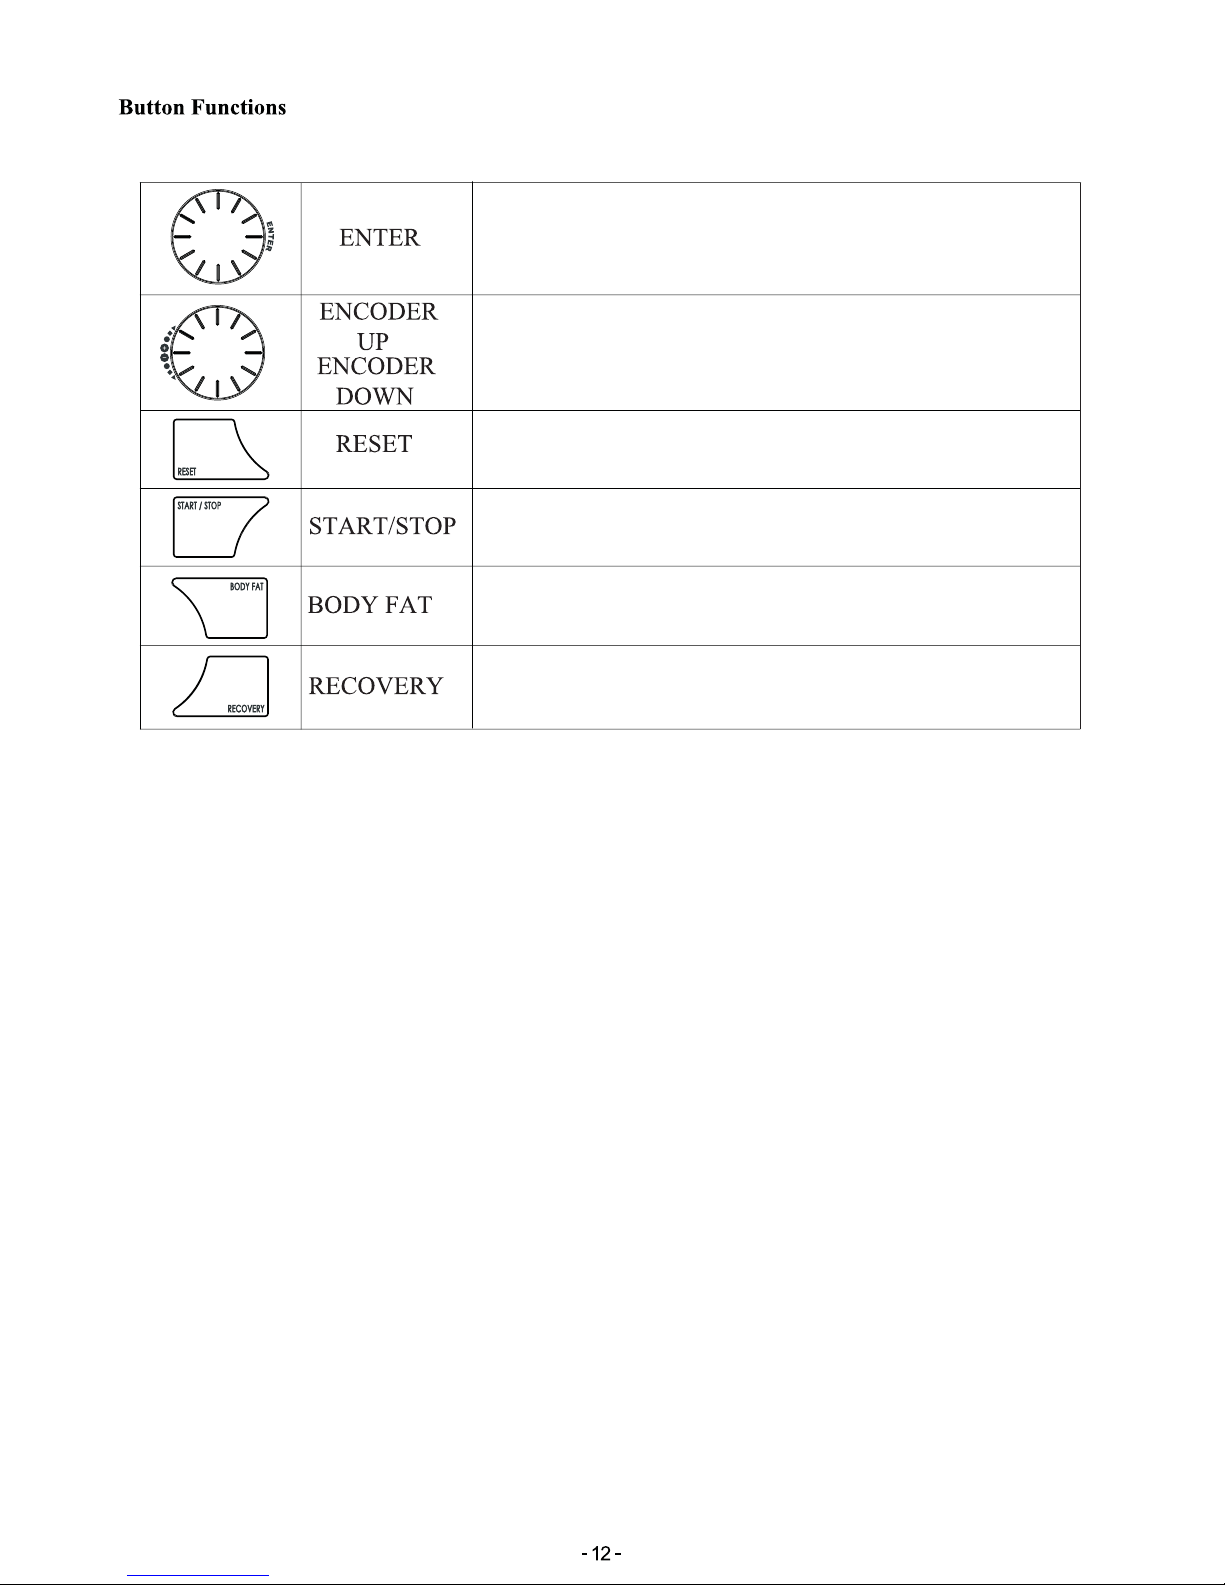
To set function value for TIME, DISTANCE, CALORIES, PULSE
in sleep mode.
To select training mode and adjust function value up.
To select training mode and adjust function value down.
Return to main function mode in STOP mode and clear
all preset.
To start or stop training.
To start or stop body fat testing.
To test heart rate recovery status.
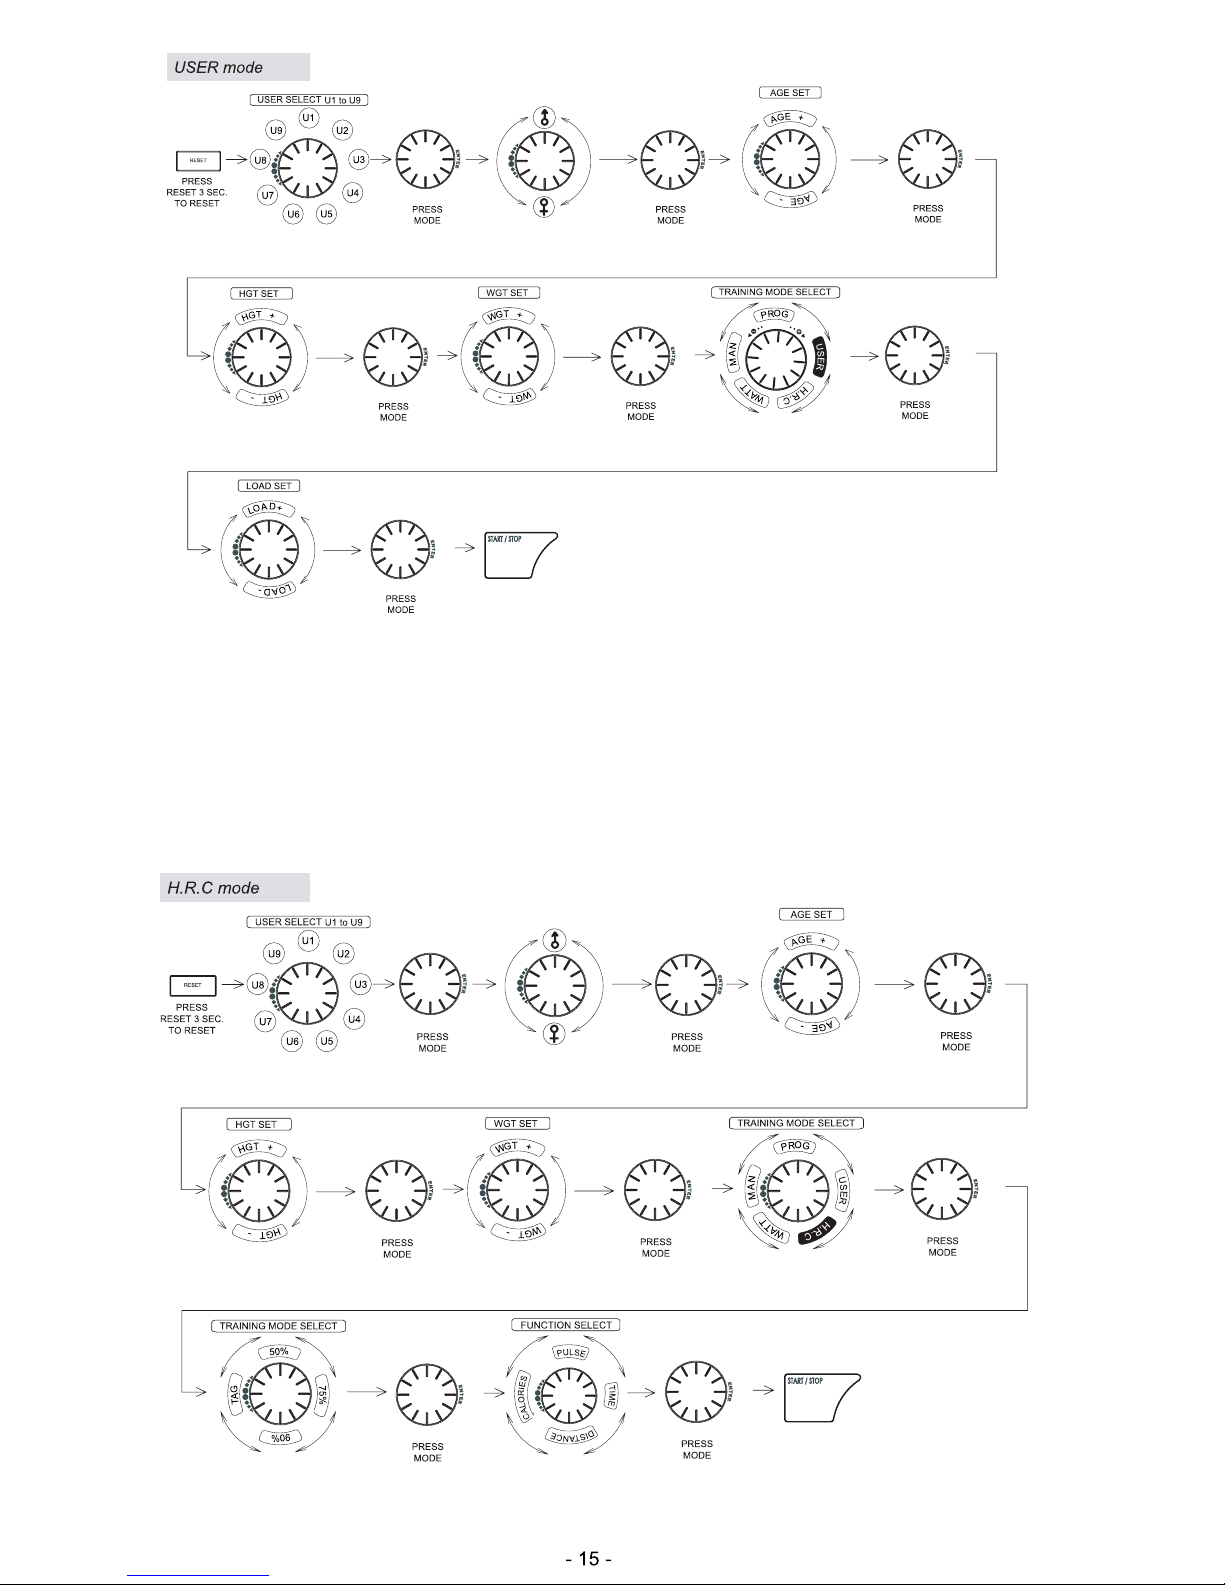
1. Power on, LCD will display segment for 2 seconds with long beep sound. Turn dial up or down to
select U1 (User number 1) to U9 (User number 9) as the user’s identification, then input personal
data: sex, age, height, weight. You may use UP or DOWN to select and adjust the data. Then press
MODE/ENER.
2. Press ENTER: UP/DOWN dial to set year/month/day/clock; screen will enter standby mode.
3. Manual is flashing in standby mode. You may turn UP and DOWN to select training mode
MANUAL / PROGRAM / USER PROGRAM / H.R.C. / WATT and press ENTER/MODE to confirm selection.
If nothing is selected the monitor will enter MANUAL mode.
4. Training in PROGRAM mode:
4-1 In the PROGRAM mode, you may turn UP/DOWN dial to select program: P01, P02, P03...P12.
The selected program will be shown on screen for 2 seconds then display program profile
accordingly.
4-2 LOAD 1 (preset value) is flashing after training program selected, you may turn UP/DOWN dial
to select level from 1 to 16 and ENTER/MODE for confirmation. Load level can be adjusted
during training.

P01
P02
P03
P04
P05
P06
P07
P08
P09
P10
P11
P12
CLOCKWISE OR
COUNTER-CLOCKWISE
CLOCKWISE OR
COUNTER-CLOCKWISE
CLOCKWISE OR
COUNTER-CLOCKWISE
CLOCKWISE OR
COUNTER-CLOCKWISE
CLOCKWISE OR
COUNTER-CLOCKWISE
CLOCKWISE OR
COUNTER-CLOCKWISE
CLOCKWISE OR
COUNTER-CLOCKWISE

CLOCKWISE OR
COUNTER-CLOCKWISE
CLOCKWISE OR
COUNTER-CLOCKWISE
CLOCKWISE OR
COUNTER-CLOCKWISE
CLOCKWISE OR
COUNTER-CLOCKWISE
CLOCKWISE OR
COUNTER-CLOCKWISE
CLOCKWISE OR
COUNTER-CLOCKWISE
CLOCKWISE OR
COUNTER-CLOCKWISE
CLOCKWISE OR
COUNTER-CLOCKWISE
5. Training in MANUAL mode
5-1 In the MANUAL mode, you may turn UP/DOWN dial to select load level from 1 to 16, the preset
level is 1.
5-2 After load level selected, you may preset function values for TIME, DISTANCE, CALORIES, and
PULSE by turning UP/DOWN dial and press ENTER (dial) confirmation.
5-3 Pressing START button to start training.
6. Training in USER PROGRAM
6-1 After USER PROGRAM is selected, you may set preferred program profile by turning UP/DOWN and
ENTER dial for each flashing column. There are 20 segments for setting. If you want to quit during
setting dial, you may hold ENTER button (dial) for 2 seconds to quit. The previous settings profile
will be saved for unfinished segment.
CLOCKWISE OR
COUNTER-CLOCKWISE
CLOCKWISE OR
COUNTER-CLOCKWISE
CLOCKWISE OR
COUNTER-CLOCKWISE
CLOCKWISE OR
COUNTER-CLOCKWISE
CLOCKWISE OR
COUNTER-CLOCKWISE
CLOCKWISE OR
COUNTER-CLOCKWISE
CLOCKWISE OR
COUNTER-CLOCKWISE
CLOCKWISE OR
COUNTER-CLOCKWISE
CLOCKWISE OR
COUNTER-CLOCKWISE
CLOCKWISE OR
COUNTER-CLOCKWISE
CLOCKWISE OR
COUNTER-CLOCKWISE
CLOCKWISE OR
COUNTER-CLOCKWISE
4. Training in H.R.C. mode:
AGE 25 is flashing after entering H.R.C. mode. You may set your age by turning UP/DOWN/ENTER
dial. The monitor will calculate preset heart rate value automatically according to your age setting.
Screen will display heart rate percentage 55%, 75%, 90% and TARGET. You may select heart rate
percentage by UP/DOWN/ENTER dial for training.

CLOCKWISE OR
COUNTER-CLOCKWISE
CLOCKWISE OR
COUNTER-CLOCKWISE
CLOCKWISE OR
COUNTER-CLOCKWISE
CLOCKWISE OR
COUNTER-CLOCKWISE
CLOCKWISE OR
COUNTER-CLOCKWISE CLOCKWISE OR
COUNTER-CLOCKWISE
CLOCKWISE OR
COUNTER-CLOCKWISE
6. Training in WATT mode:
The preset watt value 120 is flashing on screen in WATT setting mode, select UP/DOWN/ENTER
to set target value from 10 to 350.
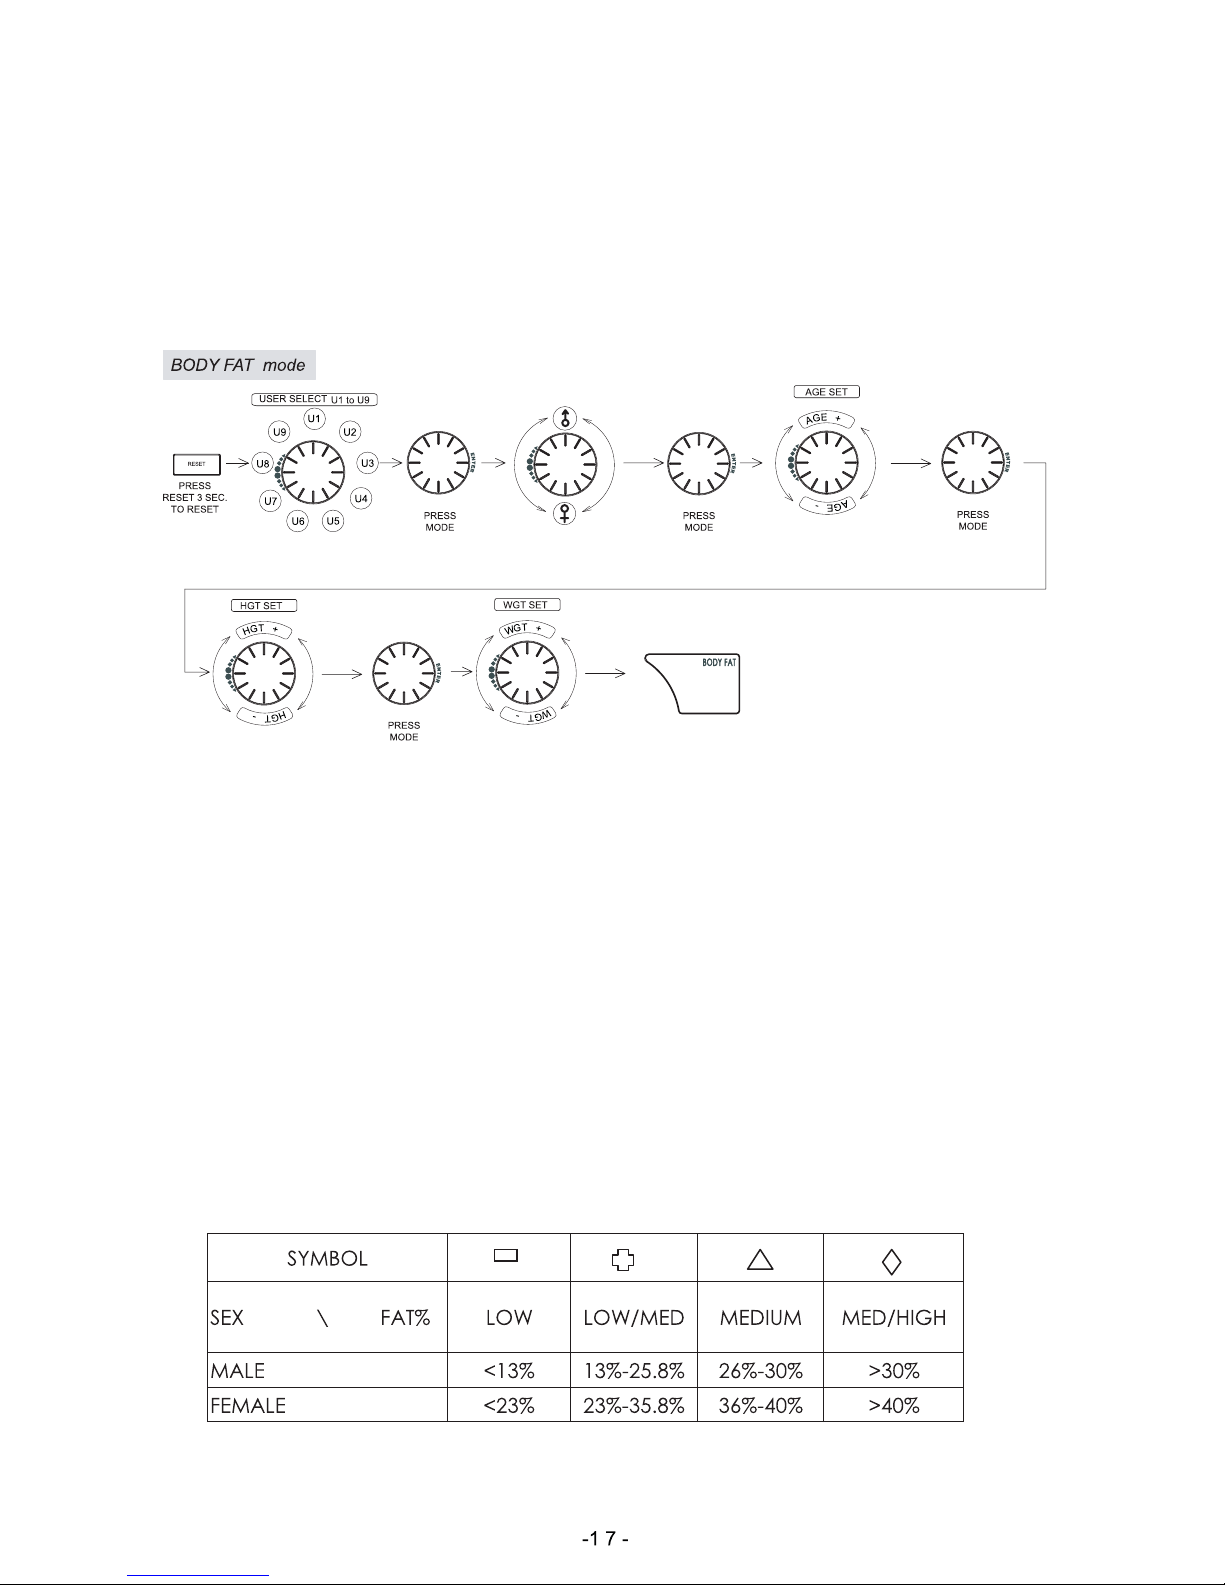
9. Traning in BODY FAT mode:
You may test and have the BODY FAT advice when the computer is in STOP mode. Please
follow the steps below:
Step I - Make sure the personal data has been entered and is correct.
Step II - Press BODY FAT button, and hold on handgrip to start body fat testing.
Step III - The symbol “--------------”will display while testing period in 8 seconds. After 8 seconds,
you will see the BODY FAT advice in percentage (*1) and BMI (*2) and the fat advice in
different symbol. It would be possible to display other indications if you have the following
situation:
1. “E-1” When you see this indication, it means you did not put your thumb properly on
the conductor. Please try again.
2. “E-4” When you see this indication, it means the BODY FAT advice has exceeded the
available area which is fixed in the program.
After BODY FAT testing, press BODY FAT button to have the computer revert back to the previous data
before testing. The BODY FAT advice figure and BMI will disappear. The computer may allow the other
people to test BODY FAT under STOP mode. The user may press RESET button for 4 seconds to select new
user identification and input new personal data. Then follow each step as above to have the new
testing.
1. BODY FAT - This is a figure that is determined using your personal data and the signal measured when
user’s hand is placed on the heart rate sensor. The computer will calculate the signal and your
personal data to figure out the FAT percentage of your body.
2. BMI - Body Mass Index: This figure is determined using height and weight data which can be
calculated to show your fitness level.
All the BMI & BODY FAT figures are the rough guide for you to take care of your health and are not for
medical treatment purposes.
Note:
1. When there is no signal being transferred into the computer for 4 minutes, the LCD display will shut off
automatically, and all previous training data will be stored. You may press any button to have the
computer resume workout.
2. The monitor can store 4 user’s (U1-U4) preset data. When the monitor is turned on, the LCD will display
the previous (before power off) user’s identification. If previous user is U1 or U2, or U3 or U4, the
previous presetting function data of Time, Distance, Calories,Watt (if training in manual) or Pulse
values will be displayed. If previous user is U5 to U9, the LCD will display user’s identification only.
3. The monitor has the same result as mentioned in point 2 if you press and hold a RESET button for
4 seconds.
4. If the LCD display is improper, please remove the battery and reinstall.
5. The monitor can be turned on with AC adapter input.
6. Body fat guidelines and symbol indication table:
CLOCKWISE OR
COUNTER-CLOCKWISE
CLOCKWISE OR
COUNTER-CLOCKWISE
CLOCKWISE OR
COUNTER-CLOCKWISE
CLOCKWISE OR
COUNTER-CLOCKWISE
CLOCKWISE OR
COUNTER-CLOCKWISE
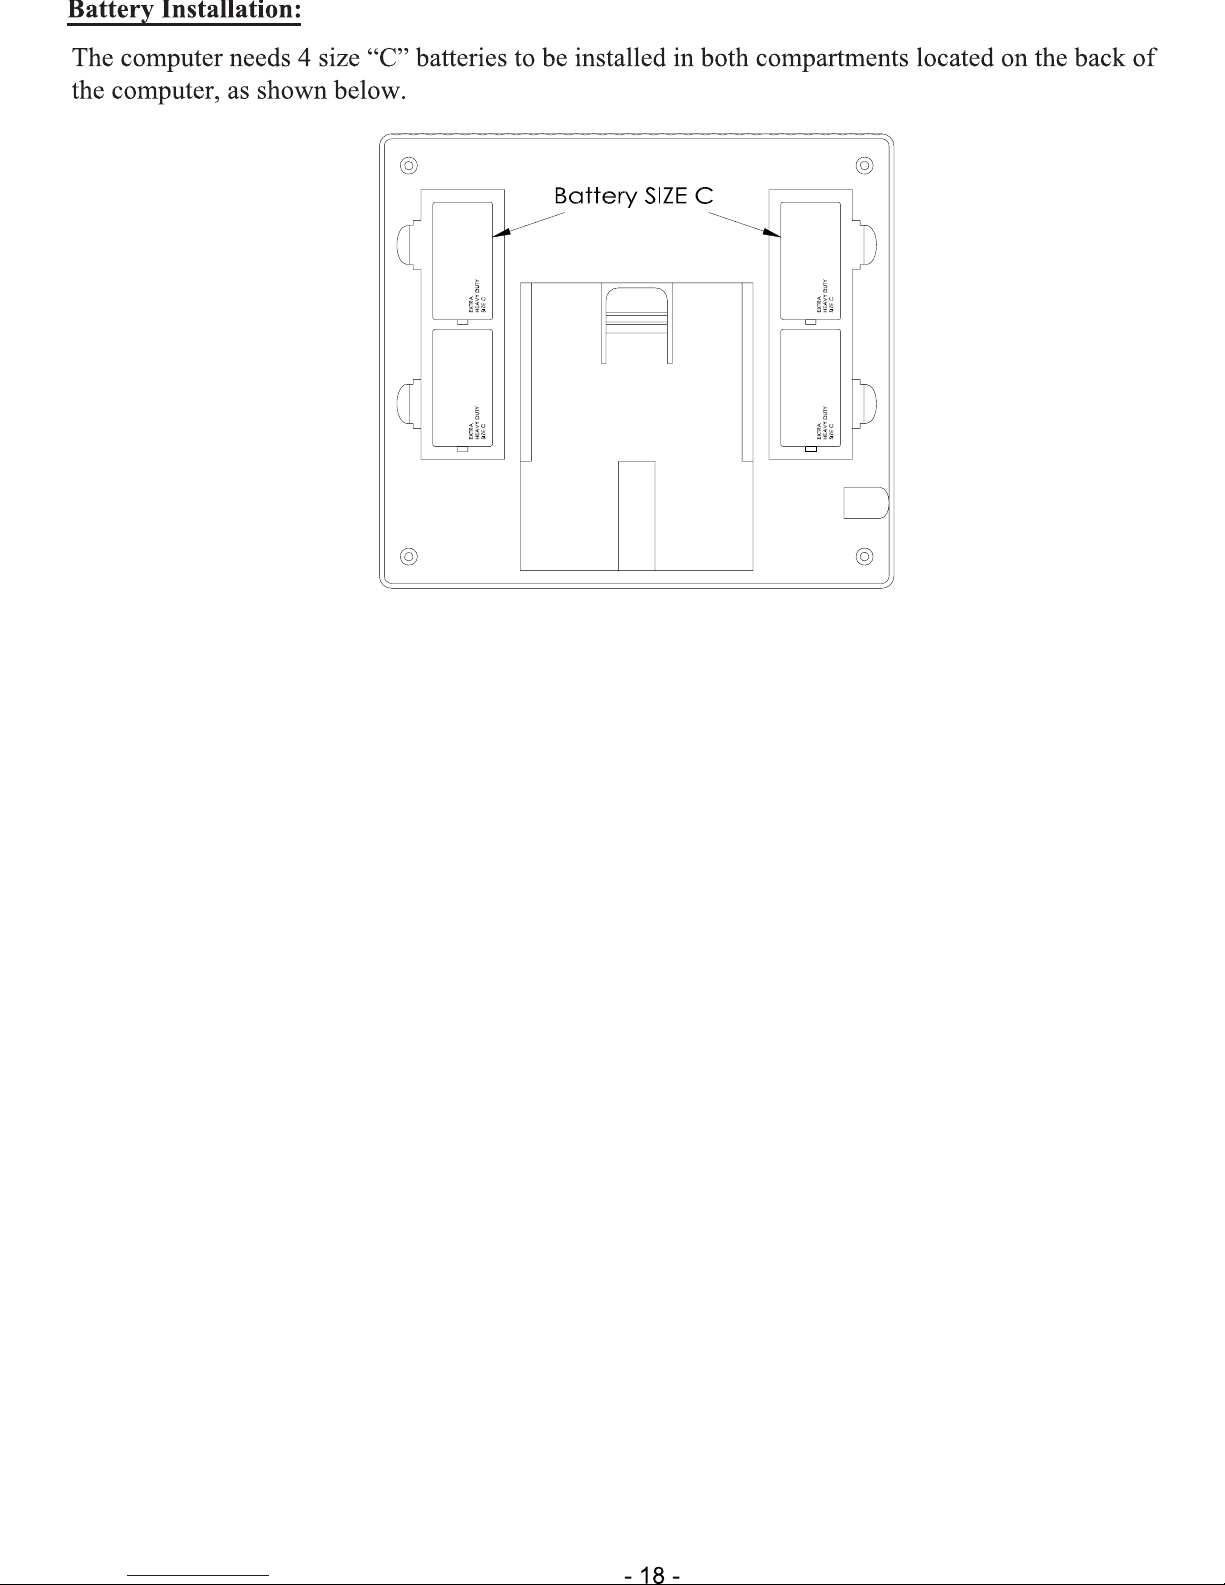
Table of contents
Other Progression Fitness Exercise Bike manuals


Popular Exercise Bike manuals by other brands


Pro-Form
Pro-Form PFEL14721-INT.0 user manual

CARDIOSTRONG
CARDIOSTRONG CST-BC70-B Assembly and operating instructions

Pro-Form
Pro-Form 740 Ekg Bike Bedienungsanleitung

Body Break
Body Break 16116901 owner's manual

Flow Fitness
Flow Fitness Turner DHT75 manual

Life Fitness
Life Fitness Lifecycle Operation manual


