Lifepro X-FLEXCYCLE PRO User manual

XFLEXCYCLE PRO EXERCISE BIKE
READY,
SET, PRO
USER MANUAL

Aerobic exercise has
enormous benefits
for your body, brain,
and mental health.
At least 75
minutes of vigorous
aerobic exercise,
such as riding an
exercise bike, are
recommended each
week for optimal
health.
HELLO THERE.
Joel and I are athletes who suffered from
severe ACL injuries a few months apart.
We purchased multiple pieces of exercise
equipment for our in-home rehab but were
left disappointed and frustrated by fitness
gear that made big promises but gave no
support, no well-thought-out plan to follow,
and no results. And that’s how Lifepro came
about, and why the Recovery + Fitness active
recovery collection was created — we’ve
set out to change all of that. It’s why every
piece of equipment bearing our name not only
undergoes rigorous scrutiny to make sure it
delivers on power and efficacy, but also comes
with built-in support from our ‘guiding angels’
and a built-in lifetime warranty so that
you’re never left hanging.
Welcome to Lifepro.
We’re in this together now.

Not everyone can afford to hire a personal trainer or a team of professionals
to help them feel and look their best. But the good news is: you don’t have to.
Lifepro brings the gym to you.
With the Lifepro X-FlexCycle Pro Exercise Bike, you can build cardiovascular
fitness and muscle strength from the comfort of your own home. The
X-FlexCycle Pro’s low-decibel fly wheel is designed specifically for in-home
use. The bike frame has three easy to set adjustment positions: upright, semi-
recumbent, and recumbent. The recumbent and semi-recumbent positions
help ease the stress on your joints and lower back and reduce fatigue during
exercise. The cushioned seat and back rest provide a supremely comfortable
ride.
The X-FlexCycle Pro improves muscle tone, cardiovascular fitness, blood
circulation, joint health and flexibility, and more. The X-FlexCycle’s computer
tracks your speed, distance, pulse rate, and calories burned so you can track
your fitness progress. Sixteen magnetic pedal resistance levels allow you to
easily adjust the difficulty of your cycling workouts. On the lowest resistance
level, workouts would be equivalent to a leisurely bike ride in the park.
Increasing the pedal resistance allows you to create more intense workouts,
similar to biking up a steep hill. Just sit back, relax, and let your legs do the
work! See results in as little as 15–20 minutes a day.
Redefine your workouts and experience the
transformative power of the Lifepro X-FlexCycle Pro:
Increase strength & stamina: improves stability and muscle tone
Regulate weight: boost your heart rate and burn calories.
Decrease chronic pain: improves core strength & circulation
Boost your metabolism: encourages your body to burn fat faster
Decrease your stress: increases serotonin and decreases cortisol
Lower blood pressure: improves circulation
Develop stronger bones: increases bone density
Check out the information in this manual for ways to get started using your
X-FlexCycle Pro. Next, be sure to visit our website xflexcyclepro.lifeprofitness.com
for access to our FREE library of workout videoswhich demonstrate how to
easily incorporate the X-FlexCycle Pro into your fitness routine.
Recovery + Fitness Collection 5

Hex Key Wrench (2)
13-15mm & 17-19mm
1
2
25
23
6
6
7
8
7
8
24
24
18
19
15
16
15
16
20 11
6
12
11
12
23
8
7
29
3
21
32
26
27
28
30
31
9
17
14 22
10 33
13
36
34
35
4
5
PARTS CHECKLIST
Item No. Description Qty Note
1Main Bike Body 1 Bolts and washers are pre-fitted
2Pedal Tension Knob 1 Pre-installed on main bike body
3Locking Pin 1
4Front Stabilizer with Wheels 1 Bolts and washers are pre-fitted
5Rear Stabilizer 1 Bolts and washers are pre-fitted
6M8×50mm Key Head Bolt 6
7∅20×1.5 Curved Washer 4
8M8 Cap Nut 4
9Seat 1 Bolts and washers are pre-fitted
10 Seat Adjustment Post 1
11 ∅24×1.5 Flat Washer 5
12 M8 Lock Nut 5
13 Backrest Frame 1 Bolts and washers are pre-fitted
14 Backrest Cushion 1 Bolts/washers are found in a baggie
15 M8×45mm Bolt 4
16 ∅8.1×4.2 Spring Washer 4
17 Rear Handlebars 1 Bolts/washers pre-fitted; nuts in a baggie
18 M8×20mm Bolt 2
19 ∅8.2×2.1 Spring Washer 2
20 ∅20×1.5 Flat Washer 2
21 Seat Adjustment Knob 1
22 Computer Monitor and Front Handlebars 1 Bolts and washers are pre-fitted
23 M6×15mm Bolt 4
24 ∅18×1.5 Flat Washer 4
25 Speed Sensor Cable (Female) 1 Pre-installed in computer monitor
26 Speed Sensor Cable (Male) 1 Pre-installed inside main bike body
27 Right Pedal 1 Labeled “R” ; Pedal nut is pre-fitted
28 Right Crank Arm 1 Labeled “R”
29 Right Pedal Nut 1
30 Left Pedal 1 Labeled “L” ; Pedal nut is pre-fitted
31 Left Crank Arm 1 Labeled “L”
32 Left Pedal Nut 1
33 Arm Resistance Band with Handle 2 For arm workouts; pre-installed on bike body
34 Leg Resistance Band with Loop 2 For leg workouts; pre-installed on bike body
35 Resistance Band Adjustment Pin 1 Pre-installed on main bike body
36 Bike Frame Adjustment Knob 1 Pre-installed on main bike body
TOOL CHECKLIST
Recovery + Fitness Collection 7Recovery + Fitness Collection 7
6X-FlexCycle Pro User Manual Lifepro
GET ACQUAINTED

8X-FlexCycle Pro User Manual Lifepro
EXERCISE BIKE PLACEMENT NOTES
In order to get in the habit of using your exercise bike every day, it’s helpful
to set it up in a convenient, comfortable location. The X-FlexCycle Pro is
designed to take up a minimal amount of floor space and to look great in any
room of your home.
IMPORTANT SAFETY NOTES FOR PLACEMENT OF YOUR
X-FLEXCYCLE PRO
• Do not use the X-FlexCycle Pro outdoors.
• Do not place the bike near water or in high-moisture environments.
• Set up the X-FlexCycle Pro where there will be at least 2 feet of clearance
on all sides of the bike.
• Only operate and store the X-FlexCycle Pro on a clear, flat, clean floor.
• We recommend you place a non-slip mat or rug under the exercise bike to
protect your carpet or floor. Before beginning exercise, ensure the floor
covering will not slide during use. The floor covering should be at least
56” × 30”.
CAUTION: Take care when lifting or moving the bike. Always use proper
lifting techniques and use assistance when needed.
Recovery + Fitness Collection 9Recovery + Fitness Collection 9
GET STARTED
FIRST STEPS
1. Remove your X-FlexCycle Pro from the shipping box and remove the
packaging from the main body of the bike, parts, and hardware. Notice
that most of the bolts, washers, and nuts come pre-fitted to the
associated part.
2. Confirm that all parts and hardware listed on the previous page are
included.
3. Read carefully through this user manual and all safety instructions
before assembling and using the X-FlexCycle Pro.
4. Go to xflexcyclepro.lifeprofitness.com and register your product within
14 days of purchase to activate your lifetime warranty.
5. Complete the steps in the 10-MINUTE ASSEMBLY GUIDE on page 10
to assemble your X-FlexCycle Pro.
CAUTION: Take care when lifting or moving the bike. Always use proper
lifting techniques and use assistance if needed.
CUSTOMER SUPPORT
If you have any questions about assembling or using your X-FlexCycle
Pro, we’re here to help. Call or email us and an experienced customer
support representative will be happy to assist you: (732) 456-6063 or
support@lifeprofitness.com.
XFLEXCYCLE PRO
EXERCISE BIKE
RECOVERY + FITNESS

Recovery + Fitness Collection 11
ASSEMBLY NOTES
• Assemble the bike on a flat surface at least 6-by-6-foot, free of obstructions.
• Pre-installed hardware must be removed from most parts before assembling.
10-MINUTE ASSEMBLY GUIDE
1
10 X-FlexCycle Pro User Manual Lifepro Recovery + Fitness Collection 11
SECURE THE SEAT TO
THE SEAT POST
1. Attach the seat (9) to the seat
post (10). Three studs on the
bottom of the seat insert through
the top of the seat post.
2. Secure the seat with three flat
washers (11) and three lock nuts
(12).
3. Use a wrench to tighten the nuts.
2
3
ATTACH FRONT AND
REAR STABILIZERS
1. Insert the locking pin (3) to
lock the main bike body (1) in
position.
2. Attach the front stabilizer (4)
to the bike body using the two
M8×50 bolts (6), two
curved washers (7), and two
M8 cap nuts (8).
3. Attach the rear stabilizer (5)
to the bike body (1) in the
same manner.
4. Tighten all four cap nuts with
a wrench.
SECURE THE BACKREST
POST TO THE SEAT POST
1. Attach the backrest frame (13)
to the seat post (10) using
two M8×50 bolts (6), two flat
washers (11), and two lock nuts
(12).
2. Use a wrench to tighten the lock
nuts.
9
10
7
7
6
7
4
5
6
8
1
6
8
12
12
11
11
12
8
8
7
11
6
10
13
6
11
11
12
12
ATTACH THE BACKREST
CUSHION
1. Attach the backrest cushion
(14) to the backrest frame (13)
using four M8×45 bolts (15)
and four spring washers (16).
2. Use the hex key to tighten the
bolts.
4
14
13
16
16
15
15
3

ATTACH THE
COMPUTER AND FRONT
HANDLEBARS
1. Insert the front handlebar
frame (22) into the slots at the
top of the main bike frame (1).
2. Secure the front handlebars
using four M6×15 bolts (23)
and four flat washers (24).
3. Use the hex key to tighten the
bolts.
4. Insert the male speed sensor
cable (26) into the female
speed sensor cable (25).
SECURE THE SEAT TO
THE MAIN BIKE FRAME
1. Insert the seat post (10) into
the main bike frame (1).
2. Secure using the seat
adjustment knob (21).
3. Screw the knob in clockwise to
tighten.
NOTE: Adjust the seat to your
desired height after the bike is
fully assembled.
6
7
10
1
1
22
17
13
18 18
21
19
20
23
25
25
26
26
24
24
23
19
20
ATTACH THE REAR
HANDLEBARS
1. Attach the rear handlebars
(17) to the backrest frame (13)
using two M8×35 bolts (18),
two spring washers (19), and
two flat washers (20).
2. Use the hex key to fully tighten
the bolts.
5
Recovery + Fitness Collection 1312 X-FlexCycle Pro User Manual Lifepro Recovery + Fitness Collection 13
INSTALL TWO AAA
BATTERIES
1. Remove the back cover (A) of
the computer monitor (C).
2. Insert two AA batteries (B)
into the battery compartment
according to the polarity
markings in the compartment.
3. Replace the back cover.
CAUTION: Never mix old
batteries and new batteries. Only
use AA batteries with the
computer monitor.
8A
B
C

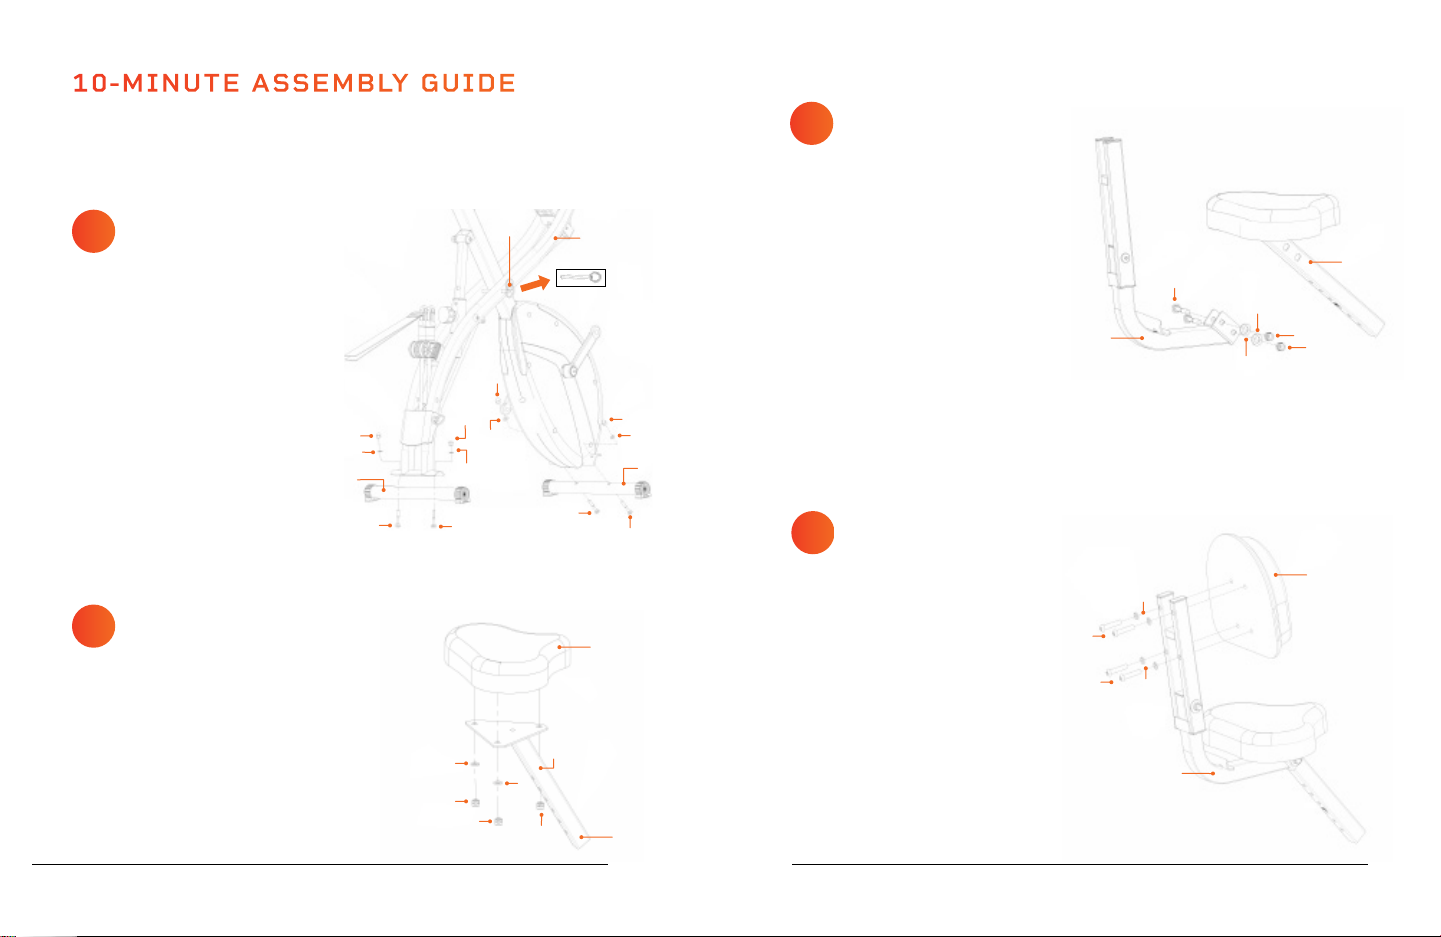
ATTACH THE PEDALS TO THE MAIN BIKE FRAME
1. Identify the left (labeled “L”) and right (labeled “R”) pedals. Identify the
left and right crank arms (also labeled with “L” and “R”).
2. Remove the pedal nut (29) from the right pedal (27). Thread the right
pedal (27) CLOCKWISE onto the right crank arm (28).
3. Thread the right pedal nut onto the pedal threads.
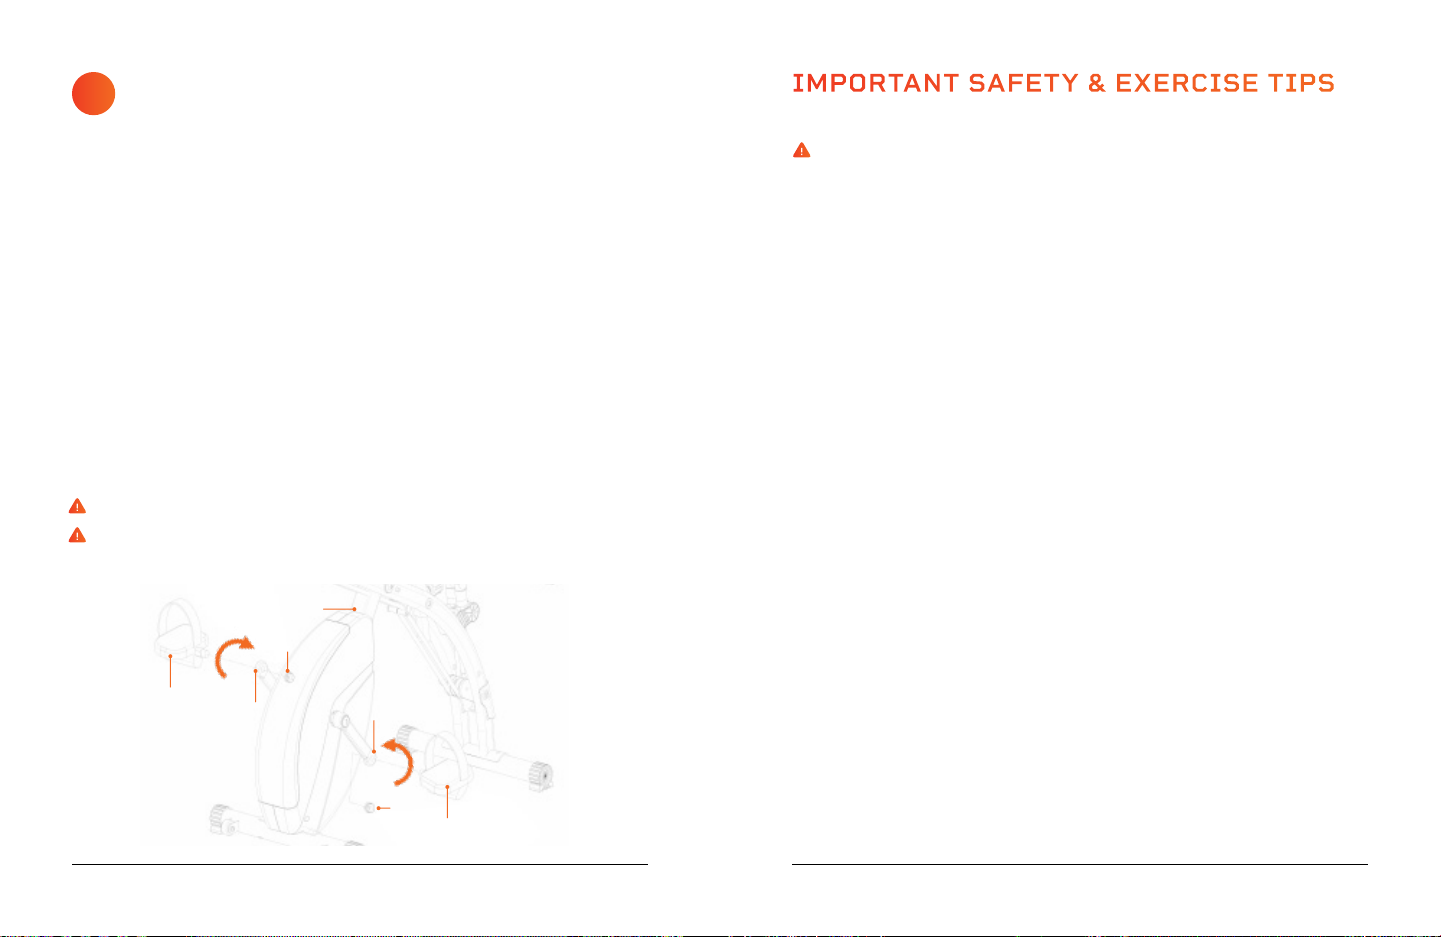
4. Use both wrenches to secure the pedal to the crank arm. Use the larger
wrench to tighten the pedal nut and use the smaller wrench to hold the
pedal thread in place. To tighten, turn the large wrench CLOCKWISE and
the small wrench COUNTER-CLOCKWISE.
5. Remove the pedal nut (32) from the left pedal (30).
6. Thread the left pedal (30) COUNTER-CLOCKWISE onto the left crank arm
(31).
7. Thread the right pedal nut onto the pedal threads.
8. Use both wrenches to secure the pedal to the crank arm as you did in step
4. However, this time, turn the large wrench COUNTER-CLOCKWISE and
the smaller one CLOCKWISE.
CAUTION: Do not mix up the left and right pedal nuts.
CAUTION: Be sure to fully tighten the pedals and pedal nuts. Riding the
bike with loose pedals can cause injury and/or strip the pedals.
9
1
30
31
27
28
29
32
Recovery + Fitness Collection 15
14 X-FlexCycle Pro User Manual Lifepro Recovery + Fitness Collection 15
Front of Bike
R
L
IMPORTANT SAFETY & EXERCISE TIPS
SAFETY TIPS
WARNING: Overexertion, or incorrect or excessive exercise, can damage your
health. Always exercise within the heart beat range and time limits recommended by
your physician.
1. Consult with a medical professional before beginning a new exercise program.
This is particularly important for those over the age of 35 or with pre-existing
health conditions.
2. Stop exercising immediately if you experience any of the following symptoms:
feeling faint, dizzy, or nauseous, pain or tightness in your chest, difficulty
breathing, irregular heartbeat. Overexertion, or incorrect or excessive exercise,
can damage your health. If you do experience any of these symptoms, consult
your doctor before continuing with your exercise program.
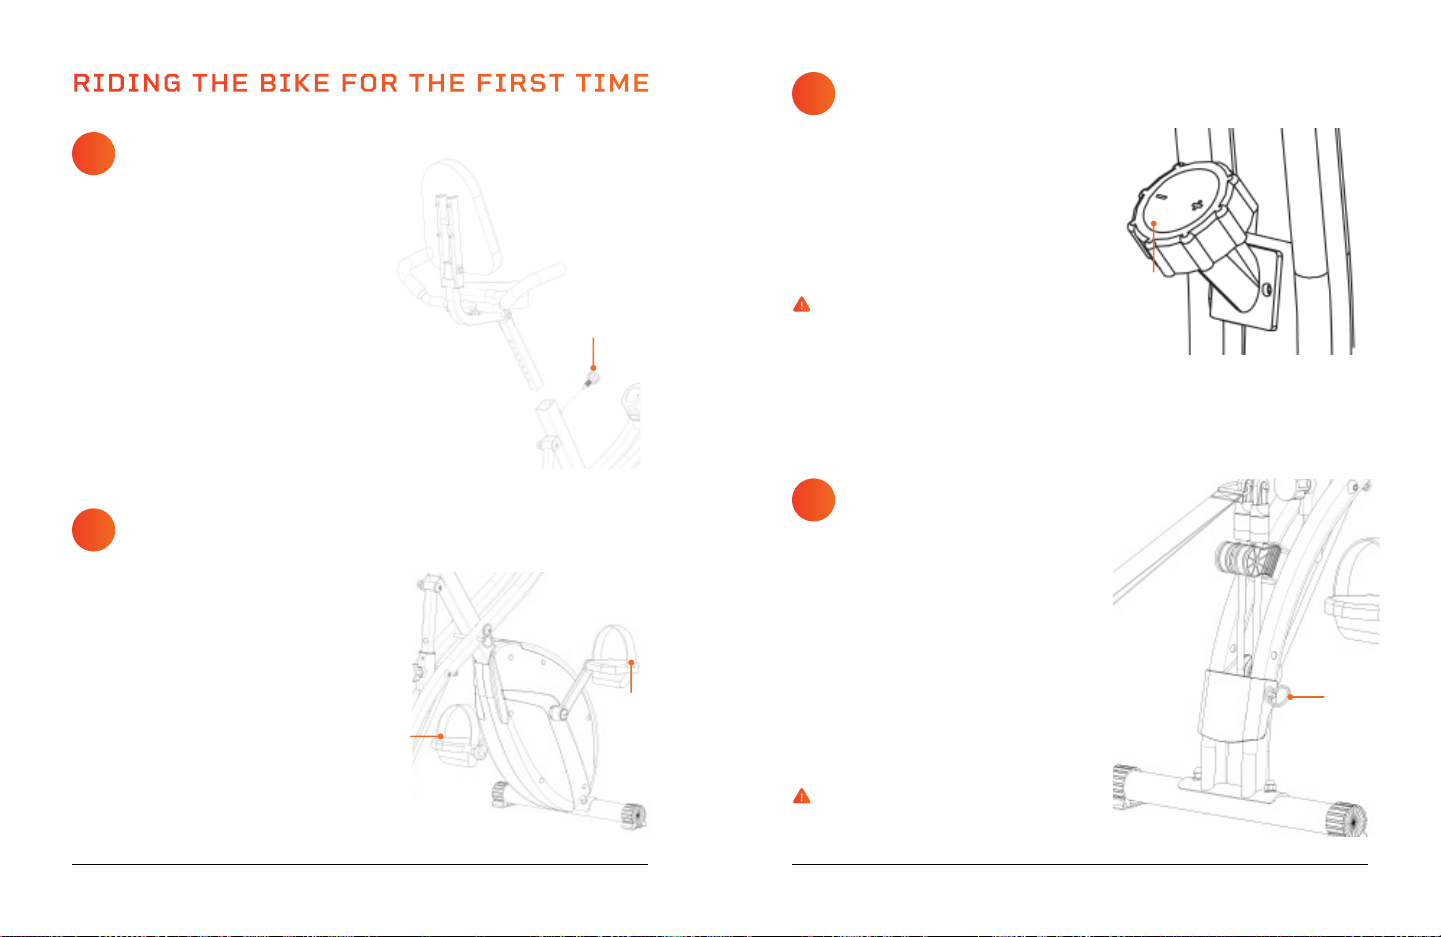
3. We recommend beginners hold the handlebars firmly while riding the X-FlexCycle
Pro to help maintain balance. As you get more comfortable riding the bike, you
can try using the arm resistance bands.
4. Keep hands away from all moving parts.
5. Always remain seated while using the X-FlexCycle Pro. Do not stand on the
pedals.
6. The X-FlexCycle Pro does not have a braking system. Always slowly decrease
pedaling speed to stop. Do not stop pedaling abruptly.
7. Do not jump from the bike to the ground while it is in motion.
8. Always wear appropriate clothing, socks, and comfortable, well-fitting athletic
shoes when using the X-FlexCycle Pro. Do not wear loose or baggy clothing as it
can get caught on the bike during exercise, causing injury.
9. Always properly warm up before exercise and cool down after to prevent injury.
10. Do not use the X-FlexCycle Pro during or immediately after eating or when you
feel tired. Never use the X-FlexCycle Pro while intoxicated.
11. Make sure that all third parties are familiar with the safety instructions.
EXERCISE TIPS
1. Keep your body and head facing forward at all times.
2. Make sure to breathe regularly and calmly during exercise.
3. Stay hydrated before, during, and after exercise.
4. Check your pulse regularly using the sensors on the front handlebars.

1
2
3
4
5
6
7
8
9
1
0
1
1
1
2
1
3
1
4
1
5
1
6
ADJUSTING THE PEDAL
TENSION
Sixteen pedal resistance levels allow
you to increase or decrease pedal
difficulty.
1. Turn the pedal tension knob (2)
clockwise to increase the pedal
resistance. Turn the knob counter-
clockwise to decrease.
CAUTION: We strongly recommend
beginning with the lowest pedal
resistance and slowly working your way
up as you get used to riding the
X-FlexCycle Pro.
NOTE: For best results, only adjust the
pedal tension during exercise.
ADJUSTING TENSION OF
THE RESISTANCE BANDS
Increase or decrease the tension of the
arm and leg resistance bands using the
resistance band adjustment pin.
1. Pull out the resistance band
adjustment pin (35).
2. Move the pin and the connected
plastic part up or down to one of the
three available adjustment holes.
The top hole is easy resistance, the
middle hole is medium resistance, and
the bottom hole is hard resistance.
CAUTION: We recommend beginning
with the easy resistance band level.
3
4
2
34
Recovery + Fitness Collection 1716 X-FlexCycle Pro User Manual Lifepro Recovery + Fitness Collection 17
ADJUSTING THE SEAT
HEIGHT
The seat adjustment knob is an elastic
knob which allows you to adjust the
seat height without removing it from
the bike frame.
1. Loosen the seat adjustment knob
(21), then pull on the knob head to
slide the seat up or down. Six height
adjustment holes in the seat post
provide a range of height options.
2. Push the knob back in. Ensure it is
securely inserted into one of the
adjustment holes, then tighten the
knob to secure the seat.
1
21
D
D
ADJUSTING THE PEDAL
SAFETY STRAPS
The pedals have safety straps to keep
your feet from sliding off. Each strap
has six adjustment holes along the
outside of the strap (D) allowing you
to lengthen or shorten the straps to fit
your foot.
1. Put your right foot on the right pedal
and adjust the safety strap so it is
snug (but not tight) across the top of
your foot. Your foot should be able to
slide easily in and out.
2. Adjust the left pedal’s safety strap in
the same manner.
2
RIDING THE BIKE FOR THE FIRST TIME

18 X-FlexCycle Pro User Manual Lifepro Recovery + Fitness Collection 19
MOVING THE XFLEXCYCLE PRO
You can easily move the exercise bike with the wheels on the front
stabilizer (4).
1. Stand in front of the bike.
2. Grasp the front handlebars (22) with both hands.
3. Tilt the bike toward you until it rests on the wheels (F).
4. Slowly and carefully wheel the bike to its new location.
CAUTION: The exercise bike should ONLY be moved by an adult.
USING THE RESISTANCE
BANDS
Incorporate strength training into your
workouts by using the arm and leg
resistance bands.
1. While sitting on the bike, use the arm
resistance bands (33) to work your
biceps, chest muscles, and shoulders.
2. While standing behind the bike, insert
one leg into the elastic loop at the
end of the leg resistance bands (34).
The leg resistance band can be used
to work your hips, glutes, hamstrings,
quads, inductors, abductors, and calves,
depending on the exercise performed.
6
USING THE PULSE HAND
SENSORS
The front handlebars have built-in
hand sensors which allow pulse to be
measured and displayed.
1. Select pulse mode (see OPERATING
INSTRUCTIONS on page 21).
2. Grasp the hand sensors (E) with
both hands during exercise. Hold the
sensors firmly but not too tightly.
3. Your current pulse will display on the
monitor (C) after a few seconds.
CAUTION: Heart rate shown on the
monitor may be inaccurate.
Overexertion can damage your health.
NOTE: If the sensors become damp, it
may be difficult to get a pulse reading.
5
E
3
F
4
22
33
E
F
C

20 X-FlexCycle Pro User Manual Lifepro Recovery + Fitness Collection 21
OPERATING INSTRUCTIONS
MODE INFORMATION SHOWN ON MONITOR VALUE
SPEED SPD The current workout speed 0.0 – 99.9 Mi/Hr
TIME TMR The duration of the current workout 00:00 – 99:59 (Min:Sec)
ODOMETER ODO The distance cycled in the current workout 0.00 – 999.9 Miles
CALORIES CAL The calories expended during the current workout 0 – 9999 KCAL
PULSE PUL The current pulse in beats per minute 40 – 240 BPM
COMPUTER MONITOR
The computer monitor helps you track
all of your workout metrics. You can
select from five different modes:
speed, time, odometer, calories,
and pulse. See the table above
for details about each mode. All
values show in small text in the
bottom row of the screen. The
selected value is shown in the
main area of the monitor (0:11 in
the image at right).
CHANGE THE MODE DISPLAYED ON THE MONITOR
To adjust the mode displayed in large digits at the top of your monitor:
1. Press the blue Mode button to toggle through the modes in order:
speed, time, odometer, calories, and pulse.
2. The name of the mode at the bottom will disappear to indicate that
mode is the selected mode.
AUTO SHUTOFF
The monitor will automatically shut off after four minutes of inactivity. The
monitor will auto power on when you press the Mode button or begin to
exercise.
ADJUSTING THE BIKE FRAME
The X-FlexCycle Pro bike frame can be adjusted to three different
configurations: upright, semi-recumbent, and recumbent. Three adjustment
holes provide the three different bike frame configurations. The bottom
hole selects the upright bike position, where the seat is in a normal bike
configuration. The middle hole selects the semi-recumbent bike configuration,
where the seat is angled slightly back. The top hole selects the recumbent
bike configuration, where the seat is angled even further back.
1. Loosen the bike frame adjustment knob (36), then pull on the knob head
out to change the angle of the seat post by choosing from the three
adjustment holes.
2. Push the adjustment knob
back in. Ensure it is
securely inserted into one
of the three adjustment
holes, then tighten the
knob to secure the bike
frame in its new
configuration.
36

Recovery + Fitness Collection 23
20Age
200
150
130
110
195
146
127
107
100%
75%
65%
55%
of maximum heart rate
190
143
124
105
185
139
120
102
180
135
117
99
175
131
114
96
170
128
111
94
165
124
107
91
160
120
104
88
155
116
101
85
150
113
98
83
145
109
94
80
140
105
91
77
135
101
88
74
100
98
85
72
25 30 35 40 45 50 55 60 65 70 75 80 85 90
PULSE MONITORING
CAUTION: The pulse monitoring system may be inaccurate. Excessive
training can cause serious injury or even death. If you feel unwell and/or
lightheaded, stop training immediately. Make sure all users of this exercise
bike are familiar with this information, understand it, and apply it
unconditionally.
PULSE MONITORING USING THE HAND SENSORS
The X-FlexCycle Pro is equipped with pulse hand sensors integrated into the
front handlebars. These hand sensors are used for short-term determination
of the pulse rate. To do this, you need to cover the sensors with both hands
at the same time. The pulse measuring system is based changes in electrical
skin resistance measured by the hand sensors due to the heartbeat and blood
pressure fluctuations. These changes are summarized as a mean value and
shown after a short time on the display as the current pulse rate.
CAUTION: For large parts of the population, the pulse-induced skin
resistance change is so minimal that usable values cannot be derived from the
measurement results. Also callouses on the palms, damp hands, and body
tremors may prevent correct measurement. In such cases, the pulse value
may be displayed incorrectly or not at all.
If the pulse fails to display or displays incorrectly, check to see if the same
problem occurs for other users. If the problem occurs only with one user, the
X-FlexCycle Pro is not defective.
CAUTION: The hand sensors measure heart rate only for the purpose of
displaying the current pulse during exercise. This value says nothing about the
safety and effectiveness of the training. Also, this type of measurement is in
no way designed or suitable for medical diagnostic purposes.
Therefore, it is important to discuss with your physician the most suitable
exercise type, duration, and exertion level for you and to create a suitable
exercise plan before you begin using the X-FlexCycle Pro.
This applies especially to those who:
• Are older than 35 years • Are overweight
• Have too high or too low blood pressure • Have not been physically active for
• Have heart problems a long period of time
22 X-FlexCycle Pro User Manual Lifepro
PULSE AND HEART RATE
Calculate your personal target heart rate, in beats per minute (shown in the chart
above) when training based on your fitness goals:
MAXIMUM HEART RATE
This value represents your maximum heart rate and serves as a basis from which
to calculate your personal training heart rate.
HEALTH & WELLNESS TRAINING
• Ideal for people who are overweight, older, beginners, and/or who do not exercise
regularly.
FAT BURNING TRAINING
• Ideal for athletes and sports people who aim to lose weight.
CONDITIONING & FITNESS TRAINING
• Ideal for athletes and sports people who want to improve their stamina and/or
conditioning.
For best results, calculate the average value of selected target zone (see chart):
• Health & Wellness: Zone average = 55% of max heart rate (max heart rate x 0.55)
• Fat Burning: Zone average = 65% of max heart rate (max heart rate x 0.65)
• Conditioning & Fitness: Zone average = 75% of max heart rate (max heart rate x 0.75)
Target Zone = 70-80% of Max Heart Rate
Target Zone = 50-60% of Max Heart Rate
220 - Your Age = Max Heart Rate
Target Zone = 60-70% of Max Heart Rate

EXERCISE RECOMMENDATIONS
PREPARING FOR EXERCISE
If you have not done endurance or cardio exercise for a long period of time, you should make
an appointment with your physician for a checkup and to discuss your fitness goals. This is
especially important for people who are over 35, overweight, or have heart/circulatory problems.
EXERCISE RECOMMENDATIONS
HYDRATION
Adequate hydration is essential before and during exercise. During a 30 minute workout it
is possible to lose up to 1 liter of liquid. You should drink about 1.5 cups 30 minutes before
beginning exercise. Take care to maintain balanced hydration during the workout.
EXERCISE FREQUENCY
Experts recommend endurance exercise 3-4 days a week to keep your cardiovascular system
fit. It is important to plan sufficient breaks, to give your body enough time for rest and
recovery. You should take at least one day off after each workout.
EXERCISE INTENSITY
Many beginners make the mistake of exercising too intensely. If your goal is to run a marathon,
your intensity will certainly be high. However, most people have fitness goals such as weight
reduction, improved cardiac/exercise fitness, stress reduction, etc., and therefore should
exercise at a lower intensity. We recommend aiming for the appropriate target heart rate for
your particular fitness goal. See PULSE AND HEART RATE on page 22 for more information.
DURATION OF INDIVIDUAL WORKOUT SESSIONS
For optimal endurance or weight-reduction training, the duration of each workout should be
25-60 minutes. Beginners and those who have not exercised regularly for a long period of
time should start with short workouts of 10 minutes or less in the first week and then slowly
increase workout duration week by week.
WORKOUT DOCUMENTATION SAMPLE EXERCISE PLAN BELOW
To stay motivated and to evaluate the success of your workouts, create an exercise plan
before beginning exercise (sample below). In your plan you can document workout data such
as distance, time, heart rate, as well as personal data, such as body weight, blood pressure,
resting heart rate (measured in the morning immediately after waking up) and how you feel
during exercise.
SAMPLE WEEKLY EXERCISE PLAN Week: __________________ Month: __________________ Year: __________________
Day Date Exercise Duration Exercise Distance Calories Burned Heart Rate Notes
Mon.
Tues.
Wed.
Thur.
Fri.
Sat.
Sun.
Weekly Totals:
WORKOUT INSTRUCTIONS
STEP 1: WARM-UP PHASE
Spend about 5 minutes doing warm up stretches before exercising; this prevents pulled
muscles and other exercise injuries. Stretching gets blood flowing and helps loosen your
muscles so they are ready for exercise. While doing the following stretches, do not force or jerk
your muscles, and most importantly, if it hurts: STOP. After stretching, continue your warm-up
by riding the X-FlexCycle Pro for 3-5 minutes at a slow speed and the lowest tension level.
TOUCH YOUR TOES
1. Bend your knees slightly. Let your back and shoulders relax as
you bend over and try to touch your toes.
2. Hold the stretch for 10-15 seconds. Repeat 3 times.
STRETCH YOUR LEGS, CALVES, AND BUTTOCKS
1. Sit on the floor or a cushion. Place your left foot against your
right inner thigh.
2. Bend toward your right foot and try to touch your toes.
3. Hold the stretch for 10-15 seconds.
4. Switch legs and repeat. Stretch each leg 3 times.
STRETCH YOUR QUADS
1. Place your left hand on a wall or a table to help with your
balance.
2. With your right hand, grab your right ankle. Pull your heel in
toward your buttocks.
3. Hold the stretch for 10-15 seconds.
4. Switch legs and repeat. Stretch each leg 3 times.
STRETCH YOUR GROIN AND INNER THIGH MUSCLES
1. Sit on the floor or a cushion with your knees bent and the soles of
your feet together.
2. Hold your ankles and bend forward at your hips.
3. Hold the stretch for 10-15 seconds. Repeat 3 times.
STEP 2: EXERCISE PHASE
During the exercise phase you’re building muscle, stamina, and
improving your cardiovascular health slowly over time. The most
important thing is to always listen to your body. If you are tired or
sore, slow down or stop exercising for the day.
STEP 3: RECOVERY PHASE
After exercising, it’s important to give your body time to cool down and recover. Ride the bike
for another 3-5 minutes at a slow speed and the lowest tension level. Then spend 5 minutes
again completing the stretches above to continue cooling down your muscles. Be careful not
to force or jerk your muscles as you stretch.
Recovery + Fitness Collection 25
24 X-FlexCycle Pro User Manual Lifepro

SAFETY INSTRUCTIONS
PLEASE KEEP THIS MANUAL IN A SAFE PLACE FOR REFERENCE.
WARNING: To reduce the risk of burns, fire, electric shock, injury to persons, or damage
to equipment, read the following important precautions and information before operating
the X-FlexCycle Pro.
DISCLAIMER
1. The health benefits suggested or implied in this manual, other product literature, and
website are not certified or endorsed by any regulatory authority or medical institute.
2. The use of this bike is entirely at the user’s discretion. Please read all instructions and
safety information carefully before using this product. We assume no responsibility for
personal injury or property damage sustained by or through using this product.
RESPONSIBILITIES
3. It is the responsibility of the owner to ensure that all users of the X-FlexCycle Pro are
adequately informed of all warnings and precautions.
4. Use the X-FlexCycle Pro only as instructed in this manual.
5. Check the unit for any damage prior to each use. Safe use of the X-FlexCycle Pro can
only be assured when it is examined carefully before each use. Do not use if damaged,
faulty, defective, or if the device is making unusual noises. Do not use the exercise bike
again until it is in perfect working order.
6. Check the unit for loose nuts, bolts, and pedals prior to every use. Some parts, such
as the pedals, are prone to loosening over time. Tighten any loosened nuts, bolts, and
pedals before use.
7. Do not allow children to use the X-FlexCycle Pro. This product is for adult-use only.
8. Keep children and pets away from the X-FlexCycle Pro at all times.
9. Adults with diminished mental or physical capacity may only use the X-FlexCycle Pro
while supervised by a responsible adult.
10. Do not allow more than one person to use the X-FlexCycle Pro at a time.
11. Do not exceed the maximum weight capacity of 220 lbs.
12. Use caution when lifting or moving the X-FlexCycle Pro to avoid injury. Always use
correct lifting techniques and get the assistance of another person when needed.
13. The X-FlexCycle Pro is intended for in-home use only. Do not use the X-FlexCycle Pro in
any commercial, rental, institutional, therapeutic, or school setting.
BATTERY SAFETY
14. Only use AA batteries to power the computer monitor. Do not mix old and new batteries
or batteries of different types.
15. Ensure the batteries are inserted into the battery compartment according to the
polarity markings. Incorrect installation of batteries may cause battery leakage and
corrosion, resulting in damage to the computer.
16. Do not dispose of batteries in a fire. Do not dispose of batteries with normal household
waste; take batteries to a local recycling center.
26 X-FlexCycle Pro User Manual Lifepro
17. Keep the X-FlexCycle Pro and batteries away from hot surfaces and heat sources such
as heaters, heat vents, furnaces, ovens, stovetops, fireplaces, and open flames.
18. Never spill water or beverages onto the monitor or operating components as this may
cause electric shock, fire, or damage to the bike components.
PERSONAL SAFETY INSTRUCTIONS FOR EXERCISE
19. Consult with a medical professional before beginning a new exercise program. This is
particularly important for those over the age of 35 or with pre-existing health conditions.
20. Incorrect or excessive exercise can be damaging to health. Always exercise within the
heart beat range and time limits recommended by your physician.
21. Stop exercising immediately if you experience any of the following symptoms: feeling
faint, dizzy, or nauseous, pain or tightness in your chest, difficulty breathing, irregular
heartbeat. Overexertion or incorrect or excessive exercise can damage your health. If
you do experience any of these symptoms, consult your doctor before continuing with
your exercise program.
22. Always properly warm up before exercise and cool down after to prevent injury.
23. Do not use the X-FlexCycle Pro during or immediately after eating or when you feel
tired. Never use the X-FlexCycle Pro while intoxicated.
24. Always wear appropriate clothing, socks, and comfortable, well-fitting athletic shoes
when using the X-FlexCycle Pro. Do not wear loose or baggy clothing as it can get
caught in the machine during exercise, causing injury.
25. Beginners and those who have issues with balance should hold the handlebars firmly
while riding the X-FlexCycle Pro . Keep hands away from all moving parts.
26. Always remain seated while using the X-FlexCycle Pro. Do not stand on the pedals.
27. The X-FlexCycle Pro does not have a braking system. Always slowly decrease pedaling
speed to stop. Do not stop pedaling abruptly.
28. Do not jump from the bike to the ground while it is in motion.
TRAINING ENVIRONMENT
29. Keep the X-FlexCycle Pro indoors, away from moisture and dust. Do not use outdoors.
Do not store in a garage or covered patio, or near water.
30. Only operate and store the unit in a dry environment between 32°F - 104°F.
31. Place the unit on a solid, flat, level floor during operation and while not in use.
32. Ensure there is at least 2 feet of clearance around the entire bike.
33. Place a non-slip floor covering (rug, carpet, mat) beneath the bike to protect carpet or
flooring. Ensure the floor covering does not slide around before beginning exercise.
34. Use the X-FlexCycle Pro in a well-ventilated room, so that an optimal amount of oxygen
is available during training. Avoid drafty areas.
CLEANING, MAINTENANCE, AND STORAGE
35. Wipe down the X-FlexCycle Pro after exercise. Clean only with a damp cloth and mild,
non-abrasive detergent. Do not use chemical, abrasive, or solvent cleaners.
36. Only use with the original parts and accessories provided by the manufacturer.
37. Servicing other than the procedures in this manual should be performed by an
authorized service representative only.
38. Never insert or drop any object into any opening.
Recovery + Fitness Collection 27

28 X-FlexCycle Pro User Manual Lifepro Recovery + Fitness Collection 29
MAINTENANCE AND CARE
CAUTION: Before you perform any care, cleaning, maintenance, repair,
or similar work on your exercise bike, ensure power to the computer
monitor is off. The monitor will automatically shut off after four minutes of
inactivity. Only when all work is fully completed, and the device is
completely re-assembled, may the computer monitor be turned back on.
MAINTENANCE & CLEANING INTERVALS
CHECK ON AND AROUND THE BIKE: BEFORE EACH USE
Check that there are no objects on or under the exercise bike that could
interfere with safe usage.
CHECK THE TIGHTNESS OF THE PEDAL NUTS: BEFORE EACH USE
Check the tightness of the pedal nuts before each use. Tighten, if
necessary.
Using the exercise bike when the pedals have come loose can cause injury.
It can also cause the pedal threads to become stripped.
CHECK TIGHTNESS OF ALL BOLTS/NUTS: BEFORE EACH USE
Check all bolts and nuts before each use. Tighten, if necessary.
CLEAN THE BIKE: AFTER EACH USE
After each workout, clean the exercise bike with a damp cloth to remove
any perspiration and/or other liquid residues. Never use solvents or
chemical cleaners to clean the exercise bike. Dry the cleaned areas
thoroughly.
Problem Possible Reason How to Resolve
Computer monitor
is not functioning.
Batteries are dead. Replace batteries with two new AA
batteries.
Batteries are installed
incorrectly.
Ensure the batteries are installed
according to the polarity markings
in the battery compartment.
Speed sensor may be
disconnected.
Ensure the male and female ends
of the computer’s speed sensor are
securely connected.
No pulse rate
reading or the
reading is erratic
or inconsistent.
Both hands are not on the
sensors.
Hold on to the sensors on the
handlebars with both hands during
exercise.
Sensors are damp. Keep the sensors dry.
Gripping the sensors too tightly. Hold the sensors firmly, but not too
tightly.
Pedals came
loose during
exercise.
This can happen if the pedals
weren’t properly tightened
during assembly.
Stop using the bike immediately
and use the included wrenches
to tighten the nuts securing the
pedals to the crank arms.
Pedals won’t stay
tightened or are
stripped.
Using the bike with loose pedals
will eventually damage the
threads on the crank arms.
If caught early, tightening
the pedal nuts will solve the
problem. If the threads are too
damaged, the pedals won’t stay
tightened even after tightening
the pedal nuts.
If the pedals are stripped, please
contact us for assistance.
Bike makes a
squeaking noise
when in use.
Bolt(s) may be loose. Check all bolts and tighten any
loose ones.
TROUBLESHOOTING GUIDE
Quickly troubleshoot simple issues you might experience using the table
below. Please contact us for additional assistance at: (732) 456-6063
or support@lifeprofitness.com. Please do not attempt to repair the
X-FlexCycle Pro on your own.

30 X-FlexCycle Pro User Manual Lifepro
PRODUCT
SPECIFICATIONS
MADE IN CHINA
UNIT SPECS
Assembled Size (3 Frame Positions):
Upright: 36.2 x 17.3 x 46.1 in
Semi-Recumbent: 41.3 x 17.3 x 43.5 in
Recumbent: 52.0 x 17.3 x 34.6 in
Net Weight: 43.0 lbs
Maximum User Weight: 220 lbs
Decibel Rating: 40 dB
Pedal Tension Settings: 0–16
Operation Temperature: 32–104F
Recovery + Fitness Collection 31
LIFETIME
WARRANTY
Lifepro Fitness creates quality,
durable exercise products and we
stand by that quality with a lifetime
warranty on all of our products.
If your X-FlexCycle Pro ever
breaks (and we doubt it will), we’ll
send you replacement parts and
show you how to repair it. If your
X-FlexCycle Pro cannot be repaired,
we’ll replace it—free of charge.
Register your X-FlexCycle Pro
at xflexcyclepro.lifeprofitness.com
to activate your warranty within
14 days of purchase.
Recovery + Fitness Collection 31
XFLEXCYCLE PRO
EXERCISE BIKE
RECOVERY + FITNESS
Batteries Required for Monitor:
2 AA batteries (included)

Enjoy all of the benefits of foam
rolling and vibration technology
together with the Surger Vibrating
Foam Roller. Use the Surger before
or after your workout as part of
your warm-up or recovery routine
to gain more flexibility and to help
prevent soreness and injuries.
Deep compression of muscle
fibers and tissues (self-myofascial
release) combined with the
Surger’s vibration technology
breaks up muscle knots and relaxes
tight muscles and fascia. Choose
from four vibration speed levels
to apply the perfect amount of
intensity every time.
SURGER
VIBRATING FOAM ROLLER
SURGER BENEFITS
• Increase workout
effectiveness
• Reduce soreness
• Speed up recovery
• Prevent injury
• Boost circulation
• Improve muscle flexibility
and performance
• Decrease pain and
inflammation
• Loosen knots, trigger
points, and tightness in
your muscles and fascia.
FROM OUR SOAR FX™COLLECTION
The Agility vibrating massage
ball is designed to target small
muscle groups. The Agility Ball is
small enough to fit in the palm of
your hand and gives you a wide
range of massage motions: circular,
up-and-down, and side-to-side.
The Agility Ball’s silicone exterior
is durable and easy-to-grip, but
soft enough to use on sensitive
areas like your neck, hands,
and feet.
AGILITY
VIBRATING MASSAGE BALL
AGILITY BALL BENEFITS
• Increase circulation
• Improve muscle flexibility
and performance
• Relax tight muscles
and fascia
• Reduce muscle
pain and
inflammation
• Boost blood flow
32 X-FlexCycle Pro User Manual Lifepro Recovery + Fitness Collection 33Recovery + Fitness Collection 33

FROM OUR SOAR FX™COLLECTION
SONIC
VIBRATING MASSAGE GUN
The Sonic Vibrating Massage Gun is a deep tissue massager
that helps eliminate the aches and pains caused by long
hours of sitting. Use the Sonic to release muscle tension and
relax after a long day at work. Get relief from stiffness and
pain in your shoulders, neck, wrists, and hands caused by
prolonged digital device use.
The Sonic’s vibration technology penetrates deeply into
your muscles and fascia—treating areas that human
hands have difficulty reaching. High-frequency
vibrations loosen tight muscles, increase blood
flow to the area, and reduce inflammation.
The Sonic is lightweight and portable, making
it the perfect device to massage your own
shoulders and back. Five speeds allow you
to choose the intensity that will give you
the most relief as you target specific
muscle pain and stiffness.
SONIC BENEFITS
• Reduce muscle pain
and inflammation
• Release toxins
• Improve circulation
• Increase flexibility
• Reduce stress.
• Loosen tight muscles
The Rhythm Vibration Platform works
by creating rapid vibrations throughout
the body, especially on the muscles
specifically targeted. These vibrations
cause the muscles to stretch, flex,
and relax at a rapid rate. This results
in increased muscle and bone growth,
improved flexibility, and boosted
metabolism—all of which increase
the number of calories you burn.
The Rhythm can be used by people
from every fitness level. If you
have suffered an injury or you
experience joint or back pain,
find relief and help prevent
future injuries by adding the
Rhythm to your rehab routine.
RHYTHM
VIBRATION PLATFORM
FROM OUR RECOVERY + FITNESS COLLECTION
RHYTHM BENEFITS
• Improve mobility
• Prevent injury
• Increase strength
• Boost metabolism
• Improve sleep
• Develop stronger bones
• Increase circulation
34 X-FlexCycle Pro User Manual Lifepro Recovery + Fitness Collection 35Recovery + Fitness Collection 35

Access Lifepro TV, our library of free
personal training videos on the web
at xflexcyclepro.lifeprofitness.com to
learn how to get the most out of your
Lifepro®X-FlexCycle Pro and achieve
the results you want.
Lifeprousa Lifeprousa support@lifeprofitness.com
YOU’VE
GOT
THIS
Table of contents
Other Lifepro Exercise Bike manuals

Lifepro
Lifepro FlexCycle User manual

Lifepro
Lifepro FlexCycle User manual

Lifepro
Lifepro READY, SET, PRO User manual

Lifepro
Lifepro DASH X User manual

Lifepro
Lifepro X-FLEXCYCLE PLUS User manual

Lifepro
Lifepro X-FLEXCYCLE User manual

Lifepro
Lifepro Recovery + Fitness X-FLEXCYCLE PRO User manual

Lifepro
Lifepro FlexStride User manual