AS21166
ITEM/ARTÍCULO #5039801/5039802
MODEL/MODELO #MT-20206TC/MT-20206TB
DANVILLE TOUCHLESS
DUAL FLUSH TOILET/
SANITARIO DE DOBLE DESCARGA
CON ACTIVACIÓN SIN CONTACTO
DANVILLE
TROUBLESHOOTING/SOLUCIÓN DE PROBLEMAS
PROJECT SOURCE and PROJECT
SOURCE & Design are trademarks or
registered trademarks of LF, LLC. All rights
reserved./ PROJECT SOURCE y PROJECT
SOURCE & Design son marcas comerciales
o marcas registradas de LF, LLC.
Todos los derechos reservados.
Thank you for purchasing this
Project Source
product. We’ve created these easy-to-follow instructions to ensure you spend your time enjoying the product instead
of putting it together. But, if you need more information than what is provided here, please visit Lowes.com, search the item number and refer to the Guides &
Documents tab on the product’s page. If the item is no longer for sale, or if you have any questions or problems, please call our customer service department at
1-866-389-8827,
8
a.m
-
8
p.m.,
EST
,
Monday
-
Sunday
.
Y
ou
could
also
contact
us
at
[email protected] or
visit
www
.lowespartsplus.com.
Gracias por comprar este producto Project Source. Hemos creado estas instrucciones fáciles de seguir para garantizar que pase su tiempo disfrutando el
producto en lugar de armándolo. No obstante, si necesita más información que la entregada aquí, visite Lowes.com, busque el número de artículo y consulte la
pestaña Guides & Documents (Guías y documentos) en la página del producto. Si el artículo ya no está a la venta o si tiene alguna pregunta o problema, llame
a nuestro Departamento de Servicio al Cliente al 1-866-389-8827, de lunes a domingo de 8 a.m. a 8 p.m., hora estándar del Este. También puede ponerse en
PROBLEM POSSIBLE CAUSE CORRECTIVE ACTION
PROBLEMA CAUSA POSIBLE ACCIÓN CORRECTIVA
Little or no ush. The batteries are low. Replace the batteries.
Mínima o nula descarga. Las baterías están bajas. Reemplace las baterías.
Toilet leaking. The button poles are too long. Adjust the length of button poles.
Fuga en el inodoro. Las varillas de los botones son demasiado largas. Ajuste el largo de las varillas de los botones.
Excessive noise when tank is lling. Valve is blocked. Remove dirt or obstruction from the valve head. Flush the lines.
Hay exceso de ruido cuando se llena La válvula está bloqueada. Elimine la suciedad u obstrucción del cabezal de la válvula.
el tanque Descargue la tubería.
CARE AND MAINTENANCE/CUIDADO Y MANTENIMIENTO
Do not use in-tank bowl cleaners as they can contain aggressive chemicals that attack the tank components and will void the warranty./No use limpiadores de taza que
se coloquen dentro del tanque, ya que pueden contener productos químicos agresivos que podrían dañar los componentes del tanque y anular la garantía.
After installation, ush several times and check for leaks./Después de la instalación, accione la descarga varias veces para vericar si hay ltraciones.
Electronic parts for 1 year warranty. Manufactured with exceptional quality standards and workmanship, this Project Source product is therefore backed by a limited
lifetime warranty to be free from defects in materials and workmanship. This Project Source product is warranted to the original consumer purchaser to be free from
defects in materials and workmanship. Any product or part that is defective will be replaced free of charge. Merely return the product to any Lowes Home Improvement
Store location for full refund or exchange. Parts found to be defective or damaged can be easily ordered by calling Customer Service at 1-866-389-8827, 8 a.m. - 8 p.m.,
EST. Proof of purchase (original sales receipt) from the original consumer purchaser must be made available for all warranty claims. "Fragile goods" (such as the com-
ponents of handle/push button, seal ring, ll valves, ush valve, and apper etc.) are only guaranteed for ve years. These parts will need to be purchased separately
by calling Customer Service if beyond the ve-year limited warranty. Electronic parts are covered under warranty for 1 year. This warranty does not apply in the event of
installation error, abuse, misuse or improper care and maintenance (whether by a contractor, service company or member of the purchaser’s household). This warranty
excludes commercial, industrial, and business use applications, incidental/inconsequential damages, failures due to misuse or abuse, and normal wear and tear. Some
states and provinces do not allow the exclusion or limitation of incidental or consequential damages, so the above limitations may not apply to you. This warranty gives
you specic legal rights and you may also have other rights that vary from state to state and province to province. Please contact Lowe’s after sales services telephone
No. 1-866-389-8827, 8 a.m. - 8 p.m., EST for more details./ Este producto de Project Source, fabricado con estándares de calidad y mano de obra excepcionales, cuen-
ta con el respaldo de una garantía limitada de por vida que asegura que está libre de defectos en materiales y mano de obra.
LIMITED LIFETIME WARRANTY/GARANTÍA LIMITADA DE POR VIDA
•
•
•Turn o water supply and ush tank completely. Use a towel to dry remaining water from tank and bowl./Corte el suministro de agua y descargue por completo
el tanque. Use una toalla para secar el agua restante del tanque y la taza.
Disconnect and remove old water supply line./Desconecte y retire la antigua tubería de suministro de agua.
Remove tank from bowl by removing old tank-to-bowl hardware./Retire el tanque de la taza retirando el aditamento antiguo que une el tanque con la taza.
Remove bowl from oor by removing bolt caps and oor bolt nuts./Retire la taza del piso retirando las tapas para pernos y las tuercas de los pernos para
montaje en el piso.
Remove oor bolts from toilet ange and clean old wax, putty and sealant from base area. (Temporarily plug oor ange with a towel or cover to block sewer
gases from escaping.)/Retire del piso los pernos para montaje de la brida del inodoro y limpie los restos de cera, masilla y sellador del área de la base. (Tape
temporalmente el oricio de la brida en el piso con una toalla o cubierta para impedir que escapen los gases de las tuberías de desagüe).
REMOVE OLD TOILET/RETIRE EL INODORO ANTIGUO
SAFETY INFORMATION/INFORMACIÓN DE SEGURIDAD
Please read and understand this entire manual before attempting to assemble, operate or install the product.
Lea y comprenda completamente este manual antes de intentar ensamblar, usar o instalar el producto.
WARNING/ADVERTENCIA
Do not use in-tank cleaners in your toilet. Products containing chlorine (calcium hypochlorite) can seriously damage ttings in the tank. This damage can
cause leakage and property damage./No use limpiadores que se coloquen dentro del tanque del inodoro. Los productos que contienen cloro (hipoclorito de
calcio) pueden dañar severamente los conectores del tanque. Esto podría causar ltraciones y daños a la propiedad.
CAUTION/PRECAUCIÓN
Do not lift or rock the bowl after placement. If the watertight seal is broken, a new wax seal will need to be installed. Be sure the water supply valve is shut o
before installation./No levante o sacuda la taza después de colocarla. Si rompe el sello hermético, deberá instalar un nuevo sello de cera. Asegúrese de que
la válvula de entrada de agua esté cerrada antes de comenzar la instalación.
Do not over-tighten bowl nuts or tank connection nut./No apriete demasiado las tuercas de la taza o la tuerca de conexión del tanque.
•
•
•
1.
2.
3.
4.
5.
FEELING CONFIDENT? START YOUR NEXT PROJECT/¿SE SIENTE CONFIADO? INICIE SU PRÓXIMO PROYECTO
• Visit Lowes.com for more information.
/Para obtener más información, visite Lowes.com.
Piezas electrónicas para 1 año de garantía. Se garantiza al comprador original este producto de Project Source contra defectos en los materiales y la
mano de obra. Cualquier producto o pieza defectuosa se reemplazará sin cargo. Simplemente devuelva el producto a cualquier tienda de mejoras para el
hogar Lowe’s para obtener un reembolso completo o un cambio. Las piezas que se consideren defectuosas o dañadas pueden pedirse fácilmente llaman-
do al Servicio al Cliente al 1-866-389-8827, de 8 a.m. a 8 p.m., hora estándar del Este. Se requiere presentar el comprobante de compra (recibo de venta
original) del cliente o comprador original para todas las reclamaciones de garantía. Los "productos frágiles" (como los componentes del mango/botón pul-
sador, el anillo sellador, las válvulas de llenado, la válvula para descarga de inodoro y el tapón, etc.) solo están garantizados por cinco años. Si se supera
la garantía limitada de cinco años, estas piezas deberán comprarse por separado llamando al Servicio al Cliente. Las piezas electrónicas cuentan con una
cobertura de garantía de 1 año. Esta garantía no aplica en caso de error de instalación, abuso, uso indebido o cuidado y mantenimiento inapropiados (ya
sea por parte de un contratista, empresa de servicios o habitante del domicilio del comprador). Esta garantía excluye las aplicaciones de uso comercial,
industrial y empresarial, los daños accidentales o irrelevantes, las fallas debidas al mal uso o abuso y el desgaste normal. Algunos estados y provincias
no permiten la exclusión o limitación de los daños accidentales o resultantes, de modo que es posible que las limitaciones anteriores no se apliquen en su
caso. Esta garantía le otorga derechos legales especícos y es posible que también tenga otros derechos que varían según el estado y la provincia. Para
obtener más información, póngase en contacto con el número de teléfono del servicio posventa de Lowe's en el 1-866-389-8827, de 8 a.m. a 8 p.m., hora
estándar del Este.
Printed in China
Impreso en China
LIMITED LIFETIME WARRANTY/GARANTÍA LIMITADA DE POR VIDA
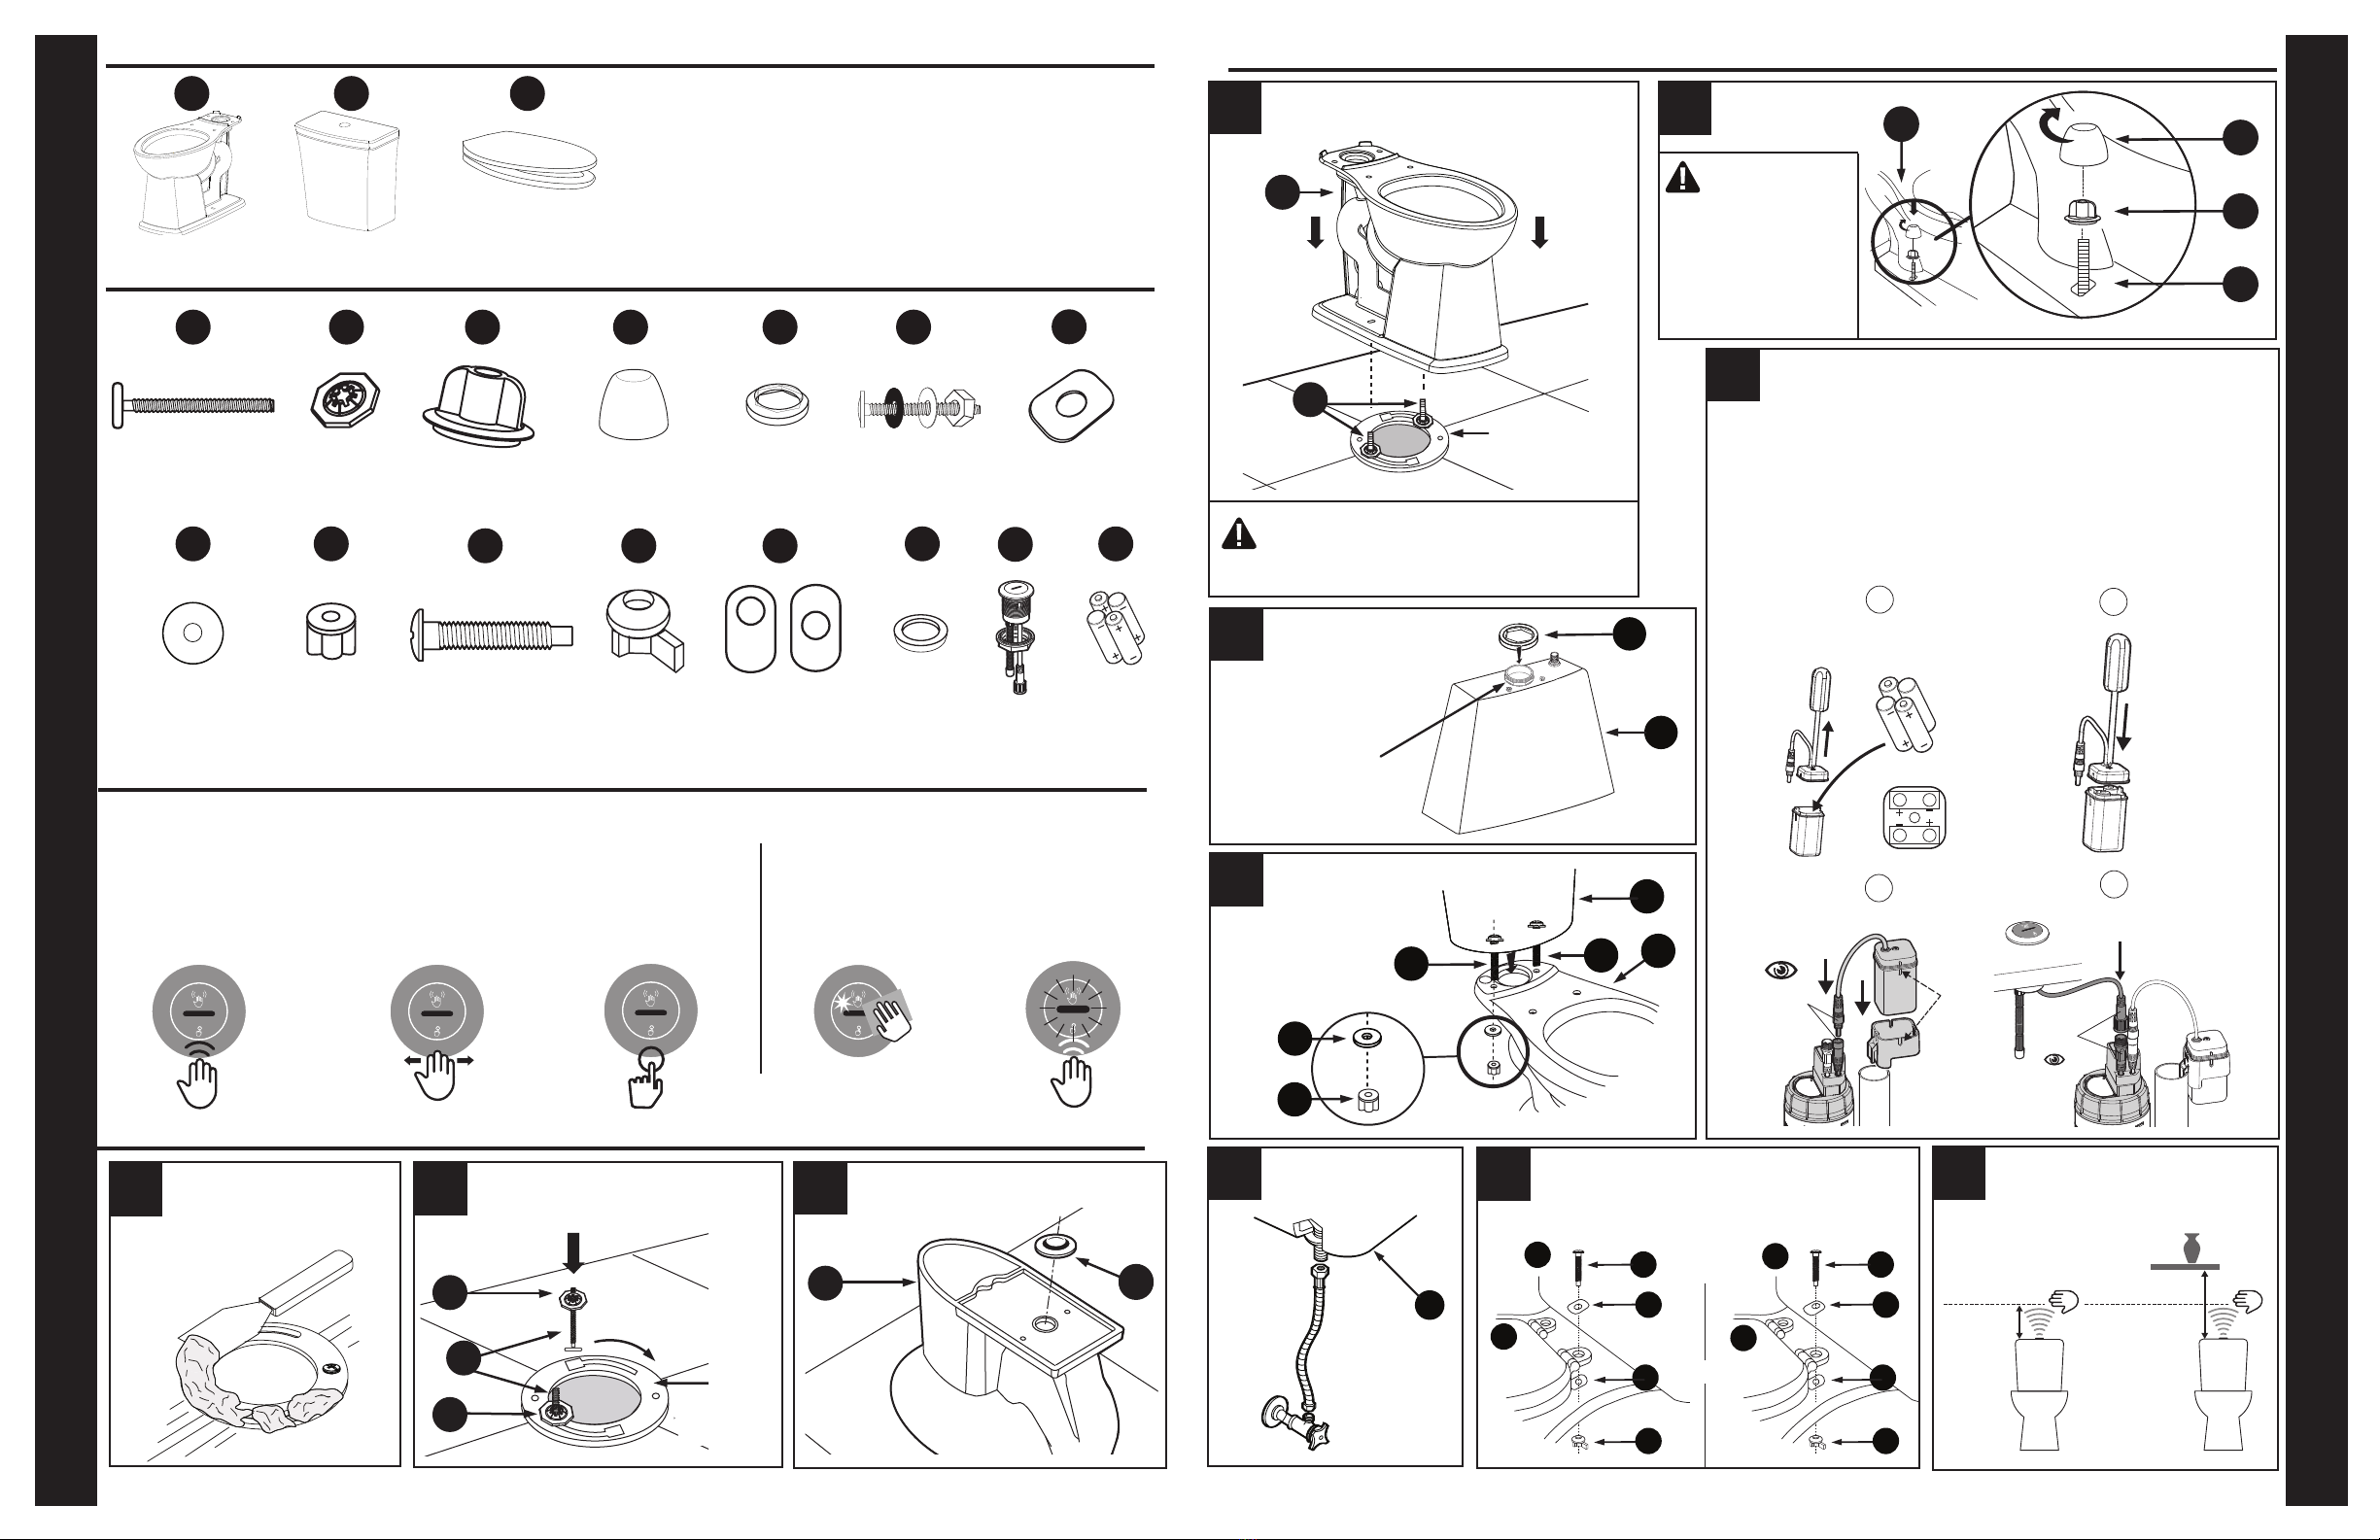
PREPARATION/PREPARACIÓN
Before beginning assembly of product, make sure all parts are present. Compare parts with package contents list and hardware contents list. If any part is
missing or damaged, do not attempt to assemble the product.
Antes de comenzar a ensamblar el producto, asegúrese de tener todas las piezas. Compare las piezas con la lista del contenido del paquete y la lista de
aditamentos. No intente ensamblar el producto si alguna pieza falta o está dañada.
Estimated Assembly Time: 50 minutes
Tiempo estimado de ensamblaje: 50 minutos
TOOLS REQUIRED (NOT INCLUDED)/HERRAMIENTAS NECESARIAS (NO SE INCLUYEN):