PROLED WALLWASHER XL User manual

WALLWASHER XL RGBW DMX
Bedienungsanleitung
User’s Manual
Bitte lesen Sie diese Anleitung vor der Inbetriebnahme sorgfältig durch
Please read the instructions carefully before use

PROLED WALLWASHER XL RGBW DMX
www.proled.com [email protected]
1
INHALTSVERZEICHNIS
1. Eigenschaften ............................................................................................................... 2
2. Wichtige Sicherheitshinweise ....................................................................................... 2
3. Installation .................................................................................................................... 3
4. Technische Daten ......................................................................................................... 4
5. Betrieb ………………………………………………………………………………………… 5
5.1. DMX Controller .................................................................................................... 5
5.2. DMX-512 Konfiguration ....................................................................................... 6
5.3. DMX-512 Anschlüsse .......................................................................................... 8
6. Fehlerbehebung ........................................................................................................... 8
7. Reinigung ..................................................................................................................... 9

PROLED WALLWASHER XL RGBW DMX
www.proled.com [email protected]
2
1. Eigenschaften
Der PROLED Wallwasher XL RGBW ist ideal für die Beleuchtung von großen Flächen, wie
z.B. Gebäuden oder Wänden im Außenbereich. Durch die CREE Hochleistungs-LED
Emitter (10 W) bietet der Wallwasher XL RGBW eine besonders homogene Farbmischung
und ein sauberes, natürliches Weißlicht.
Das Gerät kann direkt über DMX-512 angesteuert werden (4, 5, 7, 8 oder 10 Kanal DMX
Modi). Es bietet zudem 19 Stand Alone Programme (3 editierbar) sowie einen Master /
Slave Betrieb.
Die flimmerfreie 1 kHz Technologie macht den Wallwasher XL RGBW zum perfekten Gerät
für TV Studios.
2. Wichtige Sicherheitshinweise
ACHTUNG
Bitte bewahren Sie diese Anleitung als Referenz auf. Im Falle eines Weiterverkaufs
legen Sie die Anleitung bitte wieder dem Wallwasher XL bei.
VORSICHT
Alle Geräte durchlaufen ab Werk eine strenge Qualitätskontrolle. Fehler, die durch
unsachgemäße Installation oder Bedienung entstanden sind, fallen nicht unter die
Garantiebestimmungen.
Prüfen Sie das Gerät nach dem Auspacken sorgfältig auf Transportschäden, bevor Sie
es in Betrieb nehmen.
Dieses Gerät sollte von einem qualifizierten Fachmann installiert und betrieben
werden.
Verwenden Sie ein Sicherungsseil bei der Montage dieser Einheit.
Achten Sie darauf, dass der Installationsort ausreichend belüftet und mindestens 50
cm von angrenzenden Oberflächen oder Wänden entfernt ist.
Vergewissern Sie sich, dass die Ventilationsöffnungen nicht abgedeckt werden, da die
Einheit anderenfalls überhitzt wird.
Stellen Sie vor der Inbetriebnahme sicher, dass Netzspannung und Frequenz den
Anforderungen des Gerätes entspricht.
Bitte lesen Sie diese Anleitung vor der Inbetriebnahme
sorgfältig durch. Sie enthält wichtige Informationen
über Installation, Betrieb
und Wartung
.

PROLED WALLWASHER XL RGBW DMX
www.proled.com [email protected]
3
Dieses Gerät muss geerdet werden, um das Risiko eines elektrischen Schlages
auszuschließen.
Maximale Umgebungstemperatur Ta: 40°C. Betreiben Sie das Gerät nicht bei höheren
Temperaturen.
Schließen Sie die Einheit nicht an Dimmerpacks an.
Beim ersten Einschalten können Gerüche auftreten – diese verschwinden allerdings
nach wenigen Minuten.
Vergewissern Sie sich, dass sich während des Betriebes keine brennbaren
Gegenstände in der Nähe des Gerätes befinden, um die Gefahr von Feuer
auszuschließen.
Überprüfen Sie die Netzkabel regelmäßig und tauschen sie im Falle einer
Beschädigung sofort aus.
Die Oberflächentemperatur des Gerätes kann bis zu 60°C erreichen. Berühren Sie das
Gehäuse während des Betriebes nicht mit bloßen Händen.
Ein Dauerbetrieb kann die Lebensdauer verkürzen
Achten Sie darauf, dass keine Flüssigkeiten oder Metallgegenstände in das Gerät
eindringen können. Falls ein Gegenstand in das Gerät gelangt ist, schalten Sie sofort
die Stromversorgung ab.
Betreiben Sie das Gerät nicht in staubiger oder schmutziger Umgebung und reinigen
Sie es regelmäßig.
Halten Sie Kinder von dem Gerät fern.
Berühren Sie keine Kabel während des Betriebes.
Vermeiden Sie es, die Netzkabel direkt neben anderen Leitungen zu verlegen.
Tauschen Sie die Sicherung nur gegen eine gleichen Typs aus.
Schalten Sie das Gerät im Falle eines Problems sofort aus.
Schalten Sie die Einheit nicht in schneller Folge ein und wieder aus.
Gehäuse, Linsen oder Ultraviolettfilter müssen ausgetauscht werde, wenn sie sichtbar
beschädigt sind.
Öffnen Sie das Gerät nicht. Im Inneren befinden sich keine vom Benutzer
austauschbaren Teile. Versuchen Sie niemals, das Gerät selbst zu reparieren.
Reparaturen, die von unqualifizierten Personen durchgeführt werde, können zu
Schäden oder Fehlfunktionen führen. Bitte kontaktieren Sie in diesem Fall das nächste
technische Servicecenter.
Trennen Sie die Einheit vom Netz, wenn sie längere Zeit nicht benutzt wird.

PROLED WALLWASHER XL RGBW DMX
www.proled.com [email protected]
4
Verwenden Sie zum Transport das originale Verpackungsmaterial.
Blicken Sie nicht direkt in den LED Lichtstahl, während das Gerät in Betrieb ist.
3. Installation
Der Wallwasher XL wird über die Bohrungen am Montagebügel befestigt. Vergewissern
Sie sich immer, dass die Einheit sicher verschraubt ist, um Vibrationen oder ein
Verrutschen während des Betriebes zu verhindern. Stellen Sie sicher, dass die Struktur,
an die das Gerät montiert wird, mindestens das zehnfache Gewicht der Einheit tragen
kann. Verwenden Sie zusätzlich ein Sicherungsseil mit der zwölffachen Belastbarkeit des
Gerätegewichtes, wenn Sie den Wallwasher XL montieren.
Das Gerät muss durch einen qualifizierten Techniker installiert werden und der
Montageort muss sich außerhalb der Reichweite von Menschen befinden.
4. Technische Daten
LED Typ: CREE MC-E RGBW 10W x 54
Netzspannung : AC 100 – 240 V, 50/60 Hz
Leistungsaufnahme: 580 W
LED Leistung: 540 W
Linsen Option: 20°, 30°, 40°,
60°
Farbtemperatur: 6000-7000 K
Lichtstrom / Wellenlänge:
Rot: 3320 Lumen / 623 nm
Grün: 6440 Lumen / 523 nm
Blau: 1254 Lumen / 452 nm
Weiß: 9020 Lumen
R+G+B+W: 19244 Lumen
Umgebungstemperatur: -10 bis +40°C
Schutzklasse: IP 65 (für Außeneinsatz)
Abmessungen: 741 x 442 x 445 mm
Gewicht: 42,5 kg
PROLED WALLWASHER XL RGBW DMX
www.proled.com [email protected]
5
5. Betrieb
The Wallwasher XL kann auf zwei Arten angesteuert werden:
1. Über einen DMX Controller
2. Über das Setup Tool
Das Setup Tool ist ein speziell entwickeltes, handliches Setup Gerät für alle integrierten
DMX Einheiten und Controller. Wenn Sie das Setup Tool über das XLR Kabel mit einem
Gerät verbinden, können Sie einfach DMX Adresse, Kanal Modi, Weißabgleich, manuelle
Farben sowie Fadergeschwindigkeiten einstellen. Zur Bedienung des Setup Tools lesen
Sie bitte die Bedienungsanleitung des Setup Tools.
5.1. DMX Controller
Der PROLED Wallwasher XL kann über jeden universellen DMX-512 Controller
angesteuert werden. Zunächst müssen Sie die DMX Adressen von 1 bis 512 konfigurieren,
damit die Einheiten ein DMX Signal empfangen und entsprechend reagieren können. Je
nach dem Betriebsmodus benötigt der Wallwasher XL 4 bis 10 DMX Kanäle.
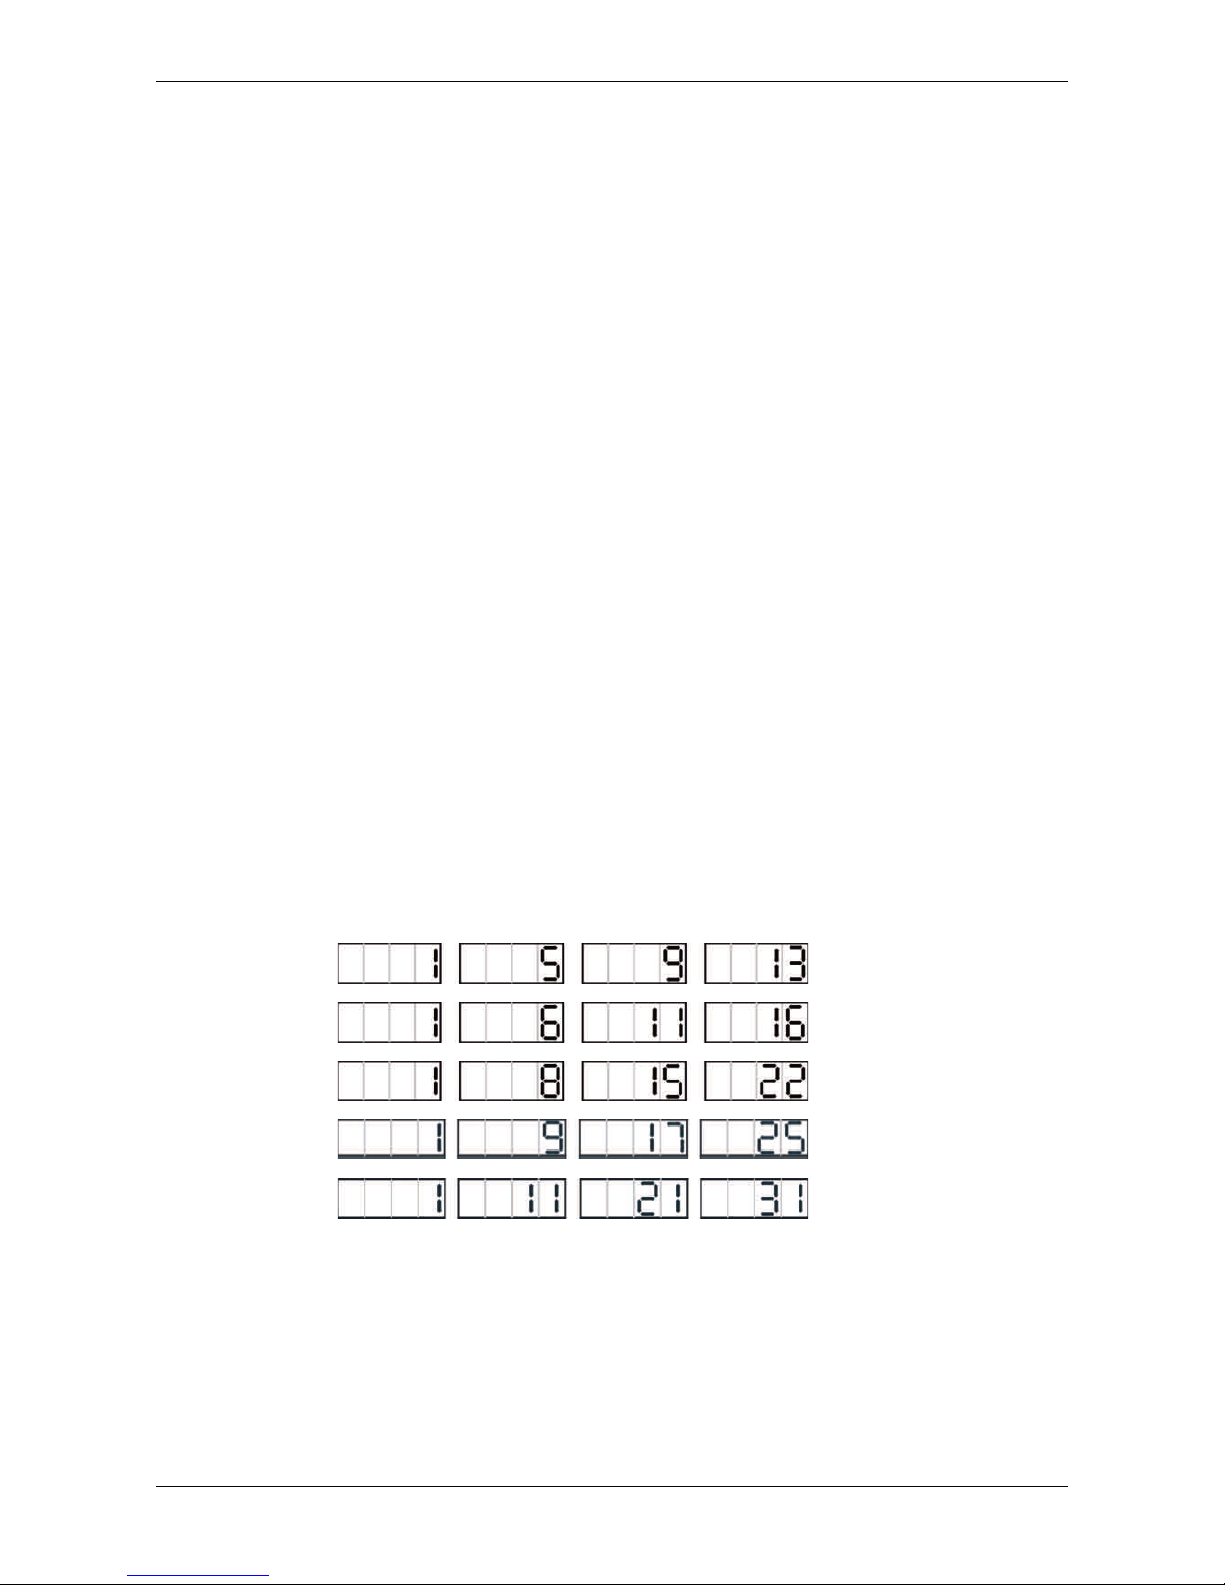
Bitte beachten Sie die folgende Grafik zur Einstellung der DMX-512 Kanäle bei den ersten
vier Einheiten:
4 Kanäle:
5 Kanäle:
7 Kanäle:
8 Kanäle:
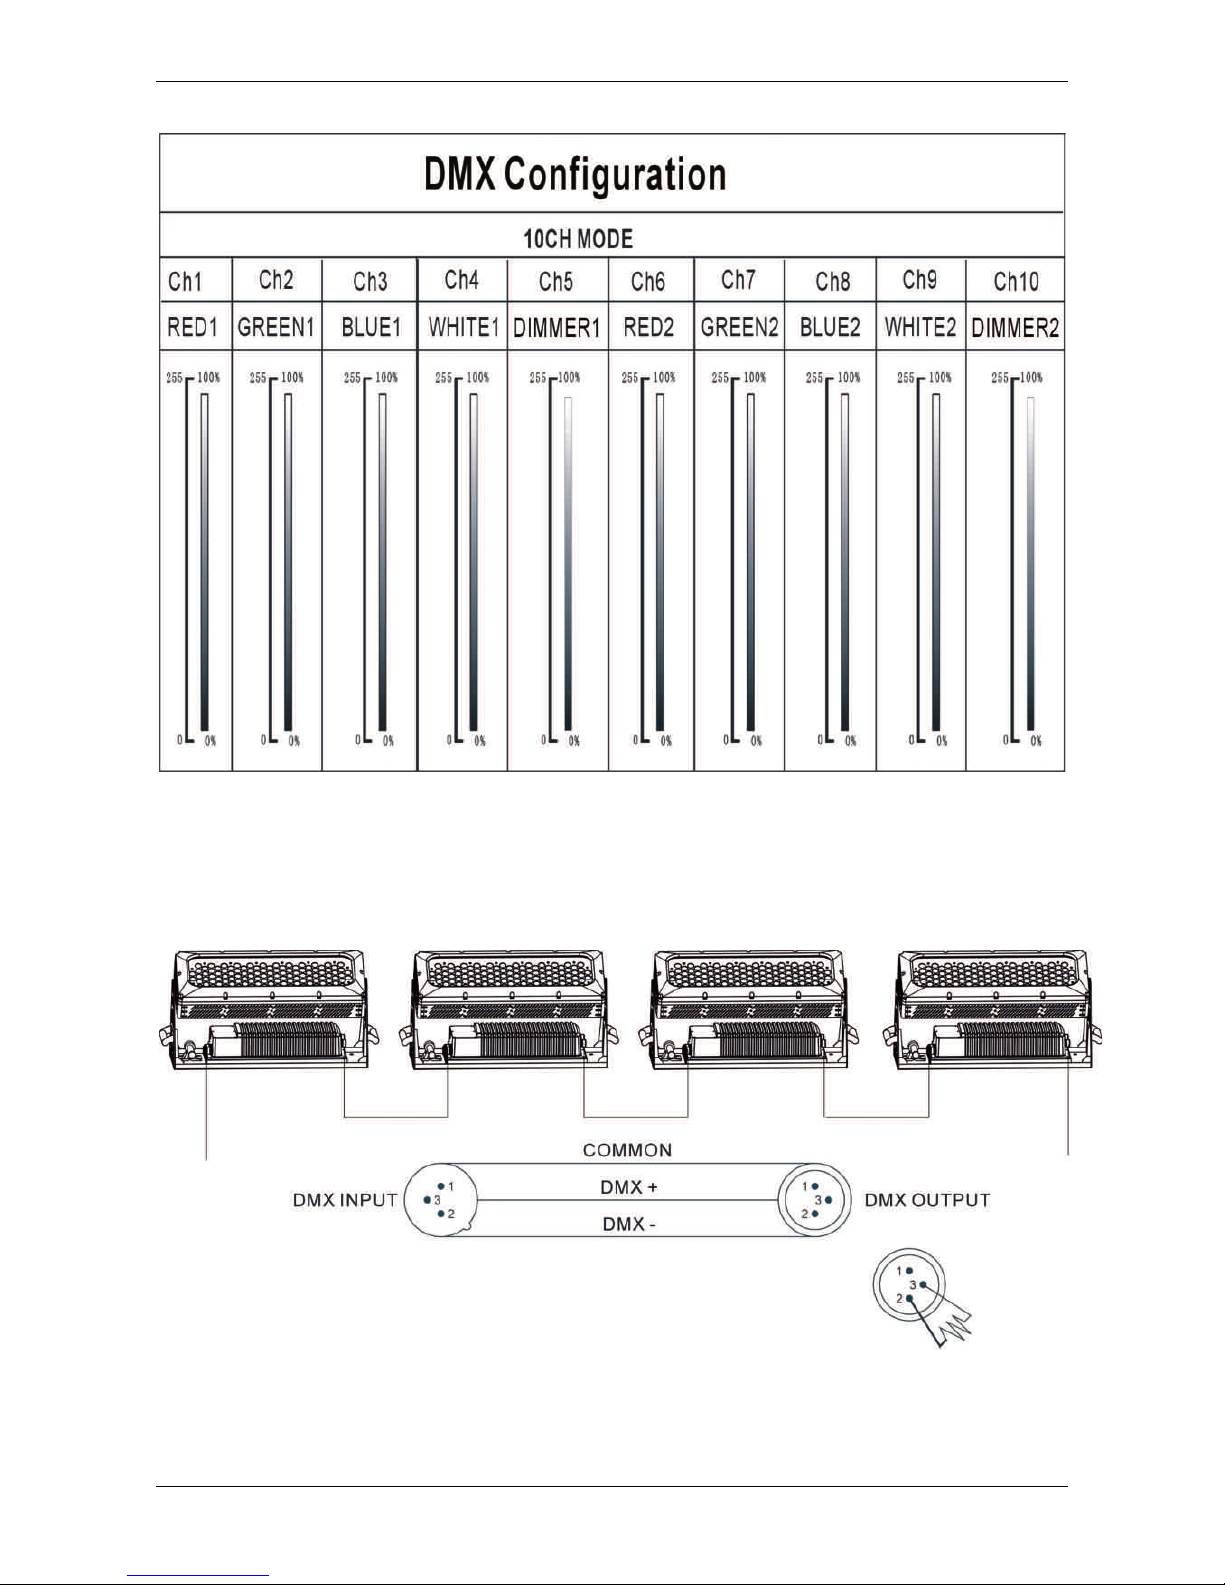
10 Kanäle:


PROLED WALLWASHER XL RGBW DMX
www.proled.com [email protected]
8
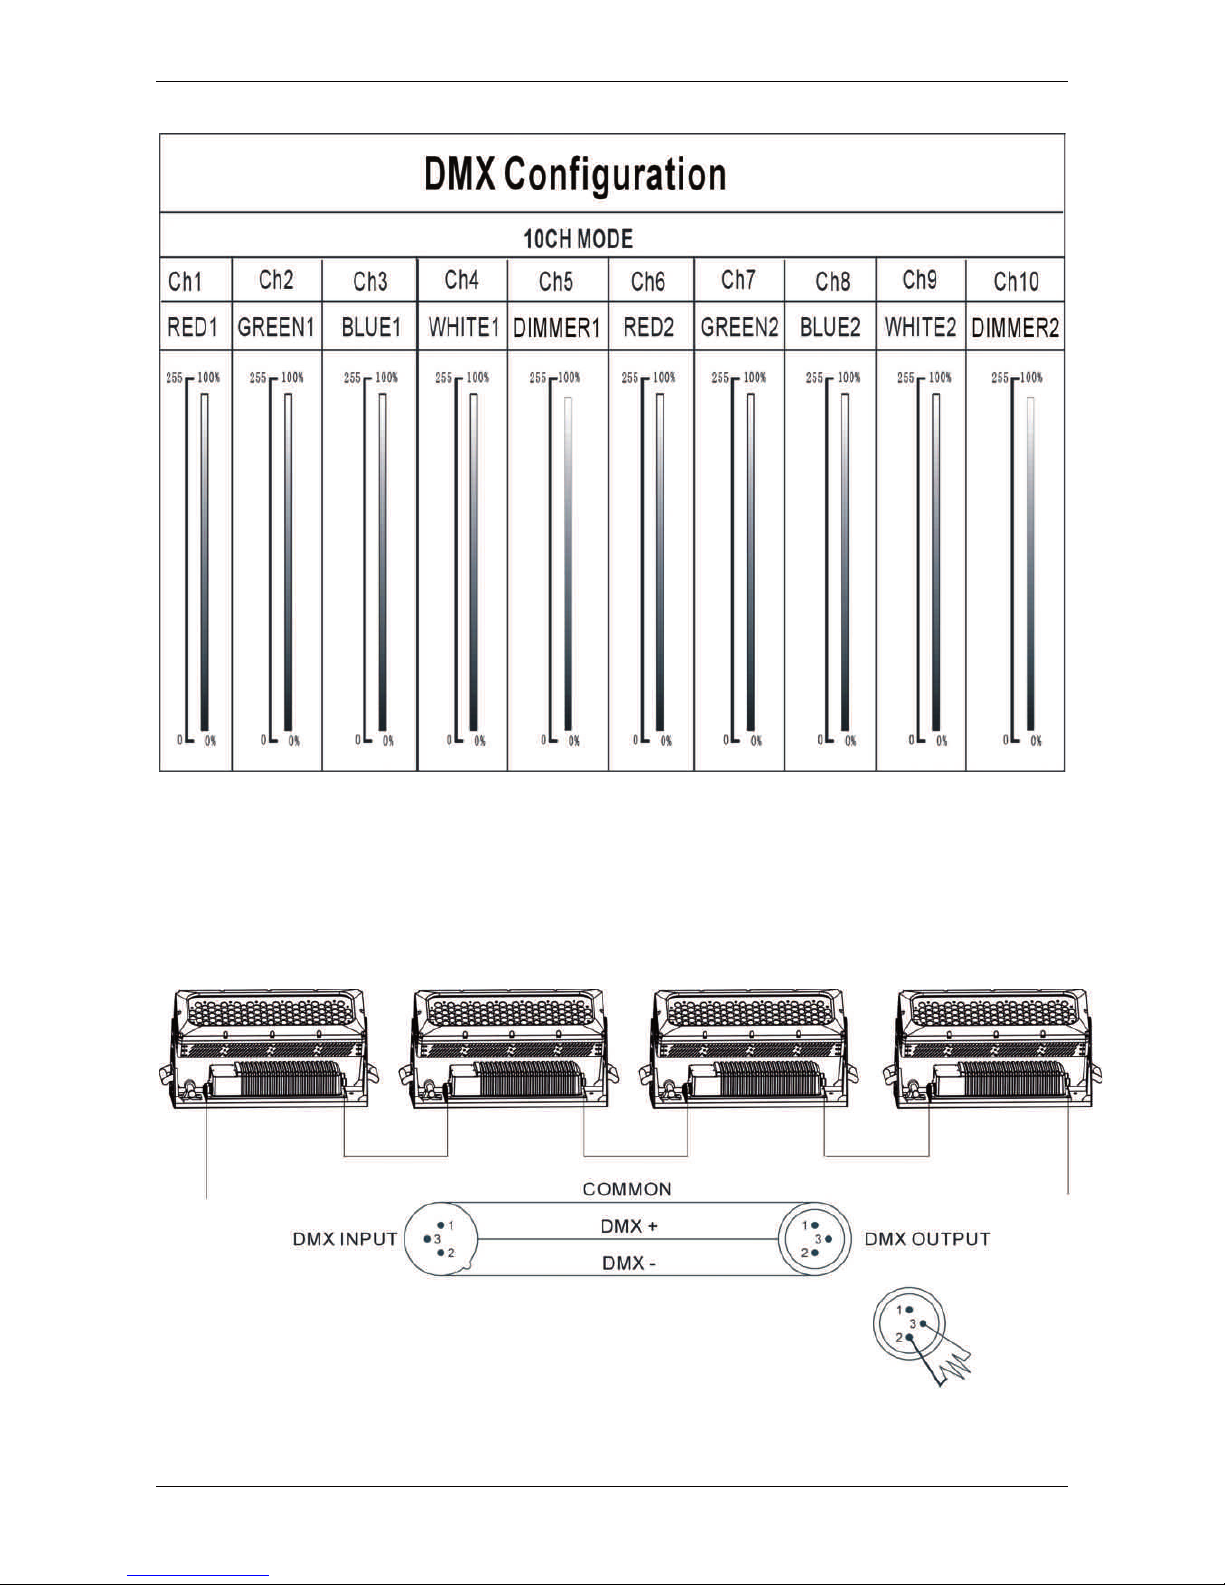
5.3. DMX-512 Anschlüsse
Um Signalstörungen zu vermeiden, muss das Ende der
seriellen DMX-512 Kette terminiert werden. Stecken Sie
einen Terminatorstecker (XLR Stecker mit einem 120
/ ¼ W Widerstand zwischen Pin 2 und 3) in die DMX
Ausgangsbuchse an der letzten Einheit der Kette ein.

PROLED WALLWASHER XL RGBW DMX
www.proled.com [email protected]
9
1. Wenn Sie einen Controller mit fünfpoliger DMX Ausgangsbuchse verwenden, müssen
Sie ein 5 auf 3 Pin XLR Adapterkabel verwenden.
2. Der Ausgang an der letzten Einheit in der DMX Kette muss terminiert werden. Löten
Sie dazu einen 120 Ohm ¼ Watt Widerstand zwischen die Pins 2 (DMX-) und 3 (DMX+)
eines dreipoligen XLR Steckers und stecken Sie ihn in den DMX Ausgang der letzen
Einheit.
3. Verbinden Sie alle Einheiten untereinander in einer seriellen Kette, indem Sie mit XLR
Kabeln den Ausgang eines Gerätes mit dem Eingang des jeweils nächsten Gerätes
verbinden. Das Kabel kann nicht verzweigt oder als „Y-Kabel“ verlegt werden. Da
DMX-512 eine sehr hohe Übertragungsgeschwindigkeit besitzt, können ungeeignete
oder beschädigte Kabel bzw. korrodierte Kontakte leicht zu Signalstörungen oder
Systemausfällen führen.
4. Wenn die Stromversorgung einer Einheit abgeschaltet ist, wird das DMX Signal
automatisch vom Eingang zum Ausgang durchgeschleift.
5. Jedes Gerät benötigt eine zuvor konfigurierte DMX Adresse, um die vom Controller
gesendeten Daten empfangen zu können. Die Adressen liegen zwischen 0 und 511
(normalerweise sind 0 & 1 gleich 1).
6. Das Ende der DMX-512 Kette muss terminiert werden, um Signalstörungen zu
vermeiden.
7. 3 Pin XLR Stecker sind gebräuchlicher als 5 Pin XLR Stecker. Pinbelegung:
8. 3 Pin XLR: Pin 1: GND, Pin 2: negatives Signal (-), Pin 3: positives Signal (+)
9. 5 Pin XLR: Pin 1: GND, Pin 2: negatives Signal (-), Pin 3: positives Signal (+), Pin 4 /
Pin 5: frei.
6. Fehlerbehebung
Im Folgenden werden einige allgemeine Probleme beschrieben, die während des
Betriebes auftreten können. Hier einige Empfehlungen für eine einfache
Fehlerbehebung:
A. Das Gerät arbeitet nicht, erzeugt kein Licht und der Lüfter läuft nichtt
1. Prüfen Sie Netzanschluss und Sicherung.
2. Prüfen Sie Netzspannung am Hauptanschluss.
B. Das Gerät reagiert nicht auf den DMX Controller
1. Die DMX LED sollte leuchten. Falls nicht, überprüfen Sie die DMX Anschlüsse und
Kabel, ob die serielle Kette korrekt angeschlossen ist.
2. Wenn die DMX LED leuchtet und die Einheit nicht auf den Steuerkanal reagiert, prüfen
sie die Adresseinstellungen und die DMX Polarität.
3. Falls während des Betriebes DMX Signalprobleme auftreten, überprüfen Sie die Pins
an den Steckern auf der Platine der betreffenden Einheit oder am vorherigen Gerät in
der Kette.

PROLED WALLWASHER XL RGBW DMX
www.proled.com [email protected]
10
4. Versuchen Sie einen anderen DMX Controller.
5. Prüfen Sie, ob die DMX Kabel nahe oder parallel zu Hochspannungskabeln verlaufen.
Starke elektromagnetische Felder, wie sie von Hochspannungsleitungen erzeugt
werden, können Interferenzen oder Schäden an der DMX Interfaceschaltung
hervorrufen.
7. Reinigung
Die Reinigung des Gerätes muss regelmäßig durchgeführt werden, um die Lichtleistung zu
optimieren. Die Häufigkeit der Reinigung hängt von den Einsatzbedingungen ab. Feuchte,
staubige oder besonders schmutzige Umgebungen können Schmutzablagerungen auf der
Optik des Gerätes zur Folge haben.
Reinigen Sie das Gerät mit einem weichen Tuch und etwas herkömmlichen
Glasreiniger.
Trocknen Sie alle Teile sorgfältig ab.
Reinigen Sie die äußere Optik mindestens alle 20 Tage. Reinigen Sie die interne Optik
mindestens alle 30 bis 60 Tage.
TABLE OF CONTENTS
1. Features ...................................................................................................................... 11
2. Important Safety Notes ............................................................................................... 11
3. Installation ................................................................................................................... 12
4. Specifications .............................................................................................................. 13
5. Operation .................................................................................................................... 13
5.1. DMX Controller .................................................................................................. 14
5.2. DMX-512 Configuration ..................................................................................... 14
5.3. DMX-512 Connections ....................................................................................... 16
6. Troubleshooting .......................................................................................................... 17
7. Cleaning ...................................................................................................................... 18
PROLED WALLWASHER XL RGBW DMX
www.proled.com [email protected]
11
1. Features
The PROLED Wallwasher XL RGBW is ideal for the illumination of large surfaces e.g.
buildings or walls in outdoor areas. Due to the CREE high power LED emitters (10 W) the
Wallwasher XL RGBW offers homogenous color mixing and a clean natural white light.
The device can be directly controlled by DMX-512 (4, 5, 7, 8 or 10 channel DMX modes). It
provides 19 stand alone programs (3 editable) and a master / slave operation.
The flicker-free 1 kHz technology makes the Wallwasher XL RGBW perfectly suitable for
TV studios.
2. Important Safety Notes
WARNING
Please keep this user’s guide for future referece. In case of reselling the
Wallwasher XL please ensure, that this instruction manual is included with
the unit.
CAUTION
All fixtures are subject to a thorough quality control from the manufacturer. Damages
caused by incorrect installation or useage are not covered by warranty.
Unpack and check carefully for transportation damage before using the unit.
This device should be installed and operated by by qualified personnel.
Use a safety bond when mounting the unit.
The unit must be installed in a location with adequate ventilation, at least 50 cm from
adjacent surfaces.
Be sure that no ventilation slots are blocked, otherwise the unit will be overheated.
Before operating, ensure that voltage and frequency of the power supply match the
power requirements of the unit.
It’s important to connect the yellow/green wire to ground to avoid an electric shock.
Maximum ambient temperature Ta: 40°C. Do not operate the device in environments
with higher ambient temperature.
Do not connect the device to any dimmer pack.
At initial startup there may occur smells, but this will disappear after a few minutes.
Please read the instructions carefully before use. It
contains important information about installation,
operation and maintainance.

PROLED WALLWASHER XL RGBW DMX
www.proled.com [email protected]
12
Make sure that there are no flammable materials close to the unit while operating, as it
may cause fire hazard.
Check power cables carefully and replace it immediately if there is any damage.
Unit surface temperature may rise up to 60°C. Do not touch the housing with bare
hands during operation.
Continuous operation may shorten the lifetime.
Avoid liquids or metal objects entering the unit. In case of any object has entered the
device, cut of the mains power immediately.
Do not operate the device in dirty or dusty environment and clean the fixture regularly.
Keep children away from the fixture.
Do not touch any wire during operation as there might be a hazard of electric shock.
Avoid installing the power wires right beside other cables.
Replace fuse only with the same type.
In case of an operating problem switch off the unit immediately.
Never turn on and off the unit in quick succession.
The housing, the lenses or the ultraviolet filter must be replaced if they are visibly
damaged.
Do not open the unit. There are no user serviceable parts inside. Never try to repair the
unit by yourself. Repairs carried out by unskilled people can lead to damage or
malfunction. Please contact the nearest authorized technical assistance center.
Disconnect the mains power if the fixture is not used for a long time.
Use the original packing materials when transporting the unit.
Do not look directly in the LED light beam while the fixture is on.
3. Installation
The unit should be mounted via its screw holes on the bracket. Always ensure that the
unit is firmly fixed to avoid vibration and slipping while operating. Always ensure that the
structure to which the unit is attached to is secure and able to support a weight of 10
times of the unit’s weight. Also always use a safety bond that can hold 12 times of the
unit’s weight when installing the fixture.
The Wallwasher XL must be mounted by a qualified technician and the installation
location must be out of the reach of people.

PROLED WALLWASHER XL RGBW DMX
www.proled.com [email protected]
13
4. Specfications
LED Type: CREE MC-E RGBW 10W x 54
Mains Voltage: AC 100 – 240 V, 50/60 Hz
Power Consumption: 580
W
LED Power: 540 W
Lens Option: 20°, 30°, 40°,
60°
Colour Temperature:
6000-7000K
Luminous Flux /
Wavelength:
Red: 3320 Lumen / 623 nm
Green: 6440 Lumen / 523 nm
Blue: 1254 Lumen / 452 nm
White: 9020 Lumen
R+G+B+W: 19244 Lumen
Ambient Temperature: -10 to + 40°C
Protection Class: IP 65 (for outdoor use)
Dimensions: 741 x 442 x 445 mm
Weight: 42.5 kg
5. Operation
The Wallwasher XL can be controlled in two ways:
1. By a DMX controller
2. By Setup Tool
The Setup Tool is a specially designed handheld setup tool for all integral DMX fixtures and
controllers. By connecting the Setup Tool to any fixture via XLR, you can easily setup DMX
address, channel modes, white balance, manual colors, and fade speed functions. If you
use Setup Tool to control the unit, please refer to the user manual of the Setup Tool.
PROLED WALLWASHER XL RGBW DMX
www.proled.com [email protected]
14
5.1. DMX Controller
The PROLED Wallwasher XL can be controlled by any universal DMX-512 controller. First
you have to set a DMX address from 1 to 512 according to the channels used, so that the
units can receive a DMX signal and respond correctly. Depending on the operating mode,
the Wallwasher XL requires 4 to 10 DMX channels.
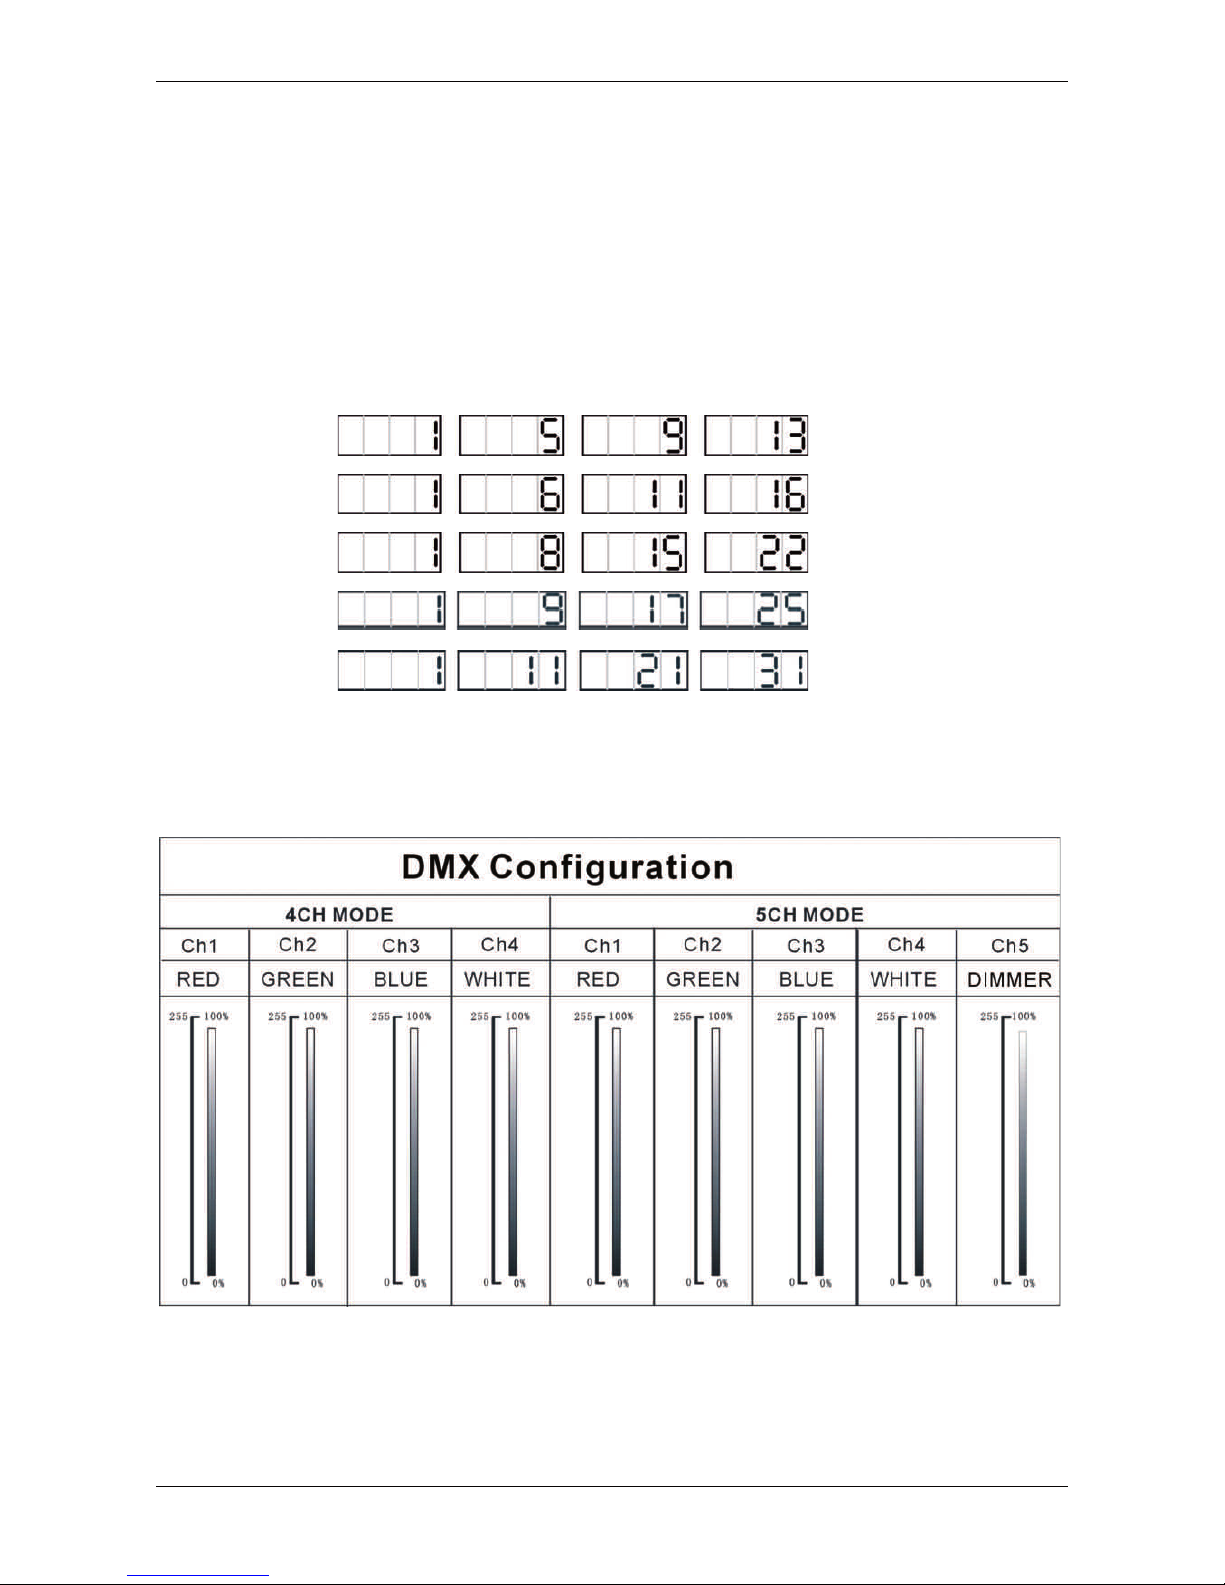
Please refer to the following diagram to address the DMX-512 channels for the first 4 units:
4 Channels:
5 Channels:
7 Channels:
8 Channels:
10 Channels:
5.2. DMX 512 Configuration

PROLED WALLWASHER XL RGBW DMX
www.proled.com [email protected]
16
5.3. DMX-512 Connections
To avoid signal errors, the end of the serial DMX-512
link must be terminated. Insert a terminator plug (XLR
connector with a 120 / ¼ W resistor between pin 2
and 3) in the DMX output socket of the last unit in the
link.

PROLED WALLWASHER XL RGBW DMX
www.proled.com [email protected]
17
1. If you are using a controller with a 5 pin DMX output socket, you need a 5 pin to 3 pin
XLR adapter cable.
2. At the last unit the DMX output must be terminated with a terminator plug. Solder a 120
Ohm ¼ W resistor between pin 2 (DMX-) and pin 3 (DMX+) into a 3-pin XLR-plug and
insert it in the DMX output socket of the last unit.
3. Connect the units together in a daisy chain with XLR cables from the output of one unit
to the input of the next unit. The cable can not branched or split to a `Y` cable. DMX
512 is a very high speed signal. Inadequate or damaged cables, soldered joints or
corroded connectors can easily distort the signal and shut down the system.
4. The DMX output and input connectors are pass-through to maintain the DMX circuit,
when one of the units’ power is disconnected.
5. Each lighting unit needs to have a preconfigured address to receive the data sent by
the controller. The address number is between 0-511 (usually 0 & 1 are equal to 1).
6. The end of the DMX 512 link should be terminated to reduce signal errors.
7. 3 pin XLR connectors are more popular than 5 pin XLR.
8. 3 pin XLR: pin 1: GND, pin 2: negative signal (-), pin 3: positive signal (+)
9. 5 pin XLR: pin 1: GND, pin 2: negative signal (-), pin 3: positive signal (+), pin 4 / pin 5:
not used.
6. Troubleshooting
In the following a few common problems are described, that may occur during
operation. Here are some suggestions for an easy troubleshooting:
A. The unit is not operating, no light is generated and the fan does not work
1. Check the connection of power and main fuse.
2. Check the mains voltage on the main connector.
B. The unit is not responding to the DMX controller
1. The DMX LED should be on. If not, check the DMX connectors and cables to see if the
link is properly set up.
2. If the DMX LED is on and the unit does not respond to the control channel, check the
address settings and the DMX polarity.
3. If you have intermittent DMX signal problems, check the pins on connectors or on PCB
of the particular unit or the previous one.
4. Try to use another DMX controller.
5. Check if the DMX cables are installed near or parallel to high voltage cables. Strong
electromagnetic fields, as produced from high voltage cables may cause damage or
interference to the DMX interface circuit.

PROLED WALLWASHER XL RGBW DMX
www.proled.com [email protected]
18
7. Cleaning
The cleaning of the fixture must be carried out regularly to optimize the light output. The
cleaning frequency depends on the conditions in which the device is operated. Damp,
dusty or particularly dirty environments can cause accumulation of dirt on the unit’s optics.
Clean with soft cloth using normal glass cleaning fluid.
Always dry the parts carefully.
Clean the external optics at least every 20 days. Clean the internal optics at least every
30 to 60 days.
MBN GmbH
Balthasar-Schaller-Str.3
86316 Friedberg - Germany
Table of contents
Languages:
Other PROLED Home Lighting manuals


