Proma A-5120 Operating instructions

Installation & Owners Manual
Proma Dental Light
!
120V 60HZ
1A
1 AMP FUSES
INPUT VOLTAGE:
CURRENT:
111153
P/N 93155
CONFORMS TO
UL STD 60601-1
CERTIFIED TO
CAN/CSA STD C22.2 No. 601.1
WARNING:
REPLACE FUSE AS MARKED
RISK OF FIRE - CLASS 1
S/N PLT A5000001
A-5120 Ceiling Mounted Light
Specications...................................... 2
Operating Conditions.......................... 2
Storage & Shipping Conditions........... 2
Classications..................................... 2
Technical Support................................2
Installation Overview........................... 2
Pre-Installation Notes..........................2
Recommended Service Tools
Electrical Connections and Supply
Cautions on Installation and Use
Installation........................................... 3
Cleaning Instructions...........................4
Wiring Diagram & Warranty................. 4
Flex Arm Counterbalance
Adjustment.......................................... 5
On / Off Switch Lever
Installation........................................... 5
Drill Template.......................................6
Table of Content Serial Numbers
Please locate and write down the Serial
Numbers on the A-5120 Dental Light
and Transformer. Having this informa-
tion available will aid in the identication
of your dental light and transformer.
Dental Light Serial Number
Transformer Serial Number
The Proma label is located in two loca-
tions on the dental light system. The
dental light serial number is located on
the light arm and the Transformer serial
number is located on top of the trans-
former housing
The serial number is located along the
left edge of the label
Bulb Replacement
Note: A replacement bulb is included.
Please locate it and store in a conve-
nient place. Order replacement Light
Bulb Proma #93146
WARNING!
Turn the light off and allow cooling be-
fore removing the shield. Failure to do
so can cause injury by burning. Always
handle bulbs with tissue paper, do not
allow skin to contact the bulb, as it will
shorten the life.
Remove the shield by gently squeezing
the ends and pull it toward you
Remove the bulb by wrapping in tissue
and gently pulling forward
The replacement bulb should be
pushed in gently. The lamp pins must
be securely in the lamp socket
Replace the shield by squeezing the
sides and gently pushing it into the
housing. You will hear a “Click” when
the shield seats properly.
WARNING!
Failure to properly seat the shield
could allow it to fall off and cause injury
Turn on the light and check the focus
by shinning the light on a surface 27”
away. The light pattern should be even
with dened edges over an area of 4”
x 6”. If necessary, rotate the focus
adjustment.
Focus Adjustment Screw
730 E. Kingshill Place • Carson, CA 90746
Phone 310.327.0035 • Fax 310.327.4601
Document 9050736 rev C 06/07

Compliance with Local Building
Codes is the Responsibility of the
Dealer and the Contractor
Specications
Electrical Input:
Voltage 120 V~
Phase 1
Frequency 60 Hz
Power 150 W
Electrical Output:
Voltage 13-19 V~
Current 3.4-5 Amps
Operating Conditions
Ambient
Temperature +10 C to +40 C
Humidity 30% to 75%
Atmospheric
Pressure Range 700 hPa to
1060 hPa
Storage & Shipping
Ambient
Temperature - 40 C to +70 C
Humidity 10 to 95 RH
(Non-condensing)
Atmospheric
Pressure Range 7 to 15 psi
(50 to 106 Kpa)
Classications
Classication
of Equipment Class I
Degree of Protec-
tion against harmful
ingress of water
Mode of Operation Intermittent
Ordinary
Technical Support
For Technical support and repair assis-
tance, contact your local Proma dealer
Check Product Contents
Immediately upon receipt, open the
box, examine for damage and com-
pare contents to the packing slip. If
not as ordered, please notify your
dealer. If hidden shipping damage
is identied, immediately contact the
shipping service. Contact Proma to
arrange for replacement goods.
Read all Cautions / Warnings on
Labels and in this Manual
Check the product for all caution and
warning labels and read them. Re-
view this manual for all cautions and
warnings prior to installation.
Check Installation Site and
Access
Before installation, check room di-
mensions, locate required tools and
establish clear access to the site.
SHUT OFF ELECTRICAL POWER
to the appropriate outlet.
Installation Overview
Prepare Electrical Connections
Conrm the electrical connections
to be used. Locate all switches and
circuit breakers involved.
Test and Adjust Product after
Installation
It is important to complete any instal-
lation by verifying all connections
and controls are functioning properly
before allowing the device to be used
for patient treatment.
Train Personnel on Operating
Equipment
Educate staff on the product’s proper
use, cleaning and disinfection. Identi-
fy parts that may require replacement
(i.e. lamps, lens covers and fuses).
1.
2.
3.
4.
5.
6.
Recommended
Service Tools
• Allen Wrench Set
• Bubble Level
• Tape Measure
• Phillips Screw Drivers
Electrical Connections
and Supply
Note: a licensed electrician must per-
form all wiring. Due to varying city elec-
trical codes, the dealer should ensure
installation will meet local requirements.
Proma cannot be responsible for an
installation that does not meet local
electrical codes. Installer must meet the
following additional requirements:
115 Volts AC (minimum) electrical
power
Use wiring with insulation rated for 90º
C minimum. Ensure all wiring is prop-
erly grounded. Protect circuit with circuit
breaker
CAUTION
Possible re hazard when used with
oxygen administering equipment other
than the nasal mask or length bed
tent type. Oxygen tent should not ex-
tend below mattress support level.
To ensure proper grounding, plug unit
into “Hospital Only” or “Hospital Grade”
outlet.
Transformer Cover to be removed by
Qualied Service Personnel Only
DANGER!
Risk of explosion if used in the pres-
ence of ammable anesthetics!
Risk of Fire. Replace fuse as marked
2
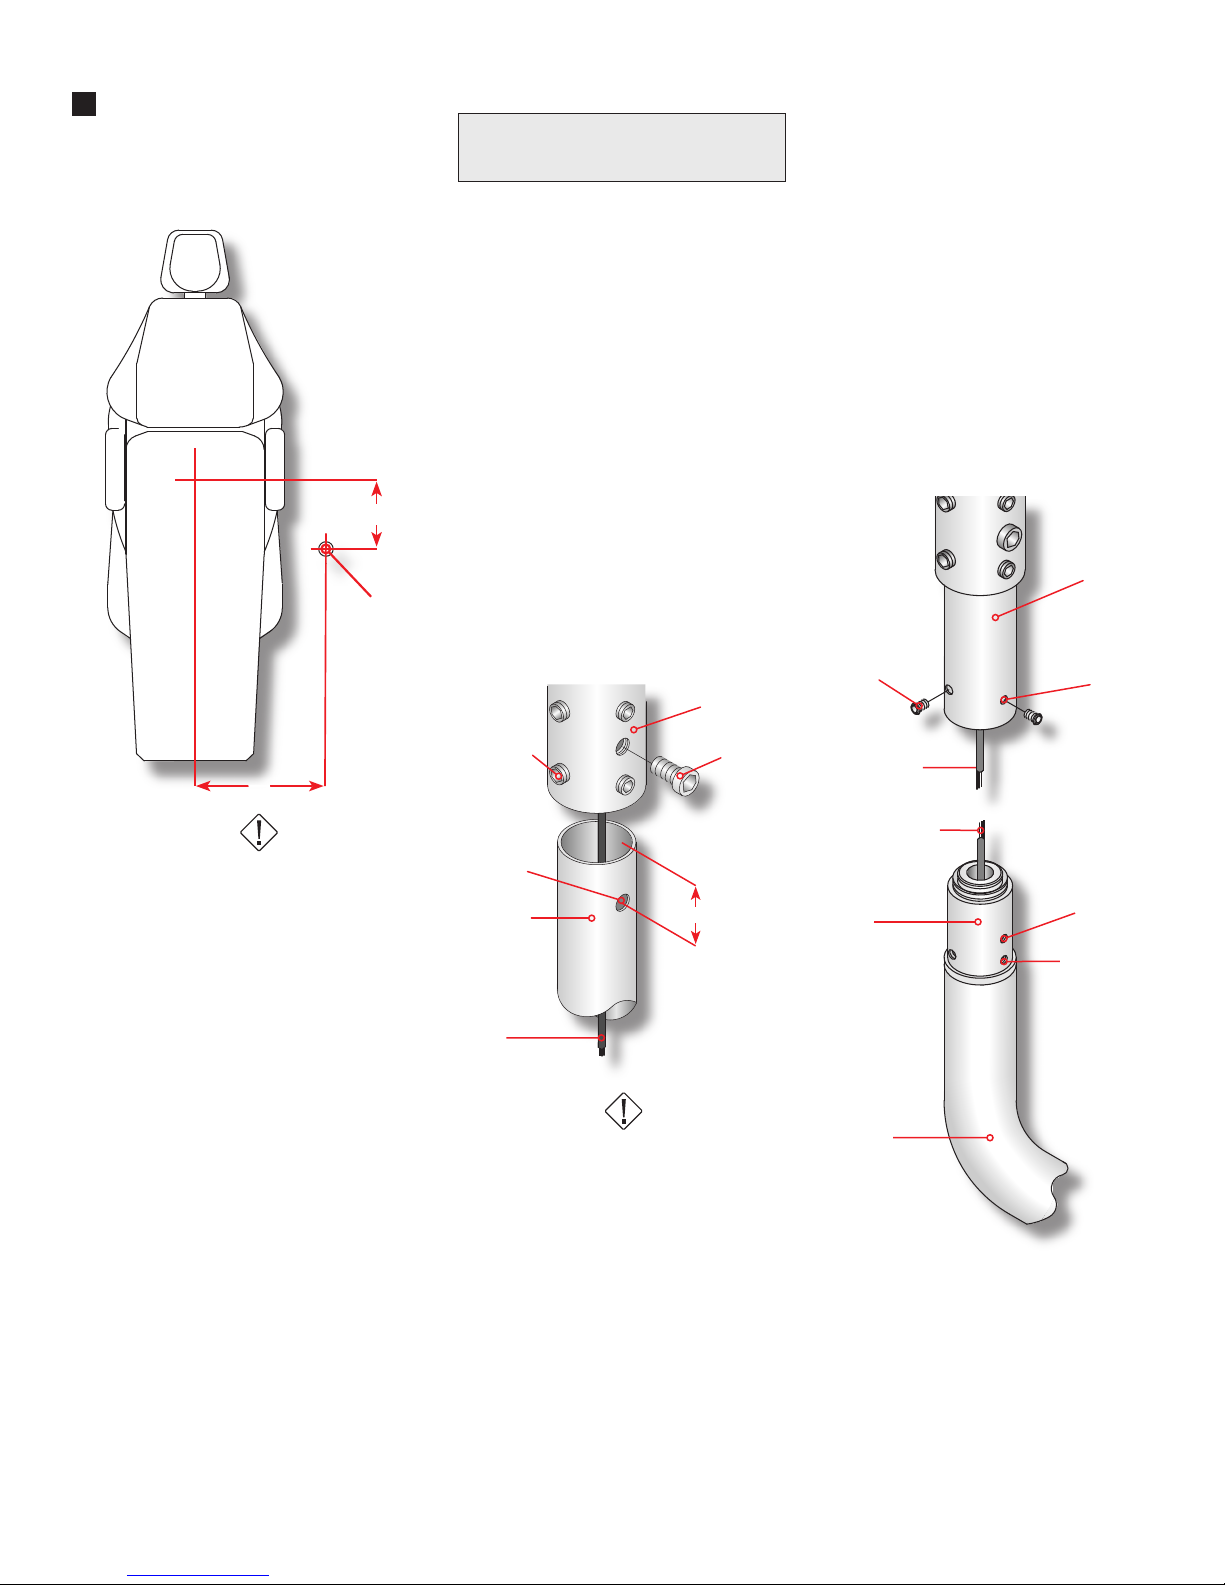
12”
18”
Drop Post
Support Hub
5/16” Bolt
5/16” - 18
Set Screw
Drop Post
Pigtail
11/32”
Diameter
1 5/8”
Figure 2
10-32 x 1/4”
Button Head
Drop Post
Clearance
Holes (3)
Pigtail - Low
Voltage Cable
Spade Terminals
Swivel
Rigid Arm
Figure 3
Rotation
Stop Screw
Tapped Holes
(3)
3
Figure 1
Installation Notes
1.
2.
3.
4.
5.
6.
7.
Follow recommended dimensions
on Figure 1 to determine the position
for the support plate.
HAZARD
Check ceiling structure and deter-
mine that it will support a minimum
of 200 pounds. Failure to fasten ceil-
ing securely to a structurally sound
and appropriately designed structure
could result in a hazard of potential
injury to patient or users caused by
the light falling.
Note: It is the responsibility of a
licensed mechanical structural engi-
neer to verify that each site is safe to
mount such device.
Using drill template provided on
page 6, mark mounting hole centers.
Mount the support plate to ceiling
using three (3) 3/8” diameter lag
screws.
Note: The ceiling light is designed to
accommodate up to 11’ ceiling. The
drop post is pre-cut to suit your ceil-
ing height.
Ceiling Height 8’ 9’ 10’ 11’
Drop Post Length 9” 21” 33” 45”
Proma discourages the use of
ceiling exceeding 11 foot heights.
Proma suggests the use of a cabinet
mounted or wall mounted light.
Note: The drop post has an 11/32”
(.343) diameter hole on the center-
line, 1-5/8” inches from one end.
This is a clearance hole for the 5/16”
bolt that secures the post to the sup-
port hub.
Route the pigtail from the transform-
er through the drop post containing
the 11/32” diameter hole. Next, insert
the post into the support hub.
Note: Align the hole on the drop post
with the 5/16” socket cap bolt. Tight-
en the 5/16” bolt and let the drop
post rest on the bolt. See Figure 2
HAZARD
Failure to install the 5/16” bolt as de-
scribed may allow the light to fall and
could result in personal injuries.
Tighten the eight (8) 5/16” – 18 set
screws on support hub. Assure that
post is level front to back and side
to side.
Slide the ceiling cover and collar
onto the drop post. Once cover is
on post and resting on the ceiling,
tighten two (2) set screws on collar.
Connect the terminals from the rigid
arm to the pigtail terminals from the
low voltage cable being careful to
match the colors.
Insert the swivel (part of the rigid
arm) into the drop post. With the
rotation stop set screw, located in
the swivel, towards the foot of the
chair, align the three (3) holes on the
drop post with three tapped holes on
the swivel and secure with the three
(3) 10-32 x 1/4” button head screws
provided. See Figure 3.
Test Light
Turn the light switch located immedi-
ately behind the light head. This is a
three position switch. Center is Off,
Left is the normal operating intensity
and Right is maximum intensity for
color matching.
8.
Cleaning Instructions
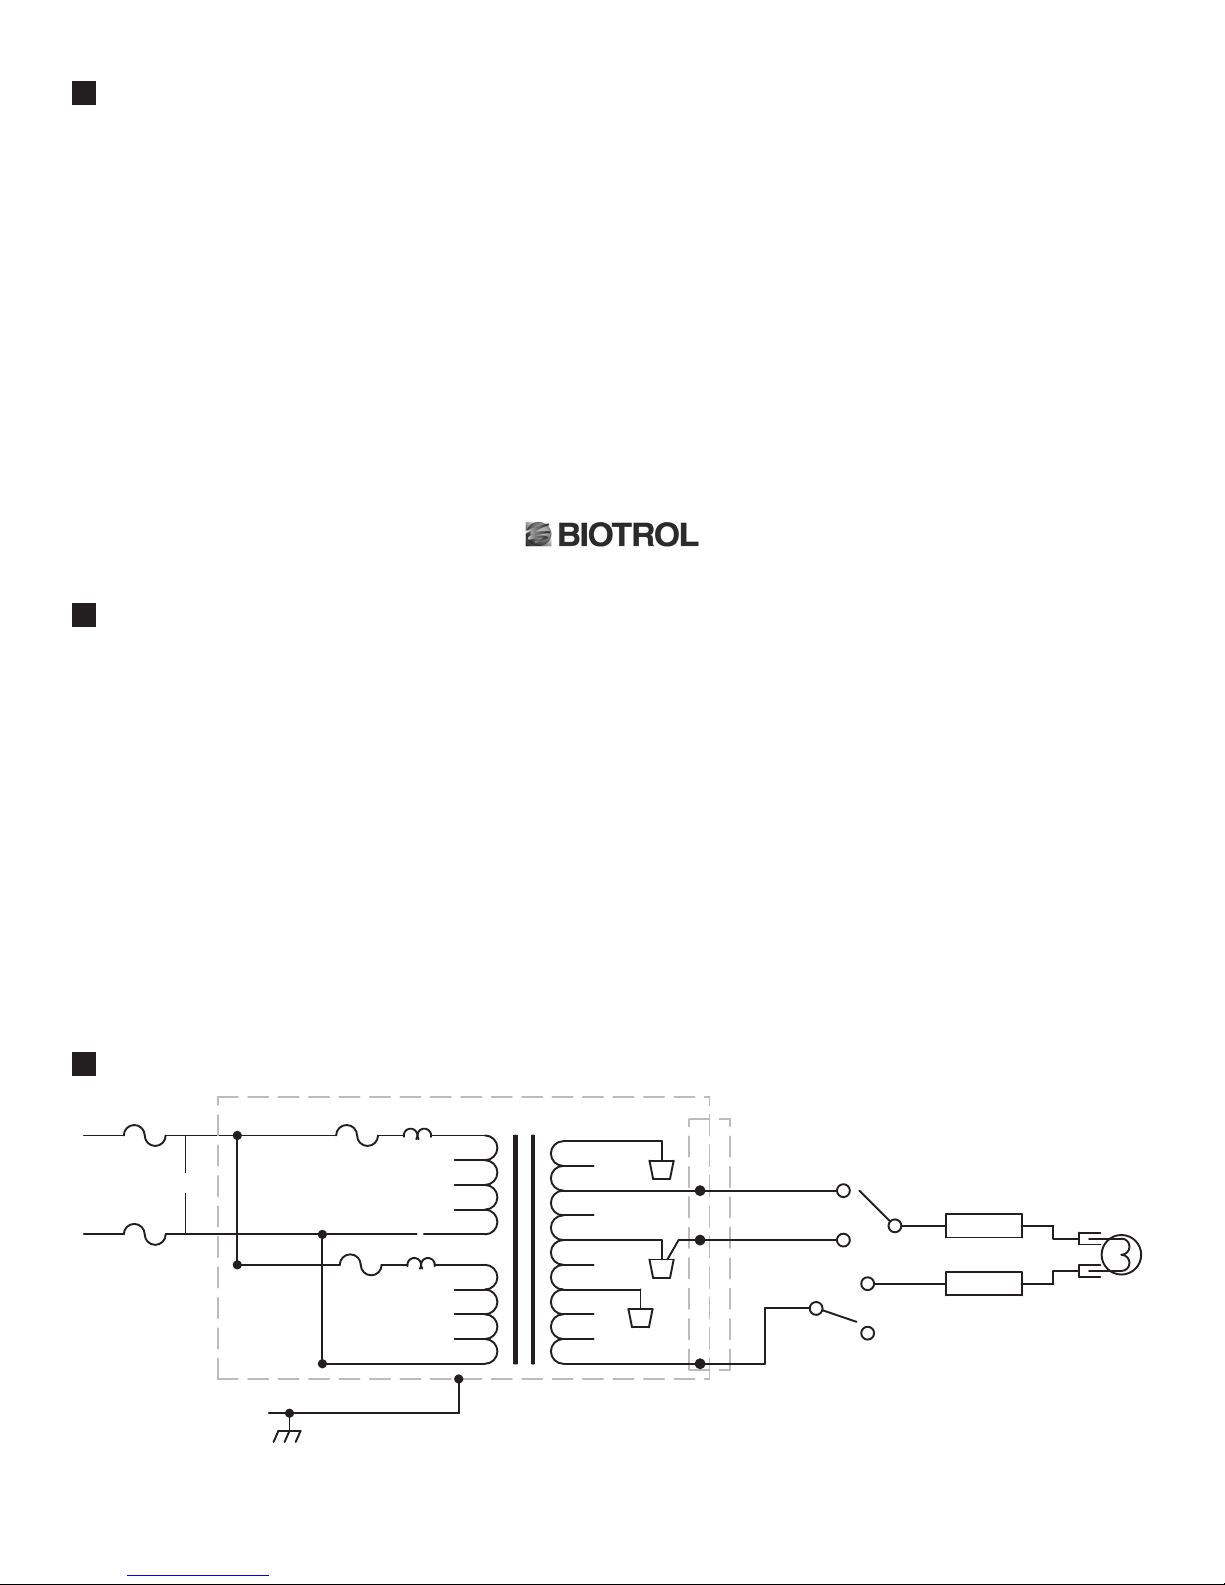
Wiring Diagram
BRW
2A
2A
BLK
LIGHT
BLUE
WHT
120 VAC
BLK
BLK / RED
F1
F2
GRN / YEL
TL1
TL2
BLK / WHT
PUR (19V)
BRN (17V)
BLU (15V)
ORG (13V)
WHT/ RED
RED
WHT
BLK
BLK
WHT WHT
WHT
120 V~APPLICATION
4
WHT
Warranty
Use Disposable Plastic Films and
Foils
Proma encourages the use of dispos-
able lms and foils on the handles
and surfaces commonly touched with
gloved hands. This can reduce the
need for chemical surface disinfection
and extend life span and appearance of
these surfaces.
Do Not Soak Plastic Parts
The useful life of many plastics may be
greatly shortened by soaking in disin-
fectant solution for extended periods
of time.
Cleaning Your Proma Light
Clean and disinfect the unit at begin-
ning and end of each workday.
The outside surfaces may be cleaned
with a moist (not dripping) soft towel
soaked in any mild soap and water so-
lution. Wipe and dry with a soft towel.
Do not use abrasive cleaners or rough
paper towels which may scratch the
molded surfaces. After cleaning, wipe
surfaces with gauze sponge moistened
(not dripping) in disinfectant.
Proma approves the use of mild soap
and water solution, applied with a soft
cloth.
Proma recommends Birex®SE manu-
factured by Biotrol International
Proma warrants its products against defects in materials and / or workmanship for ve (5) years from the date of shipment
from the factory. No other warranties are expressed or implied. No employee, representative or dealer is authorized to
change this warranty in any way, or grant any other warranty dealing with this product. Proma’s sole obligation under this
warranty is limited to repair, replace, or modify the defective part or product if, in its judgment, this is advisable. Labor and
other costs for removal and reinstallation are not included in this warranty. The buyer shall have no other remedy. (All spe-
cial, incidental, and consequential damages are excluded.) Written notice of breach of warranty must be given to Proma
within the warranty period. The warranty does not cover damages resulting from improper installation or maintenance, ac-
cident or misuse. Warranty is void if product is not installed by an authorized Proma dealer. NO OTHER WARRANTIES
AS TO MERCHANTABILITY, FITNESS FOR USE OR OTHERWISE ARE MADE. This warranty gives specic legal right,
and there may also be other rights which vary from state to state. (Some states do not allow the exclusion or limitation of
incidental or consequential damages, so the above exclusion may not apply.)
Proma will provide service advice and instructions as required for repair or replacement of this product.
Call 1.310.327.0035 for service.

1
2
3
3
Adjustment Nut
Counterbalance
2
Lever- Limit Switch
Adjust Screw
Limit Switch
4
4
Friction
Screws
1 On/Off Switch Lever Installation
Remove the white-rounded lever from the plastic bag that
contains the spare fuses and spare bulb. Install the lever
onto the On /O ff switch by pressing it over the teardrop
shape toggle until it bottoms-out. The lever is designed to
t onto the toggle with a minimum amount of force.
WARNING
Be careful not to over press the lever as you may dam-
age the switch.
Flex Arm Counterbalanced Adjustment
On / Off Switch Lever Adjustment
On / Off Switch
Rounded Lever
Light Head
Flex Arm
5
Counterbalanced Spring Tension Adjustment
If light head drifts or springs back up, the spring tension
needs to be counterbalanced. To get access to the ten-
sion nut and adjust the spring, remove the plastic bottom
cover by pulling down on the head end of arm. Pass a
at head screwdriver through the slot on the inside of the
extrusion. Rotate counterclockwise the splined nut for a
stiffer spring and clockwise for a looser spring.
Friction Adjustment
Remove plastic bottom cover by pulling down on the
head end of the arm. Use a 9/64” Allen wrench to tighten
or loosen the two friction screws. If arm is drifting, tighten
screws. If arm movement is too stiff, loosen the screws.
Always turn both screws the same amount.
Note: The bottom cover snaps back into place without
the use of any tools.
Auto On/Off Microswitch Adjustment
Remove plastic bottom cover by pulling down on the
head end of arm. Use a 3/32” Allen wrench to loosen
the set screw (marked “Adjust screw”). Move the screw
towards the light head to lower the position that the light
turns Off / On. Move the screw the opposite direction to
raise the On/Off position.

6
Drilling Template
7-1/2”
(7.50”)
8-21/32”
(8.65”)
Note: Print this page on scale of 1: 1
Do Not reduce page size
Center Mark Hole Location on
Ceiling using this Template
Table of contents
Popular Lighting Equipment manuals by other brands

Blizzard Lighting
Blizzard Lighting Puck CSI Xtreme user manual

Philips
Philips Light System Manager manual

Elumen8
Elumen8 Virtuoso 600 Profile RGBAL user manual

Stairville
Stairville Tri Flat PAR Profile 18x3W RGB 25 user manual

BRUSTOR
BRUSTOR PROSTOR E-BIKE LIFT 12V Mounting instruction

ALPHA LITE
ALPHA LITE DL Series User manual book


