LUX LUMEN StarPole User manual

StarPole

StarPole LUX LUMEN - Kernenergiestraat 53A - 2610 WILRIJK - BELGIUM p.2/23
T: +32 3 293 35 50 –www.lux-lumen.com
CONTENTS
1PICTURE..................................................................................................................... 3
2DIMENSIONS ............................................................................................................. 4
2.1 GENERAL .................................................................................................................................... 4
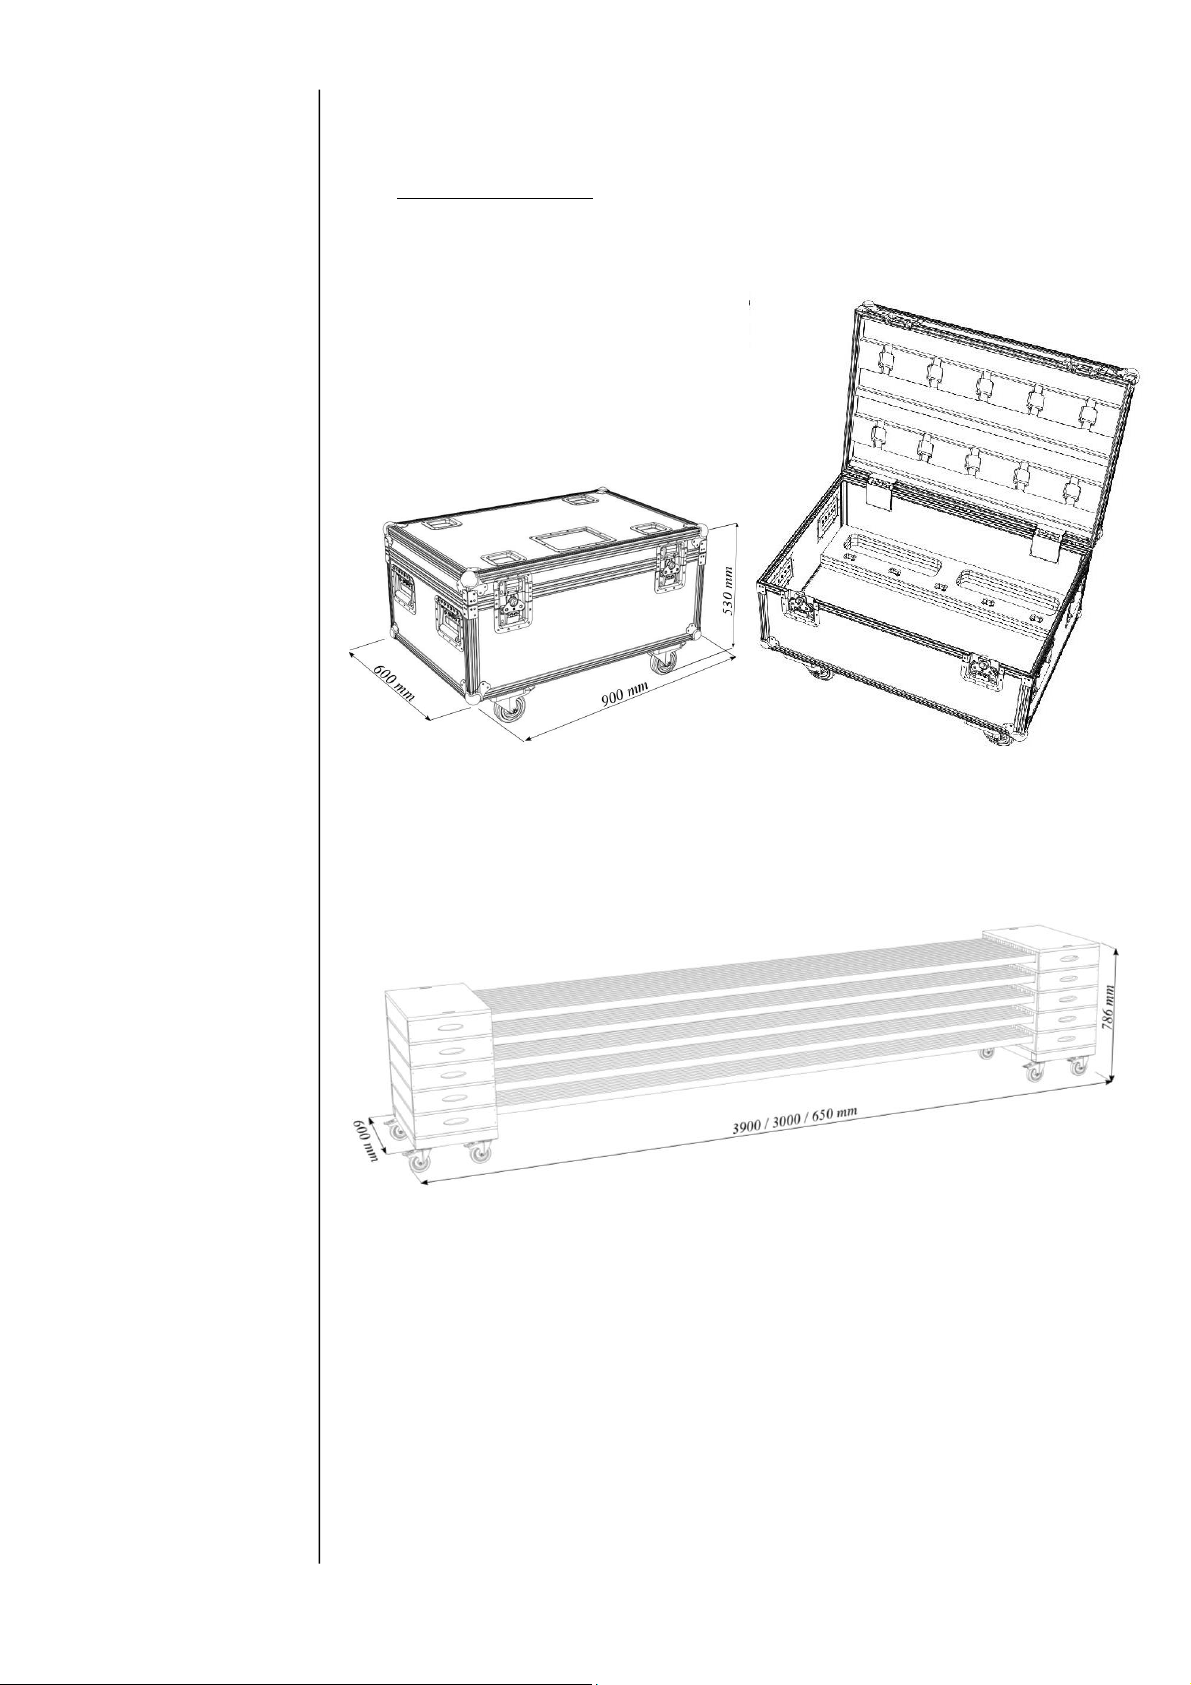
2.2 TRANSPORT CASES ..................................................................................................................... 5
3PHYSICAL INSTALLATION........................................................................................ 7
3.1 SPECIFICATION ........................................................................................................................... 7
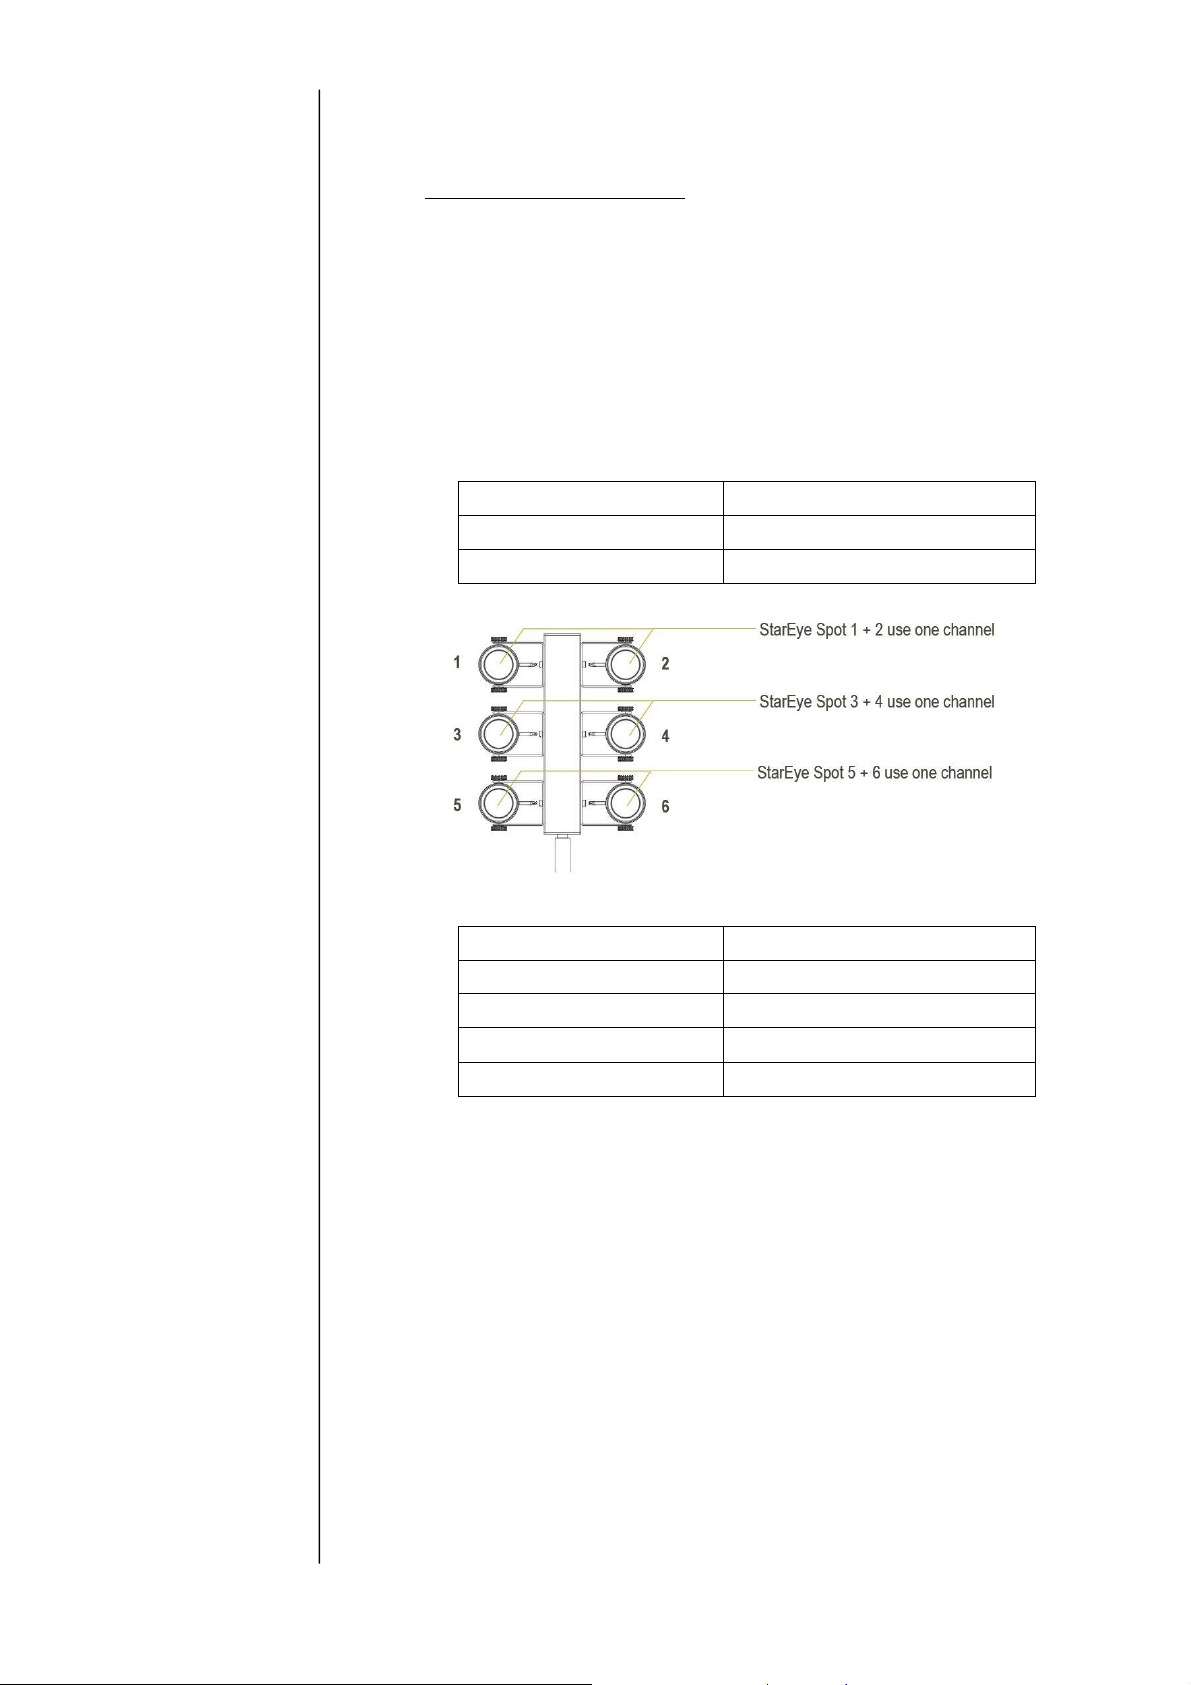
3.2 STARPOLE CONFIGURATION OVERVIEW....................................................................................... 8
3.3 STARPOLE CONFIGURATION........................................................................................................ 9
3.4 ADJUSTING OF INTENSITY ......................................................................................................... 10
4CONFIGURATION..................................................................................................... 11
5INSTALLATION....................................................................................................... 13
5.1 PROVIDE THE STAREYES MAXI WITH THE CORRECT OPTICS ..................................................... 13
5.2 PROVIDE THE STAREYE MAXI WITH SNOOT IF WISHED FOR....................................................... 14
5.3 FOCUS THE STAREYE MAXI LED-UNITS ON THE HEAD ............................................................... 14
5.4 POSITION THE BASE BLOCK ....................................................................................................... 14
5.5 PLACE HEAD ON POLE ............................................................................................................... 15
5.6 CONNECT THE XLR 5P CABLE ON THE HEAD............................................................................. 15
5.7 ASSEMBLE THE POLE ON THE BASE PLATE................................................................................. 16
6EXTERNAL CONNECTIONS..................................................................................... 17
6.1 DC POWER INPUT ..................................................................................................................... 17
6.2 BATTERY UNIT.......................................................................................................................... 17
7EMC AND SAFETY REQUIREMENTS ...................................................................... 18
8SAFETY INFORMATION .......................................................................................... 19
8.1 SYMBOLS .................................................................................................................................. 19
8.2 PROTECTION FROM ELECTRIC SHOCK ....................................................................................... 20
8.3 PROTECTIONS FROM FIRE AND BURNS ...................................................................................... 20
8.4 PROTECTION FROM INJURY....................................................................................................... 21
8.5 DISPOSING OF THIS PRODUCT ................................................................................................... 21
9SERVICE AND MAINTENANCE ............................................................................... 22
9.1 SAFETY PRECAUTIONS .............................................................................................................. 22
9.2 CLEANING ................................................................................................................................. 22
10 LIST OF USED ABBREVIATIONS ............................................................................. 23

StarPole LUX LUMEN - Kernenergiestraat 53A - 2610 WILRIJK - BELGIUM p.3/23
T: +32 3 293 35 50 –www.lux-lumen.com
1Picture
The StarPole combines multiple StarEye Maxi led-fixtures in a flexible configuration

StarPole LUX LUMEN - Kernenergiestraat 53A - 2610 WILRIJK - BELGIUM p.4/23
T: +32 3 293 35 50 –www.lux-lumen.com
2Dimensions
2.1 General
The StarPole consists of multiple elements:
L (cm)
W (cm)
H (cm)
StarPole
HEAD
23,4
12,6
27,0
POLE
2
4
15, 250 or 340
BASE PLATE
40
34
10
Power supply cases
LED DRIVER BOX
35
28
11
LED DRIVER RACK
65
72
83
Transport cases
CASE for 10 heads
90
60
53
CASE for 12 poles
60
40
11,8
CASE for 16 base plates
91
52,8
66
CASE for cables
90
61,5
53
HEAD
POLE
BASE PLATE
In the setup with head, pole and base plate, the StarPole measures:
L400 x W340 x H2775 / 3675 mm

StarPole LUX LUMEN - Kernenergiestraat 53A - 2610 WILRIJK - BELGIUM p.5/23
T: +32 3 293 35 50 –www.lux-lumen.com
2.2 Transport cases
All parts are delivered in dedicated transport cases.
Case for 10x StarPole heads
Case combination for 12x poles per level
(image exemple: 5 levels, cases piled up):

StarPole LUX LUMEN - Kernenergiestraat 53A - 2610 WILRIJK - BELGIUM p.6/23
T: +32 3 293 35 50 –www.lux-lumen.com
Case for 16x StarPole base plates:
Case for StarPole cabling:

StarPole LUX LUMEN - Kernenergiestraat 53A - 2610 WILRIJK - BELGIUM p.7/23
T: +32 3 293 35 50 –www.lux-lumen.com
3Physical Installation
Thank you for selecting this StarPole led-luminaire as best solution in your setup.
Warning! Read the safety precautions in this manual before integrating this led-
luminaire into your installation.
Installation must be carried out by qualified professionals only.
Assure yourself that there is sufficient and unrestricted air flow around the
StarPole led-luminaire.
3.1 Specification
The StarPole luminaire is an elegant and efficient solution for indoor event
lighting.
The ingress protection of the StarPole luminaire is IP20.
The housing is out of anodized aluminum in black finish.
RAL colors are not available.
It is possible to use accessories to manipulate the light, like lenses, snoots
or barndoors
The StarPole uses a simple stabilized 24 VDC power supply.
It is also possible to choose for battery packs for a stand-alone functionality
(see chapter 6 - External connections).
•Power consumption: max. 60Watt (6x 10W)
•Power voltage: 24 VDC
•Current: max 3A (full rated output)
•Weight: 15,4kg (base-pole-head version)
•Different lenses are possible:
oSpot: 22° (FWHM)
oMedium: 26° (FWHM)
oWide: 48° (FWHM)
oUltra Wide: 60° (FWHM)
oLens material: PMMA
•Different white light colors are possible:
oWarm White: 2700K CRI: 80
oWarm White: 3000K CRI: 80
oWarm White: 3500K CRI: 80
oNeutral White: 4000K CRI: 80
oCold White: 5700K CRI: 80

StarPole LUX LUMEN - Kernenergiestraat 53A - 2610 WILRIJK - BELGIUM p.8/23
T: +32 3 293 35 50 –www.lux-lumen.com
3.2 StarPole configuration overview
The following items are available for your StarPole configuration:
Luminaire set
•StarPole Head with 6x StarEye Maxi Led-units
Pole combination
•StarPole Pole in following heights:15cm (floor model), 250cm or
340cm
•StarPole Base plate
Suspension
•StarPole Bracket for suspension on trusses
Power supply carriers
•StarPole Led-driver box containing 1x 6 channel led-driver and 2x
240W power supplies.
•StarPole Led-driver rack containing 4x 6 channel led-drivers and 8x
240W power supplies.
Connecter cables
•Extension cables 4x#1,5mm, with wago 5p connectors in following
lengths: 1m, 2m, 3m, 4m, 5m, 10m and 20m.
Stand-alone supply
•StarPole Battery unit
Please also consult the specifications:
•StarPole Assembly / Installation –chapter 5
•StarPole Configuration document

StarPole LUX LUMEN - Kernenergiestraat 53A - 2610 WILRIJK - BELGIUM p.9/23
T: +32 3 293 35 50 –www.lux-lumen.com
3.3 StarPole configuration
The StarPole Head consists of 6x StarEye Maxi led-spots, linked with Higo
connectors. The head fits on the pole and is secured with bolts.
The pole can have a height of 15cm or 250cm or 340cm. It is mounted with
bolts on the base plate on top of the base block. This base block has 4
possible positions on the plate, also to be fixed with bolts. The position of
the base block determines the position of the pole.
Cabling, with an XLR 5p connector on top and a wago 5p connector at the
bottom, goes through the aluminum pole.
The StarPole uses a simple stabilized 24 VDC power supply.
The 6x StarEye Maxi spots are controlled per 2 by a 6 channel led-driver.
1 StarPole uses 3 outputs of the 6 channel led-driver. This also means that
it is possible to connect 2x StarPoles totals to a led-driver.

StarPole LUX LUMEN - Kernenergiestraat 53A - 2610 WILRIJK - BELGIUM p.10/23
T: +32 3 293 35 50 –www.lux-lumen.com
3.4 Adjusting of intensity
The StarEye Maxi led-units have a built-in step-down convertor. The StarEye
Maxi led-units are dimmable with a Lux Lumen constant voltage DMX led-
driver.
Preferred PWM led-driver:
➢Lumen Radio CRMX - 12 V –48 V DC
•DMX rotary wheels for 3 DMX channels
Start address*
2x Bottom StarEye Maxi
Start address + 1
2x Middle StarEye Maxi
Start address + 2
2x Top StarEye Maxi
* DMX start address, to be set using the wheels:
001 up to 509
Customized
6xx
Stand-alone static
7xx
Stand-alone dynamic
8xx
Battery status
9xx
Wireless Signal status
•Status leds on Electronic controller:
oPower: Red led
▪Off: No power
▪Fix led: Operational
▪Single blinking led: Standalone modus
▪Double blinking led: Short circuit
oDMX: Green led
▪Off: No signal from transmitter
▪Fix green led: Active signal from transmitter
▪Single blinking led: Link from transmitter, no radio
▪Double blinking led: Active radio, no DMX
•Synchronize
oUse the push button on the transmitter to synchronize all
receivers.
oTo disconnect from the transmitter signal, press long on the
push button of the receiver.

StarPole LUX LUMEN - Kernenergiestraat 53A - 2610 WILRIJK - BELGIUM p.11/23
T: +32 3 293 35 50 –www.lux-lumen.com
4Configuration
Please also consult the ‘StarPole configuration’document.

StarPole LUX LUMEN - Kernenergiestraat 53A - 2610 WILRIJK - BELGIUM p.12/23
T: +32 3 293 35 50 –www.lux-lumen.com

StarPole LUX LUMEN - Kernenergiestraat 53A - 2610 WILRIJK - BELGIUM p.13/23
T: +32 3 293 35 50 –www.lux-lumen.com
5Installation
Please additionally consult the document with the StarPole assembly overview.
5.1 Provide the StarEyes Maxi with the correct optics
Step 1:
Screw the front cover counterclockwise to remove it from the led-unit.
Step 2:
Take out the lens. Don’t touch the led itself to avoid damage!
Step 3:
Insert the new lens into the led-unit.
Step 4:
Screw the front cover onto the housing clockwise. Do not displace the rubber band
to prevent fluid ingress

StarPole LUX LUMEN - Kernenergiestraat 53A - 2610 WILRIJK - BELGIUM p.14/23
T: +32 3 293 35 50 –www.lux-lumen.com
5.2 Provide the StarEye Maxi with snoot if wished for
5.3 Focus the StarEye Maxi led-units on the head
5.4 Position the base block
Position the base block on the correct position on the base plate.
Secure with bolts.

StarPole LUX LUMEN - Kernenergiestraat 53A - 2610 WILRIJK - BELGIUM p.15/23
T: +32 3 293 35 50 –www.lux-lumen.com
5.5 Place head on pole
Put the StarPole head on the pole and secure with bolts.
5.6 Connect the XLR 5p cable on the head

StarPole LUX LUMEN - Kernenergiestraat 53A - 2610 WILRIJK - BELGIUM p.16/23
T: +32 3 293 35 50 –www.lux-lumen.com
5.7 Assemble the pole on the base plate
Put the StarPole head + pole on the base plate and secure with bolts.

StarPole LUX LUMEN - Kernenergiestraat 53A - 2610 WILRIJK - BELGIUM p.17/23
T: +32 3 293 35 50 –www.lux-lumen.com
6External connections
6.1 DC power input
Safety precautions
Never connect the live power on the input terminals of the StarPole led-luminaire!
In case of doubts, contact your supplier.
Polarity
The StarPole luminaire is polarity sensitive. However the led-units are provided
with a Higo connector, it is advised to observe polarity and cabling if necessary:
•Red inner conductor = positive
•Black inner conductor = negative
Improper connection might damage the StarPole luminiare and power supply
permanently. In case of inversed polarity, the warranty is void.
Power supply: Rated voltage
The rated input voltage range of the StarPole luminaire is 24 VDC. Due to the use
of a step down-convertor, integrated in the housing, a highly efficient system is
created.
Cable
The cable used in the StarPole is 4x#0,5mm with a XLR 5p connector on top and a
wago 5 connector at the bottom. It is possible to extend the cable with a cable
4x#1,5mm of maximum 25m to the 6 channel led-driver.
Lux Lumen cables are available with length 1m, 2m, 3m, 4m, 5m, 10m and 20m.
6.2 Battery Unit
Preferred battery charger:
➢Meanwell PA-120N-27c
110V or 220V, selectable by switch on charger, to be set by Lux Lumen.
Battery:
In order to charge the battery, first connect the XLR to the battery, than plug
in the power 220V.
Autonomy (from maximum load): max.12 hours
Time to fully charge empty battery: 10 hours

StarPole LUX LUMEN - Kernenergiestraat 53A - 2610 WILRIJK - BELGIUM p.18/23
T: +32 3 293 35 50 –www.lux-lumen.com
7EMC and safety requirements
The StarPole is fully compliant to the LVD and EMC directive of the European
council, if used in a properly designed setup.
The StarPole led-luminaire is only intended to be used in lighting applications, and
as such, the complete assembly of led-units and power supply needs to be fully
compliant with following harmonized standards:
LVD requirements of the power supply
•EN 60598: general requirements of lighting equipment.
EMC requirements of the power supply
Immunity according to:
•EN 61547:2009 (General EMC immunity requirements lighting eq.)
•EN 61000-4-1:2006 (General immunity testing techniques)
•EN 61000-4-2:2008 (ESD immunity test)
•EN 61000-4-3:2006 + A1:2007 (Radiated immunity test)
•EN 61000-4-4:2004 (Fast transients and burst immunity)
•EN 61000-4-5:2005 (Surge immunity test)
•EN 61000-4-6:2008 (Conducted immunity test)
•EN 61000-4-8:1993 (Magnetic field immunity test)
•EN 61000-4-11:2004 (Voltage variations immunity test)
•EN 61000-6-1:2005 (Generic standards for immunity)
Emission according to:
•EN 61000-3-2:2005+A1:2008+A2:2009 (Harmonics emission test<16A)
•EN 61000-3-3:2008 (Flicker+ voltage changes limits< 16A)
•EN 55015:2006+A2:2009 (Conducted + radiated emission lighting
equipment)
To achieve this compliance, a proper power supply must be supplied. In case of
doubts, contact your supplier.
8
9

StarPole LUX LUMEN - Kernenergiestraat 53A - 2610 WILRIJK - BELGIUM p.19/23
T: +32 3 293 35 50 –www.lux-lumen.com
10 Safety information
Before installing, powering up, or servicing the StarPole luminaire, it is highly
recommended that you read this manual and ensure yourself that you completely
understand its content. Observe the safety precautions in this manual. Install and
operate the led-unit only as described in this manual, and in conformity with local
regulations. If you have any questions how to operate this product safely, please
contact your supplier.
10.1 Symbols
Following symbols are used to identify important safety information on the
product and in this manual.

StarPole LUX LUMEN - Kernenergiestraat 53A - 2610 WILRIJK - BELGIUM p.20/23
T: +32 3 293 35 50 –www.lux-lumen.com
10.2 Protection from electric shock
Although this device itself does not operate with dangerous voltages, the
installation in which is intended to be used, can contain dangerous voltages.
Shut down the power of the complete installation before carrying out any
installation, or maintenance work.
Use only AC to DC power sources, suitable for the application, and conform to
local regulations. Please ensure yourself that the AC to DC power supply is able to
deliver the rated current requirements of the installation.
If any cable, seal or housing is damaged, cracked, or reformed, disconnect the
power of the installation immediately.
For any additional servicing, not described in this manual, please contact your
point of sale.
10.3 Protections from fire and burns
Do not operate this led-luminaire if ambient temperature is over 45 °C (113 °F).
Please ensure yourself that sufficient ventilation around the led-unit is possible.
It might be necessary to allow the led-unit to cool down for 5 minutes, before
servicing.
Do not modify the led-fixture, in a way, not described in this manual.
Other manuals for StarPole
1
Table of contents
Other LUX LUMEN Lighting Equipment manuals

LUX LUMEN
LUX LUMEN StarEye Maxi User manual

LUX LUMEN
LUX LUMEN StarEye User manual

LUX LUMEN
LUX LUMEN StarEye Midi User manual

LUX LUMEN
LUX LUMEN PowerEye User manual

LUX LUMEN
LUX LUMEN StarPoint User manual

LUX LUMEN
LUX LUMEN StarEye User manual

LUX LUMEN
LUX LUMEN StarPole User manual

LUX LUMEN
LUX LUMEN Jumbo User manual

LUX LUMEN
LUX LUMEN StarWay User manual

LUX LUMEN
LUX LUMEN 24ch LED Driver User manual