Promedon Calistar A User manual

M-90-15-1718 (05) / 11-Jul-2017
Instructions for use
ENGLISH
Instructions D’Utilisation
FRANÇAIS
Gebrauchsanweisung
DEUTSCH
Instrucción de uso
ESPAÑOL
Instrução de uso
PORTUGUES
Istruzioni Per l’uso
ITALIANO
Kullanma Talimatlari
TÜRKÇE
Инструкция по эксплуатации
Brugsanvisning
DANSK
Navodila Za Uporabo
Indicácie na Použitie
SLK
Indikace k Použití
czech
Wskazania do Stosowania
Інструкція по застосуванню

INSTRUCTIONS FOR USE
DESCRIPTION
Calistar A is a kit for the surgical treatment of the anterior and apical
prolapse, that contains:
•1 Calistar A implant (Ref.: CALISTAR-A), manufactured with biocompatible
synthetic materials.
•1 Retractable insertion guide (Ref.: DPN-MNL), disposable, designed to
be utilized along with the implant when the placement is performed and
provided with a tube in order to protect the tissues during the surgical
procedure.
•3 TAS (Tissue Anchoring System) anchors.
Calistar A consists of a permanent implant comprised of a central Type 1
single-lament polypropylene mesh with two polypropylene attachment arms
and three TAS anchors with their corresponding sutures.
Calistar S is a kit for the surgical treatment of the anterior and apical
prolapse that contains:
•1 Calistar S implant (Ref.: CALISTAR-S), manufactured with biocompatible
synthetic materials.
•1 Retractable insertion guide (Ref.: DPN-MNL), disposable, designed for the
placement of the anchors, and provided with a tube in order to protect the
tissues during the surgical procedure.
•1 Retractable insertion guide (Ref.: DPN-MNC) disposable, designed for the
placement of the anterior attachment arms of the implant.
•3 TAS (Tissue Anchoring System) anchors.
•1 Knot pusher (Ref: KP), disposable, designed to be used during the surgical
procedure if necessary, and provided with a protective tube.
Calistar S consists of a permanent implant comprised of a central Type 1
single-lament polypropylene mesh with two polypropylene attachment arms
and three TAS anchors with their corresponding sutures. The central part of
the implant is built with a low-weight, highly porous polypropylene mesh.
Calistar P is a kit for the surgical treatment of the posterior and apical
prolapse, that contains:
•1 Calistar P implant (Ref.: CALISTAR-P), manufactured with biocompatible
synthetic materials.
•1 Retractable insertion guide (Ref.: DPN-MNL), disposable, designed to
be utilized along with the implant when the placement is performed and
provided with a tube in order to protect the tissues during the surgical
procedure.
•3 TAS (Tissue Anchoring System) anchors.
Calistar P a consists of a permanent implant comprised of a Type 1
polypropylene single-lament central mesh and three TAS anchors with their
corresponding sutures.
All the components of Calistar A, Calistar S and Calistar P are supplied sterile
and ready to use.
INDICATIONS
Calistar A and Calistar S
Calistar A and Calistar S are intended for the surgical treatment of the anterior
and apical prolapse by means of tissue reinforcement and stabilization of the
soft tissues of the female pelvic oor.
Calistar P
Calistar P is intended for the surgical treatment of the Posterior and Apical
Prolapse by means of tissue reinforcement and stabilization of the soft tissues
of the female pelvic oor.
CONTRAINDICATIONS
Calistar must not be used in patients
• undergoing anticoagulant therapy,
• with infectious processes, especially of the genital system or in the urinary
tract,
• with vaginal, cervical, or uterine cancer,
• during pregnancy,
• with known sensitivity or allergy to polypropylene products,
• or with pre-existing conditions that pose an unacceptable surgical risk.
WARNINGS
Calistar must only be used by surgeons familiar with the procedures and
techniques for implanting Calistar.
Careful patient selection and complete diagnostic evaluation are essential prior
to surgery.
Maximum precautions must be taken to avoid contamination.
The surgical procedure must be carried out carefully, avoiding damage to large
blood vessels, nerves, and organs. Risks can be minimized by closely observing
the local anatomy and by inserting the retractable insertion guide correctly.
It has been established that the surgical technique is safe, but in the case of
very severe deviations from this and/or very marked anatomic variations, when

passing the retractable insertion guide, perforation or injury may occur to
blood vessels, organs or nerves, and repair surgery may then be necessary.
As with all foreign bodies, the polypropylene mesh and attachment arms
could exacerbate a pre-existing infection.
Calistar must be used with care in patients with:
• Diabetes.
• Coagulation problems.
• Obstruction of the upper urinary tract.
• Renal insufciency.
• Autoimmune diseases affecting connective tissue.
Calistar components are supplied sterile. Do not use the product if the
package is open or damaged.
Calistar components are designed for a SINGLE use only. Therefore, DO NOT
REUSE or RESTERILIZE, since this could decrease the performance of the device
and increase the risk of improper sterilization and cross-contamination.
The patient must be warned that future pregnancies could invalidate the
surgical effects of the implant.
The patient should avoid heavy lifting and strenuous exercise that involves
exertion (riding a bicycle, running, etc.) for the rst three to four weeks
after surgery, as well as sexual intercourse, for at least one month after the
operation.
The patient should contact the surgeon immediately in the event of:
• Dysuria
• Vaginal pain
• Fever
• Serous, bloody or purulent secretions
• Hemorrhages or other problems
PRECAUTIONS
The implant must not be handled with pointed, serrated, or sharp
objects since any damage, perforation, or tearing can cause subsequent
complications.
Maximum precaution must be taken to avoid contamination.
Avoid excessive tension on the implant during insertion.
Maximum precautionary measures must be taken when joining the TAS to the
insertion guide and to avoid exerting pressure in the wrong direction during
TAS insertion. (See point “2” of the surgical procedure)
Operating room conditions must meet hospital, administrative or local
government procedure.
After use, discard the product and packaging according to hospital,
administrative or local government procedure.
SUPPLY AND STORAGE
Calistar is provided sterile and pyrogen-free in pouch or blister packaging. Any
damage to the sterile barriers makes the device non-sterile.
Calistar should be stored under the following conditions:
• TEMPERATURE: Room temperature.
DO NOT USE AFTER THE EXPIRATION DATE INDICATED ON THE PACKAGING.
MAGNETIC RESONANCE (MR) ENVIRONMENT
The implant does not affect and is not affected by magnetic resonance (MR)
environments.
POSSIBLE COMPLICATIONS
Possible complications associated with the use of the implant should be
discussed with the patient before surgery.
The use of a prosthesis may cause complications related to each patient's
specic degree of intolerance to any foreign body implanted in the body.
Some complications may require removal of the implant.
Some patients may experience vaginal pain during the initial post-operative
period. Treatment with ANALGESICS and ANTI-INFLAMMATORY DRUGS may
be sufcient to relieve pain.
Other reported complications with this or other similar implants include:
• Infection.
• Urethral or vaginal erosion.
• Mesh exposure.
• Adhesion formation.
• Vaginal pain, discomfort, irritation.
• Purulent, serous or bloody discharge.
• Inammation.
• Injuries to blood vessels or nerves.
• Presence of vaginal stula.
• Bladder instability.
• Urinary obstruction.
• Bowel problems.
• Recurrence of prolapse.

Post operative formation of brous tissue around the implant is a normal
physiological response to the implantation of a foreign body.
In the event of vaginal exposure of the implant, generally due to infection,
it may be necessary to partially remove it. This is achieved by cutting off the
exposed part of the polypropylene mesh.
PROMEDON requires surgeons to report any complication associated with the
use of Calistar to the Company or to the Distributor.
PATIENT INFORMATION
The surgeon is responsible for informing the patient or her representatives
before surgery about the possible complications related to the implantation
of Calistar.
The patient should be warned that future pregnancies could invalidate the
surgical effects of implanting Calistar. The patient should avoid heavy lifting
and strenuous exercise involving exertion (riding a bicycle, running, etc.) and
not have sexual relations until the doctor determines that it is appropriate to
resume normal activities.
The patient should be advised that Calistar is a permanent implant, and any
complication associated with the implant may or may not require additional
surgery to correct the complication.
The patient should contact the surgeon immediately in the event of:
• Dysuria (pain or difculty with urination).
• Vaginal pain.
• Fever.
• Serous, bloody or purulent secretions.
• Hemorrhages or other problems.
• Urinary obstruction.
• Bowel problems.
SURGICAL PROCEDURE
Prepare the patient for surgery in the usual manner and insert a Foley catheter
into the urethra.
Calistar is implanted under local or regional anesthesia. Prophylactic antibiotic
therapy should be administered according to procedures approved by the
hospital.
The description of the technique is summarized in the following steps:
Calistar A
1. Urethrovesical Dissection:
Perform a dissection of the anterior vaginal wall. The incision of the anterior
vaginal wall is made from the middle urethra to the cervix or the apex.
The pubocervical fascia is carefully dissected. A blunt bilateral dissection is
performed toward the ischial spine and coccygeal muscle, identifying the
ischial spines, and then, the sacrospinous ligaments.
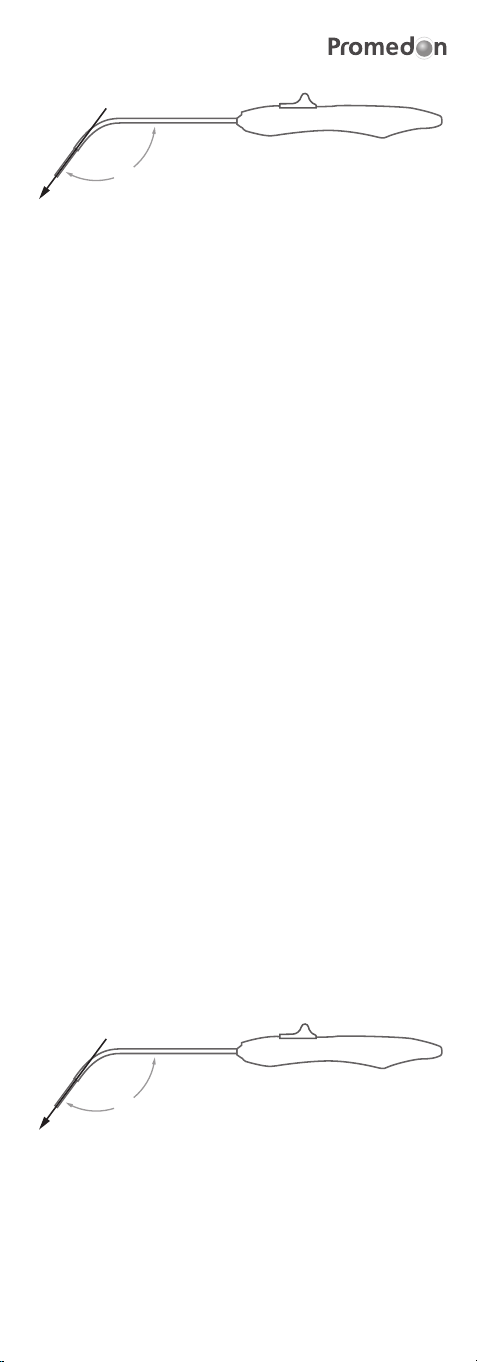
2. Insertion of the TAS (Tissue Anchoring System):
The TAS is inserted into the RIG (Retractable Insertion Guide).
Insert the TAS in the anterior wall of the sacrospinous ligament 2.0 - 2.5
cm medial to the ischial spine (Figure 1 shows the correct direction to apply
pressure when inserting the TAS). The surgeon should use his index nger to
touch and identify the ligament and to guide the RIG to its correct implant
location. The TAS should be bilaterally placed, one in each sacrospinous
ligament.
126º
Figure 1
3. Implant placement
For the insertion of the implant in the suburethral zone, rstly, the RIG is
connected to the front attachment arm and is introduced in the direction
of the obturator internus muscle, guided by the the surgeon's index nger.
When the central mark of the implant is below the urethra, the retractable
mechanism is activated to release the arm in its attachment place. This
maneuver is repeated on the other side. A pair of Metzenbaum scissors
can be introduced between the urethra and the implant in order to verify
adequate suburethral tension and to avoid hypermobility overcorrection. Two
attachment points are made with absorbable sutures on both sides of the mid
urethra to prevent subsequent displacement of the mesh.
A cystoscopy is not required.
Then the polypropylene sutures of the TAS go through the reararms of the
implant 1.5 cm from the end, taking care to keep a distance of at least 5 mm
between both threads in order to make a double sliding knot.

Two additional attachment points must be made on the posterior body of
the implant with non-absorbable sutures, which are xed onto the remnants
of the cardinal ligaments or the pericervical ring to prevent recurrence of
cystocele. Cystocele reduction is achieved by moving the implant towards the
sacrospinous ligaments, using double knots previously made on the rear arms,
to achieve full correction of the previous defect. The implant must remain
below the bladder, free of tension and the rear end excess can be trimmed.
The vaginal incision is closed as usual. No cut is made in the vaginal wall
unless necessary.
Calistar S
1. Bladder dissection:
Perform a dissection of the anterior vaginal wall. The incision of the anterior
vaginal wall is made from the bladder neck towards the cervix or the apex.
The pubocervical fascia is carefully dissected. A blunt bilateral dissection is
performed toward the ischial spine and coccygeal muscle, identifying the
ischial spines, and then, the sacrospinous ligaments..
2. Insertion of the TAS (Tissue Anchoring System):
The TAS is inserted into the corresponding RIG (Retractable Insertion Guide)
(Ref.: DPN-MNL).
Insert the TAS in the anterior wall of the sacrospinous ligament 2.0 - 2.5
cm medial to the ischial spine (Figure 1 shows the correct direction to apply
pressure when inserting the TAS). The surgeon should use his index nger to
touch and identify the ligament and to guide the RIG to its correct implant
location. The TAS should be bilaterally placed, one in each sacrospinous
ligament.
126º
Figure 1
3. Implant placement
For the insertion of the implant in the area of the bladder neck, rst, the RIG
for the anterior attachment arms (Ref.: DPN-MNC) is connected to the anterior
attachment arm and is introduced towards the obturator internus muscle,
the placement of the anterior attachment arms is made 1 cranial cm to the
bladder neck at the balloon level. When the implant is in the correct position,
the retractable mechanism is activated to release the arm in its attachment
place. This maneuver is repeated on the other side. A pair of Metzenbaum
scissors may be inserted between the bladder and the implant in order to
ensure it is tension-free. Two attachment points are made with absorbable
sutures on the central part of the implant to prevent subsequent displacement
of the mesh.
A cystoscopy is not required.
Then the polypropylene sutures of the TAS go through the rear arms of the
implant 1.5 cm from the end, taking care to keep a distance of at least 5 mm
between both threads in order to make a double sliding knot.
Two additional attachment points must be made on the rear body of the
implant with non-absorbable sutures, which are xed in the remnants
of the cardinal ligaments or the pericervical ring in order to favor apical
suspension. Cystocele reduction is achieved by moving the implant towards
the sacrospinous ligaments, using double nooses previously made on the
rear arms, to achieve full correction of the previous defect. The implant must
remain below the bladder, free of tension, and the rear end excess can be
trimmed.
The vaginal incision is closed as usual.
Note: A plastic knot pusher and its protective tube are included in the kit
in order to facilitate the knotting procedure of the TAS to the mesh, if the
surgeon considers it convenient.
Calistar P
1. Pararectal Dissection
Perform a dissection of the posterior vaginal wall.
The incision in the posterior vaginal wall is made towards the cervix or the
apex.
Make a blunt bilateral dissection toward the ischial spine, then identify the
coccygeal muscle and sacrospinous ligament on the right side. The same
procedure is performed on the left side.
Sacrouterine ligaments are identied bilaterally and are held with Allis forceps.
A 2-0 polypropylene suture point is applied to each sacrouterine ligament to
reconstruct the posterior face of the pericervical ring.
2. Insertion of the TAS (Tissue Anchoring System):

The TAS is inserted into the RIG (Retractable Insertion Guide).
Insert the TAS in the anterior wall of the sacrospinous ligament 2.0 - 2.5
cm medial to the ischial spine (Figure 1 shows the correct direction to apply
pressure when inserting the TAS). The surgeon should use his index nger to
touch and identify the ligament and to guide the retractable insertion guide to
its correct implant location. The TAS should be bilaterally placed, one in each
sacrospinous ligament.
126º
Figure 1
3. Implant placement
Then the polypropylene sutures of the TAS go through the rear arms of the
implant 2 cm from the end, taking care to keep a distance of at least 5 mm
between both threads in order to make a double sliding knot.
Two additional attachment points must be made on the posterior body of the
implant with non-absorbable sutures, which are attached to the sacrouterine
ligaments and to the posterior surface of the pericervical ring.
Reduction of the apical/posterior defect is achieved by moving the implant
toward the sacrospinous ligaments, using the slipknots previously made on
the arms of the implant, until the correction of the apical/posterior is achieved.
The implant must remain below the bladder, free of tension, and the rear end
excess may be trimmed.
The front end excess is trimmed and then sutured bilaterally to the fascia of
the levator ani muscle.
The remnants of the rectovaginal fascia are used to cover the front part of the
implant, which allows for greater protection from the exposure of the implant.
The vaginal incision is closed as usual.
Postoperative care and therapy are at the surgeon’s discretion.
In case a removal of implant is required, please note:
Polypropylene mesh integrate with patient’s tissue, so complete removal may
be difcult.
In case a mesh removal is necessary due to pain, we recommend trying to cut
all the tension areas identied by the surgeon.
In most cases, the risk of organ injury caused by mesh removal may be higher
than the benets resulting from this removal, so each case should be assessed
and decided at the surgeon’s discretion.

CATALOG NUMBER
LOT NUMBER
SERIAL NUMBER
CAUTION
EXPIRY DATE
DO NOT RE-USE
MANUFACTURE DATE
STERILE. STERILIZATION METHOD: ETHYLENE OXIDE
MANUFACTURER
AUTHORIZED REPRESENTATIVE IN THE EUROPEAN
COMMUNITY
CONSULT INSTRUCTIONS FOR USE
DO NOT USE IF PACKAGE IS DAMAGED
DO NOT RE-STERILIZE
KEEP AWAY FROM SUNLIGHT
KEEP DRY
SYMBOLS USED IN LABELS

NOTICE D’UTILISATION
DESCRIPTION
Calistar A est un KIT destiné au traitement chirurgical du prolapsus anterieur
et apical qui contient :
• 1 implant Calistar A (Réf. : CALISTAR-A), fabriqué avec des matériaux
synthétiques biocompatibles.
•1 guide d’introduction rétractable (Réf. : DPN-MNL), jetable, conçu pour
permettre la pose ergonomique de l’implant ; ET accompagné d’un tube an
de protéger les tissus lors de l’intervention chirurgicale.
• 3 xations TAS (Tissue Anchoring System).
Calistar A est un implant permanent composé d’un treillis monolament en
polypropylène de type 1 central, de deux bras de xation en polypropylène et
de trois xations TAS avec leurs sutures correspondantes.
Calistar S est un KIT destinée au traitement chirurgical du prolapsus anterieur
et apical qui contient :
• 1 implant Calistar S (Réf. : CALISTAR-S), fabriqué avec des matériaux
synthétiques biocompatibles.
•1 guide d’introduction rétractable (Réf. : DPN-MNL), jetable, conçu pour la
pose des xations ; ET accompagné d’un tube an de protéger les tissus lors
de l’intervention chirurgicale.
•1 guide d’introduction rétractable (Réf. : DPN-MNC), jetable, conçu pour la
pose des bras de xation antérieurs de l’implant.
• 3 xations TAS (Tissue Anchoring System).
•1 pousse-noeuds (Réf. : KP), jetable, conçu pour être utilisé lors de
l’intervention chirurgicale au besoin ; et accompagné d’un tube protecteur.
Calistar S est un implant permanent composé d’un treillis monolament en
polypropylène de type 1 central, de deux bras de xation en polypropylène et
de trois xations TAS avec leurs sutures correspondantes. La partie centrale de
l’implant est fabriquée avec un treillis monolament en polypropylène à faible
grammage et macroporeux.
Calistar P est un KIT destiné au traitement chirurgical du prolapsus postérieur
et apical qui contient :
• 1 implant Calistar P (Réf. : CALISTAR-P), fabriqué avec des matériaux
synthétiques biocompatibles.
•1 guide d’introduction rétractable (Réf. : DPN-MNL), jetable, conçu pour
permettre la pose ergonomique de l'implant ; et accompagné d’un tube an
de protéger les tissus lors de l’intervention chirurgicale.
• 3 xations TAS (Tissue Anchoring System).
Calistar P est un implant permanent compose d’un treillis monolament en
polypropylène de type 1 central et de trois xations TAS avec leurs sutures
correspondantes.
Tous les composants de Calistar A, Calistar S et Calistar P sont livrés stériles et
prêts à l’usage.
INDICATIONS
Calistar A et Calistar S
Calistar A et Calister S sont conçus pour le traitement chirurgical du prolapsus
anterieur et apical par le biais d’un renforcement des tissus et d’une
stabilisation des tissus mous du plancher pelvien de la femme.
Calistar P
Calistar P est conçu pour le traitement chirurgical du prolapsus postérieur et
apical par le biais d’un renforcement des tissus et d’une stabilisation des tissus
mous du plancher pelvien de la femme.
CONTRE-INDICATIONS
Calistar ne doit pas être utilisé chez les patientes
• sous traitement anticoagulant,
• présentant un processus infectieux, en particulier du système génital ou de
l’appareil urinaire,
• atteintes d’un cancer vaginal, cervical ou utérin,
• enceintes,
• ayant une sensibilité ou une allergie conrmée aux produits en
polypropylène,
• ou atteintes de maladies préexistantes qui présentent un risque chirurgical
inacceptable.
AVERTISSEMENT
Calistar ne doit être utilisé que par des chirurgiens familiarisés avec les
procédures et les techniques d’implantation de Calistar.
Une sélection soignée des patients, ainsi qu’une évaluation diagnostique
complète préalable à la chirurgie s’avèrent essentielles.
Des précautions maximales doivent être adoptées pour éviter toute
contamination.
La procédure chirurgicale doit être pratiquée avec minutie, en évitant
d’endommager les gros vaisseaux sanguins, les nerfs et les organes. Les
risques peuvent être minimisés en observant attentivement l’anatomie locale
et en introduisant le guide d’introduction rétractable correctement.

Il a été établi que la technique chirurgicale est sûre, mais en cas de
déviations très sévères ou de variations anatomiques marquées, le passage
du guide d’introduction rétractable peut provoquer une perforation ou
une blessure des vaisseaux sanguins, des organes ou des nerfs, ce qui
nécessiterait une chirurgie réparatrice.
Comme tout corps étranger, le treillis et les bras de xation en polypropylène
peuvent exacerber une infection préexistante.
Calistar doit être utilisé avec prudence chez les patientes souffrant :
• du diabète.
• de problèmes de coagulation.
• d’obstruction des voies urinaires supérieures.
• d’insufsance rénale.
• Maladies auto-immunes touchant le tissu conjonctif.
Les éléments de Calistar sont livrés stériles. Ne pas utiliser le produit si
l’emballage est ouvert ou endommagé.
Les éléments de Calistar sont réservés à un usage UNIQUE. Par conséquent,
NE PAS RÉUTILISER ou RESTÉRILISER le produit au risque de réduire ses
performances et d’augmenter le risque de stérilisation inadéquate et de
contamination croisée.
La patiente doit être avisée du fait que des grossesses futures pourraient
invalider les effets chirurgicaux de l’implant.
La patiente doit éviter de soulever des charges lourdes et de faire des
exercices incluant des étirements (vélo, course à pied, etc.) pendant les
trois à quatre semaines suivant l’intervention, ainsi que les rapports sexuels
pendant au moins un mois après l’intervention.
La patiente doit contacter le chirurgien immédiatement dans les cas suivants:
• Dysurie
• Douleur vaginale
• Fièvre
• Pertes séreuses, sanguinolentes ou purulentes
• Hémorragies ou autres complications
PRÉCAUTIONS D’EMPLOI
L’implant ne doit pas être manipulé avec des objets pointus, dentelés ou
acérés, car tout dommage, perforation ou déchirure pourrait entraîner des
complications.
Des précautions maximales doivent être adoptées pour éviter toute
contamination.
Éviter d’appliquer une tension excessive sur l’implant lors de l’insertion.
Des mesures de précaution maximales doivent être prises lors de l’introduction
du TAS dans le guide d’insertion et an d’éviter d’exercer des pressions dans la
mauvaise direction, lors de l’insertion du TAS. (Voir point « 2 » de la procédure
chirurgicale)
Les conditions de la salle d’opération doivent être conformes aux procédures
de l’hôpital, de l’administration ou du gouvernement local.
Après l’avoir utilisé, jeter le produit et l’emballage selon la procédure de
l’hôpital, de l’administration ou du gouvernement local.
APPROVISIONNEMENT ET ENTREPOSAGE
Calistar est livré stérile et apyrogène dans une enveloppe ou un emballage-
coque. Tout endommagement des barrières stériles rend le dispositif non
stérile.
Calistar devrait être entreposé dans les conditions suivantes :
• TEMPÉRATURE : Température de la salle.
NE PAS UTILISER AU-DELÀ DE LA DATE DE PÉREMPTION INSCRITE SUR
L’EMBALLAGE.
ENVIRONNEMENT DE RÉSONANCE MAGNÉTIQUE (RM)
L’implant n’affecte ni n’est affecté par les environnements de résonance
magnétique (RM).
COMPLICATIONS POSSIBLES
Les complications possibles associées à l’utilisation de l’implant doivent être
présentées à la patiente avant l’intervention.
L’utilisation d’une prothèse peut entraîner des complications liées au degré
d’intolérance spécique de chaque patiente à un corps étranger implanté dans
le corps. Certaines complications peuvent exiger le retrait de l’implant.
Certains patients peuvent souffrir de douleurs vaginales dans les premiers
temps suivant l’intervention. Un traitement analgésique et anti-inammatoire
peut sufre à soulager la douleur.
On retrouve parmi les autres complications rapportées avec cet implant ou
d’autres implants similaires :
• Infection
• Érosion urétérale ou vaginale
• Exposition du treillis
• Formation d’une adhérence
• Douleur, gêne, ou irritation vaginale
• Décharge purulente, séreuse ou sanguinolente

• Inammation
• Lésion des vaisseaux sanguins ou des nerfs
• Présence de stule vaginale
• Instabilité vésicale
• Obstruction urinaire
• Problèmes de transit
• Réapparition du prolapsus
La formation postopératoire de tissu breux autour de l’implant est une
réaction physiologique normale à l’implantation d’un corps étranger.
En cas d’exposition vaginale de l’implant, généralement due à une infection, il
peut être nécessaire de le retirer partiellement. Pour cela, il suft de couper la
partie exposée du treillis en polypropylène.
PROMEDON invite les chirurgiens à signaler toute complication associée à
l’utilisation de Calistar au laboratoire ou au distributeur.
INFORMATION DE LA PATIENTE
Le chirurgien est responsable d’informer la patiente ou ses représentants des
complications possibles associées à l’implantation de Calistar, et ce avant
l’intervention.
La patiente doit être avisée du fait que des grossesses futures pourraient
invalider les effets chirurgicaux de l’implantation de Calistar. La patiente doit
éviter de soulever des charges lourdes et de faire des exercices impliquant des
étirements (vélo, course à pied, etc.) ainsi que les rapports sexuels jusqu’à ce
que le médecin juge approprié de reprendre des activités normales.
La patiente doit être avisée du fait que Calistar est un implant permanent,
et que toute complication associée à l’implant peut ou non exiger une autre
intervention chirurgicale pour corriger la complication.
La patiente doit contacter le chirurgien immédiatement dans les cas suivants :
• Dysurie (douleur à la miction ou difcultés à uriner)
• Douleur vaginale
• Fièvre.
• Pertes séreuses, sanguinolentes ou purulentes
• Hémorragies ou autres complications.
• Obstruction urinaire
• Problèmes de transit
PROCÉDURE CHIRURGICALE
Préparer la patiente pour l’intervention selon le protocole habituel et introduire
une sonde de Foley dans l’urètre.
Calistar est implanté sous anesthésie locale. Les traitements aux antibiotiques
prophylactiques devraient être administrés selon les procédures approuvées
par l’hôpital.
La description de la technique est résumée dans les étapes suivantes :
Calistar A
1. Dissection urétrovésicale :
Pratiquer une dissection de la paroi vaginale antérieure. L’incision de la
paroi vaginale antérieure est pratiquée du milieu de l’urètre en direction du
col utérin ou de l’apex du vagin. Le fascia pubocervical est soigneusement
disséqué. Une dissection mousse bilatérale est pratiquée en direction de
l’épine sciatique et du muscle coccygien, en identiant les épines sciatiques,
puis les ligaments sacro-vertébraux.v
2. Introduction du TAS (Tissue Anchoring System) :
Le TAS est introduit dans le RIG (guide d’introduction rétractable).
Insérer le TAS dans la paroi antérieure du ligament sacro-épineux à 2.0 - 2.5
cm de l’épine ischiatique (la gure 1 montre la direction correcte des pressions
lors de l’insertion du TAS). Le chirurgien devrait utiliser son index pour toucher
et reconnaître le ligament, puis orienter le guide d’insertion rétractable vers le
bon emplacement de l’implant. Le TAS doit être placé de manière bilatérale,
un sur chaque ligament sacro-épineux.
126º
Figure 1
3. Pose de l’implant
Pour insérer l’implant dans la zone sous-urétrale, d’abord connecter le RIG
au bras de xation avant, puis l’introduire en direction du muscle obturateur
interne, avec l’index du chirurgien comme guide. Lorsque la marque centrale
de l’implant est sous l’urètre, le mécanisme rétractable est activé pour libérer
le bras dans son emplacement de xation. Répéter cette manœuvre de l’autre
côté. Une paire de ciseaux Metzenbaum peut être insérée entre l’urètre et

l’implant an de vérier si la tension sous-urétrale est adéquate et ainsi éviter
une surcorrection de l’hypermobilité. Deux points de xation sont réalisés avec
des sutures résorbables des deux côtés du milieu de l’urètre pour prévenir la
délocalisation du treillis.
La cystoscopie n’est pas obligatoire.
Ensuite, faire passer les sutures en polypropylène du TAS par les bras arrière
de l’implant à 1,5 cm de l’extrémité, en veillant à conserver une distance d’au
moins 5 mm entre les deux ls pour faire un double nœud coulissant.
Effectuer deux points de xation supplémentaires sur le corps postérieur
de l’implant avec des sutures non résorbables qui sont xées sur le reste des
ligaments cardinaux ou de l’anneau paracervical pour prévenir la réapparition de
cystocèles. La réduction des cystocèles est obtenue en déplaçant l’implant vers
les ligaments sacro-vertébraux à l’aide des doubles nœuds effectués auparavant
sur les bras arrière an de corriger complètement le défaut antérieur. L’implant
doit rester sous la vessie, sans tension, et l’excès de l’extrémité arrière peut être
rogné.
Fermer l’incision vaginale selon le protocole habituel. Ne pas effectuer de
coupure dans la paroi vaginale, sauf si nécessaire.
Calistar S
1. Dissection vésicale :
Pratiquer une dissection de la paroi vaginale antérieure. L’incision de la paroi
vaginale antérieure est pratiquée du col vésical en direction du col utérin ou
de l’apex du vagin. Le fascia pubocervical est soigneusement disséqué. Une
dissection mousse bilatérale est pratiquée en direction de l’épine sciatique et
du muscle coccygien, en identiant les épines sciatiques, puis les ligaments
sacro-vertébraux.
2. Introduction du TAS (Tissue Anchoring System) :
Le TAS est introduit dans le RIG (guide d’introduction rétractable)
correspondant (Réf. : DPN-MNL).
Insérer le TAS dans la paroi antérieure du ligament sacro-épineux à 2.0 - 2.5
cm de l’épine ischiatique (la gure 1 montre la direction correcte des pressions
lors de l’insertion du TAS). Le chirurgien devrait utiliser son index pour toucher
et reconnaître le ligament, puis orienter le guide d’insertion rétractable vers le
bon emplacement de l’implant. Le TAS doit être placé de manière bilatérale,
un sur chaque ligament sacro-épineux.
126º
Figure 1
3. Pose de l’implant
Pour insérer l’implant dans la zone du col vésical, d’abord connecter le RIG des
bras de xation antérieurs (Réf. : DPN-MNC) au bras de xation antérieur, puis
l’introduire en direction du muscle obturateur interne ; la pose des bras de
xation antérieurs doit être réalisée à 1 cm crânien du col vésical au niveau du
ballonnet. Une fois l’implant dans la bonne position, le mécanisme rétractable
est activé pour libérer le bras dans son emplacement de xation. Répéter
cette manœuvre de l’autre côté. Une paire de ciseaux Metzenbaum peut être
insérée entre l’urètre et l’implant an de s’assurer qu’il n’y ait pas de tension.
Deux points de xation sont réalisés avec des sutures résorbables sur la partie
centrale de l’implant pour prévenir la délocalisation du treillis.
La cystoscopie n’est pas obligatoire.
Ensuite, faire passer les sutures en polypropylène du TAS par les bras arrière
de l’implant à 1,5 cm de l’extrémité, en veillant à conserver une distance d’au
moins 5 mm entre les deux ls pour faire un double nœud coulissant.
Effectuer deux points de xation supplémentaires sur le corps postérieur de
l’implant avec des sutures non résorbables qui sont xées sur le reste des
ligaments cardinaux ou de l’anneau paracervical pour favoriser la suspension
apicale. La réduction des cystocèles est obtenue en déplaçant l’implant vers les
ligaments sacro-vertébraux à l’aide des doubles nœuds effectués auparavant
sur les bras arrière an de corriger complètement le défaut antérieur. L’implant
doit rester sous la vessie, sans tension, et l’excès de l’extrémité arrière peut être
rogné.
Fermer l’incision vaginale selon le protocole habituel.
Remarque : Un pousse-noeuds en plastique et son tube protecteur sont inclus
dans la trousse an de faciliter la procédure de nouage du TAS au treillis, selon
les besoins du chirurgien.
Calistar P
1. Dissection pararectale
Pratiquer une dissection de la paroi vaginale postérieure.

L’incision de la paroi vaginale postérieure est réalisée en direction du col utérin
ou de l’apex du vagin.
Pratiquer une dissection mousse bilatérale en direction de l’épine sciatique,
puis identier le muscle coccygien et le ligament sacro-vertébral du côté droit.
La même procédure est ensuite pratiquée sur le côté gauche.
Repérer les ligaments sacro-utérins des deux côtés et les tenir avec des pinces
Allis. Appliquer une suture en polypropylène 2-0 sur chaque ligament sacro-
utérin pour reconstruire la surface postérieure de l’anneau paracervical.
2. Introduction du TAS (Tissue Anchoring System) :
Le TAS est introduit dans le RIG (guide d’introduction rétractable).
Insérer le TAS dans la paroi antérieure du ligament sacro-épineux à 2.0 -
2.5 cm de l’épine ischiatique (la gure 1 montre la direction correcte des
pressions lors de l’insertion du TAS). Le chirurgien utilise alors son index pour
toucher et identier le ligament et orienter le guide d’insertion rétractable
vers l’emplacement correct de l’implant. Le TAS doit être placé de manière
bilatérale, un sur chaque ligament sacro-épineux.
126º
Figure 1
3. Pose de l’implant
Ensuite, faire passer les sutures en polypropylène du TAS par les bras arrière
de l’implant à 2 cm de l’extrémité, en veillant à conserver une distance d’au
moins 5 mm entre les deux ls pour faire un double nœud coulissant.
Effectuer deux points de xation supplémentaires sur le corps postérieur de
l’implant avec des sutures non résorbables qui sont xées aux ligaments sacro-
utérins et à la surface postérieure de l’anneau paracervical.
La réduction du défaut apical/postérieur est obtenue en déplaçant l’implant
vers les ligaments sacro-vertébraux, à l’aide des nœuds coulissants réalisés
auparavant sur les bras de l’implant, jusqu’à ce que le défaut apical/postérieur
soit corrigé. L’implant doit rester sous la vessie, sans tension, et l’excès de
l’extrémité arrière peut être rogné.
Couper l’excès de l’extrémité avant, puis le suturer de chaque côté au fascia
du muscle releveur de l’anus.
Les restes du fascia rectovaginal sont utilisés pour couvrir la partie avant de
l’implant, ce qui offre une grande protection contre l’exposition de l’implant.
Fermer l’incision vaginale selon le protocole habituel.
Les soins et le traitement postopératoires sont laissés à la discrétion du
chirurgien.
Si le retrait de l’implant est nécessaire, veuillez noter que:
Le let en polypropylène s’incorpore aux tissus de la patiente, rendant le retrait
complet potentiellement difcile.
Si le retrait du let est nécessaire en raison de la douleur, nous vous
recommandons d’essayer de couper toutes les zones de tension identiées par
le chirurgien.
Le risque d’endommager les organes en retirant le let pouvant, dans la
plupart des cas, être plus important que les avantages résultant de ce retrait,
chaque cas doit être évalué et tranché à la discrétion du chirurgien.

NUMÉRO DE CATALOGUE
NUMÉRO DE LOT
NUMÉRO DE SÉRIE
ATTENTION
DATE DE PÉREMPTION
NE PAS RÉUTILISER
DATE DE FABRICATION
STÉRILE. MÉTHODE DE STÉRILISATION : OXYDE
D’ÉTHYLÈNE
FABRICANT
REPRÉSENTANT AUTORISÉ DANS LA COMMUNAUTÉ
EUROPÉENNE
CONSULTER LA NOTICE D’UTILISATION
NE PAS UTILISER SI L’EMBALLAGE EST ENDOMMAGÉ
NE PAS RESTÉRILISER
CONSERVER À L’ABRI DU SOLEIL
CONSERVER EN LIEU SEC
SYMBOLES UTILISÉS SUR LES ÉTIQUETTES

GEBRAUCHSANWEISUNG
BESCHREIBUNG
Calistar A ist ein Behandlungskit zur operativen Korrektur von anterioren und
apikalen Prolapsen.
Das Behandlungskit enthält:
•1 Calistar A Implantat (Ref.: CALISTAR-A), hergestellt aus biokompatiblen
synthetischen Materialien.
•1 Zurückziehbare Einführhilfe (Ref.: DPN-MNL), Einwegartikel, zur
Anwendung bei der Platzierung des Implantats, inklusive Schutzhülle zum
Schutz des Gewebes während der Prozedur.
•3 TAS (Tissue Anchoring System) Anker.
Calistar A ist ein permanentes Implantat bestehend aus einem zentralen Netz
mit zwei Armen aus monolem Polypropylen Typ 1 und drei TAS Anker mit
den dazugehörigen Fäden.
Calistar S ist ein Behandlungskit zur operativen Korrektur von anterioren und
apikalen Prolapsen.
Das Behandlungskit enthält:
•1 Calistar S Implantat (Ref.: CALISTAR-S), hergestellt aus biokompatiblen
synthetischen Materialien.
•1 Zurückziehbare Einführhilfe (Ref.: DPN-MNL), Einwegartikel, zur
Anwendung bei Platzierung des Implantats, inklusive Schutzhülle zum Schutz
des Gewebes während der Prozedur.
•1 Zurückziehbare Einführhilfe (Ref.: DPN-MNC), Einwegartikel, zur
Platzierung der anterioren Befestigungsarme des Implantats
•3 TAS (Tissue Anchoring System) Anker.
• 1 Knotenhilfswerkzeug (Ref: KP), Einwegartikel, zur Anwendung während
der Implantation, inklusive Schutzhülle.
Calistar S ist ein permanentes Implantat bestehend aus einem zentralen Netz
mit zwei Armen aus monolem Polypropylen Typ 1 und drei TAS Anker mit
den dazugehörigen Fäden. Der zentrale Bereich des Netzes besteht aus einem
ultra-leichten, grobmaschigen Polypropylennetz.
Calistar P ist ein Behandlungskit zur operativen Behandlung von posterioren
und apikalen Prolapsen. Das Behandlungskit enthält:
•1 Calistar P Implantat (Ref.: CALISTAR-P), hergestellt aus biokompatiblen
synthetischen Materialien.
•1 Zurückziehbare Einführhilfe (Ref.: DPN-MNL), Einwegartikel, zur
Anwendung bei Platzierung des Implantats, inklusive Schutzhülle zum Schutz
des Gewebes während der Prozedur.
•3 TAS (Tissue Anchoring System) Anker.
Calistar P ist ein permanentes Implantat bestehend aus einem zentralen Netz
mit zwei Armen aus monolem Polypropylen Typ 1 und drei TAS Anker mit
den dazugehörigen Fäden.
Alle Bestandteile von Calistar A, Calistar S und Calistar P werden steril und
fertig zur Verwendung geliefert.
INDIKATIONEN
Calistar A und Calistar S
Calistar A und Calistar S sind für die operative Behandlung von anterioren und
apikalen Prolapsen durch Gewebeverstärkung und Stabilisierung des weichen
Gewebes des weiblichen Beckenbodens vorgesehen.
Calistar P
Calistar P ist für die operative Behandlung von posterioren und apikalen
Prolapsen durch Gewebeverstärkung und Stabilisierung des weichen Gewebes
des weiblichen Beckenbodens vorgesehen.
KONTRAINDIKATIONEN
Calistar darf nicht in Patienten angewendet werden:
• die sich einer gerinnungshemmenden Therapie unterziehen,
• die Infektionen, vor allem des Genitalsystems oder des Harntraktes,
vorweisen,
• die an Scheidenkrebs, Gebärmutterhalskrebs oder Gebärmutterkrebs
erkrankt sind,
• die schwanger sind,
• bei denen eine Überempndlichkeit oder Allergie gegenüber Produkten aus
Polypropylen bekannt ist,
• oder deren bestehender Zustand einen operative Zugriff nicht zulassen.
WARNHINWEISE
Calistar darf ausschließlich von Operateuren verwendet werden, die mit den
Techniken und Verfahren zur Implantation von Calistar vertraut sind.
Eine sorgfältige Auswahl der Patienten sowie eine vollständige diagnostische
Untersuchung sind vor der Operation unabdingbar.
Es müssen die maximalen Vorkehrungen zur Kontaminationsvermeidung
getroffen werden.
Das operative Verfahren muss äußerst sorgfältig zur Vermeidung von
Beschädigungen von großen Blutgefäßen, Nerven und Organen, durchgeführt

werden. Die Risiken können durch eine genaue Beachtung der lokalen
anatomischen Gegebenheiten und durch das korrekte Einführen der
zurückziehbaren Einführhilfe minimiert werden.
Das chirurgische Verfahren hat sich als sicher herausgestellt, jedoch kann
es bei sehr großer Abweichung von diesem Verfahren und/oder deutlichen
anatomischen Abweichungen beim Einführen der zurückziehbaren Einführhilfe
zur Perforation oder Verletzung von Blutgefäßen, Organen oder Nerven
kommen, die eine operative Reparatur erfordern können.
Wie alle Fremdkörper, können das Polypropylennetz und die Befestigungsarme
bestehende Infektionen verschlimmern.
Calistar muss mit besonderer Vorsicht in Patienten angewendet werden, die
eine oder mehrere folgender Merkmale aufweisen:
• Diabetes.
• Gerinnungsprobleme.
• Obstruktionen des oberen Harntraktes.
• Niereninsufzienz.
• Autoimmunerkrankungen, die sich auf das Bindegewebe auswirken.
Die Bestandteile von Calistar werden steril geliefert. Verwenden Sie das
Produkt keinesfalls, wenn die Verpackung geöffnet oder beschädigt ist.
Die Bestandteile von Calistar sind ausschließlich zur einmaligen Verwendung
geeignet. VERWENDEN SIE DAHER DIE BESTANDTEILE NIEMALS EIN ZWEITES
MAL ODER RESTERILISIEREN SIE DIESE, da dies zu einer Verringerung
der Zuverlässigkeit der Geräte und zu einem Anstieg des Risikos von
unsachgemäßer Sterilisation und zu Kreuzkontaminationen führen kann.
Der Patient muss darauf aufmerksam gemacht werden, dass zukünftige
Schwangerschaften die operativen Ergebnisse des Implantats unwirksam
machen können.
Der Patient sollte das Heben von schweren Gegenständen und anstrengende
Übungen, die zu körperlicher Ermüdung führen (Fahrradfahren, Jogging, etc.),
in den ersten drei bis vier Wochen nach der Operation vermeiden. Zudem
sollte der Patient mindestens im ersten Monat nach der Operation keinen
Geschlechtsverkehr haben.
Der Patient sollte unverzüglich den Arzt kontaktieren wenn folgende
Symptome auftreten:
• Dysurie
• Vaginale Schmerzen
• Fieber
• Serumhaltigem, blutigen oder eitrigem Sekret
• Blutungen oder andere Probleme
VORSICHTSMASSNAHMEN
Das Implantat darf nicht mit spitzen, gezackten oder scharfkantigen Objekten
angefasst werden, da jegliche Form von Beschädigungen, Perforation oder
Rissen zu folgenden Komplikationen führen kann.
Es müssen die maximalen Vorkehrungen zur Kontaminationsvermeidung
getroffen werden.
Vermeiden Sie übermäßige Spannung des Implantats während der
Implantation.
Die Konnektierung des TAS mit der Einführhilfe müssen unter maximaler
Vorsicht vorgenommen werden. Die Ausübung von Druck in die falsche
Richtung muss während der Verankerung der TAS unbedingt vermieden
werden. (Siehe Punkt “2” des operativen Verfahrens)
Die Bedingungen im OP sollten den jeweiligen Vorgaben des Krankenhauses,
der Verwaltung und/oder den lokalen Vorgaben und Gesetzen entsprechen.
Nach der Benutzung entsorgen Sie das Produkt gemäß den jeweiligen
Vorgaben des Krankenhauses, der Verwaltung und/oder den lokalen Vorgaben
und Gesetzen.
LIEFERUNG UND LAGERUNG
Calistar wird steril und pyrogen-frei in Pouches oder Blisterverpackungen
geliefert. Jegliche Beschädigung der sterilen Barriere führen zur Kontamination
des Inhalts.
Calistar sollte unter folgenden Bedingungen gelagert werden:
• TEMPERATUR: Raumtemperatur.
VERWENDEN SIE DAS PRODUKT NICHT WENN DAS AUFGEDRUCKTE
VERFALLSDATUM ÜBERSCHRITTEN WURDE.
MAGNET-RESONANZ-UMGEBUNG (MR)
Das Implantat wirkt sich nicht auf Magnet-Resonanz-Umgebungen (MR) aus,
und wird in ihrer Funktionstüchtigkeit auch nicht von selbigen beeinträchtigt.
MÖGLICHE KOMPLIKATIONEN
Mögliche Komplikationen die mit durch das Implantat auftreten können,
sollten vor der Operation mit dem Patienten besprochen werden.
Die Verwendung von Prothesen oder Implantaten kann zu Komplikationen
führen, deren Schweregrad von der jeweiligen, individuellen Unverträglichkeit
des Patienten gegenüber implantierten Fremdkörpern abhängt. Einige
Komplikationen können die Explantation des Implantats notwendig machen.
Bei einigen Patienten können im Zeitraum nach der Operation

vaginale Schmerzen auftreten. Die Behandlung mit Analgetika und
entzündungshemmenden Medikamenten kann zur Linderung des Schmerzes
ausreichend sein.
Weitere bekannte Komplikationen mit diesem oder ähnlichen Implantaten
umfassen:
• Infektionen.
• Uretherale oder vaginale Erosion.
• Freilegung des Netzes.
• Bildung von Adhäsionen.
• Vaginale Schmerzen, Unbehagen, Reizung.
• Serumhaltiger, blutiger oder eitriger Aususs.
• Entzündungen.
• Verletzung von Blutgefäßen oder Nerven.
• Auftreten von Scheidensteln.
• Instabilität der Blase.
• Obstruktion des Harntraktes.
• Darmprobleme.
• Wiederauftreten des Prolapses.
Die post-operative Bildung von brotischem Gewebe um das Implantat ist eine
normale körperliche Reaktion auf den implantierten Fremdkörper.
Im Falle der vaginalen Freisetzung des Implantats aufgrund einer Infektion,
kann es notwendig sein das Implantat teilweise zu entfernen. Dazu muss der
freigelegte Teil des Polypropylennetzes abgeschnitten werden.
PROMEDON verlangt von den Operateuren jegliche Komplikation die mit der
Verwendung von Calistar zusammenhängen kann dem Unternehmen oder
dem Händler zu melden.
PATIENTENINFORMATION
Der Operateur ist dafür verantwortlich, den Patienten oder seine Stellvertreter
vor der Operation über mögliche Komplikationen im Zusammenhang mit der
Implantation von Calistar S aufzuklären.
Der Patient muss darauf aufmerksam gemacht werden, dass zukünftige
Schwangerschaften die operativen Ergebnisse des Implantats unwirksam
machen können. Der Patient sollte das Heben von schweren Gegenständen
und anstrengende Übungen, die zu körperlicher Ermüdung führen
(Fahrradfahren, Jogging, etc.), in den ersten drei bis vier Wochen nach der
Operation vermeiden. Zudem sollte der Patient auf sexuelle Aktivitäten
verzichten bis der Arzt die Fähigkeit zur Wiederaufnahme von normalen
Aktivitäten feststellt.
Der Patient sollte darauf hingewiesen werden, dass es sich bei Calistar um
ein permanentes Implantat handelt und jegliche Komplikation, die mit dem
Implantat zusammenhängt, eine zusätzliche Operation zur Behebung der
Komplikation erfordern könnte.
Der Patient sollte unverzüglich den Arzt kontaktieren wenn folgende
Symptome auftreten:
• Dysurie (Schmerzen oder Schwierigkeiten beim Urnieren).
• Vaginale Schmerzen.
• Fieber.
• Serumhaltigem, blutigen oder eitrigem Sekret.
• Blutungen oder anderen Problemen.
• Obstruktion des Harntraktes.
• Darmprobleme.
CHIRURGISCHES VERFAHREN
Bereiten Sie den Patienten wie gewohnt auf die Operation vor und legen Sie
eine Foley Katheter in die Harnröhre.
Calistar wird unter lokaler Anästhesie oder Regionalanästhesie implantiert.
Antibiotika sollten gemäß der vom jeweiligen Einsatzort anerkannten
Verfahrensweisen zur Prophylaxe verabreicht werden.
Die Erklärung des Eingriffs wird in folgenden Schritten zusammengefasst:
Calistar A
1. Urethrovesikale Dissektion:
Führen Sie eine Dissektion der anterioren Scheidenwand durch. Der Einschnitt
der anterioren Scheidenwand wird von der Mitte der Harnröhre bis zum
Muttermund oder Scheidenstumpf gemacht. Die pubozervikale Faszie wird
vorsichtig seziert. Es wird eine stumpfe bilaterale Dissektion in Richtung
der Spina ischiadica und des Steißbeinmuskels durchgeführt um die Spina
ischiadica und anschließend das sakrospinale Ligament zu lokalisieren.
2. Verankerung der TAS (Tissue Anchoring System) Anker:
Der TAS Anker wird auf das RIG (Retractable Insertion Guide) aufgesteckt.
Verankern Sie den TAS Anker in der anterioren Wand des sakrospinalen
Ligaments 2.0 - 2.5 cm medial entfernt von der Spina ischiadica. (Abbildung
1 zeigt die korrekte Ausrichtung um Druck bei der Verankerung der TAS
Anker auszuüben). Der Operateur sollte seinen Zeigenger verwenden um
das Ligament zu ertasten und zu erfühlen und um das RIG zur richtigen Stelle
zur führen. Die TAS Anker sollten bilateral platziert werden, einer in jedes
sakrospinale Ligament.
126º
Abbildung 1
3. Platzierung des Implantats
Zur Einbringung des Implantats in den suburethralen Bereich wird
das RIG zuerst mit dem vorderen Befestigungsarm verbunden und
anschließend, geführt vom Zeigenger des Operateurs in Richtung des
internen Musculus obturator internus eingeführt. Wenn sich die mittige
Markierung des Implantats unterhalb der Urethra bendet, wird mithilfe
zurückziehbaren Mechanismus der Arm am gewünschten Befestigungspunkt
losgelassen. Dieser Vorgang wird auf der anderen Seite wiederholt. Ein
Paar Metzenbaumscheren kann zwischen der Urethra und dem Implantat
eingeführt werden um eine angemessene suburethrale Spannung zu
gewährleisten und eine Überkorrektur der Hypermobilität zu vermeiden. Es
werden zwei Befestigungspunkte mit absorbierbarem Nahtmaterial auf beiden
Seiten in der Mitte der Harnröhre gesetzt um ein späteres Verrutschen des
Netzes zu vermeiden.
Es ist keine Zystoskopie notwendig.
Anschließend werden die Polypropylenfäden der TAS Anker durch die hinteren
Arme des Implantats geführt, 1,5 cm von den Enden der Arme entfernt. Dabei
sollten die Fäden mindestens 5mm voneinander entfernt sein um anschließend
einen doppelten verstellbaren Knoten zu machen.
Es müssen zwei zusätzliche Befestigungspunkte im unteren Teil des Implantats
mit nicht-absorbierbaren Fäden gesetzt werden, die an den Resten der
Kardinalligamente oder am perizervikalem Ring befestigt werden um eine
Wiederauftreten der Zystozele zu vermeiden.
Die Korrektur der Zystozele wird erreicht in dem die hinteren Arme zu den
sakrospinalen Ligamenten geschoben werden, um die zuvor gemachten
Doppelknoten festzuziehen um eine vollständige Korrektur des Prolapses
zu erreichen. Das Implantat muss sich unterhalb der Blase benden und
spannungsfrei sein. Der überschüssige Rest am hinteren Ende des Implantats
kann abgeschnitten werden.
Die vaginale Inzision kann auf normale Art und Weise verschlossen werden.
Ein Schnitt in die Scheidenwand wird nicht gemacht sofern nicht notwendig.
Calistar S
1. Dissektion der Blase:
Führen Sie eine Dissektion der anterioren Scheidenwand durch. Der Einschnitt
der anterioren Scheidenwand wird vom Blasenhals bis zum Muttermund oder
Scheidenstumpf gemacht. Die pubozervikale Faszie wird vorsichtig seziert. Es
wird eine stumpfe bilaterale Dissektion in Richtung der Spina ischiadica und
des Steißbeinmuskels durchgeführt um die Spina ischiadica und anschließend
das sacrospinale Ligament zu lokalisieren.
2. Verankerung der TAS (Tissue Anchoring System) Anker:
Der TAS Anker wird auf das RIG (Retractable Insertion Guide) (Ref.: DPN-MNL)
aufgesteckt.
Verankern Sie den TAS Anker in der anterioren Wand des sakrospinalen
Ligaments 2.0 - 2.5 cm medial entfernt von der Spina ischiadica. (Abbildung
1 zeigt die korrekte Ausrichtung um Druck bei der Verankerung der TAS
Anker auszuüben). Der Operateur sollte seinen Zeigenger verwenden um
das Ligament zu ertasten und zu erfühlen und um das RIG zur richtigen Stelle
zur führen. Die TAS Anker sollten bilateral platziert werden, einer in jedes
sakrospinale Ligament.
126º
Abbildung 1
3. Platzierung des Implantats
Zur Einbringung des Implantats in den Bereich des Blasenhalses, wird das
RIG für die anterioren Befestigungsarme (Ref.: DPN-MNC) zuerst mit dem
Befestigungsarm verbunden und anschließend in Richtung des internen
Musculus obturator internus eingeführt. Die anteriore Verankerung
erfolgt 1 cm kranial entfernt vom Blasenhals auf Höhe des Ballons.
Wenn sich das Implantat in der korrekten Position bendet, wird mithilfe
zurückziehbaren Mechanismus der Arm am gewünschten Befestigungspunkt

losgelassen. Dieser Vorgang wird auf der anderen Seite wiederholt Ein
Paar Metzenbaumscheren kann zwischen der Urethra und dem Implantat
eingeführt werden um die Spannungsfreiheit zu garantieren. Es werden zwei
Befestigungspunkte mit absorbierbarem Nahtmaterial im zentralen Teil des
Implantats gesetzt um ein späteres Verrutschen des Netzes zu vermeiden.
Es ist keine Zystoskopie notwendig.
Anschließend werden die Polypropylenfäden der TAS Anker durch die hinteren
Arme des Implantats geführt, 1,5 cm von den Enden der Arme entfernt. Dabei
sollten die Fäden mindestens 5mm voneinander entfernt sein um anschließend
einen doppelten verstellbaren Knoten zu machen.
Es müssen zwei zusätzliche Befestigungspunkte im unteren Teil des Implantats
mit nicht-absorbierbaren Fäden gesetzt werden, die an den Resten der
Kardinalligamente oder am perizervikalem Ring befestigt werden um die
apikale Suspension zu begünstigen. Die Korrektur der Zystozele wird erreicht
in dem die hinteren Arme zu den sakrospinalen Ligamenten geschoben
werden, um die zuvor gemachten Doppelknoten festzuziehen um eine
vollständige Korrektur des Prolapses zu erreichen. Das Implantat muss sich
unterhalb der Blase benden und spannungsfrei sein. Der überschüssige Rest
am hinteren Ende des Implantats kann abgeschnitten werden.
Die vaginale Inzision kann auf normale Art und Weise verschlossen werden.
Bemerkung: Ein Knotenhilfswerkzeug und die zugehörige Schutzhülle sind
im Behandlungskit enthalten um das Festknoten des Implantats an den TAS
Ankern auf Wunsch des Operateurs zu Erleichtern.
Calistar P
1. Pararektale Dissektion
Führen Sie eine Dissektion der posterioren Scheidenwand durch.
Der Einschnitt der posterioren Wand wird in Richtung des Muttermunds oder
des Scheidenstumpfes gemacht.
Führen Sie eine stumpfe bilaterale Dissektion in Richtung der Spina ischiadica
durch um die Spina ischiadica und anschließend das sacrospinale Ligament
auf der rechten Seite zu lokalisieren. Wiederholen Sie dieses Verfahren auf der
linken Seite.
Die Sakrouterinligamente werden beidseitig lokalisiert und mit Allis Zangen
gehalten. Ein 2-0 Polypropylenfaden wird in jedem Sakriuterinligament
appliziert um das posteriore Erscheinungsbild des perizervikalen Rings
wiederherzustellen.
2. Verankerung der TAS (Tissue Anchoring System) Anker:
Der TAS Anker wird auf das RIG (Retractable Insertion Guide) aufgesteckt.
Verankern Sie den TAS Anker in der anterioren Wand des sakrospinalen
Ligaments 2.0 - 2.5 cm medial entfernt von der Spina ischiadica. (Abbildung
1 zeigt die korrekte Ausrichtung um Druck bei der Verankerung der TAS
Anker auszuüben). Der Operateur sollte seinen Zeigenger verwenden um
das Ligament zu ertasten und zu erfühlen und um das RIG zur richtigen Stelle
zur führen. Die TAS Anker sollten bilateral platziert werden, einer in jedes
sakrospinale Ligament.
126º
Abbildung 1
3. Platzierung des Implantats
Anschließend werden die Polypropylenfäden der TAS Anker durch die hinteren
Arme des Implantats geführt, 1,5 cm von den Enden der Arme entfernt. Dabei
sollten die Fäden mindestens 5mm voneinander entfernt sein um anschließend
einen doppelten verstellbaren Knoten zu machen.
Es müssen zwei zusätzliche Befestigungspunkte im posterioren Teil des
Implantats mit nicht-absorbierbaren Fäden gesetzt werden, die an den
Sakrouterinligamente und an der unteren Seite des perizervikalen Rings
befestigt werden.
Die Korrektur des apikalen/posterioren Prolapses wird erreicht in dem die Arme
des Implantats zu den sakrospinalen Ligamenten geschoben werden, um die
zuvor gemachten Doppelknoten festzuziehen bis die Korrektur des apikalen/
posterioren Prolapses erreicht ist. Das Implantat muss sich unterhalb der Blase
benden und spannungsfrei sein. Der überschüssige Rest am hinteren Ende
des Implantats kann abgeschnitten werden.
Der überschüssige Rest am vorderen Ende des Implantats wird abgeschnitten
und dann bilateral an den Faszien des Musculus levator ani genäht.
Die Reste der rektovaginalen Faszie werden genutzt um den vorderen Teil des
Implantats zu bedecken, um den Schutz vor einer Freilegung des Implantats
zu vergrößern.
Die vaginale Inzision kann auf normale Art und Weise verschlossen werden.
Die post-operative Behandlung und Therapie liegen im Ermessen des Arztes.

KATALOGNUMMER
CHARGENNUMMER
SERIENNUMMER
ACHTUNG
VERFALLSDATUM
NICHT WIEDERVERWENDEN
HERSTELLUNGSDATUM
STERIL. STERILISATIONSMETHODE: ETHYLENOXID
HERSTELLER
AUTORISIERTER VERTRETER IN DER EUROPÄISCHEN
GEMEINSCHAFT
GEBRAUCHSANWEISUNG BEACHTEN
BEI BESCHÄDIGTER PACKUNG NICHT VERWENDEN
NICHT ERNEUT STERILISIEREN
VOR SONNENLICHT SCHüTZEN
VOR FEUCHTIGKEIT SCHüTZEN
AUF DEN ETIKETTEN VERWENDETE SYMBOLE
Im Falle einer erforderlichen Entfernung des Implantats bitte beachten:
Polypropylennetze integrieren sich in das Gewebe der Patientin, was eine
vollständige Entfernung erschweren kann.
Falls Schmerzen der Grund für eine erforderliche Entfernung des Implantats
sind, empfehlen wir, möglichst alle vom Chirurgen identizierten
Spannungsbereiche durchzuschneiden.
In den meisten Fällen kann das Risiko einer Organverletzung aufgrund einer
Netzentfernung größer sein als die Vorteile der Entfernung, sodass jeder Fall
einzeln beurteilt werden und nach dem Ermessen des Chirurgen entschieden
werden sollte.

INSTRUCCIONES DE USO
DESCRIPCIÓN
Calistar A es un kit para el tratamiento quirúrgico del prolapso anterior y
apical, que contiene:
•1 Implante Calistar A (Ref: CALISTAR-A), fabricado con materiales sintéticos
biocompatibles.
•1 Guia retráctil de inserción (Ref: DPN-MNL), descartable diseñada para ser
usada junto al implante en la colocación del mismo y provista junto con un
tubo para proteger a los tejidos durante el procedimiento quirúrgico.
•3 Arpones TAS (Tissue Anchoring System).
Calistar A consta de un implante permanente que consiste en una malla
central de polipropileno monolamento tipo 1 con dos brazos de jación de
polipropileno y tres arpones TAS con sus correspondientes suturas.
Calistar S es un kit para el tratamiento quirúrgico del prolapso anterior y
apical, que contiene:
•1 Implante Calistar S (Ref: CALISTAR-S), fabricado con materiales sintéticos
biocompatibles.
•1 Guía retráctil de inserción (Ref: DPN-MNL), descartable, diseñada para la
colocación de los arpones, y provista junto con un tubo para proteger a los
tejidos durante el procedimiento quirúrgico.
•1 Guía retráctil de inserción (Ref: DPN-MNC) descartable, diseñada para la
colocación de los brazos anteriores del implante.
•3 Arpones TAS (Tissue Anchoring System).
• 1 Baja nudos (Ref: KP), descartable, diseñado para ser utilizado durante el
procedimiento quirúrgico si es necesario, y provisto con un tubo protector.
Calistar S consta de un implante permanente que consiste en una malla
central de polipropileno monolamento tipo 1 con dos brazos de jación de
polipropileno y tres arpones TAS con sus correspondientes suturas. La parte
central del implante está construida con una malla de polipropileno de bajo
peso y alta porosidad.
Calistar P es un kit para el tratamiento quirúrgico del prolapso posterior y
apical, que contiene:
•1 Implante Calistar P (Ref: CALISTAR-P), fabricado con materiales sintéticos
biocompatibles.
•1 Guia retráctil de inserción (Ref: DPN-MNL), descartable, diseñada para ser
usada junto al implante en la colocación del mismo y provista junto con un
tubo para proteger a los tejidos durante el procedimiento quirúrgico.
•3 Arpones TAS (Tissue Anchoring System).
Calistar P consta de un implante permanente que consiste en una malla
central de polipropileno monolamento tipo 1 y tres arpones TAS con sus
correspondientes suturas.
Todos los componentes de Calistar A, Calistar S y Calistar P se proveen
estériles y listos para usar.
INDICACIÓN DE USO
Calistar A y Calistar S
Calistar A y Calistar S están indicados para el tratamiento quirúrgico del
Prolapso Anterior y Apical mediante el refuerzo de tejido y estabilización de los
tejidos blandos de soporte en el piso pélvico femenino.
Calistar P
Calistar P está indicado para el tratamiento quirúrgico del Prolapso Apical y
Posterior mediante el refuerzo de tejido y estabilización de los tejidos blandos
de soporte en el piso pélvico femenino.
CONTRAINDICACIONES
Calistar no debe ser utilizado en pacientes
• bajo terapia con anticoagulantes,
• con procesos infecciosos, especialmente en el sistema genital o en el tracto
urinario.
• Cáncer de vagina, cervical o uterino
• Embarazos presentes y futuros.
• con sensibilidad o alergia conocida a productos de polipropileno,
• con condiciones pre-existentes que signiquen un riesgo quirúrgico
inaceptable
ADVERTENCIAS
Calistar debe ser usado solamente por cirujanos familiarizados con los
procedimientos y técnicas para la implantación de Calistar.
Es esencial una cuidadosa selección de pacientes, así como también un estudio
diagnóstico completo previo a la cirugía.
Se deben tomar las máximas precauciones para evitar contaminación.
El abordaje quirúrgico se debe llevar a cabo con cuidado, evitando dañar
grandes vasos, nervios y órganos. Los riesgos se minimizan atendiendo a la
anatomía local y con el correcto pasaje de la Guía Retráctil de inserción.
Dejando establecido que la técnica quirúrgica es segura, en casos de
desviaciones muy severas de la misma y/o variaciones anatómicas muy
This manual suits for next models
2
Table of contents
Languages:
Other Promedon Medical Equipment manuals


Popular Medical Equipment manuals by other brands

natus
natus Madsen AccuScreen user manual

MHC Medical Products
MHC Medical Products SureLife Clearwave II user manual

Nellcor
Nellcor N-180 manual

CGX
CGX Mobile-72 manual

Cardinal Health
Cardinal Health CATALYST NPWT Clinician Quick Reference Guide

VQ OrthoCare
VQ OrthoCare BioniCare Hand System operating manual


