PromoKine PK-CA724-488HTS User manual
Cell Proliferation Kit III
(EdU; HTS)
Instruction Manual
Cat.No. PK-CA724-488HTS
PK-CA724-555HTS
PK-CA724-594HTS*
PK-CA724-647HTS*

2
Instruction Manual
Contents
Introduction and product description: 3
Materials provided with the Kit and Storage Conditions 4
Required Material and Equipment not included in this Kit 5
Workflow 5
Preparation of the Stock Solutions 6
Labeling of Cells with EdU 6
Staining Cell-surface Antigens with Antibodies (optional) 7
Cell Fixation and Permeabilization 7
EdU Detection 8
Staining Intracellular or Surface Antigens (optional) 9
Imaging and analysis 9
Example Data 10
Ordering Information 12

3
Instruction Manual
Introduction and product description:
The detection of cell proliferation is of utmost importance for assessing cell health,
determining genotoxicity or evaluating anticancer drugs. This is normally performed by
adding nucleoside analogs like [3H]thymidine or 5-bromo-2’-deoxyuridine (BrdU) to
cells during replication, and their incorporation into DNA is detected or visualized by
autoradiography or with an anti-BrdU-antibody respectively. Both methods exhibit
several limitations. Working with [3H]thymidine is troublesome because of its
radioactivity. Autoradiography is slow and thus not suitable for rapid high-throughput
studies. The major disadvantage of BrdU staining is that the double-stranded DNA
blocks the access of the anti-BrdU antibody to BrdU units. Therefore, samples have to
be subjected to harsh denaturing conditions resulting in degradation of the structure of
the specimen.
The PromoKine EdU-based Cell Proliferation Assays overcome these limitations,
providing a superior alternative to BrdU and [3H]thymidine assays for directly measuring
DNA synthesis of adherent cells in 96 well plates. EdU (5-ethynyl-2’-deoxyuridine) is a
nucleoside analog to thymidine and is incorporated into DNA during active DNA
synthesis. In contrast to BrdU assays, the EdU-based Cell Proliferation Assays are not
antibody based and therefore do not require DNA denaturation for detection of the
incorporated nucleoside. Instead, the EdU-based Cell Proliferation Assays utilize click
chemistry for detection in a variety of dye fluorescent readouts. Furthermore, the
streamlined detection protocol reduces both the total number of steps and significantly
decreases the total amount of time. The simple click chemistry detection procedure is
complete within 30 minutes and is compatible with multiplexing for content and
context-rich results.
For research use only.
Information in this document is subject to change without notice. PromoCell GmbH
assumes no responsibility for any errors that may appear in this document.
PromoCell GmbH disclaims all warranties with respect to this document, expressed or
implied, including but not limited to those of merchantability or fitness for a particular
purpose. In no event shall PromoCell GmbH be liable, whether in contract, tort,
warranty, or under any statute or on any other basis for special, incidental, indirect,
punitive, multiple or consequential damages in connection with or arising from this
document, including but not limited to the use thereof.
Please read the material safety data sheets (MSDS) provided for each
product/component.
The EdU-Click technology is protected by patents WO2006/117161 and
WO 03/101972. Any commercial use will require a licence. Please contact us for details.
Also available: PromoKine EdU-based Cell Proliferation Assays available for Flow
Cytometry (PK-CA724-488FC, PK-CA724-555FC, PK-CA724-594FC & PK-CA724-
647FC) and Fluorescence Microscopy (PK-CA724-488FM, PK-CA724-555FM,
PK-CA724-594FM & PK-CA724-647FM) are also available.
See our website for more information.

4
Instruction Manual
1. Materials provided with the Kit and Storage Conditions
Vial-label Amount for 2 x 96
assays/well plates Component
Component
long term
storage
Kit storage
Component A
yellow 2 mL 5-Ethynyl-deoxyuridine (5-EdU) -20°C
2 - 8°C
Dark & Dry
Do not
freeze
RT
Component B
red 130 µL
•6-FAM Azide
1
(PK-CA724-
488HTS)
•5-TAMRA-PEG3-Azide1(PK-
CA724-555HTS)
•5/6-Sulforhodamine101-
PEG3-Azide1
•(PK-CA724-594HTS)
•Eterneon-Red 645 Azide1
(PK-CA724-647HTS)
-20°C
dark
Component C
orange 20 mL Reaction buffer RT
Component D
green 1 mL Catalyst solution RT
Component E
blue 200 mg Buffer additive RT /
-20°C*
Component F **
grey 6 ml Rinse buffer (10X) RT
Table 2: Contents of the kit and storage conditions.
Cell Proliferation Kit III (EdU; HTS) ready for 2 x 96 well plate assays:
The Kit contains sufficient material for 2 x 96 well plate assays.
This kit is stable up to 1 year after receipt, when stored as directed.
1Stable if stored at -20°C in the dark for at least one year.
* When dissolved the component E has to be kept at -20°C for long-term storage.
** Cautions: The rinse buffer (Component F): contains hazardous components. Use with appropriate
precautions. Keep away from acids to avoid dangerous gases.
Handle reagents containing the rinse buffer using equipment and practices appropriate for the hazards
posed by such materials. Use gloves. Dispose of the reagents in compliance with all related local
arrangements. For the correct handling we refer you to the MSDS which can be downloaded from our
webpage www.promocell.com.
This solution is stored at RT and will crystallize at lower temperatures. If crystallized, the solution has to
be brought to RT, mixed thoroughly and can then, once homogenously dissolved, be used without
further considerations. The activity of this compound is not affected hereby.
Product number 20X EdU in PBS Used fluorescent dye
PK-CA724-488HTS 2 mL 6-FAM Azide (λabs=496/λem=516)
PK-CA724-555HTS 2 mL 5-TAMRA-PEG3-Azide (λabs=546/λem=579)
PK-CA724-594HTS 2 mL
5/6-Sulforhodamine 101-PEG3-Azide
(λabs=584/λem=603)
PK-CA724-647HTS 2 mL Eterneon Red 645-Azide(λabs=643/λem=662)

5
Instruction Manual
2. Required Material and Equipment not included in this Kit
Adherent cells
Reaction tubes (size depends on the volume of reaction cocktail needed)
Buffered saline solution, such as PBS, D-PBS or TBS
Fixative solution (4% paraformaldehyde in PBS)
Permeabilization solution optimised for your cell type (for example, 0.5% Triton®
X-100 in PBS, or 0.5% saponin in PBS buffer)
Appropriate cell culture medium
1% BSA (bovine serum albumin) in PBS, pH 7.1 – 7.4
Deionized water or 18 MΩ purified water
3. Workflow
The following protocol was developed using a final EdU concentration of 10 µM and
can be adapted for any cell type. There are many factors which can influence the
labeling such as the growth medium, the density and the type of cells. To determine the
optimal concentration for your experiment, a range of EdU concentrations should be
tested for your cell type and experimental conditions.
Principally, a similar concentration to BrdU can be used for EdU as a starting point.
Heparin can be used as anticoagulant for collection, if a whole blood sample is used.
Workflow scheme for the
EdU-based HTS Assay
Incubate sample with EdU
Harvest cells
Optional: Treat cells with antibodies to cell surface antigens
Fix and permeabilize cells*
Optional: Treat cells with antibodies to intracellular antigens
Detect / Label EdU
Wash cells well with rinse buffer
Optional: Treat cells with cell cycle stain
Imaging and Analyse Cells
* At this point the sample can be stored safely

6
Instruction Manual
4. Preparation of the Stock Solutions
4.1 Allow all vials to warm to room temperature before opening.
4.1.1 For the preparation of a 20 µM stock solution of EdU (2X EdU), add the
appropriate amount of aqueous solution (1X PBS) to EdU (component A)
according to table 3 and mix until the compound is completely dissolved. After
use, store any remaining solution at -20°C. When stored as directed, this stock
solution is stable for up to one year.
EdU-based HTS Kit 20X EdU solution
In dilution Volume for 2X EdU
solution in PBS
1 well plate 1 mL 9 mL
2 x 96 well plates 2 mL 18 mL
Table 3: Amounts of aqueous solution needed to dissolve EdU to a final concentration of 20 µM.
4.1.2 For the preparation of a stock solution of the buffer additive, add the appropriate
amount of deionized water (see table 4) to the component E and mix until the
compound is dissolved completely. After use, store any remaining solution at -
20°C. When stored as directed, this stock solution is stable for up to 6 months.
We recommend preparing aliquots to avoid repeated thaw and freeze cycles!
EdU-based HTS Kit
Buffer additive
(solide)
Dilution volume of deionized water
1 well plate 100 mg 1 mL
2 x 96 well plates 200 mg 2.5 mL
Table 4: Amounts of aqueous solution needed to dissolve the buffer additive to the final work
solution.
4.1.3 For the preparation of a stock solution of the buffer additive, add the appropriate
amount of deionized water (see table 4) to the component E and mix until the
compound is dissolved completely. After use, store any remaining solution at -
20°C. When stored as directed, this stock solution is stable for up to 6 months.
We recommend preparing aliquots to avoid repeated thaw and freeze cycles!
5. Labeling of Cells with EdU
5.1 Suspend the cells in an appropriate tissue culture medium to obtain optimal cell
growth conditions. Please note that the growth of the cells during incubation
decelerates, if the temperature changes or the cells are washed prior to
incubation with EdU.

7
Instruction Manual
5.2 For the desired final concentration, add the appropriate amount of EdU to the
culture medium and mix well. We recommend using a concentration of 10 µM
for 1-4 hours as a starting point. Use higher EdU concentrations for a shorter
incubation time. A longer incubation time requires lower EdU concentrations.
5.3 The incubation of the cells with EdU should be performed under the optimal
conditions for your cell type, the number of cells plated and for the desired
length of time. Various DNA synthesis and proliferation parameters can be
evaluated by altering the EdU incubation time or by subjecting the cells to pulse
labeling with EdU. Effective time intervals for pulse labeling and the length of
each pulse depend on the cell growth rate.
5.4 If performing antibody surface labeling, proceed immediately to step 6,
otherwise continue to step 7.
6. Staining Cell-surface Antigens with Antibodies (optional)
6.1 Wash cells in each well with 100 µL of 1% BSA in PBS.
6.2 Remove the wash solution and add again 100µL of 1% BSA in PBS to the cells.
6.3 Add surface antibodies and mix well but gently.
Note: PE, PE-tandem or Quantum Dot antibody conjugates should not be used
before performing the click reaction (step 8).
6.5 Incubate the cells for the recommended length of time and temperature. Protect
from light!
6.6 Proceed to step 7.
7. Cell Fixation and Permeabilization
This protocol was developed with a fixation step using 4% Paraformaldehyde in PBS,
followed by permeabilization step. A saponin-based permeabilization solution can be
used with cell samples containing red blood cells or whole blood as well as with cell
probes containing different cell types. The morphological light scatter characteristics of
leukocytes are maintained by a saponin-bases solution while red blood cells are lysed.
7.1 Remove the incubation media and wash the cells, each well with 100 µL of 1%
BSA in PBS. Afterwards remove the wash solution.
7.2 Add 100 µL of the fixative solution to the cells in each well. Incubate for 15
minutes at room temperature. Protect from light.
7.3 Remove the fixation solution and wash the cells in each well twice with 200 µL
of 1% BSA in PBS. If red blood cells or haemoglobin are present in the sample,
repeat the washing step. Remove all residual blood cell debris and haemoglobin
before proceeding.
NOTE: At this point of the procedure the probes can be stored safely.

8
Instruction Manual
7.4 Remove the wash solution and add to each well 100 µL permeabilization
solution. Mix well but gently, incubate for 10-20 minutes at room temperature
and proceed to step 8. for the click reaction.
8. EdU Detection
8.1 Prepare the click assay cocktail in the same order as described in table 5. If the
ingredients are not added in the order listed, the reaction will not proceed
optimally or might even fail.
Important: Once the assay cocktail is prepared, use it immediately, at least within
the next 15 minutes!
Material Component
Number of 96-well plates
1 2
Reaction buffer C- orange 9.635 mL 19.27 mL
Catalyst solution D -green 220 µL 440 µL
Dye Azide (10 mM) B - red 55 µL 110 µL
Buffer additive
(prepared in 4.1.2) E - blue 1.1 mL 2.2 mL
Total Volume - 11.01 mL 22.02 mL
Table 5: Click assay cocktails.
8.2 Remove permeabilization solution from step 7.4 and add 100 µL of the click
assay cocktail to each well and mix well but gently to distribute the assay
solution evenly.
8.3 Incubate the click assay mixture for 30 minutes at room temperature. Protect
from light!
8.4 From the 10x rinse solution prepare a 1x rinse solution by applying following
table (table 6). Add the appropriate amount of PBS (1X) (see table 6) to the
component F and mix well (To prevent crystallization, keep component F at
room temperature at all times. If component F has crystalized, please warm up to
dissolve again. Please see also “cautions”). This additional wash step with this
special rinse buffer reduces unspecific, cell number dependent background
signal. After use, store any remaining solution at RT. When stored as directed,
this stock solution is stable for up to 6 months.
EdU HTS Kit Volume of 10X rinse buffer Dilution volume of 1X PBS
1 x 96 well plate 2.9 mL 26.1 mL
2 x 96 well plate 5.8 mL 52.2 mL
Table 6: Amounts of aqueous solution needed to dissolve the rinse buffer to the final work solution
Remove Click assay cocktail and wash the cells in each well twice with 150 µL
with the 1X rinse solution prepared above.

9
Instruction Manual
8.5 Remove rinse solution. 100 µL of 1% BSA in PBS is then given to the cells in
each well.
8.6 If performing antibody surface or intracellular labeling, proceed immediately to
step 9, otherwise continue to step 10.
9. Staining Intracellular or Surface Antigens (optional)
The PromoKine EdU-based Cell Proliferation Assay (HTS) can be used with antibodies
against surface and intracellular markers. To ensure the compatibility of your reagent or
antibody, please refer to Table 7.
9.1 Add antibodies against intracellular antigens or against surface antigens that use
RPE, PR-tandem or Quantum Dot antibody conjugates. Mix well.
9.2 Incubate the cells for the time and temperature required for antibody staining.
Protect from light.
9.3 Wash each well twice with 100 µL permeabilization solution. Remove the
solution. Add again 100 µL of 1% BSA in PBS to the cells.
9.4 Proceed with step 10 for analyzing the cells.
Fluorescent molecule
Compatibility
Organic dyes such as Fluorescein and Alexa dyes Compatible
PerCP, Allophycocyanin (APC) and APC-based tandems
Compatible
R-phycoerythrin (R-PE) and R-PE based tandems
Use R-PE and R-PE based tandems
after the EdU detection reaction
Quantum Dots
Use Quantum Dots after the EdU
detection reaction
Fluorescent proteins (e.g. GFP)
Use anti-GFP antibodies* before the
EdU detection reaction or use organic
dye-based reagents for protein
expression detection
Table 1: EdU detection dye compatibility.
* Compatibility indicates which involved components are unstable in the presence of copper catalyst for
the EdU detection reaction (either the fluorescent dye itself or the detection method). Not all GFP
antibodies recognize the same antigen site. Rabbit and chicken anti-GFP antibodies result in a good
fluorescent amount. The mouse monoclonal antibodies tested are not recommended for this application
because they do not generate an acceptable amount of fluorescence.
10. Imaging and analysis
10.1 Close the 96 well plate by using a sealing film, if desired.
10.2 Fluorescence is quantified by scanning the plate using an automated imaging
platform equipped with filters appropriate for the dye used. Images of each well
can be taken by microscopy.
The Excitation and emission maxima of the available dyes are listed in table 8.

10
Instruction Manual
Table 8: Emission and excitation maxima of the available dyes. * Currently not available.
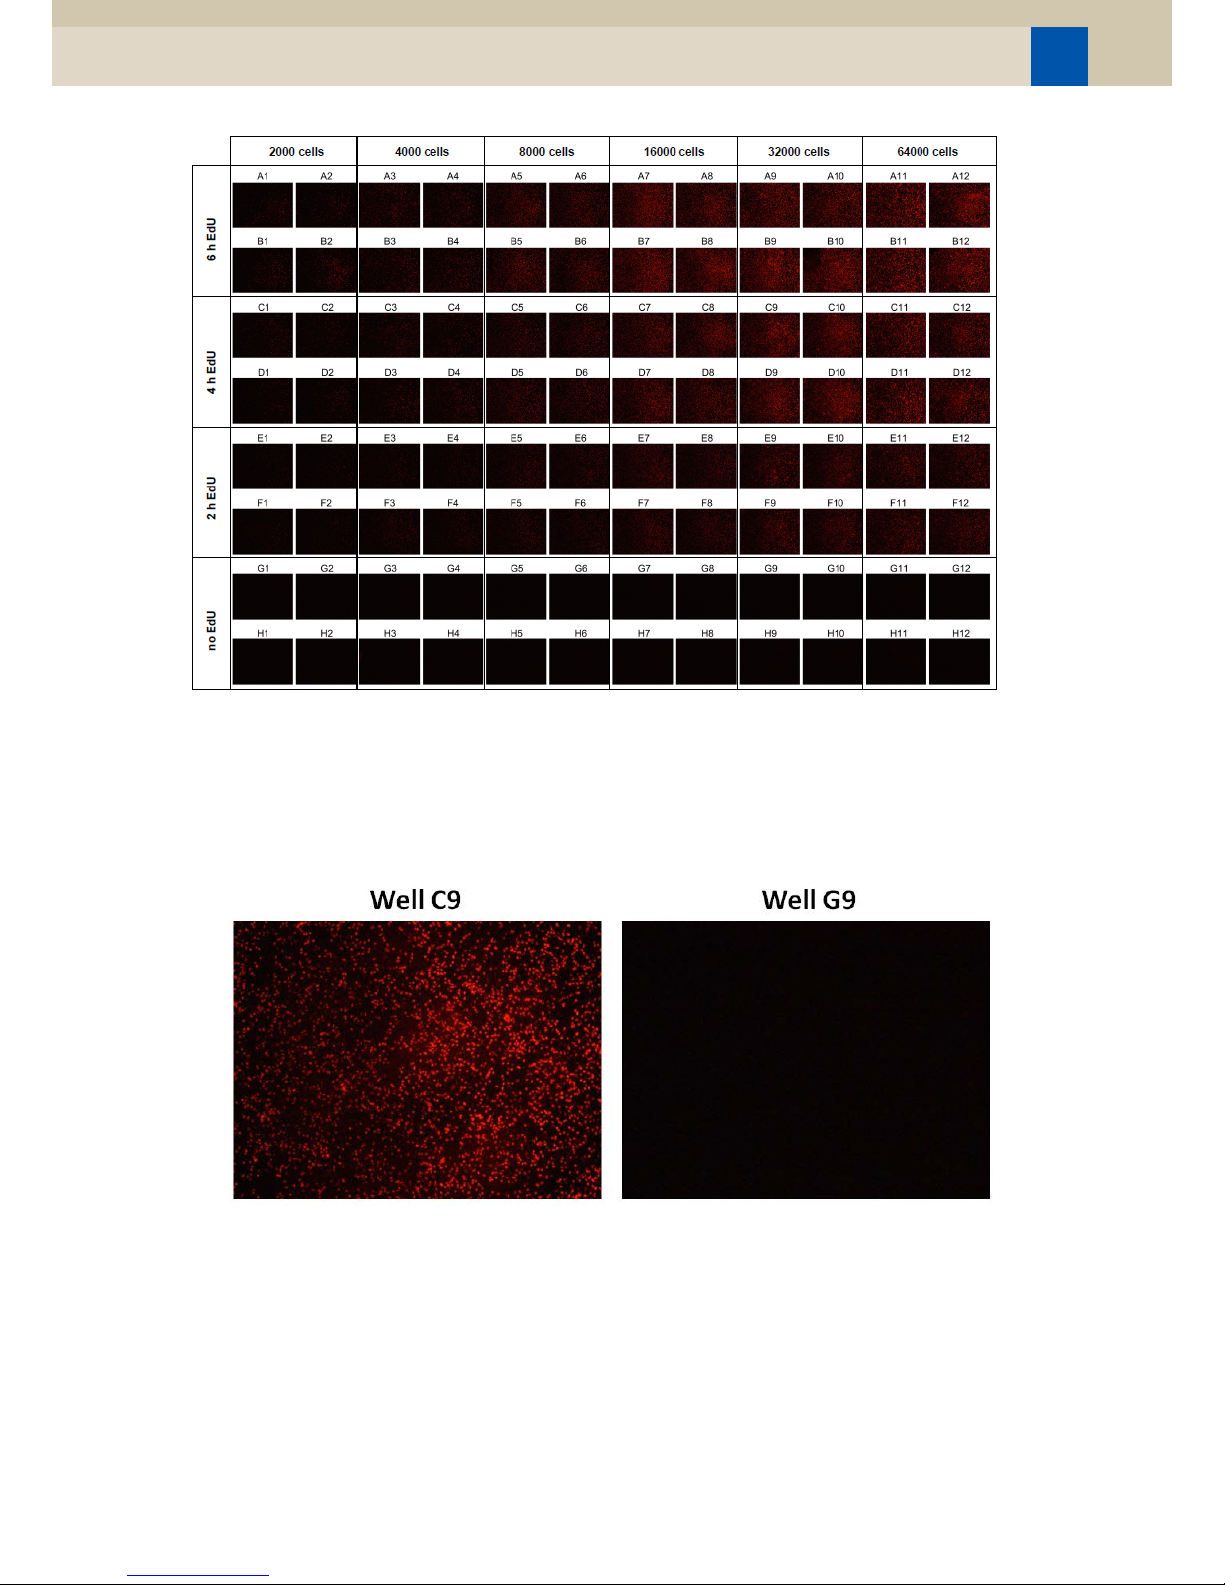
11. Example of the data derived from an experiment using the EdU-based HTS Kit:
Figure 1. Detection of EdU incorporation depending on cell number and EdU incubation time.
HeLa cells were seeded in a transparent 96well cell culture plate with indicated cell
numbers per well. After 42 hours cells were incubated with or without 10 μM EdU for
2, 4 or 6 h and subsequently EdU incorporation was detected using the EdU-based Cell
Proliferation Assays III (EdU; HTS) and a fluorescence plate reader. Mean and SD values
from quadruplicates are shown.
Product number Dye
Excitation
(nm)
Emission
(nm)
Filter
PK-CA724-488HTS 6-FAM Azide 496 516 Green
PK-CA724-555HTS 5-TAMRA-PEG3-Azide 546 579 Violet
PK-CA724-594HTS* 5/6-Sulforhodamine 101-PEG3-Azide 584 603 Orange
PK-CA724-647HTS* Eterneon Red 645-Azide 643 662 Red
11
Instruction Manual
Figure 2: Detection of EdU incorporation via fluorescence microscopy.
A fluorescence photograph (40x) of the center of each 96 well of the, with rinse buffer
washed assay plate was captured and presented using the Nikon NIS-elements
software.
Figure 3: Zoom on the samples after Click reaction and washing (in Figure 5) cells which do EdU
proliferation in well C9 and cells, which haven’t received EdU, in well G9.

12
Instruction Manual
Ordering Information
* Currently not available.
www.promocell.com
Product Name
Size
Catalog Number
Cell Proliferation Kit III (EdU-488; HTS)
200 assays
PK-CA724-488HTS
Cell Proliferation Kit III (EdU-555; HTS)
200 assays
PK-CA724-555HTS
Cell Proliferation Kit III (EdU-594; HTS)
200 assays
PK-CA724-594HTS*
Cell Proliferation Kit III (EdU-647; HTS)
200 assays
PK-CA724-647HTS*
PromoCell GmbH
Sickingenstr. 63/65
69126 Heidelberg
Germany
USA / Canada
Phone: 1 – 866 – 251 – 2860 (toll free)
Fax: 1 – 866 – 827 – 9219 (toll free)
Deutschland
Telefon: 0800 – 776 66 23 (gebührenfrei)
Fax: 0800 – 100 83 06 (gebührenfrei)
France
Téléphone: 0800 90 93 32 (ligne verte)
Téléfax: 0800 90 27 36 (ligne verte)
United Kingdom
Phone: 0800 – 96 03 33 (toll free)
Fax: 0800 – 169 85 54 (toll free)
Other Countries
Phone: +49 6221 – 649 34 0
Fax: +49 6221 – 649 34 40
Email: info@promokine.info
For in vitro research use only.
Not for diagnostic or therapeutic procedures.
07/2017
This manual suits for next models
3
Table of contents


