Prompter People ProLine FreeStand Manual

STEP 2 - ATTACH BRACKET TO STAND
STEP 1 - ATTACH STAND MOUNT
TO BRACKET (may be already attached) The ProLine Freestand’s patent pending mounting system
allows the use of any size/weight camera. The FreeStand ships
with 2 stands, one short and one tall. Use the short stand if
the subject is in a low chair. For normal chair and standing
subjects use the taller stand.
Screw stand mount into bottom of bracket.
ProLine FreeStand Set-Up Sheet
Tighten handle after
bracket is set onto stand.
1
Slide the LCD monitor onto the rail and
tighten the thumbscrew.
The LCD can be adjusted fore/aft by loosening
the thumbscrew.To remove the LCD unscrew
the thrumbscrew all the way and slide the LCD
off the rail.
Note:The thumbscrew has a stop to keep it
from coming out all the way.
STEP 3 - LCD INSTALL
NOTE: Camera and tripod not provided.
PROLINE FREESTAND
FULLY ASSEMBLED
Revised 102808

MIRROR ASSEMBLY/REMOVAL
Mirror
Assembly slides
into uprights
Loosen both knobs
on each side
MIRROR ASSEMBLY ATTACHMENT
Slide bracket into
channels
on each side
Re-tighten 4 thumbscrews
after mirror assembly has been
attached. The mirror should
not be touching the monitor.
Loosen 4 thumbscrews
on mirror assembly
1
2
1
2
ADJUSTING MIRROR ASSEMBLY
The ProLine FreeStand’s patent pending mirror assembly offers both height and angle adjustment. The mirror
assembly can also be folded flat for easy, safe transport. The mirror assembly offers an infinitely adjustable angle
and locks at the closed and standard 45 degree positions.The mirror assembly can also be easily removed for
more compact transport.
2
OPENING MIRROR ASSEMBLY
Press down red 45 degree
angle locks into notch to
lock mirror assembly
in position.
Push red angle lock up
Loosen both knobs on
each side of teleprompter
to release mirror assembly
Lift mirror assembly
to 45 degree position
Re-tighten knobs.
Revised 102808
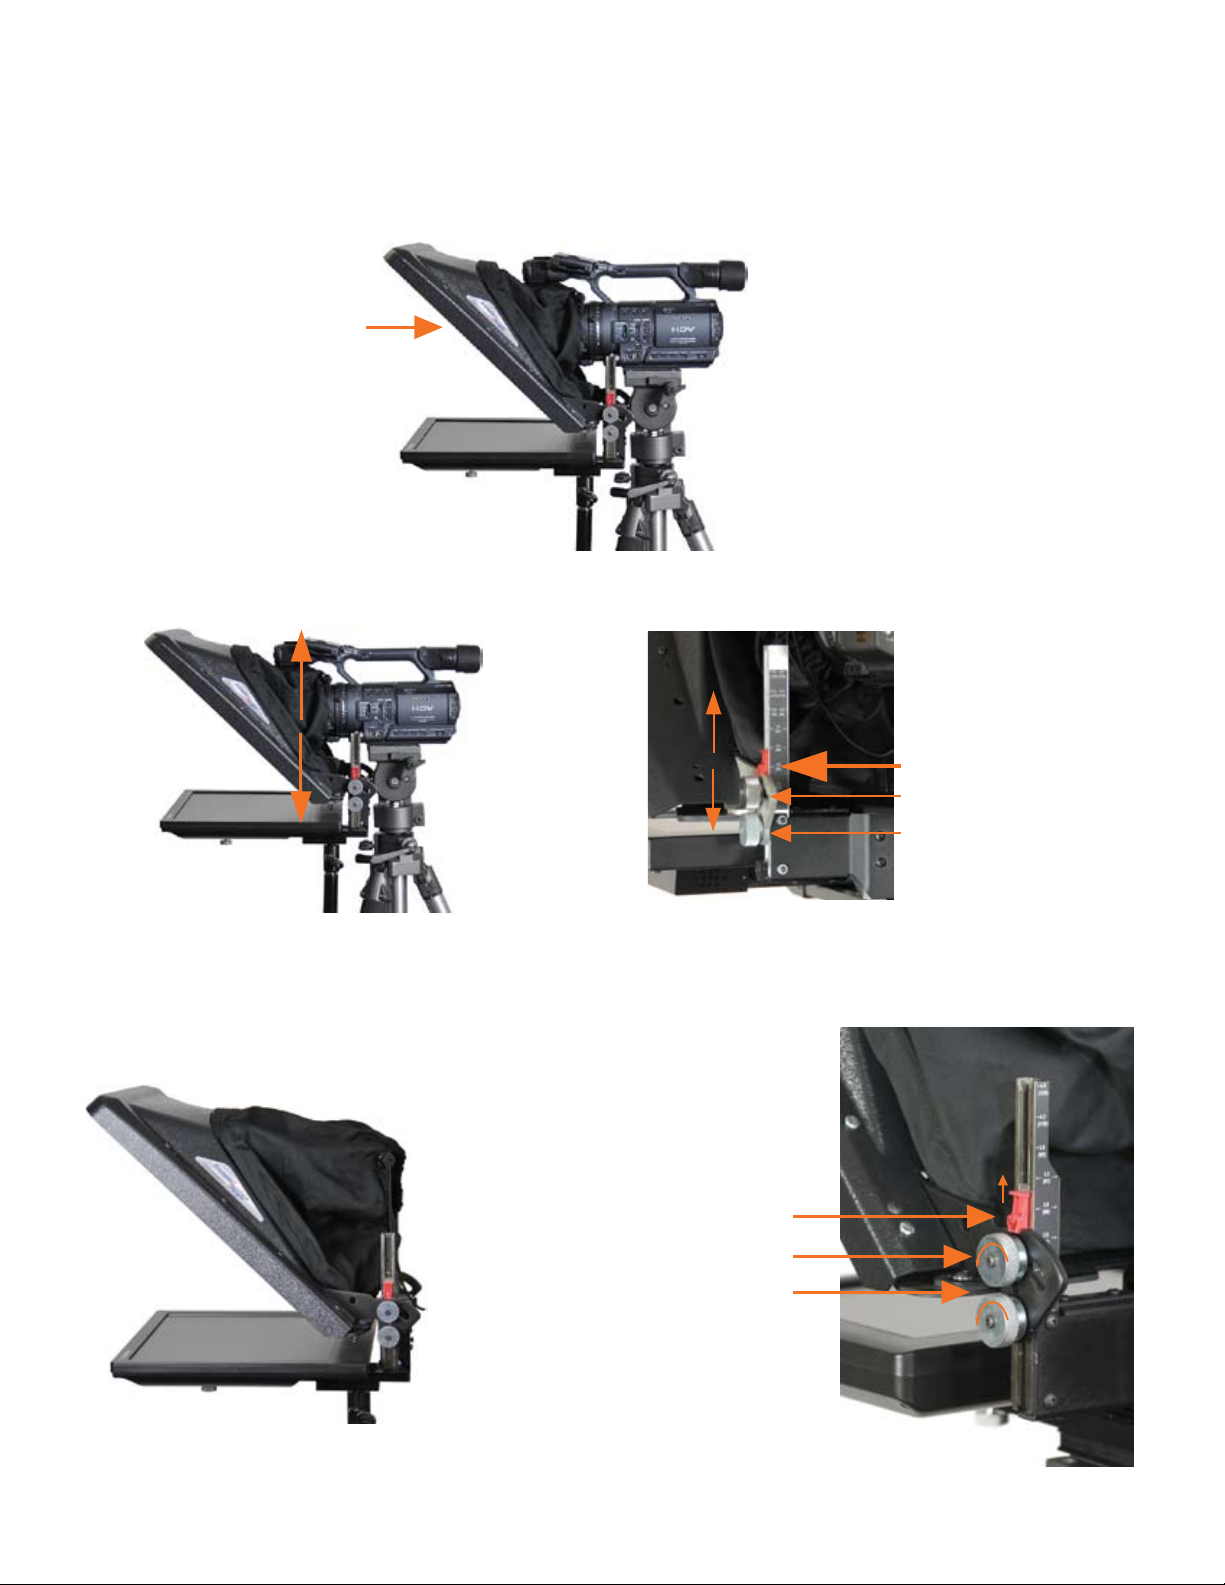
STEP 4 - CAMERA/LCD POSITION ADJUSTMENT
The Proline FreeStand allows easy set-up and adjustment. The cloth lens shade wraps around the lens to keep light
from entering from the rear. The LCD can be postioned fore/aft by loosening it’s thumbscrew.The LCD can be quickly
removed for safe, compact transport. The mirror assembly can also be quickly nad easily removed for safe and
compact transport.
ADJUSTING MIRROR HEIGHT
To use height scale
position the top of the
bracket to the point on the
scale that corresponds to
your cameras lens height.
Measure the lens height
from the bottom of the
camera.
Tighten both knobs
on each side to lock
mirror height in place
ADJUSTING MIRROR ANGLE
To adjust mirror assembly to an angle
other than 45 degrees do the following
1. Lift the angle lock on both sides.
2. Slightly loosen the four thumb screws,
3. Adjust angle and tighten knobs to lock
3Revised 102808
Camera should be positioned so that the lens is in the center
of the hood opening. The lens should be within an inch of the
beamsplitter. Attach the hood to the lens and tighten up
the drawstring so there are no light leaks.
Tighten drawstring
around lens

GLASS REMOVAL PROCEDURE
It is not normally necessary to remove the beamsplitter glass from the hood. In certain cases such as breakage or
cleaning requirements the glass must be removed.The glass is easily removed by unscrewing the four screws on each
side of the mirror assembly.To replace the glass just reverse the procedure.
4Revised 102808
Other Prompter People Camera Accessories manuals


Popular Camera Accessories manuals by other brands


Trojan
Trojan GC2 48V quick start guide

Calumet
Calumet 7100 Series CK7114 operating instructions

Ropox
Ropox 4Single Series User manual and installation instructions

Cambo
Cambo Wide DS Digital Series Main operating instructions

Samsung
Samsung SHG-120 Specification sheet

Ryobi
Ryobi BPL-1820 Owner's operating manual