PRONAILS VISION TECH II User manual
VISION TECH II
HIGH PRECISION NAIL DRILL SET
INSTRUCTION MANUAL VISION TECH II - ENGLISH
PRODUCT DESCRIPTION
High precision nail drill for electrical manicure and pedicure purposes as well as filing of gel nail
enhancements on fingers and toes. The handpiece with locking system ensures a stable holding of the
bit during operation without vibration. The powerful motor ensures a constant rotation speed up to
35.000RPM.
Suitable for both starting as well as experienced nail technicians.
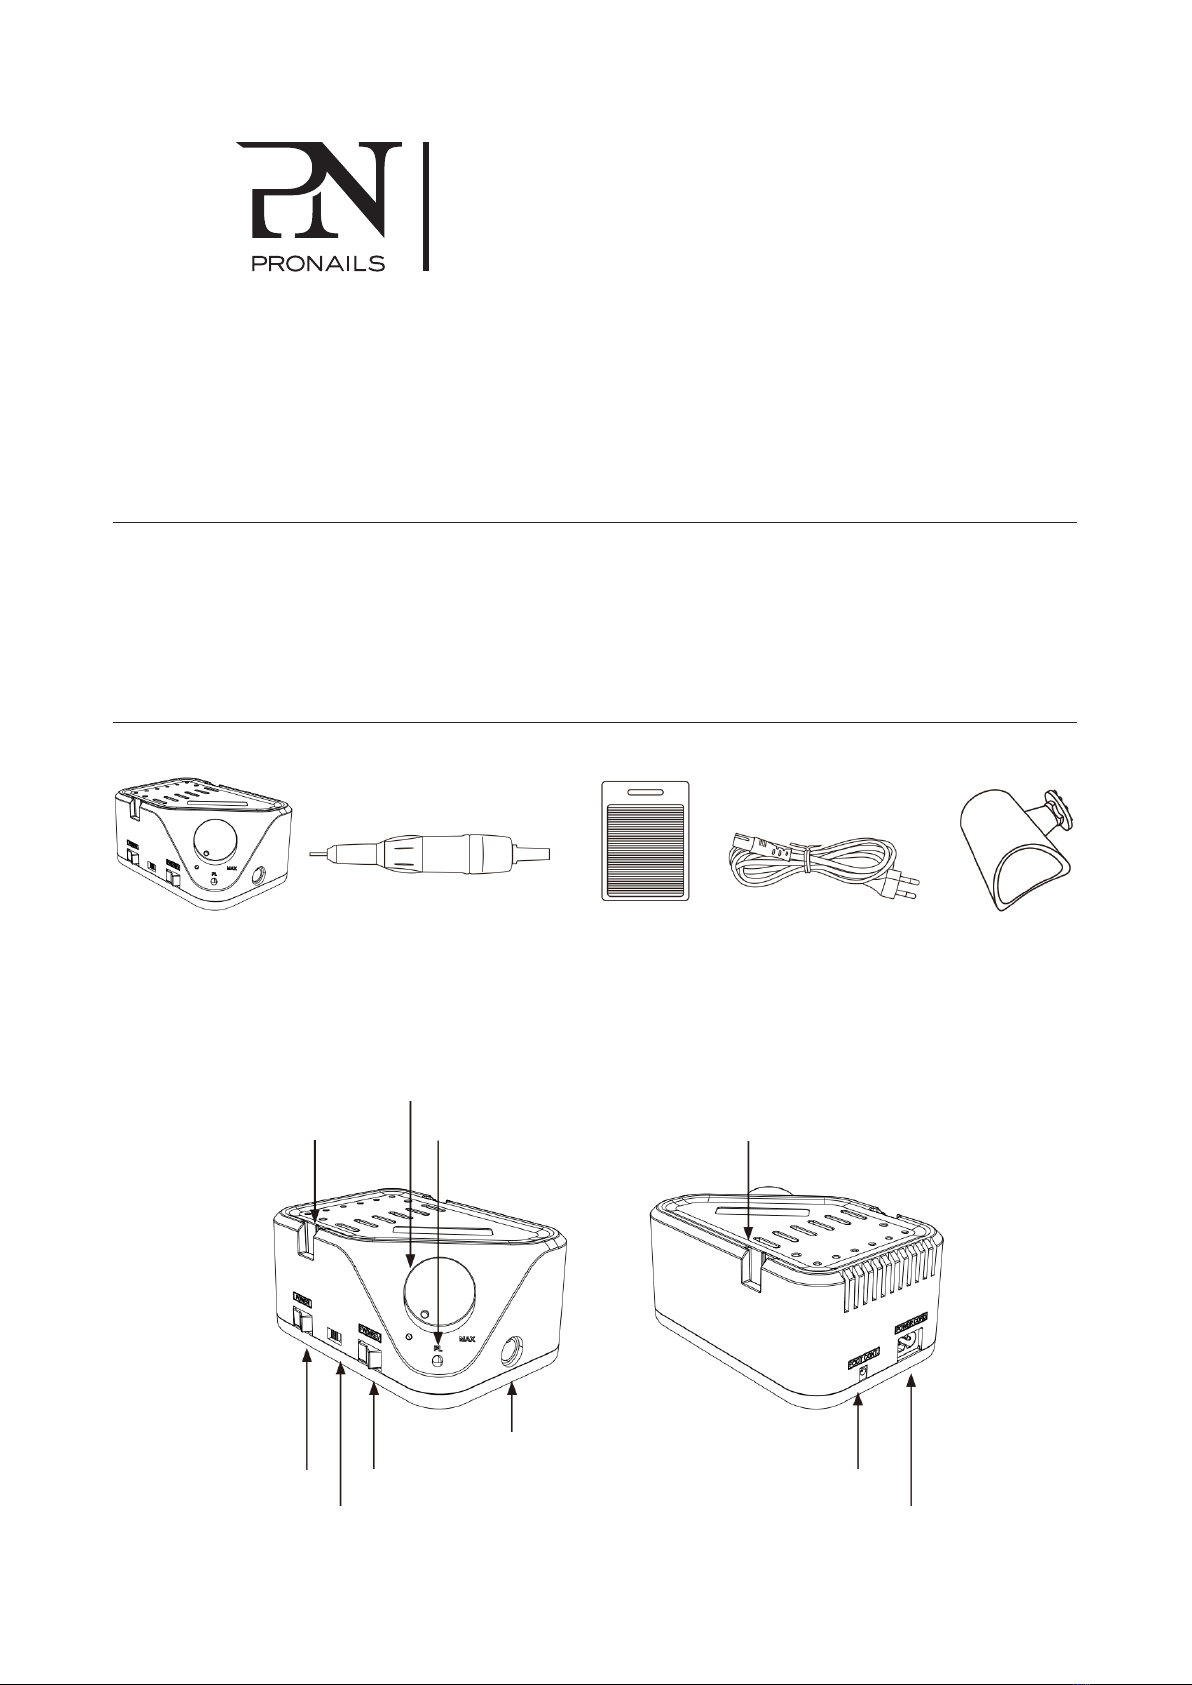
PRODUCT COMPONENTS
Please check all components are included.
1. Control Box
Power
Switch
110V/220V Change Switch
Rotation Direct Switch
Foot Controller
Connector
Power Socket
2. Handpiece 3. Foot Controller
(on/o)
4. Power Cord 5. Handpiece
Holder
Handpiece
Holder
Power Light
(LED)
Handpiece Connector
Handpiece
Holder
Speed Control
Dial

OPERATION BUTTONS
1. Power Switch: I = Power On O = Power o
2. Rotation Speed : 0 - 35.000RPM.
Turn clockwise to increase speed. Turn anti-clockwise te reduce speed.
3. Rotation Direction:
FW = clockwise for righthanded user
RV = reverse for lefthanded user
TECHNICAL SPECIFICATIONS
Control Box
Model Name Vision Tech II
Input AC 100-120 V, 50/60 Hz
AC 220-240 V, 50/60 Hz
Fuze AC 100-120 V, 2A
AC 220-240 V, 2A
Maximum Load Ciurrent 2A
Hand Piece
Model Name Vision Tech II
Max. RPM 35,000 rpm
Torque 3.0 N cm
Bur Replacement Type Collet Chuck Type
Bur Dimension ∅2.35 mm
Motor Type DC Type
GETTING STARTED AND USING THE UNIT
1. Before using the unit, make sure the “Power Switch” is in the “OFF” position.
2. Connect the “Foot Controller” cord when using the foot controller.
3. Set the “Speed Control Dial” to ‘o’.
4. Connect the “Power Cord”
5. Connect the « Handpiece ».
6. Attach the handpiece holder to the control box. Position it on the left or right side depending on your
preference. The handpiece can be positioned both vertically (90°) and angled (45°) according to
preference.
7. Select a bit and open the handpiece chuck by turning it counter clockwise. Place the bit in the opened
chuck and lock it by turning it clockwise.

8. Check if the bit is fitted correctly and if the chuck is securely locked.
9. Select the rotation direction with the “Rotation Direction Switch”.
FW means clockwise rotation and is suitable for Right-handed users
RV means reverse or counter clockwise and is suitable for Left-handed users
10. Now use the “Speed Control Dial” and set the required speed.
IMPORTANT
• Before changing the rotation direction, make sure that the handpiece has come to a full stop to avoid
handpiece damage.
• Before exchanging bits, make sure that the handpiece has come to a full stop.
11. Set the “Power Switch” in the “ON” position. When the power is ON, the Power Light below the Speed
Control Dial lights up into green.
When connecting the foot controller, the operation of the foot controller is automatically activated.
IMPORTANT
• Make sure the handpiece is locked with a bit inside before you set the device on ON mode.
WARNING! !
When the unit is not to be used for more than 3 hours, please make sure it is properly
switched o! The green Power LED should be o. Otherwise, the unit might heat up!
TROUBLE SHOOTING
Problem Solution
The control box does not work. Check if the control box is properly connected to the mains outlet.
The power LED does not light up. Check if the power switch is in “ON” position.
The handpiece does not rotate. Check if the handpiece is properly connected to the control box.
Check if the handpiece is properly locked.
Check if the foot pedal is connected to the control box,
in which case you need to press the foot pedal to start/stop.
The bit does not enter Make sure the handpieces is not locked.
the handpiece. Make sure the bit diameter is 2.35mm.
The foot pedal doesn’t work. Check if the foot pedal cord is properly connected to the control box.
Check if the rotation speed is set to zero and increase to the desired
working speed.
Should the issue persist, please contact your Professionails distributor.
1. Turn the handle to open the handpiece chuck.
2. Insert the bit in the front of handpiece.
3. Lock the handpiece chuck by turning the handle.

CARE AND MAINTENANCE TIPS
1. Keep the inner parts of the handpiece as free as possible of dust and filing residue.
2. Use Clinilotion on a tissue to remove dust from the unit and avoid moisture inside the unit (never spray
Clinilotion directly on the device nor handpiece).
3. Only use bits that conform to the standard 2.35mm diameter size and avoid using damaged or rusty bits.
Improper use of this kind can lead to excessive wear and tear of the ball bearings. Follow ‘Professionails’
safety procedures and keep to the designated safe speed.
4. Do not subject the handpiece to hard shocks, as this can damage the bearings.
If you do drop the handpiece, check if the filing bit is not damaged or twisted.
Stay alert for signs of damages such as noise and overheating.
If the handpiece is damaged, send it for repair right away.
SAFETY INSTRUCTIONS
Before Using the unit:
1. Never set up the unit in a wet or humid environment.
2. Never bring the unit into direct contact with fire, gas, oxygen or hot objects such as cooker hot plates.
When operating the unit:
1. The handpiece must be used only with the device it is supplied with.
2. Suitable filing bits:
• Use only ProNails approved bits at the recommended minimum and maximum rotation speeds.
• Standard size: 2.35mm shaft diameter and 35 to 40 mm shaft length
• Only use balanced filing bits with rounded shaft end.
• Do not use rusty, twisted or damaged filing bits.
3. Switch o the unit before changing the rotation direction.
4. Switch o the unit before changing filing bits.
5. Take every possible precaution not to drop the handpiece or damage it in any other way.
6. Should problems with the handpiece arise, please send it for repair right away.
7. Do not wash or lubricate the handpiece.
8. Never switch on the unit when the chuck is open.
9. When storing the unit, insert the test bit into the chuck.
“This appliance is not intended for use by persons who lack experience and filing knowledge. May be used
by students under supervision of a certified ProNails educator.
WARRANTY
• 1 Year
• Warranty does not include misuse or normal wear of the bearings, carbon brush, collet chuck,
spindle and armature.
Professionails NV • Ruiterijschool 11 • B-2930 Brasschaat • Belgium • www.pronails.com • info@pronails.com
Table of contents
Other PRONAILS Personal Care Product manuals

Popular Personal Care Product manuals by other brands


Sanitas
Sanitas SMA 36 Instructions for use

Madeli
Madeli IMAGE Slique IM-IM2036-00 Specifications, Installation and User’s Guide

Otto Bock
Otto Bock Lower back support brace Instructions for use

Core Products
Core Products Pain Remedy instruction manual

Goodwind
Goodwind Intensive Body Renewal user manual

Bort
Bort Knopfloch PIP manual