Proseries PSJ-2212 User manual

0099001544-00
Model / Modelo / Modèles :
PSJ-2212, PSJ-3612, PSJ-4424
Jump Starter and DC Power Source
Arrancador y Fuente de Poder de CC
Aide de Démarrage et Source d’Énergie CC
OWNER’S MANUAL
MANUAL DEL USUARIO
GUIDE D’UTILISATION
PLEASE SAVE THIS OWNER’S MANUAL AND READ BEFORE EACH USE.
This manual will explain how to use your jump starter safely and effectively. Please
read and follow these instructions and precautions carefully.
POR FAVOR GUARDE ESTE MANUAL DEL PROPIETARIO Y LEER ANTES DE
CADA USO. En este manual se explica cómo utilizar el arrancador con seguridad
y ecacia. Por favor, lea y siga las siguientes instrucciones y precauciones.
ESSAYER DE GARDER LE MANUEL D’INSTRUCTIONS ET LE LIRE AVANT
CHAQUE UTILISATION. Ce manuel explique comment utiliser l’unité d’une façon
sûre et efcace. S’il vous plaît lisez et suivez ces instructions et précautions.
PSJ-2212

CONTAINS SEALED, NON-SPILLABLE LEAD-ACID BATTERY.
MUST BE DISPOSED OF PROPERLY.
CONTIENE UNA BATERÍA SELLADA DE ÁCIDO-PLOMO NO
DERRAMABLE QUE DEBE DESECHARSE APROPIADAMENTE.
CONTIENT UNE BATTERIE À L’ACIDE QUI DOIT ÊTREDISPOSÉ
CORRECTEMENT.
WARNING: Possible explosion hazard. Contact with battery acid may cause severe burns
and blindness. Keep out of reach of children.
ADVERTENCIA: Posible riesgo de una explosión. El contacto con una batería de ácido
puede causar quemaduras y ceguera. Manténgase alejado de los niños.
AVERTISSEMENT : Hasard d’explosion possible. Contact avec l’acide de batterie peut
provoquer sévère brûle et la cécité. Ne le laissez pas a la portée des enfants.
CONTENTS
IMPORTANT SAFETY INSTRUCTIONS.............................................................................. 4
PERSONAL SAFETY PRECAUTIONS ................................................................................ 4
FEATURES........................................................................................................................... 5
CHARGING THE INTERNAL BATTERY OF THE JUMP STARTER.................................... 5
USING THE JUMP STARTER.............................................................................................. 6
MAINTENANCE AND CARE ................................................................................................ 7
TROUBLESHOOTING.......................................................................................................... 7
BEFORE RETURNING FOR REPAIRS ............................................................................... 8
SPECIFICATIONS................................................................................................................ 8
REPLACEMENT PARTS/ACCESSORIES ........................................................................... 9
LIMITED WARRANTY .......................................................................................................... 9
WARRANTY CARD ............................................................................................................ 23

CONTENIDOS
INSTRUCCIONES IMPORTANTES DE SEGURIDAD....................................................... 10
PRECAUCIONES DE SEGURIDAD PERSONAL.............................................................. 10
CARACTERÍSTICAS.......................................................................................................... 11
CARGA DE LA BATERÍA INTERNA DEL ARRANCADOR ................................................. 11
USO DEL ARRANCADOR.................................................................................................. 12
MANTENIMIENTO Y CUIDADO......................................................................................... 13
LOCALIZACIÓN Y SOLUCIÓN DE PROBLEMAS............................................................. 13
ANTES DE DEVOLVER A REPARACIONES ..................................................................... 14
ESPECIFICACIONES......................................................................................................... 14
REPUESTOS/ACCESORIOS............................................................................................. 15
GARANTÍA LIMITADA ........................................................................................................ 16
TARJETA DE GARANTÍA ................................................................................................... 23
TABLE DES MATIÈRES
CONSIGNES DE SÉCURITÉ IMPORTANTES .................................................................. 17
MESURES DE SÉCURITÉ PERSONNELLE ..................................................................... 17
CARACTÉRISTIQUES ....................................................................................................... 18
CHARGE DE LA BATTERIE INTERNE.............................................................................. 18
CONSIGNES D’UTILISATION............................................................................................ 19
MAINTENANCE ET ENTRETIEN....................................................................................... 20
DÉPANNAGE ..................................................................................................................... 20
AVANT DE RETOURNER POUR LES RÉPARATIONS ..................................................... 21
SPÉCIFICATIONS.............................................................................................................. 21
PIÈCES DE RECHANGE / ACCESSOIRES ...................................................................... 22
GARANTIE LIMITÉE .......................................................................................................... 22
CARTE DE GARANTIE ...................................................................................................... 24

•4•
1. IMPORTANT SAFETY INSTRUCTIONS
SAVE THESE INSTRUCTIONS.
WARNING – RISK OF EXPLOSIVE GASES
WORKING IN THE VICINITY OF A LEAD-ACID BATTERY IS DANGEROUS.
BATTERIES GENERATE EXPLOSIVE GASES DURING NORMAL OPERATION.
IT IS IMPORTANT THAT YOU FOLLOW THESE INSTRUCTIONS EACH TIME
YOU USE THE JUMP STARTER.
To reduce the risk of battery explosion, follow these instructions and those published
by the battery manufacturer and the manufacturer of any equipment you intend to
use in the vicinity of a battery. Review cautionary markings on these products and
on the engine.
WARNING: Pursuant to California
Proposition 65, this product contains
chemicals known to the State of
California to cause cancer and birth
defects or other reproductive harm. Wash
hands after handling.
•Keep out of reach of children.
•Do not disassemble the jump starter.
Take it to a qualied service professional
if service or repair is required. Incorrect
assembly may result in re or electrical
shock.
•Do not use the jump starter to jump a
vehicle while charging the internal battery.
•Do not recharge the jump starter with a
damaged extension cord.
•The jump starter gets hot during charging
and must have proper ventilation.
•Do not set the jump starter on ammable
materials, such as carpeting, upholstery,
paper, cardboard, etc.
•Place the jump starter as far away from
the battery being jumped as the cables
will permit.
•Do not expose the jump starter to rain
or snow.
•Never place the jump starter directly
above battery being jumped.
•To prevent arcing, never allow the clamps
to touch together or to contact the same
piece of metal.
•Use of an attachment not recommended
or sold by Schumacher® Electric
Corporation may result in damage to the
unit or personal injury.
•Never operate the jump starter if it is
damaged.
•If someone else uses the jump starter,
ensure they are well informed on how to
use it safely, and have read and
understood the operating instructions.
•The jump starter is NOT designed to be
installed as a replacement for a vehicle
battery.
•Use ONLY on vehicles, boats and garden
tractors powered with a 12V DC battery
system.
•If the engine fails to start after the
recommended number of attempts,
disconnect the unit and look for other
problems that may need to be corrected.
•Use the jump starter for jump starting
lead-acid batteries ONLY. Do not use for
dry cell batteries that are commonly used
with home appliances.
2. PERSONAL SAFETY PRECAUTIONS
•Wear complete eye protection and
protective clothing when working near
lead-acid batteries. Always have
someone nearby for help.
•Have plenty of fresh water, soap and
baking soda nearby for use, in case
battery acid contacts your eyes, skin, or
clothing. Wash immediately with soap
and water and seek medical attention.
•If battery acid comes in contact with eyes,
ush eyes immediately for a minimum 10
minutes and get medical attention.
•Neutralize any acid spills thoroughly with
baking soda before attempting to clean up.
•Remove all personal metal items from
your body, such as rings, bracelets,
necklaces and watches. A battery can
produce a short circuit current high
enough to weld a ring to metal, causing a
severe burn.
•Never smoke or allow a spark or ame in
the vicinity of the battery or engine.

•5•
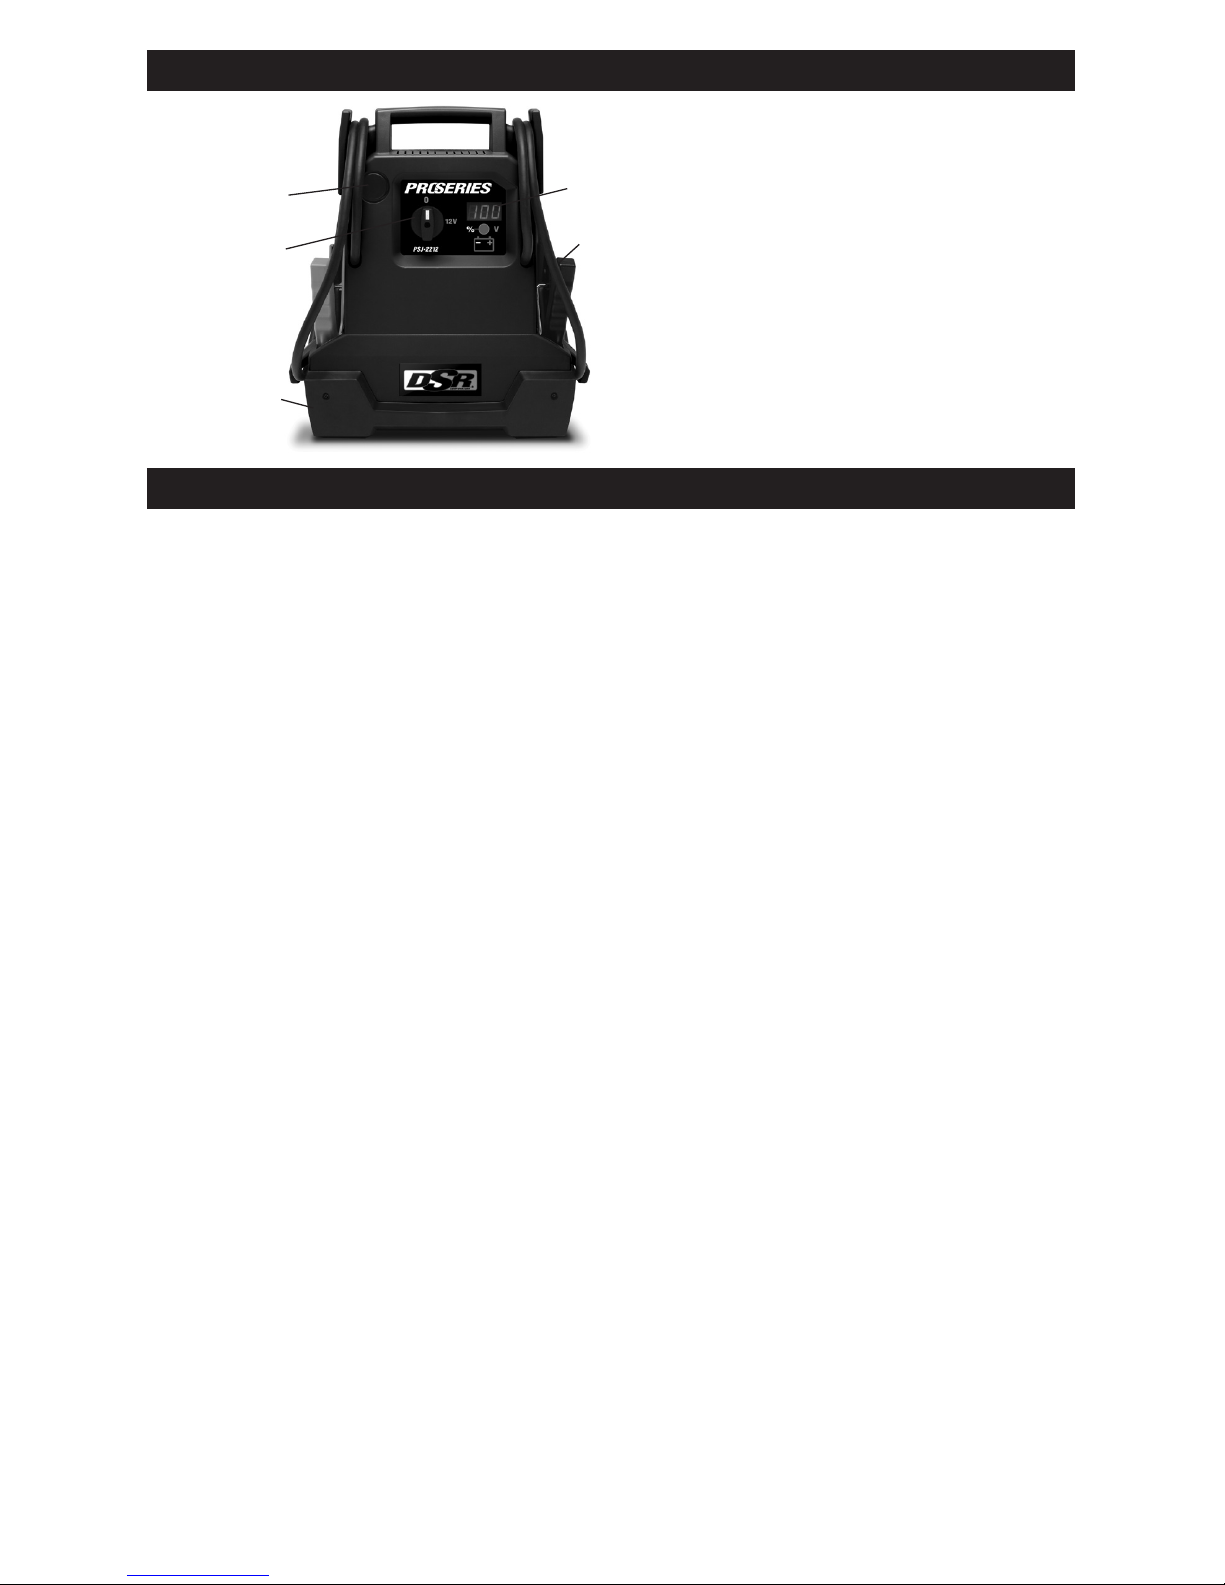
3. FEATURES
1. Durable polypropylene case
with high-impact rubber base
2. ON/OFF switch
3. 12 Volt DC power outlet
4. Two function digital display
5. Heavy-duty replaceable
battery clamps
2
4
3
5
1
4. CHARGING THE INTERNAL BATTERY OF THE JUMP STARTER
IMPORTANT! CHARGE IMMEDIATELY
AFTER PURCHASE, AFTER EACH USE
AND EVERY 30 DAYS, TO KEEP THE
JUMP STARTER’S INTERNAL BATTERY
FULLY CHARGED AND PROLONG
BATTERY LIFE.
DIGITIAL DISPLAY
The display can be used to indicate a
battery’s voltage percentage when
connected to a battery or the percentage of
charge in the jump starter’s internal battery.
With the switch in the OFF position,
connect the clamps to the vehicle’s
battery and its voltage is displayed. Turn
the jump starter’s rotary switch to 12V
(12V or 24V for PSJ-4424) and the
combined voltage of both internal and
external batteries is shown.
To read the internal battery’s charge
status: Press the display button to read
the percentage of charge left in the
internal battery. A fully charged battery
will read 100%.
CHARGING THE INTERNAL BATTERY
Charge the internal battery for the
jump starter using an extension cord
(not included).
NOTE: Use of an improper extension
cord could result in a risk of re and
electric shock.
1. Make sure the rotary switch on the
front of the jump starter is in the O
(OFF) position.
2. To charge, plug an 18 gauge (AWG)
or larger extension cord (not included)
into the charger plug on the side of
the jump starter.
3. Plug the extension cord into a 120V
AC electrical wall outlet.
4. While the jump starter is charging,
the battery’s percentage of charge will
be displayed. When the internal
battery is fully charged, the display
will show 100. Complete charging
may take up to 72 hours. The jump
starter is then ready to use.
5. The charger will automatically go
into maintain mode and maintain
the battery at full charge without
damaging it.
6. Charge the jump starter as soon as
possible after use.
IMPORTANT: Do not use the jump starter
while charging the internal battery.
CHARGING THE INTERNAL BATTERY
WHILE DRIVING
You may also charge the internal battery
while driving, using a male-to-male
charger cable (part number 94500109 –
not included).
IMPORTANT: DO NOT CHARGE
INTERNAL BATTERY FOR MORE
THAN 30 MINUTES OR LEAVE THE
BATTERY UNATTENDED. IT COULD
EXPLODE, CAUSING PROPERTY
DAMAGE OR PERSONAL INJURY.
1. Make sure the car is running.
2. Insert one end of the accessory cable
into the 12V DC power outlet.
3. Insert the other end of the accessory
cable into the vehicle’s accessory
outlet (lighter socket).
IMPORTANT: Using this method to charge
the battery overrides the maintain mode
and the battery can be overcharged.
4. Monitor the progress of the charge by
pressing the Display button on the front
of the unit. When the battery is fully
charged, disconnect the accessory
cable from the jump starter, then from
the lighter socket of the vehicle.
NOTE: Completely disconnect the charger
cable when the engine is not running.

•6•
5. USING THE JUMP STARTER
IMPORTANT: Using the Engine Start
feature without a battery installed in the
vehicle will damage the vehicle’s
electrical system.
1. Turn the ignition OFF.
2. Make sure the area is well ventilated.
3. Lay the DC cables away from any
fan blades, belts, pulleys and other
moving parts.
4. Make sure the rotary switch on the
front panel is in the O (OFF) position
until the clamps are connected to the
vehicle. If plugged into an AC wall
outlet, unplug.
5. DO NOT allow the clamps to touch
together or to contact the same piece
of metal.
6. For a negative-ground vehicle (as
in most vehicles), connect the jump
starter’s POSITIVE (RED) clamp to the
POSITIVE (POS, P, +) battery post.
Next, connect the NEGATIVE (BLACK)
clamp to the vehicle chassis or engine
block, away from the battery.
7. For a positive-ground vehicle,
connect the jump starter’s NEGATIVE
(BLACK) clamp to the NEGATIVE
(NEG, N, -) battery post. Next,
connect the POSITIVE (RED) clamp
to the vehicle chassis or engine block
away from the battery.
IMPORTANT: If you have connected the
clips backwards, an audio alarm will
sound. DO NOT turn on the jump starter.
This could cause serious damage to the
jump starter or the vehicle. Reverse the
connections and the audio alarm will stop.
8. If no audio alarm sounds, turn the
rotary switch to the 12V position (12V
or 24V position for Model PSJ-4424).
The 3-digit display will show the
voltage of the battery.
9. Crank the engine. If the engine does
not start within 5-8 seconds, stop
cranking and wait at least 1 minute
before attempting to start the vehicle
again. (This permits the battery to
cool down.)
10. After the engine starts, turn the
rotary switch to the O (OFF) position.
Disconnect the black clamp (-) and
then the red clamp (+), in that order.
11. Recharge the jump starter as soon as
possible after use.
POWERING A 12V DC DEVICE
The jump starter is a power source for all
12V DC accessories that are equipped
with a 12V accessory plug. Use it for
power outages and on shing or camping
trips. Estimated usage times are listed in
the chart.
NOTE: Do not power a 12V device with
the jump starter while charging the
internal battery.
1. Make sure the device to be powered
is OFF before inserting the 12V DC
accessory plug into the 12V DC
accessory outlet.
2. Ensure the battery clamps are
secured on the storage holders.
3. Open the protective cover of the DC
power outlet on the jump starter.
4. Plug the 12V DC device into the DC
power outlet and turn on the 12V DC
device (if required).
5. When nished, turn off the DC device
(if required) and unplug from the DC
power outlet.
NOTE: Do not use the jump starter
to run appliances that draw more than
15A DC. If the 12V DC device draws
more than 15A or has a short circuit, the
internal circuit breaker of the jump starter
will trip and disconnect the power to the
device. Disconnect the 12V DC device.
The breaker will automatically reset after
an overload occurs.
NOTE: Extended operation of a 12V DC
device may result in excessive battery
drain. Recharge the jump starter
immediately after unplugging the 12V
DC device.

•7•
12V DC ESTIMATED RUN-TIMES
APPLIANCE TYPE ESTIMATED WATTAGE ESTIMATED RUN TIME
PSJ-2212
ESTIMATED RUN TIME
PSJ-3612, PSJ-4424
Cell phone,
uorescent light 4 watts 66 hrs 132 hrs
Radio, fan,
depth nder 9 watts 23.9 hrs 58.6 hrs
Camcorder 15 watts 17.6 hrs 35.2 hrs
Electrical tool 24 watts 11 hrs 22 hrs
Electric cooler 48 watts 5.5 hrs 11 hrs
Car vacuum,
air compressor 80 watts 3.3 hrs 6.6 hrs
NOTE: Actual time may vary. Times are based on the internal battery being fully charged.
6. MAINTENANCE AND CARE
•Clean the clamps and the case after
each use.
•Recharge the unit once a month, when
not in use.
•Store the clamps on their support posts,
to ensure they do not come into contact
with any metallic surface.
•Never completely discharge the internal
battery.
7. TROUBLESHOOTING
PROBLEM POSSIBLE CAUSE REASON/SOLUTION
The jump starter won’t jump
start my car.
Clamps are not making a good
connection to the battery.
The jump starter’s battery is
not charged.
The vehicle’s battery is
defective.
Check for poor connection to
battery and frame. Make sure
connection points are clean.
Check the battery charge
status by pressing the Display
button on the front of the unit.
The display will show the
percentage of charge.
Have the battery checked.
The jump starter won’t power
my 12V device. The 12V device is not
turned on.
The jump starter’s battery is
not charged.
The 12V device draws more
than 15A or has a short
circuit.
Turn on the 12V device.
Check the battery charge
status by pressing the Display
button on the front of the unit.
The display will show the
percentage of charge.
Disconnect the 12V device.
The internal breaker will
automatically reset after a
minute or two. Try using the
12V device again.
The battery in the jump starter
won’t hold a charge.
The battery is bad (will not
accept a charge). Replace the battery.
Chg shows on the display. The battery is charging. Not a problem; continue
charging.
The jump starter’s alarm is on. Connections are reversed. Disconnect the jump starter
and reverse the clamps.

•8•
8. BEFORE RETURNING FOR REPAIRS
If these solutions do not eliminate the problem, or for more information
about troubleshooting, contact customer service for assistance:
www.batterychargers.com
or call 1-800-621-5485
Monday-Friday 7:00am to 5:00pm CST
For REPAIR OR RETURN, contact Customer Service at 1-800-621-5485.
DO NOT SHIP UNIT until you receive a RETURN MERCHANDISE AUTHORIZATION
(RMA) number from Customer Service at Schumacher Electric Corporation.
9. SPECIFICATIONS
PSJ-2212
Internal Battery Type.....................................Sealed, Maintenance Free, AGM, Lead-Acid
Nominal Voltage......................................................................................................12V DC
Capacity......................................................................................................................22Ah
DC Power Output (Maximum Continuous Load)...........................................................15A
Peak Amps.................................................................................................................. 2200
Cranking Amps.............................................................................................................. 330
Cold Cranking Amps ..................................................................................................... 275
Battery Hookup Cables................................................ 4 gauge, AWG, 50" (127 cm) Long
Dimensions (H x W x D)...................................... 15" x 14" x 4.7" (37.1 x 35.56 x 11.9 cm)
Weight................................................................................................... 21.55 lbs (9.78 kg)
PSJ-3612
Internal Battery Type.....................................Sealed, Maintenance Free, AGM, Lead-Acid
Nominal Voltage......................................................................................................12V DC
Capacity................................................................................................................ (2) 22Ah
DC Power Output (Maximum Continuous Load)...........................................................15A
Peak Amps.................................................................................................................. 3600
Cranking Amps.............................................................................................................. 470
Cold Cranking Amps ..................................................................................................... 385
Battery Hookup Cables............................................. 2 gauge, AWG, 55" (139.7 cm) Long
Dimensions (H x W x D)......................................15" x 14" x 7.7" (37.1 x 35.56 x 19.6 cm)
Weight................................................................................................. 37.55 lbs (17.04 kg)
PSJ-4424
Internal Battery Type.....................................Sealed, Maintenance Free, AGM, Lead-Acid
Nominal Voltage......................................................................................................12V DC
Capacity................................................................................................................ (2) 22Ah
DC Power Output (Maximum Continuous Load)...........................................................15A
Peak Amps.................................................................................................................. 4400
Cranking Amps.............................................................................................................. 500
Cold Cranking Amps ..................................................................................................... 415
Battery Hookup Cables............................................. 2 gauge, AWG, 55" (139.7 cm) Long
Dimensions (H x W x D)......................................15" x 14" x 7.7" (37.1 x 35.56 x 19.6 cm)
Weight................................................................................................. 38.15 lbs (17.32 kg)

•9•
10.REPLACEMENT PARTS/ACCESSORIES
Battery clamp jaw replacement kit .................................................................. 2299001580
Male-to-male accessory cable ............................................................................ 94500109
BATTERY CLAMP JAW REPLACEMENT
1. Make sure the rotary switch on the
front panel is in the OFF (O) position
and the jump starter is not plugged
into a 120V AC wall outlet.
2. Secure the clamp in the open position
using a vise or equivalent clamping
device.
WARNING: The clamps are spring loaded,
so use caution when replacing the jaws, to
avoid injury.
3. Remove the rear screw that attaches
the jump starter cable to the jaw.
4. Remove the screw holding the copper
jaw to the plastic clamp. Repeat for
the other jaw.
5. Remove the two jaws and braided
cable.
6. Reverse the steps to install the
replacement clamps.
11. LIMITED WARRANTY
SCHUMACHER ELECTRIC CORPORATION, 801 BUSINESS CENTER DRIVE, MOUNT
PROSPECT, IL 60056-2179, MAKES THIS LIMITED WARRANTY TO THE ORIGINAL
RETAIL PURCHASER OF THIS PRODUCT. THIS LIMITED WARRANTY IS NOT
TRANSFERABLE OR ASSIGNABLE.
Schumacher Electric Corporation (the “Manufacturer”) warrants this jump starter for one
(1) year from the date of purchase at retail against defective material or workmanship that
may occur under normal use and care. If your unit is not free from defective material or
workmanship, Manufacturer’s obligation under this warranty is solely to repair or replace
your product, with a new or reconditioned unit, at the option of the Manufacturer. It is the
obligation of the purchaser to forward the unit, along with proof of purchase and mailing
charges prepaid to the Manufacturer or its authorized representatives in order for repair
or replacement to occur.
Manufacturer does not provide any warranty for any accessories used with this product
that are not manufactured by Schumacher Electric Corporation and approved for use with
this product. This Limited Warranty is void if the product is misused, subjected to careless
handling, repaired, or modied by anyone other than Manufacturer or if this unit is resold
through an unauthorized retailer.
Manufacturer makes no other warranties, including, but not limited to, express, implied or
statutory warranties, including without limitation, any implied warranty of merchantability or
implied warranty of tness for a particular purpose. Further, Manufacturer shall not be liable
for any incidental, special or consequential damage claims incurred by purchasers, users
or others associated with this product, including, but not limited to, lost prots, revenues,
anticipated sales, business opportunities, goodwill, business interruption and any other
injury or damage. Any and all such warranties, other than the limited warranty included
herein, are hereby expressly disclaimed and excluded. Some states do not allow the
exclusion or limitation of incidental or consequential damages or length of implied warranty,
so the above limitations or exclusions may not apply to you. This warranty gives you specic
legal rights and it is possible you may have other rights which vary from this warranty.
THIS LIMITED WARRANTY IS THE ONLY EXPRESS LIMITED WARRANTY AND THE
MANUFACTURER NEITHER ASSUMES OR AUTHORIZES ANYONE TO ASSUME OR
MAKE ANY OTHER OBLIGATION TOWARDS THE PRODUCT OTHER THAN THIS
WARRANTY.
Schumacher® and the Schumacher logo are registered trademarks
of Schumacher Electric Corporation.

•10 •
1. INSTRUCCIONES IMPORTANTES DE SEGURIDAD
GUARDE ESTAS INSTRUCCIONES.
ADVERTENCIA – RIESGO DE GASES EXPLOSIVOS
TRABAJAR CERCA DE UNA BATERÍA DE PLOMO-ÁCIDO ES PELIGROSO. LAS
BATERÍAS GENERAN GASES EXPLOSIVOS DURANTE SU FUNCIONAMIENTO
NORMAL. ES IMPORTANTE QUE SIGA LAS INSTRUCCIONES CADA VEZ QUE
UTILICE EL ARRANCADOR.
Para disminuir el riesgo de explosión de la batería, siga estas instrucciones, al
igual que las recomendaciones publicadas por el fabricante de la batería y de
cualquierequipoqueseutilizarácercadelabatería.Veriquelasseñalesde
advertencia que se hayan colocado en estos productos y en el motor.
ADVERTENCIA: Conforme a la
Propuesta 65 de California, este producto
contiene químicos de los cuales en el
Estado de California se tiene
conocimiento que provocan cáncer y
malformaciones congénitas u otras
lesiones reproductivas. Lávese las
manos después de usar.
•Manténgase alejado de los niños.
•No desmonte el arrancador; hágalo
revisar por una persona capacitada que
efectúe reparaciones cuando necesite
servicio de mantenimiento o una
reparación. Volver a ensamblar en forma
incorrecta puede provocar riesgo de
incendio o descarga eléctrica.
•No utilice el arrancador para pasar
corriente a un vehículo mientras se carga
la batería interna.
•No recargue el arrancador con una
extensión dañada.
•El arrancador se calienta durante la carga y
debe tener una ventilación adecuada.
•No coloque el arrancador en sobre
materiales inamables como alfombras,
tapicería, papel, cartón, etc.
•Coloque el arrancador tan lejos de la
batería que se está cargando como los
cables lo permitan.
•No exponga el arrancador a la lluvia
o la nieve.
•Nunca coloque el arrancador directamente
sobre la batería que se está cargando.
•Para evitar la formación de arcos
eléctricos, nunca permita que las pinzas
se toquen entre sí o estén en contacto
con la misma pieza de metal.
•El uso de un accesorio no recomendado
ni vendido por Schumacher®Electric
Corporation puede causar daño en la
unidad o lesiones corporales.
•Nunca opere el arrancador si está dañado.
•Si otra persona utiliza el arrancador,
asegúrese de que esté bien informada
sobre cómo usarlo de manera segura y
además, de que haya leído y comprendido
las instrucciones de funcionamiento.
•El arrancador NO está diseñado para ser
instalado como reemplazo de la batería
del vehículo.
•Utilícelo SOLO en vehículos, barcos y
tractores de jardín alimentados con un
sistema de batería de 12 V CC.
•Si el motor no arranca luego de realizar
el número recomendado de intentos,
desconecte y verique la unidad en
busca de otros problemas.
•Utilice el arrancador para arrancar las
baterías de plomo-ácido solamente. No lo
utilice para cargar las baterías de celdas
secas que habitualmente se colocan en
los aparatos domésticos.
2. PRECAUCIONES DE SEGURIDAD PERSONAL
•Use protección completo de los ojos y la
ropa de protección cuando trabaje cerca
de baterías de plomo-ácido. Siempre
cuente con la presencia de otra persona
para obtener ayuda.
•Tenga a la mano bastante agua fresca,
jabón y bicarbonato de sodio en caso de
que el ácido de la batería entre en
contacto con los ojos, la piel o la ropa.
Lave inmediatamente con agua y jabón y
busque atención médica.
•Si el ácido de la batería entra en contacto
con los ojos, enjuague inmediatamente
durante 10 minutos como mínimo y
busque atención médica.
•Neutralice el ácido derramado
abundantemente con bicarbonato de
sodio antes de intentar limpiarlo.
•Retire todos los objetos metálicos de su
cuerpo (anillos, pulseras, collares y relojes).
Una batería puede producir una corriente
de cortocircuito lo sucientemente alta
como para soldar un anillo al metal, lo que
ocasionaría una quemadura grave.
•NUNCA fume o permita la presencia de
chispas o llamas en la proximidad de una
batería o motor.

•11 •
3. CARACTERÍSTICAS
1. Protección de polietileno durable
con base de caucho de alto impacto
2. Selector ON / OFF
3. Enchufe de 12 Voltios de CD
4. Indicador de doble función digital
5. Pinzas reemplazables
de durabilidad
2
4
3
5
1
4. CARGA DE LA BATERÍA INTERNA DEL ARRANCADOR
IMPORTANTE: CARGUE LA UNIDAD
INMEDIATAMENTE DESPUÉS DE
ADQUIRIRLA, AL TÉRMINO DE CADA
USO Y CADA 30 DÍAS PARA
MANTENER LA BATERÍA INTERNA DEL
ARRANCADOR COMPLETAMENTE
CARGADA Y PROLONGARÁ SU
VIDA ÚTIL.
PANTALLA DIGITAL
La pantalla puede usarse para indicar el
voltaje de una batería al estar conectada
a una batería o el porcentaje de carga en
la batería interna del arranque inmediato.
Con el conmutador en la posición OFF,
conecte las pinzas a la batería del vehículo
y su voltaje se muestra. Ponga el
conmutador rotativo del arranque inmediato
a 12V (12V o 24V para Modelo PSJ-4424)
y se muestra la tensión combinada de
ambas baterías internas y externas.
Para leer el estado de carga de la batería
interna: Oprima el botón “display” para
leer el porcentaje de carga que se queda
en la batería interna. Una batería a plena
carga muestra el 100%.
CARGA DE LA BATERÍA INTERNA
Para cargar la batería interna del
arrancador, utilice un cable de extensión
(no incluido).
NOTA: Al utilizar una extensión
inadecuada, se corre el riesgo de
ocasionar un incendio o descargas
eléctricas.
1. Asegúrese que el interruptor giratorio
en el frente del arrancador auxiliar
está en la posición O (APAGADO).
2. Para cargar, enchufe un cable de
calibre 18 (AWG) o una extensión
larga (no incluido) en la clavija
localizada al lado derecho del
arrancador.
3. Conecte el cable de extensión en un
tomacorriente eléctrico de 120 VCA.
4. Mientras el arrancador está cargando,
el porcentaje de carga de la batería
de se mostrará. Cuando la batería
interna está completamente cargada,
la carátulsa demostrará100. Para
completar la carga se requieren por lo
menos 72 horas. La fuente de poder
está lista para ser utilizada.
5. El cargador pasará automáticamente
al modo de mantenimiento y
mantener la batería a plena carga,
sin sufrir daños.
6. Cargue el arrancador tan pronto como
sea posible después de cada uso.
IMPORTANTE: No utilice el arrancador
mientras carga la batería interna.
CARGA LA BATERÍA INTERNA
CON EL VEHÍCULO EN MARCHA
También puede cargar la batería interna
durante la conducción, utilizando un cable
de carga de varón a varón (p/n 94500109
– no incluido).
IMPORTANTE: NO CARGAR LA
BATERÍA INTERNA POR MÁS DE 30
MINUTOS, NI DEJAR LA BATERÍA SIN
SUPERVISIÓN. PODRÍA EXPLOTAR Y
OCASIONAR DAÑOS MATERIALES O
LESIONES CORPORALES.
1. Asegúrese de que el vehículo esté en
marcha.
2. Inserte un extremo del cable auxiliar
en la toma de corriente de 12 V CC.
3. Inserte el otro extremo del cable
auxiliar en el enchufe auxiliar del
vehículo (toma del encendedor).
IMPORTANTE: Al utilizar este método
para cargar la batería, se anula el modo
de mantenimiento y la batería podría
sobrecargarse.

•12 •
4. Para supervisar el progreso de la
carga, presione el botón de pantalla en
la parte frontal de la unidad. Cuando la
batería esta completamente cargada,
primero desconecte el cable auxiliar
del arrancador y luego, de la toma del
encendedor del vehículo.
NOTA: Desconectar completamente el
cable del cargador cuando el motor no
está funcionando.
5. USO DEL ARRANCADOR
IMPORTANTE: Utilización de la función
arranque del motor sin una batería
instalada en el vehículo dañará el
sistema eléctrico del vehículo.
1. APAGUE el motor.
2. Asegúrese de que el área esté bien
ventilada.
3. Ponga los cables de CD lejos de las
aspas del ventilador, bandas, poleas
u otras partes móviles.
4. Asegúrese de que el conmutador de
potencia rotativo en el panel delantero
esté en la posición O (OFF) hasta
que las pinzas estén conectadas al
vehículo. Si la unidad está enchufada
en un tomacorriente de pared de CA,
desconéctela.
5. NO HACER permita que las pinzas se
toquen una a otra o hagan contacto
con la misma pieza de metal.
6. En los vehículos con carga negativa
a tierra (como en la mayoría de
los vehículos), conectar la pinza
POSITIVA (ROJA) del arrancador al
borne POSITIVO (POS, P, +) de la
batería. A continuación, conectar la
pinza NEGATIVA (NEGRA) al chasis
del vehículo o al bloque del motor,
lejos de la batería.
7. En los vehículos con carga positiva
a tierra, conectar la pinza NEGATIVA
(NEGRA) del arrancador al borne
NEGATIVO (NEG, N, -) de la batería.
A continuación, conectar la pinza
POSITIVA (ROJA) al chasis del vehículo
o al bloque del motor, lejos de la batería.
IMPORTANTE: Si se ha hecho conexión
invertida de las pinzas, suena una alarma
de audio. NO encienda su arranque
inmediato. Esto podría causar daño
severo. Inviertir las conexiones, y la
alarma de audio se para.
8. Si no suena ninguna alarma, ponga
el conmutador rotativo en la posición
12V. (Para el Modelo PSJ-4424, en
12V o en 24V). La pantalla de 3 dígitos
mostrará el voltaje de la batería.
9. Arranque el motor. Si el motor no
arranca dentro de 5-8 segundos, deje
de arranque y espere al menos 1
minuto antes de intentar arrancar el
vehículo nuevo. (Esto permite que la
batería se enfríe.)
10. Después de que el motor se encienda,
ponga el conmutador rotativo en la
posición O (OFF). Luego desconecte
primero la pinza negra (-) y después la
pinza roja (+), en ese orden.
11. Recargar el arrancador tan pronto
como sea posible después de su uso.
PARA HACER FUNCIONAR UN
APARATO DE 12V DE CD:
El arrancador es una fuente de poder para
cualquier accesorio de 12V de corriente
directa que estén equipados con enchufe
de 12V. Utilícelo durante apagones, pesca o
días de campo. Tiempos estimados se
muestran en el gráco.
NOTA: no encienda un dispositivo de 12V
mientras se esté cargando la batería
interna del arrancador.
1. Asegúrese de que el dispositivo que
desea cargar esté apagado (OFF)
antes de insertar el enchufe auxiliar de
12V CC en la toma auxiliar de 12V CC.
2. Asegúrese de que las pinzas de la
batería están asegurados en los
soportes de almacenamiento.
3. Abra la tapa protectora de la toma
de alimentación de CC del arrancador.
4. Conecte el dispositivo de 12V CC
a la toma de alimentación de CC y
enciéndalo (si es necesario).
5. Cuando haya terminado de cargarse,
apague el dispositivo de CC (si es
necesario) y desenchúfelo de la toma
de alimentación de CC.
NOTA: No utilice el arrancador en
aparatos que consuman más de 15A de
CC. Si el aparato de 12V de CD absorbe
más de 15 A o tiene un corto circuito, el
interruptor de circuitos interno del
arrancador se reactivará e interrumpirá el
paso de corriente al aparato. Desconecte
el aparato de 12V de CD. El mismo
interruptor se reactivará automáticamente
después de que una sobrecarga ocurra.
NOTA: Si hace funcionar un dispositivo
de 12V CC durante mucho tiempo con la
fuente de poder, la batería se agotará por
completo. Recargue el arrancador
inmediatamente después de desconectar
los dispositivos de 12V CC.

•13 •
TIEMPO ESTIMADO DE FUNCIONAMIENTO
TIPO DE
DISPOSITIVO
POTENCIA
APROXIMADA
TIEMPO ESTIMADO
DE FUNCIONAMIENTO
PSJ-2212
TIEMPO ESTIMADO
DE FUNCIONAMIENTO
PSJ-3612 y PSJ-4424
Teléfono celular,
luz uorescente 4 vatios 66 hrs 132 hrs
Radios, ventiladores,
localizador de profundidad 9 vatios 23,9 hrs 58,6 hrs
Videocámara 15 vatios 17,6 hrs 35,2 hrs
Herramientas eléctricas 24 vatios 11 hrs 22 hrs
Refrigerador eléctrico 48 vatios 5,5 hrs 11 hrs
Aspiradora de auto,
compresor de aire 80 vatios 3,3 hrs 6,6 hrs
NOTA: El tiempo real de funcionamiento puede variar. Los tiempos están basados en una batería
interna completamente cargada.
6. MANTENIMIENTO Y CUIDADO
•Limpie las pinzas y la carcasa de la
unidad cada vez que termine de usarla.
•Recargue la unidad una vez al mes,
cuando no esté en uso.
•Guarde las pinzas en sus postes de apoyo
para asegurarse de que no entren en
contacto con alguna supercie metálica.
•Nunca descargue completamente la
batería interna.
7. LOCALIZACIÓN Y SOLUCIÓN DE PROBLEMAS
PROBLEMA CAUSA POSIBLE SOLUCIÓN
El arrancador no arranca
mi coche.
Las pinzas no hacen buena
conexión a la batería.
La batería del arrancador no
está cargada.
La batería del vehículo esta
defectuosa.
Asegúrese de que existe
buena conexión a la batería y
la carrocería. También que los
puntos de las conexiones estén
limpios. Gire las pinzas para una
conexión efectiva.
Compruebe el estado de carga
de la batería presionando el botón
Display en la parte frontal de la
unidad. La pantalla mostrará el
porcentaje de carga.
Haga un chequeo de la batería.
La unidad no pone a
funcionar mi aparato de
12V.
El aparato de 12V no enciende.
La batería de la unidad no está
cargada.
El aparato de 12V absorbe
más de 15A, o tiene un corto
circuito.
Encienda el aparato de 12V.
Compruebe el estado de carga
de la batería presionando el botón
Display en la parte frontal de la
unidad. La pantalla mostrará el
porcentaje de carga.
Desconecte el aparato de
12V. El interruptor interno se
autoprogramará después de uno
o dos minutes. Trate de usar el
dispositivo de 12V de nuevo.

•14 •
PROBLEMA CAUSA POSIBLE SOLUCIÓN
La batería del arrancador
no retiene la carga.
La batería está en malas
condiciones (No recibirá carga). Reemplace la batería.
Chg muestra en la
pantalla.
La batería se está cargando. No es un problema; continúe
cargando.
La alarma del arrancador
está encendido.
Las conexiones están a la
inversa.
Desconecte el arrancador y
coloque las pinzas en forma
correcta.
8. ANTES DE DEVOLVER A REPARACIONES
Si estas soluciones no eliminan el problema o si desea obtener más información
sobre la solución de problemas, póngase en contacto
con el departamento de servicio al cliente para recibir asistencia:
www.batterychargers.com
o llame 1-800-621-5485
Lunes-viernes 7:00am to 5:00pm CST
Para REPARACIÓN O DEVOLUCIÓN, comuníquese con Servicios al Cliente al
1-800-621-5485. NO ENVÍE LA UNIDAD hasta que usted reciba AUTORIZACIÓN
DE DEVOLUCIÓN DE MERCANCÍA (RMA) de Servicios al Cliente de Schumacher
Electric Corporation.
9. ESPECIFICACIONES
PSJ-2212
Tipo de batería interna ........... Sellada, libre de mantenimiento, AGM, de ácido de plomo
Voltaje nominal........................................................................................................12V CC
Capacidad...................................................................................................................22Ah
Salida de potencia CD (máxima carga continua) .........................................................15A
Amperaje pico............................................................................................................. 2200
Amperaje de arranque .................................................................................................. 330
Amperaje de arranque en frío....................................................................................... 275
Cables de conexión de la batería .......................... Calibre 4, AWG, 50" (127 cm) de largo
Dimensiones (Altura x Ancho x Profundidad) ..... 15" x 14" x 4,7" (37,1 x 35,56 x 11,9 cm)
Peso.................................................................................................. 21,55 libras (9,78 kg)
PSJ-3612
Tipo de batería interna ........... Sellada, libre de mantenimiento, AGM, de ácido de plomo
Voltaje nominal........................................................................................................12V CC
Capacidad............................................................................................................. (2) 22Ah
Salida de potencia CD (máxima carga continua) .........................................................15A
Amperaje pico............................................................................................................. 3600
Amperaje de arranque .................................................................................................. 470
Amperaje de arranque en frío....................................................................................... 385
Cables de conexión de la batería ....................... Calibre 2, AWG, 55" (139,7 cm) de largo
Dimensiones (Altura x Ancho x Profundidad) ..... 15" x 14" x 7,7" (37,1 x 35,56 x 19,6 cm)
Peso............................................................................................... 37,55 libras (17,04 kg)

•15 •
PSJ-4424
Tipo de batería interna ........... Sellada, libre de mantenimiento, AGM, de ácido de plomo
Voltaje nominal........................................................................................................12V CC
Capacidad............................................................................................................. (2) 22Ah
Salida de potencia CD (Máxima carga continua) .........................................................15A
Amperaje pico............................................................................................................. 4400
Amperaje de arranque .................................................................................................. 500
Amperaje de arranque en frío....................................................................................... 415
Cables de conexión de la batería ....................... Calibre 2, AWG, 55" (139,7 cm) de largo
Dimensiones (Altura x Ancho x Profundidad) ..... 15" x 14" x 7,7" (37,1 x 35,56 x 19,6 cm)
Peso............................................................................................... 38,15 libras (17,32 kg)
10.REPUESTOS/ACCESORIOS
Juego de mordazas de repuesto para abrazadera de batería ........................... 2299001580
Cable accesorio macho a macho ........................................................................... 94500109
REPUESTO DE MORDAZAS PARA
ABRAZADERA DE BATERÍA
1. Asegúrese que el interruptor giratorio
en el panel frontal esté en la posición
de APAGADO (O) y que el arrancador
auxiliar no esté conectado a un
tomacorriente de pared de 120V CA.
2. Asegure el sujetador en la posición
abierta usando un tornillo de banco
o un mecanismo de sujeción
equivalente.
ADVERTENCIA: Las abrazaderas son
accionadas por resorte, así que sea
precavido al reemplazar las mordazas
para evitar lesiones.
3. Retire el tornillo posterior que une
el cable del arrancador auxiliar a la
mordaza.
4. Retire el tornillo que sujeta la
mordaza de cobre a la abrazadera de
plástico. Repita el procedimiento para
la otra mordaza.
5. Retire las dos mordazas y el cable
entrelazado.
6. Invierta los pasos para instalar las
piezas de repuesto.

•16 •
11. GARANTÍA LIMITADA
SCHUMACHER ELECTRIC CORPORATION, 801 BUSINESS CENTER DRIVE, MOUNT
PROSPECT, IL 60056-2179, REALIZA LA PRESENTE GARANTÍA LIMITADA AL
COMPRADOR MINORISTA ORIGINAL DE ESTE PRODUCTO. LA PRESENTE GARANTÍA
LIMITADA NO PUEDE TRANSFERIRSE NI CEDERSE.
Schumacher Electric Corporation (el “Fabricante”) otorga garantía por esta unidad por un
(1) año contados a partir de la fecha de compra, contra cualquier material defectuoso o
de mano de obra de la unidad que pudieran surgir durante su uso y bajo cuidado normal.
Si su unidad cuenta con material defectuoso o defectos de mano de obra, la obligación
de los Fabricantes, conforme a la presente garantía, será simplemente reparar o sustituir
el producto por uno nuevo o por una unidad reparada, a elección del fabricante. Es la
obligación del comprador enviar la unidad con comprobante de compra y los gastos de
envío prepagos al Fabricante o a sus representantes autorizados para que estos reparen
o reemplacen el producto.
El Fabricante no presta garantía por lo accesorios utilizados con este producto que no
sean los fabricados por Schumacher Electric Corporation y que no estén aprobados
para su uso con este producto. La presente Garantía Limitada será nula si el producto
se utiliza en forma errónea, se trata de manera inadecuada, es reparado o modicado
por personas que nos sean el Fabricante o si esta unidad es revendida a través de un
vendedor minorista no autorizado.
El Fabricante no realiza ninguna otra garantía, incluidas, a título enunciativo, las
garantías expresas, implícitas o legales, incluidas, a modo de ejemplo, las garantías
implícitas de comerciabilidad o adecuación a un n especíco. Asimismo, el Fabricante
no será responsable ante reclamos por daños accidentales, especiales ni directos en
los que incurran los compradores, usuarios u otras personas asociadas al producto,
incluidas, a título enunciativo, los ingresos y ganancias no percibidas, ventas anticipadas,
oportunidades comerciales, el buen nombre, la interrupción de la actividad comercial
o cualquier otro daño que haya provocado. Todas las garantías, excepto la garantía
limitada incluida en el presente, por medio de la presente, quedan expresamente
anuladas y excluidas. Algunos estados no permiten la exclusión ni la limitación de los
daños accidentales ni directos o el plazo de garantía implícita, por lo que las limitaciones
o exclusiones mencionadas anteriormente podrían no corresponder con su caso. La
presente garantía le otorga derechos legales especícos y es probable que usted cuente
con otros derechos que podrían diferir de los incluidos en la presente garantía.
LA PRESENTE GARANTÍA LIMITADA ES LA ÚNICA GARANTÍA LIMITADA EXPRESA
Y EL FABRICANTE NO ASUME NI AUTORIZA A NADIE A ASUMIR O A ADQUIRIR
NINGUNA OTRA OBLIGACIÓN RESPECTO DEL PRODUCTO QUE NO SEA LA
PRESENTE GARANTÍA.
Schumacher® y el logo Schumacher son maracas registradas
de Schumacher Electric Corporation.

•17 •
1. CONSIGNES DE SÉCURITÉ IMPORTANTES
CONSERVER CES CONSIGNES.
AVERTISSEMENT – RISQUE DE GAZ EXPLOSIFS
TRAVAILLER À PROXIMITÉ D’UNE BATTERIE PLOMB-ACIDE EST DANGEREUX.
EN FONCTIONNEMENT NORMALE, LES BATTERIES PRODUISENT DES GAZ
EXPLOSIFS. POUR CETTE RAISON IL EST IMPORTANT QUE VOUS SUIVIEZ CES
INSTRUCTIONS CHAQUE FOIS QUE VOUS UTILISEZ L’UNITÉ.
Pour réduire les risques d’explosion de la batterie, suivez ces instructions et
celles publiées par le fabricant de la batterie et le fabricant de tout équipement
que vous avez l’intention d’utiliser à proximité de la batterie. Examinez les
marquages sur ces produits et sur le moteur.
AVERTISSEMENT : Conformément à la
Proposition 65 en Californie, ce produit
contient des produits chimiques reconnus
par l’état de Californie pour causer des
cancers et des malformations congénitales
ou d’autres problèmes de reproduction,
laver les mains après chaque utilisation.
•Ne pas laisser à la portée des enfants.
•Ne démontez pas l’unité. Prenez-la à une
personne qualiée si une réparation est
nécessaire. Un montage incorrect peut
provoquer un incendie ou un choc
électrique.
•Ne pas utiliser l’unité pour démarrer un
véhicule pendant le chargement de la
batterie interne.
•Ne pas recharger l’unité avec une
rallonge endommagée.
•L’unité devient chaude pendant la charge
et doit avoir une ventilation adéquate.
•Ne mettez pas l’unité sur des matériaux
inammables, tels que les tapis, tissus
d’ameublement, papier, carton, etc..
•Placez l’unité loin de la batterie qui va
être utilisé étant que les câbles le
permettent.
•Ne pas exposer l’unité à la pluie ou la
neige.
•Ne placez jamais l’unité directement
au-dessus de la batterie qui va être
utilisé.
•Pour éviter un arc électrique, ne jamais
laisser les pinces se toucher entre eux ou
mis avec le même morceau de métal.
•L’utilisation d’un accessoire non
recommandé ou vendu par Schumacher®
Electric Corporation peut entraîner des
dommages à l’appareil ou des blessures
corporelle.
•Ne jamais utiliser l’unité si elle est
endommagée.
•Si quelqu’un d’autre utilise l’unité,
assurez-vous qu’ils sont bien informés
sur la façon de l’utiliser en toute sécurité,
et avoir lu et compris les instructions de
fonctionnement.
•L’unité n’est pas conçue pour être
installée comme un remplacement de la
batterie du véhicule.
•Utiliser SEULEMENT sur les véhicules,
les bateaux et les tracteurs de jardin
alimentés par un système de batterie de
12V CC.
•Si le moteur ne démarre pas après le
nombre de tentatives recommandé,
débranchez l’unité et chercher d’autres
problèmes qui peuvent avoir besoin
d’être corrigée.
•Utilisez l’unité pour le démarrage des
batteries au plomb acide SEULEMENT.
Ne pas utiliser pour des batteries sèches
qui sont couramment utilisés dans les
appareils ménagers.
2. MESURES DE SÉCURITÉ PERSONNELLE
•Porter des lunettes et des vêtements de
protection lorsque vous travaillez à
proximité des batteries au plomb. Toujours
avoir quelqu’un à proximité pour vous aider.
•Avoir beaucoup d’eau fraîche, du savon et
du bicarbonate de soude pour une
utilisation à proximité, en cas si l’acide
touche vos yeux, la peau ou les
vêtements. Laver immédiatement avec du
savon et de l’eau et consulter un médecin.
•Si l’acide de la batterie entre en contact
avec les yeux, rincer les yeux
immédiatement pendant 10 minutes et
consulter un médecin.
•Neutraliser l’acide avec du bicarbonate
de soude avant d’essayer de nettoyer.
•Retirez tous les objets personnels en
métal de votre corps, tels que des bagues,
bracelets, colliers et montres. Une batterie
peut produire un court-circuit sufsamment
élevé pour souder une bague de métal,
causant de graves brûlures.
•Jamais fumer ou laisser une étincelle ou
d’une amme à proximité de la batterie
ou du moteur.
•18 •
3. CARACTÉRISTIQUES
1. Cas polypropylène durable
avec la base de caoutchouc
de haut impact
2. Début / Arrêt sélecteur
3. Sortie de courant continu CC
de 12 volts
4. Deux fonctionnent l’étalage
numérique
5. Clips de batterie solide
et remplaçables
2
4
3
5
1
4. CHARGE DE LA BATTERIE INTERNE
IMPORTANT! CHARGE IMMÉDIATEMENT
APRÈS L’ACHAT, APRÈS CHAQUE
UTILISATION ET TOUS LES 30 JOURS,
POUR GARDER LA BATTERIE INTERNE
DE L’UNITÉ ENTIÈREMENT CHARGÉE.
RECHARGE DE LA BATTERIE APRÈS
CHAQUE UTILISATION PROLONGERA LA
VIE DE BATTERIE.
AFFICHAGE NUMÉRIQUE
On peut se servir de l’afcheur pour
indiquer la tension de la batterie, lorsque
l’appareil est relié à une batterie, ou le
pourcentage de charge de la batterie
interne de l’aide-démarrage.
Lorsque le commutateur est à la position
d’arrêt, raccordez les pinces à la batterie
du véhicule; la tension de cette batterie est
alors afchée. Tournez le commutateur
rotatif de l’aide-démarrage à 12V, (à 12V
ou à 24V pour modèle PSJ-4424) et la
tension combinée des deux batteries
internes et externes est afchée.
Pour que s’afche l’état de charge de la
batterie interne, appuyez sur le bouton de
l’afchage et le pourcentage de charge
de la batterie interne apparaît alors. Si la
batterie est complètement chargée,
l’afcheur indique 100 %.
CHARGE DE LA BATTERIE INTERNE
Chargez la batterie interne de l’unité
utilisant une rallonge (non inclus).
REMARQUE : L’utilisation d’une rallonge
inadéquate peut entraîner un risque
d’incendie et d’électrocution.
1. Assurez-vous que le commutateur
rotatif du panneau avant est en
position d’arrêt (O).
2. Pour recharger, branchez un calibre
18 (AWG) ou plus rallonge (non inclus)
dans la prise du chargeur sur le côté
droit de l’unité.
3. Branchez la rallonge dans une prise
électrique murale 120V CA.
4. Alors que l’aide de démarrage est en
charge, en pourcentage de la charge
de la batterie est afché. Lorsque la
batterie est complètement chargée,
l’écran afche100. Chargement peut
prendre jusqu’à 72 heures. L’aide de
démarrage est alors prêt à utiliser.
5. Le chargeur se mettra
automatiquement en mode de
conservation et conservera la batterie
à pleine charge sans l’endommager.
6. Rechargez l’appareil dès que possible
après l’avoir utilisé.
IMPORTANT : Ne pas utiliser l’unité
quand en chargeant la batterie intérieure.
CHARGE DE LA BATTERIE INTERNE
PENDANT LA CONDUITE
Vous pouvez également charger la
batterie interne pendant la conduite, en
utilisant un câble de chargement mâle-
mâle (Numéro 94500109 - non inclus).
IMPORTANT : NE PAS RECHARGER
LA BATTERIE INTERNE DE PLUS DE
30 MINUTES OU LAISSER LA
BATTERIE SANS SURVEILLANCE. IL
POURRAIT EXPLOSER ET
PROVOQUER DES DOMMAGES
MATÉRIELS ET DES BLESSURES.
1. Assurez-vous que la voiture est en
marche.
2. Insérez une extrémité du câble dans
la prise 12V.
3. Insérez l’autre extrémité du câble
dans la prise accessoire du véhicule
(allume-cigare).
IMPORTANT : L’utilisation de cette
méthode de charger la batterie passe au
mode maintiens et la batterie peut être
surchargée.

•19 •
4. Surveillez la progression de la charge
en appuyant sur le bouton d’afchage
de l’unité. Quand il atteint une charge
complète, débranchez le câble
accessoire de l’unité, puis à partir de
l’allume-cigare du véhicule.
REMARQUE : Débranchez
complètement le cordon du chargeur
lorsque le moteur n’est pas en marche.
5. CONSIGNES D’UTILISATION
IMPORTANT : Utilisation de la fonction
de démarrage du moteur sans batterie
installée dans le véhicule peut causer des
dommages au système électrique du
véhicule.
1. Coupez le contact avant d’effectuer
les connexions des câbles.
2. Utilisez dans un endroit bien aéré.
3. Disposez les câbles CC loin de
toutes pales de ventilateur, courroies,
poulies et autres pièces mobiles.
4. Assurez-vous que le commutateur
rotatif du panneau avant est à la
position arrêt (O) jusqu’à ce que les
pinces sont reliées au véhicule. S’il
est branché dans une prise murale de
CA, débranchez-le.
5. Les pinces ne doivent JAMAIS se
toucher ni toucher à la même pièce
de métal.
6. Pour un véhicule à masse négative
(comme dans la plupart des
véhicules), connectez POSITIF
l’unite (Rouge) pince à la borne de
la batterie (POS, P, +) POSITIVE.
Ensuite, connectez la borne
NÉGATIVE (NOIRE) pince au châssis
du véhicule ou le bloc moteur, loin de
la batterie.
7. Pour un véhicule positive terre,
branchez NEGATIVE l’unité (NOIR)
pince à la borne NÉGATIVE (NEG, N, -)
de la batterie. Ensuite, connectez la
borne POSITIVE (ROUGE) pince au
châssis du véhicule ou le bloc moteur à
distance de la batterie.
IMPORTANT : Si vous avez inversé les
pinces lors du raccordement, l’avertisseur
sonore se déclenchera. N’ouvrez PAS
l’aide-démarrage. De graves dommages
pourraient en résulter. Inversez les pinces
et l’avertisseur sonore cessera de se faire
entendre.
8. Si l’avertisseur sonore ne se déclenche
pas, tournez le commutateur rotatif à la
position 12V (12V ou 24V pour modèle
PSJ-4424). L’afcheur à trois chiffres
indique alors la tension de la batterie.
9. Démarrez le moteur. Si le moteur ne
démarre pas dans les 5-8 secondes,
s’arrête de tourner et attendre au
moins 1 minute avant de tenter de
démarrer le véhicule à nouveau. (Cela
permet à la batterie de se refroidir.)
10. Après le démarrage du moteur,
tournez le commutateur rotatif à la
position O (arrêt). Débranchez alors la
pince noire (-) puis la pince rouge (+),
dans cet ordre.
11. Chargez l’unité dès que possible
après chaque utilisation.
ALIMENTER LES APPAREILS DE 12V
L’unité est une source d’énergie pour tous
les accessoires 12V CC qui sont équipés
d’une prise accessoire 12V. Utilisez le pour
des pannes de courant et des voyages de
pêche ou de camping. Durées d’utilisation
estimées sont listés dans le tableau.
REMARQUE : Ne pas alimenter un
appareil 12V avec l’unité pendant le
chargement de la batterie interne.
1. Assurez-vous que le dispositif à
alimenter est éteint avant d’insérer la
prise 12V CC accessoire dans la prise
12V CC accessoire.
2. S’assurer que les pinces de la
batterie sont xées sur les supports
de stockage.
3. Ouvrez le couvercle de protection de
la prise d’alimentation CC.
4. Branchez l’appareil 12V CC dans la
prise d’alimentation CC et allumez
l’appareil 12V CC (si nécessaire).
5. Lorsque vous avez terminé, éteignez
l’appareil CC (si nécessaire) et
débranchez la prise d’alimentation CC.
REMARQUE : Ne pas utiliser l’unité pour
alimenter les appareils qui attirent plus
que 15A. Si l’appareil 12V CC consomme
plus de 15A ou est en court-circuit, le
disjoncteur interne de l’Aide de
démarrage se déclenchera et
déconnectera l’alimentation de l’appareil.
Débrancher l’appareil 12V CC. Le
disjoncteur se réinitialisera
automatiquement après une surcharge.
REMARQUE : Le fonctionnement
prolongé d’un dispositif 12V CC peut
entraîner un épuisement excessive de la
batterie. Rechargez la batterie interne
immédiatement après avoir débranché la
prise 12V.

•20 •
TEMPS ESTIMÉ POUR USAGE DE 12V
TYPE APPAREIL WATTAGE
ESTIMÉ
TEMPS D’EXÉCUTION
ESTIMÉ PSJ-2212
TEMPS D’EXÉCUTION
ESTIMÉ PSJ-3612
ET PSJ-4424
Téléphone cellulaire,
lumière uorescent 4 watts 66 h 132 h
Radio, ventilateur,
sonde des profondeurs 9 watts 23,9 h 58,6 h
Caméscope 15 watts 17,6 h 35,2 h
Outil électrique 24 watts 11 h 22 h
Refroidisseur électrique 48 watts 5,5 h 11 h
Aspirateur et compresseur 80 watts 3,3 h 6,6 h
REMARQUE : La durée réelle peut varier. Les temps sont basées sur la batterie interne
complètement chargée.
6. MAINTENANCE ET ENTRETIEN
•Nettoyer les clips et chaque fois que vous
avez terminé de l’utiliser.
•Rechargez l’unité chaque mois quand il
n’est pas en utilisation.
•Stocker les clips accrochés sur leur
support, pour s’assurer qu’ils ne touchent
pas une surface métallique.
•Ne jamais complètement décharger la
batterie interne.
7. DÉPANNAGE
PROBLÈME CAUSE POSSIBLE RAISON / SOLUTION
L’unité ne démarre pas ma
voiture.
Clips ne font pas une bonne
connexion à la batterie.
La batterie Interne n’est pas
chargée.
La batterie du véhicule est
défectueuse.
Vériez mauvaise connexion
à la batterie et le châssis.
Assurez-vous que les points de
connexion sont propres.
Appuyez sur le bouton d’état
de la batterie de l’appareil.
Les voyants indiquent l’état de
charge.
Faites vériez la batterie.
Le bloc d’alimentation
n’allume pas mon appareil
de 12V.
Le dispositif de 12V n’est pas
activé.
La batterie Interne n’est pas
chargée.
L’appareil 12V consomme
plus de 15A ou a un court-
circuit.
Allumez l’appareil 12V.
Vériez l’état de charge de la
batterie en appuyant sur le
bouton d’état de la batterie.
Débranchez le produit de 12V. Le
disjoncteur interne se réinitialise
automatiquement après une
minute ou deux. Essayez à
nouveau l’appareil 12V.
La batterie interne ne
garde pas la charge.
La batterie est défectueuse
(n’accepte pas de charge). Faites vériez la batterie.
Chg s’afche sur l’écran. La batterie est en charge. Pas un problème; continuer à
charger.
L’alarme de l’appareil est
allumé.
Connexions sont inversées. Débranchez et inverser les
clips.
This manual suits for next models
2
Table of contents
Languages:


