Digital Treasures ChargeIt! Jump User manual

Package Contents:
On/Off Button
LED Flashlight
Jumper
Cables
USB to icro-USB/
Apple®30-Pin/Apple 8-Pin
Charging Cable
Power Level
Indicator Lights
USB 5V/2A
Outlet Ports
Jumper Cable
Outlet Port
14-18V 1A
Charging Input
Port
Technical Support
Email: [email protected]
Phone: (248) 236-0061 9:00am - 5:00pm EST, M-F.
FCC Compliance
This device complies with Part 15 of the FCC Rules. Operation is subject to the following two conditions: (1) this device may not cause harmful
interference, and (2) this device must accept any interference received, including interference that may cause undesired operation.
Note 1: This equipment has been tested and found to comply with the limits for a Class B digital device, pursuant to part 15 of the FCC Rules.
These limits are designed to provide reasonable protection against harmful interference in a residential installation. This equipment generates,
uses, and can radiate frequency energy and, if not installed and used in accordance with the instructions, may cause harmful interference to
radio communications. owever, there is no guarantee that interference will not occur in a particular installation. If this equipment does cause
harmful interference to radio or television reception, which can be determined by turning the equipment off and on, the user is encouraged
to try to correct the interference by one or more of the following measures: a) Reorient or relocate the receiving antenna b) Increase the
separation between the equipment and receiver c) Connect the equipment into an outlet different from that to which the receiver is connected
d) Consult the dealer or an experienced radio/TV technician for help.
Note 2: Any changes or modifications to this unit not expressly approved by the party responsible for compliance could void the user’s authority
to operate the equipment.
One (1) Year Limited Warranty
PC Treasures, LLC warrants this product to be free from defects in materials and workmanship. This warranty covers the original purchaser
only, and is not transferable to anyone who subsequently buys, leases, or otherwise obtains from you. Your One Year Limited Warranty begins
on the date of purchase. Your original purchase invoice or sales receipt, showing date of purchase, is your proof of warranty period. The
duration of this warranty does not extend beyond the initial period of coverage should any repairs or replacements be made or performed.
This warranty does not extend to any product not purchased from PC Treasures, LLC, or an authorized PC Treasures, LLC reseller. This warranty
does not extend to product that has been damaged or rendered defective as a result of use for which the product is not intended, is contrary
to instructions provided in the user manual, as a result of the use of parts not manufactured or sold by PC Treasures, LLC, or due to any
misuse, abuse, negligence, modification, or improper packing when returning product to PC Treasures, LLC.
EXCEPT FOR T E WARRANTY SET FORT EREIN, PC TREASURES, LLC DISCLAIMS ALL OT ER WARRANTIES, EXPRESSED OR IMPLIED OR
STATUTORY, INCLUDING BUT NOT LIMITED TO T E IMPLIED WARRANTIES OF MERC ANTABILITY OR FITNESS FOR A PARTICULAR PURPOSE.
ANY IMPLIED WARRANTIES T AT MAY BE IMPOSED BY APPLICABLE LAW ARE LIMITED TO T E TERM OF T IS WARRANTY. IN NO EVENT S ALL
PC TREASURES, LLC BE LIABLE FOR ANY INCIDENTAL, SPECIAL OR CONSEQUENTIAL DAMAGES, INCLUDING BUT NOT LIMITED TO LOSS OF
BUSINESS, PROFITS, DATA OR USE, W ET ER IN AN ACTION IN CONTRACT OR TORT OR BASED ON A WARRANTY, ARISING OUT OF OR IN
CONNECTION WIT T E USE OR PERFORMANCE OF T E PRODUCT. YOU AGREE T AT REPAIR, AND (UPON AVAILABILITY) REPLACEMENT, AS
APPLICABLE, UNDER T E WARRANTY SERVICES DESCRIBED EREIN IS YOUR SOLE AND EXCLUSIVE REMEDY WIT RESPECT TO ANY BREAC
OF T E PC TREASURES, LLC LIMITED WARRANTY SET FORT EREIN.
How Do I Obtain Warranty Service?
For warranty service, please email [email protected] or call (248) 236-0061 to report a claim, at which time PC
Treasures, LLC technicians will attempt to solve any issues. If unable to resolve your issue, you will be issued an RMA to authorize the return
of the item for repair/replacement. All charges incurred while returning product, including postage, duties, export taxes, and customs duties,
are the responsibility of purchaser, and purchaser assumes all risk of loss during shipment. For more information visit www.digitaltreasures.com
odel Covered Under This Warranty: 09597, 09599
Digital Treasures is a division PC Treasures, LLC, 3720 Lapeer Rd., Auburn ills, MI 48326
Made In China
PC Treasures, Digital Treasures, the Digital Treasures logo, ChargeIt! Jump, and the ChargeIt! Jump logo are trademarks or registered
trademarks of PC Treasures, LLC. Apple is a trademark of Apple Inc., registered in the U.S. and other countries.
© 2015 PC Treasures, LLC All rights reserved. ChargeItJump_MAN_12/14
Carry Case
User Guide
ChargeIt!
Jump
ETL-Certified
Wall Adapter
(For Charging
ChargeIt! Jump)
Car Adapter (For
Charging ChargeIt! Jump)
IMPORTANT SAFETY INSTRUCTIONS:
DO NOT ALLOW THE BATTERY CLA PS TO AKE CONTACT WITH EACH OTHER WHEN
CONNECTED TO THE CHARGEIT! JU P. READ USER GUIDE BEFORE OPERATING.
WARNING!
DO NOT attempt to open or disassemble the ChargeIt! Jump. There are no replaceable
parts inside. DO NOT drop, hit or otherwise abuse the ChargeIt! Jump. DO NOT expose
the ChargeIt! Jump to excessive moisture or rain. Keep the ChargeIt! Jump away from
fire or from other sources of extreme heat. DO NOT incinerate. To avoid explosion hazard,
DO NOT use the ChargeIt! Jump in the presence of gasoline fumes or other flammable
gasses. When jump starting a boat battery located in the bilge area ensure that the bilge
has been adequately ventilated to remove any gasoline fumes. As a safety precaution
ensure that an adequate supply of fresh water, soap, and baking soda are nearby. Baking
soda will neutralize the lead acid battery electrolyte.
How to Properly Dispose of Batteries
This product contains a lithium polymer battery. To properly dispose of expired batteries, view
your city’s website or newsletter to find what guidelines, if any, should be followed and to make
note of their hazardous waste collection days. Batteries should be recycled or disposed of as per
state and local guidelines. Do not dispose of batteries in fire.
Specifications:
7500mAh Lithium Polymer Battery
Battery Rating: 11.1V —
--- 28Wh
Battery Life Cycles: >500:
Input: 14-18V 1A
Output: USB 2A+2A (2.5 Max),
12V Automobile Jump Start
200 Amp Starting Current, 400 Amp
Peak Current
Over-Current, Short Circuit, Overload,
Over-Voltage, Over-Charge, and
Reverse-Polarity Protection
Recharging Time: Approx. 4 ours
Size: 5.5” x 3.125” x .875”
(140mm x 79mm x 22mm)
Operating Temperature Range: 15° - 140° F
(-9° - 60°C)
Ultra-Bright LED Flashlight with S.O.S. Mode
For Use With: Automobiles, Watercraft,
Motorcycles, Smartphones, Tablets, and
Most Other Portable Electronic Devices
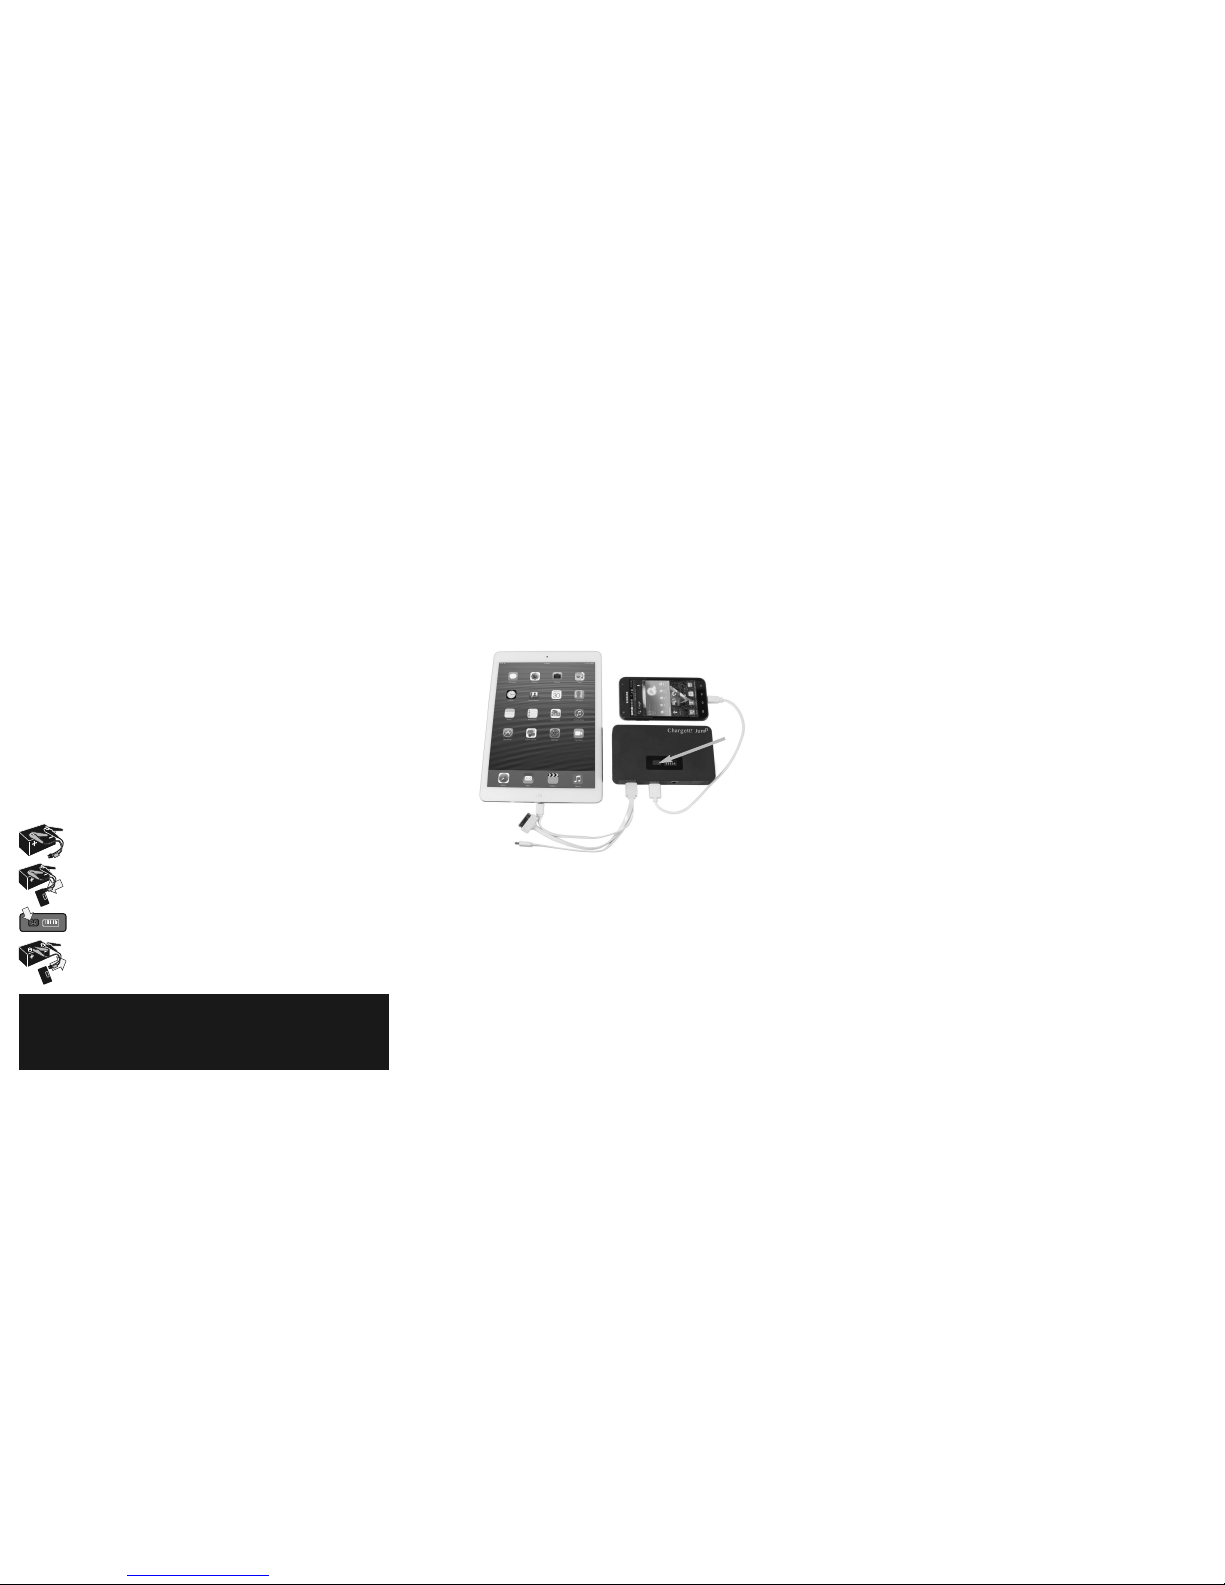
Charging a Smartphone, Tablet, or Other Portable Electronic Device
1) Plug the USB end of the charging cable that came with the device to be charged into
either of the two USB 5V/2A Outlet Ports. If the charging cable that came with the device
is not available, use the USB to Micro-USB/Apple 30-Pin/Apple 8-Pin Charging Cable that
was included with the ChargeIt! Jump.
2) Plug the other end of the charging cable into the device to be charged.
3) Press the On/Off Button on the top of the ChargeIt! Jump. The Power Indicator Lights
will glow to show that the device is being charged and to show how much power is left in
the ChargeIt! Jump. The ChargeIt! Jump will automatically turn off once the device is
charged.
Using the Built-In LED Flashlight
To turn the LED Flashlight on, press and hold the On/Off Button for three seconds. Press the
On/Off Button a second time to make the light blink quickly. Press the On/Off Button a third
time to make the light blink in a repeating S.O.S. pattern. Press the On/Off Button a fourth time
to make the light shut off.
Frequently Asked Questions
How do I turn the ChargeIt! Jump off once it is done charging something?
The ChargeIt! Jump goes dormant when no load is detected. This means that once a device is
charged, there is no energy being lost from the ChargeIt! Jump. It will automatically turn off.
How long does it take to charge the ChargeIt! Jump?
It takes about four hours to get the ChargeIt! Jump fully charged using one of the included
adapters.
How many times can the ChargeIt! Jump be used to recharge a smartphone?
A fully-charged ChargeIt! Jump can fully charge an iPhone 5 approximately three times. Most
other smartphones can be charged four to five times.
Frequently Asked Questions (continued)
How long will it take the ChargeIt! Jump to charge a smartphone?
It should take two to three hours to fully charge a smartphone.
Can a fully-charged ChargeIt! Jump be used to jump start a car more than once?
A fully-charged ChargeIt! Jump can be used to jump start a car multiple times. The number of
times will vary depending on temperature, age of the battery being jumped, etc.
How long will the ChargeIt! Jump last?
With normal use, the ChargeIt! Jump should last three to five years.
How long can a fully-charged ChargeIt! Jump be stored between uses and remain charged?
The ChargeIt! Jump will hold a useful charge and can be used to start a car for twelve months.
owever, to extend the life of the ChargeIt! Jump, charge it once every three months.
Troubleshooting
y electronic device is plugged into one of the USB charging ports but it is not charging.
Make sure to turn the ChargeIt! Jump on after you have connected your devices by pressing the
On/Off Button on the top of the ChargeIt! Jump.
While the ChargeIt! Jump is being charged, all five Power Indicator Lights are glowing
steadily but the ChargeIt! Jump is not fully charged.
This usually means the ChargeIt! Jump is half charged. Unplug the charger and plug it back in.
When I press the On/Off Button to see how much power is available in the ChargeIt! Jump,
none of the Power Indicator Lights turn on.
This usually means that the ChargeIt! Jump is totally out of power. Recharge the ChargeIt! Jump.
CAUTION
• ChargeIt! Jump contains no user-serviceable parts. Do not attempt to open the case and/or
remove any internal parts.
• Keep the ChargeIt! Jump away from children.
• Never connect an input port to an output port.
• Never clip the Jumper Cables together while they are plugged into the ChargeIt! Jump.
• When jump-starting a vehicle, always be sure to observe correct polarity. Always be sure to
connect the red jumper cable to the positive battery terminal and the black jumper cable to
the negative battery terminal.
• Keep ChargeIt! Jump away from fire and other heat sources.
• When charging the ChargeIt! Jump, use only the adapters that came with it.
• Only use the ChargeIt! Jump when the temperature is between 15° and 140°F (-9° and 60°C).
• If you have any difficulties using the ChargeIt! Jump that can not be solved by referring to the
Troubleshooting section above, please discontinue use immediately.
• If fluid leaks from the ChargeIt! Jump, discontinue use. If the fluid comes in contact with
hands or other exposed skin, immediately wash the area. If the fluid comes in contact with
eyes, DO NOT rub them. Immediately rinse the eyes with water and contact a doctor.
• If the ChargeIt! Jump gets too hot to touch or becomes discolored, discontinue use.
• While using the ChargeIt! Jump to charge a device, make sure that it does not come in
contact with anything flammable.
IMPORTANT SAFETY INSTRUCTIONS: To avoid the risk of the battery clamps touching
each other and causing a short circuit, always follow the above steps in the order indicated.
Be sure to connect the battery clamps to the battery before plugging the other end of the
jumper cables into the ChargeIt! Jump. Always unplug the jumper cables from the
ChargeIt Jump once the vehicle has started, before unclipping them from the battery.
Press the On/Off
Button to begin
charging your
device(s).
Charging the ChargeIt! Jump
Please make sure that your ChargeIt! Jump is fully charged before first use. The ChargeIt!
Jump can be charged using the included Wall Adapter or the included Car Adapter. Choose
which one you would like to use and plug it into a wall plug or a car lighter/power socket. Plug
the other end of the adapter into the 14-18V-1A Charging Input Port on the side of the
ChargeIt! Jump. The Power Level Indicator Lights on the top of the unit will light up to show
that the unit is charging. One of the lights will blink to show the level of charge until the unit is
fully charged. When all five Power Level Indicator Lights glow steadily, the unit is fully charged.
It will take approximately four hours to fully charge a completely drained ChargeIt! Jump.
The Power Indicator Lights
To see how much power is available from your ChargeIt! Jump, press the On/Off Button. The
Power Level Indicator Lights will light up as described below.
• Five Lights On - 100% Charge • One Light On - 20% Charge
• Four Lights On - 80% Charge • Five Lights Flashing - 10% Charge
• Three Lights On - 60% Charge • No Lights On or Flashing - 0%
• Two Lights On - 40% Charge
To Jump Start a Car, Boat, otorcycle, Etc.
I PORTANT: Before jump starting a car or other vehicle, make sure that at least THREE of the
Power Indicator Lights are on, showing that the ChargeIt! Jump has at least a 60% charge.
CAUTION—Operating in Extreme Weather: Do not expose the ChargeIt! Jump to temperatures
over 140°F (60°C) or under -15°F (-9°C). Use at extreme high or low temperatures may reduce
the internal battery’s capacity and shorten battery life. For best performance in extreme cold
weather conditions, it is best to warm the ChargeIt! Jump to 60-80°F prior to use.
1) Clip the Red Jumper Cable to the Positive (+) terminal on the battery and clip
the Black Jumper Cable to the Negative (-) terminal on the battery.
2) Insert the plug on the other end of the Jumper Cables into the Jumper Cable
Outlet Port on the side of the ChargeIt! Jump. Please note that the plug on the
end of the Jumper Cable is designed so that it will only fit into the Jumper
Cable Outlet Port one way.
3) Press the On/Off Button on the top of the ChargeIt! Jump and start the vehicle.
4) As soon as the vehicle starts, unplug the Jumper Cables from the ChargeIt!
Jump. I PORTANT: Do this within 30 seconds after the vehicle starts to avoid
damage to the ChargeIt! Jump and possible damage to the battery being jump
started. Unclip the Jumper Cables from the vehicle battery terminals.
Table of contents


